#1280x720
Explore tagged Tumblr posts
Text

Some pixel art of one of my lads from a pathfinder campaign, Graz. If you watch any of my summer leagues stuff, which currently does not exist on this website, then you'll know who this is :P Anyway.
A hobgoblin and a conduit to pure magic, Graz is a mysterious entity that lives on the outskirts of society working with plans that none truly understand.
1 note
·
View note
Text
☮
21:9 aspect ratio: 2560x1080, 3440x1440, 5120x2160
16:9 aspect ratio:
1280x720, 1366×768, 1600x900, 1920×1080, 2560x1440, 3840x2160, 5120x2880, 7680x4320
#notebook
#sketchbook
#diary
#notes#musicdiary#sketchbook#journal#art#web design#web#dev#beta#2023#index#📸#.txt#.zip#1280x720#1920x1080#1350x1080#math#calculator#betafish#may#October#November#march#library#text#librarian#♎#⚖️#photos
0 notes
Text
576p??


576?????
2 notes
·
View notes
Text
Okay so with my last released game (Start Game Game) I learned a few things:
For pixel art to look good you can't scale things up or down in any way. It has to be in integer increments. This also goes for zoom in/out on the camera.
Viewport size should be set before everything else.
I actually understood inheritance :)
You can "ctrl" + "k" to make a selection a comment
On the "pass" and "break" there's a break option which stops the game from running. This helps with debugging.
Inherited scenes are a thing. I can have a base scene, for an assortment of things, and then just instance it as the root of a new scene.
Probably some more stuff that isn't coming to mind at this moment.
#In the Start Game Game I set the viewport size to 1280x720 in the start bc I thought it'd be easy to change it later. It was not#So the game is just locked to that resolution bc I didn't want to redo every single level :)#indiedev#godot engine
5 notes
·
View notes
Text
new year’s resolutions
320x400
640 x 480
800 x 600
1024x768
1280x720
1360x768
1600x900
1920x1080
2560x1440
2K notes
·
View notes
Text
You'll Be Back Mr Puzzles MAP!
No this is actually real soahsodhsoshsi
Hihi everyone saw my last post hahahhhh I wasn't joking 💀
READ THE ENTIRETY OF THIS IF YOU WANT TO JOIN ‼️‼️‼️‼️
I don't want no nobody to not understand anything
Anyways, onto the details!
Wait, what's a MAP?
Ah.. I should explain that shouldn't I?
MAP stands for Multiple-Animator Project. It's basically a collaborative project made up of numerous animations by different creators!
You might have seen these before in the art fandom, if not, you're not a real artist /jk /nsrs /lh
Jokes aside, these projects tend to be fun for most creators and I'm hoping that this would bring some fun to the people joining :)
Is this begginer friendly?
Why yes it is! Regardless you're good at animation or not, you're welcome to join! Just... At least put some effort rather than being lazy?
Regardless, everyone is welcomed with open arms here! So don't be afraid ;)
What canvas size should I use?
1280x720 preferably! Just to make sure it doesn't take up too much of my data ;w;
But you can use any canvas size you'd want besides that! A box shape, or that weird YouTube short form... Nvm exclude that one but anyways, yeah any canvas size that you're comfortable with!
Is there a specific theme?
There's actually none! The map is supposed to just be a silly Mr puzzles map :3
This includes the setting and etc like- go crazy! Do a sad, fun, crazy, angry moment or something! Do what your imagination can make out of that song using Puzzles ^^
Is it okay if I can't remove my animating apps watermark?
It's completely fine if you can't remove it! Don't worry you're not the only broke one here ;)
Am I allowed to put my watermark?
Yes! You're incouraged to add in your watermark so people know it's your part!
Dw, if you don't have one them I'll just put your name while I'm editing the entire thing :)
Can I include my OCS or my Mr puzzles design?
Yes you can! You can also change your Puzzles aus whenever you'd like.
E.g my Showman Puzzles on part 1 and my Puzzles kinsona on part 2
It's just an example! If you're adding ocs, it's good! But the animation should primarily focused on Puzzles! He can interact with other characters but it's mostly just him. Oh and if you're wondering, it doesn't have to be SMG4 OCS :)
How many parts can I take?
Hey hey don't be greedy /hj
2 parts! I want everybody to take their chances and do some cool stuff :D
Where should I ask for parts or send submissions at?
In the discord server I made! The link will be at the end of the post. I know I just replied to some in this blog and they got their parts, I will NOT be accepting any ask parts OUTSIDE of the server.
The same goes with submissions/finished parts, please do send it in discord.
Why is this? This is because I want everything to be easier for me so I could manage stuff. I get frustrated very easily so yeah 😭
Is there a deadline?
Well uh- I'm not sure! But it's probably going to be planned on the June or July, somewhere in the middle of the year. Though I will be making sure nobody feels rushed for their sake
Have you ever host a MAP before?
Wait where tf did that one come from-
No I haven't unfortunately, this is my first one! I've always wanted to make a MAP because of how cool the idea itself is.
Now that that's done, here are the parts! As time progresses a and people enter, I'll fill them up :3
Intro : me
1. @e-v-e-l-l-e
2. @rainbowrocketraichu
3. Entity-lol
4. @lari-the-dragon
5. @rat-n-atty
6. @madhalo
7. @mrtophat518
8. @fenicearts420
9. @cosmicoreo9
10. Entity-lol
11. @niranutcake
12. @madhalo
13. Me
14. @alex-dolmatescu2-0
15. @libbytwq
16. @alex-dolmatescu2-0
17. @rr3d2y
18. Me
19. @niranutcake
20. Rainbowrocketraichu
21. @messydoodlesyt
22. @messydoodlesyt
23. @icedbeverageenjoyer
24. @mrtophat518
Outro : me
Last but not least.. Please do enter your submissions in the discord server below this sentence :D
You can post your part outside the server if you want but I'm only taking the ones submitted in the server itself :)
Andddd that's about all! You can ask questions here and in the server. Yeetus chat!
155 notes
·
View notes
Text
TOPAZ AI TUTORIAL
i was asked to do a tutorial for Topaz AI (a software that enhances screencaps), so here it is! :)
[tutorial under the cut]
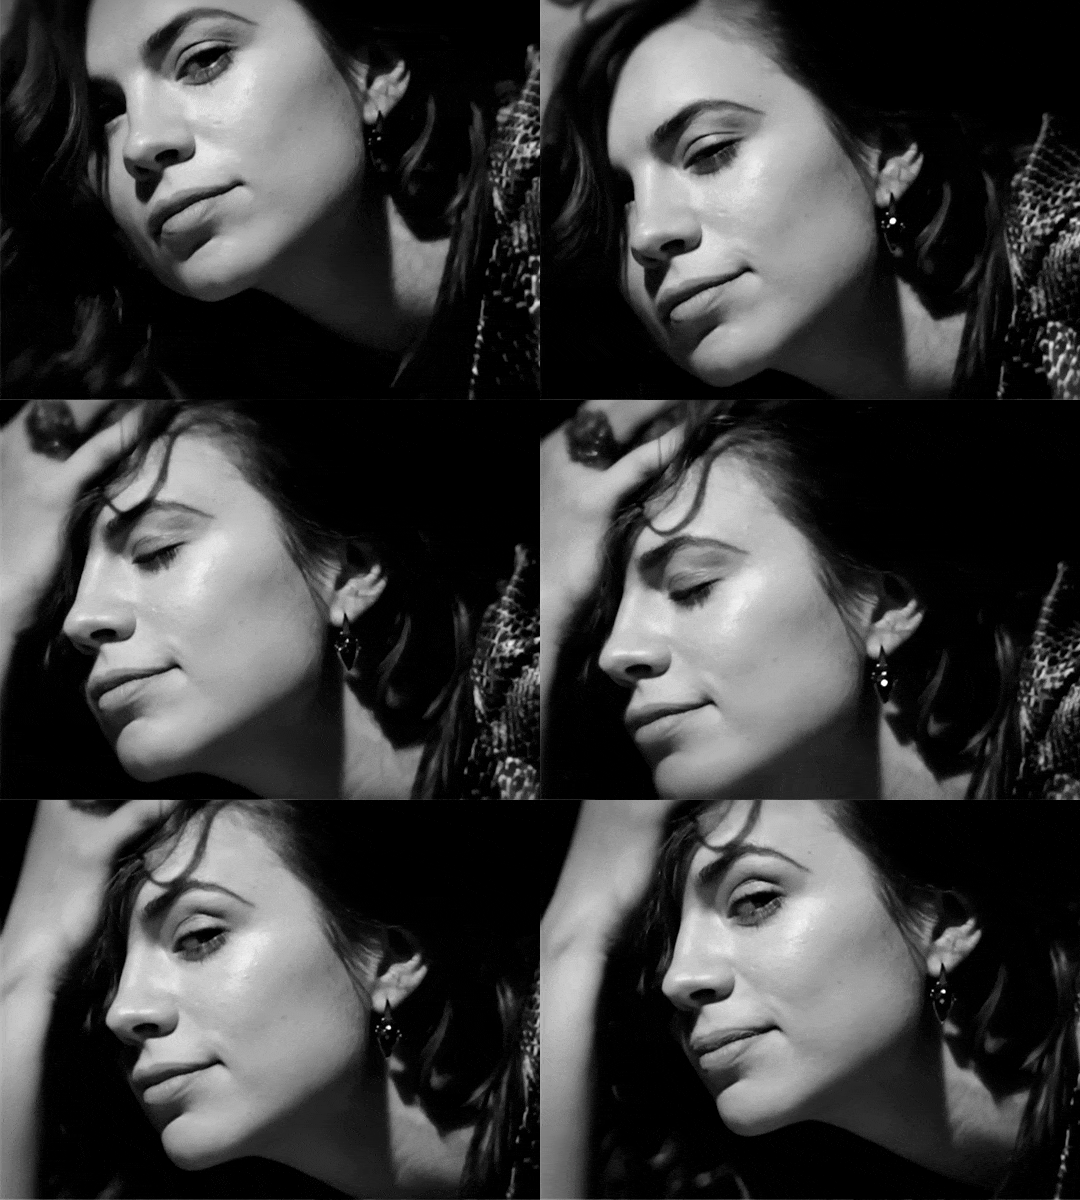
i’m going to gif a 720p YouTube video from 12 years ago as an example. it’s the bottom of the barrel when it comes to image quality, but in the end, you won’t believe it was once so shitty. here’s the gif, without any editing:
THE APPLICATION
Topaz AI is a paid software for image enhancement. you can download it for free, but your images will have watermarks. here's a random link that has nothing to do with this tutorial.
you can use Topaz AI as a Photoshop plugin or use the software separately. i will explain both methods in this tutorial.
USING SEPARATELY
it’s the way i do it because it’s more computer-friendly, the plugin can take a toll on your PC, especially when you’re dealing with a lot of screencaps.
you first take screencaps as you normally would (if you don’t, here’s a tutorial on how to do it). open Topaz AI and select all the images. wait a while for the software to do its thing.

on the left, there is your screencap untouched. on the right, is your edited version. if you click the edited screencap and hold, Topaz will show you the original, that way you can compare the versions even better than just looking at them side by side.
Topaz AI will automatically recognize faces, if any, and enhance them. this can be toggled off, by disabling the “recovering faces” option in the right panel. it’s always on for me, though. you can tweak this feature by clicking on its name, the same thing for the others.
Topaz AI will also automatically upscale your screencaps if they’re too small (less than 4k). it will upscale them to achieve said 4k (in this gif’s case, the original 1280x720 screencaps became 4621x2599). i suggest that you let the app upscale those images, giving you more gif size flexibility. you can change into whatever size you want if you want something less heavy to store. don’t worry though, even these “4k screencaps” are very light megabytes-wise, so you won’t need a supercomputer. it might take a while to render all your screencaps, though, if you’re on a lower-end computer. (the folder with the edited screencaps ended up being 1GB, but that’s because it contains 123 screencaps, which is a lot of screencaps for 4k giffing).
two options won’t be automatically selected, Remove Noise and Sharpening, you will need to enable them to use them. rarely i don’t use Remove Noise, as is the best tool to remove pixelization. the Sharpening option depends on the gif, sometimes your gif will end up too over-sharpened (because of Topaz’s sharpening and later your own). that said, i used the Sharpening option on this gif.

next, select all images by clicking the “select all” button. you will notice that one of the screencaps’s thumbnails (in my case, the first one) will have small icons the others don’t have. this is the screencap you enhanced. you will need to click the dots menu, select “apply”, and then click “apply current settings to selected images”. this way, every screencap will have the same settings. if you don’t do this step, you will end up with one edited screencap and the rest will remain untouched!

all things done, click “save X images”. in the next panel, you can select where to save your new screencaps and how you want to name them. i always choose to add a topaz- prefix so i know what files i’m dealing with while giffing.
just a note: if your way of uploading screencaps to Photoshop is through image sequence, you will need to change the names of your new screencaps so PS can perceive that as a sequence (screencap1, screencap2, etc). you can do that by selecting all the screencaps in your folder, then selecting to rename just one of them and the rest will receive numbers at the end, from first to last. you don’t need to rename them one by one.
here’s the first gif again, without any editing:

without Topaz enhancement but with sharpening:

without sharpening, only the Topaz enhancement:

with Topaz enhancement and sharpening:
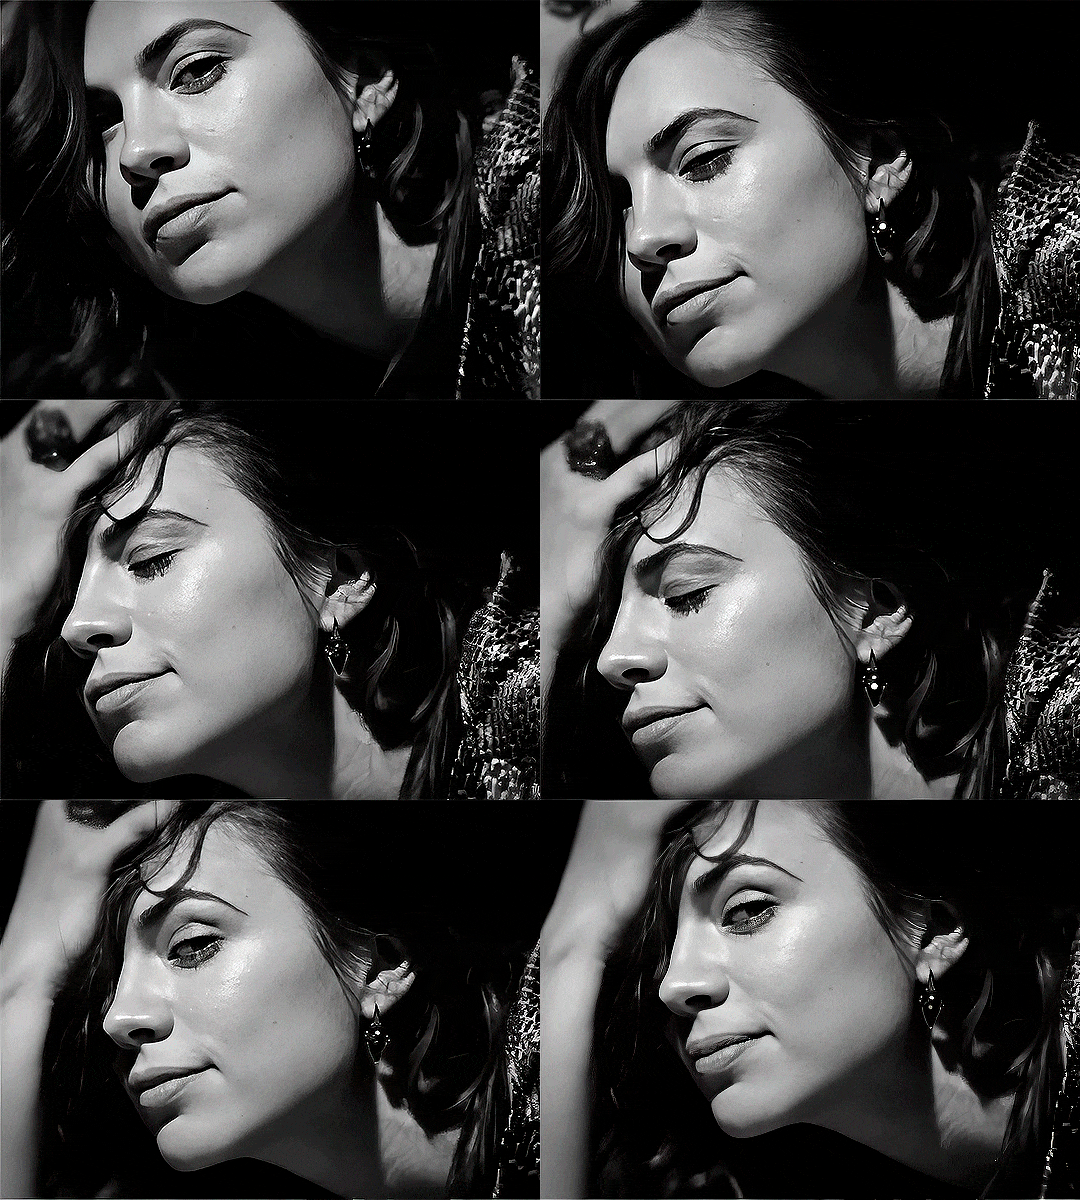
her skin is so smooth that it is a bit unrealistic. i could have edited that while tweaking the “Recovering Faces” option and/or the “Remove Noise” option, but i prefer to add noise (filter > noise > add noise) when necessary. this way, i don’t risk not enhancing the quality of the screencaps enough.

i added +3 of noise, making the gif look more natural. it’s a subtle difference, but i thought it necessary one in this case. you can continue to edit your gif as your heart desires.


VOILA! 🥳
AS A PHOTOSHOP PLUGIN
if you have Topaz AI installed on your computer, Photoshop will recognize it. you will find it in filter > Topaz Labs > Topaz AI. while in timeline mode, select the filter. the same Topaz AI window will pop up and you can tweak things the same way you do when you use the software separately. by using the plugin, you don’t need to upload your edited screencaps or use screencaps at all, a video clip (turned into a Smart Layer, that is) will suffice. the downside is that for every little thing you do, Topaz AI will recalculate stuff, so you practically can’t do anything without facing a waiting screen. a solution for that is to edit your gif in shitty quality as you would edit an HD one and at the very end, you enable Topaz AI. or just separately edit the screencaps following the first method.
this is it! it's a very simple software to use. the only downside is that it can take a while to render all screencaps, even with a stronger computer, but nothing too ridiculous.
any questions, feel free to contact me! :)
#*#alielook#usershreyu#userlaro#userchibi#tusernath#usersanshou#userbunneis#userzil#tuserlou#jokerous#usersnat#userdavid#userbuckleys#userbarrow#gif tutorial#completeresources#ps help#resources#*tutorials
236 notes
·
View notes
Text


sorry if the quality is bad, when i go back to saw x i'll record better clips, rn im just throwing down the clips i recorded when i first watched the movies so obs wasnt at max quality then, 6000 kbps.. uh 1280x720.
#saw#saw x#saw x spoilers#amanda young#sawposting#sawtism#saw posting#saw movies#saw film#saw films#saw franchise#amanda saw#amanda young saw#saw amanda#saw movie#saw series#my gifs
85 notes
·
View notes
Text
NO LONGER BEING UPDATED
emulation sources
roms megathread (ssa wii u internet archive download) (may require cdecrypt if not downloading roms through usbhelper) dolphin wiki + download rpcs3 wiki + download cemu wiki + download zadig (if using a real portal. i know dolphin and rpcs3 have portal emulation, unsure with cemu) prototype builds: giants builds (useful info), ssa xpec builds, swap force build, superchargers build
will update if i get any more information. feel free to add anything additional info based on stuff i've toyed with (i don't know my specs): > you may need to allow a usb passthrough in dolphin, it's in the config > as stated on the wikis, cemu requires updating the usb input driver while dolphin requires zadig to have it changed to a libusb/winusb driver (either work about half the time. technology moment). the portal is under spyro porta. i recommend having separate portals for cemu and dolphin so you don't need to mess with drivers > i used vulkan graphics for cemu and default for dolphin. i'm not a tech guy though so just play with whatever works best ig i just use default settings. portal compatability guide > for dolphin gif making, i used 8x msaa anti aliasing and had the internal resolution as 1920x1080. for the most part it ran average on a half dead computer from 2015. i'd recommend 1280x720 w/ no or minimal anti aliasing though > ssa and giants' main gameplay both ran mostly fine with vbi skip on (though i haven't checked heroic challenges) with occasional drops to 12fps, only superchargers racing's first cup and parts of the second have been tested > never used rpcs3 and i don't know if citra can run skylanders games, until i learn more it'll be absent > swap force is pretty broken on cemu, lawl > ir sensors for dolphin will need to be configured if using something like an xbox controller, have relative input on so the cursor doesn't snap back to the middle > ssa and giants can lag often and being in the ruins starting from around the middle part of the game will be noticeably slower. co-op is very slow. cemu handles co-op great though and generally is pretty fast > if you wanna play online with a friend, get parsec > if not using the console's controller type, i'd recommend just using your own controls rather than setting them to whatever makes sense (like having the trigger be your primary instead of something like A w/ an xbox controller) > if the game lags hard enough your skylander might disconnect for a sec (only experienced in giants when recording with obs). pausing the game for a couple seconds if having lag usually fixes it > dolphin games run fine when being recorded w/ obs or streamed on discord. haven't checked cemu yet > cutscenes in dolphin always have a weird like. screen tearing? thing? as far as i know there's no way to fix it, but they play fine besides that > newer (experimental) versions of cemu seem to break with skylanders >if you're getting wii u roms from the internet archive you'll need to get cdecrypt. its newest release is super easy to use (drag the rom folder onto it and it'll do everything for you, thank god) >dolphin is the only emulator with freecam >superchargers racing was buggy on both computers i got it on. 2015 pc wouldn't launch it and my 2022 laptop disconnects the portal after every race, requiring the game to be restarted >cemu would crash after doing about two races (updated 31/8/2024. added another piece of info)
#skylanders#story scrolling#dolphin emulator#cemu#figured i'd do a proper post instead of little posts every now and then
28 notes
·
View notes
Text

THE FUTURE IS COLD. FIND WARMTH IN EACH OTHER.
(background created in BRYCE 3D, elements created in Aseprite, canvas size: 1280x720)
#my stuff#my art#pixel art#digital art#art#y2k aesthetic#y2k#neo y2k#aseprite#bryce 3d#LOVE how this came out
20 notes
·
View notes
Text
OPENING COMMISSIONS!!

(I know a lot of people in way more destitute scenarios offering commissions, and I am well-off without them, so please consider spending your money on someone who needs it to survive! But as a middle-class, unemployed, autistic trans girl who recently turned 18 and is expected by my parents to get a job soon to continue living here, I would desperately appreciate any sort of income possible!)
~~~~~~~~~~~~~~~~~~~~~~~~~~~~~~~~~~~~~~~~~~~~~~~~~~~~~~~~~~~~~~~

All Prices in USD, pay via PayPal - Please pay at least 50% upfront, thank you!
-Basic lineart + coloring for a 720x480 or 480x800 panel: $10 (+$5 per extra character)
-Lineart + coloring + shading + effects + background for a 800x1280 or 1280x720 comic-page-sized drawing: $30 (+$20 per extra character)
-Purely landscape/environmental with no characters, 1280x720: $25 (though depends on the complexity)
There’s no set time or schedule for me, so it could take anywhere between a few hours and a few weeks for me to finish, depending on mental health, work, other activities, etc., but you may ask for a 50% refund if it takes me more than a month. If I am unable to finish the piece for whatever reason, I will offer a full refund. Please don’t rush me or change your instructions after I’ve started it. Thank you!
Anything you commission from me will be subject to my copyright and will be posted publicly (UNLESS IT IS NSFW), however you are allowed to also post and use it in any way UNLESS that way involves harassment, discrimination, to be directly sold or used for your own product(s), training any sort of AI models, or claiming ownership over my art.
Oh yeah and feel free to just DM me if you want a commission, though I'm not the most active at times lol
~~~~~~~~~~~~~~~~~~~~~~~~~~~~~~~~~~~~~~~~~~~~~~~~~~~~~~~~~~~~~~~

I’ll try drawing pretty much anything, but there are some disclaimers I should make:
Things that I am not necessarily adverse to drawing, but my lack of experience in the specific subject may result in the process taking much longer and/or the result being of lesser quality than my other work: -Drawing outside of my normal artstyle -Furries -Animals -NSFW -Complex designs, vehicles, mechs
Because of this, you may request the price to be 20% off if it includes the above.
And these things are completely off the limits for obvious reasons: -Any art that is hateful or discriminatory in any way -Art made to harass someone -Fetish content -NSFW of minors, non-anthro animals, non-consensual encounters, and/or incest -Heavy gore, maggots, feces, and other disgusting stuff
Oh yeah and PLEASE DO NOT commission anything NSFW from me if you are a minor!!!!!
~~~~~~~~~~~~~~~~~~~~~~~~~~~~~~~~~~~~~~~~~~~~~~~~~~~~~~~~~~~~~~~

!!!ALSO!!! I likely can only handle no more than 8 commissions at a time, but I will have the available slots in my bio.
~~~~~~~~~~~~~~~~~~~~~~~~~~~~~~~~~~~~~~~~~~~~~~~~~~~~~~~~~~~~~~~
Here is a bunch of other random drawings and comic pages I've made!


I'll likely make an updated version of this later lol
Please reblog and share to help get a young artist started in their life! Any support is greatly appreciated, have a fantastic day!!
#commission#commissions#commissions open#open commission#open commissions#art commisions#commisions open#digital commisions#taking commisions#artist#art#character art#artwork#artists on tumblr#comic#comics#queer artist#autistic artist#young artist#looking for commissions#exspiravit#exspiravit comic
35 notes
·
View notes
Text


Redone VTMB Main Menus
I didn't save my screenshots from last time so I made new ones <3
My images are 1920x1080 instead of 1280x720, so if you're having some issues, feel free to resize them in Photopea or something similar.
Here's the folder for all of the menus. Use Ctrl+F to find the one you want, and remember you can only have one. The menus are set to not show the household by default. If you want to see it switch to the store tab, then the home tab. If you did this accidentally and want to clear your screen again, just hit 'T'.
17 notes
·
View notes
Text
A Temporary Solution for The Sims 1 UI
The Sims Legacy Collection automatically adjusts to your monitor's resolution, making the UI very small. Even in windowed mode, the borders can't be resized. After searching for solutions online, some players recommend changing your Windows screen resolution to 1280x720 before opening the game, and switching it back to the recommended setting after playing.
This is a temporary fix until EA fixes the issue.
After testing, the game feels more playable with the UI zoomed in. But unfortunately, windowed mode is useless. Unless the desktop Toolbar is hidden.
13 notes
·
View notes
Note
hii, sorry if you've answered this before but what do you use to make your edits ? your stuff is so cool it's inspiring me to try it out for myself hdkghdkgj,,

oh my gosh tysm 🥺 i really appreciate this but ill just get straight into the list! underlined = link , highlighted is website names
sorry for the long post i ended up yapping.. tldr photopea, ezgif, lunapic, alphabetiser, nameberry, magic baby names, baby centre, sekaipedia, pinterest, tumblr, . also at the bottom is a tutorial on making stamps & some templates
for basic editing i use photopea - https://www.photopea.com/ , if its too confusing you can also try ibis paint but its too confusing for me. i click "new project" and then use the dimensions i need ( tumblr banner = 1280x720 , twt banner = 1500x500 ). i can also make basic photopea functions tutorial if you need it bc a lot of people find it difficult to navigate. i dont have any specific favourite layer blends but i recommend light colours -> use the section under "lighten" , dark colours -> use the section under "darken" , blacks and whites -> use the section under "difference". of course once ur more comfortable u can just do whatver layer blends u want ^ ^
for gif editing / merging (layouts, pixels, blinkies) i use photopea's layer -> animation -> merge settings, however if that doesn't work i use ezgif - https://ezgif.com/ , specifically the gif maker.
for adding animations to stamps, i use lunapic's animations tab - https://www6.lunapic.com/editor/?action=animation-examples . i also used to use this website a lot for old layouts before i knew how to use photopea. below i highlighted my fav settings (3x for sizing)


for npts i use alphabetizer - https://alphabetizer.flap.tv/ to organise name lists. if you use this make sure to turn ON "ignore case" in the side menu!! it sorts capital letters as normal, and then i delete the capital letters later when formatting a post. for names i use websites like nameberry, magic baby names, and baby center. not sure how to explain it but i just get a feeling that a name suits a character ^ ^. as an example in all of these i used "orchid". for titles and pronouns i just use my imagination based off the character's wiki page.


for resources: i find proseka transparents online at sekaipedia - https://www.sekaipedia.org/wiki/Characters , or at @prosekaipng or @sekaitransparents . i find frames and pngs on pinterest or tumblr, and use unscreen to remove the background of gifs and remove.bg to remove the background of any image i cant be bothered manually removing. when i need to do touch-ups myself i use photopea
i find colour matches for layouts on pinterest, and then edit the shit out of them until it looks close enough to a colour palette (example below of some colour editing i've done recently). most of the things i do are extreme changes but i started off by making subtle changes in my old layout posts on lunapic, which i still sometimes do today like in the last example from a post currently sitting in my drafts i havent finished. ( ̄  ̄|| )
(this is how i found out my emu photopea file didnt save btw so excuse the missing elements ...)


for overlays, btw i use A LOT OF THESE, and also lots of custom PSDs. a psd is basically a colouring file you overlay on top of something, and are similiar to smart filters. in photopea you can click "image -> adjustments -> (whatever)" and apply that to one singular image, and these are called smart filters because you can transfer them to other images by individually dragging them. OR you can click "layer -> new adjustment layer -> (whatever" and this is a PSD because it automatically applies to all images. in photoshop, there are no "smart filters" iirc. i use a combo of smart filters & psds & overlays. i find overlays sometimes on pinterest, but mainly on tumblr. my favs below. use layer blends on these!!


for stamps i use templates in photopea using a raster mask. you can find templates on tumblr and deviantart, majority of tumblr dumps are from deviantart, so i focus on using deviantart myself and finding original stamp works on tumblr rather than reposts. some accounts i recommend are caterpillar-with-a-crayon and dixons-graveyard. remember to credit artists!!
to do this, first open a template in photopea using either " file -> open " or " open from computer " . next select the magic wand and select the inside of the stamp. next open a new layer using the blank page (second from the right, bottom right, next to the trash can below the layers) and use the brush tool to colour in the selection from earlier. it may look like an eraser, or any other icons shown in the menu. right click and select the brush tool, then hold down to colour it in. you should have something now looking like the fourth slide, with a stamp template on one layer and the colour on a layer above it.
to make the raster mask, de-select the colour by clicking anywhere in the dark grey surrounding the canvas. while on the colour layer, select "layer" (fourth from the left, next to "image" and "select, menu in the top left), then select "raster mask" -> "from transparency" . your coloured layer will then split into the colour surrounded by black, and a white version of the colour. both connected with a chain.


now, create a folder above your stamp template by clicking the button shaped like a file (bottom right menu, 3rd from the right, between a sheet of paper and a circle cut in half). now, click on the RIGHT split from the layer (the white colouring) and drag it onto the folder. it should stick there. now, anything you put inside that folder will fit the stamp inside! remember to turn OFF the red layer by click the eyes next to the layer. this wont affect your raster mask. i used an image and the text tool.
you can also do more complex things involving stamps but this is a basic tutorial ^ ^.


15 notes
·
View notes
Text

Just in time for Mega Man's thirty-sixth anniversary, I've whipped up a wallpaper themed after Mega Man 3, sized at a comfy 1280x720— I think that this one may just be my most detail-oriented anniversary wallpaper yet... as well as my favorite, too! 💙✨
Previous Anniversary Wallpapers: 1, 2
#⭐ Star's Art ⭐#Mega Man 36th Anniversary#Mega Man#Rockman#Mega Man 3#Rockman 3#Break Man#Needle Man#Magnet Man#Gemini Man#Hard Man#Top Man#Snake Man#Spark Man#Shadow Man#Proto Man#Coolness#Lately I've been feeling a little self-conscious about my art lately...#... but I've been especially excited for everyone to see this piece in particular as I've had it complete for around a week now#Oddly for a wallpaper of this magnitude I recall it only took me less than an hour to complete#And that's taking into account of all the sprites I had to both choose and place...#... ON TOP OF completely reshading Gamma's head for a bit of extra sheen as well as the two Proto Man and Break Man portraits.#I actually found myself liking the end result so much that it's my current wallpaper as of writing these tags!#I just hope that y'all will think it's as good as I do too 💙✨
68 notes
·
View notes
