#1 mm laminate
Explore tagged Tumblr posts
Text
1 mm laminate price
Ogaan Laminate offers premium quality 1 mm laminate at competitive prices, ideal for a variety of interior applications. Known for its durability, stylish designs, and easy maintenance, Ogaan’s 1 mm laminate is perfect for residential and commercial projects. Contact us for the best 1 mm laminate price in the market.
0 notes
Text


Bound: Long Haul by @wolfpants
As a writer, I often am fondest of my shorter stories, but these fics are not the obvious choice for binding because they're so little. I actually started setting this story a while ago but put the typeset aside when I realized it was going to be such a low page count.
But more recently, I have been experimenting with a pamphlet bind to see if short stories and/or text blocks can be bound to my satisfaction, and yep! They can!
I love this short story by wolfpants and I have read it often enough that it deserved to be bound and put in my library. The story contains lovely delicious smut and (as you'd expect from wolf) excellent character-building, dialogue, and just exactly the right amount of realism. Wolf writes true adult characters and I adore this about their writing.
More about process and materials under the cut!
Materials: This is a quarto letter pamphlet bind using letter-sized 24# paper. The end papers are chiyogami acquired in Montreal. Book boards are actually cut from matte board that came in some packet of supplies or another, about 1 mm thickness and quite a bit bendier than my usual 2 mm book board, but worked nicely and feels appropriate for this little baby.
Book cloth is wooqu off Amazon as per. I sewed the pamphlet using three strands of waxed embroidery floss. Spine is strengthened with mull and a little strip of the same paper as the text block. Cover decoration is HTV vinyl. A few titles are foiled with toner-activated foil and a laminator. (Big shout-out to @sits-bound for technical assistance with figuring out that process!)
Process: This is a sewn 64-page/16 sheet quarto. I followed DAS Bookbinding's YouTube video here pretty closely except (as you can see) I went for a full cloth bind. I also added the paper layer on the spine before wrapping in cloth. I did this because I found mull alone — at least my cheap-ass mull — was not making for a smooth spine. The paper was a huge help on this front.
This is actually my third attempt at this style of binding (not counting the versions I did in class under adult supervision) so please do not be too impressed, lol.
The whole thing is held together by 50/50 corn starch/PVA mix (as well as the thread.)
I trimmed the tail twice by accident so then I had to trim the head twice too, and so that's why my margins are slender. :D
The HTV decoration was designed by yours truly (if you look at it for very long you'll be like "oh yeah I can see that" ahahaha) but I was really pleased with how it came out. I think I'm FINALLY finding my successful approaches for applying HTV. And yes, it was a monumental pain in my ass to weed. Worth it!
Peep the grease mark on the front title page. Sexy. No idea where it's from but yowza.
Bind short fic! Short fic also deserves binding! *steps off soapbox*
150 notes
·
View notes
Text
Lakeside
Summary:
James Sunderland doesn't remember why he'd driven his car into the lake. He can't explain why he was rescued, or what led to his decision, but he clings to the hope that someone will help him piece it together before hell freezes over. Douglas Cartland swore he'd never set foot in that godforsaken town again. That vow gets tested when Toluca Lake begins freezing in the middle of summer, against all logic and reason, and resurrects the drowned man he'd given up for dead.
Or, "Nature is healing. Hell is freezing over."
Prologue - Tumblr / AO3
1.
Will you reach heaven unassisted? Or must corpses point the path, Blind eyes glimpsing gold?
Another face swims in.
"Mr. Sunderland: Dr. Takuma again. I know how worn out you must be from the tests you've endured today. Rest assured, we won't keep you for much longer. Before we let you go, though, there is one last thing we must test."
"I need to go home."
"This will move much faster with your cooperation."
The laminated card clipped to the breast pocket claims his name is Robert Takuma. When James observes his face, he sees no connection. Certainly there are pieces that constitute an identity, eyes, nose, and mouth, but no underlying thread stitches them together. They float in a loose amalgamation without coherence or meaning. A mannequin of clothed limbs perches on the stool before him.
"Now, this exercise may seem rather silly and childish on the surface, but it will reveal quite a bit about the nature of your condition. With these flashcards, I will show you a series of illustrations. You tell me which is correct about them. Ready?" He interprets James' silence as consent and raises the first card. "Man or woman?"
James dwells in wordlessness before murmuring, "Woman."
"Why?"
"It's wearing high heels."
"Mm." The card settles in Takuma's lap, replaced by another. "Old or young?"
"Old."
"Why?"
"Cane."
"Good." Hands shuffle the deck. "Blonde or brunette?"
Silence.
"Blonde or brunette, Mr. Sunderland?"
"…I don't know."
"We'll circle back to that," Takuma says. "Which of these is not wearing glasses?"
He chooses the left.
"Point to the figure with a green shirt."
He complies.
"Heart tattoo on the bicep."
That, too.
"Smiling?"
They're treating him like a child.
"If you would, please list three differences between these faces."
He stares at the twin cards. They aren't illustrations but Polaroids. In his left hand, Takuma holds an enlarged facsimile of the photo he keeps in his wallet.
Kept; the lake stole it from him. Where Toluca's minerals leached its color and the water crumbled its grain to dust, the image burns clearly, seared into his mind by the radiant thuribles of the fluorescents burning around them.
In a world where most faces elude him, she shines, clear and lucent.
The other hand shows a horrendously different woman. Pustules swell and blister her complexion like globules of ancient film burning to a close. Melting into a wax grotesquery of herself, deprived of her outer beauty, never abandoning her smile.
The whisper crawls from his vocal cords. "Why do you have pictures of my wife?" A cold trickle forms on the back of his neck as the doctor rises. "No— Who gave you those?"
"Thank you for your time, Mr. Sunderland."
---
Damn it, what kind of game do they think they're playing? They've kept him penned in here for way too long. Locking him in a dim room like this, it's insane. More than insane. It's criminal. Mary's coming home tomorrow. He can't be languishing in the hospital himself.
Confined to a padded mattress, James glances down his arm. Gray, waterlogged skin bundles a loose blanket of flesh over atrophied muscles, showing veins and bones in disgustingly salient detail. Blue vessels weave a fine net over his flesh. IVs have blossomed grotesque bruises along its expanse.
Crushing his lips together, James tears the adhesive. The needle he extracts stings like hell, bringing a startling smatter of crimson to the surface.
Monitors scream, a noise he extinguishes by pulling the cord. No need to alert the nurses.
His head throbs as he wheels his bare feet onto the tile.
God, he's exhausted.
In the corner stands a bureau. Rising on unsteady knees, he shambles toward it.
Swinging the door open, he finds a bright silver square staring back at him. He opts to ignore it as he bends down to put on what remains of his clothes. They've taken his jacket, but at least the undershirt doesn't feel too damp when he slips his arm through the sleeve.
First things first. He's got to find a payphone and call his father. He doesn't want to impose on Frank, but he harbors a faint hope that he might have a spare key to their apartment so he can let Mary inside, allowing her to get settled in with her new nurse.
Hell, he'll pay, if that's what his father wants. Frank will protest anything for family; it's more to ease James' mind. He can't have Mary waiting out in the hall.
Tomorrow, he resolves. He'll straighten this out then. Tell his good Samaritans thank you even though he can't stay. Board a bus for North Ashfield.
The prospect of travel makes him nervous. Mary can hardly stand as it is, and… Well. St. Jerome's can't loan her a wheelchair her insurance won't cover.
She could lean on the wall, he supposes, try to slumber out his arrival, but can he gamble on the landlord allowing her to loiter there? Besides, her circulation's poor. Her hands and feet swell with fluid. Even though he finds himself sweating in this balmy air, she'd shiver.
His head sags on its neck. James indulges a new habit he's formed since being admitted and slowly, deliberately pops his knuckles one at a time. His hands have become skeletal, corded things he doesn't recognize; the water has eroded the muscle and fat that used to reside beneath the skin.
Air pockets crackle the joints as he depresses, with long, thin fingers tapering into chalk-white nailbeds. He doesn't feel them. These can't be his. These are borrowed from someone else, a pair of gloves he's forced to wear, coated in small nicks and gouges.
(woodgrain biting into his flesh when he grips the)
He raises his head to face his reflection.
They alleged this was his as well. All of these unsolicited gifts offered him, as though he had to be introduced as a guest to his own body.
The staff hadn't taken too kindly to his refusals. The first time, they insisted. The second, he grew agitated. Please put that away. He'd made his request clear after the numerous hours they'd spent poking and prodding him to ensure his mind remained intact. His patience had worn thin in worry over how long they were keeping him from Mary.
Wasn't a little disorientation after a car accident to be expected? How many more hoops did they want him to jump? He's healthy, isn't he?
(more than she'll ever be)
The third, he lunged to snatch the mirror from the nurse, but missed. Instead, he wound up knocking it out of her hand, accidentally shattering glass in the process.
James froze when the pieces scattered diamonds across the tiles. Disembodied parts flooded the floor. Eyes, lips, ears. Nothing adding up.
The moment he realized what he'd done, a shameful heat suffused his cheeks, pricking needles under his skin. Look at yourself, he thought, the irony of his inability only pushing the thorns deeper. You're acting like a child. What would Mary think?
James gives empty gaze to the glass, the impostor on the other side mirroring his languid movements. Watched by a mask he cannot remove. The eyes that track him aren't really his own. Two broken-bottle green irises. Not too deep. Too shallow.
Fingers uncertain, he traces the contours of this alien terrain, starting from the bridge of his nose downwards, into the dip of his Cupid's bow. The soft streams of breath he releases through his nostrils tickle him.
A thin sheet of epidermis stretched over musculature, bone, and cartilage. It feels too dead an inheritance to claim.
As he watches this strange reflection mimic his movements, he suffers a dark but fleeting impulse to harm it. If he hooked his dirty nails into the flesh and peeled away his doppelganger's false mask, shed his snake's skin layer by layer, there may be a chance he'd reveal something truer underneath.
(or maybe you would find nothing)
6 notes
·
View notes
Text
フェンダー編第458回:「Made In Japan FSR Traditional Late 60s Stratocaster GP -Mahogany Body&Neck!-ってこんなこと」
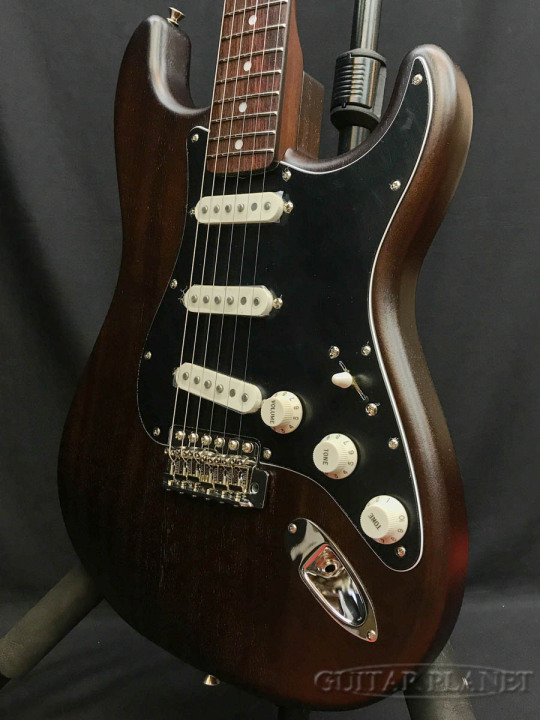
ギタープラネット限定販売の特注オーダー・モデル!! まるで「オール・ローズ」!? 有りそうで無かった、「オール・マホガニー・ストラトキャスター」が入荷しました!! 担当スタッフのこだわり多め、ラヴ多めの逸品です!! お見逃しなく!!
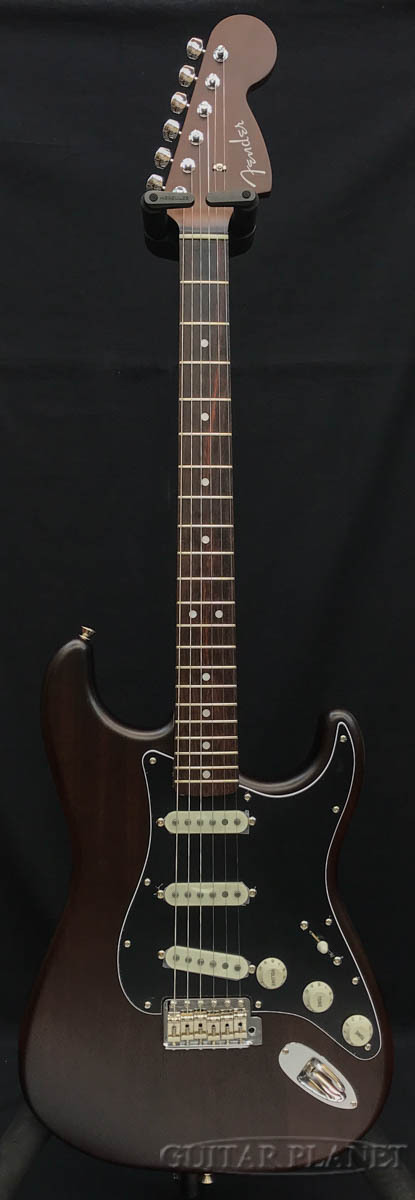
SPEC Body : Mahogany Body Finish : Satin Polyurethane Neck : Mahogany, “U” Shape Neck Finish : Satin Urethane Fingerboard : Round-Laminated Rosewood, 9.5 (241 mm) Frets : 21, Vintage Pickups : Fender Custom Shop Fat 60s STRAT PU ×3 Controls : Master Volume, Tone 1. (Neck Pickup), Tone 2. (Middle&Bridge Pickup) Hardware Finish : Nickel/Chrome Strings : Nickel Plated Steel (.009-.042 Gauges)
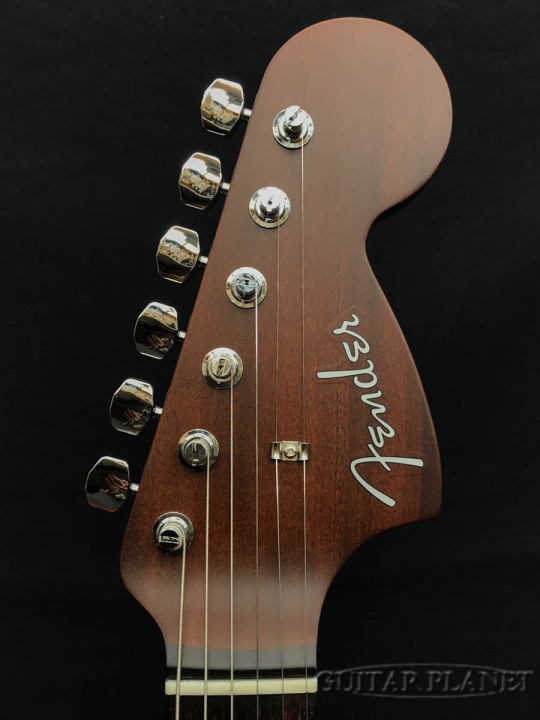
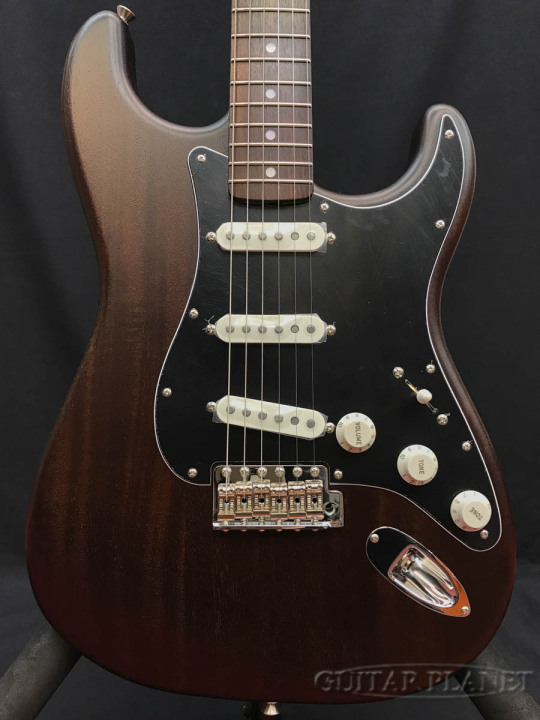
”Jimi Hendrixへ提供する為に製作開始されたものの、氏の逝去を以て行方知れずとなった伝説的なギター” としてギター・ファンの間で語り草となっている、1968年製オール・ローズウッド・ストラトキャスターからインスパイアされたデザインとなっています。 僭越ながら、カスタムショップ製品の横に並んでいても遜色無い!? と思える程にクールなルックスのみならず、 もちろんサウンドも、マホガニー・マテリアルに由来した”暴れるサウンド・フィール”が大変格好良いです!! 当店こだわりの特注オーダー・モデルを、ぜひこの機会にご検討下さい!!
/_/_/_/_/_/_/_/_/_/_/_/_/_/_/_/_/_/_/_/_/_/_/_/_/_/_/_/_/_/_/
GUITAR PLANET 2023
吉岡 哲志
https://www.guitarplanet.co.jp/
8 notes
·
View notes
Text
How I bind my fics - Part 3
We ended part two with an assembled text block, which is perfectly functional as a book, but we're here for the hardbacks
Hardbacks start as greyboard for me, 3mm (1/8 inch), and we have to do a little maths to work out the size. We want a 3mm overhang around the top, bottom, and outside edge, which sounds simple (and it is for the top and bottom), but for the width we need to take a few mm away too, so the book can open flat. In this case, it ended up being 4mm narrower than the text block
We cut the cover and spine boards using our trusty L-ruler and knife, although sometimes I also score the line I want to cut and use the chisel

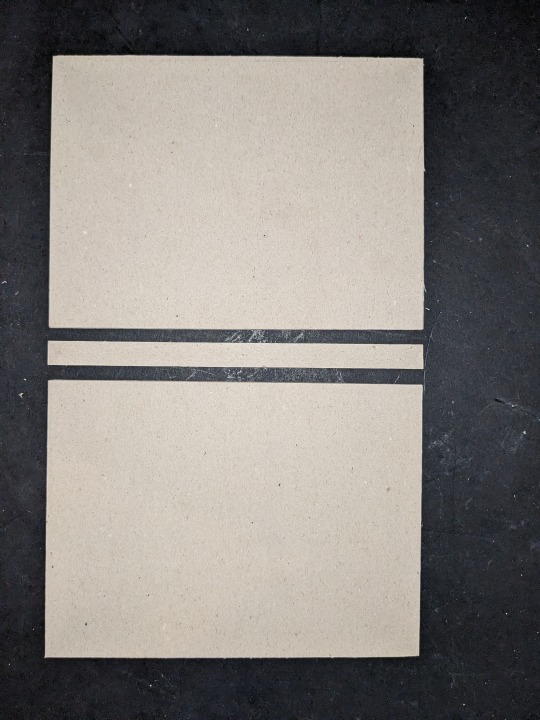
I like to make Bradel bound books, so we need to make a "hinge" for the spine to connect to the cover - the video explains it better than I could, but essentially it's a piece of thickish paper (120gsm) that we glue the boards to


We then need to line the inside of the covers, again with 120gsm paper, leaving about an inch unglued closest to the spine

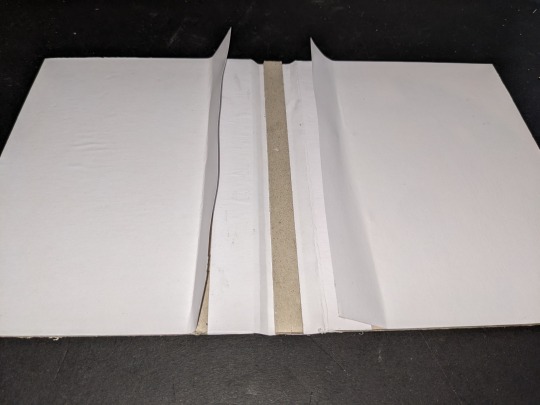
These flaps are what the textblock's flaps will sit under later when we come to glue it up

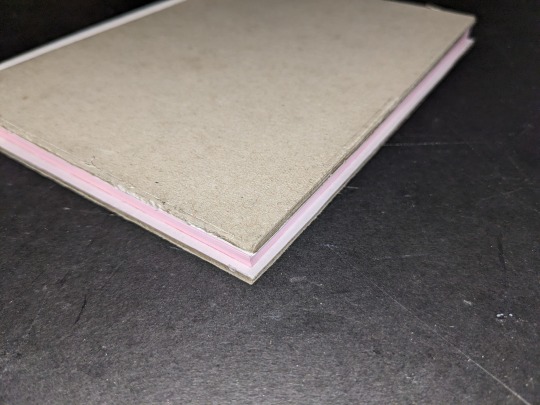
It's starting to look like a book!
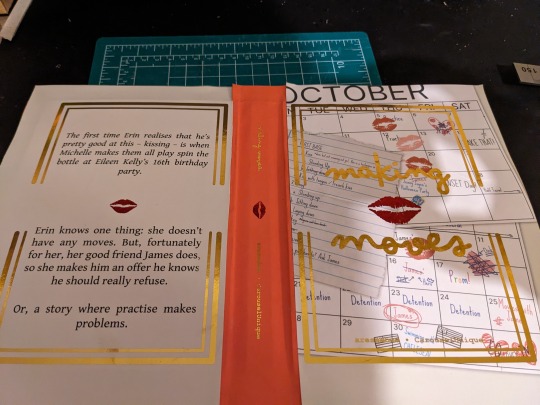
We can now move on to designing the covers. One day I'll get a A3 printer and be able to do full spread covers, but for now I break it into three - the front, the back, and the spine.
These are again designed in inDesign, and in this case I've made a background and a foreground for the front and back. This is because the backgrounds will be inkjet printed, and the foreground will be laser printed over top

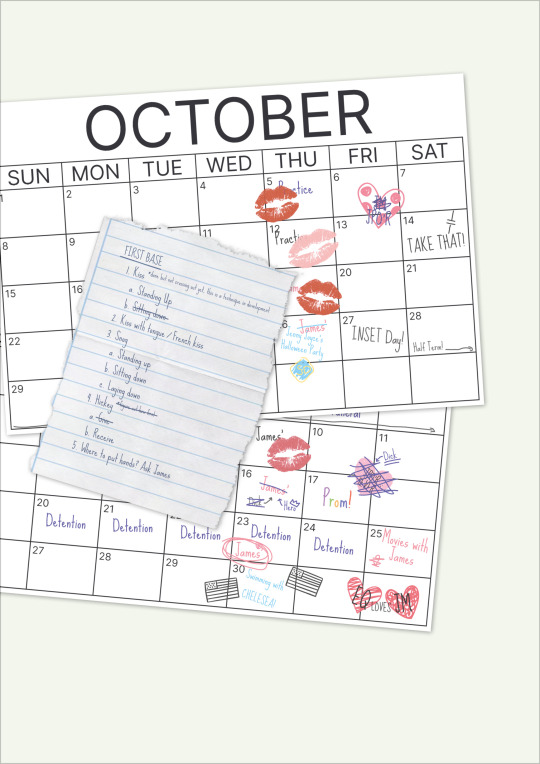
(A higher res version of the cover background - I've tried to tally the fic to Erin's Diary, and hope I've shown Erin's personality a bit - there's a point when she stops labelling it a going to "Practice", and starts going to "James'"...)

The spine is laser printed directly onto coloured 150gsm paper - slightly thicker, as this bit will be under the most stress of the cover
The reason we're laser printing over top is so we can use toner reactive foil - it'll stick to the laser print but not the inkjet one
It's simply a case of taping the foil sheets down tight over the areas we want to foil, masking areas we don't (although if you're doing two colours like we are, my experimentation says do them together), then feeding it through a hot laminator before peeling the foil sheet off

(ignore the masking tape - its on areas we're cutting off in a minute)
Next we're cutting and gluing these pages onto the boards - the little boxes you can see jutting out from the edges are registration marks so I can pencil in on the revese where to line up the boards - we use the bone folder again to smooth them out, work out any air bubbles, and to push the paper into the nooks and crannies
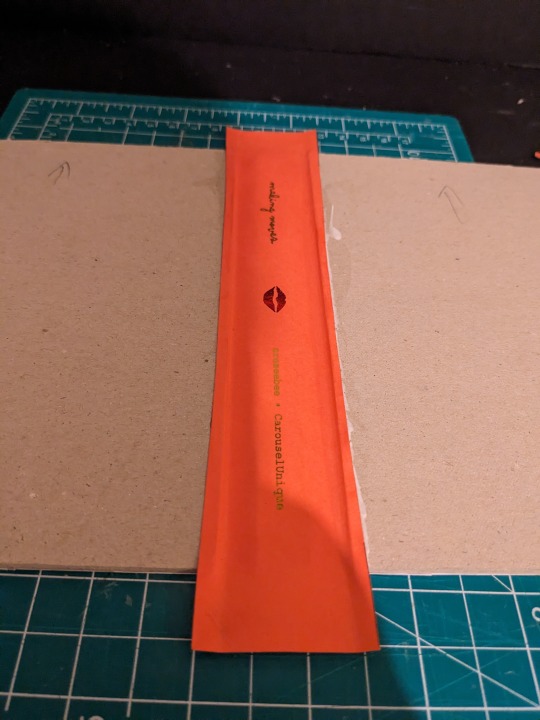
Now we need to cut the corners, using my handy-dandy 3D printed template

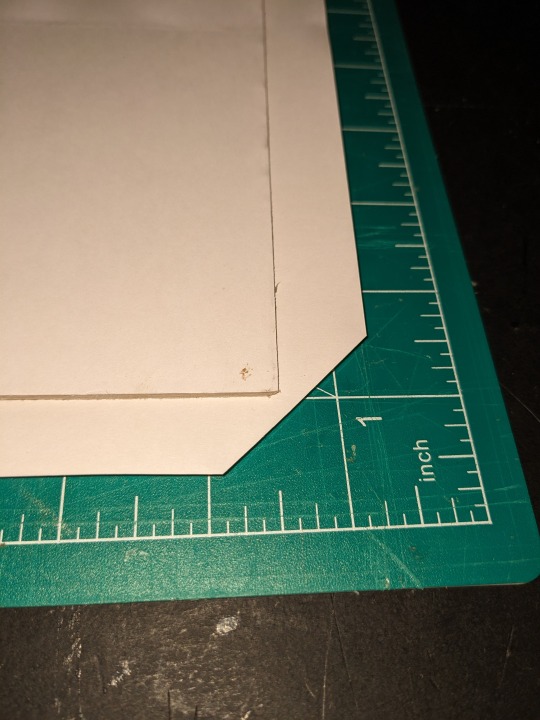
We cut them so that when we fold it over we get a nice crisp fold
On that note, we need to glue the edges and fold them over, making sure to get the glue right into the edge of the board

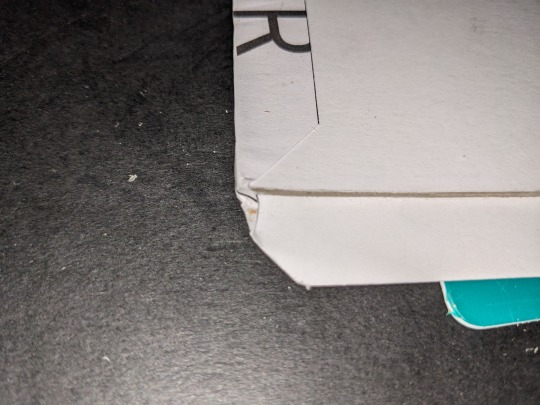
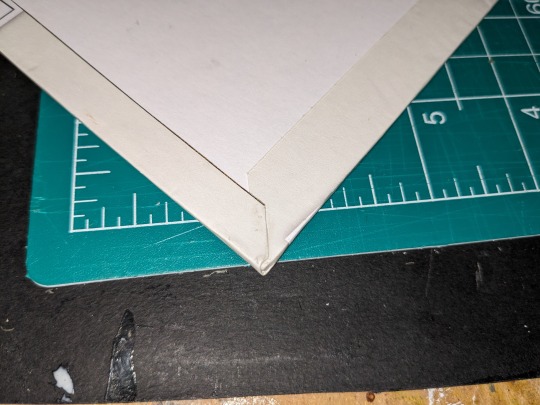
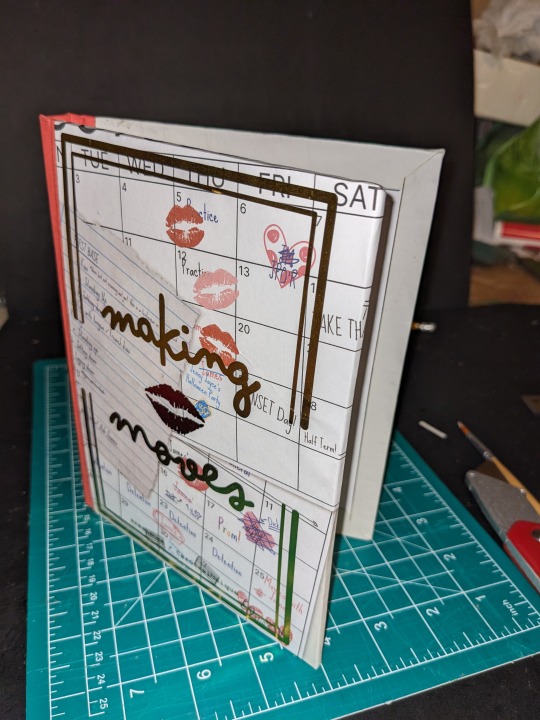
We're very nearly there now - just need to wed the textblock to the casing
We start by dry fitting the block in the case, then carefully opening one cover and gluing the tabs down, followed by the other, again smoothing with the bone folder

Finally, we need to carefully glue down the endpapers to the board (no matter how careful or which order you do them in, the front paper always gets a little messy for some reason)

Et voilà! We have a book - it'll live in the press overnight while the glue dries, but once it's ready it'll take it's place between "In Their Thirties" (which I'm tempted to rebind now I have foil for the cover), and "Vacation James"

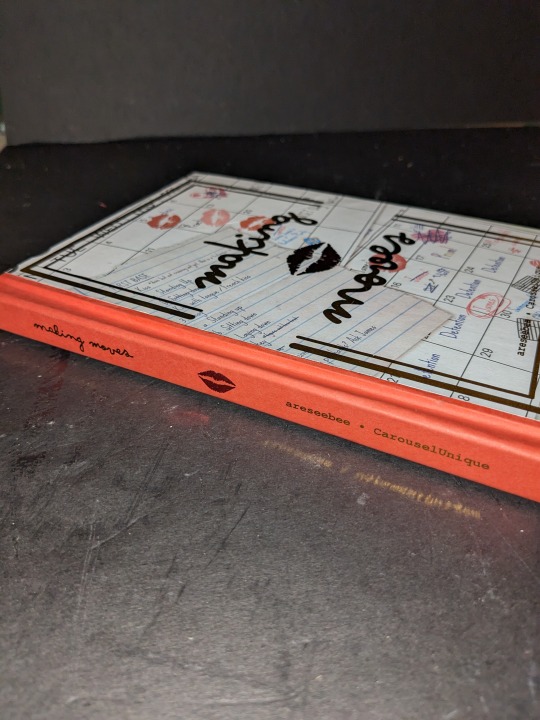

tumblr
I'm sure there are seasoned bookbinders reading this going "No, you fool!", but I'm happy with the outcome. It's fun, and I love being able to have something in my hands at the end of it; I may not be able to draw fanart, but I can make something to show my love for my favourite creators!
Thanks again to @areseebee and @derrygirlstrash/@carouselunique for writing this really fun fic, and to @imstressedx for planting the notion in my head to do a step-by-step
Now, on to the next fic!
3 notes
·
View notes
Text
Price: [price_with_discount] (as of [price_update_date] - Details) [ad_1] From the manufacturer Excellent Finish: This TV unit is made using European engineered wood with 15 mm thickness for a sturdy finish. Scratch Resistant: The surface is resistant to scratches, keeping your unit in pristine condition. Laminated Base: The laminated base on the TV unit adds to the aesthetic of your home. Dust Resistant PVC Band: The PVC banding keeps the dust away from the unit, enhancing the visual appeal. 1 Scratch Resistant: 2 Laminated Base: 3 Dust Resistant PVC Band: Termite Resistant: The make of this TV unit ensures the termites stay away from it and your home stays termite-free. Tested for Quality: This TV unit has passed 15+ quality checks to offer you the best at the best price. Premium Quality. Great Value. Welcome to the world of Solimo - a place where premium quality and great value go hand in hand. Every Solimo product is carefully built to deliver exceptional quality. Right from the materials used, to detailed quality checks, to thoughtful improvements, quality is at the core of everything we do. Product Dimensions: 180 x 39.5 x 61 cms Number of Shelves: 7 Shelves Assembly Instructions: Installed by seller Product Weight: 38 KG Special Features: - Made with 15 MM European standard engineered wood - Being termite resistant, the product also ensures longevity and durability. Featuring full edging and secured with lamination, prevents the build-up of moisture. Also, it is easy to clean [ad_2]
0 notes
Text
How to Plan a Budget-Friendly Parallel Modular Kitchen Without Sacrificing Style
A Parallel Modular Kitchen with counters and storage running along two opposite walls maximizes efficiency in narrow spaces. In Pune’s competitive real estate market, creating a stylish yet affordable kitchen is possible by making strategic material and design choices. Here’s a step-by-step guide, featuring insights from Winsquare, to help you plan a budget-friendly parallel kitchen that doesn’t compromise on aesthetics or functionality.
1. Establish Clear Priorities and Budget Allocation
Begin by defining your must-haves versus nice-to-haves. List essentials—such as ample countertop workspace, sink placement, and core appliances—and optional features like decorative lighting or glass-front cabinets. Allocate your total budget across key categories:
Cabinetry & Carcass: 50%
Countertops & Backsplash: 20%
Hardware & Fixtures: 15%
Labor & Installation: 15%
This framework ensures you invest where it matters most sturdy cabinets and durable surfaces while controlling costs on accents.
2. Smart Substrate Selection: MDF Over Plywood
Winsquare recommends moisture-resistant MDF (MR-MDF) for cabinet carcasses instead of pricier marine plywood. MR-MDF resists warping in Pune’s humid monsoons and provides a smooth surface for laminates. It costs up to 30% less than plywood, freeing funds for higher-impact details like quality countertops or hardware.
3. Cost-Effective Finishes: High-Pressure Laminate (HPL)
Choose HPL for cabinet exteriors. Bonded under heat and pressure, HPL offers scratch resistance and a wide range of wood-grain and solid-color patterns. It mimics expensive materials such as natural wood or stone at a fraction of the price. For a modern touch, consider a two-tone scheme: a darker HPL on base cabinets and a lighter shade on overhead units to create visual depth.
4. Streamlined Layout and Standardized Modules
A Parallel Modular Kitchen thrives on simplicity. Use standardized 600 mm-wide modules to reduce custom cutting and labor time. Fewer bespoke pieces translate directly into lower fabrication costs. Position the sink on one side and cooking zone on the other to maintain the classic work triangle enhancing workflow without extra cabinetry.
5. Efficient Storage Solutions
Instead of costly pull-out corner units, install adjustable shelves and deep drawers with simple box dividers. Incorporate a basic vertical tray rack for baking sheets. Reserve premium soft-close slides for the most frequently used drawers (e.g., cutlery and utensil drawers), balancing everyday luxury with overall savings.
6. Affordable Countertop Options
While quartz and granite are durable, budget-friendly alternatives exist:
Laminate Countertops: Economical, stain-resistant, and available in many patterns.
Granite Remnants: Leftover slabs sold at discount; ideal for small parallel kitchens.
Engineered Marble: Mid-range price with decent durability and uniform appearance.
Pair your chosen countertop with a simple tile backsplash or waterproof laminate sheet to protect walls affordably.
7. Value-Driven Hardware and Fixtures
Select sleek, minimalist handles in anodized aluminum or ABS plastic costing up to 50% less than designer brass. Opt for a single-lever stainless-steel sink and a standard-flow faucet with a pull-out spray. These provide durability and functionality without premium pricing.
8. DIY Finishing Touches
Save on labor by handling minor finishing tasks yourself. Painting walls with mold-resistant emulsion, installing peel-and-stick backsplash tiles, or fitting open floating shelves can be DIY projects that cut costs and add personal flair.
9. Phased Implementation for Cash Flow Management
If budget constraints are tight, split the project into two phases:
Phase 1: Base cabinets, countertop, sink, and essential appliances.
Phase 2: Overhead cabinets, decorative elements, and additional storage modules.
This approach delivers immediate functionality while spreading expenses over time.
10. Leverage Winsquare’s End-to-End Service
Choosing Winsquare means benefiting from in-house design software that optimizes material usage and minimizes waste. Our streamlined manufacturing and certified installers reduce rework, ensuring your parallel kitchen is completed on time and within budget. We also provide transparent quotes with no hidden fees, so you can plan confidently.
By focusing on cost-effective substrates, standardized modules, smart storage, and selective upgrades, you can create a stylish Parallel Modular Kitchen tailored to Pune homes—without breaking the bank. Partner with Winsquare to transform your kitchen into a functional, beautiful space that stands the test of time and budget.
0 notes
Text
High-Quality X-Ray Room Door Manufacturer in India | Radiation Safe & Certified
When it comes to safety in healthcare and diagnostic environments, installing the right X-ray room door is critical. These doors are specifically designed to shield radiation, protect medical staff and patients, and meet strict compliance standards. As a trusted name in the door manufacturing industry, Tufwud offers premium-quality, lead-lined X-ray room doors that combine functionality, durability, and regulatory safety.
What is an X-Ray Room Door? An X-ray room door is a specially constructed door designed to block radiation emitted from diagnostic machines such as X-ray, CT scan, MRI, and fluoroscopy equipment. These doors are lined with lead or lead-equivalent material to prevent the escape of harmful radiation from the imaging room.
The door typically includes:
Lead sheet insulation (1 mm to 3 mm depending on protection level)
Radiation warning signage
Seamless sealing and tight frame fit
Vision panels with lead glass (optional)
Compatibility with access control systems
Why Hospitals and Clinics Need Radiation-Proof Doors Healthcare facilities use various imaging technologies that emit ionizing radiation. Without proper shielding, this radiation can cause long-term health risks. Installing a certified X-ray room door is not just a safety measure but a legal requirement as per Atomic Energy Regulatory Board (AERB) guidelines in India.
Key Benefits of Tufwud X-Ray Room Doors: ✅ Lead Lined Protection – Available in different thickness levels based on shielding needs
✅ AERB Compliance – Meets all Indian regulations for radiation safety
✅ Durable Design – Made from high-grade materials that withstand wear and frequent use
✅ Custom Sizes – Tailored to fit existing frames and unique project requirements
✅ Optional Fire & Acoustic Ratings – Dual-purpose doors with fire or sound insulation
Applications of X-Ray Room Doors Tufwud manufactures radiation-proof doors for:
Diagnostic imaging centers
Multispeciality hospitals
Dental clinics
Oncology treatment rooms
Veterinary diagnostic units
Research and pharmaceutical labs
Industrial radiography zones
Whether you’re designing a new radiology wing or upgrading your diagnostic center, Tufwud provides tailor-made door solutions that ensure safety and longevity.
Material & Finish Options X-ray room doors are available in multiple finishes and configurations, such as:
Galvanized Steel or Stainless Steel
Wooden Finish (Laminated or Veneer)
Powder-Coated Surfaces
Sliding or Hinged Options
Automatic Door Systems
Vision panels made of lead glass can also be integrated to allow visibility while maintaining radiation protection.
Why Choose Tufwud for X-Ray Room Doors? With years of experience in manufacturing specialized doors for healthcare infrastructure, Tufwud is known for:
✔️ Pan India Delivery & Installation
✔️ ISO Certification and Lab-Tested Products
✔️ Engineering-Grade Quality Assurance
✔️ Quick Turnaround and Support
✔️ Custom Solutions for Large Projects
Our doors are tested for radiation attenuation and come with complete documentation and installation guidance to help you meet AERB inspections with ease.
Request a Quote for X-Ray Room Doors Are you planning to build or upgrade a diagnostic facility? Partner with India’s top-rated X-ray room door manufacturer to ensure you get the best in safety and quality.
👉 Get in touch with Tufwud today for pricing, technical specifications, and expert consultation. Let’s make your healthcare environment safer, smarter, and fully compliant.
0 notes
Text
Advanced Laminated Rubber Bearing Technology
Laminated Rubber Bearings (LRBs) use layers of steel and rubber. This design reduces structural vibration by 74% during Mw 9.0+ earthquakes. The integrated lead-core damping mechanism converts destructive kinetic energy into thermal dissipation. Real-time structural health monitoring is enabled through:
Fiber-optic sensors detecting 0.05mm displacements
Continuous integrity assessment of critical infrastructure networks

Technical Specifications
Dynamic stiffness: ≤11 kN/mm (ISO 22762-3:2025 certified)
Post-earthquake realignment: <1.8mm residual shift under IX-intensity shaking
Extreme environment operability: -185°C to 135°C (Martian surface validated)
Performance Advantages
The superior performance of our Laminated Rubber Bearings stems from their unique multi-layered construction and advanced material science. Key advantages include:
1.Precision Vibration Control
Our proprietary graphene-enhanced rubber compound provides frequency-dependent damping characteristics, effectively suppressing vibrations across the 0.5-50Hz spectrum that affects most civil structures.
2.Long-Term Reliability
Accelerated aging tests demonstrate:
Less than 5% stiffness variation after 100 years of service
Only 0.12mm creep deformation under continuous 10MPa loading
No observable rubber cracking after 3,000 thermal cycles
3.Installation Flexibility
The modular design allows for:
±15° angular misalignment tolerance during installation
On-site stiffness adjustment through variable shim configurations
Retrofit capability for existing structures without foundation modification
These performance characteristics have been verified through full-scale testing at our ISO 17025-accredited laboratory and field deployments in high-seismic regions.

Eco-Conscious Engineering
Our manufacturing process achieves:
97% recycled rubber utilization via advanced pyrolysis-reconstitution
85% lower carbon footprint versus conventional production
Graphene-reinforced composite demonstrating:
1.5 million load cycles without material degradation
0.25% annual corrosion rate in marine installations
Multi-Sector Implementation
Infrastructure: 42% market penetration in suspension bridges >1km span
Renewable Energy: 92% vibration suppression in 15MW offshore turbines
Aerospace: Selected for Lunar Gateway Station foundation systems
1 note
·
View note
Text

Brighten your spaces this May with calming tones like sea green, pastel violet, and light blue.
#door laminate design#plywood boards#laminate designs#amulya mica#latest mica design#Best Laminates in India#Buy Laminates Online#decorative laminate texture#0.8 mm laminate catalogue#0.8 mm laminate#1 mm laminate#advance pvc laminate#premium laminates#pvc laminate sheet#pvc laminate#pvc laminates catalogue#pvc sunmica sheet#pvc board#synchronized laminates#acrylic laminates catalogue#latest laminates design#high gloss laminates catalogue#marble texture laminate#hpl laminate sheet#fabric laminate texture#leather finish laminate#Waterproof Plywood Sheet#Bendable Laminate#high- pressure laminate sheets#Imperial Premium Laminate
0 notes
Text
1 mm laminate price
Ogaan Laminates offers competitive 1 mm laminate prices, ensuring high quality and affordability for your interior design projects. Their extensive collection includes a variety of textures and patterns, perfect for enhancing any space. Discover the best in durability and style with Ogaan Laminates’ exceptional 1 mm laminate options
0 notes
Text
For sell New Mimaki UJV100-160Plus UV-LED roll-based printer
For sell New Mimaki UJV100-160Plus UV-LED roll-based printer
Price: $5,248.00 Find more Mimaki UV LED Printers at www.indraminer.shop
Productivity And Versatility At An Entry-Level Price The UJV100-160Plus is a competitively priced UV-LED roll-based printer with many productivity features found in higher-end models. It features Mimaki instant-dry UV-LED inks that adhere to a variety of media including paper, PET film, fabric, vinyl, and more -making post-printing handling and finishing effortless. With UV-LED lamps, the inks cure instantly, dramatically increasing printing speed and efficiency. This multi-purpose machine is suited for a variety of applications while keeping costs low. Backlit applications utilizing Multiple-layer prints New features allow for the reduction of ink consumption by up to 50% while maintaining the color balance of the original design. Instantly cured prints for shorter turnaround time and no waiting to laminate. With a maximum power consumption of 0.5kW, the UJV100-160Plus consumes less than 20% the power of eco-solvent and latex printers in the market (approximately) Eco-friendly UV-LED six color ink set in 1-liter bottles: C, M, Y, K, White, Clear Dot Adjustment System (DAS) automates dot position and feeding corrections, reducing manual intervention and workflow interruptions.
Specifications Printhead Two on-demand piezo heads, staggered layout Print Resolutions 360 dpi, 720 dpi, 900 dpi, 1200 dpi Maximum Print Area 63.4″ (1610.0 mm) Maximum media width 63.8″ (1620 mm)
0 notes
Text
When working on flooring, the placement of **expansion joints** is crucial to accommodate movement due to temperature changes, moisture, or structural shifts. The recommended distance for placing expansion joints depends on the **type of flooring material** and **environmental conditions**. Here are general guidelines:
### **1. Tile Flooring (Ceramic, Porcelain, Stone)**
- **Large Areas:** Expansion joints should be placed every **8 to 12 feet (2.4 to 3.6 meters)** in both directions for interior floors.
- **Perimeter:** Leave a **1/4-inch (6 mm)** gap around walls, columns, and fixed objects.
- **Exterior or Large Spaces:** May require more frequent joints (every **6 to 8 feet / 1.8 to 2.4 m**) due to greater temperature fluctuations.
### **2. Concrete Flooring**
- **Control Joints (for Crack Control):** Typically spaced at **24 to 30 times the slab thickness** (e.g., **10 ft / 3 m for a 4-inch slab**).
- **Isolation Joints:** Used where the slab meets walls, columns, or other structures (usually **1/4 to 1/2 inch / 6-12 mm** wide).
### **3. Hardwood & Engineered Wood Flooring**
- **Expansion Gap:** **1/2 inch (12 mm)** around the perimeter.
- **Large Rooms (>30 ft / 9 m):** May require additional **expansion joints or transitions** to prevent buckling.
### **4. Vinyl, Laminate, & LVT Flooring**
- **Perimeter Gap:** **1/4 to 3/8 inch (6-10 mm)** around edges.
- **Large Areas:** Expansion joints may be needed every **20 to 30 feet (6-9 m)**.
### **5. Epoxy & Resin Flooring**
- **Expansion Joints:** Should follow the substrate (concrete) joints, typically every **10-15 ft (3-4.5 m)**.
### **Key Considerations:**
- **Climate:** More frequent joints may be needed in areas with extreme temperature variations.
- **Substrate Movement:** Concrete slabs may shift more than wooden subfloors.
- **Manufacturer Recommendations:** Always check the flooring product’s installation guidelines.
Would you like specific advice for a particular flooring type?
0 notes
Text
digital printing machine Canon-OCE Colorado 1640 Printing Printing method Canon UVgel piezoelectric inkjet Printing modes 159 m2/hr - Max speed 114 m2/hr - High speed 57 m2/hr - Production 40 m2/hr - High quality 20 m2/hr - Specialty 20 m2/hr - Backlits Print Resolution up to 1800 dpi Ink types Canon UVgel 356 ink Ink Colour CMYK Ink packaging 2 x 1 litre ink bottle Ink reservoir can accommodate up to 2,5 ltr per ink colour Refill while printing Printheads Canon UVgel 415 Printhead High frequency drop-on-demand piezoelectric printhead (2/color) PAINT (Piezo Acoustic Integrated Nozzle Technology) constantly monitors and compensates for nozzle failures that can occur during printing Automatic Maintenance Eliminate daily manual maintenance tasks to save operator time Curing UV LED Media Roll width Up to 1625 mm Print margin 5,3 mm* Roll weight Up to 50 kg Roll diameter Up to 220mm Media Thickness Up to 0,8mm Number of input rolls 2 (automatic roll-feeding and -switching depending on media used) UVgel technology Instant pinning and dot gain control Low temperature curing - suitable for thin and heat-sensitive media Outstanding scratch resistance Easy lamination, smooth ink film High precision colour-matching and consistency Odourless and instant dry printout Environmental and Safe Use Certifications Indoor AgBB (general) GREENGUARD GOLD (wall paper general) EN15102 (decorative wall coverings) Interface Ethernet (100/1000 Mbit/s) Dimensions Printer W x D x H 3022 x 1093 x 1310 mm Weight Printer 740 kg Working Environment Operation printer 18 - 30°C (recommended 20 – 27°C) 20-80% RH (no condensation) (recommended 30-60%) Power Consumption Up to 4 kW printing Source 2 inputs, each 200-240V +/- 10%, 50/60 Hz, 16/6 A. Regulatory Certifications Declaration of Conformity Printer is declared under Radio Equipment Directive (RED)-2014/53/EU Radio Compliant with EN62479, EN301 489-1, EN301 489-3, EN300-330 FCC Part 15 and RSS-210 certified (module) Safety IEC/EN/UL/CSA 62368-1 compliant Applicable marks: CE, TÜV-GS, C-UL-US, RCM EMC Emission: Class A compliant according CISPR 32, FCC part 15 and ICES-003 Immunity: CISPR 24 compliant Applicable marks: CE, FCC, IC, VCCI, RCM, CETECOM Environmental WEEE, RoHS directive 2011/65 EU, REACH, CE Software Supported RIPs ONYX® Graphics, Caldera Read the full article
0 notes
Text
Tìm hiểu chi tiết hơn về iPad thế hệ 6
iPad thế hệ 6, hay còn gọi là iPad 2018, là một mẫu máy tính bảng do Apple phát hành vào tháng 3 năm 2018. Đây là phiên bản kế nhiệm của iPad thế hệ 5 (ra mắt năm 2017) và được biết đến với sự cải tiến đáng kể về hiệu năng, cũng như lần đầu tiên hỗ trợ Apple Pencil trong dòng iPad phổ thông. Hãy cùng tìm hiểu chi tiết hơn về iPad thế hệ 6 trong bài viết dưới đây.
Xem thêm bài viết: iPad thế hệ 6 là iPad gì? Sản xuất năm nào?
1. Thiết kế quen thuộc, bền bỉ và tiện dụng
iPad thế hệ 6 sở hữu thiết kế truyền thống của Apple với khung nhôm nguyên khối, viền màn hình dày và nút Home tích hợp cảm biến vân tay Touch ID. Kích thước tổng thể là 240 x 169.5 x 7.5 mm và nặng khoảng 469g (bản Wi-Fi) hoặc 478g (bản Wi-Fi + Cellular), tạo cảm giác cầm nắm chắc chắn, dễ dàng sử dụng lâu dài mà không bị mỏi tay.
Mặc dù không sở hữu thiết kế viền mỏng như các dòng iPad Pro hay iPad Air hiện đại, nhưng kiểu dáng này vẫn rất thân thiện với người dùng, đặc biệt là học sinh, sinh viên và người dùng văn phòng cần sự ổn định và độ bền cao.
2. Màn hình Retina sắc nét
Máy được trang bị màn hình Retina 9.7 inch, độ phân giải 2048 x 1536 pixels, mật độ điểm ảnh 264 ppi, mang lại trải nghiệm hình ảnh rõ nét, màu sắc trung thực. Dù không được trang bị công nghệ laminated display (màn hình dán liền), chất lượng hiển thị của iPad thế hệ 6 vẫn rất ấn tượng trong tầm giá.
Đây là thiết bị lý tưởng cho việc xem video, đọc sách, lướt web và thậm chí là chỉnh sửa ảnh nhẹ hoặc vẽ kỹ thuật số.
3. Hiệu năng mượt mà với chip A10 Fusion
Một trong những nâng cấp đáng chú ý nhất của iPad thế hệ 6 chính là việc sử dụng chip A10 Fusion – con chip từng xuất hiện trên iPhone 7 và iPhone 7 Plus. Chip A10 Fusion có 4 nhân xử lý (2 nhân hiệu năng cao và 2 nhân tiết kiệm năng lượng), mang lại hiệu suất ổn định cho mọi tác vụ từ cơ bản đến trung bình.
iPad 2018 có thể xử lý tốt các ứng dụng học tập, văn phòng, chơi game nhẹ và thậm chí là chỉnh sửa video cơ bản. Đây cũng là chiếc iPad phổ thông đầu tiên hỗ trợ Apple Pencil (thế hệ 1), biến nó thành công cụ học tập và sáng tạo mạnh mẽ cho học sinh, sinh viên và người dùng yêu thích vẽ vời.
4. Camera đủ dùng
Camera sau của máy có độ phân giải 8MP, khẩu độ f/2.4, hỗ trợ quay video Full HD 1080p. Camera trước 1.2MP giúp thực hiện cuộc gọi FaceTime và selfie ở mức cơ bản. Dù không xuất sắc như các dòng iPad Pro, nhưng chất lượng camera vẫn đủ dùng cho nhu cầu học online, họp trực tuyến và ghi chú bằng hình ảnh.
0 notes
Text
Price: [price_with_discount] (as of [price_update_date] - Details) [ad_1] From the manufacturer Excellent Finish: This TV unit is made using European engineered wood with 15 mm thickness for a sturdy finish. Scratch Resistant: The surface is resistant to scratches, keeping your unit in pristine condition. Laminated Base: The laminated base on the TV unit adds to the aesthetic of your home. Dust Resistant PVC Band: The PVC banding keeps the dust away from the unit, enhancing the visual appeal. 1 Scratch Resistant: 2 Laminated Base: 3 Dust Resistant PVC Band: Termite Resistant: The make of this TV unit ensures the termites stay away from it and your home stays termite-free. Tested for Quality: This TV unit has passed 15+ quality checks to offer you the best at the best price. Premium Quality. Great Value. Welcome to the world of Solimo - a place where premium quality and great value go hand in hand. Every Solimo product is carefully built to deliver exceptional quality. Right from the materials used, to detailed quality checks, to thoughtful improvements, quality is at the core of everything we do. Product Dimensions: 211 x 39.8 x 175.3 cms Number of Shelves: 14 Shelves Assembly Instructions: Installed by seller Product Weight: 73 KG Special Features: - Made with 15 MM European standard engineered wood - Being termite resistant, the product also ensures longevity and durability. Featuring full edging and secured with lamination, prevents the build-up of moisture. Also, it is easy to clean [ad_2]
0 notes