#﹙ the menu. ﹚: tutorials ���� ݁
Explore tagged Tumblr posts
Visit Tumblr Blog
Explore Tumblr blogs with no restrictions, modern design and the best experience.
Last Seen Tumblr Blogs


Fun Fact
70% of Tumblr users say the Dashboard is their favorite place to spend time online.
Text
CREATE YOUR OWN LOADING + MENU SCREEN TUTORIAL MASTERLIST so you won't be held hostage by AI anymore
I've decided to join info in a singular post so you will also be able to make your own stuff. You could find those on google and youtube but I wanted to place it riiiiight over your face, because I'm a fan of making everything easier for everyone. Become ungovernable, DIY! ♥
♦ CUSTOM ENTRY SCREEN
[MISSING TUTORIAL! Share if you know!!]
♦ CUSTOM LOADING SCREEN (s4pe)
youtube
Thank you @goddess-gamez !
♦ CUSTOM LOADING SCREEN (Mod Manager *curseforge related alert*)
youtube
Thank you @southernsimming !
♦ CUSTOM PLUMBOB ANIMATION
youtube
*if this is outdated, @vyxated got our backs with this bug fix
♦ CUSTOM MAIN MENU
Thanks @ellesimsworld !!
♦ FREE IMAGE DOWNLOAD SITES you can get your images from (Uncheck AI if needed)
Unsplash / Pexels / Pixabay / LifeOfPix / Vecteezy
Feel free to add if you know more!
♦ ART/EDITING/DRAWING PROGRAMS (just in case you want to make your own)
Paint Tool Sai (🏴☠️) (thank you @fangirlinginleatherboots !)
Adobe Photoshop (🏴☠️ • Multiple versions) (thank you @ruefinds !)
I think that covers it. And remember kids, bots were supposed to be doing things humans weren't capable of doing! If you can do it and there's a bot taking your place, revolt! This includes ART. Defend art! Make your own stuff and never be dependent on people who didn't want to make any effort to remain human.
#the sims 4#ts4#sims 4#simblr#the sims community#the sims 4 main menu#sims 4 main menu#the sims 4 loading screens#resources#tutorials#tutorial#main menu#loading screen#Youtube
200 notes
·
View notes
Text

Create Your Own Main Menu for The Sims 4 - Tutorial
Hey folks!
This tutorial will walk you through creating your own main menu override for The Sims 4 based on my custom repository.
_________
What is required:
JPEXS Free Flash Decompiler
Sims 4 Studio
Raster graphics editor (e.g. Photoshop, Gimp, Photopea)
Your Own Main Menu repository
_________
Step 1: Download and unzip the Your Own Main Menu repository
It's available on my Patreon page for free.
_________
Step 2: Prepare your custom images
There are two images that you need to customize:
SimMattically_YourOwnMainMenu_MainBG.pngThis is the main background image, where you want to put the desired graphic.Size: 1440px x 1200px
SimMattically_YourOwnMainMenu_BarBG.pngThis is the second background for the navigation bar on the right.Size: 480px x 1200px
Prepare your own images based on these templates. Do not change the size of the images.
Tips: If you're using a more complex background, such as a screenshot from your game, I recommend blurring the Bar_BG with a Gaussian Blur (~60px). Additionally, I suggest adding a white overlay with ~50% opacity and a 5-pixel wide white bar on the left edge with ~10% opacity. This helps improve the readability of the navigation bar buttons and adds an extra layer of detail to your menu design.

The repository also contains the optional file "SimMattically_RefreshedMainMenu_ScenarioButton.package" from my other mod, which replaces the Scenario button icon with a semi-transparent white version. It's up to you whether you want to use it.
_________
Step 3: Import the images to the .GFX file
Firstly, open JPEXS Free Flash Decompiler and then open my SimMattically_YourOwnMainMenu_Template.gfx with it.


Select "No to all" when prompted.

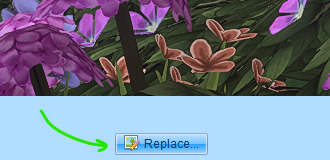
On the left, choose "images" and scroll to the bottom where you will see the images you just edited in their original form. Right-click on each and select "Replace." Select the custom images you prepared in step 2.


Save the file.
_________
Step 4: Import the .GFX file into the .package file.
Open Sims 4 Studio, then click on "My Projects" and open SimMattically_YourOwnMainMenu.package. Select "Scale Form GFX" (the one with the "gameentrylauncher" description) and click on "Import." Select the modified .GFX file and import it. On Windows OS, you need to switch from .binary to all file types to see the file.


Save the .package file via File -> Save As... Give it a custom name and place it in The Sims 4/Mods folder.
That's it! Enjoy!
_________
IMPORTANT INFORMATION/TERMS OF USE:
Main menu overrides can become outdated with some game updates, causing them to break the game. You will have to remake your custom main menu with a new, updated template in this case. Always make sure you are using the latest available template and that it's not outdated.
Since these mods can break the game, I do not advise sharing your custom main menus with other players. You are free to do so, but be aware that since you're relying on this repository to create your own version, you most likely won't be able to update the mod and resolve issues for other players on your own, so you take responsibility for breaking their game.
If you decide to share your version with other players, please credit my repository and link to my Patreon post.
Do not put your custom main menu based on this repository behind any paywall or early access. I made this repository and tutorial free for everyone, so keep it fair.
I do not take responsibility for people misusing this repository or breaking your game with incorrectly modified files. I do not provide support for custom main menu overrides created by other creators using this repository.
_________
#sims#thesims#thesims4#sims4#sims 4 mods#sims 4 custom content#simblr#s4cc#ts4#main menu override#sims tutorial
284 notes
·
View notes
Note
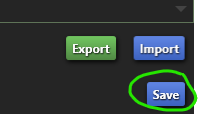
Hi, would you consider doing a tutorial for your main menu mod? It's lovely and I like how you sharpened the edges of the boxes.
There may already be tutorials about this, but I haven't found any so will do a small tutorial myself ^^ (also not quite sure what you meant by sharpening box edges, i don't think i did but lmk if i just didn't understand something)
✨🌳 Making a Main Menu Replacement for the Sims 4 🌳✨

❕ You'll need: • Sims 4 Studio • JPEXS Decompiler • Image editing software (Photoshop/Photopea/etc.)
👉 And download my TEMPLATE 🌷
🠇 Full Tutorial Under The Cut 🠇
1
🖼️ Open my template archive and get the picture templates - open them in image editing program and change to whatever you want (but don't change their dimensions, sizes and names!)
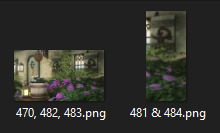
I've also included a little explanatory pic of how to create '481 & 484' image.
2
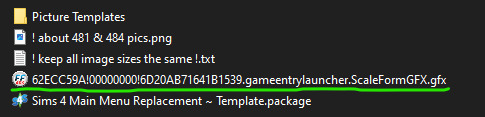
✳️ Launch JPEXS decompiler (ffdec.exe), open the .gfx file from my archive - 62ECC59A!00000000!6D20AB71641B1539.gameentrylauncher.ScaleFormGFX.gfx (In the popup warning about SWF assets press "No to all")
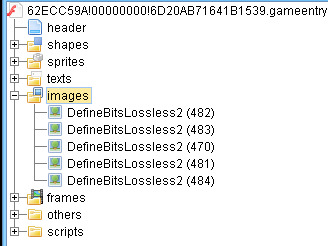
🔄 Under 'images' tab you'll see image entries called DefineBitsLossless2 (482,483...) - click on and replace each of them with your edited pics using 'Replace..." button at the bottom - according to their numbers.
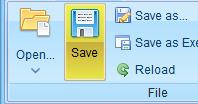
💾 Once it's done, press "Save" and close the program.
3
⚙️ Change the extension of that .gfx file to .binary (by typing binary instead of gfx at the end - you'll need to toggle 'File name extensions' in View catogory of Windows folder panel). Press 'Yes' on warning.

4
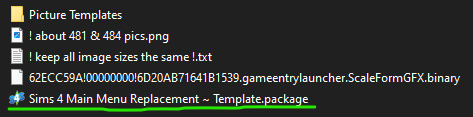
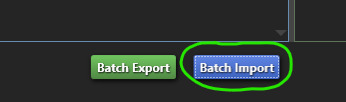
✳️ Open 'Sims 4 Main Menu Replacement ~ Template' package with S4S, press 'Batch Import' and choose the (now) .binary file you edited - 62ECC59A!00000000!6D20AB71641B1539.gameentrylauncher.ScaleFormGFX.binary. It will replace the existing entry, visually nothing will change.

💾 Don't forget to save!
5
📁 Rename the template package to your liking and put it in Mods folder. That's it! Let me know if anything wasn't clear enough ^^
~~~~~~~~~~~~~~~~~~~~
☽ CREDITS: • sigma1202 ~ Loading screen making tutorial (my tutorial is basically a copy of it with some adjustments) • @lama-lama ~ Main menu replacements (i took the initial package file from lama-lama's replacements <3 check them out, they're beautiful!)
🤍
87 notes
·
View notes
Text
Recipe tutorials
Quick meals
Healthy recipes
Vegan cooking
Vegetarian dishes
Meal planning
Budget meals
Family dinners
Breakfast ideas
Lunch recipes
Dinner options
Snacks
Appetizers
Soups
Salads
Desserts
Baking basics
Bread making
Pasta dishes
Seafood recipes
Meat meals
Poultry recipes
Barbecue tips
Grilling techniques
Slow cooker recipes
Instant Pot meals
Food prep hacks
Cooking tips
Chef secrets
Culinary skills
Knife skills
Food safety
Gluten-free
Keto recipes
Paleo diet
Low-carb options
Dairy-free
Nut-free cooking
Sugar-free desserts
Comfort food
Gourmet dishes
International cuisine
Asian recipes
Italian cooking
Mexican dishes
French cuisine
Indian recipes
Middle Eastern food
Vegan desserts
Vegetarian breakfast
Festive meals
Thanksgiving recipes
Christmas dinner
Easter treats
Halloween snacks
Valentine’s Day dishes
Cooking shows
Food challenges
Kitchen gadgets
Cookware reviews
Ingredient guides
Spices and herbs
Organic ingredients
Farm-to-table
Sustainable eating
Leftovers ideas
Kids' meals
Baby food
Cooking for seniors
Student recipes
Batch cooking
One-pot meals
Charcuterie boards
Cheese pairing
Wine pairing
Cocktail recipes
Smoothies
Juices
Coffee concoctions
Tea recipes
Plant-based nutrition
Superfoods
Anti-inflammatory meals
Probiotic-rich foods
High-protein snacks
Energy-boosting meals
Low-calorie snacks
Heart-healthy diets
Diabetic-friendly meals
Allergy-aware cooking
Culinary trends
Food vlogging
Cooking classes online
Food photography tips
Food festival tours
Culinary competitions
Chef interviews
Seasonal ingredients
Food market tours
Culinary travel adventures
#lifestyle#food#dinner#Dinner ideas#Easy dinner ideas#Dinner recipes#Dinner ideas healthy#Healthy dinner ideas#Quick dinner ideas#Easy dinner recipes for family#Easy dinner ideas for family#Dinner ideas for two#Easy dinner ideas healthy#Dinner ideas for tonight#Easy dinner ideas for two#Dinner ideas for two easy#Dinner ideas vegetarian#Quick and easy meals#Dinner ideas easy#Quick dinner ideas for 2#Easy weeknight dinners for family#Dinner ideas for two healthy#Dinner menu#Recipe tutorials#Quick meals#Healthy recipes#Vegan cooking#Vegetarian dishes#Meal planning#Budget meals
95 notes
·
View notes
Text
﹙ cafe v. ﹚ ─── A guide for tumblr text colour 𖹭 ݁


It is quite simple actually! 𖹭 Three big steps ( with some sub steps guys, you can do it, I believe in you ) is all you have to go through for you to find the colour for your blog aesthetic!
step 1 ) find a colour
first, you find the colour desired for your blog. You can do this by looking up sites such as:
HTML colour codes
colour designer ( you can play around with this one a lot !! )
or by simply looking up the hexcode of your desired colour if you already have one or more!!

step 2 ) formatting the colour into your posts
You guys still with after step 1? You're doing great! Gold star for you alright! you got the colour you want for your blog aesthetic! now, this is where it might seem a bit intimidating, but we assure you, it is not!
now, we are all excited to put in the colour, and we'd think: "it's time to put it onto tumblr!" but then suddenly you notice, that doesn't work?
that is because to put things into tumblr with colour. You must use a formatter site. odd, we know
the one we here at valentine café use is ( drumroll )
Roleplay formatter
let us show you how it is done with some small screenshots!
oh hey! good job you got on there with me! now just follow my steps, and you'll be good to go on your aesthetic adventure!
ready? okay let's go :DD !!
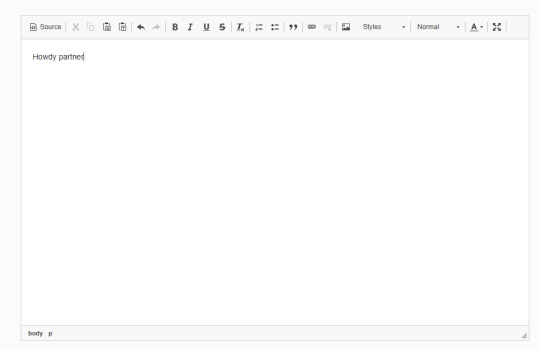
first, you write a little sentence ( you know, when eden first taught me this. I thought it'd be so complicated and hard, my brain couldn't comprehend it. I love my wife guys )

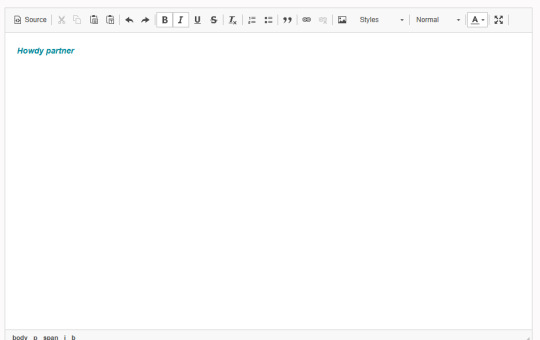
you then select your text, and then go to the little A in the corner! this is where you will find the colour options for your text, then at the bottom of the colour palate, there is an option that says "more colours"
jingle jingle jingle, pay attention. are you with? okay good! I give you a cookie and a gold star.
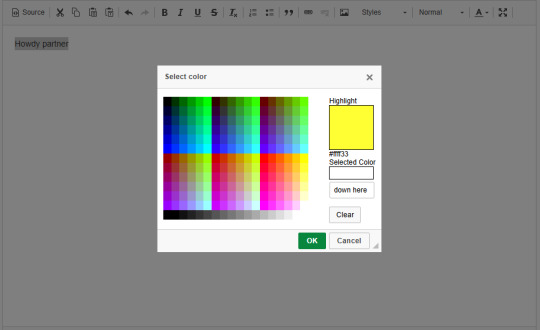
now that we are on more colours, you see the selected colour option in the corner! you paste the hexcode, right there <3
WHAPEESH, you got dat smexy colour down on your text now! What you do next, is perhaps the most intimdating of all. . . HTML ( screams of tired agony from Eden at 3AM )
You go up to the big tempting button that is called: "Source" and then you click on dat and-

oh my god bro. . . what IS THAT. That, my darling, is HTML and it looks like the link to hell I know. but this is what you use when you go to tumblr and go on the options button on post
Step 3 ) put the text into tumblr
okay guys, ( sobs ) it's been a journey. I'm so glad I can teach all of you about HTML and colour :,)) This is the last big step. . . Putting it into tumblr!! YIPPEE
What you will do now, is make the post for your fancy new text and smack that HTML onto it! But how do we do that?
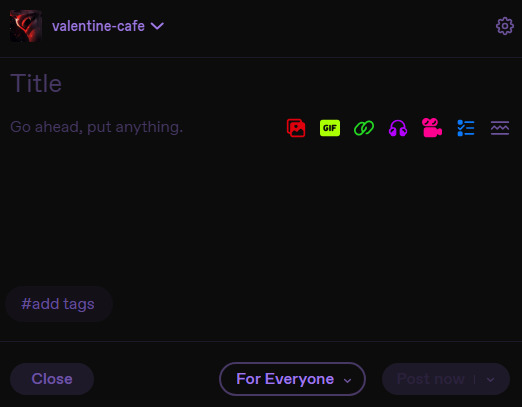
It's not too hard, don't worry, just a little clicking here and there you go onto the options and then right down by text editer!
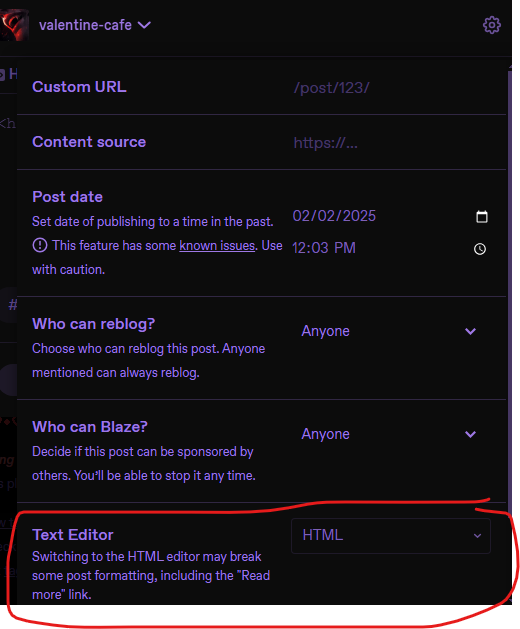
After that, your posting pop up on tumblr will tell you that you can copy the HTML you have onto the page and whambam thank you ma'am, you'll have that fancy schmancy text spread out on the paper sheet! You can sprinkle some more aesthetics onto the post even more for some extra good stuff!!
we really hope that this was of some help to those curious on how to make their blogs fit their own aesthetics more!
let us know if it helped!
15 notes
·
View notes
Text

They aren't the same thing. They aren't the same thing. They aren't the same thing. They aren't the same thing.
#cool argument but as you can see i have a visual aid#anda loves shippers#if you cant tell where characters land then you are missing foundational knowledge go back to the tutorial menu
91 notes
·
View notes
Text
my biggest pet peeve about modern fighting games is that they NEED to stop hiding their tutorialization behind the casual 'arcade story mode' gamemodes (world tour sf6/arcade quest t8). i do not want to engage with your metaverse avatars i want to read what my options are when i'm downed!!!!
#shut up mira#SC6 just had a fucking tutorial menu with text explaining everything accessible from anywhere even ingame#if my bunk-ass poverty game can do that why can't the AAA ones
54 notes
·
View notes
Text
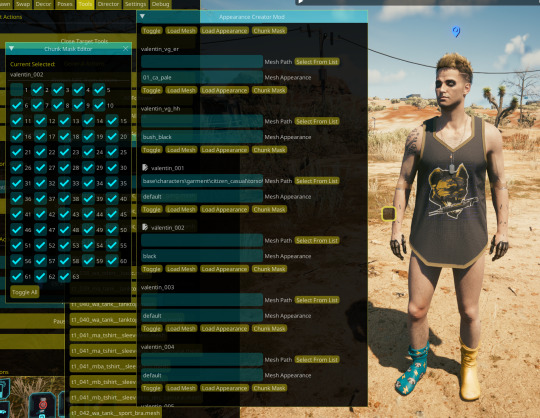
🟨 Appearance Creator Mod Infos Dump
With the release of ACM (Appearance Creator Mod) I wanted to dump some information that might be useful, especially for non-modders that want to play around with it!
(I had no involvement with the making of this mod at all, nor I have any tie with AMM development, just throwing my two cents as a regular user, player and modder)
You'll find some How To, Tutos and other useful heads-up under read more, if you plan on using this mod as a modding tool (sketching up outfits ideas before modding them as custom appearance for your blorbo for example) or simply want to play blorbo dress up!
━━━━━━━━━━━━━━━━━━━━━━━
First, You might want to get familiar with these suffix, as you will need to identify what part of a character's outfit you wanna swap
▶ Garments Components Names
h0 - Character's head mesh he - Eyes mesh heb - Eyebrows mesh ht - Teeth mesh hx - Head's details meshes (pimples, makeup...) hh - Hair mesh t0 - Character's Body mesh t1 - Torso Inner Garment (T-shirt, Tank top...) t2 - Torso Outer Garment (Vest, Jacket, Hood...) a0 - Character's Arms mesh (Cyberarms...) l1 - Legs Garment (Pants...) s1 - Feet Garment (Shoes, Socks...) i1 - Accessory / Item Garment (Cyberware, Belt, Necklace...)
▶ Garments Rigs Names
ma - Man Average mb - Man Big mc - Man Child mf - Man Fat mm - Man Massive wa - Woman Average waf - Woman Average Fat
━━━━━━━━━━━━━━━━━━━━━━━
⚠ It's important to note that Garments are NOT automatically refited to the character! You can use a WA garment on a Male NPC but it won't magically fit his shape
⚠ Johnny and Kerry, despite using the MA rig, both have a thinner bodies and most of the garment will float and appear larger on them
⚠ A lot of Garments have their own RIGs and physics, and might T-pose / break upon being swapped on your NPC of choice! For this reason, Hair with physics will automatically break as well
━━━━━━━━━━━━━━━━━━━━━━━
AMC is a standalone window in game, and not included in AMM main window!

After spawning a NPC, the AMC window should fill up with the spawned entity's garment components (and yes it can get crowded really quick, especially on smaller monitors and resolution)
Yes, It also works on NPVs and NPC+! 🔥
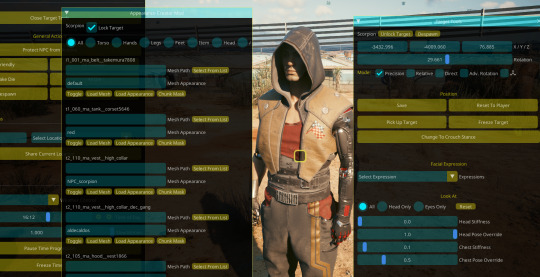
Everything on these windows can be overwhelming especially if you're not familiar with modding, so I'll throw a little example here using Scorpion
First I want to get rid of his hood and vest, without using AMM's custom appearance, using only ACM
In the list, I look for his Vest and his Hood component

We can easily turn them invisible by clicking the "Toggle" button Make sure to also disable any decals, stickers, and additional component (his vest also has a decal component, see in the screenshot)

The little icon next to a component's name indicate it has been edited in some way
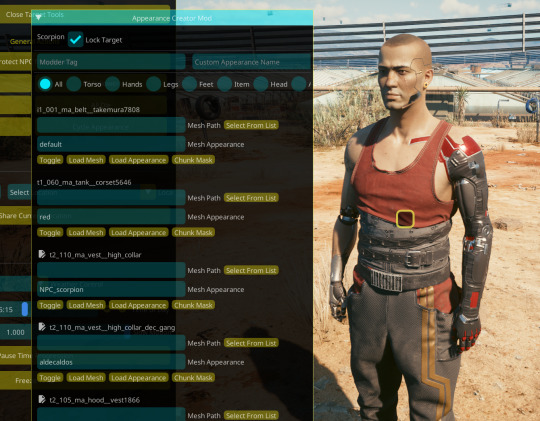
I'll now switch his tank top for something else
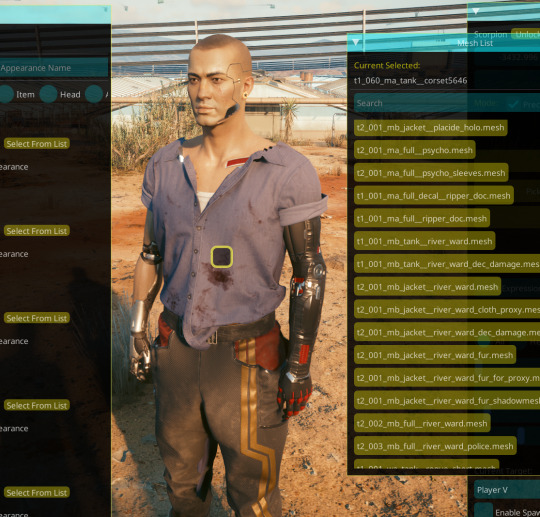
Click on "Select From List" next to the "Mesh Path" of the desired component (in Scorpion's case, t1_060_ma_tank__corset) Open up the "Torso" list, and you'll be able to click on any of the listed t1 and t2 garments!
⚠ As mentioned above, garments doesn't magically refits on characters; Scorpion use the Man Average body and rig, anything that isn't a "ma" garment won't fit him correctly!
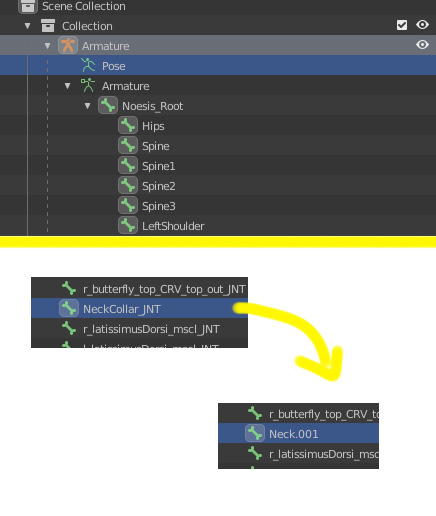
⚠ Another thing to be aware of is that a lot of garments's might break around the collar area! However if you plan on using this same mesh in an outfit, don't let that scare you, as it's easily fixable in blender
Export your desired mesh and look for the "NeckCollar_JNT" bone and simply rename it to "Neck" (blender will put some numbers next to it but that's fine, ignore that)
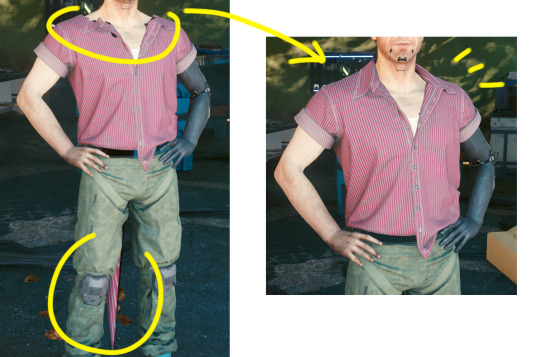
I'm going to switch to Valentin here to showcase how to deal with potential clipping 🤏 Since Valentin's body is customized, bit chubbier, he always needs refiting
Let's say you swapped your character's top for something else but part of his torso clips out

To put my boys titas away, I'll look for his body component (t0)
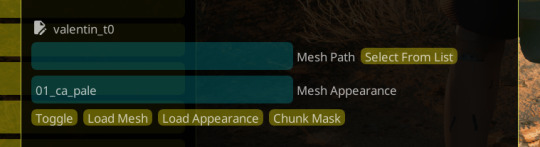
Click on "Chunk Mask" to open the garment's submeshes list
Garment's meshes are broken down in multiple submeshes that can be easily chunkmasked (disabled) at will to deal with clipping! This is why NPC usually don't even have a full body mesh when taking off their clothes, they are chunkmasked to avoid clipping :D
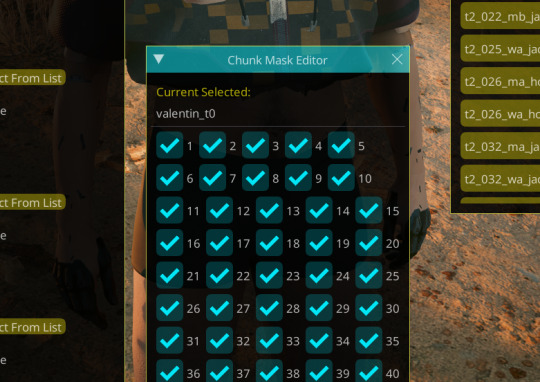
I will disable the Submesh 1 by unchecking the "1" box
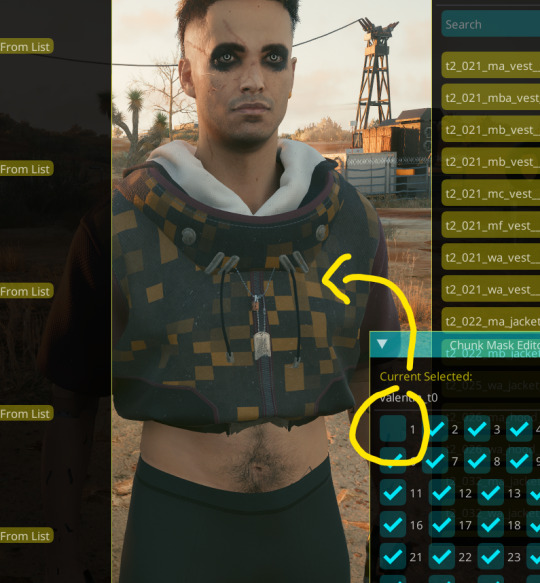
Don't be afraid to click on multiple box and see what gets chunkmasked on different meshes! You won't break anything 👌
aaand for now that's about all I can think of that might be confusing for users- tho if you have question don't hesitate to ask on this post, to reblog or to come into DMs!
114 notes
·
View notes
Text
New Game+ Tutorial
"I don't remember this part of the story." "It's been so long since I played X expansion." "What happened during that raid again?" "Who was this character?" "I story skipped the MSQ/job quests so I don't know what happened and who these people are!"
There's answers to this, friends. Not only is the game's own Unending Journey (in inn rooms, or as furnishing in your FC or private rooms/homes) able to replay many cutscenes, and there's the completed quest log, but there are places online, such as Garland Tools and the FFXIV Game Script, that keep most (not all) of the quest text handy.
But if you want to relive those quests, and/or get the side dialogues and replay (or first time play!) the experiences, as of Shadowbringers 5.1 there's a feature called New Game+ to allow that.
New Game+ (or NG+) will let you replay past questlines, at your current level (which makes it go pretty fast in a lot of cases). There is No experience or rewards to gain through this feature--no using it to level alt jobs. It purely exists to allow experiencing, or re-experiencing, completed content.
Once defeating the Ultima Weapon and Lahabrea at level 50 in ARR's finale of 2.0, you can go to Vesper Bay and find the Wistful Whitebeard.
More info and images below the Keep Reading cut...
(image taken from gamesconsolewiki and their article on this feature.)
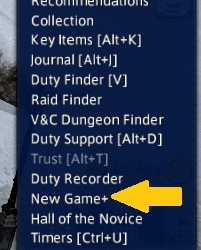
Once you've unlocked the feature by talking to him, you get a new menu option in your Duty menu (the exclamation point icon), right between Duty Recorder and Hall of the Novice.
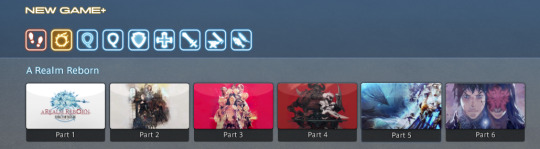
Once you select the feature it brings up a menu of options; it usually defaults to Main Story Quests, but I also have a paused replay under "Suspend" in progress. There are also options that match other quest interfaces, like your Journal or the Unending Journey; Chronicles of a New Era for raids and trials, Side Story for quests like Hildibrand, the Scholasticate, Role Master Quests, Void Quests, and Chronicles of Light (story important side quests, like Tales of the Dragonsong War, Tales from the Shadows, Tales of Newfound Adventure). Tank, Healer, DPS, Crafting, and Gathering quests also have their own categories.

Each Expansion MSQ is broken into parts; usually 2 parts for the x.0 main expansion, and then 2 parts for the patches. They're only available after x.0 or the patch stories are complete.
Also notice the "Help" icon in the top right of the NG+ overlay; it opens a pretty comprehensive guide, divided into menu sections, about how the feature works.
ARR is split into 6 parts, and I do think 2.0 could use a rework in how they're split but for now, I'm selecting Part 6 to look for specific side dialogues that only exist in this timeframe.
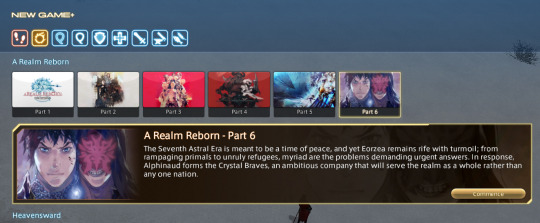
Selecting Part 6 opens the description; the Crystal Braves have just been formed, to help the Scions with the turmoil still facing the realm--from refugees, to Garlemald's continuing threat, to primals and Ascians.
Once you do, the NG+ quest info shows up, usually around where ever you keep your MSQ quest marker. I hide my MSQ tracker once it's done, so NG+ fits in that same spot in the upper left for me.
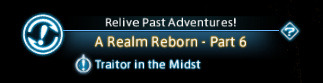
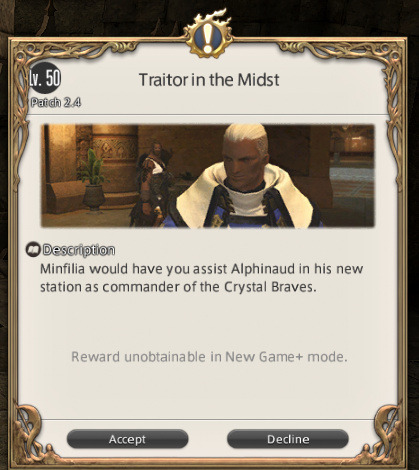
It tells me to "Relive Past Adventures!", which expac and part I'm in, and which quest is my starting point in this case, "Traitor in the Midst", the start of the Ivy spy plotline in Patch 2.4.
From here it progresses as if I am back in that patch and on those quests, but without any experience or rewards. Aeryn's in her current level 90 appearance and skills, making it easy to skip past and handle level 45-50 enemies in these zones.
So long as I am in NG+, I cannot do current quests, plots, or other content; I can't complete new current level duties (duties new in NG+ itself are fine), I can't access the MB, my retainers, or the Unending Journey. I can manually Suspend my current playthrough, or performing some of these actions (like duties) will automatically suspend my NG+ playthrough. You also cannot start NG+ while doing certain things (like some quests, such as leves).
This also will not let you play through the start of other city-states, only your original starter town. Solo duties will let you choose their difficulty immediately, without having to fail them first like in normal play.
If I want to drop my NG+ save before I've finished the replay--maybe I found the info and screenshots I wanted--I can delete the save.
This is an extremely helpful feature that can be used to replay events and quests, either for the fun of it, or because you want to find specific dialogue or lore information that only exists in a specific point in game. Maybe you want to visit old friends lost along the way, or take new screenshots of your WoL as they are post-fantasia.
Maybe it's just been a few years, and you've found you've forgotten some things and want to remember how the story actually went, especially knowing what you know now.
36 notes
·
View notes
Text
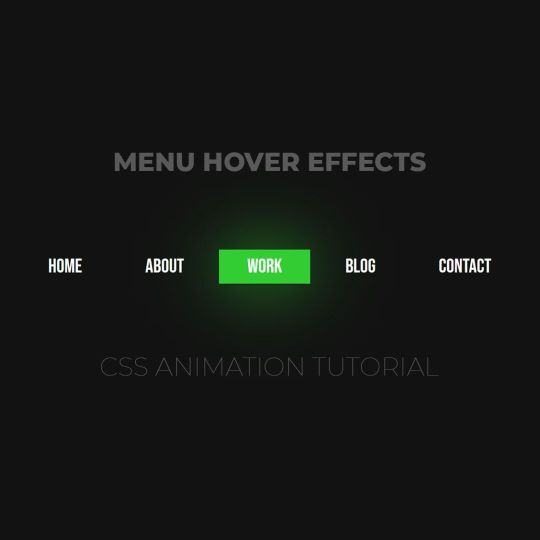
Animated menu hover
#animated menu hover#css menu hover#html css#html5 css3#codenewbies#frontenddevelopment#webdesign#css animation examples#css animation tutorial#pure css animation#css#html css animation#css menu#html css menu
7 notes
·
View notes
Text
the difference between blender tutorials and live2d tutorials is so fucking funny bc every blender tutorial assumes you're technologically illiterate and only doing this because you've read somewhere that 3d modelling is a Hot Disruptive Tech Industry Career. and every live2d tutorial assumes you're an arcane virgin who has touched more mechanical keyboards than blades of grass and that your horniness and fervent desire to be a streamergirl somehow gives your brain superpowers that allow you to telepathically link with the software and intuit every single ui element as soon as you see it
#'heres how to make a cube (30 minutes long)' vs 'you already know which deformer type to use. kill yourself.'#cant wait to get into rigging in blender when this completely flips and im back in anime loserland#i feel like im being talked down to by all these blender men. fuck. thanks for showing me the menus though#disclaimer. im sure nobody who uses either of these programs fits into either of these stereotypes but boy do these tutorials say they do
14 notes
·
View notes
Text

CSS Menu Hover Animation
#css menu hover effects#css menu hover animation#css menu hover#html css#frontend#css#html#frontenddevelopment#webdesign#css3#html css menu#css menu#css animation tutorial#css animation examples
9 notes
·
View notes
Text
if I could instantly download a probram into my brain so I didn't have to learn it I would pick unity hands down .. I want to make a vrchat Avi and blender I get well enough but unity is my nemesis
#its just so far out of my realm. at least in blender its like. sculping and drawig#guy who has trouble conceptualizing abstracts not linked to visuals when he has to work with numbers and menus#dont give me advice or tutorials i have those i just dont WANT TO i want to already knoe it. ughhggkf#begrudgingly doing the work#my bemoanings#im talking more cus my sleep hours are wack rn and all my friends are asleep. sorry tumblr
18 notes
·
View notes
Text


rigging vs. weight painting
every joint i place i can vividly imagine mistys polygons going to valhalla because my face count is so low it counts as a crime against humanity
#3d art#maya#blenders a whole other beast i keep mentally seeing peoples blender rigs and going 'but.. but where are the controllers??'#i could find out if i watched a tutorial yes. its probably easier than the 10+ part maya one. but. breakdances#did you know in maya you can also use a spreadsheet ass menu instead of qeight painting ? its very very evil but kind of cool!
6 notes
·
View notes
Note
How can I start modding?!
To mod, you need to own the computer version of the game. Most importantly, the original Steam version (otherwise it won't work).
Once you have this set, you just go to Nexus and download the Tlou debug dev menu mod by Goghor (link here).
The installation is a bit tricky. If you have never installed mods in any game before, I recommend to ask someone who has experience. If you want to try it on your own, I advise you to download Vortex (which should be on the Nexus page) and install it via this utility.
When you finish installing Vortex, make sure to connect the game to it. It should be easy, but if you don't know how to do it, I'm sure there are a lot of tutorials on the internet. It's necessary to connect the game to it before doing anything else.
Then, when you're done connecting the game, go to the link I attached, and on the right, you'll see an icon called "vortex." Once you click on it, it should install the mod right into the game without you having to deal with it manually. This is perfect for beginners; this way you can be sure you're doing it right.
Then, after all this is done, the real fun begins. I'm not even shitting you when I say I spent over 5 hours figuring out how to work with the freakin' mod. I couldn't find out how to turn on the free roam camera, and it was driving me crazy.
So, just in case you went through all the previous steps and got the mod into the game, here's a little help on how to work with the dev menu!
Once the game launches and you're in the main menu, you need to open the dev menu to activate the mod. To do it, you need to press [CTRL] + [~]. When the little window in the left corner pops up, don't bother with the "camera" option. It doesn't work. To use the free roam cam, you have to go to "display" and press [1] - the one above Q and tab. This should open a quick menu. From here, you just go to "manual camera" and you're good to go.
This is what it should look like before you press [1] and the manual camera option shows up.
I'm from Europe, and the keys work just fine for me. But I heard some people have trouble opening the dev menu with the keys mentioned. For those who can't use the [CTRL] + [~] option, try [CTRL] + [ ' ] to open it.
If you don't know where to find the [~] button, it's under the ESC key on your keyboard. The [ ' ] is basically the apostrophe you use in English grammar.
Also, when ready to mod, I highly recommend connecting a controller, because the manipulation with the camera is pretty sketchy, and unless you want to fall into mild rage, this is the easier way.
I wish you the best because I almost lost my fucking mind learning to work with this, lmao. So good luck!
#tlou debug dev menu tutorial#the last of us#tlou#tlou game#the last of us part 1#goghor#nexus mods#elliespuns answers#tutorial
10 notes
·
View notes
Text
The funniest fiber arts BS is doing your current fiber-art-of-choice project while playing a youtube video tutorial about a completely different fiber art
#art#fiber art#crochet#knit#(i'm crocheting something and watching a youtube tutorial about a knit hat that i have never even attempted)#the worst thing is that i've watched this specific video multiple times while crocheting#also the worst thing is that i'm sat in front of my laptop on the sdv start menu (i was GOING to play some)
18 notes
·
View notes