Kids These Days seem to use Tumblr purely to store gifs and instagrams. Like the closets of yore, mine is full of invented monsters. my homepage
Don't wanna be here? Send us removal request.
Text


I miss doing longform project writeups here; it's been a while! I recently replaced the old stock stereo in my 2009 car with a modern system (nothing fancy, just a super basic bluetooth stereo because I was tired of not having the AUX cable adapter for my phone since phone manufacturers decided to hamstring the world's phone users by removing AUX jacks).
It came out surprisingly affordable to upgrade, at $62 total! After-tax cost breakdowns:
Bluetooth stereo: $23
DIN dash trim (Metra brand): $20
Radio wiring harness (also Metra): $10
Antenna wiring harness (optional): $9
Replacing an older stereo is theoretically straightforward, but annoying in practice because you have no idea what you need until you actually open up the car and realize you were supposed to buy another simple part they didn't tell you about. I got mad and wrote this post up because I had already yanked the old stereo out of my car before realizing I was supposed to buy a wiring harness, and then my car dash had a big hole in it for a few days while I waited for it to ship.
What you need to wire up an aftermarket stereo:
The stereo kit, which should come with plugs that are compatible with the stereo itself
"Dash trim kit": the molded plastic piece on your dashboard that components are mounted into. It should be made for your particular car. This is only necessary if your new stereo mount is different from your old stereo mount.
"Radio wiring harness" (connects stereo to power & speakers) and "antenna wiring harness" (if you also want radio reception). These are sockets matching the proprietary connectors for the wires coming out of your car.I had to buy mine online because my car is 14 years old. If your car is newer then you may be able to find the parts at a local auto store.
Either soldering equipment (soldering iron, solder, electrical tape, wire stripper, and "helping hands"), or you pay someone else to install it for you, in which case you probably aren't reading this post lol
(My new stereo conforms to the "single DIN" dimension standard. DIN sizing is blessedly standardized across cars. Single DIN is the smaller size that lets you install a little snack compartment or drawer beneath your stereo, and double DIN is the bigger size that's usually used for a touchscreen.)
You probably can't just buy a single cable that will connect your new stereo directly into your car, for many reasons. Car manufacturers are based all over the world, and cars in general are extremely non-standardized. Different cars and stereos all use different plugs, and it would be too difficult for each stereo manufacturer to provide a different wiring harness for every possible car model out there.
Also, it is beneficial for every electrical connector in your dash region to be shaped differently, so that you can't accidentally plug it into the wrong socket. At first I was annoyed to see five totally different proprietary connectors when I opened up the dash, but after failing to label three of them, I was very glad that they were all different shapes.
So unless you wanna sit in your car soldering your stereo directly to your car with no takebacks, you probably want to make yourself that custom stereo<>car cable by getting the radio wiring harness & antenna wiring harness that fit your car model, then soldering them to the cable that came with your stereo kit. Thankfully my cables seemed to come with a standardized coloring scheme for the wires, so it was easy to match them up.
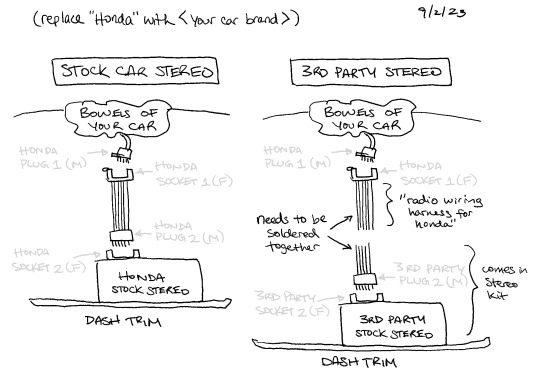
Tools you need to replace your old dash & stereo (I winged it with whatever was in my toolbox...but most people have fewer tools than me)
Either an auto trim remover kit, OR two small pry bars, a flathead screwdriver, and something long and flat such as a butter knife for leverage
Philips screwdriver -- a ratcheting one is helpful, but not required
Any additional tools as recommended by your car's service manual (or friendly local Youtube). For example, my car's service manual called for an 8mm socket wrench with a 6" extender to remove a bolt securing the stock radio.
Having two mini pry bars was helpful for taking off the retaining clips without breaking them. They are very fiddly.
Also, my stereo felt slightly wobbly in its thin sheet metal mount. So I stuffed a bit of cardboard between the stereo and the snack compartment as a makeshift shim, and am just crossing my fingers that something so close to the back of the engine won't catch on fire. Maybe the proximity to the AC helps.

3 notes
·
View notes
Text

the way I wrote this is obviously inspired by Tumblr, so give back to the Tumblrverse, I must.
(you can find my children at IG: @chaos.children)
3 notes
·
View notes
Photo

It’s been a while, tumblr. I drew this after seeing a few ship dynamics posts and obviously the only place I could possibly post this was tumblr. If you have any fiction to recommend me based on this, I’m all ears. Chaotic Found Family is definitely my favorite dynamic of all time.
If you couldn’t already guess, I was thinking about Avatar: The Last Airbender (not a kids’ show!!), N.K. Jemisin’s Broken Earth trilogy (The Fifth Season), Tamsyn Muir’s Locked Tomb series (Gideon the Ninth), and the Grishaverse (TV adaptation) while drawing these.
#ship dynamics#dynamics#found family#chaotic found family#ot3#trauma bonding#enemies with benefits#platonic#platonic soulmates#platonic relationship#sun and moon#avatar tla#grishaverse#the fifth season#the locked tomb#griddlehark#gideon the ninth#battle couple#battle twins#palamedes sextus#camilla the sixth#only on tumblr#tumblr meme#I am trash
1K notes
·
View notes
Photo


Had to regenerate a new batch of my self-care pocket checklists for an upcoming trip (we may have different definitions of necessity) and figured I might as well document why the details which may seem so natural in the end result are wildly unnatural to execute.
Lamination film doesn’t just magically hold like magnets, of course -- it’s gotta have a margin around the object it contains, so it can adhere to itself. But since you have to arrange objects in your lamination pouch by hand and then delicately lift the pouch into the machine, there will inevitably be some misalignment. So one pain about laminating many small objects is that you have to spend extra time cutting all their edges individually, and you can’t scale by cutting in a grid.
This little Kadomaru corner cutter is my raddest (only?) papercutting investment other than the straight cutter. It cuts three incremental sizes of corners, which is perfect for cutting internal corners with one corner size and external laminate corners with the next size up. I do the same for my tiny A8 notebooks, cutting the cover corners to the next size larger than the page corners.
(As usual, I attained this process by making everything up as I went along -- there may well be a more efficient way that my future self will be kicking me for not realizing earlier. If so, please drop me a message.)
#process#detail#constraints#papercraft#paper#self-care#tiny#smol#physical#design#graphic design#instructable
7 notes
·
View notes
Photo


Long after Merry’s impromptu band “Avotado Coast” laid down 60 seconds of sick tunes at a house party, I’ve synesthetically dreamt of rolling hills and subtly-wrong-on-second-glance but wholesome linocut design. Is it a national park? A bluegrass band? A brunch food? Why is the sun a giant avocado? THE WORLD MAY NEVER KNOW
Absentmindedly sketched it on a sticky note while sitting across from my coworker’s laptop’s excellent collection of uplifting national park stickers, then stayed up way too late turning it into an illustration. It’s rare, but sometimes the original unconscious sketch really works out for the final concept!
Prints & things @ Redbubble
#hand lettering#lettering#illustration#linocut#style emulation#indie band#misleading#avocado#avocado toast#wordplay#spoonerism#process#nature#wholesome#graphic design#fonts
3 notes
·
View notes
Photo

my primary problem shopping as an androgynous lady too small for menswear is that the default thesis of the vast majority of women’s clothing, even basic shirts, is heavily centric on the demonstration and accentuation of boobs so now I pretty much get clothes by setting price alerts on ebay because I have small-boobs privilege
no offense to women who love dressing feminine keep doing whatever makes you happy, I just do not identify strongly enough with my own boobs to give in any more to necklines that point at them (even though it is a struggle to find ones that don’t)
#androgynous#fashion is hard#comic#boobs#shopping#rfong#autobiographical#flat chest privilege#setitandforgetit
1 note
·
View note
Photo

home taking antibiotics and tiny sips of soup. the only hobby I am lucid enough to viably do right now is comics (which requires a certain threshold level of insanity on my end anyways)
#strep#sickness#PSA#hygiene#uvula#trashbody#bandolier#solo cups#tea bandito#comic#rfong#autobiographical
6 notes
·
View notes
Photo

if you’ve ever heard me nattering about these rope darts and poi and what-have-you, here’s the deal SPINNY THINGS: CONTINUOUSLY & RELIABLY CURING MY DEPRESSION SINCE 2015
and with that I’m gonna pass outtt
#comic#depression#spinny things#flow arts#shoulder devil#too sentimental to be punchy#tiny antispins#poi#flipping myself off#self care manual
2 notes
·
View notes
Photo


If you are unfamiliar with the gloriousness that is the Sesame Street Martians / Yipyips, may I recommend the episode “Martians Discover A Radio”
I prefer my occasion-wear to be highly reusable throughout the year and in daily life, so true to form, I’ve been wearing this thing around the house constantly. I mean, it’s basically a soft security blanket with tentacles. Or a kigurumi without a front or bottom.
This costume was all about proportion. I wanted the open mouth to be massive and formed by my encircled arms, so I put in 24″ of fabric allowance to let my arms be all the way up or all the way down. I folded the rim of the mouth inside, sewed in a partial tube so I could stick my arms in it to flap the mouth around, but easily take out my hands to use them. The effect is that if I’m just standing around chilling, my costume is in a continuous state of open-mouthed horror, which is ideal.
The hood is traced off a kigurumi hood, although I might need to do some more tweaking there as the hood shape I made is a bit froglike and doesn’t really match the top of the martians’ weird yipyip mouths.
First draft was haphazardly basted together out of a cheap fleece blanket in our throwaway bin -- I cut pieces oversize, pinned them while holding them up to myself, and just adjusted the sewing as I went. The body is formed by four pieces: a rectangular front panel, two side panels that taper forward to give the mouth a bowl shape, and a narrow back piece that comes down from the hood.
The first draft slid off my shoulder easily because the hood and body are so wide. I tried fixing this by configuring elastic like backpack straps, but found this too uncomfortable. I instead made the hood start higher up and narrower to pull in the shoulders. Once I had basted things to my general liking, I measured them and updated the diagrams in prep to cut up the nice fabric.
Final version: A plushy queen size (90″x90″) blanket I snagged for cheap; I ended with about a quarter of the blanket to spare. The tentacles are simply a 24″L x 50″W piece that wraps all the way around the bottom hem, cut in a wide fringe, sewed into ~4″ wide tubes turned inside out. I made an additional tentacle sleeve that starts from inside that I can stick my arm in it and poke at objects, but the mouth looks best when I am operating it with two arms, so I may not use this option often.
Eyes: I found some 4″ styrofoam balls literally on the floor of our house. The texture was kinda gross and flaky, so I covered them in white scrap plush. I figured a baseball style seam would be the simplest to make a sphere -- basically cut out two giant menstrual pad shapes for each sphere (I made a draft first on the crappy fabric), pin ‘em together, lazy stitch most of the way until you have to turn it inside out, and then pillow stitch (I think that’s what it’s called) to close.
Antennae: Fluffy 18″L “colossal pipe cleaners”, which I guess is a thing that exists! Dang.
Mask: A very thin black neckwarmer I already had on hand. I do own a black morph suit, but their hoods are tight and it’s also kinda nice to not have to get completely naked to take a bathroom break.
Yip yip yip yip yip yip! NOPE NOPE NOPE
3 notes
·
View notes
Photo

no one should be surprised at this point. I’m going to be in Japan during persimmon season and I won’t shut up about it! can’t wait to start seeing persimmons in stores here, any day now
previous persimmony adventures
#persimmons#rfong#maybe I have a vitamin deficiency#comic#guide#educational#trivia#food#instructable
40 notes
·
View notes
Photo


So long as I am wearing pants, I am nearly never without a Field Notes notebook, and have boosted my personal productivity through the roof by always having on hand measurements for projects, new friends’ contact info, and random ideas for projects like this. Can’t do without a paper exobrain.
When I was at Oregon Country Fair a couple months ago, my friend wanted to take notes too, but he didn’t have a pen or paper, so I ended up keeping post-its in the back of my Field Notes for him, and I realized how critical analog note-taking has become to my daily life (be it a stack of post-its in my back pocket or a proper notebook). So I decided to make tiny notebooks to give out as gifts at off-grid events.
You could theoretically buy mini notebooks at the Japanese dollar store, but when something is overtly productized, I find I am more averse to start using it for the first time. Thick notebooks with super fancy printed covers and archival paper are super appealing, but have never started writing in one because they are too nice. The non-committal smallness (48 pages) and kraft paper roughness of Field Notes makes it easy to just start writing, so I heavily emulated them.
I bought some 100lb kraft cardstock, took out my paper cutter and some plain printer paper, and started chopping to see what worked. Field Notes are 3.5″ x 5.5″. I tried scaling down about 60% to 2-1/8″ x 3″, meaning the unfolded cover was 4-1/4″ x 3. I could cut 6 of these from a single sheet. Folded in half, this yields 12 sheets or 24 pages, which sounded like a perfect little pocket-sized amount of writing surface for a 3-day event.
I made one sacrificial notebook with the cardstock and inner paper cut to the same dimensions to see how much the pages would stick out when thickly folded in half (answer: about 1/16″), and then compensated all future inner pages by cutting them (unfolded) at 4-1/8″ x 2-15/16″. Field Notes probably has some kind of fancy machine that cuts everything flush once it’s bound, but I was just using a plastic cutter and wanted to keep it simple.
I stapled & folded them in the center and used my Kadomaru corner cutter to round off all the corners, doing the cover separately and about 3 inner sheets at a time. Then a quick "property of” inscription and done -- it was a super gratifying 2 hour hackathon. I really love turning simple, featureless materials into utilitarian nuggets.
Gonna go find some mini pens before leaving to give out with these :) ### EDIT ###
After excessively extensive research, the writing utensils I ended up getting to give out with these: Paper Mate InkJoy mini retractable ballpoints (4.5″L), and this ultracheap pack of mini mechanical pencils (3.75″L).
Now that the assembly line process is down, each batch of 6 (discretized to a single sheet of cover stock) takes half an hour.
#paper#papercraft#notebooks#paperexobrain#diy#gifts#gifting#tiny#instantgratification#physical#instructable
0 notes
Photo

new canonical illustrated guide to how to tell me and my housemate Yan apart, with obligatory regal Reese included for free
3 notes
·
View notes
Photo

morning tablet doodle of an extremely textural fallen tree by our hot springs campsite
1 note
·
View note
Photo

Kaden's mandolin
1 note
·
View note
Photo

For the past couple of years, my indoor practice space has been a weirdly-shaped trapezoid of living room with foam puzzle mats and a slightly cracked mirror we picked up for free that leans haphazardly against the wall. It’s the space I spend the most time in aside from my room, so I decided to make it suit its function a little better.
This mirror is heckin’ heavy, not to mention sharp-edged, and obviously couldn’t be trusted to plastic mirror mounts. I had just finished making a router table, so I decided to make a mount sort of like a photo frame: by routing a channel the depth of the mirror out of the back of some solid wood trim, and then screwing the trim into studs. This would give the mirror a very sturdy base to rest on top of, and it would be snugly held against the wall along its entire length.
Since I wasn’t planning to frame the sides, I made the trim a little longer than the mirror for aesthetic reasons.
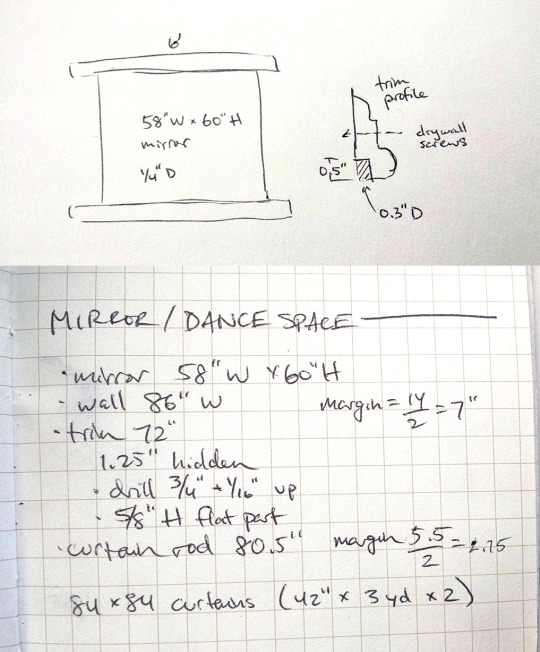
yay routing! checking the depth fit

before, ew. there was a surprise outlet behind the perma-leaning mirror!

predrilling the trim to line up with the studs (the only reason I cut them in half was to fit them in my backpack on the way home)

I highly recommend recruiting a helping hand to hold things level, but if you are #foreveralone like me, you can pull fun stunts with your feet

janky mirror up! I also mounted a pegboard on the left to hold my spinny props.

As the largest open space in my house, this area does double duty with my housemates’ VR setup (note the sensor mounted at the top right), so we need to be able to quickly cover all the mirrors to minimize sensor confusion. I picked up 5 yards of cream lining from the fabric store and sewed a tunnel top to make some sweet floor length curtains. Bonus: they make the space look bigger and conceal the cracked mirror edges :)

0 notes
Photo


It’s settled: I’m in love with my wood router. Here are the chronicles of the simple/fancy router table I designed for it.
At heart, a router table is just a thing you use to mount your router upside down, so let’s be real: the only component that actually matters here is a copy of your baseplate pattern on a piece of plywood, which you can just trace if you want something quick. Unfortunately, I am a fancy lady and wanted a couple of extra bells and whistles for convenience.
(You could do everything here using only a router if you wanted, but I used a lasercutter for most of it since I happen to have cheap access to one.)
I started by measuring my horrifically proprietary baseplate, which had some truly annoying offsets (this is a problem common to all router baseplates). Like, why differ the spacing of the top and bottom pairs of screws by only 2mm? clearly so that people will throw up their hands and buy your mounting hardware out of sheer frustration
I didn’t want to buy an entire box of metric screws just to get the four measly M4 screws I needed for mounting. Fortunately, a friend saved me by "finding” some at work.
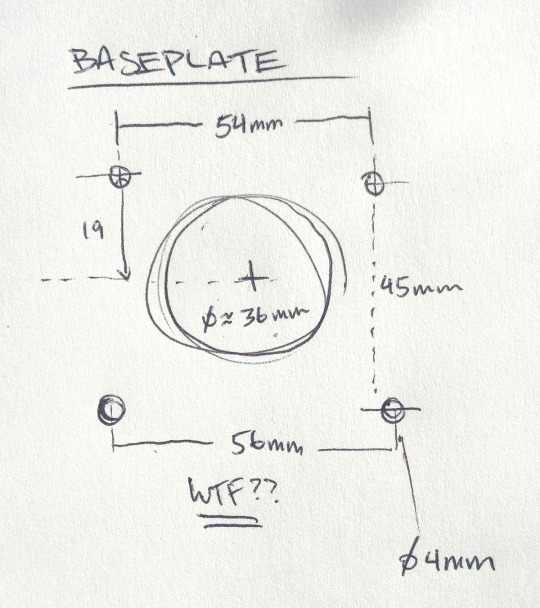
I futzed around on a 12x24 area in Illustrator to make the template. I only wanted the table to be about 16″ long for portability, so I used the remaining area for a fence and an ergonomic push stick (AHEM NOT A SEX TOY).

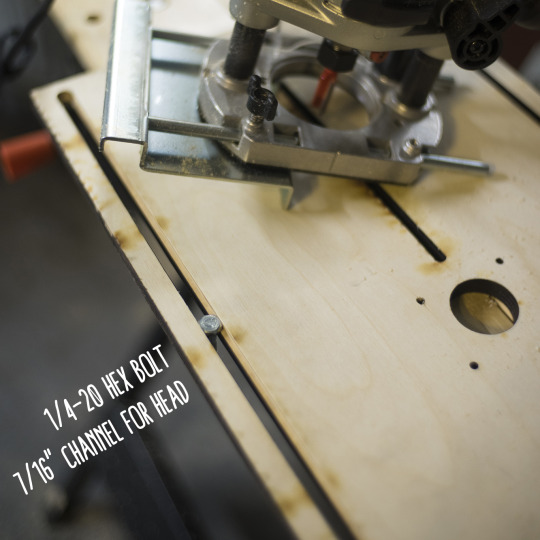
A fence is a straight guide for feeding material into the router at a particular offset. Again, you could just get away with clamping on any old straightedge, but I don’t like carrying around extra clamps for contingencies; those things are heckin’ heavy. So I picked up two 1/4-20 hex bolts and wingnuts, ran slots down the length of the table to make it super easy to adjust, and decided to etch ruler marks into the sides of the table to make it easier to eyeball whether the alignment was roughly even. The center slot doesn’t actually have a purpose right now; I just figured it would come in handy at some point in the future, maybe for circle cutting.
I then lasercut the DXF from a 1/2″ thick piece of nice birch craft plywood (again, I’m a fancy lady; you could just use whatever sturdy plywood you have lying around). Note that in the final design I decided to make the board a little narrower and cut it entirely self-contained within the plywood, as opposed to just making one straight cut across. This is to ensure that the edges are squared, which is rather useful.
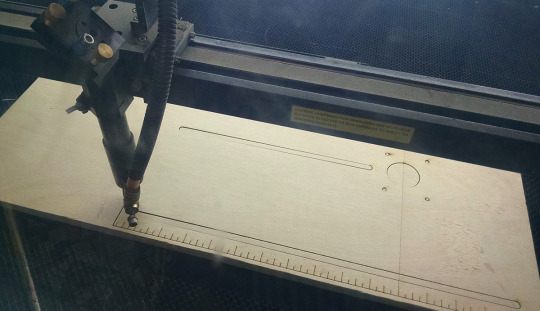
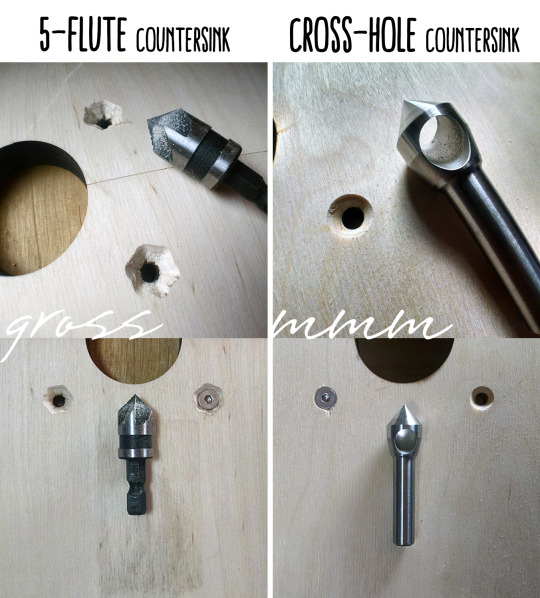
The screws need to sit flush with the top of the table, so I countersunk the mounting holes. It was fortunate that I did this on a test piece, because the 5-flute countersink bit I had on hand was terrible and made a countersink like a toddler had tried to chisel it with a screwdriver.
I highly recommend everyone just throw out their shitty many-fluted countersink bits right now and replace them with a cross-hole (or “zero flute”) countersink, because damn do those things cut flawlessly.
After using the adjustable fence for a bit, I decided to plunge route 7/16″ recesses into the backs of the 1/4″ slots. This has the dual benefit of (a) holding the hex heads so that you don’t need to have a wrench on hand, and (b) letting the heads sit flush with the underside of the table, so the fence can sit anywhere over the surface you’re clamped to.
All done! The final touch is a dust port on top of the fence that a shopvac can plug into, to keep your lungs clear :)
Materials ($10-20)
1/2″ thick plywood, 12″x24″
(2x) 1/4-20 hex bolts 1-1/4″L + wingnuts
(4x) 20mm M4 countersunk screws (router dependent)
dust port (~$10)
Tools used
router (obviously) with plunge base and fence
digital calipers
lasercutter (optional; can do everything with router)
bar clamps
7/16″ router straight bit
countersink bit
any workbench
#router#wood router#woodworking#physical#tools#tools for my tools#lasercut#pinterestthirsttrap#tutorial#router table#instructable
2 notes
·
View notes
Photo


my mini dozuki (japanese dovetail saw) kept tearing its cardboard sheath, so today I made a simple leather sheath by riveting a rectangular leather scrap.
I love this handsaw! japanese saws cut on the pull stroke (unlike most western saws which cut on the push stroke), which means the blade can be made much narrower and cut a thinner kerf. so far I’ve just been using it as a very pleasing pocket hacksaw to cut random shims and scrap during personal projects, but it’s supposed to be really nice for making precision angled cuts like dovetails.
note to self / #oops: the tie closure I made is suboptimal because it allows the sheath to pull forward a little. were I to make this again, I would install a strap with a snap that looped around the heel of the saw to secure the sheath snugly against the blade profile.
two reasons I didn’t do this to start with:
I didn’t want to have metal rubbing on metal, meaning I would have had to do extra work to cover the snap backing from the inside of the sheath.
I didn’t have any snaps that stylistically matched these rivets :p
0 notes