#zbrush 3d brushes
Note
Hi, I have a friend that really wants to play with vr sculpting, do you recommend using the tilt five, quest 2, or quest 3.
Do you know of any plans to add support for any other headsets?
Also if you want an easier way to display art check these out (holographic displays) https://lookingglassfactory.com/
I’d go with a secondhand Quest 2 if it’s specifically VR sculpting your friend is interested in! though I think the price for a new Q2 dropped recently so either option is a more affordable entry point. 👍
and we wanna be on Apple Vision and maaaayybe also SteamVR so Figmin could run on any PCVR headset… but we’ll see haha
current supported hardware is the Quest line, Tilt Five, Magic Leaps, HoloLens, Vive XR Elite, aaand Android & Apple mobile devices. (if anyone wants to be part of the mobile beta hit me up 👀 we need more testers 👀👀👀)
and YES I know Looking Glass!! I’ve seen their displays and other similar 3d displays in person before and they’re wild.
#auropost#saw a computer monitor that tracks your eye movement#and displays a different image into each eye so that you see simulated depth of 3d objects#it looks like at actual 3d thing is floating in front of your face#and was working live with like…. zbrush or something#there was a dragon on the screen and i felt like i could reach out and touch it#ANYWAYS i will push quest2 until the price drops on anything else#the color passthrough is nice on the q3 but isn’t integral to learning this type of art#get gravity sketch#get open brush#try vermillion if you wanna paint#get figmin if you want to build more complex things and interactivity#they’re all fun and have many tutorials on youtube 👍👍👍
11 notes
·
View notes
Photo


So, when people say it’s cheating to use reference and 3d models... does it still count if I quicky sculpt my own 3d reference and then light it? lmao
I’m working on a special lil illo and got stuck on what angle/lighting angles I wanted, so I decided to just make a rough bust.
#solivaga#pu art#3d artwork#not as easy to throw down a rough hair sketch in this program as it is in z brush#but I don't have zbrush anymore so womp
255 notes
·
View notes
Text
extremely specific work-related gripe that has been playing on repeat in my brain since yesterday:
Mudbox my betolerated, why you save paint layers as .tif's by default
#Mudbox my betolerated#3D artist#3D Art things#Mudbox#look I know Mudbox is the ginger step-cousin of the 3D art world but I can smudge on imported paint layers and the knife tool is so dope#meanwhile Zbrush gives you 32 brushes but all you'll ever need is Dam Standard and even that isn't the Mudbox knife tool#just let me have adjustable falloffs Zbrush PLZ#I imported Mudbox's texture alphas into Substance because they're so dope#Don't worry I use Zbrush for most of my other sculpting work#Y'all have too much loyalty to certain programs istg#.TIF doesn't even make sense in a high-fidelity 3D setting because it was designed for PRINTING#.TARGA if you want a lossless filetype with an actual dedicated Alpha channel jfc#Yeah I know .TGA is from 1980-something but .PNG is from 1997 so its not much better in the grand scheme of things#screaming into the ethernet#work-related screeching
2 notes
·
View notes
Text
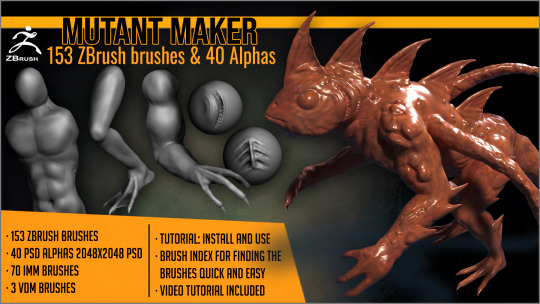
Our new product released at ArtStation: Mutant Maker is a set of 153 brushes for ZBrush for creating mutant monsters and creatures, with base bodies, arms, legs, tails, tentacles, mouths, spikes, bone plates, skin folds, skin protuberances, and other details.
Our other stores: http://www.artisticsquad.com
#3d#brushes#alphas#zbrush#imm#artstation#mutant#skin#maker#sculpting#detailing#zombies#scifi#fantasy#horror#radioactive#post#apocalyptic#characters#monsters#creatures#radiation#damage
2 notes
·
View notes
Text
Need help Refining my IMM fur card system
long time no post! I've been tinkering off and on on a system that uses Zbrush's IMM brushes to place premade clusters of haircards with different UV cells in arrangements so that I can have my models be fluffy and customizable in texture without looking repetitive!
the premade floofs I have made are looking great when rendered but when put together, despite having great coverage! it becomes splotchy and blegh... I have no idea how to fix/refine this into something usable and so I am reaching out to the internet for advice/help!
for more details please see my Reddit post on the same subject here!
https://www.reddit.com/r/3Dmodeling/duplicates/1amegk0/fur_cards/
if anyone would like to nab a copy of the IMM brush that I'm working on and try fiddling with/fixing it please don't hesitate to reach out!


#zbrush#3d modeling#3d model#3d#sil says stuff#maya autodesk#arnold render#siletreas workshop#siletrea#pls help#fibermesh#fur card#hair card#3d fur#IMM brush#Reddit#looking for help#3d wip
2 notes
·
View notes
Text
youtube
#brushes#zbrush#3d game assets#alpha#artstation#character design#game art#cyberpunk#artwork#sketch#ZBrush#WoodSculpting#3DArt#DigitalArt#CustomBrushes#WoodTextures#RealisticTextures#BrushTutorial#ZBrushTutorial#3DModeling#DigitalSculpture#ArtTutorial#TimeSavingBrushes#BeginnerFriendly#Youtube
1 note
·
View note
Text
Get this product Free 100%Use the coupon code: ORGANIC2023
0 notes
Text
We Don't Gatekeep Art Resources | A Comprehensive List
Here's a list of some of the tools/sites I currently use or have used previously for works/studies. I'll separate it into Software/Utility, Reference, and 'Other' which will be just general things that could help you map out things for your experience with art.
**[Free highlighted in pink, paid highlighted in green. Blue is variable/both. Prices Listed in USD]**
Software/Utility:
2D
Krita Painting app (PC) (my main digital art software on PC for 5+ yrs)
Clip Studio Paint [PC] [CSP 2.0+ allows for 3d modelling within the painting app and a lot of other cool features] [apparently allows up to 6 months free trial]
Procreate (12.99) [iPad/iPad Pro] (the GOAT)
Artstudio Pro [iPad/iPad Pro] (An alternative to Procreate if you enjoy the more traditional art app layout) -- I find this app handy when Procreate is lacking a feature I need, or vice versa. (you can easily transfer files between the two, but keep in mind Procreate's layer limit)
2D "Collaborative Painting/Drawing apps"
Magma Studio
Drawpile
Discord Whiteboard
Gartic Phone (Pretty decent for 2d animation practice, but has a hard limit on frames)
3D
Blender [3D Modelling, Sculpting + Layout] (PC)
Sculptris [PC] (it's an old unsupported version of Zbrush, but can help to get ideas out, and functions better than browser sculpting apps
Nomad Sculpt [iPad/iPad Pro] ($20) Works pretty well if you prefer a mobile setup, but it is a bit intense on the battery life and takes some getting used to
References + Study
Magic Poser [ PC and Mobile ] Has both free and paid versions, I've made do with just the lite version before
Artpose ($9.99) [Iphone + Steam]
Head Model Studio [IPhone] A 3D head, with both a basic blockout version for angles, and a paid version with more detail
Cubebrush [simply search "[keyword] pose reference pack"], they usually have good results + they frequently have sales!
Line of Action [Good for Gesture practice + daily sketching], also has other resources built in.
Quickposes Similar to Line of action, more geared toward anatomy
Drawabox | Perspective Fundamentals Improvement modules (Suggested by @taffingspy )
Sketchfab, this skull in particular is useful, but there is other models that can help you study anatomy as well.
Pinterest can be good, you just have to be careful, usually you're better off just finding reference pack if you have the money, sometimes certain creators have freebies as well
Artstation Marketplace can be decent [make sure to turn on the Aye-Eye filter so it doesn't feed you trash], a colleague of mine recommended this head model for practicing facial blocking, there is also this free version without lighting.
Local Art Museums [Unironically good for studying old "master work" if you're into that, or even just getting some inspiration]
Brushes + Other Useful software:
I personally have used both of these brush packs before making my own
(I actually don't know how to share my daily brush set because I frequently switch between Krita, Procreate, and ASP, but once I figure that out I'll be sure to do that lol)
Marc Brunet's Starter brush pack [Technically free but supporting him for this if you like it is ideal, there's some good brushes]
Dave Greco Brush Pack [$3]
Gumroad in general is a good place to find brushes and art resources. *Note; for Krita specifically, brush packs are a bit weird, so it may require you to find different packs, or import them in a particular way
PureRef [PC] - Reference Compiler/Moodboarding
VizRef ($3.99) [iPad] - Moodboarding/Reference Compiler
Artist Youtubers/Creators that helped me improve/guide me along as a self-taught artist from when I first started digital art to where I am today:
Proko
Marco Bucci
Sinix Design
Sycra
Hardy Fowler
Lighting Mentor
Winged Canvas
Moderndayjames
Swatches
Chommang_drawing
Marc Brunet (YTartschool)
+ Observing a lot of speedpaint art by people whose work I enjoy on social media/youtube, trying to dissect their processes
If you've gotten this far, first of all, congrats, you can read a lot, and second of all, thank you for reading and I hope this helps! I'll continue to come back and update this if I find any new resources in the future, or if my processes change :)
Much Love,
-Remidiy
#art#artwork#digital painting#painting#artists on tumblr#drawing#anime art#sketch#digital illustration#transfem#art tools#art resources#useful websites#small artist#illustration#digital art#artist on tumblr#procreate#my process#my art#krita#art tag#sharing is caring#learning#knowledge#useful stuff#links#reference
127 notes
·
View notes
Note
Hello! I’ve seen your 3d models of Symbilo and Faust and I’ve been thinking of learning how to make them as well, but I don’t know where to start 😭😭 what software do you use to make your models, and do you have any tips/advice for learning how to make them?
I used zbrush!
And for tips well to be honest to make the models feel like what you want, you only need patience. a LOT of patience (most of the time is to learn how to use the software) 😔
But if you want it to be easier you could download some brushes though it’s still tough to make one
Also you could draw some sketches before starting to build a model, it’s hard to start with only imaginations
8 notes
·
View notes
Note
i have so many questions like how did you do the hair cards ? how do you apply them? did you do the UVs in Zbrush? how was the retopology for the pants, especially around the folds? what program do you use for retopo? was sculpting the mesh of the sword and texturing it super hard??? i'm impressed with your work i need to learn so much more
Hi! this is a great tutorial going over the type of hair cards I used for this project: https://www.artstation.com/artwork/xD0bPm
to simplify the process universally:
1. analyse your references and determine which type of strands make up the hairstyle you want to do
2. generate the textures in a program of your choice, I simulate the hair strands in Maya using x-gen and bake the opacity and normals onto cards in Substance Painter where I also do a simple diffuse and roughness map (think normal high to low poly workflow)
3. apply the textures to your cards in your 3D program and start placing them on your character in layers, starting from the lowest
4. set up a shader in your rendering program of choice and frequently test your groom, I'm using marmoset toolbag 4!
I did the Retopo/UVs for everything in Maya since that's the program I was taught and most comfortable in, I don't think Zbrush is great for UVs but with plugins Blender comes close to the utilities Maya has!
Most of the retopology was based on the topology of the underlying body mesh since it's mostly tight-fitting items that need to deform exactly the same way to avoid clipping. The folds took a while to retopo and it's again mostly the same topology as the body underneath but adding detail/faces by using the cut tool along the flow of the folds without disturbing the overall edgeflow! :)
The sword was less sculpting than you would assume, I've started making my own IMM brushes to use for ornaments and similar things so it's mostly just placing things around and making it look good together! I found that doing ornaments that way leads to a cleaner result and it's easier to iterate, compared to attempting to sculpt that level of detail
The textures of the sword are still sort of early in the process, the bake is doing a lot at the moment and I want to add more signs of wear and damage to the metal as well as the hilt
Thanks for the questions! I love talking 3D so feel free to hit me up if you want more explanations, just keep in mind that I am a recent grad so there's a lot of things I myself am still learning!
6 notes
·
View notes
Note
I just found your blog and I really really love your work. I wanted to ask what you primarily work with / on / in (like what program and if you've got a drawing tablet etc)
I also wanted to say I really love your wrinkles, I've stumbled upon a very similar thing in my own drawing and I hope it's as fun for you to do as it is for me
Hello, and thank you!
The tools I usually use to create my 2D work are Clip Studio Paint (with brush sets by Frenden and Paolo Limoncelli) and an old Cintiq tablet (I have a Wacom Bamboo tablet as well but don’t use it often.) Other things in the toolbox are: Krita ( a very nice free and open source painting app, very similar to Clip Studio Paint ) Rebelle ( painting app that mimics real paints such as watercolors and oils ) Procreate ( iPad drawing app ) Art Rage ( another app mimicking real materials ) GIMP/GNU Image Manipulation Program ( Photoshop alternative, I use it for image editing ) and Aseprite ( for pixels. )
The 3D toolbox contains: Blender ( I generally use an older version of Blender, 2.79b, but will use newer versions when working with the Cycles rendering engine ) 3D-Coat ( 3D app with sculpting, retopology and many other things. I generally use it for texture painting ) ZBrush ( 3D sculpting app ) Sculptris ( simple 3D sculpting app ) Nomad ( iPad 3D sculpting app ) and xNormal ( for rendering the surfaces of highpoly models onto lowpoly models. )
I do enjoy rendering wrinkles and all sorts of textures in my work, even though they can take up so much time ( I am currently working on a painting that is taking forever to complete because wrinkles. ) Wrinkles are fun and beautiful, I think they’re neat!
6 notes
·
View notes
Text
List of Sonic Boom: Rise of Lyric artists I could find on Artstation
Made the list on discord but figured this might be of more use here !
+ added the softwares they worked in when listed, if it helps anyone ?
3D artists :
Martin Ocejo [ CRYENGINE, ZBrush, not sure of the rest ]
Their gallery is absolutely FILLED with RoL stuff. If you're only gonna check out one link on this list, check this one out, they even have a post with free ZBrush brushes !
Mick Jundt [ Maya, CRYENGINE, Photoshop, ZBrush ]
Christian Davis [ Photoshop ]
Niles Tucker
Kyle Bromley
Sunghye Yoon [ Maya, 3ds Max, Photoshop, ZBrush ], mostly props
2D artists ( not including texture art here ) :
Nicolas Weis [ Photoshop ], environmental concept art ( BANGER, definitely check this out )
Sylvain Deboissy [ Sketchbook Pro ], character design for both the game and the TV show
Not directly related to Rise of Lyric :
Jason Lin, environmental concept art for Fire and Ice
Risal Prakasa, 3D character models for s2 of the TV show
Definitely please add to this post or @ me if you find any more Sonic Boom devs ! And also this is all Artstation, but you can add other platforms too !
#sonic boom#sonic boom rise of lyric#sonic the hedgehog#sonic fandom#quite the random post i know but hey#i had the list already#figured it wouldn't hurt to post it#i myself found it super cool to peruse all this stuff#really is depressing how much these people got screwed over and ragged on with this project#teka talk
14 notes
·
View notes
Text
Character Design: From Concept to Creation
Creating a memorable character is like cooking up a magical recipe. It’s all about blending imagination, storytelling, and a pinch of technical skill. Whether you’re new to the game or a seasoned pro, the journey of character design is a wild ride full of twists and turns. Ready to dive in? Let’s explore the exciting world of character design, from the first spark of an idea to the final masterpiece!
Step 1: The Spark of Inspiration
Every awesome character starts with a spark of inspiration. This can hit you while reading a book, watching a movie, daydreaming, or even while brushing your teeth! The trick is to grab onto that spark and let it light your creative fire.
Picture this: you’re designing a character for a fantasy video game. Maybe you’re inspired by mythical creatures from ancient tales. You see a majestic, winged warrior with the strength of a lion and the wisdom of an owl. Boom! You’ve got your starting point.
“Inspiration is everywhere and often where you least expect it.” — Chuck Jones
Step 2: Concept Development
With inspiration in hand, it’s time to dive deeper. Develop your character’s backstory, personality, and quirks. Ask yourself fun questions like:
What makes your character tick?
What are their superpowers and weaknesses?
How do they vibe with the world around them?
For our winged warrior, maybe they’re the last of their kind, on a mission to find a magical relic that can save their homeland. They’re brave but feel the weight of their epic quest.
Step 3: Visual Exploration
Now, let’s get visual! Start with rough sketches to play around with shapes, poses, and expressions. Don’t worry about making it perfect; this is your playground.
Think about:
Silhouette: A cool silhouette makes your character instantly recognizable.
Proportions: Play around with exaggerated features to add flair.
Details: Scars, accessories, or funky tattoos can tell your character’s story.
For our winged warrior, try out different wing shapes, armor styles, and facial expressions. Maybe they have a battle scar or a unique emblem showing their heritage.
“Every great design begins with an even better story.” — Lorinda Mamo
Step 4: Refining the Design
You’ve got a bunch of cool ideas, so now it’s time to polish them. Pick the elements that scream "this is my character" and refine them into a slick, cohesive design. Pay attention to colors, textures, and materials to make your character pop.
Create a detailed turnaround sheet showing your character from all angles. This will keep your design consistent and serve as a handy reference for future art or animations.
Step 5: Bringing Your Character to Life
With your refined design, it’s showtime! Bring your character to life in your favorite medium. This could be a digital illustration, a 3D model, or even a traditional painting. Add depth, lighting, and shading to make your character feel real.
Imagine your winged warrior in a heroic pose, wings spread wide, ready to soar. Or if you’re into 3D, sculpt a detailed model with intricate textures and realistic lighting.
Software to Use:
Adobe Photoshop: Great for digital painting and creating detailed illustrations.
Clip Studio Paint: Excellent for character design, especially for comic and manga artists.
Blender: A powerful, free tool for 3D modeling, rigging, and animation.
ZBrush: Industry-standard for detailed 3D sculpting and modeling.
Procreate: Perfect for sketching and painting on the go with an iPad.
“Design is not just what it looks like and feels like. Design is how it works.” — Steve Jobs
Step 6: Storytelling and Beyond
A well-designed character is more than just eye candy; they’re a storytelling machine. Throw your character into different scenarios and see how they react. This adds depth and opens up new adventures.
Maybe your winged warrior teams up with an unexpected ally, sparking a new quest. Or they discover a hidden talent that changes their destiny. The sky’s the limit!
Conclusion
Character design is a thrilling journey where creativity meets storytelling and skill. From that first spark of inspiration to the final creation, each step is a chance to breathe life into your ideas. So, grab your sketchbook, unleash your imagination, and embark on the adventure of character design. Who knows? Your next creation might be the next big thing in art and storytelling.
Happy designing!
#2d animation#3d animation#animation#animation studio#cgi animation#Character design process#Character creation tips#Developing character concepts#Visual character development#Character design inspiration#Character design software
2 notes
·
View notes
Text
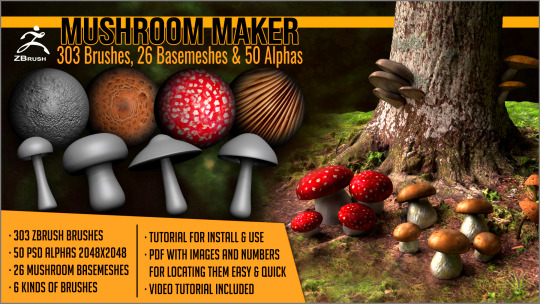
Our new product released at ArtStation: Mushroom Maker for ZBrush, with 303 brusehs, 26 basemeshes and 50 alphas for building mushrooms.
https://www.artstation.com/a/32636812
#3d#brushes#zbrush#mushroom#fungus#gnome#fae#fairy#garden#forest#woods#nature#plants#environment#im#imm#artstation#gameart#games#lowpoly
2 notes
·
View notes
Text
Practice 1
assignment 5, concept art - Using a "bit" of 3D
. Blog post 02
I sculpted a lot of detail, but I couldn't render it in ZBRUSH's rendering mode in sub-material finesse, which is the unfortunate part of this assignment.
In the meantime, I used brushes of monster tentacles made by -artist Bernhard van der Horst to speed up my modelling.
TENTACLES - 40+ in ZBrush brushes and OBJs
ArtStation - TENTACLES - 40+ in ZBrush brushes and OBJs | Brushes
Different rendering outcomes:
1.2D style:

2. Metallic glossy style

3. The following figure shows a number of different views of the creature

This assignment marks my exploration of the software ZBrush and a venture into 3D concepts. I believe that the expression of current conceptual design should be diversified, encompassing both 2D and 3D forms.
Thank you for reading this~
#concept art#game art#video games#artwork#creep#zbrush#3d sculpting#3d art#3d model#3d artwork#lovecraft#lovecraftian horror#cthulhu#hertfordshire
3 notes
·
View notes
Text

Documenting some process problems.
Image text below ↓
—
Need to put some transparent paint strokes around this bust & hair.
Problems:
No software can model (add & position geometry) AND seamlessly paint transparency with custom brushes —
→ 3DCoat Textura is good for painting, but can't adjust geometry. Technically you CAN do this in another "Room" in 3DC's full version (I use Textura). But "Rooms" are unintuitive: you'd think models could be moved seamlessly between them, but no. Rather it's like a separate instance with its own version of the model. Might as well use a different software.
→ Blender does both, but the painting UX is not good.
Needs addons; the ones I tried don't match 3DCoat's capabilities.
→ Painting in ZBrush is great and geometry can be adjusted, but it's only vertex painting: UV-texture & alpha/transparency painting like these examples is not possible.
→ C4D can do both, but painting UX is bad.
→ I neglected to mention Substance Painter in the screenshot: Despite the name, it’s not great for hand-painting. (I don’t want to explain here & now; if you’ve used it you probably know. Though some of this can be done with generators & textures.) But SP also doesn’t have modeling capabilities.
—
...So there's lag & blind guesswork:
I'm planning to add the strands & planes in Zbrush. Have to guess where to position them. Then have to UV (RizomUV) and hope they'll work out once I bring them in to 3DCoat to paint. I CAN update the model in ZBrush, update the UVs in Rizom if needed, re-export, and replace in 3DCoat. (Which is also not intuitive UI-wise; the way to replace parts of a model in 3DCoat is not quite what you'd think to do.) ...Then if it's still not right, have to go back, adjust again, re-export/import again, etc.
All of that takes a lot of time. Plus problems to troubleshoot with exporting & importing can add to that time.
I've talked to several of the other artists who've used this technique and all said this is basically the process. Currently, there's no getting around it.
—
Another idea:
• Screenshot angles of the model in 3DCoat.
• Roughly paint over those in Photoshop.
• Place geometry in ZBrush based on those "blueprints", kind of like working from a concept.
• Final paint in 3DCoat
This might save on some of the guesswork. But doesn't necessarily save time — have to paint twice & it might still require adjustment in 3D.
#3d art#3d#handpainting#3d illustration#3d artist#WIP#process#troubleshooting#3Dcoat#zbrush#Textura#b3d#blender
11 notes
·
View notes
Last Seen Blogs

longdn
Untitled

2470124gordon-blog
Kaylee

sogregre
Sans titre

softshirringsound
Subtle Electric Fires

anacarolina1610-blog
Sem título