#you cant just glue them on you need to make the exact size hole for the crystal or diamond to fit in
Explore tagged Tumblr posts
Text
Ecthelion Lord of the Fountains

...greater and more loudly was Ecthelion Lord of the Fountains at that time Warden of the great Gate
All in silver was he clad and upon his shining Helm there was a set of spike steel pointed with a diamond; ...
His house found delight in diamonds
I was looking at some Lord's and Lady's and stumbled on Ecthelion description and
wow
Tolkien made very sure to point out that Ecthelion really liked to shine an sparkle.
His Shield was bedazzled with so many crystals studs that it looked like thousands rain drops.
Sooo of course I had to draw him.
I didn't finished the hair my finger hurts but I add him to the pile of shame to be colored in the future :)
It was very important to draw him with his helm and then to not look silly.
Did I manage that ?
I tried to give him a stern face idk but that's how he is often portrayed like.
I imagine his sword style to be very fluent and swishy like Malenia from elden ring.
Hence the odd gripp on his sword.
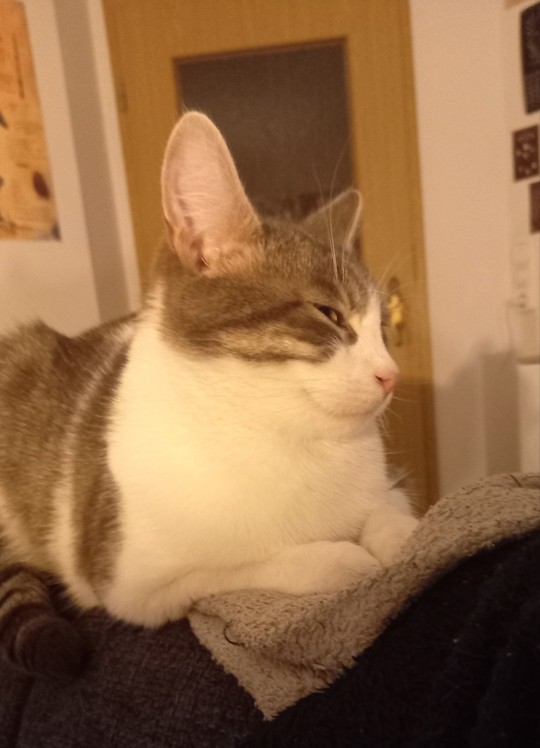
Here's a close up to the armor it is very pretty and full of details so take a peek!!! and my cat giving side eye

#silmarillion#tolkien#traditional art#silm art#gondolin#lord of the Fountains#ecthelion#can you imagine how long it would take to bedazzle a shield with a thousand studs#you cant just glue them on you need to make the exact size hole for the crystal or diamond to fit in#its not like they have a electric drill to do that!#that poor elf making that shield i would have quitt my job after that#making 1000 tiny holes in a shield for 1000 tiny diamonds is insane#rip unnamed elf
30 notes
·
View notes
Photo
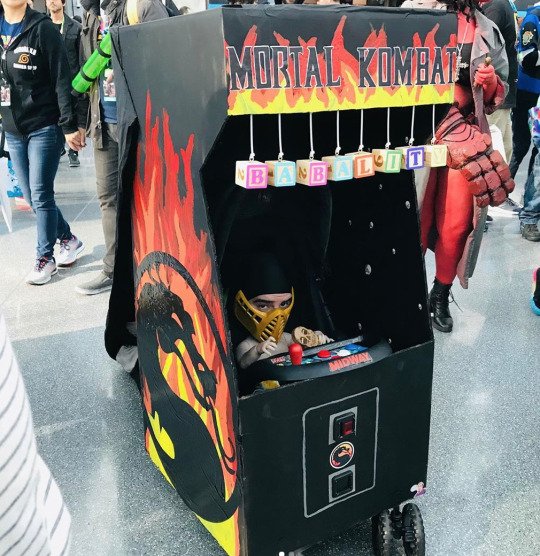
Babality from Mortal Kombat // Cosplayer : rethinkcosplay
I’ve wanted to do a fighting video game cosplay for a while, but there aren’t many I play. Mortal Kombat has a special place in everyone’s hearts though, mine included. My friends would cosplay Mortal Kombat characters every year, and I was off doing my own thing and missing out on the fun. Sometimes it is hard to get to do all your ideas if you can only afford very little cons. Sometimes there’s more ideas than there are cons. This year finally became that year. Only given its Anime NYC, I didn’t know how my idea would fit, so I almost had to find a “cultural loophole” that would allow it.
Mortal Kombat features a lot of Asian-based characters and ideas, so I thought that yeah, maybe this is the time and place. I’m also not exactly one of the big famous cosplay people, so I like to do a huge outing. It’s important for people to know this comes from a little fella each time. I have like 700 followers between 3 profiles, so when you aren’t anything of grandiose size, it helps to dream big, and build that way to make up for it. But when people know you have a certain style, you cant just cosplay either. I wanted it to have its own special touch too, an almost manga-flair, or influence, with that tongue. Much of cosplay to me is interpretation; to be artful and not a literal translation of a character, I like to do my own “musical cover” on these famous songs, so I thought, well what is the weirdest thing to pull off in Mortal Kombat?. Then, I realized arcade machines kind of almost resemble baby strollers. I knew Babality was in there, and it just grew from there, but because the idea was on the backburner for so long, that allowed it to marinate and I kept adding things to it in my head before I could add to it in real life.

People are generally so nice it is overwhelming, you just want to stay in it all day to please everyone. Even if people don’t get it, they make fun, or laugh, I take it all in stride cause at the end of the day, they are laughing. They are happy. And you are the source of that. Getting fixated on a result you want isn’t healthy, and if I can’t leave with a good story or interaction, in person, online or other, doesn’t devalue the cosplay or my worth. The majority is love, to the point where it’s easy to take any pitfalls life has to offer. It’s too late if people hate it, I’m already wearing it. I do find it funny though that many times I’m at such an in-CON-venience that when I see people I know or recognize, I can’t do anything about it. I can’t tell if people think I’m unfriendly or whatever, by not being able to break apart and hug or talk to them. Then there’s also a thing itching my back saying “stay in character”. People are seeing this for the first time, and saying hello risks breaking the magic. But I would like people to know that I know it’s them, and that I do love them, yes I’m in pain, yes it is worth it, and because of cosplay life decisions, I can’t do anything about those things to illustrate that at the time.
Before anything is made, its all sketched out in my head. I never put anything to paper. I don’t draw – but I know how to draw out things from my soul. In real life, I worry a lot and overthink things, but if not for that ailment, I wouldn’t have these ideas come together the way they do. I overthink things through. I “rethink cosplay”. Overthinking is like a superpower. I like working with cardboard too, it has this school project, purity aspect, and behaves really well for what I want it to do. Anything more rigid is too costly or heavier.
So I start there as my base. I then break it down into steps, where to get parts, days parts are painted or attached, when to cut, xyz etc. I take my time with it so I’m not agonizing, or in that “con crunch” mode thing. I always have to have it done the month before. I have designated spots of what I want to achieve daily, and if I finish early its best not to continue. This allows for the brain to rest, and free flow these ideas, if not refine old and new ones. I try to follow exact measurements and the like, but it is exciting if it veers from what I see in my head too, new discoveries help with brain fog. I painted it myself, and whatever I wasn’t able to paint, I traced or got decals for. Then a lot of variations of glue was used to hold it together. Essentially, the cardboard arcade is a slip on cover for the stroller is what you are seeing. It had to be built in a way that was easy to manage to get around, so the wheels were nice, as was the size. But I didn’t account for how much comfort I needed, so I had to keep moving my body often. My head goes through the hole, and the arms have wooden rods that I move with my hands. I like that there’s this almost theatrical aspect too, as con-goers who would have no otherwise exposure to how cool puppetry is, get to have it brought to them. A very special effect.
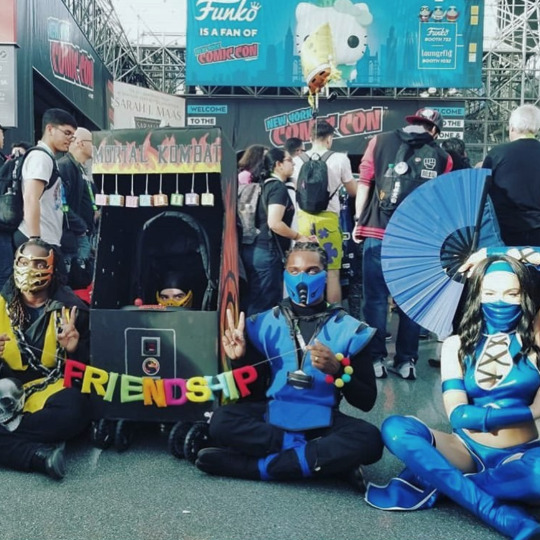
How I came to cosplay is very interesting. I guess it is rooted in attending for so long, you have to find ways to keep it stimulating for yourself, that I cosplayed as an experiment. I used to go for panels and CGC grading originally – those were my things, but when I dressed up, and saw how people reacted, how happy they were, how happy I was, it became a feeling hard to match. I never wanted to go back casual again. It is love from people who love what you love, think about that. I tell everyone to do it. It is empowering. Uplifting. Beneficial for all. I’m very proud of my work as a Cosplayer. I’m secure in what I have, and what I accomplished so far. It started off innocently, but I feel that innocence has evolved, and taken on more meaning. It’s this artistic outlet. I noticed if you do not have some kind of artistic outlet you take on the pains of this world in its most concentrated forms. People could have worse outlets, but this one is mine. Maybe it’s what fills in the blanks for most?. Sometimes I find that what we lack, we make up for in creativity. Cosplayers are a different kind of bodybuilder. I have creative muscles for days. I always say the same mind that makes such big displays is capable of doing it again, that I try not to worry if this ability would leave me. It came from somewhere inside me to begin with. And so, the biggest thing I will ever do in cosplay hasn’t happened yet. I know what it is, but I’m not saying.
So this is actually my first time at Anime NYC, but one thing that sticks out is how cosplay-heavy it is, and food-based it is. When you go to these with little-to-no knowledge on what everything is, the craftsmanship also really stands out. So many people are dressed well, at least one in every three. All very creative people, and lots of pastel colors. Almost like a Pastel New York Comic Con?. Regardless, it reminds you of New York Comic Con in its younger years, being NYCC holds the flagship for so many good things now, it’s refreshing to be at a con not as congested. I was also surprised/relieved by how many people knew what I was, given what I was doing isn’t Anime. Thank you all for accepting me.
46 notes
·
View notes
Note
I was wondering how you made the rabbit cage where you got the materials etc
lumber, cable ties, hinges, nails, linoleum tiles, superglue, screws, mechanical screwdriver, (optional) hand saw- home depot
storage cube grids- probably better to order these online, but we got em at bed bath and beyond.
make sure you read all the steps here before starting, since it’s hard to include all the information you need in one step and you might do something too early and have to undo it. i also probably forgot stuff...its hard to remember everything i did.
STEP ONE(measurements and preparation): first we measured the space that the cage was going to go. it is not an easy cage to move around once constructed unless you detach the floors/cut some of the cable ties, and even then it is pretty cumbersome. to move it on carpeted floors i have had to use furniture sliders. keep this in mind before building the cage: is it going to stay in that spot? will you be moving soon? do you have carpet or wood floors? theyre all things to consider before you start. if you have wood floors you will want something to go under this cage because it is likely to damage the floor otherwise.
STEP TWO(buy storage cube grids, do more measurements): after you’ve measured the space, you need to know the dimensions of the storage cube grids. they dont all come in the same size, so i can’t provide this to you. the reason you want the dimensions first is so you know what size to cut your lumber. i watched a youtube video to see what materials i would need, and in the video they cage was four grids long. after measuring the space and buying the grids, i decided that it was better if i made ours three grids long. as you can see in the post, it is also two grids wide, and each cage section is two grids tall. the goal was to make a big cage for two rabbits, so it is four grids tall in total. each section of the floor(except for the bottom one) has grids supporting it as well. this means we used 56 grids for the entire cage.
STEP THREE(purchase wood and other materials): the wood needs to be untreated wood. no processed woods with glues in them. likely the rabbits will chew on them so its better not to risk them consuming any weird chemicals. you can use treated wood for the bases,(especially if it’s lighter wood) since the rabbit will not have access to that part. it will be covered by the grids and the floor tiles. when cutting the lumber, you’ll want to make it so the base floor section fits inside the grids. the grids will sit on the floor around it. the floor sections will also need a sort of lip around them to attach the grids to. it’s hard to describe so just look at this picture to see how the wood sections go.
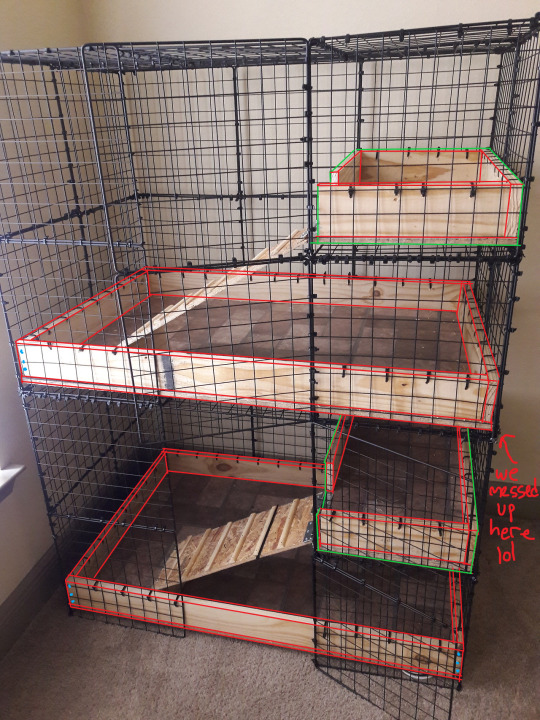
as you can see we messed up cutting the lumber on one side, so we just had to put it together as best we could. also youll notice the ramps are some kind of particle board material...i wasnt comfortable with that so i took them out later and we have yet to replace them. it’s been a tough year financially and i cant drive so i haven’t made the trip out to home depot to get new wood...we also haven’t adopted another rabbit yet for the same reasons. jojo has been using the bottom section of the cage and that alone is huge enough for me to fit inside pretty comfortably so i’m not too worried about him having limited space for a while.
STEP FOUR(floor tiles, then put all the wood together): you will want stick-on linoleum floor tiles to cover the floors of the cage. this is just to make sure things are more sanitary if your bunny pees on the floors. pee will probably still get on the sides of the wood if your bunny is not litter trained, but there is nothing you can do about that. basically just install the floor tiles as you would in your kitchen, with the edges flush against one another so your bunny can’t dig them up. i would reccomend you use superglue(the kind that works on these materials) around the bottom edges for added security. depending on what kind you use, the glue will take time to cure. this applies to every step of the project, but make sure the room is well ventilated. between the the wood and the glues, it might build a strong smell in a small room. this is something you want aired out before you put bunnies in because theyre more sensitive to fumes than we are. after we were done the smell was strong enough for us to notice, but it did go away eventually.
once the floor tiles are secured on, you can drill the wood sections together. don’t put the floor tiles on afterwards or you will have an awkward time getting them in there. since the tiles are thin they are easy to drill through.
STEP FIVE(attach the grids together): the grids themselves are secured together with cable ties. this might seem structurally unsound, but it really works if you use a lot of them. you will most likely use over a thousand cable ties in the process, so get a big bag. it doesnt hurt to have extras. just lay the grids out on the floor and tighten each section together. for added security, make an “X” shape with the ties at the corners. for the horizontal-laying grids that support the floor sections, make sure to attach them together with as many cable ties along the edges as you can. when it’s all put together it can support the weight of the wood and it’s very secure. if you want to take the cage apart you will have to cut some of the cable ties with a wire cutter. IMPORTANT- make sure you don’t attach all the grids together before putting the wood in or you’ll have to cut the cable ties again. we did this. woops. for the doors, just make sure a section of the grids in the middle is only attached with cable ties on one side. you can use a binder clip or something to lock the doors when they are closed.
STEP SIX(construct the wood pieces together): you will need a mechanical screwdriver to screw the wood together. i would also recommend having a hand saw in case the wood was cut too large at the hardware store...you really dont want to make the trip all the way back out there. it’s good to have the exact measurements written down when you get the wood cut so there arent any mistakes, but as mentioned we messed it up somehow anyway. it works as long as the wood is secured together properly and fits inside the grids. drill holes on the outer lips and put cable ties through them to secure the grids to the floor sections.
STEP SEVEN(ramps): the ramps need to be long enough so that it isn’t too steep for the bunny to climb up, and they need to be wide enough for the bunny’s body to fit onto. we don’t want bunny to fall. we nailedd thin, rounded pieces of wood(it comes in long sticks at the hardware store, dunno what its called) at short intervals up the ramps as a sort of grip for the bunnys feet. they dont have pads at the bottom of their feet so i think this makes it easier to climb up. you will need door/gate hinges for the ramps to attach to each floor and to drill them on. i would drill the hinge to the floor part first, then attach it to the ramp. looking at the picture our cage is actually two separate cages stacked on top of each other. we plan to cut a section out of the second “floor” and add another ramp to it later. you want to do this during construction if it’s going to be one entire cage from the start.
STEP EIGHT(check your work): make sure everything is secure and attached. the finished cage should be really strong and sturdy. clean the floor sections of any wood shavings, residues or plastic from the cable ties before letting bunny in the cage. the tiles make the cage easy to clean, using a dustpan and then wiping down with an animal-safe cleaner like nature’s miracle. hopefully bunny will use the ramps and climb to the other sections of the cage. if they dont do this eventually, consider getting wider ramps or something to make them easier to get onto.
sorry i could not make the instructions more clear. let me know if you have questions! it has been several months since we built this so im fuzzy on the details and mightve forgotten something. look up “rabbit cage storage cube grids” on youtube and you might find similar projects. i got the idea from watching one of these and tried to follow it, but we had to improvise some of the details ourselves. it took three days to put together and then several weeks afterwards airing out the room when we realized we had left the cage in there to build up fumes. but jojo loves the cage now.
8 notes
·
View notes