#with the sims stuff i know how to remove files so it should be whatever like i did it when my laptop broke with no issues
Text
youtube
Bro. The new Veil log. As usual, I am just losing it.
Chioma: Chioma Esi, incident log: the Vex.
Osiris: Interesting.
Chioma: Six weeks ago, our settlement came under attack by an intrusion of Vex forces. It was a test of our defenses for a larger incursion. Yesterday, scouts discovered temporally realigned architecture just outside the stronghold limits. The Vex had retroactively inserted themselves into Neptune's history... just like they did on Venus. But unlike Venus, something stopped them short of our habitat. They had to fight their way in. I think it's the Veil. Something about the paracausal nature of the Veil is preventing their temporal excursions. But the Vex aren't giving up. They did something to Neptune's magnetic field - wove a sim into it. A screen to isolate us. It's a double-edged sword. The Vex screen hides us from the outside world, from whatever's happened. So we're safe... ish. But we're stuck with the Vex. Thankfully, they're slow to react and it's giving us time to research countermeasures. Huh... it's almost our anniversary. I should do something for Maya. She'll forget. She's always so busy. Computer, prepare food synthesis. File: Chioma date night 6. Oh, and add a bottle of port.
Nimbus: Osiris? You... all right?
Osiris: Y-yes. I'm fine. I just, um... saw shadows. My choices. Saint. Dr. Sundaresh and I walked very similar paths of obsession, it seems.
Nimbus: Oh.
Osiris: [stutters] Nevertheless... it appears that Neomuna's history is deeply tied to the Vex. Hopefully the next decryption will shed more light on this.
So, the Veil affects the Vex and stops them. Why were they trying to replicate it then? To get by the Veil's defenses? Or for some other purpose? Still thinking about the Veil's effects on Exos as well; Exos are made from radiolaria so when the Veil removed the effects of Clarity on it, it may have something to do with the fact that their base is Vex.
Also, the thing that was shielding Neomuna from being seen (and from seeing outside) wasn't just the base magnetic field of Neptune. It was also the Vex' doing! Intriguing. I talked about the magnetic field shielding Neomuna in this post which is about reasons why Neomuna never helped the Earth after the Collapse. Them not being able to even see Earth for a while was a part of it. Interesting to know that this isn't 100% natural but also influenced by the Vex.
Absolutely shattered over Osiris identifying with Maya and how being busy kept them both away from their partners. On the other hand, I love how Osiris was immediately interested when Chioma mentioned the Vex. His original field of study! Same as him, I do also hope we'll get some more stuff about them in some of the next decrypted files.
These are so good and super detailed. I genuinely would say these files are enough content to fill at least 2 full missions. I'm loving it and I love that it's being spaced out week by week. Genuinely enjoying that this will be going on for a while, keeping the theme of the expansion throughout the year.
We'll definitely be able to say more as we get more of these, but I like the plot threads set by the first few. I was waiting to see if we'll get something on the Vex and here it is! Very likely a lot more to come. Super interesting that the Vex keep being drawn to paracausal powers, despite not being able to understand them.
36 notes
·
View notes
Conversation
Cassie when Frank first offered for her to go undercover: Wait a minute! This is a very big decision. It might affect the course of my entire life. I shall have to think about it.
Cassie: *pauses for 1 second*
Cassie: I’ll do it.
#okay i am going to complain abt something#i have been trying to remove files from a fifteen year old computer for like three days#specifically ancient sims and minecraft files#and the way nothing fucking works#with the sims stuff i know how to remove files so it should be whatever like i did it when my laptop broke with no issues#so i opened the files and like ??? half of them are gone??? because apparently my mother was just deleting things#so i've given up on those because i don't know what's gone and i'm afraid of breaking my game by putting fucked up files on my computer#then there's the stupid fucking minecraft ones oh my god#so like. i can't log into it on the computer because apparently at some point in the last like decade they migrated their servers? so i have#go through my phone because internet browsers don't function on the computer and i have the migrate it over that way#except it's my sister's account. not mine#and i don't know what the fucking password is#except naturally she doesn't either so i have to change the password. that finally happens and i go to log in#EXCEPT!!!! you have to answer the fucking security questions#so i have to try to get into the headspace of my sister when she was like 11 and try to work out what her favourite movie and author are#naturally she refuses to help with this and asks like it's ridiculous that i would even ask#eventually i just fucking give up and after like ten minutes of the website not functioning i managed to change the security questions to#stuff that will not change lmao#so i finally manage to log in and i try to migrate the server or whatever using my microsoft account. it tells me that my microsoft account#does not exist. i literally have it open in another tab#but whatever i'll just make a new one ig so i did that with my gmail and FINALLY everything got moved over#which fucking fantastic! i can log into it on the computer now!!! so like i do that and i dont know how this game works so i had looked up#how you remove the game files and it seemed really easy except none of the stuff that the internet says i should be looking at was there#but i was sorta confused about whether i was supposed to be in the launch window or like actually open the game so i decided to open the#game and see if i could find it there#except it loaded forever and ever and then i finally had to force quit it because it froze#and now nothing on the entire computer will open#like literally nothing#i dont know what the fuck to do#okay that's all sorry LMAO
6 notes
·
View notes
Text

This is the tutorial that ate Manhattan my entire day. Ah, retirement is great. It started out as a single post and ended up as four, so if this at all interests you, grab Tempest if you don't already have it, and get a snack while you're at it. Please note that the individual parts of this tutorial don't stand alone; they assume you've read the part(s) previous to the one you're reading. I just can't put it all in one post because it'd be too many pictures for Tumblr's delicate sensibilities.
You are here:
Part One - The Easy Stuff, WTF Happened to My Plants, & Holidays
There are also these parts:
Part Two - Wait, I Thought This Mod Was About Weather?? (AKA, The Scary Math Part)
Part Three - I've Seen Fire Snow and I've Seen Rain.
Part Four - Creating Non-Default Weather Settings (AKA, Losing the Last Bit of Your Sanity)
I've been sharing default presets for this mod that are easy to download and import into whatever world you want to use them in. But what if you're unhappy with something I did and want to tweak them a little but you don't know what you need to do? What if you want to make a setting of your own from scratch and you have no idea how to go about it? What if you want more detailed and realistic weather patterns than a compressed default setting can provide, details like weather changing by "month" or week if you're playing with very long seasons? To answer all that and possibly more, I decided to put together this guide, to supplement the basic Tempest information on the NRaas site. Like it says on the tin, it's comprehensive, with some pics, so I am cutting the rest. If you're interested in this sort of stuff, then read on. If you aren't, then scroll on by. :)
First of all: I'm 'Murican, so my game uses the Fahrenheit temperature scale. Don't argue with me about how Celsius is better because it's just as arbitrary as Fahrenheit is and, in my opinion, it doesn't have enough fine gradations to describe temperature on Earth without resorting to decimals. But whatever! If your game uses Celsius, the temperatures on the menu pictures throughout this guide will obviously be different from what you'll see in your own game. Tempest understands and works with both scales and will even convert the numbers for you if you plunk a preset made in a Fahrenheit game into a Celsius game, so don't worry about that.
Now, off we go.
To use and configure Tempest, you need to have Tempest installed (Duh!) and a world loaded. Click on the city hall or any computer in your world. From there, choose NRaas/Tempest. That will bring up this screen, where all the pain begins:

Some of these options are self-explanatory and just require clicking on the line in question to change, and some have sub-menus.
Export Tuning: This exports settings to an XML file that can be used by a separate tuning file for the mod, which is available for download on the NRaas site. I believe at one time this was the only way to export/import Tempest settings between saves. Nowadays, the better way to do it is to export/import the settings using NRaas Overwatch as explained here. That way, any settings you create and export are saved in your Library folder, and you can then easily import them to any save you subsequently start.
Fireplace Auto-Lighting: If the line that says NRaas.Tempest.AutoLightFireplaces:MenuName (Which should say "Auto Light Upgraded Fireplaces In Cold Weather;" I don't know if the broken text is just my game or what) is set to true (which it is by default), then the "Fireplace Auto Light Temperature" line dictates at what temperature to light such fireplaces. If I want this option enabled at all, I usually pick 50F/10C or 10 Fahrenheit degrees above the coldest winter temperature, whichever is higher. You can set it to whatever you want, of course.
Remove Fallen Leaves During Winter: False means no. True means yes. Duh. Set it to true if you can't be bothered having Sims rake leaves but you also don't want the leaves hanging around forever. It will clear leaves world-wide, not just on your active lot.
Show Debugging: Leave this false, unless you're a developer or something. Pie only knows what it does.
Suppress Insects During Winter: True means that the bug spawners (which includes nanite spawners) won't work in the winter. False means they will work. I usually use true for climates with snowy and/or freezing winters and false for climates with milder winters but, again, it's a preference thing.
Total Reset: If you click this, everything in the mod resets back to its default values, so if you screwed everything up and want to start fresh, click this. Otherwise, don't touch it. Especially not if you’ve been working on a huge preset and haven’t exported a WIP of it recently and no, I have not done this nor have I sworn like a sailor for hours after doing it.
Version: This is simply the version number of the mod that you have installed. Version 15 is the current one. If you're showing a different number on that line and you're patched to 1.67/1.69, go to the NRaas site and get and install the latest version.
OK, that's it for the easy stuff and leaves us with the options that have sub-menus: Holidays, Plants, and Weather. We'll cover Holidays and Plants in this part, but Weather is ginormous and has two entire parts of this guide all to itself.
Plants: This is the simplest one. It dictates if and how hail and snow will affect harvestable plants. The menu looks like this and is self-explanatory:

You enter the percent chance that hail will render a harvestable plant dead and/or whether or not hail or snow will "damage" any ready-to-harvest produce by setting the plant's growth stage back to mature. The chance of both is 0 by default, but you can change one or the other or both to your likings. If you want a 10 percent chance of plant death and a 20 percent chance of produce damage, just click those lines and enter those numbers on them.
Holidays: This one's main sub-menu looks like this:

Notice that there's options for each season, which look like this when you click on them:

The first line is the default holiday for the season you chose. If you click on it, you get this:

From there, you can change the day on which the holiday falls by clicking on that line. Entering a negative number counts backward from the end of the season while a positive number counts forward from the start of the season. If you enter 0, that will cancel the holiday altogether and erase the line from the menu. (So if you want no holidays in your game at all, do that for each season and voila! No more holidays! War on Christmas, suckers!) So, in this case, the -2 on the Day line means that the holiday is set to fall two days before the end of the season, and it's going to be a Love Day because it says "Spring" on the Holiday line.
If you don't want spring's default holiday to be a Love Day, you can set it to be any of the four holidays included with Seasons by clicking on that line and then making your choice from this menu that comes up:

So, you could, for example, have a Spooky Day/trick-or-treating in every season rather than the other holidays by choosing the Fall holiday instead of the spring, summer, or winter one in each of those seasons.
You can also create more than one holiday in a season or extend the default holiday by using the "Add New Entry" option. This can be useful if you're playing really long seasons or if you just want lots of holidays for whatever reason. When you click "Add New Entry," you get this:

Notice that it just duplicates the season's default holiday, so that you have two lines that are the same. Simply click on one of them to edit it as above for your new holiday. Obviously you'll want it to be on a different day than the season's original holiday.
In addition, if you wanted, say, a fall Spooky Day that lasts for three days, then in the fall season you'd add two new entries and change the days on the new entries so that you have Spooky Day for three consecutive days. It would look like this:

And that’s it for the easy stuff. In the next part we’ll get into the, you know, weather. Click here to go to Part Two.
86 notes
·
View notes
Photo


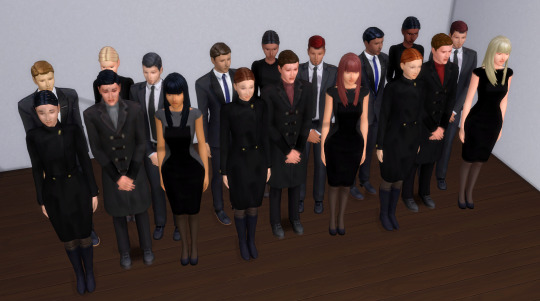
Tutorial - Decor crowds (and decor sims)
Hi everyone! Someone asked me if I could make a tutorial showing how I make decor crowds. Now my university stress is mostly gone so I finally have the time and energy to show the procress.
I am not going to show how to make poses, so if you don’t already know how to make poses, I recommend this tutorial.
This tutorial works for both one sim and for crowds. You just need to skip some parts if you only want to make one sim.
Now, let’s get started.
You will need:
TS4 SimRipper
Sims 4 Studio and Blender (preferably 2.70 if you want to follow along with my tutorial in the same version)
Image editing tool of your choosing, I use Paint Tool Sai, but you can use any that supports files with transparent backgrounds (PNG-files).
I recommend that you create one folder which you work within to keep track on all files, but that it up to your own preference!
Edit: 3/8-2020 Hello everyone! I can recommend checking out this tutorial if you experience any problems with shadows! It’s extremely useful and made by the talented @theroyalthornoliachronicles
Step 1 - Make one or a bunch of sims.
Make one or more sims that you want to have as your decor sims/crowd. Name them something easy like A A or 1 1. Each of these sims are names 1.1 1, 1.2 1, 1.3 1, etc. This makes them very easy to locate later.
When you’re finished, save your game and close/minimize it.
Step 2 - Launch TS4 SimRipper

TS4 SimRipper is super easy to use. Place it in a folder so you have every file at the same place, unzip it, install it and then launch the program. If you cannot find the file, it should be a program file, look below for a guide.
When it launches, press Select (1) and choose the file at the top of the list. Let it load (don’t click anything).
When it’s finished, choose the sim you want to export (2). Again wait, it may take a while but that is normal.
When the sim is loaded, press Save as .dae (3). This is going to also take a while, so you can do other stuff in the meantime. For example, you may proceed to the next step in this tutorial. Remember to name them something easy to find, like 1, 2, 3, etc.
Remember to check if the program is finished every now and then to export the other sims you made.

If you cannot find the program, it should look like this. My system language is Swedish, but it should be named something along the line of program under the type-category.
Step 3 - Export files and rigs from Sims4Studio.
Now it’s time to start making the decor sims. Either start with Objects (1) or Poses (2). If you want a tutorial on how to make poses, please follow the tutorial I linked above.
When it comes to Object (2), choose create 3D Mesh and then the blue button.
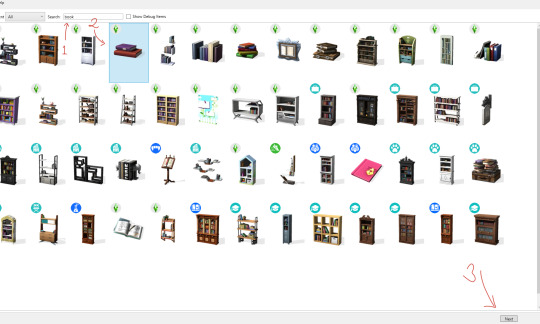
Like my last tutorial, we are going to use these books are our base. Start by searching for them (1), click on them (2) and then press Next (3). Name it whatever, but I recommend a name that will make sense a mod folder.
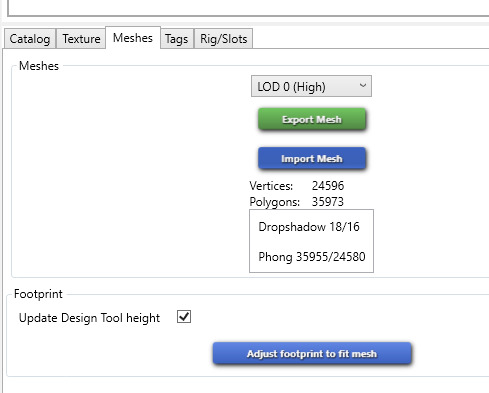
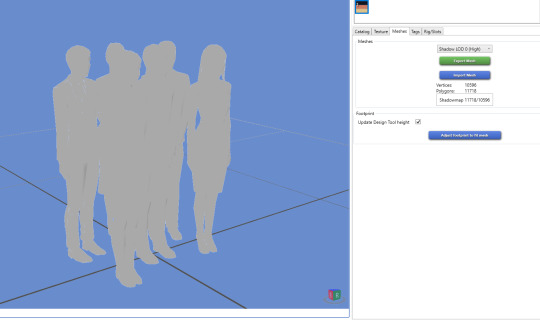
When it has loaded, click on Meshes and choose Export Mesh (1). Again, name the file whatever you want. I named my Grund - which means base in Swedish.
Step 4 - Working in Blender

Open the newly exported mesh in Blender by double-clicking on it. You should be met with something that looks like this.
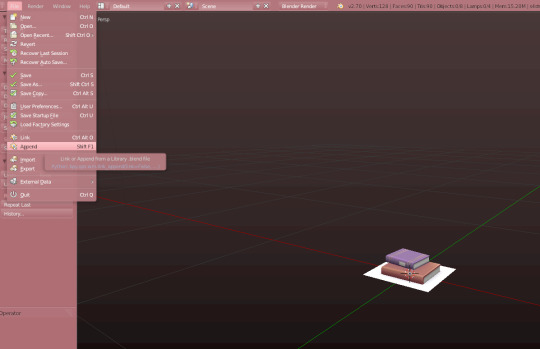
Open the File-folder and press Append, or just click Shift + F1.
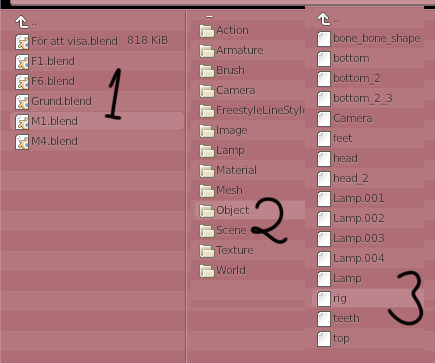
Choose one of the poses you made in advance or just import the rig you exported earlier. I am using a pose from my Mourning pose pack. Click on the pose (1), then Object (2) and finally rig (3). You do not need any of the other pieces in this tutorial.
If you are using another creator’s cc, like a pose, be sure to ask for permission before sharing the decor sim with the public.

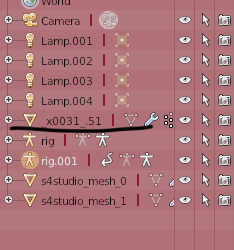
When done correctly, it should look like this. This is the sim’s frame which we will base our decor sim on. This rig will be named rig.001, just leave it be.
Step 5 - Import the .dae file
Unlike my last tutorial, this step is super easy and takes almost no time.
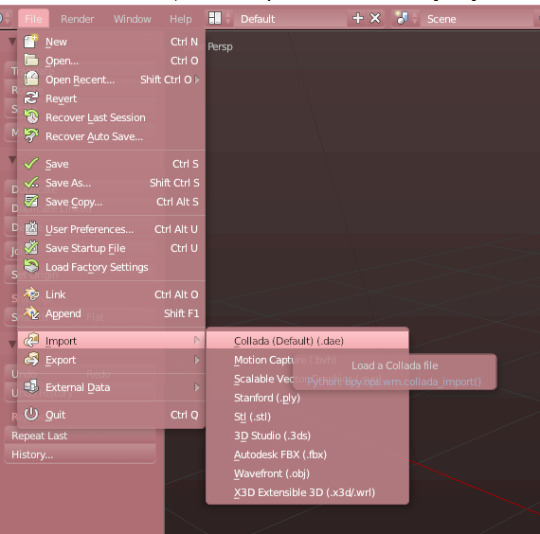
Go to file, then down to Import. Choose Collada (Default) (.dae). This is your sim with its rig and body exported from the game. This means that you can make decor sims of any body size, skin colour or other feature.
Click on any of the .dae files you exported eariler.
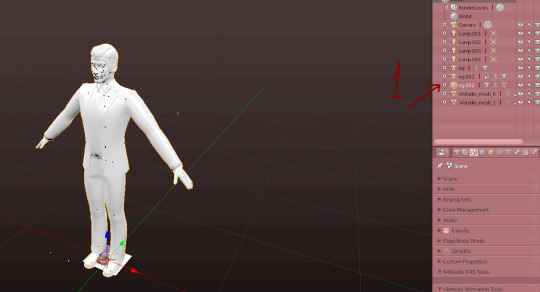
Now you will have a new rig named rig.002. Go right ahead and delete it.
Now the body will be named something like this instead, just keep an eye what it turns into.

Now press the modifier-button (1). Then click on the Object bar on the rig modifier (2). Choose the second rig (3) and press Apply (4).
After pressing the Apply button, you cannot move the sim’s body, so if there is something that needs to be fixed, do that before.
When that is done, delete rig.001.
Step 6 - Preparing the meshes to be merged

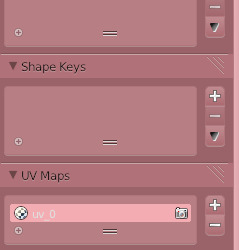
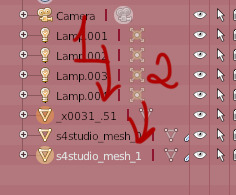
Now we’re gonna delete any trace that this sim used to be a moving object. Start by removing every vertex group from the sim. Delete them by clicking on the - button a whole bunch of times (1). Then rename the first UV-map to uv_0 (2) and delete the second one (3).
This is what it should look like when you’re done.
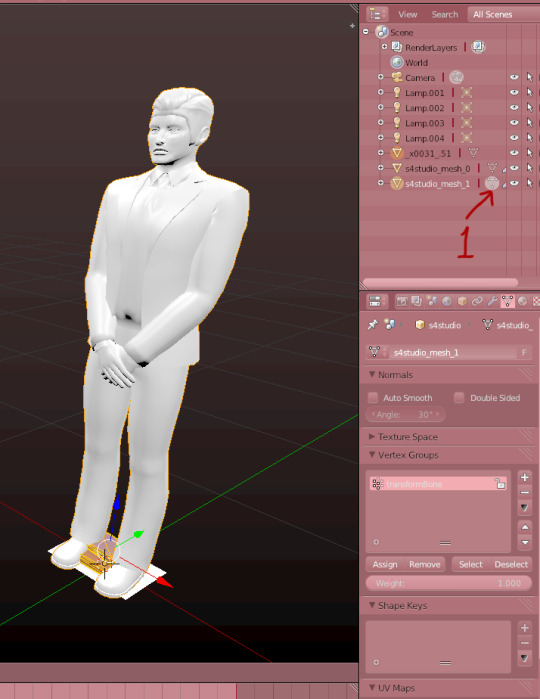
Now we’re gonna merge the two meshes. Start by clicking on the Sims4Studio-file’s thingy I marked (1). Then press A so it looks like it does on the image. When the mesh is orange, press X to delete it. You’ll need its values, so do not delete the whole thing, only it’s mesh.
Now, click on the sim in the list of things (1). Then hold shift and click on the S4S-mesh (2).

When they’re both marked like in the picture, press Ctrl + J, or the join button to the left.
Now it should look like this, if it’s all black, you need to go back and rename the uv-maps to uv_0. You go back by pressing Ctrl + Alt + Z.
Step 7 - Save and finish up the project.
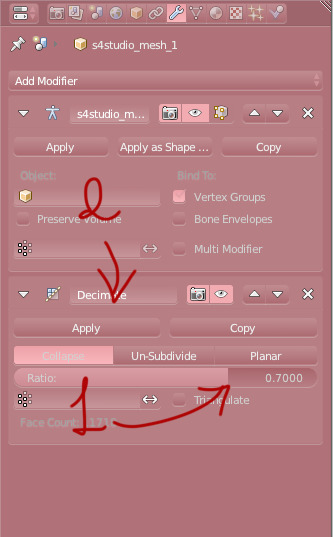
Now save your project before doing this step.
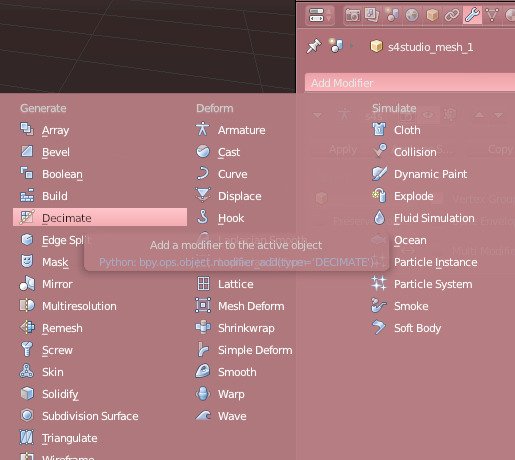
When it’s saved, go back to modifiers and add the Decimate-modifier.
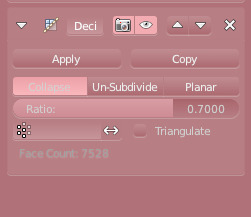
Chance the Ratio to anywhere between 0.6 to 0.8. I usually go with 0.7. Click apply when you’re satisfied.
Save your project again.
If you are only making one decor sim, you’re finished here for now!! You only need to add the other LODs, so you can skip the next step.
Step 8 - Fixing the uv-map (Not necessary for only one sim).
The uv-map is already finished if you are making only one sim, but if you are going to make a crowd, this is a very important step. Don’t worry, it’s really easy.
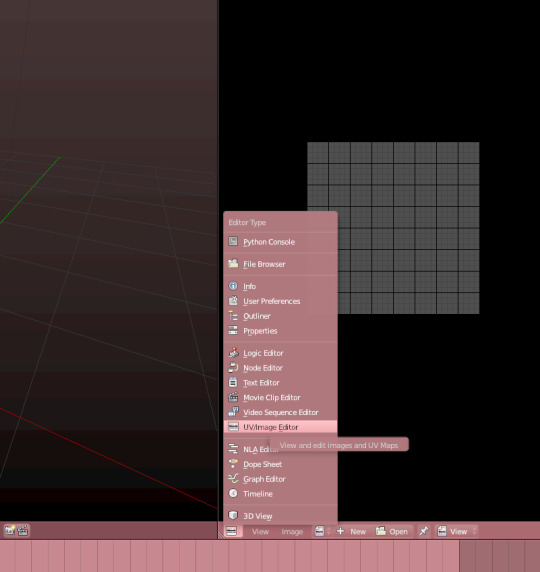
Open the uv-map by opening a new window and then choosing the UV/imagine Editor. Remember to enter the edit-mode on the mesh.
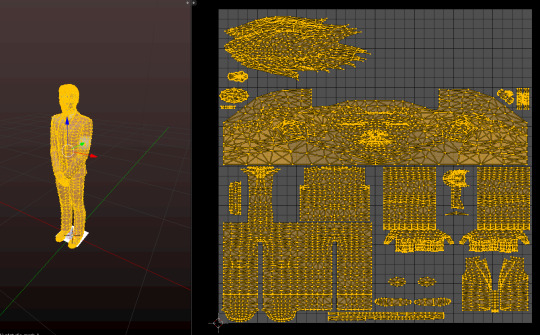
Press A on both windows to highlight everything.
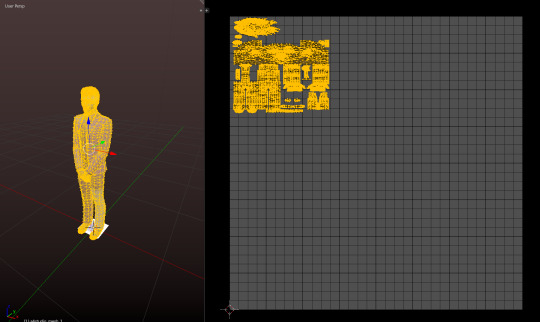
When it’s highlighted, scale it down so that it can fit more uv-maps on it. You make it smaller by pressing S on your keyboard and you can move it by pressing G.
Make sure that it’s big enough to still be able to show textures. but small enough to allow other sims’ uv-maps to be placed beside them.
Now you’re done. Now, redo all the steps you just did but place the uv-map on another spots. You do not want them to overlap or they’ll look ugly.
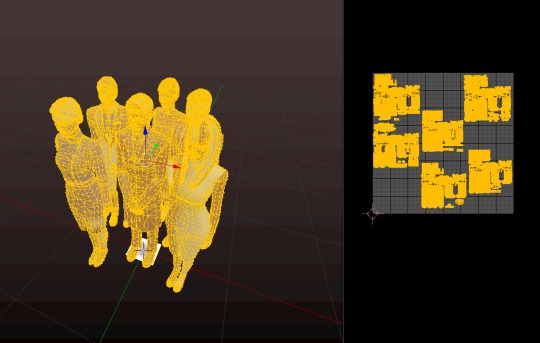
When you done all that, append the decor sims together so they form one mesh and uv-map. If done correctly, it should look like this.

After that, export the uv-map like this. Name it whatever you want.
Save your work again, and decimate the mesh. Try to make it to a 0.5 ratio. This make the crowd more manageable for the game.
Save it again and minimize Blender.
Step 9 - Making the object and fixing the texture.
Okay, here comes the annoying part. Now it’s time for a lot of waiting and to put a texture on your uv-map.
Unless you’re only making one sim, which means that you only need to import both files you just created!
Start by importing your mesh into Sim4Studio. Now this is going to make a while, the more sims you added to your crowd, the longer the waiting. I made 6 sims, so that is a very big file.
When it’s loaded into S4S, save your file, so you don’t lose any progress.
While its loading, open your imagine editing tool and prepare yourself for a lot of fiddling.
Your uv-map should look like this. So now it’s time to open every diffuse map you exported earlier in your editing tool and start matching them up.
When you’ve managed to fix the uv-map, it looks like this. This took a lot of time, as one pixel makes a big difference. Have patience when you do this part.
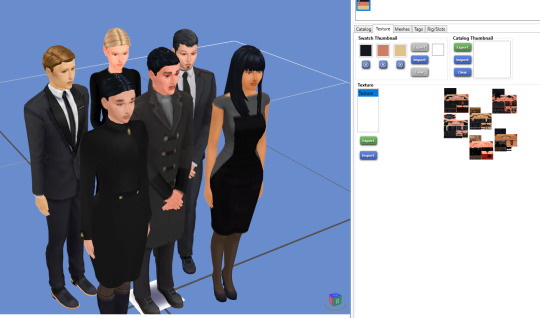
When you take the time, the crowd looks something like this, or hopefully a little more dapper, as mine is quite... depressed.
Step 10 - LODS and Shadow-LODS
ANYWAY let’s fix the LODs. Go back to your blender-file and decimate it with a ratio between 0.6 - 0.8. Again, I use 0.7. Press save and import it into Sims4Studio. Repeat once more for the last LOD. Save between each LOD if you are worried about losing the progress.

Last step in Blender is to make a shadow LOD.
Start by deleting this mesh (1). This is the shadow when you have the “full” object, so now it is just in the way.
When its gone, change the Cut from 1 to 0. This makes it into a shadow mesh. Save and go back into Sims4Studio.
Now you can import that same shadow-mesh into every shadow LOD. Then it’s finished, you’re done!
Now all that’s left is to fix the Catalog name, description and tags.
Thank you so much for following my tutorial! If you have any questions, feel free to ask me🌸
398 notes
·
View notes
Text
Gather round, children, for the legend of Grimwood Abbey
(that’s the tiny pre-MCC I mentioned the other day. I only came up with this concept, oh, over a year ago. Dropped it to play a nice easy modern Megahood. I don’t have much wherewithal.)
...so I have spent two days on the weekend so far just working on getting my CC sorted out so I can consider starting this. Yesterday the big issues were a. realizing it was super inefficient to delete stuff in-game one by one even though it’s nice to be able to see it, and becoming paralyzed with indecision about whether to take the time to hunt down unidentified files by hand, or continue spending time deleting dozens and dozens of recoiled by hand… eventually I did a little of both, but boy I gotta use some kind of tooltip renamed now huh… b. I am not good at Delphy’s Download Organizer. I don’t understand it. Why is there no “how to use” documentation. So then I set it to scan for orphans or duplicates, stare hopelessly at the results unable to figure out what is the best course of action, and then quietly quit it to yet again… move files around manually. Don’t get me wrong, I was able to use it to shove several file types into correct folders, but my real issue would be so easily solved if there was a thoroughly explained duplicate scanner that I was able to trust. Ugh, I probably should have started by moving all the files to one big folder and sorting them from there but WHATEVER.
Because, you see, like many simmers, I have been collecting my cc since roughly 2004. I legit cannot remember if I have lost the whole thing and had to start over, but this collection can certainly be traced back to my first laptop that could run the Sims 2. For the longest time, I merely collected a big pile of everything shiny and cool that caught my eye, resulting in a big mixed-up mess combining modern and medieval fantasy and sci-fi and random fandoms and steampunk and everything I ever enjoyed. That… was not sustainable. I tried keeping individual folders within Downloads for specific genres, with the idea that I could swap them in and out for different hoods. Alas, that was too time-consuming for my taste, and I ended up with the same basic downloads folder but very lightly sort of organized but not really.
Sometime within the last ten years, I started trying to cultivate different downloads folders of broad genre categories, all neatly saved on a big flash drive. That’s all well and good, but copying and backing up that shit took away precious hours I could be using to play. Not only that, but it was very rough trying to separate my downloads folder properly—some stuff worked well for multiple genres! So I ended up making copies of the whole downloads folder to build these alternates, which I could then whittle down to only the stuff I actually wanted in there. This medieval alternate downloads folder therefore also contained the folder I’d labeled Medieval CC in my last attempt at organizing, and just to be sure I copied everything over and back repeatedly. And you know how it goes—every time I got excited about the idea of an MCC, I had to go out and download anything new or shiny. And oh yeah, had to stock up on defaults because now I could be using a solely medieval downloads folder! And this new CC would get plonked right into the DL folder, nary a care for organization because I needed to play before I lost interest!
So I had at least two, possibly three copies of all the same content in a collection of medieval CC that’s been building for, let’s call it 15 years more or less. I can’t trust the download organizer—like sir are you showing me all of them? do I throw all these out or leave one behind?—and doing it by hand is extremely tedious, carefully removing all txt and preview files to improve my load time. And actually playing a year-old story concept is delayed yet again.
I’ve got a Megahood set up that I can start converting to medieval whenever I get my act together, and I still that that sounds like fun but also waaaay too big a project for me (latest issue: wait if the capulets and montagues are traditionally alike in dignity is it wrong to make the Capps gentry and the montys merchants? But if I make them both gentry it’ll be an entire damn subhood of nothing but gentry!). I also have the same old MCC hood I started building a year ago, restarting after years of having the concept ready (this one is Algary and it is the one i was building a castle for; it has a few interesting rolled families to start with such as the gentry family having no sim older than teen and me choosing to set that up as the direct heir and some cousins, and a peasant family that involved two elderly ladies who were in love and joined households after their obligatory husbands died, pooling resources to care for their families, but one of them was gonna feel obliged to head off to the church and repent while the other cared for the kids and became a midwife). And then there’s the new guy, Grimwood Abbey, whose concept is only a year old but I sure hope I can follow through on it because it is quite small. Even then I can’t decide yet whether to start with one household (everybody living together for protection!), two households (the church vs the knights), or several households (each knight beginning in their own household with their squire). The latter would make it easier for each knight to earn their own money and compete to purchase gentry approval from the church… but idk.
Anyway. After all that I am really hoping I am about ready to actually play a bit. Even just making some sims and buildings. Today I need to progress further in weeding out CC, try to find a way I can do that more efficiently, maybe find some nice standardized set of makeup and default eyes and skin to use rather than the haphazard collections I barely touch (I prefer to lean toward maxis match over Shiny Realistic skins where everyone has auto makeup, but I’m sure there is something nice out there that suits my needs), and I unfortunately saw some nice medieval clothes I don’t have while downloading a whole fresh set of Sun&Moon Star Factory stuffs (which, I had multiple copies of! Didn’t know what was updated and what was outdated or what! So I threw out everything I had and re-downloaded the entire collection, which may have been a bit drastic but it definitely worked. Also, why is there no complete user guide for this. A “how to get started” or something. Whatever.), so I also gotta download that. Then maybe I can make a test sim to make sure defaults and stuff work okay, and then maybe download some medieval lots to speed up the building process? And then I can play one of my various hood concepts finally actually? Maybe?
TLDR: I am getting frustrated because I have so many downloads, many of them duplicates within folder within the main folder, that it’s taking me all weekend just to straighten them out (and even then I might not be able to finish, despite it being a 3 day weekend where I live). I swear, it would be faster just to throw it all away and start over, except I can’t do that because I am clearly a CC hoarder and I might need a piece of CC that can no longer be downloaded.
...thus goes the preliminary legend of Grimwood Abbey and the horror story of Getting It Set Up. Someday, someday...
#the sims 2#medieval sims#grimwood abbey#boy I hope somebody enjoys reading my long winded rambling complaints#it’s okay someday I might have actual sims content to post#simblr#I guess#I feel like I have not discovered the correct way to tag this yet
1 note
·
View note
Text
Flow Just Like Water
youtube
Story and writing-related transparency update and my many shames...
The Question on Everyone’s Mind
“Hey you haven’t updated No Stars over Uptown in almost a year...”
Hmm, I hate it when you’re right. (This section has been rewritten ad-nauseam to curb back the bitchiness by the way)
So back in early/mid 2018, the idea was to divorce Uptown from a person who influenced it (and myself) heavily. She was my most important audience member, the closest friend I ever had, and unfortunately someone who used her power to bully, ostracize, and hurt others with my help. I cut contact when the hurt + some self-awareness finally reached me. Apologies were made and I feel like my work will never be done with it, but there was still Uptown.
Between censored comments, entirely recasting Axel’s save, different plot threads, and a load of disclaimers, there was nothing that would scrub her influence from the story. There was no way to cleanly drop everything because of how deep her influence went. It disgusted me to look back at it, and I had to private the blog because I feared what it endorsed, even if just in the past.
I pulled back from that sims writing community. I had its main thread on the Official Forums removed too (I guess if that was a mystery to anyone). It was a surrender that I never wanted to do, but I had it in my mind that if I was gone, then she wouldn’t be there either. Uptown became this cursed item, and as I quietly retired it, I noticed that she went quieter too. Not gone, but enough to make me sleep easier at night and even occasionally say hello to old friends.
And I hope deep in my heart that no one else is getting hurt in my place, but now this is gonna haunt me all day huh!
The two paths forward...
1) Complete Uptown rewrite that I’ve been threatening everyone with all year. While it won’t ever be clean because I can’t undo time, I do have a sound outline for a story that is much more true to my actual vision and how I’ve evolved, with a few necessary boundaries in place that are going to be there for all stories moving forward: no more casting calls and no more collaborative efforts. I am not going to open myself up to this happening again, even if the people have changed.
2) Same as above, but I continue the original Uptown as a favor to loyal readers alongside the rewrite. I would try to put the effort into it that I initially did, but with no promises on an update schedule and no advertising. I did ask myself “is there Patreon but without pledging money, just the private posts function” but it could operate as part of a private forum, a members-only part of a website, etc.
Also readers of the original would be beholden to a rule of “don’t spoil the rewrite for new readers, c’mon guys”. I mean, not really, but it is a good courtesy to extend to people.
Priority on this isn’t high but you at least will see what is!
I will probably make the blog public again either way due to the many broken links on my Tumblr but we’ll see. There are other things to deal with as I shall list!
Where Life’s Been Regardless
Been spending more time with my grandpa every weekend. Life’s pretty good and he’s warming up to my dogs.
Shiny New Webbed Site
Cucumber Fields Forever is a site I own now. We have a full domain, cucumberfieldsforever.com, a blog with one post, and the framework needed to host stories the way I want to and still through WordPress. The functionality of likes, comments, and following should still be the same but you know...I’ll take feedback too...
The main blog still has an undefined purpose though I do have drafts sitting around about:
The maybe/maybe not hoax band that was on the Metal Archives and the history of Funeral Doom Metal.
The curious case of when Sims 4 babies get their genetics and my only collaboration (read: was talking about it with a friend and might quote her if needed, it’s actually a bit of a doozy)
Amazon.com’s fake dried udon noodles, an actual issue by the way.
Things I’m reading! (This’d be a monthly feature if so)
For the sake of unity, I am thinking of solutions for hosting old and shameful content there including Uptown and for the real fans in my followers feed, Eight Cicadas...a world I totally have plans for too (not really). I don’t want them to be front-and-center, and that’s why I mentioned forums/members-only content. I finally have that power! Maybe.
Ooooh but what are the costs? Not too much to handle, that’s what. 😉 (Like really, I don’t need any hand-wringing about this, I can manage my finances)
Project Queue (In Order of Confirmedness)
Outrun the Scythe: have you seen me post out-of-context Sims 3 pictures? Did you want more? Did you hope it was Linda in Custody? If the answers are yes, yes, and “meh, whatever you want”, then you’re in luck.
Outrun the Scythe is a Sims 3-based tale of a young gay man and his zombie grandma, as they are both offered separate roles of being the undying intermediaries between the world of humans and the influence of a race of space daemons. It’s pretty familiar if you’ve been following me pre-Uptown, taking some cues from stories I’ve kept under lock and key like Eight Cicadas, The Chains of Lyra, and the not-so-locked-up Ironstar Immortals (of which Outrun is just the direct sequel to sans any retconning...ah the smell of early 2013 and performative heterosexuality)
Ah, back to my roots.
It’s a hybrid of gameplay, story, and lore about my little race of daemons with a lot of my own idiosyncrasies that I’m not really ashamed of: basing it off a super-polarizing Sims 3 challenge from a site I moderate, using a lot of EA’s pre-made townies and their genes, lots of unnecessary posemaking, stupid references. It’s a comfort to have in my roster.
While the first few chapters are in the middle of revision, I have around six in the queue and will be making this public when I have ten. I’m guessing December then?
Undocumented Black Widow Challenge: I just did this for fun/forum kudos (yes, in fact I have joined many forums), there was going to be a short story but it was quickly becoming something against my code of ethics. I mean, sims die and all. (read: I had to choose between “heterosexual widow” and “widow with some same-sex marriages that still end in tragedy, reinforcing negative stereotypes to the public for the sake of me not getting bored and detached during gameplay” so there were no good choices. Except for her affair with the mailwoman, 10/10) I hope to finish this before October ends and get my medal on Boolprop, I’m pretty far through it all. I might upload the sims involved anyways. This is for TS4.
I mentioned it because it’s keeping me busy. But not for long!
NaNoWriMo 2020: Dipping my toes into that again! It’s not sims-related, just a tale of lesbians, nosy neighbors, a haunted beach house, and some light murder and kidnapping. And I actually got my brother to scout out locations for me this weekend. If there’s any demand, I can share chapters as the rough drafts are finished, especially for the sake of proofreading.
Not saying I’m publishable, but wouldn’t it be nice? Will keep me occupied for much of November.
Untitled “Dear Diary” Challenge: Tired of feeling left out of the fun on the Boolprop forums, their “Dear Diary” challenge was the one that appealed to me the most on first glance. Why? Probably once I found an idea that let it be set in the early/mid-2000′s to begin with and explore some interesting characters through diary entries (which I have mixed feelings on as a literary device but I think that’s just me saying “well I didn’t like Dracula”, yes you get bonus points for writing it like a diary)
Also writing is the one skill I’m good at across multiple games. Wanna hear me bitch about the cooking skill tree in TS4 or riding in TS3? I’ll spare you.
I guess I could have included “spending time on Boolprop with old and new friends” in where my life has been. It’s a nice lil community if also a place with its own idiosyncrasies as well. So it doesn’t feel like I’m promoting another community if/when I make a thread there for Outrun the Scythe, I want to have a couple chapters of this ready to go by Outrun’s release, though it’s not gonna be the highest priority compared to it nor as long because I think I can blast through the gameplay quickly.
This one will be played in TS4 due to it having the easiest writing skill/I dunno variety is the spice of life. And hopefully another December release.
Defunded or Forgotten?: Oh shit I actually released stuff in 2020 and told no one? I do have a “mortifying ordeal of being known” sinking feeling whenever I get a site hit because it’s not my best work (but good enough) and veered sharply into issues I may be over my head in, though I try to be a good noodle with research and listening. Maybe hiding is bad after all.
Being based off a very flawed and incomplete Sims 3 challenge I found in the annals of the Official Forums, there’s a lot of behind-the-scenes work just making sense of things. And I’m scared of working on reconstructing the house but I haven’t abandoned the project yet. The story has eight chapters so far and is pretty game-based with some additions here and there. Scared of how long it could be though!
Date for this unknown.
Untitled Sunlit Tides Decadynasty: another year-long abandoned TS3 project with a much stupider reason why. Last update was about Hua getting ready for her wedding, and I wanted to do some poses for a bait-and-switch wedding chapter because to put it mildly, her real one was an absolute disaster.
Blender decided to fuck up its interface again, I got discouraged (this probably does account for some of the Uptown delays too), and when I decided to plow forward, it was for other projects instead.
Meanwhile I played all the way to Gen 5′s teenhood and the only thing stopping me is time (it takes almost 30 minutes to load the file right now, though they’ll be looking at moving towns in a couple gens) and maybe fear of the Logic skill.
Date for this also unknown but it’s easy to pump out updates once I’m in the groove for it. My third heir had a difficult life so maybe I’m just trying to bury it.
Also I just noticed the view count there was really good and probably because I linked it here on Tumblr last year. Thank you so much guys. I can’t really fret over views on Carl’s forum these days thanks to the years-long death spiral pretty much every forum anywhere has been riding on. But it’s a nice surprise. And it’s an alright little challenge recap to read during your lunch break or whatever.
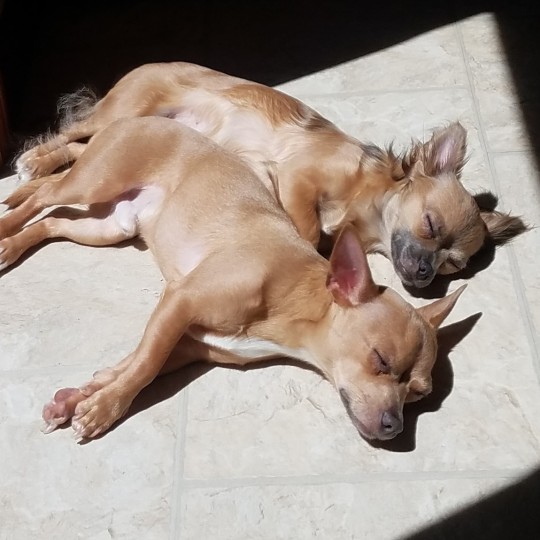
The Wawas
I figured I’d end on the real news everyone wants! Both the chihuahuas are a year and a half now and reached their adult size around a year ago. For the most part, they are happy and healthy dogs.
15 notes
·
View notes
Text
III. Meshing a (vintage) dress
(Previous: II. Learning to mesh)
Now that you know how to get around in Blender, you can finally put your newly acquired skills into action and mesh your first dress. I just hope you did your homework and really made your donuts - otherwise you might find it very difficult to understand what's going on in this part! I'll assume that you've watched and practised it all, so I won't explain the basic yet again. I will be writing the shortkeys in brackets though – there are way too many of them to remember them all after just a couple of videos.
So, let's get it started... But where?
As usually, there's no one proper answer to this question. Generally speaking, creators' approaches to meshing can be divided into 3 categories:
Combining parts of different EA meshes into a new mesh – a.k.a. frankenmeshing.
For sure you've seen frankenmeshed CC many times, even though you might not have realised it. Let's say EA releases a new DLC which includes a top with some cool, never-seen-before sleeves. Let's say there's a dress in game which you think would look great with those new sleeves instead of the boring old ones. In such case you can simply export both meshes in S4S, open one of them in Blender and append the other one (more on it later). A bit of deleting & merging of vertices and voilà! The mesh is ready. Most of the time you don't even have to worry about uv-1 and weights (again, more on it later... LOTS on it later).
Mesh editing
That's pretty self-explanatory, isn't it? This method is what most tutorials try to teach you. Look for a piece which resembles the most what you'd like to make. Export the mesh and make the necessary adjustments. Depending on how much you edited, you might have to mess with uv-1 and weights a little bit, but usually it shouldn't be too problematic.
Making a mesh from scratch
As far as I know without having ever used Marvellous Designer, this is what MD creators do: 'sew' their mesh completely from scratch and then import it to Blender. Such a mesh doesn't carry any of the vital information – uv-maps, weights, bones, anything - so all of those have to be manually assigned to it. This, obviously, significantly increases the workload and can be very tricky to do; however, this meshing method gives you almost unlimited freedom. If you don't limit yourself to editing existing stuff, you can make pretty much ANYTHING.
As you can see, all of those methods have their pros and cons - and they're all equally valuable as long as they help you achieve your goal. The method which I like the most and which I'm going to show you lands somewhere between no. 2 and 3: I use an existing top and make it into a dress. This way I have lots of creative freedom, but also reduce the unnecessary workload (yes, in most cases meshing a top from scratch would be totally unnecessary).
Enough theory, let's go grab that top!
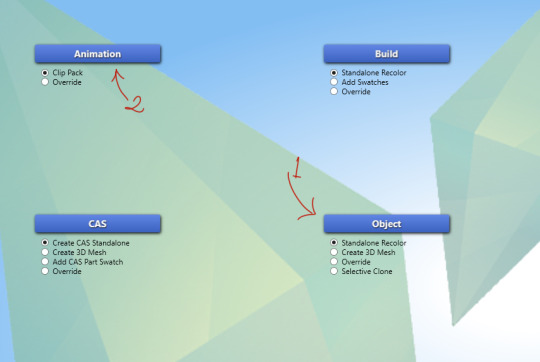
Open S4S. Choose the “Create 3D mesh” option under “CAS” menu and then click that “CAS” button. You will see the list of all CAS items in your game.
NOTE: If you DON'T see the list, that probably means S4S didn't manage to find your TS4 files. You have to open the 'Settings' tab and manually change the 'Sims 4 Path' and 'Sims 4 Documents'. And if you're already there, make sure your Blender path is correct as well!

As you can see, there are many categories you can choose from at the top to narrow down your search. I need a top for adult females, so that's what I'm going to select. My favourite starting point is that simple BG top – it's skin-tight (meaning: the texture is only printed on top of the body, not really meshed, which makes it perfect for any future edits) almost everywhere, except for the breast area: there it's nicely stretched, just like it should be in case of my dress. If I wanted to make a dress with a deep décolletage, like an evening or ball gown, I'd type 'nude' in the search bar and select that naked female Barbie top instead.
The swatch doesn't matter. Select any of them and then click 'next'. I chose the red one, just because I like the colour:
What you're doing now is cloning a BG item and creating a new package. Name it whatever you want and save it in some 'Tutorial' folder or so. It doesn't really matter, as soon you won't need it anymore – we're here only for the mesh.
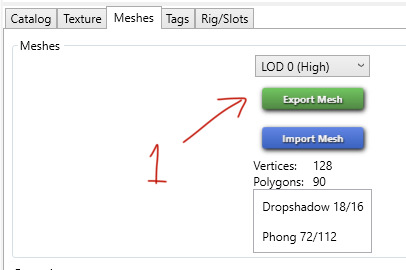
Once you've done it, a new window will appear. This is your new package with all the information it carries. We'll delve into details later – for now, as I said, we only need the mesh. Go to the 'Meshes' tab and click the 'Export mesh' button (make sure NOT to change the level of detail by accident!). Save it in your Tutorial folder as whatever (e.g. mesh_1).
You can close S4S now – we won't need it for a loooong time. Open your newly exported Blender file instead. This is what you should see:

NOTE: It won't make any sense to you right now, but check if you see the 'S4Studio CAS Tools' on the right side! If they're not there, it means your Blender and S4S are not properly connected and you'll run into problems later. Go back to S4S settings and assign the correct Blender path!
I'd suggest you immediately change the perspective to Ortho (num 5) and hide those sidebars on the right (n) and left (t) of the main window. Better, right?
Make sure your cursor is in the main window! If the shortkeys aren't working, it's probably because the cursor is in the wrong place.
When you go into edit mode (tab), you might notice one very important detail: body parts are also parts of the mesh. If you delete them, they won't appear on your sim either. Our top includes hands and neck only – the rest of what you can see is visible only in Blender. A good way to check if your mesh isn't missing anything is clicking that little plus next to 'rig' and then 'closing' all those little eyes next to all the listed body parts. Now your model will look a bit different:

Of course, missing some of those body parts is not a problem. A dress shouldn't include head or feet – those are separate categories. We can toggle feet, both heads and teeth visible again. What we lack is a bottom, i.e. legs – but luckily, we don't have to worry about it, as they'll be hidden under the skirt anyway. I will explain how to add legs (or any other missing body parts) to the mesh at one point, but a bit later – for now let's say we don't need them.
There are two methods of meshing a skirt that I'd like to show you, and they both start with the same basic steps:
1. Just after exporting, your mesh is cut wherever its uv map was cut, which might lead to some problems. Better select all your vertices (a), press w and choose 'remove doubles' from the list. Almost 300 vertices got merged!

2. Turn on the X-ray. Make sure you're in the front view (num 1) and then select (b) all the vertices below the waistline. Press X or del and choose 'vertices'. Kaboom!
3. Select (b) the lowest remaining row of vertices.
4. Extrude those vertices down (e, z) until the point to which your dress should reach. If you're using a reference picture, that's one of those moments when you should take a close look at it.

5. Scale (s) those extruded vertices until the bottom of your dress is as wide as it should be. If you're using a picture, pay attention to the proportion of the bottom of the dress vs shoulders – that's usually the best reference point you can get. Mine should be quite a bit wider than the shoulders, so I got this:

6. Turn the camera around and check how it looks from other viewpoints. I can see that my skirt is kind of asymmetrical, and not in a good way: flat at the back, going too far to the front. Let's go to the side view (num 3) and move those vertices back a bit (g, y). Much better!
7. I still don't like that flatness at the back. Let's go to the top view (num 7) and select only the central vertex on the back. Now, do you remember what you did to get that icing on the donut? Proportional editing? That's what I'm going to use. I'll turn it on only for connected vertices (alt + o) and then move that central vertex back (g, y).
NOTE: If your whole mesh is moving when you're trying to use proportional editing, scroll your mouse wheel until you see a white circle on the screen. The smaller the circle, the smaller the area affected by your edits. By default it's very big, that's why everything is moving!
8. Once again look around and make sure the basic shape of your skirt mesh is correct. Save, e.g. as mesh_2 (ctrl + shift + s).
Did you make it till the end? Congratulations! I'm sorry it got so long and I hope you could follow everything (also, please tell me if something isn't clear, I'll try to add explanations). Of course we're not done with our meshing adventures; the skirt still needs lots of tuning, but we'll deal with it next time. Now we all deserve a good rest :).
(Next: III a. Method I: Loop, Sculpt, Cut)
66 notes
·
View notes
Photo


RABBIT HOLE RECOLOURS AND RESCRIPTING TUTORIAL
Are you having difficulties getting the outrageously coloured rabbit holes to fit into your moody emo town? Or would you like to make your high street look like a Skittles factory had just exploded? Despair no more! Release your inner MacGyver and DIY!
Programs you need:
S3oc
S3pe
Photoshop or Gimp (DDS plugins for Photoshop -> this and this, Gimp has this feature built in already)
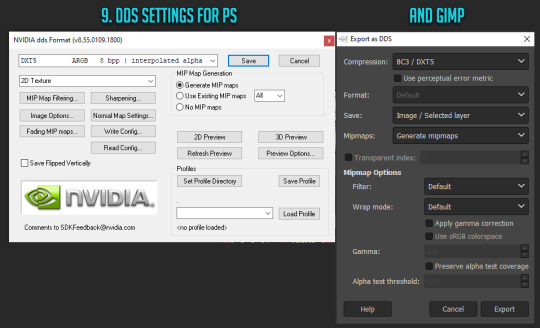
// Disclaimer: This tutorial is picture and text heavy. I hate having to have bazillion different tutorials open because everyone always assumes you know what you are doing and I keep on closing tabs by accident, so this tutorial will run you through each and every step with (far too much) detail because I’m a simpleton and I need both pictures and text when learning new stuff! I have divided this into digestable parts, so you can skip ahead down the tutorial if you are familiar with some of the steps such as cloning. Pictures above are numbered and each step is explained below.
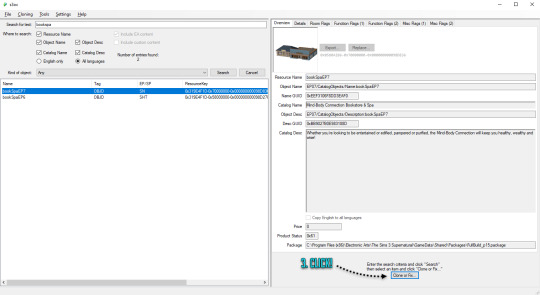
1. CLONING A RABBIT HOLE
1. Open S3oc, click Cloning and Normal objects.
2. Click Tools and Search, type in keywords such as bookspa or hospital. If you still can’t find what you are looking for, then the other option is to just scroll down the list of items and try locating the rabbit hole you need.
3. Once you have found your rabbit hole, click Clone or Fix.
4. Tick all the boxes I have ticked.
5. Edit the Catalog Name and Description, these are the things you see in game when you browse through the items and stuff. If you are not fussed, leave them as is.
6. Change the file name here (Some guides mention changing it, some skip it, but I have changed mine and nothing exploded so far!) and click Start. A window pops up asking where you want to save your package, I usually create separate folders for my projects on my desktop as I don’t want to accidentally mix my .DDS files with other rabbit hole files and stuff, but if chaos is your thing just save wherever.
2. RECOLOURING A RABBIT HOLE
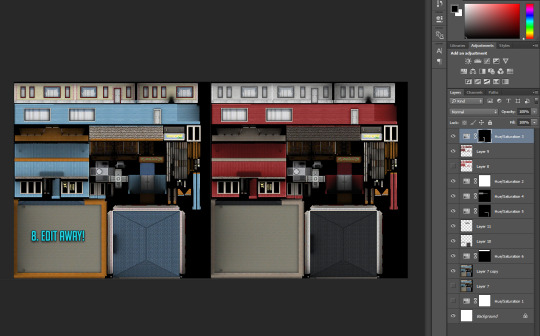
7. Locate your newly created rabbit hole clone .package (You can create a backup copy of it somewhere if you think you will mess up somehow) and open it with S3pe. Look through the IMG tags and find a LOD image like this. Right click and Export to file. If you are organized like I am, you can save it in your project folder with your package file... Or place it wherever because of whatever method of madness you use when editing your files. I’m not your mother. Do whatevs.
8. Now depending on which program you use, open the .DDS file in Gimp or Photoshop, if you get a pop up window just go with default size and no mipmaps. This is the step where you let your creative juices flow and take over. Want to change everything? Or only one colour? Depending on the rabbit hole you have chosen to edit it could be a really simple one click thing fix, or if you picked a more complicated one like I did, you are going to spend some time on this step. I added my before and after picture edits I did in Photoshop as an example.
// Photoshop Tip! I’m not familiar with Gimp, so I’m not sure how well this works in there, but I abuse the hell out of Hue/Saturation and the colour picker in Photoshop to get rid of and edit the colours. Press the little hand icon in the Hue/Saturation pop up box and click the colour you want to change in the image and it picks it for you, then just use the three sliders to change your colours, easy! Be careful though! Sometimes it changes too many areas in one go, so you might have to use marquee tool to isolate the bits you want to edit so rest of the image doesn’t change (While using marquee tool you can press either Shift or Alt at the same time which allows you to add into or remove from your current selection!). Or use masks. Up to you. Then once you have selected the areas, create a new layer and hit the Hue/Saturation button and it will only impact the areas you have selected. Play with layer settings if you end up adding separate colours on top, for example my red paint layer looked best with linear light and 80% opacity.

9. Once you are satisfied with your colours and you have merged your layers, this next step is different with Photoshop and Gimp. With Photoshop you can use Save As option while with Gimp you have to use Export As. Either way, save or export over/replace the image you originally opened using the .DDS settings shown (Please correct me if I’m wrong with Gimp settings as I don’t really use it!). If you have been saving as psd or changing the file’s name, make sure the name is now EXACTLY the same as when you exported it earlier. However, I’d urge you to do backup copies before overwriting the file, in case you have coloured something wrong or if you think you might want to change something after doing a test. Just you know, to save you some hassle if shit hits the fan.
10. Back to S3pe, you will now replace the image you previously exported with the edited one. Click Resources (or right click the IMG file on list you are replacing, both ways work), Import from file and pick the newly edited file, click ok on the prompt. Your old IMG file should be crossed out on the list and new IMG added (Once you save the crossed out one simply disappears). Depending on what kind of edits you did to the LOD IMG, you have to repeat exporting, editing and importing each and every IMG file corresponding to the changes you did with the first one. Be extra careful with matching the colours between the IMG files, otherwise you get some funky rabbit holes when zooming in and out! For example for my rather edit heavy LOD image I had to edit another 5 IMG files all in all in the end (Different wall bits, bit of carpet, window trims, roof!).
3. MAKING IT BASE GAME COMPATIBLE
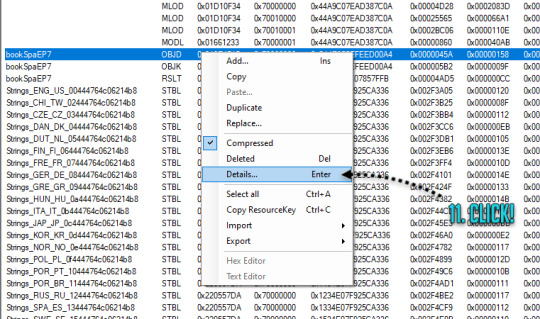
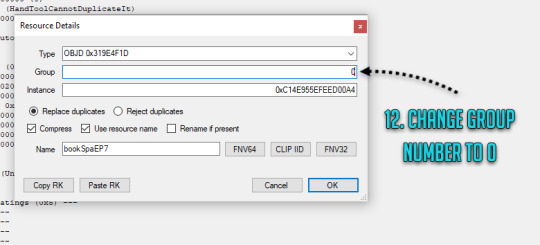
11. Done with your IMG files? Still in S3pe, locate OBJD file on the list, either hit enter or right click for Details.
12. Change the group number from whatever to 0. Save your package.
You are done and your rabbit hole is ready to go in game! Drop it with your other .packages in your Mod folder and test it, in edit and live mode in game. Are some parts of the building still showing old colours or are they changing drastically when you zoom in or out? It’s not the end of the world! You must have forgotten to edit one of the IMG files or the colours are not matching, double check that all the bits you edited in the first image match with rest of the IMG files. Even if you got the colours right there will be a slight chance due to how Sims 3 renders items, so don’t panic unless IT’S REALLY BAD! Just look at how other nonedited Sims 3 stuff renders and compare how yours behaves.
// But wait! Maybe you want to make it a default replacement rather than a new individual rabbit hole like my tutorial does? For default replacements, follow this guide.
4. CHANGING THE RABBIT HOLE SCRIPT (OPTIONAL)
Like the look of your rabbit hole building, but don’t think it looks like a spa or a bookshop? Is it giving you a hospital and science lab vibe instead? Again, no need for anxiety! You can fix it! Sort of. It should work but be wary! If you use lets say the Annex script, you got to have University EP installed to make it work. Without the right expansion, you can’t have special careers. Just keep in mind that some scripts may not work with some buildings due to the specific animations and stuff, so test it before you release your masterpiece in the wild.
13. Open your .package in S3pe, locate OBJK file and right click Edit OBJK.
14. Replace the String bit with one of these scripts from the following list. Commit to changes and save your package. You are done!
Bookstore
Sims3.Gameplay.Objects.RabbitHoles.Bookstore
Business and journalism
Sims3.Gameplay.Objects.RabbitHoles.BusinessAndJournalismRabbitHole
City hall
Sims3.Gameplay.Objects.RabbitHoles.CityHall
Criminal building
Sims3.Gameplay.Objects.RabbitHoles.Hideout
Diner
Sims3.Gameplay.Objects.RabbitHoles.Diner
Grocers
Sims3.Gameplay.Objects.RabbitHoles.Grocery
Hospital
Sims3.Gameplay.Objects.RabbitHoles.Hospital
Mausoleum
Sims3.Gameplay.Objects.RabbitHoles.Mausoleum
Military
Sims3.Gameplay.Objects.RabbitHoles.MilitaryBase
Movie studio
Sims3.Gameplay.Objects.RabbitHoles.MovieSet
Police station
Sims3.Gameplay.Objects.RabbitHoles.PoliceStation
School
Sims3.Gameplay.Objects.RabbitHoles.SchoolRabbitHole
Science
Sims3.Gameplay.Objects.RabbitHoles.ScienceLab
Spa
Sims3.Gameplay.Objects.RabbitHoles.DaySpa
Sports stadium
Sims3.Gameplay.Objects.RabbitHoles.Stadium
Theatre
Sims3.Gameplay.Objects.RabbitHoles.Theatre
Vault Of Antiquity
Sims3.Gameplay.Objects.RabbitHoles.VaultOfAntiquity
Subway
Sims3.Gameplay.Objects.RabbitHoles.Subway
Fortune teller caravan
Sims3.Gameplay.Objects.RabbitHoles.GypsyCaravan
Equestrian center
Sims3.Gameplay.Objects.RabbitHoles.EquestrianCenter
Annex
Sims3.Gameplay.Objects.RabbitHoles.Annex
Hospital & science combo
Sims3.Gameplay.Objects.RabbitHoles.ComboHospitalScienceLab
School & stadium combo
Sims3.Gameplay.Objects.RabbitHoles.ComboSchoolStadium
Book & spa combo
Sims3.Gameplay.Objects.RabbitHoles.ComboBookstoreDaySpa
City hall, police & military combo
Sims3.Gameplay.Objects.RabbitHoles.ComboCityhallPoliceMilitary
Business & bistro combo
Sims3.Gameplay.Objects.RabbitHoles.ComboBusinessRestaurant
And I think that’s it. Let me know if you know a better way or I have made an error in this tutorial! Or if you want to fight me, I will meet you behind the mall by the bins for some asskicking.
#the sims 3#ts3#simblr#ts3 tutorial#ts3 rabbit hole recolour tutorial#ts3 base game compatible tutorial#ts3 cloning tutorial
132 notes
·
View notes
Note
So, it's actually my first time playing The Sims 2 and i'm really liking so far, i'm having quite a tough time finding what stuff should I download to make the game better (and prettier). What mods/cc do you use to make the perfomance top notch? I'm currently going through resources from simblrs, but i'm trying to hold back so i don't break the game with too many things. (btw do you know how much GB you can have until the game gets laggy?)
Oh man this is pretty hard question for someone who has pretty much just winged it with same setup for years only adding on top of the pile and replacing files that got corrupted between computer transfers but well lessee... (this got really long so I’ll put the rest under read more)
For starters, protect your game from itself, this tutorial goes through quite few points, I recommend going through each step just in case. Most important is write protecting your game files though, that way you can’t break your installation.
Marasims has tutorial for how to get your game to recognize your graphics and fix pink flashing and crashing (might wanna go through it even if your game appears to be working now)
Get some essential mods! These are up to anyone’s preferences and you should choose what to install depending on the way you play really but the ones listed in the first post are good start, they basically are things that’ll keep the game from killing itself. I’d at least recommend FFS Director's Cut and Boiling Oil’s No Sim Loaded, they’ll help to keep your game safe and it does help the performance a little too when the game isn’t spawning hundreds of Sims in the background.
Get familiar with things you can do in your game that will cause it to explode and avoid doing them. Yeah, it’s old and crappily coded and many default functions will cause neighborhood/game corruption.
And that’s most important ones for making the game run and not break for starters. If it’s still not flashing pink at that point after few minutes of playing then let’s get to beautification:
For nicer looking Sims I’d start with default replacements, you can only have one per item in your game at once, but if you get bored/don’t like the one you chose just delete it and replace with another and it should just work without extra steps (do delete caches between though, the first tutorial linked mentions the three: accessory.cache, groups.cache, and cigen.package). Defaulting the game items alone gets you pretty far before you need to start introducing custom content.
Lighting mod can do a lot for the looks of your game, there are couple to choose from:
Gunmod’s Radiance
Hat’s edit of it
Spookymuffin’s
DreadPirate’s maxis match lighting mod. (I think this is what most people use nowadays)
Perhaps you’d like some additional face sliders if you create a lot of sims?
Choose if you’re going for more realistic or more maxis matchy game and try to build your downloads folder accordingly, doing so helps to limit the content and keep the look more cohesive.
If you want hairs you can probably find anything you might need from allthehairs.uk. Keep an eye on the listed polycounts, while your computer probably can display high poly hairs if it has actual graphics card it’s really not good idea to fill your game with hairs that have polycount over 10k-20k since those will cause lag and possibly ruin your graphics card.
Simscave updates (+updates archive) are good way to find new content to download, they get updated almost daily.
I honestly don’t build/decorate enough to have recommendations for buy/build category things, I just download houses and whatever nice items I see, throw everything that comes with them in and then cry because I have to clean out the things I don’t even need for anything. Talking of which: Never install sims2packs with the game’s installer, always use Clean Installer instead!
If you’ve played Sims 3 and used to merge files in it for better performance you can do the same thing in Sims 2 too with SimPE, but: before you merge things together make absolutely sure you want to keep each and every single color you put in that file since if you delete one in game the game will delete the whole bundle. I believe merging does make the game read the files bit faster so it can be beneficial if you aren’t like me who’s constantly changing her mind about what I want in my game and what not. Here’s tutorial for how to do it.
Renaming files (and folders!) to remove special characters like [({%¤?~*})]+ etc and spaces should also help loading times, - and _ are fine though. Also make sure your file paths stay as short as possible with as few folders as possible since it helps loading times. So for example downloads\hair\male\newsea is fine but downloads\hairMaleNewsea would be better since it’s only one folder level to read instead of three.
As for what your computer can take without lagging, there’s really no number of files I can give you. I’ve read some people run their games fine with like 40GB of content, mine takes about 6 minutes to reach neighborhood with about 5GB of custom content but it runs without problems once I get in the game. Also just warning in advance: in CAS your makeup/accessory tab will pretty much lag if you install anything there, that’s just how it seems to be for whatever reason and there’s no way around it. High poly items cause more lag than lower poly items and files with bigger textures do so too.
I hope I’m not forgetting anything too important from the above, it’s really late and way past my bed time so I gotta just post this as is. If anyone else has any tips or other things to add please do!
54 notes
·
View notes
Text
Wanting Is More Pleasurable Than Having (And Other Things Vulcans Don’t Know a Damned Thing About): Part 2
There’s no rhyme or reason to why it starts up again. There really never is.
He’s on an away mission with the Lieutenant Commander and Lowen, barely disengaged from the bay, when suddenly he’s on the floor of the shuttlepod, LT crouched over him, his hands holding his shoulders back to the grating. He’s only vaguely aware of what’s happening around him; all he can focus on is Wisteria yelling into the comms, telling the bridge that they’re docking back up and Doc Gazalt better be there to meet them.
“Breathe,” Lowen tells him, but even that seems hard, seems impossible.
“What happened?” he asks groggily, but he knows, he knows. There’s no other reason for his chest to feel so tight, for his throat to feel so raw.
“Looks like you had a bit of a bad spell there, Obi.” Lowen gives him one of his kind smiles, helping him upright so he can put his head between his knees. “Has us all worried here for a minute.”
“Sorry,” he mutters, ducking his head. He hopes the LT can’t see the humiliation stamped on his face. Probably visible in the next fucking system with his luck, but he can hope.
“Hey, it’s okay.” The LT’s voice is low, soothing, despite the downright tooth-shaking way he claps him on the back. “You can’t control stuff like this. Not all the time.”
Of course you fucking can; he doesn’t spend hours down in medbay every month trying to recalibrate his dosage just for shits and giggles. He appreciate the fiction, though. He’ll take what face he can save; right now he doesn’t even have a paperclip and shoestring of pride left.
When they get back, the captain is waiting, along with the doctor and -- oh god -- Seiran. This is going to be pleasant.
“It’s nothing.”
Doc Gazalt doesn’t say anything, too busy filling in the updates to his medical record. Not like she really needs to either; one glance up at her face tells him all he needs to know about how stupid she thinks he is.
“Your episodes have been increasing in frequency in the last month,” she says finally. “And you’ve been living off three hours of sleep a night for nearly a week. I don’t think it’s nothing.”
Obi sighs, dragging his uniform back over his chest. “I just need more medication. It’ll fix itself like it always does.”
Garrack balances her PADD on the jut of her hip, considering him. “I think we need to think about alternative treatment.”
“What, you got some pot growing down in hydropnics?” he asks. “Think I should ask the replicator if it knows how to make hash brownies?”
The Chief Medical Officer sends him one of her patented unimpressed glares, but he knows better. She ducks her head down at some files, and he catches it, the smile flirting with the corners of her mouth. “I was thinking something more along the lines of neuropressure.”
“Neuropressure?” He’s heard stuff about it, of course -- there wasn’t much you didn’t hear around the barracks -- but here? “Vulcan neuropressure? You got someone around here who can to that?”
He doesn’t like the coy look on her face. He hasn’t been on the Wistal long, but he’s already been warned off the good doctor’s attempts at meddling.
“Why, of course,” she purrs, so satisfied she should have feathers sticking out. “Ensign Shirayuki is considered a master practitioner back on Vulcan.”
He nearly tumbles off the bed. “Ah, no. No way. Not happening.”
Garrack’s head swivels toward hm, eyebrows raised. “Oh? And why is that?”
“It’s just a bad idea,” he grumbles, rubbing at his shoulder. “Me and her, I mean. Oil and water, you know?”
They’re at her hairline now. “You don’t like Shirayuki?”
Her smile is blinding in his memory, framed by those soft lips, and even now his heart stutters thinking about being near her again, about having her tilt her head to give him that curious look and --
-- And yeah, he’s not the limiting factor here. “No, it’s not -- I made a bad impression.”
“You think Shirayuki doesn’t like you?” she stares. “What on earth did you do?”
“It’s not that funny,” Obi complains, minutes later, when Garrack stops laughing.
“Oh no,” she sniffs, wiping tears away from her eyes. “It is.”
That’s supposed to be the end of it.
Of course it isn’t. Not even slightly.
Three days later he catches himself on his locker, nearly about to pass out on his feet.
“Damn,” he mutters, shaking his head. “Maybe I should check out hydroponics.” He’s heard one of the ensigns down in medbay has his own corner full of plants no one’s allowed to catalog. There’s got to be something exciting in there.
“Ensign.”
He nearly jumps out of his skin, dropping his civvies on the floor. “Christ.”
Bent-angle brows shift to question. “I must apologize, Ensign,” Shirayuki says, so unfailingly polite. “I hadn’t meant to startle you.”
“It’s....fine.” God, he needs sleep. “I just -- I’m easy to startle today. Is there something I can do for you? Phaser not working properly?”
“No, the weapon you have modified for me is performing quite admirably, in the way that I have not killed anyone with it.”
He stares, half bent to pick up his shirt. “Have you tried?”
Her eyes are wide and jubilant when she tells him, “No!”
How on earth is this girl a Vulcan.
“Something else then?” His mind searches for anything she might possibly need from him, other than to be accidentally sexually harassed. “Maybe your, uh, replicator needs fixing?”
God, that sounded sexual. And like he was inviting himself into her quarters. He really just needs to not talk for a little while. He’s only going to get himself in trouble, standing round with no shirt and asking a woman if he can fix something for her. The ensign certainly isn’t going to take anything wrong, but all he needs is Seiran walking by at the wrong time --
“Ah, no.” Her head twitches just slightly, the Vulcan equivalent of a head shake. “I meant to say there is something I can do for you.”
This is like the start of a really bad holodeck sim. The kind people really frown on you for using on a federation starship.
“You need neuropressure,” she tells him. “I’m amendable to providing it. Come to my quarters after dinner.”
This is not helping. “That’s really not necessary.”
“That is not what Garrack told me.”
Obi sets his jaw. He gets that this could help, he does, but --
He doesn’t need anyone meddling in his life. “Well, I’m sorry to disappoint you but --”
She’s damn quick, he’ll give her that. He’s barely given his back to her when her hand flashes out, hitting him right in the spine and --
Oh, damn. That feels great. His whole body tingles, warmth flooding his veins.
“Fuck,” he says, pressed flat against the metal.
“Oh, I --!” Whatever she’s about to say, she things better of, clearing her throat. “I mean...my quarters. After dinner. If you please, Ensign.”
He doesn’t mean to go. He’s already made an ass of himself in front of her, practically asking her to fuck him in front of her superiors. Obi’s not eager to find out what other cultural misunderstandings he can perpetuate if he lets himself into her private quarters. Last thing he needs is to cause an intergalactic incident with his pants down.
Though, if history serves, he wouldn’t be the first.
He doesn’t mean to go, but after that stunt in the locker room, he lays down on his bed and loses an hour. When he gets up, he’s so disoriented that he worries this is yet another sign that he’s losing it, until he realizes -- that was an hour of dreamless sleep.
Vulcan High Command can kiss his ass; he’ll risk anything for another hour of that.
Even still, the second her door chimes, he gets the urge to bolt. She doesn’t like him -- how could she? -- and the fact that he’s taking her up on this is just taking advantage of her kindness. She can’t possibly --
Her door slides open with a breathy shoosh, and all he can see is that damn smile.
“Welcome!” It’s hard to tell on her face, even with the smile, but she looks -- pleased. It’s not a state he’s ever associated with Vulcans. “You came. Please, come inside.”
“Uh.” He idles in the hallways, uncertain, before surging over the threshold. There, barrier broken. “Right. Thanks for having me, I guess.”
“It is my pleasure,” she assures him warmly. “Now if you’d please remove your pants.”
He gapes. “Excuse me?”
“Did I put that rudely?” Her eyebrows tilt worriedly. “I need you to...disrobe? Strip. To be as naked as the day you were born.”
She grins at that last one. “I do so enjoy English. So many ways to say a single thing! And similes! So expressive.”
He grimaces, bringing up a hand to clutch at his shoulder. “Ah, no one told me --”
“Oh, I’m sorry,” she gasps, the very picture of regret. “I’ve only seen you in uniform, I merely assumed -- is there something misshapen? I assure you I have seen everything --”
He squawks. “There’s nothing wrong with my body!”
Her forehead wrinkles. “Then why --?”
“Fine!” he grumbles, fisting a hand in the back of his shirt. “I’ll get undressed!”
He heaves it off in one swift motion, spiking it to the floor. Too late he realizes that it wasn’t some challenge.
“Oh,” she murmurs faintly, gaze stuck firmly to his chest. The scar. He has a fucking scar there. “I think -- that should be enough. For tonight.”
“You sure?” he asks, a little tight. He needs to learn how to think things through before he does them. Maybe Starfleet has a remedial course. “You were all bullish on my pants earlier.”
“Your torso and upper limbs should be enough.” She’s looking a little greener than normal. He would too, if he had to look at that twisted hunk of flesh with no warning.
She gestures to a mat on the floor. “If you would please kneel?”
All the air goes out of him.
Get on your knees.
“Ah,” he coughs. “Sure,”
His knees feel stiff, locked, but -- but she’s not going to do anything he won’t like. Maybe she doesn’t like him, but she’s not that kind. She wants to help, not humiliate.
Still, every inch feels like a mile on his way to the floor. His breath is coming harsh when he finally settles onto the balls of his feet, braced for -- something.
He doesn’t see but rather feels her settle behind him. Cold fingertips trace down his spine, taping at one, two, three vertebrae before traveling further down. She pushes firmly, and he opens himself to it, to the flood of --
Nothing.
“Hm,” she grunts, sitting up on her knees. She tries harder, enough to make him jerk forward and catch himself on the mat. “Ah, I’m --” She huffs out an annoyed breath, hunching closer, prodding at a few different points before sitting back on her heels.
“I am sorry, Ensign.” She’s the closest to consternation he’s ever herd a Vulcan come. “But you are very...broad. And I am small. And you are very tense besides. I don’t know quite how to...hm.”
He want to offer calling the whole thing off, but the words that come out are, “Would you like me to lay down?”
“Yes!” He looks back to see her wide smile. “That would be preferable.”
He gives her one last lingering look before falling forward onto his hands. This is a terrible idea, he can already tell.
He gets himself on the ground anyway. Like he’s a person that makes good decisions anyway.
The ensign approaches him critically, circling around him as if he’s a particularly puzzling board of Kal-toh. She starts to sit down once, only to make a frustrated noise and stand. Stepping to his other side, she crouches again, only to repeat the process. Eventually, she lets out a loud breath, and then suddenly there’s weight spanning his hips, a flush of heat, and there she is, delicately perched on the cushion of his ass.
Oh there is just...not going to be a way to explain this to Chief. He can kiss that looming promotion to junior grade goodbye.
“Much better,” she tells him. “Are you comfortable?”
“As I’m going to be,” he mutters into his arms. Scuttlebutt says she’s got something going on with Wisteria, and he takes all gossip with a grain of salt but --
“Is there a problem?”
“No.” But if she’s going to be touching him all evening, there is. “Just...kind of weird, knowing you know all my secrets.”
“Do I?”
“You’ve got my medical records.” He doesn’t mean to sound cross but -- there’s no reason for her to play dumb. He’s been around enough Ferengi to know when he’s being sold fake rations. “I heard Doc Gazalt’s are exhaustive. So you, you know...have seen it all.”
“Ah.” She shifts on her knees, like she’s uncomfortable. “No, it is -- this is a physical therapy. Not psychotherapy. I didn’t --” She hesitates. “I felt it would be a violation to read the whole thing. I only checked for outstanding conditions. If you were considered...touch averse. Things that might make this difficult.”
“Oh.”
“I know you do not like your face touched.” He knows better, but she sounds nervous. “So I will not do that until you tell me you wish to. And I know I should not -- restrict your breathing. I did not concern myself with why.”
His chest is a little tight, but -- in a good way. He thinks.
“The sessions might be more fruitful if you shared your thoughts,” she continues, “but it’s not...required. And I will not invade your privacy by finding these answers for myself. Anything I know will be from your mouth, under your own will.”
“That’s --” It’s hard to speak past the lump in his throat. “Thank you.”
“Please note,” she says, voice lilting slightly. “That this is a sacrifice for me. I am very curious.”
She’s teasing. “Well I’ve got many secrets. A few extra names too. Maybe if you do a good enough job, you’ll get a little something extra out of me.”
She hums, pleased. “I will endeavor to put you at ease, Ensign.” Her hands lift, and after moment of silence she says, “I’m going to touch you now.”
He jumps still, but it’s hardly more than a twitch. It’s nice to be touched skin-to-skin like this. Still, he’s not used to it, not anymore, and he squirms a little under her hands.
And even when he was... it was never as gentle or purposeful as Shirayuki’s touch. He finds himself arching into her just slighting, trying to rise to meet each press of her fingers.
“You’re making this harder, Ensign.” She sounds...amused. “Please lie still.”
“You know,” he says as she presses under the wing of his shoulder blade. “You can call me Obi. Considering you’re going to see me without my pants one day.”
Vulcans don’t laugh, but there’s something about her touch that is lighter, playful. “You may call me Shirayuki, then.”
“Uh-uh, Doc.” He grins into his arms. “Last I checked you were keeping all your clothes on.”
He feels her quiver against his back. “At least for now,” she tells him, but he has no time to ask before a rush of endorphins rolls over him, blotting out his thoughts.
“Are you feeling more at ease...Obi?”
He’s hardly in ambit at this point, floating in a blissed out bubble of the top-shelf neurotransmitters, but her voice tethers him back to the Wistal. “Oh, yeah. This is -- great. Damn.”
“Good.” She sits back, hands leaving the skin of his back. He shouldn’t like how he misses them. “I should do your front as well.”
“Mm,” he agrees, trying to locate the muscles that control his hands. He’s lost track of them over the last...half hour? Damn. Damn. “Yeah, I’ll --”
He’s halfway up, hips lifting off the ground and -- oh. Oh, no. There will be no front doing with that happening.
“I change my mind,” he says, trying to sweep his panic under the carpet. “I think -- I think we’re done.”
“The session is incomplete,” she insists, and from this position, he can see the disapproval etched onto her sharp face. “Get onto your back.”
“Doc, that’s just not -- I mean --”
“Do you have an erection?”
Obi doesn’t believe in gods or higher powers, but if one of them wanted to smite him right now, he’d be mighty grateful.
“I --”
“It’s perfectly normal for human men to experience erections while receiving neuropressure,” she assures him. “You are young, and clearly athletic; barring genetic conditions, your cardiac health must be excellent. And I assume that you regularly m--”
“I will flip over right now,” he grunts, sweat beading at his brow, “if we can just stop having this conversation.”
“I’m trying to put your mind at ease --”
“I’m plenty at ease,” he snaps. “That’s part of the problem. You --”
One moment he’s got his head twisted over his shoulder to snipe at her, the next his back is on the ground, and Shirayuki’s hands have pinned him to the mat.
“I’m sorry,” she huffs, looking like she gotten patina from the exertion. “You were just being unreasonable. Your natural human responses do not worry me. Please be unconcerned as well.”
He’s having a real hard time getting unconcerned when she looks like that over him, pinning him down like he’s some sort naughty mutt. “It’s...fine. Just....keep going.”
She nods, sitting back and --
“Oh!” Her eyes go impossibly round. “Is that --?”
“Yes,” he grits out. “You see why -- ahh!”
Her hand reaches between them, pressing his dick down so it’s under her. She stops dead at his moan. “Did that hurt?”
“No, just --” He coughs. “Just sit up on your knees a little. Might be easier.”
She looks dubious, but doesn’t contradict him. “If you say so.”
“Please,” he begs, and she lifts up, just barely.
“Great,” he gasps. “You can, uh, just...do the thing now.”
Her eyes narrow at him thoughtfully, but her hands come to his chest anyway. “As you wish.”
At the end he’s...mostly relaxed.
“I hope this helps you, Obi,” she tells him at the door. “Humans need regular sleep.”
“Yeah, I’m definitely feeling like I could go to bed.” And handle some pressing business, but that’s not something she needs to know.
“I’m glad to hear that!” She offers him another of her bright smiles. “I hope what dreams you have are good.”
“I’m hoping for none, really.” Especially after the way she touched him in there, but that’s a little much to expect. Something tells him that will be on replay in his subconscious for a good long while.
Just great.
“Then that then.” She nods. “Have a good night.”
“You too, Doc.”
He’s halfway down the hall when she calls. “We never talked about your next session!”
“Three times a week,” Garrack tells him, too gleeful. “Every week. Maybe more if your nightmares persist. But that’s where we’ll start.”
“You’ve got to be kidding.”
She grins. “Nope.”
Aw, fuck.
#obiyukiweek17#day 6#star trek AU#my fic#obiyuki#ans#this is a month or two after the first chapter#Obi has just been low key avoiding her#even though they share friends#because he is convinced there is no way to recover#Shirayuki is not of the same opinion
19 notes
·
View notes
Text
This Is Exactly How to Plan for a Full Year of Working Abroad
At Skillcrush we believe that learning tech skills is the best way for you to upgrade to a flexible, exciting remote career—one you can do from anywhere in the world. Still, saying you want to travel the world and actually doing it are two very different things. To clear up any lingering worries you might have about how to build the globetrotting career of your dreams, we partnered with our friends over at Remote Year to bring you all the insider info on how to become a total remote work pro. Keep reading for the best tips on everything from what to do with your vehicle to how to file taxes internationally.
The idea of picking up your life and committing to traveling for an entire year may make you feel a variety of different emotions: extreme excitement, paralyzing indecision, a sharp sense of fear—sometimes all in the same moment.
How do you even begin to tackle a project like preparing to travel for a year? There are so many things in your life that you need to tie up: your current lease, your agreement with your employer, that kind-of-sort-of relationship that you just started. They all fall under the category of “need-to-figure-out-asap”, but you just don’t know what steps you need to take to start.
To be fair, traveling for a year is not a decision that should be made lightly. After all, you’re committing to 365 days of travel, not just a week or two on the road. That kind of commitment takes some serious planning and organization, which will undoubtedly result in many Google searches for the answers to the questions that are running through your head.
What do I do with my car if I’m going to travel for a year?
While you’re traveling you’ll rely more on planes, trains, and buses to get around than you will your own car. However, if you currently live in a city that requires you have your own form of transportation (we’re looking at you, Los Angeles) you probably have a few questions about what you should do with that expensive investment.
The obvious first answer is to sell. Fully embrace a minimalist lifestyle while you’re on the road knowing that everything you own is in your luggage. On top of that feeling of freedom that comes when you let go of the things you don’t need, selling your car will line your pockets with some extra cash to take with you on your journey.
If you’re attached to your car, if you’ve given it a name, if you have years worth of memories stored between the seat cushions, or you just aren’t ready to part with it before your trip, consider a long term storage solution. Most cities have storage facilities with spaces large enough to house a car – you’ll just have to think about if you want to be footing a monthly storage bill in addition to your car payment.
What should I do with my apartment when I’m traveling?
Maybe you were hit with an epiphany, a moment when a lightbulb went off in your head telling you that now is the exact right time to travel. The only problem? You’re in the middle of the year-long lease.
It’s never a good idea to break a lease without having a discussion with your landlord! First, try to see if your landlord will allow you to cut your lease a few months short, or sign a new lease that lets you go month-to-month.
If those avenues don’t work out, you can search for a subletter, or use a service like MetroButler or Airbnb. Tap into your network and see if there’s anyone that is searching for a short-term place to live in your city. There are Facebook groups and online communities created for just this purpose. It’s in your best interest to have a responsible subletter, so do your due diligence before signing on the dotted line. Some buildings require the sublessee to pay a fee every month in addition the subletter’s rent, so keep that in mind when you’re budgeting for your year of travel.
How should I handle long-distance relationships?
Dating long-distance is tough, but it can be even tougher across international borders and timezones. Before you take the leap and book your plane ticket, think about whether you’ve done long-distance before as a couple, if you’re good at communicating, and if your relationship is stable enough to overcome the challenge of being apart. This isn’t an aspect of your decision that is black and white – there will be some downsides no matter what you choose to do.
Sit down and have a detailed discussion with your partner about what you’re interested in doing and gauge their feelings. They may want to join you! If you’re traveling with a work and travel program, you can often find a couples’ discount. Traveling together could be just the experience that you need to make your relationship stronger.
How do I take care of my pet while abroad?
One of the most common things that stops people from setting out on a long-term adventure is the fact that they would have to leave their beloved pet behind. We get that. Odie the dog or Loki the cat is your best friend – how could you possibly say goodbye to them for an entire year?
It’s definitely not easy – however, there are ways to make sure that you’re leaving your pet in the best hands possible.
The easiest thing to do is ask your parents, close friends, family members to help you out and take care your pet for a year. If a personal connection isn’t viable, consider asking your groomer if they have a boarding option, or if they know of any local boarding facilities or doggy daycares that could look after your fur baby. Whatever you do, make sure that you’re completely comfortable with your decision before you pack up. Remember – you can always Facetime your furry friend whenever you need a spark of happiness to jumpstart your day.
What should I do for storage while I’m traveling?
Over the years, you’ve probably accumulated enough stuff that your head hurts just thinking about how you’re going to be able to store it all. Your mom’s basement just isn’t big enough.
Here’s one clean, simple idea: sell it, donate it, or toss it.
As humans in the 21st century, we’ve gotten used to wanting things and have put the concept of wanting experiences on the backburner. You’re about to flip that idea on its head and, in the process of doing so, you should remove a lot of those unnecessary things from your inventory.
If it’s an item that has no value to you or anyone else, toss it. Some social media sites offer marketplaces where you can sell any of your belongings to people in your area for a reasonable price. If you can’t find a willing buyer, think about giving your things away to people who could use them, but might not necessarily be able to afford them. We call this radical gifting. You’ll be leaving for your trip with a little less baggage – and a lot of good karma.
How do I file my taxes as a traveler?
Now you’re getting into the logistics! Taxes are an important thing to consider before you start traveling, as it’s good to have a game plan in place before you jump on a plane. You’re going to want to see how your country handles international residency and how you can file your income if you’re going to be working remotely.
Some U.S. tax residents participating in work and travel programs have been able to take advantage of the Foreign Earned Income Exclusion (the “FEIE”). Many factors determine whether the FEIE may be applicable in your case, and you should consult a tax professional to see if it’s a fit for your situation. If you do qualify, you could earn back tens of thousands of your tax dollars.
While we see ourselves as experts on all things “work and travel”, we are definitely not tax professionals. We’re unable to give tax advice and nothing that we say should be construed as tax advice or legal advice rendered by Remote Year or anyone employed by or associate with Remote Year.
When it comes to remaining tax compliant, it’s all up to you. Many of our participants have reached out to a trusted tax professional for advice, and we suggest that you do the same if you feel that your tax obligations are unclear.
Do I need a different bank account as a remote worker?
Most banks make it possible for you to make purchases around the world – for a fee. Before you start your year-long adventure, look into what financial services your bank offers without international fees. You may want to consider moving your assets to another location so that you’re not spending more than you need to while you travel.
In addition to your checking accounts, check out your current credit cards. Can you collect mileage points with your current cards? Are their foreign transaction fees? Do you get any travel-related rewards that can make your time on the road a bit easier? Don’t lose out on taking advantage of these perks just because you didn’t want to do the research!
One thing to note: We’re not financial experts. Though we’ve been through it all with the participants of our programs, we’re not in a position to give financial advice, and none of the information that we provide should be misconstrued as such.
Will my phone work when I’m in a different country?
If you head out on your journey with your phone as-is, it probably won’t work for you in a different country. While WiFi is as readily available as air these days, there will be some destinations on your itinerary that will require you to have access to data in order to use cellular services.
There are a few different routes you can go when it comes to your phone. One of the simplest is to purchase a new SIM card in the countries that you’re traveling in. SIM plans are pretty inexpensive and if you run out of data, you can just recharge them. If you’re working and traveling with Remote Year, we can take care of this step for you. We offer local SIM plans so that you can be connected wherever you go.
If you don’t want to have to seek out a local cellular service in every one of your destinations, you can sign a contract with a company like T Mobile that has great rates for international data plans, or use a service like Google Voice or Project Fi so that you can keep your current phone number when you travel.
As you consider whether you should travel for a year, there will certainly be a few obstacles in your way, but don’t let the barriers above stop you from following the path you want to take toward personal growth. There’s always a solution even if it isn’t a simple one. Every time you come up against something that might hold you back, take a deep breath and remember the reason that you want to go on this adventure. That it will all be worth it. Then get out there and make it happen.
from Web Developers World https://skillcrush.com/2018/10/19/how-to-prepare-to-travel-for-a-year/
0 notes
Last Seen Blogs

kommandonuovidiavoli
BEST FRIENDS V-EVER

motocrossracing
Motocross

omotasemiyage
Omotase-Temiyage

tasha03
Natasha 👀

omniasamirsblog
Untitled