#whenever it gets dark like this and i have my icon folder open
Explore tagged Tumblr posts
Note
When do you usually do most of your writing?
Pet peeves?
What is on your wishlist?
When do you usually do most of your writing?
I wake up very late because I have no self control and a really messed up sleeping schedule, so I do the writing from 1 pm onward, generally speaking. Then again, I have spent more than one day doing nothing but typing away on my keyboard for this account, so... Yeah. I'd like to say I do most of it during the daytime, but it depends: if a thread I like gets a reply at 2 am (which happens a lot because everyone seems to be living in the Americas?) you can bet I'll be typing a reply as soon as I get the notification (though I almost never post them right away, since I'm anxious about spelling, syntax and so on). It might be that I'm new to the scene and that I'm a situation in which I have little else to do, but I get really excited whenever I get a reply or an ask and will jump at the chance to start interacting with new people- which is sadly kind of hard because of how unpopular GX seems to be among the RPC. People have still been very nice to me and have been very open to testing out interactions, which I'm deeply grateful for. I am wagging my nonexistent tail of all of you, constantly. On a separate note, I do the fic writing after midnight. Always. And I hate it.
Pet peeves?
... Oof. Ok. I'll take my chance to say a bunch of things? Don't hate me for it, I don't mind any of these that much.
1) I kind of dislike writing in present tense, mostly because I find it unnatural, but I will when the other person does. I'm the opposite of picky- and it isn't necessarily a good thing.
2) Fancy formatting. It's one thing to use small text, that I don't mind one bit. But when fonts and random highlighted words are involved I get very confused? I know I use italics for emphasis and for things that are meant to be internal monologue that isn't narrated, but rather delivered by the muse himself- maybe that's annoying or distracting to someone? I bet someone out there has looked at a reply of mine and wanted to delete the post in my stead at some point.
3) Heavily edited icons. Again, icons or not, it technically doesn't make much of a difference. I personally have taken a liking to keeping my Manjoume icon folder open on my second screen- plus I'm Italian. Come on. Half my communication skills are non verbal I'm lying I suck at communicating in general. The edited icons, yes- a frame and coloured filter make icons look personal and I appreciate the work put into them, but when I can barely make out the expression I have to wonder what the point is. Aesthetics, I suppose, which is fine, of course.
4) Tumblr themes. Some themes don't allow for reblogs when you open posts on the op's blog. WHY. It's sort of annoying to have to fish for the post in order to reply to it.
5) Endless threads. Very few do this, but I think you should consider that people who are not involved in a given thread will have to scroll through it on their dashes before you reblog a thread without cropping it. That's all. I didn't know how to do it initially, but I asked and I was lucky enough to get an answer from a very kind person.
6) ... Grammar. Typos are fine and dandy. Sometimes they happen and you can't notice them because some words exist and thus are not highlighted by the spellchecker (which is on everyone's chrome, by the way). An example is 'fir' and 'for'. I can assure you there is no red squiggle under 'fir'. It's a tree, apparently. I had no clue. But yes, I am not from an English speaking country, so don't take this as like... a British dude coming up to you and bullying you because your English is bad. No. A misplaced comma is ok, I don't care. It becomes a problem when the sentences are hard to understand. That's it. (Note- if I write something that you think is an incomprehensible mess, tell me and I'll try my best to fix it.)
... I'm done. I am not angry at anyone who does any of these, believe me. Pet peeve number seven is a request. DM me for literally anything. If I do something wrong, tell me. I write a lot of extra tags to convey how I feel about what has been written and maybe it's unnecessary, but I do it so you can always know that I'm actively invested in the interaction. If I don't add tags it's solely because there is nothing to add. But if it's annoying, tell me and I'll stop immediately. That is all.
What is on your wishlist?
... This.

How very unexpected, I know.
A bunch of other things, too: I have some Jojo prints in my cart on Etsy and I know I'll never get them (sad) and a bunch of videogames on Steam and the Nintendo e-shop (which I'll never buy or play- they look neat though). On Amazon I have the last few volumes of the DM manga and the GX series (Light and Darkness Dragon, my beloved). Also also any charm that has to do with Manjoume. I haven't found any I could buy, but I want 'em all. Literally break into my house if you find one. Ah! And the matching figures of Komaeda and Hinata from Danganronpa 2! (Big Danganronpa fan, bigger Komahina shipper- I've made a fucking animatic and I can't post it because the music is copyrighted ;) ) I also have a bunch of zines I'm waiting for- some I've bought and are about to be sent out and others have only posted interest checks. 2021 was the year in which I discovered that yes, I can commission people and buy zines and it doesn't need to a big event (except I'm not rich and need to be mindful with spending of course). ... I also really want the new Pokemon games. Like right now.
... If it turns out the question wasn't actually about like... material things, but rather what I want to do with my blog and muse in the future... Well, first of all pretend I said nothing. Second, I want to find an art style I can comfortably use to make more frequent illustrations for threads and asks. I was a big fan of ask blogs as a kid (I saw them through crust screenshots and reposts only, I didn't have a tumblr lol) and I always wanted to be that cool artist that makes cool art for a given cool character. Manjoume is the coolest of characters to me, so yeah.
#(( i've written too much on the pet peeves watch me shake from anxiety for a week straight#(( but i also want to be honest so yeah there#(( it would be hypocritical to say that i love everything always#(( i want to buy a shitton of things for someone who doesn't have a job huh#(( maybe i'll try to get commissions to afford stuff... when i git gud#(( stan manjoume always#// asks#// ulri's corner#// ooc
1 note
·
View note
Note
So how does Scrivener work cdelphiki? Any specifics? I think you talked about it a fair bit before, early in November, but I can't quite remember.
Scrivener is awesome!! Basically, it’s a word processor on steroids specifically for writers (and not student/business purposes, like Microsoft Word/Google Docs) Although you can use it for student or business purposes, if you wanted.
Basically, you use it by first creating your project. It has a lot of templates to choose from, and once you pick what you want to do, it has instructions of how to structure your project in your newly created file. There are a ton of template options, but I’m here for the novel format:
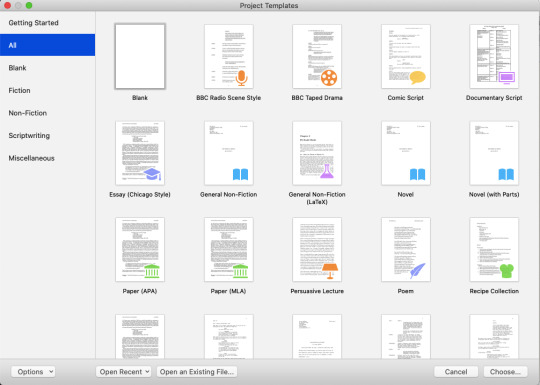
But you can write pretty much anything you can imagine in scrivener.
Pick what you want and click “choose” then save it somewhere. I have the app for ipads/iphones, so I save all my projects on dropbox so I can access them from my phone or computer. (This is how scrivener is set up for synced across platforms: over dropbox, not icloud for mac users. It took me a hot minute to figure out.) It has you name and save it up front so it can start backing up your work!!
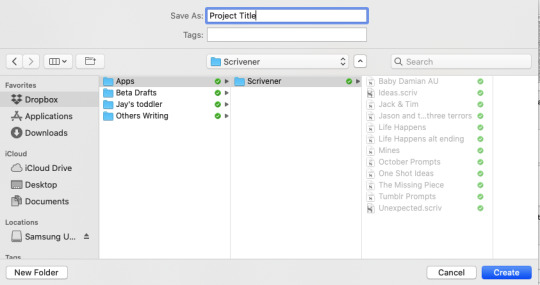
Once it’s got the project created, it will give you the informational page for the template you selected. Read through it for a lot of good information on how to use all the organizational tools for your specific project.
Now you basically just start working. There is no real wrong way to go about putting together your story. I use scrivener for both one shots and multi-chaptered fics. I actually keep most my one shots in one project, titled “Tumblr Prompts,” just to make it easier than having a zillion project files for single stories.
If you want a pretty detailed walkthrough of how I use scrivener, I put it all below the cut. :D
Here’s one of my my well-used project files:

There’s a lot going on here. The left column is your navigation bar. This is basically your entire book. As you can see I have folders within folders. The main one, called “Manuscript” by default, is basically the book in its entirety. I then use more folders for each chapter. Right now, since I’m still drafting, I actually just have it broken into ‘events,’ rather than chapters. This is just a me thing and is what I figured out to help me keep better track of everything.
So I have the Prologue, and then event 1.1 (act 1, event 1), 1.2, 1.3, etc. In 1.3, as you can see, I have both chapter 3 and 4 as scene cards. 1.4 has five scene cards that will likely turn into 7 chapters, once I do a revision!
All the various colors of text are revisions. By default, the first draft is written in black.
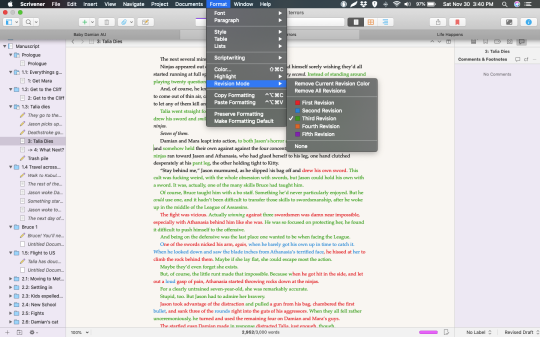
When you’re ready to do a revision, you can turn on revision mode and select which version you’re on. I’m on my third revision. I really like this function because it lets me see my progress.
Now, inside all these folders you can see a couple different symbols there. You can actually change the symbols of these things yourself by right clicking on the object in the navigation pane and selecting “change icon.” I put the pencil on all my notes, so it’s very easy for me to know what to get rid of when I’m cleaning up and about to call something “done.” On Precedent, for example, whenever I publish a chapter, I go ahead and name the chapter folder in Scrivener and get rid of all the note cards so all that is left is what I actually published.
Probably one of the best things about Scrivener, is when you want to get rid of something, you don’t have to erase it entirely. On this project here, you can see I have a file a couple under the file selected for viewing called “trash pile.” Whenever I remove large chunks of text, I actually just copy it over to a blank scene card so it’s not ‘lost.’ I then “move to trash,” so it’s not in the way, but it’s always available to me. Scrivener does not delete anything you ‘move to trash’ unless you specifically move to that trash bin and make it delete it. This is great because I can’t tell you how many times I’ve ‘thrown something away’ just to realize, sometimes months later, that that exact scene would work perfectly now! And good thing I saved the draft, so I had something to start with!
Now, back to these ‘scene’ cards. Scene cards are just the files you actually write on. I don’t know if Scrivener calls them that or not, but they’re set up like notecards. I don’t know if you ever did the notecard method in school, where you wrote major points on note cards and then arranged them into a logical order on the table? That’s basically what this is.
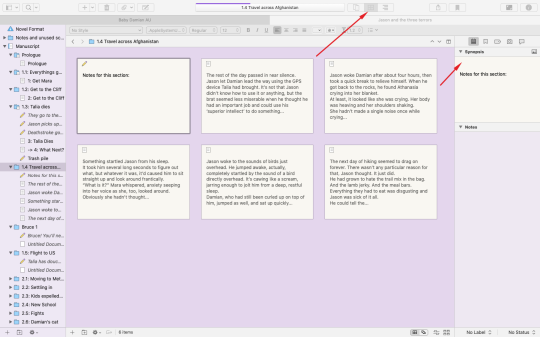
To get to this screen, I selected the folder for section 1.4. You can pick any folder you want, even the over all manuscript to get here. Then you pick the view option, where the top arrow is pointing. The first view option shows it as a document, as my other pictures have already demonstrated.
What the notecards are going to show you is your synopsis, if you have one written. Each and every file, even the folder itself, has a spot for ‘synopsis’ and ‘notes,’ which do not count into your overall word count. It’s really nice for keeping stuff out of the way. I’ve found I prefer having my notes as actual scene cards, but the notes section is handy for throwing important things. I also save the link to where I’ve posted stuff on tumblr for easy saving or research so I don’t lose anything.
If you do not have anything written in the synopsis section, the card will just show as much as the text as it can in a dark grey, rather than the black ink of the synopsis. I rarely use the synopsis section, so you can see all my documents just have the first bits of text.
On this screen you can start dragging around cards and move them however you think things need to line up. This works remarkably well if you write in a lot of small scenes, and need to reorganize because you realized that Tim needs to have a panic attack before he faces Ra’s. Or whatever. You can also reorganize at any point in the navigation pane itself. I drag stuff between folders all the time. That’s another reason I love having my notes on actual scene cards, because a lot of times I end up punting scenes off into the future, and it makes it way easier to drag and drop it into the next chapter folder to deal with later.
Another feature I really like is ‘targets.’
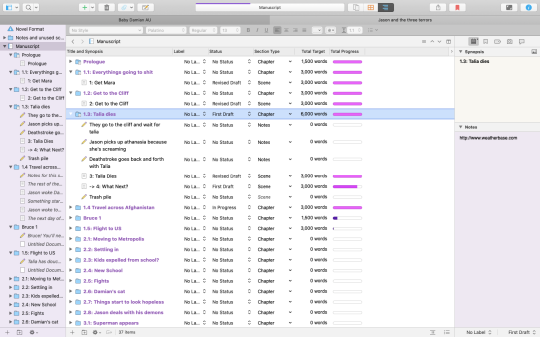
To get here, I selected the overall manuscript, and then switched to the third view option, up there next to the note cards option. It shows me my whole book this way, as well as the status of each folder or document (which I have to set myself.) It also shows me if I had a target word count, and how close I am to reaching it. I like my chapters to be about 3k words, so I make that my target. (set your target by clicking on the target icon on the bottom right corner of a document while in document view.) The purple goes from a dark purple to a lighter one the closer you get. (This is because I am using the ‘theme’ “Purple Haze.” The color is based on your theme. I forget what the default is.)
You can also set daily word goals, and up at the top, below the project’s name, it’ll show you progress toward that goal. I’ve written two words today.... so I don’t have a progress bar yet. The bar above the project’s name is for the overall word goal set. I have this project set to 100k.
I think that’s pretty much it. The only other feature I use regularly I haven’t mentioned is the split screen.
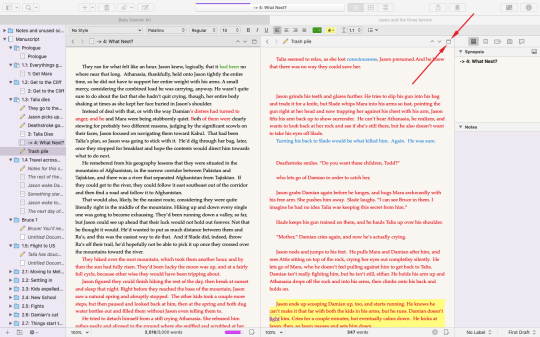
Basically, click where the arrows are pointing. When you’re in just regular view, it’ll look like a split screen, rather than a single document view button. When you hit it, it opens your currently selected document twice, on both sides of the screen. Click on the bar for the document you want to change and then select whatever you want from your navigation pane. I use this mostly for putting my notes on one side and my actual working document on the other. Yesterday I was using while revising, throwing anything I didn’t want anymore into my ‘trash pile’ by just dragging it across.
Once you’re done with something, you can run spelling and grammar check (because it does not check as you go, unless you go into settings and make it do that. It’s turned off by default. I find the squiggly lines distracting, so I love this feature) and use the various text tidying tools, such as the one that turns all multiple spaces into single spaces!
So yeah! That’s Scrivener. I love it so much. It has made writing so much easier. I wrote most of Life Happens in a single Microsoft Word document, and that was a huge mess and horrible and really difficult. I’ve written two long fics in their entirety now on Scrivener and I won’t ever go back.
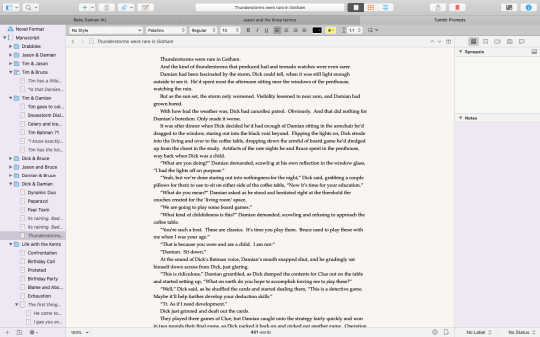
Oh, and if anyone was curious, this is how I use Scrivener for my one shots: I just label the folders with the main relationship or the collection they’re from, rather than treated the folders like chapters. I then name the scene cards either with their actual titles or a brief description (if I didn’t give them titles) to let me know what’s been published and what isn’t done.
34 notes
·
View notes
Note
you probably are not taking prompts anymore but if you ever have time and want to write Uma and Harry on pirates of the Caribbean (pirates + Disney)x2!! I think it would be great if it was an Auradon movie and they were called to make a cameo since they are real pirates, but it's up to you 😘
Hi anon! Okay, so this has been in my inbox for awhile and this has also been in my WIP folder for just as long. It’s not the movie idea that you originally wanted but I did have Uma and the crew ride the Pirates of the Caribbean ride. This is just a headcanon list but maybe one day I’ll have time to make it into a oneshot. Hope you enjoy this sporadic ramble of thoughts!
After a tough few months of council meetings, school, and dealing with the relentless press, Ben decides to gift Uma and her crew with a trip to Disney World, the happiest place on Earth (“Sounds like a nightmare.” “Shut it, Harry.”)
(When they had Gil, who had surprisingly taken to using the internet better than anyone else on the crew, Uma had to agree with her first mate that this Disney World did seem like a nightmare.)
When Uma and the crew get there, Uma definitely regrets taking up Ben’s offer.
Unsurprisingly, Gil is ecstatic and gets everyone on the crew mouse ears.
He gives Uma one that has a little crown on it for obvious reasons
Harry gets one with a red and white bow on it with lot of sequins (Either Harry doesn’t know that usually girls get that one or he doesn’t care. Either way, he’s extra enough to make it work.)
Jonas gets a hat that says “It’s my birthday” even though it’s not his birthday but for some reason whenever the stop at a food stand or a restaurant, people always give him some free dessert or something and asking how old he turned (On the Isle they don’t really celebrate birthdays so Jonas has no clue what is going on or why people are giving him free food but he’s not going to stop it.) Winds up with a horrible stomach ache at the end of it but totally worth it.
Desiree and Bonnie get matching Star Wars ears that light up
Gonzo gets a big green hat that says “Goofy” with long black pieces hanging from it looking like ears
And Gil gets the bridal Minnie hat because he was trying it on and Uma (jokingly) said it made him look pretty which Gil instantly believe because in a totally platonic way Gil does think that Uma is super pretty so she would know.
They try all the rides and agree that “It’s A Small World” is a new type of torture because they can’t get the damn song out of their heads and the little doll people creeped them all out.
(“Ye sure this ain’t some sort of cruel and unusual punishment, Captain?” “…I actually have no clue, Hook.”)
Eventually, they find themselves at the “Pirates of the Caribbean” ride.
“This feels like a trap.”
“It’s not a trap, Harry.”
“Nah, Captain. He’s right this feel like a trap.”
-annoyed sigh- “Guys for the last time, this. Is. not. A. tap.”
And Uma was right. It wasn’t a trap. It was much worst.
Harry, sitting next to Uma: “What the hell type of sailing are we supposed to do in these dingy little boats? Where’s the mast? Where’s the wheel?” Gil: “I feel seasick….” Uma: “We haven’t even moved!”
Bonnie, next to Gil: “Why is it so dark?” Jonas, grabbing on to an irritated Desiree as the ride begins: “Yo, I had a dream that began like this. In the end, giant gummy bears ate us. I ain’t going out like that. “You hear me giant gummy bears! I AIN’T GOING OUT LIKE THAT!” Gonzo in the back, too preoccupied with playing with the “ears” of his hat
The crew hearing: “Psst! Avast there! It be too late to alter course, mateys. And there be plundering pirates lurkin’ in ev'ry cove, waitin’ to board. Sit closer together and keep your ruddy hands in board. That be the best way to repel boarders. And mark well me words, mateys: Dead men tell no tales! Ye come seekin’ adventure with salty old pirates, eh? Sure you’ve come to the proper place. But keep a weather eye open, mates, and hold on tight. With both hands, if you please. Thar be squalls ahead, and Davy Jones waiting for them what don’t obey.”
Harry scoffing at the voice over, muttering that that’s not how a real pirate sounds before slipping out an unintentional “argggh!”
Harry leading the crew in singing along to “A pirate life” bringing out the flasks of rum that he managed to hide in his jacket.
Desiree, frowning as she hears something, “Does that sound like a waterfall to anyone else?”
Jonas almost peeing his pants at the unexpected drop
Bonnie looking at all the skeletons: “Well this got very dark, very quickly.” Jonas: “Bet you that’s what they’ll do to us once this is over.”
More skeletons.
Jonas: “What the hell?!?!?! How is this the happiest place on Earth? It’s filled with so much death!”
Uma: “Reminds me of when Harry went through his emo phase.”
Harry, smushing Uma’s face with his hands (gently of course): “We don’t. Speak of that.” he says before giving her a quick peck on the forehead. Uma just rolls her eyes.
They past by the figure of Captain Barbossa who always managed to have the best rum on the Isle for a man who couldn’t actually taste it
Harry: “Why does that old windbag get a giant creepy doll thing and not me dad? All old Barbossa does is drink, shit, and fuck!”
Desiree: “Well can your dad turn into a giant walking skeleton at night time? Because you can’t argue how fucking cool that is!”
Harry: -pouts but doesn’t say anything more-
Someone (Harry) passes around another flask of rum that everyone takes a sip from whenever any of the ride’s pirates say “Arrrr!”, “matey”, or any other stereotypical pirate saying. (Jonas and Gonzo taking extra sips basically any time Harry opens his mouth during the ride.)
The pirate crew simultaneously boo-ing but also applauding the Jack Sparrow figure lounging on the throne of gold surrounded by treasure.
Uma, scowling: He was a traitor and a drunk-
Harry, looking like the definition of a fanboy: -but damn did the man have style.
As they pass the robot Jack Sparrow actually smoothly gets up, snatches the flask from Jonas’s hands and gives the crew a bow, winking at Uma and saying “Captain” before falling back in his chair, going back into the robotic motions of drinking from the flask, drunkenly singing “What’s my name? What’s my name? Jack! Say it louder! Drunk pirates have all the fun! Can’t count cause I’m number one!”
Everyone is speechless before Bonny says: “What. A fucking. Icon.”
Jonas looking at his hands: “I’m never washing these hands again.”
Gonzo: “Like you wash your hands to being with.”
The Crew leaves the park with lots of souvenirs thanks to the King’s credit card that may or may not have been given to them
Harry explained easily: he shouldn’t have just left his wallet out in the open like that!
Uma, pinching the bridge of her nose: It was in his pocket!
Harry, looking at her confused: Like I said, he shouldn’t have just left his wallet out like that around pirates!
They also managed to leave the park, only managing to cause one food fight and one small fire (Bonnie: Don’t give me that look guys! You know I like to see things burn!); managing to get the Beast cast actor to go out of character when Jonas threw up all of the deserts he eaten after on him after Gonzo and Desiree had forced him to go on the spinning teacup ride; to scandalize only a handful of parents and their innocent children when Harry and Uma went into a full out makeout with loud moans and wandering hands as the firework show.
When they get back to school and Ben greets them back at the gates Uma places mouse ears with a little tiara between the ears on Ben’s head as Harry smoothly tucks the “borrowed” credit card back into Ben’s pocket.
Ben: Did you see the Pirates of the Caribbean ride? It’s sad that the the Jack Sparrow robot had to be taken out for repairs. You know, when he was still alive, sometimes Mr. Sparrow would show up and take the place of his robot.
Harry and Uma look at each other before saying: When he was alive?
Ben: Yeah, his ship sunk at sea 15 years ago. No one has seen him since and he’s not the most subtle of men so everyone just assumed he was dead after a few years.
Jonas, once been leaves, staring down at his hands: I’m really never washing these hands again!
Uma rolling her eyes but smiling nonetheless: What did you expect? He’s a pirate.

#edream93 answers#disney descendants#uma descendants#harry hook#girl descendants#bonnie descendants#jonas descendants#desiree descendants#gonzo descendants#pirates of the caribbean#jack sparrow#sorry this took forever
17 notes
·
View notes
Text
A Gentle Introduction to Using a Docker Container as a Dev Environment
Sarcasm disclaimer: This article is mostly sarcasm. I do not think that I actually speak for Dylan Thomas and I would never encourage you to foist a light theme on people who don’t want it. No matter how wrong they may be.
When Dylan Thomas penned the words, “Do not go gentle into that good night,” he was talking about death. But if he were alive today, he might be talking about Linux containers. There is no way to know for sure because he passed away in 1953, but this is the internet, so I feel extremely confident speaking authoritatively on his behalf.
My confidence comes from a complete overestimation of my skills and intelligence coupled with the fact that I recently tried to configure a Docker container as my development environment. And I found myself raging against the dying of the light as Docker rejected every single attempt I made like I was me and it was King James screaming, “NOT IN MY HOUSE!”

Pain is an excellent teacher. And because I care about you and have no other ulterior motives, I want to use that experience to give you a “gentle” introduction to using a Docker container as a development environment. But first, let’s talk about whyyyyyyyyyyy you would ever want to do that.
kbutwhytho?
Close your eyes and picture this: a grown man dressed up like a fox.
Wait. No. Wrong scenario.
Instead, picture a project that contains not just your source code, but your entire development environment and all the dependencies and runtimes your app needs. You could then give that project to anyone anywhere (like the fox guy) and they could run your project without having to make a lick of configuration changes to their own environment.
This is exactly what Docker containers do. A Dockerfile defines an entire runtime environment with a single file. All you would need is a way to develop inside of that container.
Wait for it…
VS Code and Remote – Containers
VS Code has an extension called Remote – Containers that lets you load a project inside a Docker container and connect to it with VS Code. That’s some Inception-level stuff right there. (Did he make it out?! THE TALISMAN NEVER ACTUALLY STOPS SPINNING.) It’s easier to understand if we (and by “we” I mean you) look at it in action.
Adding a container to a project
Let’s say for a moment that you are on a high-end gaming PC that you built for your kids and then decided to keep if for yourself. I mean, why exactly do they deserve a new computer again? Oh, that’s right. They don’t. They can’t even take out the trash on Sundays even though you TELL THEM EVERY WEEK.
This is a fresh Windows machine with WSL2 and Docker installed, but that’s all. Were you to try and run a Node.js project on this machine, Powershell would tell you that it has absolutely no idea what you are reffering to and maybe you mispelled something. Which, in all fairness, you do suck at spelling. Remember that time in 4ᵗʰ grade when you got knocked out of the first round of the spelling bee because you couldn’t spell “fried.” FRYED? There’s no “Y” in there!
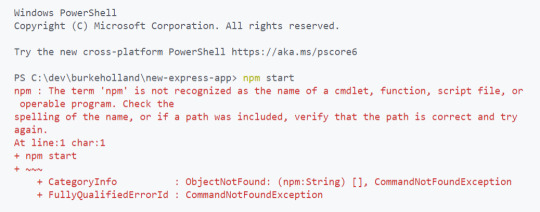
Now this is not a huge problem — you could always skip off and install Node.js. But let’s say for a second that you can’t be bothered to do that and you’re pretty sure that skipping is not something adults do.
Instead, we can configure this project to run in a container that already has Node.js installed. Now, as I’ve already discussed, I have no idea how to use Docker. I can barely use the microwave. Fortunately, VS Code will configure your project for you — to an extent.
From the Command Palette, there is an “Add Development Container Configuration Files…” command. This command looks at your project and tries to add the proper container definition.

In this case, VS Code knows I’ve got a Node project here, so I’ll just pick Node.js 14. Yes, I am aware that 12 is LTS right now, but it’s gonna be 14 in [checks watch] one month and I’m an early adopter, as is evidenced by my interest in container technology just now in 2020.
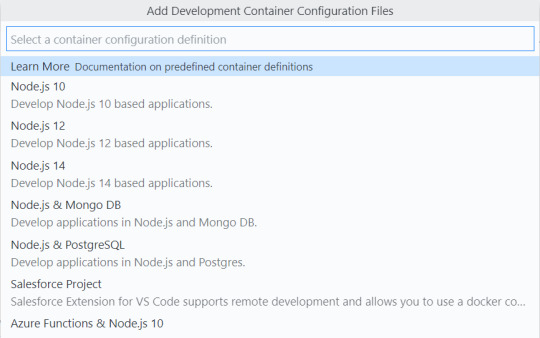
This will add a .devcontainer folder with some assets inside. One is a Dockerfile that contains the Node.js image that we’re going to use, and the other is a devcontainer.json that has some project level configuration going on.
Now, before we touch anything and break it all (we’ll get to that, trust me), we can select “Rebuild and Reopen in Container” from the Command Palette. This will restart VS Code and set about building the container. Once it completes (which can take a while the first time if you’re not on a high-end gaming PC that your kids will never know the joys of), the project will open inside of the container. VS Code is connected to the container, and you know that because it says so in the lower left-hand corner.

Now if we open the terminal in VS Code, Powershell is conspicously absent because we are not on Windows anymore, Dorthy. We are now in a Linux container. And we can both npm install and npm start in this magical land.
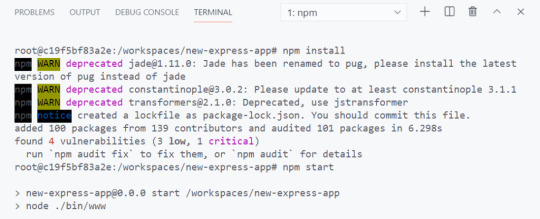
This is an Express App, so it should be running on port 3000. But if you try and visit that port, it won’t load. This is because we need to map a port in the container to 3000 on our localhost. As one does.
Fortunately, there is a UI for this.
The Remote Containers extension puts a “Remote Explorer” icon in the Action Bar. Which is on the left-hand side for you, but the right-hand side for me. Because I moved it and you should too.
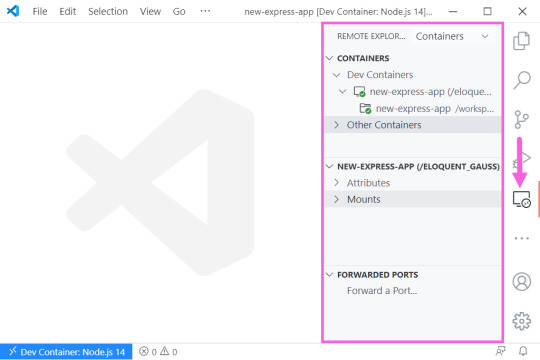
There are three sections here, but look at the bottom one which says “Port Forwarding,” I’m not the sandwich with the most lettuce, but I’m pretty sure that’s what we want here. You can click on the “Forward a Port” and type “3000,” Now if we try and hit the app from the browser…
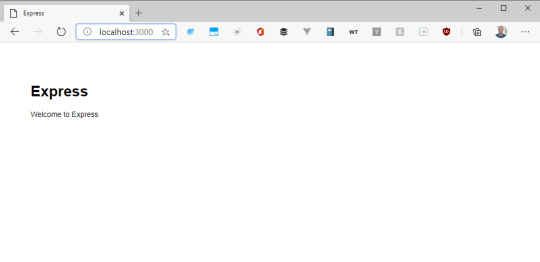
Mostly things, “just worked.” But the configuration is also quite simple. Let’s look at how we can start to customize this setup by automating some of the aspects of the project itself. Project specific configuration is done in the devcontainer.json file.
Automating project configuration
First off, we can automate the port forwarding by adding a forwardPorts variable and specifying 3000 as the value. We can also automate the npm install command by specifying the postCreateCommand property. And let’s face it, we could all stand to run AT LEAST one less npm install.
{ // ... // Use 'forwardPorts' to make a list of ports inside the container available locally. "forwardPorts": [3000], // Use 'postCreateCommand' to run commands after the container is created. "postCreateCommand": "npm install", // ... }
Additionally, we can include VS Code extensions. The VS Code that runs in the Docker container does not automatically get every extension you have installed. You have to install them in the container, or just include them like we’re doing here.
Extensions like Prettier and ESLint are perfect for this kind of scenario. We can also take this opportunity to foist a light theme on everyone because it turns out that dark themes are worse for reading and comprehension. I feel like a prophet.
// For format details, see https://aka.ms/vscode-remote/devcontainer.json or this file's README at: // https://github.com/microsoft/vscode-dev-containers/tree/v0.128.0/containers/javascript-node-14 { // ... // Add the IDs of extensions you want installed when the container is created. "extensions": [ "dbaeumer.vscode-eslint", "esbenp.prettier-vscode", "GitHub.github-vscode-theme" ] // ... }
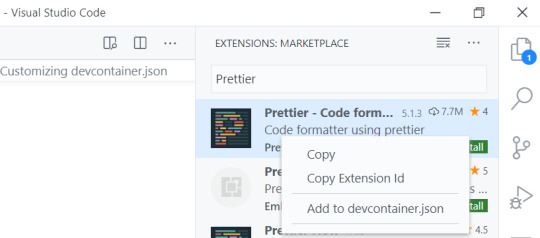
If you’re wondering where to find those extension ID’s, they come up in intellisense (Ctrl/Cmd + Shift) if you have them installed. If not, search the extension marketplace, right-click the extension and say “Copy extension ID.” Or even better, just select “Add to devcontainer.json.”
By default, the Node.js container that VS Code gives you has things like git and cURL already installed. What it doesn’t have, is “cowsay,” And we can’t have a Linux environment without cowsay. That’s in the Linux bi-laws (it’s not). I don’t make the rules. We need to customize this container to add that.
Automating environment configuration
This is where things went off the rails for me. In order to add software to a development container, you have to edit the Dockerfile. And Linux has no tolerance for your shenanigans or mistakes.
The base Docker container that you get with the container configurations in VS Code is Debian Linux. Debian Linux uses the apt-get dependency manager.
apt-get install cowsay
We can add this to the end of the Dockerfile. Whenever you install something from apt-get, run an apt-get update first. This command updates the list of packages and package repos so that you have the most current list cached. If you don’t do this, the container build will fail and tell you that it can’t find “cowsay.”
# To fully customize the contents of this image, use the following Dockerfile instead: # https://github.com/microsoft/vscode-dev-containers/tree/v0.128.0/containers/javascript-node-14/.devcontainer/Dockerfile FROM mcr.microsoft.com/vscode/devcontainers/javascript-node:0-14 # ** Install additional packages ** RUN apt-get update \ && apt-get -y install cowsay
A few things to note here…
That RUN command is a Docker thing and it creates a new “layer.” Layers are how the container knows what has changed and what in the container needs to be updated when you rebuild it. They’re kind of like cake layers except that you don’t want a lot of them because enormous cakes are awesome. Enormous containers are not. You should try and keep related logic together in the same RUN command so that you don’t create unnecessary layers.
That \ denotes a line break at the end of a line. You need it for multi-line commands. Leave it off and you will know the pain of many failed Docker builds.
The && is how you add an additional command to the RUN line. For the love of god, don’t forget that \ on the previous line.
The -y flag is important because by default, apt-get is going to prompt you to ensure you really want to install what you just tried to install. This will cause the container build to fail because there is nobody there to say Y or N. The -y flag is shorthand for “don’t bother me with your silly confirmation prompts”. Apparently everyone is supposed to know this already. I didn’t know it until about four hours ago.
Use the command prompt to select “Rebuild Container”…

And, just like that…

It doesn’t work.
This the first lesson in what I like to call, “Linux Vertigo.” There are so many distributions of Linux and they don’t all handle things the same way. It can be difficult to figure out why things work in one place (Mac, WSL2) and don’t work in others. The reason why “cowsay” isn’t available, is that Debian puts “cowsay” in /usr/games, which is not included in the PATH environment variable.
One solution would be to add it to the PATH in the Dockerfile. Like this…
FROM mcr.microsoft.com/vscode/devcontainers/javascript-node:0-14 RUN apt-get update \ && apt-get -y install cowsay ENV PATH="/usr/games:${PATH}"
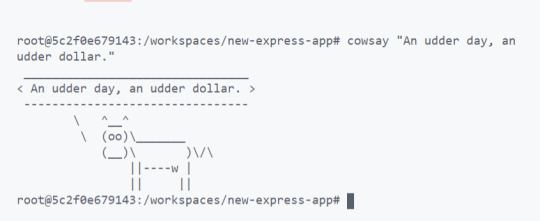
EXCELLENT. We’re solving real problems here, folks. People like cow one-liners. I bullieve I herd that somewhere.
To summarize, project configuration (forwarding ports, installing project depedencies, ect) is done in the “devcontainer.json” and enviornment configuration (installing software) is done in the “Dockerfile.” Now let’s get brave and try something a little more edgy.
Advanced configuration
Let’s say for a moment that you have a gorgeous, glammed out terminal setup that you really want to put in the container as well. I mean, just because you are developing in a container doesn’t mean that your terminal has to be boring. But you also wouldn’t want to reconfigure your pretentious zsh setup for every project that you open. Can we automate that too? Let’s find out.
Fortunately, zsh is already installed in the image that you get. The only trouble is that it’s not the default shell when the container opens. There are a lot of ways that you can make zsh the default shell in a normal Docker scenario, but none of them will work here. This is because you have no control over the way the container is built.
Instead, look again to the trusty devcontainer.json file. In it, there is a "settings" block. In fact, there is a line already there showing you that the default terminal is set to "/bin/bash". Change that to "/bin/zsh".
// Set *default* container specific settings.json values on container create. "settings": { "terminal.integrated.shell.linux": "/bin/zsh" }
By the way, you can set ANY VS Code setting there. Like, you know, moving the sidebar to the right-hand side. There ��� I fixed it for you.
// Set default container specific settings.json values on container create. "settings": { "terminal.integrated.shell.linux": "/bin/zsh", "workbench.sideBar.location": "right" },
And how about those pretentious plugins that make you better than everyone else? For those you are going to need your .zshrc file. The container already has oh-my-zsh in it, and it’s in the “root” folder. You just need to make sure you set the path to ZSH at the top of the .zshrc so that it points to root. Like this…
# Path to your oh-my-zsh installation. export ZSH="/root/.oh-my-zsh"
# Set name of the theme to load --- if set to "random", it will # load a random theme each time oh-my-zsh is loaded, in which case, # to know which specific one was loaded, run: echo $RANDOM_THEME # See https://github.com/ohmyzsh/ohmyzsh/wiki/Themes ZSH_THEME="cloud"
# Which plugins would you like to load? plugins=(zsh-autosuggestions nvm git)
source $ZSH/oh-my-zsh.sh
Then you can copy in that sexy .zshrc file to the root folder in the Dockerfile. I put that .zshrc file in the .devcontainer folder in my project.
COPY .zshrc /root/.zshrc
And if you need to download a plugin before you install it, do that in the Dockerfile with a RUN command. Just remember to group all of these into one command since each RUN is a new layer. You are nearly a container expert now. Next step is to write a blog post about it and instruct people on the ways of Docker like you invented the thing.
RUN git clone https://github.com/zsh-users/zsh-autosuggestions ${ZSH_CUSTOM:-~/.oh-my-zsh/custom}/plugins/zsh-autosuggestions
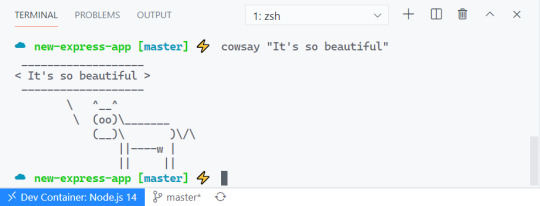
Look at the beautiful terminal! Behold the colors! The git plugin which tells you the branch and adds a lightning emoji! Nothing says, “I know what I’m doing” like a customized terminal. I like to take mine to Starbucks and just let people see it in action and wonder if I’m a celebrity.
Go gently
Hopefully you made it to this point and thought, “Geez, this guy is seriously overreacting. This is not that hard.” If so, I have successfully saved you. You are welcome. No need to thank me. Yes, I do have an Amazon wish list.
For more information on Remote Containers, including how to do things like add a database or use Docker Compose, check out the official Remote Container docs, which provide much more clarity with 100% less neurotic commentary.
The post A Gentle Introduction to Using a Docker Container as a Dev Environment appeared first on CSS-Tricks.
You can support CSS-Tricks by being an MVP Supporter.
A Gentle Introduction to Using a Docker Container as a Dev Environment published first on https://deskbysnafu.tumblr.com/
0 notes
Text
3am i should sleep
#*・゚⊰ 𝐎𝐔𝐓 𝐎𝐅 𝐂𝐀𝐑𝐃𝐒. ⊱ ✦ › OUT.#I CANT KEEP DOING THIS -continues to keep doing it-#im back on track though. wrote. god bless#whenever it gets dark like this and i have my icon folder open#dark's eyes look So Bright#it a lways makes me laugh#signal to go to bed: start seeing dark's tapetum lucidum#GN THOUGH.... HOPE AB STAYING UP HAS A NICE TIME
4 notes
·
View notes