#waiting for my editing program to export the video and waiting for youtube to upload it
Text
Wish exporting and uploading a video didn't take like five billion years
#ramblings#i swear the hardest part of making speedpaints is the waiting#waiting for my editing program to export the video and waiting for youtube to upload it#it's like. something that feels like it shouldn't take that long. but i also don't really know how it all works internally so#it probably is supposed to take that long. but still it's annoying#it's even worse when it's almost done exporting and suddenly it's like 'we can't export the video'#like you LITERALLY JUST DID IT WHY ARE YOU MAKING ME WAIT EVEN *MORE*#so annoying#i just wanna finish and post this speedpaint man..
5 notes
·
View notes
Photo
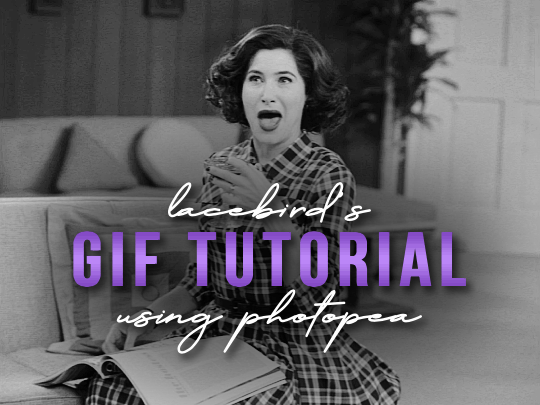
💜 HOW TO MAKE A GIF WITH PHOTOPEA 💜
Hey everyone! I recently got asked to do a tutorial on how I make my gifs. I know that many people (such as myself) don’t have access to Photoshop for various reasons but they’d like to get into gif making. When I started making gifs, I only had a free trial of Photoshop, but when that ran out, I had to find another way to make gifs. Enter Photopea! A free, web-based software that you can use anywhere and that works just like Photoshop!
In this tutorial, I’ll teach you how to make a basic gif like the one I did above. I use a macbook air, but it should be doable on a regular pc too!
If you found this helpful, feel free to share it with your friends! The tutorial can be found under the cut below 💜
THINGS YOU’LL NEED
A browser (I switch between Safari and Chrome, more about this later)
A screencapping software (like MPlayer OSX Extended) or, alternatively, a presentation program like Keynote or Powerpoint.
A program to screenrecord or a program that let’s you download from YouTube
Lots of patience bc gifs are annoying little shits <3
1. GETTING A VIDEO BY SCREENRECORDING
First things first, you need to have the clip you want make a gif out of. There are plenty of ways that you can get them. I’ve seen some gifmakers say that they torrent entire movies and gif from that. The way I do is I screenrecord the part I want to gif directly from where I’m watching the movie or show (like Disney+ or Netflix [or something like 123movies if you’re a pirate 🏴☠️)]). That way, I don’t have to download the entire movie and I have just the part that I want.
To screenrecord, I use my macbook’s built-in program called Screenshot.
Open the program by pressing ctrl + command + 5 on your keyboard and you get these funny little buttons.
Click on the button that says record entire screen. The program is now recording your screen. Play the scene and make sure you expand the video into full screen so you get a full resolution. When you’re done, click the stop button that is at the top right of your screen (next to the wifi and battery symbols.)

If you don’t have Mac, I suggest you look into how to screenrecord on your computer, as I don’t know how other operating systems work. Sorry!
1B. GETTING A VIDEO FROM YOUTUBE WITH CLIPGRAB
Another way you can get videos is from Youtube. I use a program called ClipGrab for this. Download and open the program. You’ll get this window

Simply paste the link and chose the highest quality, then click ‘grab this clip!’. Done!
2. SCREENCAPPING
After we’ve obtained the clip we wanted, we can do this two ways. The first way is to use the program MPlayer OSX Extended. Here’s a tutorial on how to set it up, make sure you do this if it’s your first time using the program. Make sure that you have a special screenshot folder!
Open MPlayer, then go to file > open and find the video of the scene you screenrecorded or downloaded. MPlayer will now play the video. Use the left and right keys (< and >) to go go backwards or forwards 1 minute, but try not to move around too much because the software crashes if you do. If that happens, just click the reopen button when the popup comes on, and reload the video again.
When you’ve gotten to the point you want in the video, press the command + shift + s buttons at the same time and the program will now take a screencap of every single frame until you stop.
If everything goes smoothly, you should find all your frames in your screenshot folder that you’ve made before when setting up the program!
2B. USING A PRESENTATION SOFTWARE TO MAKE A GIF
If you want to skip the screencapping part and you want to have a fully completed gif, you can do the second option. That’s what I used to do before I got MPlayer. In my experience, it’s a really fast way to make a gif, but the quality isn’t really good.
Here’s a tutorial on how to turn a slide into a gif in Keynote.
Here’s a similar tutorial on how to make a gif on PowerPoint.
Basically, you make sure that the size of your presentation is the same as your video, and that you make sure to export one slide into a gif. Also make sure that you export in the highest quality!
3. LOADING THE FRAMES IN PHOTOPEA
Finally, we can start giffing! As I said at the start, Photopea can be used anywhere, but I switch between Safari and Chrome. The reason why is that if I upload the frames in Chrome, the frames will be out of order. In Safari, that doesn’t happen, but the downside is that once I start editing, Safari will reload the page because it takes up too much memory.
So, first I go to photopea.com on Safari. I click New Project and put in the same dimensions as the screencaps (in my case, they are 1440x900 px). You’ll get an empty project.
Then click file > open & place and select your screenshots. Wait until Photopea has loaded all the frames, then, at the speed of light, quickly click file > save as psd before Safari reloads! You’ll find it in your folder where all your downloads are.
Next, I open Chrome (I use the incognito window because I have adblock on my usual Chrome, the program won’t work as usual if you have it enabled) and I click Open From Computer, locate your saved .psd file that you saved from Safari.
Now, you’ll see all the frames as individual layers. Select everything by clicking on the first layer, then golding the shift button and clicking on the last layer. Press command + G to group the frames into a folder. Here’s how everything should look after you’ve grouped the layers.
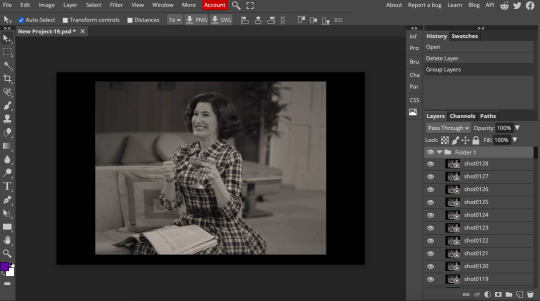
^^ See how Agnes approves! Agnes things you’re going a great job!
Now, it’s time to crop the gif and get rid of the black borders. Making sure that the folder is selected, click on the crop tool (or press C) and click on Fixed Size

W is Width and H is Height, write in your sizing here. Tumblr’s max width is 540, so I put the width as such. For the height, I use 405. Then you just drag the corners until you’ve selected the part that you want, like this
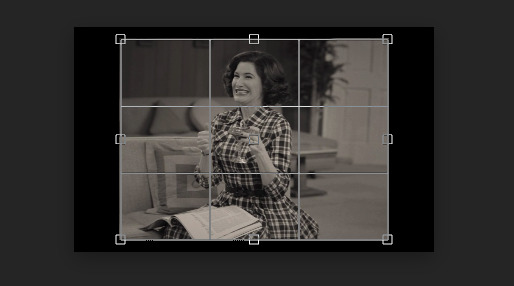
Press enter and the image will be sized down 540x405 px.
Now, our gif looks like this after cropping!
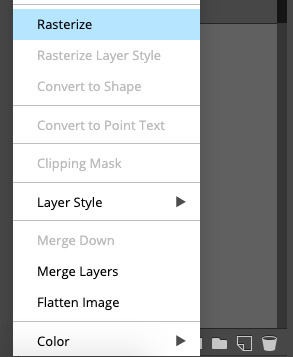
Open the folder so you can see all the layers. Select all your layers and right click on them, then click rasterize.
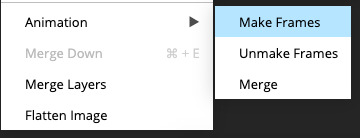
Then, go to layer > animation > make frames. You’ll now see that each layer begins with _a_ - this is crucial because this is how Photopea knows that the layers are part of a gif. If your layers don’t begin with _a_, then it will not play as a gif
If you instead already have a gif done, all you have to do instead is simply click open from computer when you first open Photopea and load your already finished gif and it’ll have the _a_ at the start of every layer. You won’t have to go through the steps of loading your frames into a new project to make your gif as it’s already done and in a folder :) Just start cropping once you load it
You can preview your work by going to file > export as > gif. Make sure to change the speed in the preview window until your gif plays the way you want it! I put my speed at 500%
4. SHARPENING
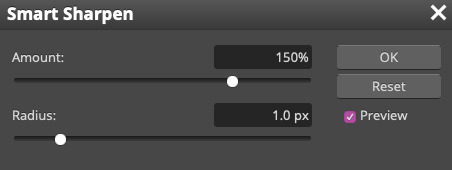
Hooray, we now have our gif! But to make it look a little nicer, it’s good to sharpen it. I always use Smart Sharpen when I sharpen my gifs, and many other gifmakers use that too. It’s really good :D
To sharpen your gif, again, make sure that all your layers are selected. Go to filter > sharpen > smart sharpen. I use two different settings for my gifs, it really depends on the gif.
Setting 1 (which is the default setting)
Setting 2
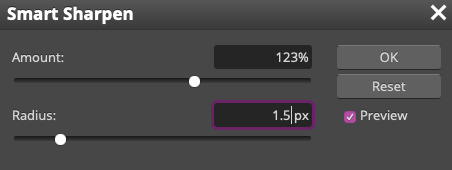
Again, it depends on the gif, play around until it looks good to you!
Here’s our gif after sharpening it
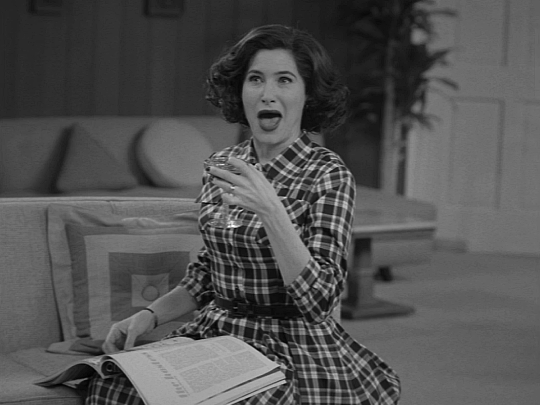
I ended up deleting the last few layers as the gif got bigger than 10mb (that’s Tumblr’s file limit, it your file is bigger than 10mb, it won’t upload). I also added a gradient map and it made the file size smaller, more about that in the next segment!
5. COLORING
Here’s the fun part! Now we get to play around with the gif, making it brighter and look Extra Nice™! Since this is a black and white scene, I make sure that the blacks and the whites really pop.
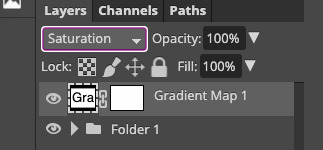
Notice how in the original scene it’s not actually b&w, it has a slight sepia tint to it. I want to remove this, so I add a gradient map by clicking on the white square with a black circle (I want to point out that we’ll be clicking on this button a lot in this step)

and I change the blending mode to Saturation
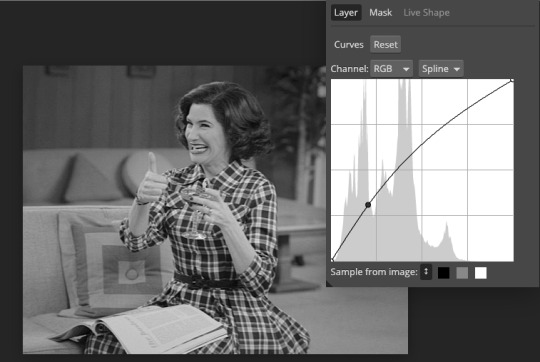
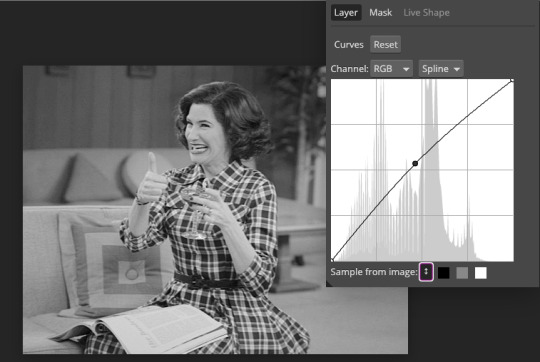
Then I add a curves layer using these settings
Then a second curves layer
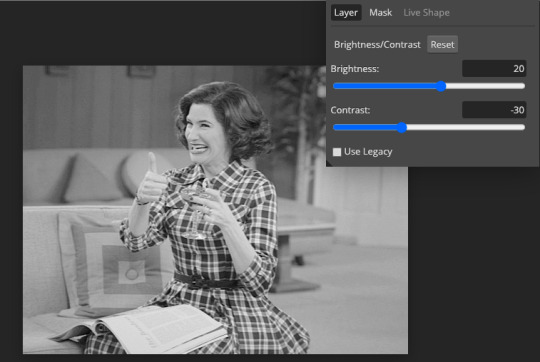
Brightness/contrast
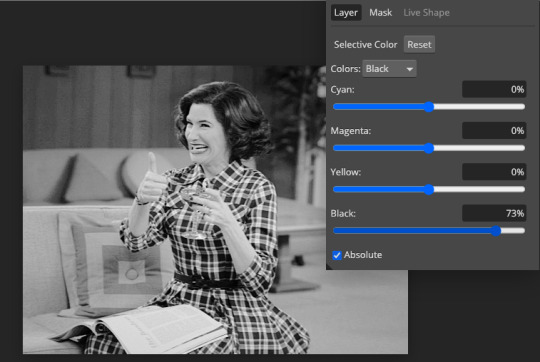
Then my favourite! Selective color! First layer, I deepen up the blacks
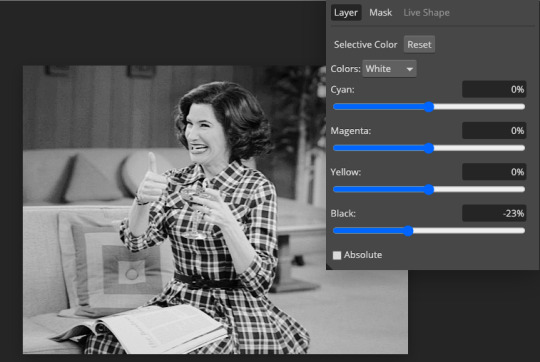
Then another selective color layer, this time the whites
Lastly the neutrals

Here we have the final results!

Wasn’t this a gas! I hope this helped you out, let me know if you want to know anything else about gifmaking, I’m happy to help! Also, sorry if I wasn’t very clear, I’m bad at explaining 🙈
MORE RESOURCES:
Here are some other tutorials that are really helpful in making gifs. These users use Photoshop, but you can still use their tips most of the time in Photopea too, you just need to play around and see what works for you!
Gifmaking for beginners by @chloezhao (this one saved my life)
Pale coloring tutorial by @itsphotoshop
Two-Toned Gif Background by @clubgif
Text with white outline tutorial by @anya-chalotra
#resources#tutorial#gif tutorial#photopea#photoshop tutorial#photopea tutorial#tuserfran#userlaur#userlaura#usermirna#(tagging mutuals if you wanna share :P)#my tutorials
1K notes
·
View notes
Photo

"Hello, operator? Yes, hi, I was wondering if I could get a refund on my 2020 subscription? Yeah, I know, it's just that every issue after January has been very disappointing and it's already September so like..." . Good news: I finally bit the bullet and bought proper studio lights AND a teleprompter!! 🎉 Clouds have been my goddamn archnemesis for 5 years now and I'm so sick of color correcting my vids for 3 hours only to still end up with janky footage. And now that I have a teleprompter, I can make long form content without looking like an idiot on screen for an entire 1 hr video! My life is about to get so much easier you have no idea 😭 . Even though I've been on YouTube for years, I've always been soooo reluctant to buy equipment for myself. The hours I've wasted editing on shitty programs, waiting for footage to export because I didn't have big enough SD cards, refilming because the sun started to set, babysitting my broken laptop for literally 12 hours to make sure it properly exported, etc could literally have been used to make another 100+ videos. And even though I've always had the money, my imposter syndrome would stop me. "Oh, I'm not that big a YouTuber, I don't make weekly videos, maybe once I get to 100k... " Meanwhile, the reason I don't upload that often and haven't committed to upping my YouTube game is BECAUSE of my shitty equipment! Every time I get inspired to make a video I have to think, "is this worth the 20+ hours of bullshit to make?" It usually isn't. All of this is to say that if you're like me who keeps suffering in the present because it'll be "better to wait for x in the future" stfu and solve the problems NOW. Every time I've upgraded my equipment, I'm so shocked by the results and always end up wondering why the FUCK I waited so long to upgrade. Take this point as the sign you've been waiting for and LEVEL 👏THE👏 FUCK👏 UP 👏 This has been a PSA. #instaart #instaartist #illustration #digitalart #digitalportrait #portraitartist #portraitillustration #freelanceillustrator #artistsonig #procreateartist #procreateillustration #drawingoftheday #drawdaily #artsketch #artstudiopro #artillustration #digiart #illustratoronig https://www.instagram.com/p/CEuNGeODXsJ/?igshid=1pygiyhchweth
#instaart#instaartist#illustration#digitalart#digitalportrait#portraitartist#portraitillustration#freelanceillustrator#artistsonig#procreateartist#procreateillustration#drawingoftheday#drawdaily#artsketch#artstudiopro#artillustration#digiart#illustratoronig
6 notes
·
View notes
Text
Cut music in iMovie
In contrast to the original, Nova offers numerous customization and customization options. The Apex Launcher is almost tik tok video download mp4 3gp identical to Nova - which one you want to use Is a matter of taste. The launcher is the heart of your Android smartphone. If you do not want this, you can deactivate the automatic in the menu under Settings. And now you create your first video. To do this, click the Create button at the top right of the screen. You now have access to your gallery with all your pictures and videos as well as videos stored on Google Drive.
PHOTO gallery - Update messes up my beloved photo gallery
Then use the vertical white lines in the timeline to set when the slow-motion effect should start and end. Apps like InShot Video Editor & Photo have a photo editor as well as video editing. In addition to videos, you can also create beautiful collages from your last beach vacation, which you can embellish creatively with stickers and picture effects. The often extensive video editors offer almost exclusively a voluntary premium upgrade. Have you taken a lot of pictures on vacation and would you like to present them to your friends in an ideal format? Then you can easily create a video from pictures. You only need the right program for this, with which you can achieve good results even as a beginner. Mobile phone videos are usually recorded on Android and iOS as MP4 or sometimes as MOV. If you connect your device to the PC using a USB cable, you can transfer the video files to your computer.

To add a transition, go to the transition tab and choose from 16 transition effects.
First set the radio button to "Video" and then click "Add". li>
You can upload the finished videos directly to YouTube via the software.
When that's done, just press the Create Movie button and wait a few minutes. After you have opened the app, take a look at Magisto as a guest to get to know the app. You will receive a short description of what you can do with Magisto. You can navigate through these with a swipe of your finger. Magisto is an app that combines your photos and videos into a short film of seconds. With FilmoraGo you bring life to your videos. You can process your video clips and photos into attractive videos with background music that your friends will love. The program also includes many pre-made transition and title effects. An essential feature for amateur filmmakers is the possibility of subsequently stabilizing blurred video recordings, which is accompanied by a certain cropping of the image. In the VLC player you can not only play videos, you can also rotate them, for example. How you want to shoot it is up to you. Navigate to the filters of the VLC player to be able to rotate your video. The free APK version of the Google "Digital Wellbeing" app brings important information about cell phone use to your smartphone. All the more disappointing that the app only works on Android P smartphones so far. The cookie settings on this website are set to "Allow cookies" to ensure the best surfing experience. If you use this website without changing the cookie settings or if you click on "Accept", you agree to this. Magisto asks you for a rating after each film you have created, so if you want to share or comment on your film, you cannot do so as a guest. Registration via Facebook, Google+ or email is required to use this function. If you have no desire and / or time to edit your videos, you will love Magisto. The basic version of the app can be used free of charge, but you can only export and edit your videos in the premium version.
1 note
·
View note
Text
WAV, MP3 To MIDI Or MUS
Convert AIFF to MP3. Nice Software program, Works Completely. Nice software, low CPU and tons of easy choices. Now to fix the official evaluation- batch mode works nice, and also you possibly can select your output bitrate. Just press the pink button within the High quality field, and you can select between 32-320kbps. I've had probably the most success utilizing WAV files, however I've additionally successfully converted movies etc to MP3. That is definitely one among my go-to software program instruments. 5 stars.
Click the pull-down arrow on the best of the Output Format option. And select MP3 from the output Audio format category because the target video format. You'll be able to modify the audio parameters like encoder, channel, sample fee and bit fee. 4. Click on "Convert" button! After a few minutes waiting, you can play the converted MP3 recordsdata in your any portable music units like PSP, iPod.

Should you're on the lookout for data on the way to upload digital information, please use our Importing Digital Information tutorial. Navigate to your WAV file that you simply want to convert to MP3 and press the Open button. There are countless different considerations as properly. As an illustration, in case your finished challenge is going to be played in entrance of a giant crowd, you need to use the highest high quality music doable. Nevertheless, if your undertaking is just background music for a enterprise meeting or classroom presentation, an MP3 file would more than suffice.
Convert MP3, WAV, AIFF, FLAC, M4A, OGG, AAC, etc. to other codecs and make the audio file smaller. Because the program does all of its rendering in the background, it's going to assist you to play any of the three audio codecs in real time while you are modifying — although it is nonetheless advised you select AIFF or WAV for high quality functions. Support is for non-DRM information solely. Latest versions of Traktor Professional on Windows require Home windows 10 to play ALAC.
Our most popular format for digital audio recordsdata is MP3 using the following specs. We are able to additionally handle most other digital formats , however MP3 is preferred. 3. Modify output folder and hit Run button to begin conversion. Each format is provided with a profile package and a preset editor. You may create new presets, delete and edit the outdated ones, and modify the audio converter settings and parameters.
Step three: Select MP3 Recordsdata from Save as sort menu. The very last thing it's best to know is that it's not advisable to convert between lossy codecs as you'll proceed to loss high quality. It is OK, nevertheless, to transform between lossless codecs as the standard is retained. Another choice worth noting is one that permits you to set up to three preset conversion formats in an effort to proper-click on on an audio file and choose one of those codecs for a fast conversion. It's an enormous time saver.
From the iTunes menu bar, Click on ‘Basic' after which select ‘Import settings' option. With the Importing option chose you'll see you have an possibility that claims "Import Using": trailed by a drop-down menu. Click on this case, and choose MP3 Encoder. For the setting dropdown field set it to "Good Quality". At that time hit OK.
To convert recordsdata from one audio format to a different in iTunes, it's good to set the conversion format within the iTunes preferences. Click "Convert" to convert your AIFF file. Complete Audio Converter may be run through command line (get the prepared-to-use command line from GUI settings). Complete Audio Converter can get audio tracks from YouTube movies - simply paste the url.
AIFF is shorted for "Audio Interchange File Format", it is a file format for sound that wraps various sound bit streams, starting from uncompressed waveform to MIDI. Files with LCPM waveform data are the main target of this dialogue. Compressed waveforms are wrapped by aiff to mp3 converter download filehippo-C (or an earlier model generally referred to as AIFC), not documented at this website.Changing an MP3 recordsdata to something else is not going to add anything to a file that already has been reduced in high quality. Mac MP3 software allows to extract audio from AVI, MPG, MPEG, WMV, FLV, SWF, MKV, VOB, DV, 3GP, MOV, RM, RMVB etc and save as MP3 on Mac. Step 2: Select Audio to import AIFF audio files and click on Export Audio in File. When you've got multiple information to transform, you'll be able to select all of them to begin with and then use the Proper-Click method to transform your complete batch.
1 note
·
View note
Text
Video Splitter version history
Support for external subtitles in ASS / SRT, GAB2 format. Cutting and joining possible for the formats MKV, WEBM, MP4, AVI. Support for embedded subtitles in UTF8, ASS, SSA format. Play and edit multiple subtitle streams. Cutting and joining possible for the formats MKV, WEBM. The ability to create projects with a variety of input files. Of course, we have to pay tribute to the most original and productive video recorder for VCRs on Mac computers. Apple made it easy for us to integrate iMovie itunes music and iPhoto Images into our project and also to export the finished product directly to the iCloud. If you don't have iMovie, you can download it for $ 14.99. FileLab allows you to do a lot more in-depth editing, unlike some of the earlier free online editing tools for MP4s. Similar to WeVideo, you are able to work together and share your efforts with ease.
4. Magisto - Magical Video Editor
Weeny works great for small and large files and there are no extra costs for exporting in certain formats. Now the only thing left to do is to convert the name into something that makes a 12 year old and his friends laugh. Make files compatible with a specific video format. Convert video files for upload to video, PSP or mobile-based portable media center device. The Video Editor has a modern, intuitive user interface that makes it easy to create videos with the help of various wizards.

VidTrim has various filters, clip trimmers and even frames for the videos to create still shots and thumbnails and to rave about outside of the video editor. Another interesting feature is the possibility to take audio from the video clip and convert it into a simple MP3 in order to export smaller file sizes more easily. Nero 8, in addition to burning to any type of media such as CD, DVD, Blu Ray, HD-DVD and any type of file, can convert video files to formats supported by many mobile devices such as cell phones, PDAs and PSP. Video Magic Free - Easily convert video files for the most popular mobile devices.
If you are signed in to YouTube you can add this video to a playlist.
MP4Split for Mac is a fantastic program to break MP4 files into chapters, to burn DVD and Authorize a lot easier.
Convert video files for upload to video , PSP, or mobile-based portable media center device.
The time editing windows the marker when a marker is secreted are not both active.
This question is locked and the answer function has been deactivated. Convert video files to the monitoring directory automatically after uploading. These examples can contain colloquial words based on your search result. Copying of materials from this website is only permitted with the written approval of the website administration. It supports a large number of different video effects - so color corrections and conversions can be carried out and video filters can be used on video files and images. Combine the available effects and filters and create a variety of new special effects. VidTrim is another free app that gives you the option to upgrade to Pro Version for more content and watermarking. It supports different languages for global use.
3. YouTube Video Editor
Funimate has a user-friendly interface for the less experienced and much more. Convert directly from MP4 to VOB (DVD-Video), AVI, MKV, MOV and 1000+ other formats. For users who allow the execution of Javascript in the browser, this number is significantly higher than for users who prohibit this. Therefore, it might help if you activate Javascript in your browser settings, wait a few hours, and then continue using Linguee normally. My tutorials are primarily aimed at beginners who are just starting out and are looking for free video editing programs that are relatively quick and intuitive to use. Very easy to use, and only 4 steps to convert video files are needed. Easy Video to iPod Converter - Convert video files for playback on your iPod player. This program can capture video from various sources and convert video files.
0 notes
Text
VideoSeeder Review
VideoSeeder Testimonial - Are you looking for more knowleadge regarding VideoSeeder? Please check out my truthful review concerning it prior to selecting to examine the weak points as well as strengths of it. If you buy VideoSeeder with my link, you will certainly get special and also eye-catching bonus plans. I constantly update my bonuses everyday.
Introducing VideoSeeder
A 6-Step Workflow to Create Video for Numerous Platforms
Is video a vital part of your social media sites advertising and marketing? Trying to find an effective method to create video for multiple social systems?
In this short article, you'll discover a six-step video operations to generate more social media sites video clip content for your business.
A 6-Step Operations to Produce Video for Numerous VideoSeeder Systems by Marshal Carper on Social Network Examiner.
Why You Required a Social Video Workflow
You've listened to the news: Video is king on social networks. Regrettably, grabbing the crown to rule your very own video clip kingdom isn't as straightforward as hitting Record on your camera. Below's why the social video landscape is extra difficult and tough than ever before:
Use a six-step process to produce video for several platforms, instance of video on social by Southwest Airlines
Platform algorithms like LinkedIn as well as Facebook are focusing on indigenous video clip (web content submitted directly to their platform) over web links to videos hosted off-platform.
YouTube is still a juggernaut, however the treatment of developers on the platform as well as the value of the YouTube algorithm are debatable at best.
The frequency of mobile devices indicates we need to reserve timeless VideoSeeder like facet ratio as well as sound if we wish to see the video clip interaction that provides us a choice in social media formulas.
Real-time streaming-- whether via Facebook, Twitch, or perhaps future challengers like LinkedIn-- is still a large question mark for brands.
Taking advantage of these chances can suggest modifying your video clip manufacturing process. Fortunately is that social video clip presents a large opportunity for your business. The trouble is that your brand name will shed if your video technique is to export to widescreen, upload to YouTube, and then blast the web link across your social media residential properties. Video is different currently and here's just how you ought to adjust.
When I chat with organisations about utilizing more video clip, one of the greatest barriers is manufacturing. Making excellent videos can be labor-intensive, and if you follow the recommendations in this article, you may be realizing you require to put a lot more time into developing your video clips. Don't anguish, though. There are methods to make this less uncomfortable.
What follows is the operations my team utilizes to reduce the rubbing of creating social video clip on a constant basis. This is, certainly, not the end-all of how video teams ought to operate. Nevertheless, if you're brand-new to on a regular basis generating social networks video, VideoSeeder may assist you miss a lot of the difficulties that typically interrupt groups.
Keep in mind: The software program I cover in this article-- Best Pro-- belongs to the Adobe Creative Cloud (offered as a 7-day free trial, with strategies beginning at $20.99/ month).
There are various other devices you can make use of to edit video clips as well as produce images, but using some industry-standard devices enables you to do more involved tasks in the future (without having to find out a brand-new collection of tools). Likewise, in terms of efficiency, the devices within the Adobe Creative Cloud incorporate well with each other, which can conserve you a lot of time.
# 1: Fire Your Video clip
Video pretenders like myself battled the increase of upright cellular phone video clips, and we lost. Despite how many times we commented about revolving the cam to film in widescreen, the vertical mobile routine could not be broken. Today, the whole of the mobile web experience is developed around upright screens, which indicates Instagram, Twitter, as well as Facebook social experiences are likely to remain in this style.
VideoSeeder Evaluation & Overview
Supplier: Cyril Jeet
Product: Videoseeder
Release Date: 2019-Nov-20
Release Time: 11:00 EST
Front-End Cost: $24-$37
JV Web page: https://www.socialleadfreak.com/videoseeder-review/
Particular niche: Video clip
What Is VideoSeeder?

Your consumers are looking for website traffic, as well as video clips are the most effective web traffic generation system in 2019. Video clip submission can produce a ton of traffic, SEO positions and also clients for any online marketing expert if done right.
The only problem - All the video submission applications in our market oblige sharing from a tiny pool of IPs (their server). Result - Spammers and also bad marketing experts eliminate the joy for every person using the system.
VideoSeeder Is The Most Effective Video Marketing & Posting Automation Application That Gets You The Maximum Traffic From Numerous Platforms.
PRO
Organization videos to all popular video clip platforms.
Promote your uploaded video clips to 17 various sharing websites
100% automated with auto-uploading, auto-promotion.
Complete support for hands-free organizing.
VideoSeeder Testimonial - Features & Conveniences
Even More Exposure & Website traffic Than Any Other Submission Platform Around
Submission as an approach is powerful, yet syndicating successfully doesn't imply simply throwing content at system. It is all about posting web content in an effective and also staggered fashion to make sure that Browse formulas uncover brand-new web content and also links at all times, powering up your initial video and driving the most amount of web traffic to you.
It also means shielding your content from spammers and also not being bunched together with them. Using the very same IPs as well as web server as a person that could be spamming misbehaves information for everybody.
VideoSeeder is the only submission system that has every one of the advantages as well as none of the downsides.
Independent procedure protects you as well as your organisation from misuse by other users.
Advertises as well as distributes the uploaded video clips on a selection of sharing sites to obtain you the optimum web traffic and sales.
Uploads videos on full vehicle to your favorite systems.
Staggered syndication maintains your material in circulation. Offering search brand-new fodder regularly and maintaining you in information.
Powerful automated submission method. You need to not do anything even more and also set it up. It can work in the history forever, driving website traffic to you without a break.
Final thought
"It's A Lot. Should I Invest Today?"
Not just are you obtaining accessibility to VideoSeeder for the very best price ever offered, yet likewise You're investing completely without threat. VideoSeeder consists of a 30-day Cash Back Warranty Plan. When you pick VideoSeeder, your complete satisfaction is guaranteed. If you are not entirely satisfied with it for any factor within the very first one month, you're entitled to a complete refund-- no doubt asked. You've obtained absolutely nothing to lose! What Are You Waiting on? Try It today as well as get The Adhering to Benefit Now!
Ps: If you have any type of concerns you intend to ask me about VideoSeeder or you just wish to offer your feelings and thoughts regarding it. Please feel free to relay your remarks, ideas or corrections., I will certainly answer you totally as well as attentively. Many thanks!
0 notes
Text
Creating a good lyric video for less than $10
How to make a lyric video for your song (without using Motion or After Effects)
Lyric video: a video that shows your song lyrics while the music plays. [Pretty self-explanatory.]
Not only are lyric videos a great and manageable way to keep your video content coming in between bigger projects that involve more complicated production, but I’ve found they can actually be a lot of fun to make.
Below I’m going to talk about how I created six different lyric videos along with info on some of the FREE tools I used.
A few things to keep in mind:
I’m not a video guy. Every time I make one of my own lyric videos it’s a process of trial and error. A pro could probably create something twice as good in half the time, but I enjoy playing around to find solutions on my own. Plus, video budget? (Pshaw).
You can make really cool lyric videos with programs like Motion and After Effects. I didn’t. For one, those programs cost money (see pshaw above). But diving into one of those programs would mean I have yet another learning curve to climb. I’m interested in exploring Motion at some point, but in between family, work, and everything else, I’d rather use what time is leftover to make music and bang out some videos, not hunker down in the lab for days on end. Maybe those programs are easier to use than I’m imagining, and I’m missing out (let me know in the comments), but for the sake of this article, let’s just refer back to the zero-budget appeal of making lyric videos WITHOUT Motion or After Effects.
That leaves you with free video editing software like iMovie or Windows Movie Maker. Pros might scoff at these intro-level video production tools, but when you combine them with a few other tricks, plus some creativity, I think you can create compelling lyric videos with little more than what comes loaded on most desktops, tablets, or smartphones. [Full disclosure: I used Final Cut Pro X on some of the videos below, but I’d worked in iMovie for long enough before that to know most of the things I’m doing in FCPX can be done in iMovie.]
Beginner tips for making lyric videos
Open your movie-making software and set your new project’s aspect ratio to 16:9.
Import your song and any other media (like video clips, still images, logos, etc.) that you plan to use.
Move your first clip or background image to the project pane. If you plan to use one static background image the whole time, you can click and drag to adjust the duration that it appears so it’s long enough to display during your whole song.
Place your song into the project pane. If you want it to start playing right away, drag it all the way to the left. If you have a title page or some other introductory elements, you can leave a little room before the song starts.
Use “titles” to place the lyrics on the video at the appropriate time during the song, matching with the vocals.
Use a font size and style that’s readable (or that looks cool at the very least).
Position your titles on the video (again, by dragging) so they appear in a place that’s legible. For instance, if you’re using a still image of a sandy beach below a light gray sky, you don’t want white font to appear over that sky. Better to drag it down so it appears with starker contrast over the dark sand.
Make adjustments to the length of the titles (you can do this by clicking and dragging) to smooth out the transition from line to line.
Watch your whole video a few times through and make any needed fixes.
Export your video file and upload it to YouTube, Facebook, Vimeo, etc.
Some tricks to spice up your lyric videos
youtube
This is the lyric video for my single “Collapsing Star” — a long fade-out kind of song about devotion in the face of aging — so I thought the visuals should do exactly what the music and lyrics do: fade, shrink, collapse.
The creation of this video involved some really basic elements:
Still images of space that slowly evolve — I wanted there to be a extraterrestrial time-lapse effect, so I used some super hi-res photos from Unsplash, applied a very long cross-fade between each transition, and also used just an imperceptible touch of “Ken Burns” (an effect that creates some motion using a still image).
A shrinking sun — Scientifically speaking, I know stars don’t collapse in this way; they usually get big and bright before dwindling into white dwarfs or black holes. But I thought a slowly shrinking star would paint the lyrics in a haunting way, so I used Canva to create dozens of colored circles, each one small than the next. I then placed them on the timeline with overlap so that each one could (like the space images) fade into the next and depict shrinking. With the addition of some blur and some “stencil” effects, I was able to hint at dark sun spots and the rippling surface of a star, as well as the halo around a star.
The twinkle of space — Because I was using static images, I needed to add some other light effects that made for a kind of twinkle or oscillation in the background stars. The main one I relied on was the “sketch” effect in FCPX.
youtube
This is the lyric video to my song “Irretrievable Beauty.” To create it I followed all the basic steps mentioned above, but here are a few of the bonus elements I added for (hopefully) extra impact:
Additional text — No one ever said a lyric video should contain ONLY your lyrics. So I wrote a bunch of other text (a letter from the 22nd-Century) and placed my lyrics within it. Check out the video and what I’m describing will make more sense.
Color contrast of text — The actual lyrics of the song needed to be easily readable, so they’re all in black against a lighter background. The rest of the words are white, and it’s fine if they roll by without anyone being able to read them all. I intended to create the feeling of being flooded by text, so lots of it is supposed to wash over you.
Public domain image — I found a super hi-res image from 1905 to use for the background of the video (and my cover artwork too), and slowly zoomed in throughout the whole video.
youtube
Above is the lyric video for my song “1+1+1=3.” Some of the things I did to make this video:
Slow fade between different versions of the same photo — The background image for this video is the same as the cover artwork, a photo I took of arithmetic on a chalkboard. I then applied different filters to the photo to create three separate versions. While editing the video, I started by laying the three images out in a repeating pattern and then cross fading them all so it looks like there’s some kind of slow transformation happening.
More extra text — The additional text in this video is nowhere near as crazy as in “Irretrievable Beauty,” but I wanted to add a few bits here and there. You’ll spot ’em.
Directly reference the subject matter — The song is called “1+1+1=3.” Yes, it’s about love, but the math element was a fun visual reference point. Arithmetic on a chalkboard. Strange equations in the text. Etc. What’s the visual reference in your song?
youtube
Above is the lyric video for my song “Silently.” Some things I did to create this one:
Hyperlapse sunset — One afternoon when I was visiting Oregon, I ran up to the top of Mt. Tabor (an extinct volcano in the heart of Southeast Portland) and found a good spot to film the changing sky as dusk fell. I made sure to be out of the way of anyone who might walk in front of the camera and ruin the looooooong time-lapse shot. Hyperlapse is a free app from Instagram, and it makes it easy to shoot long videos and then speed them up at various rates. I think my 4-minute music video required about 45 minutes of footage.
Intro titles from Word Swag — If you read this blog frequently, you probably know I love Word Swag, a free app that lets you add cool fonts to images. I used Word Swag to create both the circle logo at the beginning with my name in it, and also the “Silently” title. You could use this app to create text for every single lyric, but that’d get time consuming so I just ended up using it for those two elements at the beginning. For this purpose, within Word Swag you’ll usually want to lay the font over a transparent background so you can fly it into whatever video you’re creating without disrupting the moving footage. [Note: I used Word Swag to create the intro text for all the lyric videos below.]
Sketch effect — I then added some built-in effects, including a color saturation effect and two doses of a sketch illustration effect, to make the video look grainy and lo-fi. Like I said above, this wasn’t premeditated. Just playing around with effects to see what looked promising. On that note…
Earthquake wobble effect — I used the earthquake effect because I thought it kind of made the text look like it was on a transparent slide overlay that was out of focus for a second.
Alternating pacing of lyric appearances — Sometimes the lyrics appear and disappear with the vocal. Sometimes certain lines linger. I just went by feel, and payed more attention to how the titles looked laid out across the screen than anything particularly musical.
Alternating the color of the text — This is another obvious way to add some variation if you feel like your lyric video is too much of the same thing: change the colors of the lyrics!
youtube
Here’s a video for a song called “Morning Edition” which I posted right before the election in 2016. The recording is actually just a super lo-fi Garageband demo, but I only had two weeks until election day, and I figured if I’m going to make some kind of statement, there’s no time to wait to get my band into a proper studio. So, a few notes about this lyric video:
A lyric video can still have live action — I’ve never really liked the distinction between “music video” and “lyric video,” as if one is more legit and exciting than the other. As someone who listens to lyrics just as much as the music, I love good lyric videos, and I think there can be an interesting hybrid between these two approaches. For “Morning Edition” I lip-synced to my song, 10 seconds at a time, while using the Face-Swap tool in Snapchat to graft a certain someone’s mug onto mine. Then I edited all those takes together and applied a sharp contrast filter to blend the background of the Snapchat clips with the large black borders on both sides of the clips.
Did I say the lyrics have to be legible? — Well sure, it’s good to have legible lyrics, but I don’t think they need to be HUGE if that means you’re ruining the aesthetic of the video. For this one I figured I’d keep the text in a thin minimalist font at the top of the screen, out of the way of my face, and anyone who really wanted to read along could watch the video in full-screen mode.
youtube
Here’s the lyric video for my song “Veterans Day.” By complete accident — again, lots of playing around with built-in options — it ended up with a kind of Zen art aesthetic. Here’s how:
Stock video — I looked through tons of stock video sites to find an affordable, hi-res clip that could be used as the background for the whole video. I ended up buying (for less than $10) a short video of milk being poured into a clear glass of water with a black background. But 6 seconds of video wasn’t going to cut it for a 5 minute song, so I…
Slowed the clip WAY down — I stretched the clip as long as it could go and still only had about 2.5 minutes’ worth. So then I…
Reversed the clip — By duplicating the clip I had 2.5 minutes of forward motion, and 2.5 minutes of backwards motion. So the result is like a palindrome, or like that famous bass solo on “Call Me Al.” Halfway through, the whole thing turns around and the milk goes back into the bottle by the end. Another accident that I ended up enjoying.
Color inversion — I used the built-in tools to invert the colors so the white milk became like black ink, and the black background turned to a light gray.
B&W — I then took that video and turned it to black and white, which ended up darkening the whole thing in a nice way.
Scrolling text — One of the built-in title options on many video software programs allows you to scroll text vertically, like the end credits of a film. I used this effect separately for each verse and chorus of the song. Then I did another layer of scrolling text with just a bunch of randomly spaced letters and symbols, with a high transparency on the font so it appears as a graphic element, and I think it gives the whole video a kind a translucent papery feel.
youtube
Here’s a few things you might be able to learn from the lyric video to my song “Premiere:”
Still photos are your friend — Check out royalty-free photo sites such as Unsplash. I made the entire video for “Premiere” using photos I found on that site. The one risk you run is that other artists use the same photos in their work, but you can always tweak the images so they’re barely recognizable as I did with the milk video in “Veterans Day.”
Don’t be afraid of Ken Burns — He has a built-in video effect named after him for a reason; that technique of zooming in and out on still photos can be really effective for creating mood. Dynamics! Don’t go crazy or anything with the motion, but a little Ken Burns here and there can make flat photos come to life.
Mix and match fonts — I used a bunch of different kinds of fonts on “Premiere,” giving each section of the song its own feel.
Apply effects and transitions to the titles (text) too — Don’t forget that many of the same effects you can use on pictures and video will work to give your lyrics an interesting look as well.
Don’t publish your video until you’ve proofread it a dozen times! — If you watched my lyric video for “Premiere” you might’ve found a typo. Whoops. I didn’t catch it until it’d been posted for over a week, and by then… oh well. Staring at text while you’re editing gets tiring. Your brain tricks you. While you’re in the process of creating, you might not catch something that seems glaringly incorrect later on. So get some bandmates and friends to watch the video a few times to make sure you don’t have any spelling or grammar issues on your lyrics (I mean, besides the usual grammar or syntactical issues that ALL lyrics have). Another way to limit errors is to…
Write your lyrics out in Word and then paste them into your titles — When you type your lyrics in Word first, you get the benefit of the program’s spellcheck system. Some of the popular video editing software doesn’t have spellcheck, so paste those lyrics in after you’ve vetted them in the external doc.
Okay, those are some of the tricks I’ve used to make my lyric videos more interesting than just white font on a black background, all without paying for extra software or expensive stock footage and images. Hopefully they’re helpful as you create your next video.
Do you have any advice to add? I’d love to hear it. Holler in the comments below and be sure to post a link to your best lyric videos on YouTube!
The post Creating a good lyric video for less than $10 appeared first on DIY Musician Blog.
0 notes
Text
Traffic Titan Review - MMO with FREE Traffic and Experience from ZERO
Traffic Titan is a software & training package focused on traffic.Titan lets affiliates and marketers get free targeted traffic from Google & YouTube… Then turn that free traffic into ClickBank, JVZoo or Amazon affiliate programs – and also ecommerce sales.
Product: Traffic Titan
Type: Software + Training
Price: $27.00
Creators: MemePlex – Chris X
Home Page: Traffic-titan.com
SIX Automated Softwares... Changes Amazon, eCommerce, YouTube, Google, ClickBank & JVZoo.. Affiliate Marketing & Free Traffic... Forever!
youtube

Traffic Titan Review - MMO with FREE Traffic and Experience from ZERO
Traffic Titan is the ultimate guide to getting free traffic from Google & YouTube, for the most profitable, low-competition keywords on the planet…
Traffic Titan is a software & training package focused on traffic.Titan lets affiliates and marketers get free targeted traffic from Google & YouTube… Then turn that free traffic into ClickBank, JVZoo or Amazon affiliate programs – and also ecommerce sales.
6 Software Tools - $2 Million In Commissions:Traffic Titan Is A Fresh NEW Way To Look At Free Traffic, eCommerce & Affiliate Marketing In April 2017
Can you imagine the results you'd get with a software this unique?
Let me show you the rock-solid proof that's possible...

Traffic Titan Review - MMO with FREE Traffic and Experience from ZERO
So Are You Ready To Take YourAffiliate Business To The Next Level?
Are you in?
OK great.
The first step is to click on the order button below.
You'll get Instant Access to the Traffic Titan "tool-suite", with all 6 super powerful affiliate & traffic softwares:
Niche Money - pre-loaded with 100+ eCom/affiliate niches (with 1000+ keywords for each - $1billion of keywords!)
Keyword Titan - import Niche Money keywords & find the easy "free traffic opportunities" on Google & YouTube
Website2Image- quickly load the top 100 affiliate programs for ClickBank & JVZoo and export your video campaign
Image2Video - creates proven, profitable, affiliate review videos for any niche or keyword in 60 seconds
April 17th UPDATE: Image2Video automatically imports your video campaigns from Website2Image - instant video!
April 17th UPDATE: Image2Video includes 6 royalty-free music tracks, 10 background images & more
Domainaveli - find the best domain names for any keyword. Run 100 searches in 1 click across 30 extensions!
April 18th UPDATE: Domainaveli now includes 100+ premium domains for affiliate & ecommerce (limited availability!)
Titan Theme - a premium WordPress theme, which instantly gives you a Google-friend, big-money website
April 18th UPDATE: Titan Theme now includes unlimited installs - scale across 256 million affiliate niches.. forever!s
And that's just the Traffic Titan software - but there's even more..
A 39-page COMPLETE quick start guide that shows you how to get started within minutes with my Traffic Titan system
Plus secret hidden videos where I explain all my secret tips and tricks for promoting from this $150 billion loophole!
But that's not all. Order now, and you'll also get access to all these additional newbie-friendly features...
5 complete bonus systems on profiting with video + Facebook, YouTube, affiliate marketing & much more
Over 100 pages of PDF training on profiting in 2017 - beautifully formatted & complete PDF documents...
Training videos - how to use the software & start profiting with video marketing today.
Future upgrades, training & more - we supported Video Titan for 14 months. This is just the beginning!
Plus, you'll get access to my T-Shirt Titan system, (with over 3,000 happy customers paying $25!) which teaches you how to profit with TeeSpring & Facebook Ads, and includes FOUR software tools & SOOOO much more...
The Tee Searcher that lets you find proven tshirt designs on eBay, Zazzle, Facebook & many others
The Idea Maker that auto generates over 100 proven design ideas in any niche in under 60 seconds
The Auto Designer that automatically generates ready-to-upload PNG design images in seconds
The Auto Model tool that lets you automatically create Facebook ad images that get dirt-cheap clicks
Over 8 hours of training videos, covering niche selection, finding designs, facebook ads management..
A quick start guide that shows you how to get started within minutes
Plus secret hidden videos where I explain all my secret tips and tricks..
So, on top of the $5,000 of Traffic Titan software, you get T-Shirt Titan 1.0 ( 4x software, tools & 8 hours of training)...
The #1 package (Titan) for t-shirts - as well as the #1 package for free traffic marketers & affiliates! This cannot last!
Oh, and of course, you'll also get personal access to my email address in the members area.
And remember, I'm here to help you succeed.
But you must act now.
This is on a strictly first-come, first-served basis...
So Once the Discount Ends, I'll Charge $147 Per Month For Each License...
If you order now, you'll get Traffic Titan at the discounted price of $47 ONLY $27! ONE TIME FEE.
But that's not all. There's still even more value - if you join today and become a Titan member
When you buy Traffic Titan right now, you'll also get the high value, time-limited bonuses below...


Traffic Titan Review - MMO with FREE Traffic and Experience from ZERO
Examine my automated software in your home for 30 days, read the quick start guide, apply my system, watch the videos...
Automate your free traffic & affiliate business with my simple software tools, download the training, get swarms of free, targeted traffic with YouTube & Google, copy my entire system...
Do whatever it takes to convince yourself that it is possible to finally succeed with affiliate marketing in 2017.
But if for any reason whatsoever, you are not completely satisfied, just let me know and your fee will be fully refunded.
You can cancel at any time, and for ANY reason.
That's how certain I am that you are going to love this.
So what are you waiting for? This is 100% risk-free!
Fair enough?
Ok, then all that's left to do is buy this before this limited time offer CLOSES FOR GOOD!
Get Traffic Titan and I guarantee it will change the way you look at affiliate marketing forever...
So what are you waiting for? Click the button below to get started...

GB Cracked Review & Bonuses
Blogging for Profit PLR
VIDGEOS OTO1
OctoSuite Ocean Edition
SyndLab Pro Review
PostGopher Review
Viddyoze Live Action Review and Bonus
Traffic Titan Review
from SOFTWARE MAKETING ONLINE http://www.mmosoftware.net/2017/05/traffic-titan-review-mmo-with-free.html
0 notes
Text
Sir Stevie Spielberg
I’d like to blog about the gateway drug that my instructors have pushed upon me. “What drug?” you ask? Why, video editing, my hard rocking amigo. What once seemed daunting and intimidating, has become just another obsessive nit pick in my life. All jokes aside, I find editing videos very fun and can see myself doing this on my own time.
I’ve been assigned 2 different video projects conveniently at the same time. The first being for adobe photoshop. There, I have to utilize the basic video editing tools given by the program to make a simple 10 minute video. 10 minutes. That seemed like a long time. Well, before I worked on the project for Social Media Design. I think the objective for that project was to post a video on your youtube channel that is at least one minute long and basically promotes yourself in some way. I think I accomplished that.
So let’s talk about that. My video is about 7 minutes long (cut from a total of 28 minutes of footage) and I put a decent amount of editing into the sucker. From music to fast forward sequences, I worked frustratedly into the night. I’d like to put emphasis on frustratedly. Is frustratedly a word? I think it is. It’s not being auto corrected. Anyways! No matter how hard the editing process got, there seemed to be a way around everything. Like, for instance- The software only allows you to speed up segments by 400%. That seems like enough, right? Wrong. Basically, I had to export and save that cut of the video and then import it as a new clip. Since it had already been sped up, I could then speed it up an additional 400%. This may not be groundbreaking to some people, but I was pretty proud of myself.
My video ended up being a “how to”, sort of. It’s basically me just drawing and mumbling like a half asleep jubrone, but I think that after the editing, its quite the charming video. It’s pretty fascinating. The things you can do and how easy it is to do them. Pretty fast too. Recording and editing everything took about 3-4 hours. My only hangup, however, was uploading the hunk of junk. I uploaded the thing like 6 times, and each time it screwed up my audio. Eventually, Youtube took it without ruining anything. Other than that, it was a pleasant learning experience.
Editing a video is very much like editing a picture. Same frame work and tools almost. So it was an easy transition getting into the groove of things, Easier than I thought, at least. After I saw how easy it was to edit a video, I was eager to jump into things and get to work. I honestly can't wait for future video projects.
0 notes
Text
nero 2016 platinum serial download free
Obtaining Started
Though there are usually for $49. 99 upon Nero's site, the cost is discounted to $29. 99 as of this particular writing, for an everlasting software license. You may also download a completely free trial version with regard to the associated with a good email address-with no bank card information required. The software program requires Windows 10, 8, or 7 (32-bit plus 64-bit are both supported). First you download the small stub program that will downloads and installs the particular actual program, which takes up a surprising 1. 7GB on the disk.
The specialist also installed an individual Music Recorder app set up, which puts an symbol in the system holder. this wouldn't be considered an issue, except that it turned into completely unrelated to Nero Video. I tested along with an Asus Zen AiO Pro Z240IC running 64-bit Windows 10 Home plus sporting a 4K screen, 16GB RAM, a quad-core Intel Core i7-6700T PROCESSOR, and an Nvidia GeForce GTX 960M discrete images card.
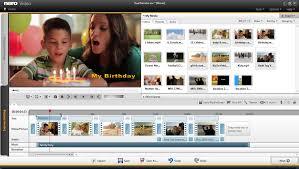
Interface and Modifying Fundamentals
There's no desktop computer icon to consider a person directly to the movie app: Instead, you operate the tile-based suite begin page and then select Nero Video from that will.
A registration dialog jumps up when you 1st run the video publisher, but you can avoid that. When you release it editor proper, the interface looks different through most editors, and this feels a bit out-of-date. Still, how to obtain going is apparent sufficient: You can start taking media from a gadget, open the editor or even an existing project, or even start a disc burning up project. An interesting option is Open Windows Reside Movie Maker Project: That will product, though still obtainable, is no longer becoming updated by Microsoft. We are going to waiting to see in case something replaces it quickly.
Once i first tried in order to import videos, an service dialog popped up informing me I needed in order to activate the software prior to continuing. A simple click on later, my clips made an appearance within the video editor's content tray. You may adjust the ratio among preview quality and overall performance (the former reduces the particular latter on weaker hardware). I had no problems importing 4K content through a Microsoft Lumia 950, but the software does not support the popular XAVC-S format or H. 265.
The default timeline view-Express Editing-shows clip thumbnails within storyboard format. Tapping the particular big vertical tab tagged Advanced Editing switches a person to definitely the a lot more standard timeline track see. You can't switch returning to Express if you create edits in Advanced. Whenever you drag a cut onto the timeline, this nicely snaps next in order to the last clip. The particular timeline is easy in order to expand and contract along with the mouse wheel.
1 limitation is the truth that right-clicking on the clip doesn't offer in order to show you its document information. There's lots associated with undo levels, however, having a big button for that will purpose along the bottom part. As with Magix Film Edit, the program shown some iPhone and Home windows Phone clips upside-down within my testing; other apps such as CyberLink PowerDirector and Corel VideoStudio did not have this problem. It can easy enough to turn the clip, though, making use of the Flip adjustment.
A person can easily start full-screen playback with a switch, and even view on the separate monitor. Double-clicking the clip in the schedule opens a trimmer windows, which lets you exactly set start and finish points, down to the particular single frame. But Nero doesn't offer PowerDirector's several in and out stage editing. It does allow you set markers, although. Cutter, slip, and move tools enable those a lot more advanced editing styles.
Show Editing is of program much simpler, and in case that's even too a lot effort, Nero offers more than 40 themes that instantly add intros, titles, changes, and background music based on activities and designs, such as sports, children, and retro.
Advanced Results
You get a healthful choice of transitions, though no place near as many because Pinnacle Studio offers; presently there are some nice innovative ones, though there not necessarily any true 3D options one of them. It's the just editor I've tested that will doesn't have sample animated graphics for the transitions, which means you don't see exactly what they are doing till you use these to your cut. Nero also lacks Last Cut Pro X's simple way of adding cross-fades by simpling pulling straight down the clip corders around the timeline to add the particular transitions. Adding transitions in order to the timeline is simpler than in Pinnacle Studio, however; the program numbers out the clip overlap for you. However, a person can only adjust the duration, not the exact clip positioning, which might prove irritating at occasions. There's no search with regard to transitions and effects, which usually is unfortunate, since they may all in one lengthy list. It is easy to add transitions in order to your Favorites section, nevertheless, and this will help you discover them again more rapidly.
If you are looking to perform green-screen work, look somewhere else: Nero delivered the most severe chroma-keying results I've observed in any editor. We used the same acting professional on an imperfect eco-friendly screen background, which some other programs like Premiere Elements could convincingly superimpose upon background forest and seaside scenes almost instantly. Along with Nero Video, the preliminary application of the impact was completely unusable, along with areas of the design made transparent, even whenever I used the eyedropper tool to sample the particular green background shade. Making use of the Similarity slider in order to add back the lacking parts of the design made things no much better, as it also additional back green background. Some other editors get a much better result on first click on than Nero does right after tweaking.
For picture-in-picture (PiP) effects, I like exactly how Nero's video preview windows has handles at the particular corners for resizing with regard to PiPs. There's a PiP editor with a large number of pre-specified PiP designs. This system also includes stabilization, speedup and slowdown effects (though no specific freeze-frame tool), and tilt shift. Furthermore, there are decent cartoon text options, clip artwork, and backgrounds.
Audio
Nero includes a decent choice of background music, plus it enables you to unlink sound from videos. One really nice tool is Match Music, but it simply faded the song, rather of recomposing it because VideoStudio's tool does. Sound reduction, compression, reverb, de-ess, high-pass, and other regular audio effects are incorporated.
Performance
Though it do not exhibit slowness or even wait periods during easy and advanced video modifying and importing, Nero has been far slower at making a movie project in order to a video file within my testing compared in order to leaders, CyberLink PowerDirector and Peak Studio.
I test making time by creating the movie consisting of 4 clips of mixed sorts (some 1080p, some SECURE DIGITAL, some 4K) with the standard set of changes and rendering it in order to 1080p MPEG-4 at 15Mbps, H. 264 High User profile. The clip's audio will be MPEG AAC Audio: 192 Kbps. I test upon an Asus Zen AiO Pro Z240IC running 64-bit Windows 10 Home plus sporting a 4K screen, 16GB RAM, a quad-core Intel Core i7-6700T PROCESSOR, and an Nvidia GeForce GTX 960M discrete images card.
The test film (whose duration is simply under 5 minutes) required Nero Video 4 moments and 19 seconds in order to render. The speed innovator, Pinnacle Studio, took simply 1 minute and thirty four seconds to render the particular same project, and PowerDirector came in at two: 34. Nero did advantage out two other opportunities tested, VideoStudio, which required 4: 20, and Adobe Premiere Elements, which required 5: 18.
Sharing plus Output
You get in order to Nero Video's output choices by tapping the large Next arrow at the particular end of the publisher screen. This program allows you output to the good selection of movie file formats and furthermore can burn DVDs, Blu-rays, and AVCHD discs. Backed file types include AVI FORMAT, WMV, Flash video, MPEG-1, -2, and -4, plus even AVCHD Ultra HD, which is a 4K format. You may also export sound separately, and send your own movie via email. 1 surprisingly missing option will be to the ability discuss video directly to on the internet social networks, something discovered in abundance in the particular competition.

The Web result option simply saves the file in online-friendly types. But after I selected Export to Web, made the video file, plus installed another program up-date, the choice to sign into a YouTube accounts and upload to that will particular site was additional. Facebook and Vimeo had been nowhere to be discovered, though. Nero's own on the internet storage has been stopped, and the company does not have an equivalent in order to CyberLink's DirectorZone for discussing movies and effects.
Elaborate Missing? Is It Really worth the Money?
Quite the few features which possess made their way in to competing enthusiast-level video modifying software are not in order to be found in Nero Video 2016-like motion monitoring, multi-cam editing, plus some 4K support, just to title a few. But items that support those price triple what Nero Video does. If you may live with that plus you are looking in order to save some coin while getting a decent arranged of video editing equipment, Nero Video might become for you-that is, so long as you don't mind its out-of-date interface, slow rendering, plus lack of advanced modifying options. For faster overall performance and a much larger palette, look to PCMag Editors' Choices for enthusiast-level video editing software, CyberLink PowerDirector and Corel VideoStudio.
• PROS
Blu-ray authoring, burning, plus playing. Excellent picture-in-picture device.
• CONS
Some outdated user interface elements. Lack of link between media organizer plus video editor. Slow new venture. Slow video rendering. Simply no 64-bit version. No marking of media.
0 notes
Text
VidViral 2.0 Review And Large Bonus
VidViral 2.0 Evaluation - Are you searching for even more knowleadge about VidViral 2.0? Please read through my straightforward review concerning it prior to choosing to review the weaknesses and also toughness of it. If you get VidViral 2.0 via my link, you will certainly get unique as well as attractive bonus offer plans. I always update my bonuses everyday.
Introducing VidViral 2.0
Top 10 Video Quality Enhancers (Part 4)
6. Corel VideoStudio Pro 2018
Cost: $63.99.
Compatibility: Windows.
The software is simple sufficient that also someone with no previous video editing and enhancing experience can promptly find out how to use it as well as yet powerful enough to allow you to produce 360-degree video clips, stop-motion animations or just routine 4K activity webcam video clips. VideoStudio also lets you resize or chop your clips, while the split screen attribute allows you to incorporate several videos right into one. The collection of over 1500 aesthetic results provides a sea of creative opportunities, while the Lens Improvement devices the software gives can be utilized to enhance the footage you're editing.
The limited quantity of timeline tracks and underwhelming audio editing features make Corel VidViral 2.0 a not likely choice for experts, but if you are just seeking to edit your footage swiftly there are very few much better choices.
7. Lightworks
Rate: freemium, month-to-month permit $24.99.
Compatibility: Windows, Linux, macOS.
Quentin Tarantino, Martin Scorsese or Danny Boyle are simply a couple of world-famous film directors whose motion pictures were modified in Lightworks. What's more, in 2017 the software application won the Emmy Award for introducing digital non-linear modifying. For almost thirty years, Lightworks has actually been among the most effective video clip boosters in the sector, that provides groundbreaking features cinema professionals love.
This video modifying software program lets you do practically anything if you know just how. VidViral 2.0 editing, rich selection of effects or assistance for a broad variety of video clip documents layouts make Lightworks a superb option for proficient video modifying professionals. Despite the fact that the complimentary variation of the software is offered, acquiring a monthly or the yearly license is still a far better alternative if you want to approach your next task professionally.
8. Last Cut Pro
Price: $299.99.
Compatibility: macOS.
The possibilities Final Cut Pro deals are almost limitless. The software program supports mostly all video file styles, its non-linear timeline allows you arrange all type of media documents freely, as well as the color wheels permit you to boost the colors in your videos by merely dragging the mouse cursor. Besides offering support for 360-degree video clips, Final Cut Pro also supplies 360-degree graphics as well as effects.
The video clip editor is built on a 64-bit design, which allows its individuals to service very demanding projects, although it is best to examine the system needs before mounting it on your Mac computer. Last Cut Pro is ill-suited for newcomers to the world of video clip modifying since making use of the majority of its attributes requires an enviable quantity of ability.
VidViral 2.0 Review & Review
Vendor: Harshal Jadhav
Item: VidViral 2.0
Release Date: 2019-Sep-16
Release Time: 11:00 EDT
Front-End Cost: $27-$37
Sales Page: https://www.socialleadfreak.com/vidviral-2-0-review/
Particular niche:
What Is VidViral 2.0?

VidViral 2.0 is a Newest Updated Version of VidViral launched back in 2017.
VidViral 2.0 is a cloud based Video Booster that turns any kind of Video clip(YouTube, Vimeo, Dailymotion, Amazon.com s3 or self upload) into a Focus Ordering Masterpiece by adding Focus Grabbing elements to the video which directly talks with the visitor, making them Interested as well as actually forcing them to click on the play button, Inevitably obtaining more views as well as even more Traffic.
Users can include Engaging CTA Texts, Photos, Symbols, GIF's, Timeline Night clubs, Smileys to the Header & Footer of any kind of YouTube video clip or video clip on their disk. They can Make and also Download Completed videos or share on social media sites websites such as Facebook, Twitter, Google Plus as well as extra from a cloud based control panel.
VidViral 2.0 Review - Quality & Perks
Innovative remedies to involve with video
You can now add introductions, outros, images, icons, forms, GIF's as well as more to make exciting video clips that involve, delight, and also are a cut over the competition.
Make a wonderful first impression
With many terrific brand-new enhancements-- border frameworks, subtitles, font styles, images, backgrounds, to the newest version of VidViral, you can be assured of making a wonderful perception with your video meme from the second it begins having fun.
New elements included in help you inform your story
With countdown timers, emojis, timeline bars, as well as much more, you currently have a number of brand-new ways to order your visitor's attention, inform your tale and also involve with them.
Videos prepared in simply a few minutes
You only require to spend a few mins to make your video clips spectacular. You can get going immediately and build a library of wonderful video clip content in extremely little time.
Economical solution to increase your Videos Ads CTR
Video clips advertisements might melt your money if it fails to bring in video involvement. This will decrease your CTR. Yet with using VidViral, you can add custom-made headers and also footers and make your Videos standout. This will certainly lead to higher involvement and also enhance your Video clip Ads CTR, causing greater purchaser traffic at reduced advertisement invests.
Choice to choose your video resource
Usage video clips from YouTube, Vimeo, DailyMotion, Amazon.com S3 or your own laptop computer or desktop computer to get going with your video memes right now.
Select from a collection of high converting themes
The latest variation of VidViral features 25+ square as well as 25+ upright high-converting templates to make sure that you can personalize your distinct video clips for Facebook, Instagram, Snapchat, Pinterest as well as lots of various other sites.
User friendly super-intuitive software application
With a new UI as well as an easy-to-use editor, VidViral brings you loads of attributes at the click of a button. You don't need to be a video editing expert-- you can make a spectacular video utilizing the easy drag as well as decrease attribute even if it's your initial attempt at video production.
Make your video clips go viral on social networks instantaneously
Not just can you keep your video clip meme on your own gadget however you can also publish your interesting video clip right to your social media web page in an immediate. Share your video clips on your social channel, spread understanding, go viral with your video content, and produce unlimited buyer traffic completely free!
Can Develop 50 Campaigns with FE
Export Videos upto 720p
Transform any Video Clip to Meme Video right into Square and Vertical format. (so it supports Facebook, Instagram, Snapchat, Pinterest along with Stories of Fb, Insta and Snapchat)
Access to High converting Themes - 50+ Consisting of 25 Square themes and 25 Vertical Design templates
Brand-new UI and Easy to use Editor
Include Countdown timer to the Video
Include Computer animated GIF's to the Video - Upload or Resource it from Giphy
Include Timeline Bar on top or base of the video clip - This bar display the video clip size.
Source Videos from Youtube, FB, Vimeo, Instagram, Dailymotion, Amazon.com S3 or from your Computer system
Accessibility to Substantial Image Gallery to utilize on the Videos - Upload or Resource it from UnSplash
Accessibility to Massive Icons Gallery to use on the Videos - Can Publish very own Symbols also
Accessibility to Backgrounds, Shapes, Lines as well as Videos
Social share - YouTube and also Facebook
Can deal with videos upto 30 minutes.
Verdict
"It's A Large amount. Should I Invest Today?"
Not just are you obtaining access to VidViral 2.0 for the very best price ever supplied, yet additionally You're spending entirely without threat. VidViral 2.0 includes a 30-day Money Back Guarantee Plan. When you select VidViral 2.0, your fulfillment is guaranteed. If you are not completely pleased with it for any type of factor within the very first thirty days, you're qualified to a full reimbursement-- no doubt asked. You've got nothing to shed! What Are You Waiting for? Try It today and get The Complying with Bonus offer Now!
0 notes
Text
Sketch Maker PRO Review
Sketch Maker PRO Review - Are you searching for even more expertise concerning Sketch Maker PRO? Please review my straightforward evaluation regarding it before selecting, to review the weak points as well as toughness of it. Can it be worth your effort and time and also cash?
Introducing Sketch Maker PRO
The 5 Finest Explainer Videos (& & How to Make Your Own) (Component 3)
Step 2: Recording the Voiceovers
Once you have a manuscript, you'll require a voiceover. Some options are:
Voices.com: This site has a huge network of specialist voice stars to choose from.
Craigslist: Ah of course, old reputable. You can find just about anything on crazy Craigslist, consisting of voiceovers.
Fiverr: Yup, you can obtain a good voiceover for your explainer video clip for simply $5 on Fiverr! You'll possibly have to pay a little bit more than that ($5 is generally the starting price-- some fee by the second, others by the word. Chances are you won't be in the most affordable Sketch Maker PRO price bracket). Still, you aren't most likely to locate a voiceover anywhere for cheaper.
Action 3: Explainer Video Production
There are a number of various paths you can take when it comes down to the actual creation and manufacturing of your explainer video clip. Alternatives include ...
Highlight the Pros: There are some extremely skilled specialist video clip manufacturing business out there that can aid you make an awesome marketing video clip. You'll have some high explainer video clip prices if you go this path-- be prepared to pay out anywhere from $5,000 - $20,000 for a solution similar to this. The advantage is that you'll have video professionals aiding you every action of the means, and you're video clip is assured to look excellent. Trial Duck, Wyzowl, LessFilms, Flikli and also Studio Pigeon are a couple of explainer video business to think about.
Pow Toon: if you're making computer animated explainer videos, have no computer animation experience, yet want to do it on your own on a budget, Pow Toon is the method to go. Any individual with some basic computer skills can utilize this animated explainer video software. It likely won't be a masterpiece, but it's easy to create and free (to begin at the very least). They also have a guide collection to stroll you with building your development.
Do It Yourself Explainer Video with iPhone: That's right, you can movie your very own explainer video clip on your iPhone! This incredible article from Wistia will reveal you exactly how. Do It Yourself recording is a wonderful means to develop cheap explainer videos. For the editing, iMovie or Camtasia are good choices. If you intend to take on a Do It Yourself computer animated explainer video clip, this computer animation toolkit from Salsify can offer you with a lots of terrific animation devices and also sources.
Employ a Freelancer: Experienced freelancers can provide high-quality explainer video clip manufacturing aid at a much lower cost than a huge production firm. You need to be able to find one easily enough on craigslist or various other freelance sites.
Crowd Sourcing: One alternative you may give a go is the video crowd-sourcing business Video clip Brewery. Submit a general job review and also obtain a bunch of propositions from Video Brewery's network of relied on freelancers. Pick one you like and you get on your method! Sketch Maker PRO notes that these explainer video clip expenses normally run someplace between $3,000 - $5,000.
Step 4: Songs & & Noise Impacts
Chances are your animated explainer video and even your online action explainer video requires some wonderful sound impacts as well as music. Some locations to rack up tracks include ...
MusOpen: Supplying totally free songs sources such as recordings, sheet music, etc.
. Free Sound: A data source of Creative Commons accredited audio examples and recordings.
YouTube: The king of video clip itself provides some complimentary background songs to make use of in video clip creations.
Audio Forest: Nobility cost-free audio documents consisting of loopholes, sound effects, and a lot more.
Audacity: This free device isn't a source of audio data, yet instead aids you create your own.
Keep in mind to check out the small print carefully on these websites with regards to what is or is not allowed under the audio documents's licensing arrangement. Some are an economical one-time purchase and also aristocracy free, others require attribution, etc
.
Sketch Maker PRO Evaluation & Introduction
Maker: Jimmy Mancini
Product: Sketch Maker PRO
Launch Date: 2019-Apr-18
Release Time: 10:00 EDT
Front-End Rate: $18
Sales Web page: https://www.socialleadfreak.com/sketch-maker-pro-review-from-a-real-user/
Particular niche: Video
What Is Sketch Maker PRO?

Sketch Maker PRO is a brand-new Whiteboard Video clip Manufacturer that deals with any type of Internet browser connected to the Internet (Chrome, Firefox, Safari ...) enabling you to develop amazing Explainer Videos in Minutes and all is done on the Cloud!
Sketch Maker PRO Features & Conveniences
Advantages
Use it when you are online
Forget about downloading significant data, installing bulky software program, obtaining intallation mistakes or absence of space. Currently with the brand-new Sketch Maker PRO you just open your Browser (Chrome, Firefox ...) login as well as done; after that you can start creating outstanding Explainer Doodle Videos!
Produce Videos With Different Formats as well as Dimensions
We understand that you may want to produce video clips with differente sizes/dimensions, that's why we developed Sketch Maker PRO in such a way that will permit you to choose your preferred video clip layout 16:9 or 1:1 * (for social networks) or your preferred measurements, 1920x1080 *, 1280x720 *, 640x360 - * PRO PLUS Accounts Only).
Easy to make use of!
Yes, it is so easy to use! You simply select or drag and drop your preferred photos or include some message to the canvas preview and then preview it before developing your video. That's it!
Maintain a couple of Videos Online or Download them
When you crate a video clip, your video is stored on the cloud, after that you will certainly have the alternative to download it, maintain it saved online (restricted area) or delete it. So you can constantly monitor your 'Master Pieces':-RRB-.
Export it in Minutes (Making)
Some 'other' devices on the marketplace make you wait a long, long, time to produce a video clip. Sketch Maker PRO making engine is among one of the most effective as well as fastest on the market, so you obtain Impressive Whiteboard Videos done very quick! (* if your video clip is as well large it will certainly take longer that common, it wil depend exactly how busy the server in fact is, but generally is quick).
Produce Fantastic White Boards Videos in Minutes (Save Time & Cash)
There is no need to pay a designer or a company to do it for you, you simply spend a few minutes and you will certainly get it done! Map out maker PRO will certainly allow you to create fantastic explainer videos, that look professional as well as are done quick! Saving you Money And Time!
Functions
FUNCTION 1: Add the consisted of Images or your OWN photos
We have actually consisted of a number of photos for you to select from, beginning with animated SVG pictures to wonderful looking personalities from various particular niches. You simply need to browse the consisted of classifications and choose the one that fits your specific niche.
And also, we have actually added the alternative to upload your very own pictures or logo designs (Just on PRO accounts), so you can individualize your video clips even more. You just click on the upload switch, post your photos and then they will stay saved on the server (restricted MEGABYTES per account).
FEATURE 2: Include Text
Adding message to your explainer video clips is much more easy then ever before, you just compose your text, click the include switch and also the message will certainly be added to the sneak peek (and also in the future your explainer video clip). As Easy as that!
You can individualize your text by changing the font kind, typeface size and font style shade! Plus the message is integrated with the audio of your video clips so if we include the hand composing impact (consisted of) your video clips will certainly look impressive!
ATTRIBUTE 3: Include the consisted of backgrounds or add your OWN Backgrounds
We have actually included some wonderful backgrounds for you to choose from, there are some great histories however certainly you will have the option to get even a lot more histories (optional).
You just require to go to the background's tab as well as scroll down to have the ability to see all the readily available histories!
ATTRIBUTE 4: Add History Songs Tracks (Included or your own)
Sketch Maker PRO features a few music tracks to contribute to your videos (around 3 minutes each), yet you might have the option to upload your own songs as well.
You'll have the alternative to get monthly songs tracks (optional).
ATTRIBUTE 5: Add Text To Speech * (optional), Add Your Own Audio File or Record Your Voice
Sketch Maker PRO comes with several Human-like Text To Speech voices to add to your video clips (optional).
You'll have the alternative to tape your very own voice using your OWN microphone * or simply publish SHORT audio data * to develop your video clips. * PRO PLUS Accounts Just).
FUNCTION 6: Preview an Slide or All your Animation (Adjustment hands also!)
You can sneak peek your video prior to rendering it. You can preview each slide or all your computer animation on the preview canvas.
Plus you can change the hands made use of, also the pens/pencils the hand utilizes to simulated the composing message could be changed!
FUNCTION 7: Slide Consequences, Allocation, Download Your Video clips!
We've included the option to use some slides effects, even an arbitrary impact is consisted of to enable you to provide your video clips a much more professional appearance!
Inside your account's web page you will have the ability to see your individual information as well as your Allocation per day! We've included a distinct web page to enable you to access all the videos you have actually produced, you can simply download them by clicking the download switch.
Rate & Evaluation
Front-End $17.95: Sketch Maker PRO (PRO Variation).
Produce 48 Video clips per day (2 video clips per hour)
Shop 10 Sketch Videos (Cloud)
Up to 10 slides per task
10 Songs Tracks
20 Backgrounds
144 SVG Characters
199 SVG Path animation images
Publish very own Images/Music/Backgrounds (5mb)
OTO 1 (Month-to-month) $12.95
Develop 96 Videos per day (4 videos per hr)
Shop 20 Lay Out Video Clips (Cloud)
As much as 30 slides per job
10 Songs Tracks Monthly
10 Backgrounds Monthly
50 SVG Personalities Monthly
100 SVG Path computer animation photos Monthly
Submit very own Images/Music/Backgrounds (50mb)
Text To Speech Voices
TTS Summary: 28 Voices/ 11 Languages
OTO 2 $19.95: Commercial Certificate.
Extra coming quickly
Conclusion
" It's A Good deal. Should I Spend Today?"
Not just are you getting accessibility to Sketch Maker PRO for the very best cost ever before supplied, however additionally You're spending entirely without danger. Sketch Maker PRO include a 30-day Money Back Assurance Policy. When you select Sketch Maker PRO, your contentment is guaranteed. If you are not totally pleased with it for any type of factor within the very first 1 month, you're qualified to a full refund - no question asked. You have actually got absolutely nothing to shed! What Are You Waiting on? Attempt It today and get The Complying with Bonus offer Now!
0 notes
Text
Creating a good lyric video for less than $10
How to make a lyric video for your song (without using Motion or After Effects)
Lyric video: a video that shows your song lyrics while the music plays. [Pretty self-explanatory.]
Not only are lyric videos a great and manageable way to keep your video content coming in between bigger projects that involve more complicated production, but I’ve found they can actually be a lot of fun to make.
Below I’m going to talk about how I created six different lyric videos along with info on some of the FREE tools I used.
A few things to keep in mind:
I’m not a video guy. Every time I make one of my own lyric videos it’s a process of trial and error. A pro could probably create something twice as good in half the time, but I enjoy playing around to find solutions on my own. Plus, video budget? (Pshaw).
You can make really cool lyric videos with programs like Motion and After Effects. I didn’t. For one, those programs cost money (see pshaw above). But diving into one of those programs would mean I have yet another learning curve to climb. I’m interested in exploring Motion at some point, but in between family, work, and everything else, I’d rather use what time is leftover to make music and bang out some videos, not hunker down in the lab for days on end. Maybe those programs are easier to use than I’m imagining, and I’m missing out (let me know in the comments), but for the sake of this article, let’s just refer back to the zero-budget appeal of making lyric videos WITHOUT Motion or After Effects.
That leaves you with free video editing software like iMovie or Windows Movie Maker. Pros might scoff at these intro-level video production tools, but when you combine them with a few other tricks, plus some creativity, I think you can create compelling lyric videos with little more than what comes loaded on most desktops, tablets, or smartphones. [Full disclosure: I used Final Cut Pro X on three out of the four videos below, but I’d worked in iMovie for long enough before that to know most of the things I’m doing in FCPX can be done in iMovie.]
Beginner tips for making lyric videos
Open your movie-making software and set your new project’s aspect ratio to 16:9.
Import your song and any other media (like video clips, still images, logos, etc.) that you plan to use.
Move your first clip or background image to the project pane. If you plan to use one static background image the whole time, you can click and drag to adjust the duration that it appears so it’s long enough to display during your whole song.
Place your song into the project pane. If you want it to start playing right away, drag it all the way to the left. If you have a title page or some other introductory elements, you can leave a little room before the song starts.
Use “titles” to place the lyrics on the video at the appropriate time during the song, matching with the vocals.
Use a font size and style that’s readable (or that looks cool at the very least).
Position your titles on the video (again, by dragging) so they appear in a place that’s legible. For instance, if you’re using a still image of a sandy beach below a light gray sky, you don’t want white font to appear over that sky. Better to drag it down so it appears with starker contrast over the dark sand.
Make adjustments to the length of the titles (you can do this by clicking and dragging) to smooth out the transition from line to line.
Watch your whole video a few times through and make any needed fixes.
Export your video file and upload it to YouTube, Facebook, Vimeo, etc.
Some tricks to spice up your lyric videos
youtube
This is the lyric video to my song “Irretrievable Beauty.” To create it I followed all the basic steps mentioned above, but here are a few of the bonus elements I added for (hopefully) extra impact:
Additional text — No one ever said a lyric video should contain ONLY your lyrics. So I wrote a bunch of other text (a letter from the 22nd-Century) and placed my lyrics within it. Check out the video and what I’m describing will make more sense.
Color contrast of text — The actual lyrics of the song needed to be easily readable, so they’re all in black against a lighter background. The rest of the words are white, and it’s fine if they roll by without anyone being able to read them all. I intended to create the feeling of being flooded by text, so lots of it is supposed to wash over you.
Public domain image — I found a super hi-res image from 1905 to use for the background of the video (and my cover artwork too), and slowly zoomed in throughout the whole video.
youtube
Above is the lyric video for my song “1+1+1=3.” Some of the things I did to make this video:
Slow fade between different versions of the same photo — The background image for this video is the same as the cover artwork, a photo I took of arithmetic on a chalkboard. I then applied different filters to the photo to create three separate versions. While editing the video, I started by laying the three images out in a repeating pattern and then cross fading them all so it looks like there’s some kind of slow transformation happening.
More extra text — The additional text in this video is nowhere near as crazy as in “Irretrievable Beauty,” but I wanted to add a few bits here and there. You’ll spot ’em.
Directly reference the subject matter — The song is called “1+1+1=3.” Yes, it’s about love, but the math element was a fun visual reference point. Arithmetic on a chalkboard. Strange equations in the text. Etc. What’s the visual reference in your song?
youtube
Above is the lyric video for my song “Silently.” Some things I did to create this one:
Hyperlapse sunset — One afternoon when I was visiting Oregon, I ran up to the top of Mt. Tabor (an extinct volcano in the heart of Southeast Portland) and found a good spot to film the changing sky as dusk fell. I made sure to be out of the way of anyone who might walk in front of the camera and ruin the looooooong time-lapse shot. Hyperlapse is a free app from Instagram, and it makes it easy to shoot long videos and then speed them up at various rates. I think my 4-minute music video required about 45 minutes of footage.
Intro titles from Word Swag — If you read this blog frequently, you probably know I love Word Swag, a free app that lets you add cool fonts to images. I used Word Swag to create both the circle logo at the beginning with my name in it, and also the “Silently” title. You could use this app to create text for every single lyric, but that’d get time consuming so I just ended up using it for those two elements at the beginning. For this purpose, within Word Swag you’ll usually want to lay the font over a transparent background so you can fly it into whatever video you’re creating without disrupting the moving footage. [Note: I used Word Swag to create the intro text for all the lyric videos below.]
Sketch effect — I then added some built-in effects, including a color saturation effect and two doses of a sketch illustration effect, to make the video look grainy and lo-fi. Like I said above, this wasn’t premeditated. Just playing around with effects to see what looked promising. On that note…
Earthquake wobble effect — I used the earthquake effect because I thought it kind of made the text look like it was on a transparent slide overlay that was out of focus for a second.
Alternating pacing of lyric appearances — Sometimes the lyrics appear and disappear with the vocal. Sometimes certain lines linger. I just went by feel, and payed more attention to how the titles looked laid out across the screen than anything particularly musical.
Alternating the color of the text — This is another obvious way to add some variation if you feel like your lyric video is too much of the same thing: change the colors of the lyrics!
youtube
Here’s a video for a song called “Morning Edition” which I posted right before the election in 2016. The recording is actually just a super lo-fi Garageband demo, but I only had two weeks until election day, and I figured if I’m going to make some kind of statement, there’s no time to wait to get my band into a proper studio. So, a few notes about this lyric video:
A lyric video can still have live action — I’ve never really liked the distinction between “music video” and “lyric video,” as if one is more legit and exciting than the other. As someone who listens to lyrics just as much as the music, I love good lyric videos, and I think there can be an interesting hybrid between these two approaches. For “Morning Edition” I lip-synced to my song, 10 seconds at a time, while using the Face-Swap tool in Snapchat to graft a certain someone’s mug onto mine. Then I edited all those takes together and applied a sharp contrast filter to blend the background of the Snapchat clips with the large black borders on both sides of the clips.
Did I say the lyrics have to be legible? — Well sure, it’s good to have legible lyrics, but I don’t think they need to be HUGE if that means you’re ruining the aesthetic of the video. For this one I figured I’d keep the text in a thin minimalist font at the top of the screen, out of the way of my face, and anyone who really wanted to read along could watch the video in full-screen mode.
youtube
Here’s the lyric video for my song “Veterans Day.” By complete accident — again, lots of playing around with built-in options — it ended up with a kind of Zen art aesthetic. Here’s how:
Stock video — I looked through tons of stock video sites to find an affordable, hi-res clip that could be used as the background for the whole video. I ended up buying (for less than $10) a short video of milk being poured into a clear glass of water with a black background. But 6 seconds of video wasn’t going to cut it for a 5 minute song, so I…
Slowed the clip WAY down — I stretched the clip as long as it could go and still only had about 2.5 minutes’ worth. So then I…
Reversed the clip — By duplicating the clip I had 2.5 minutes of forward motion, and 2.5 minutes of backwards motion. So the result is like a palindrome, or like that famous bass solo on “Call Me Al.” Halfway through, the whole thing turns around and the milk goes back into the bottle by the end. Another accident that I ended up enjoying.
Color inversion — I used the built-in tools to invert the colors so the white milk became like black ink, and the black background turned to a light gray.
B&W — I then took that video and turned it to black and white, which ended up darkening the whole thing in a nice way.
Scrolling text — One of the built-in title options on many video software programs allows you to scroll text vertically, like the end credits of a film. I used this effect separately for each verse and chorus of the song. Then I did another layer of scrolling text with just a bunch of randomly spaced letters and symbols, with a high transparency on the font so it appears as a graphic element, and I think it gives the whole video a kind a translucent papery feel.
youtube
Here’s a few things you might be able to learn from the lyric video to my song “Premiere:”
Still photos are your friend — Check out royalty-free photo sites such as Unsplash. I made the entire video for “Premiere” using photos I found on that site. The one risk you run is that other artists use the same photos in their work, but you can always tweak the images so they’re barely recognizable as I did with the milk video in “Veterans Day.”
Don’t be afraid of Ken Burns — He has a built-in video effect named after him for a reason; that technique of zooming in and out on still photos can be really effective for creating mood. Dynamics! Don’t go crazy or anything with the motion, but a little Ken Burns here and there can make flat photos come to life.
Mix and match fonts — I used a bunch of different kinds of fonts on “Premiere,” giving each section of the song its own feel.
Apply effects and transitions to the titles (text) too — Don’t forget that many of the same effects you can use on pictures and video will work to give your lyrics an interesting look as well.
Don’t publish your video until you’ve proofread it a dozen times! — If you watched my lyric video for “Premiere” you might’ve found a typo. Whoops. I didn’t catch it until it’d been posted for over a week, and by then… oh well. Staring at text while you’re editing gets tiring. Your brain tricks you. While you’re in the process of creating, you might not catch something that seems glaringly incorrect later on. So get some bandmates and friends to watch the video a few times to make sure you don’t have any spelling or grammar issues on your lyrics (I mean, besides the usual grammar or syntactical issues that ALL lyrics have). Another way to limit errors is to…
Write your lyrics out in Word and then paste them into your titles — When you type your lyrics in Word first, you get the benefit of the program’s spellcheck system. Some of the popular video editing software doesn’t have spellcheck, so paste those lyrics in after you’ve vetted them in the external doc.
Okay, those are some of the tricks I’ve used to make my lyric videos more interesting than just white font on a black background, all without paying for extra software or expensive stock footage and images. Hopefully they’re helpful as you create your next video.
Do you have any advice to add? I’d love to hear it. Holler in the comments below and be sure to post a link to your best lyric videos on YouTube!
The post Creating a good lyric video for less than $10 appeared first on DIY Musician Blog.
0 notes
Last Seen Blogs


drpepperdragoon
Stuck As Grandpa

catering10
Untitled

permanentt-reveriee
if only you could see yourself in my eyes