#umodel
Text


Replaced the funniest wiki file… ill miss you
#image rip biiiiitch. got someone smarter than me to figure it out LOL.#i did try to look for it at 1 point but i guess i found cutscene data or something idk i got scared and closed umodel.#the raw images are so bright LOL its fine but funny#probably.#the kat goes meow#gg
36 notes
·
View notes
Text
sherlock vest outfits in the sun bc i hadnt gotten the purple vest b4 nd it made me wanna take a closer look


#frogwares holmes#ive looked up close in umodel but it doesnt capture all of the texture and embossing and such
21 notes
·
View notes
Text
Romeo exports/imports with his body rig fine but I like to clown around with auto rig. Totally an accident but just the way his lip curls like that made me so sad HE'S SO MAD AT ME and that's valid
#romeo king of puppets ready to throw down with me personally#俺の#there is no sound only romeo's anger for me#video#body horror#i am simultaneously very hungry and very sleepy#one of these days i'm accidentally gonna record a song with these and it's gonna be a bop#sorry the second one is faster hee ho#i thought i did a keyframe every 10 frames for both but who knows#if i knew how to use blender i would auto rig his face but i don't so i won't (what if)#(this was umodel to max to maya)#lies of p
11 notes
·
View notes
Text

He’s just standing there… menacingly… /ref /j
#figuring out how to use umodel to look at stuff within shipwrecked 64 👍👍#I already know how to use fmodel pretty well (not 100% but… 60%.) but I just wanna see how umodel works#☆ (it’s time to make history!)
7 notes
·
View notes
Text
i must resist the urge to fuck around with it until i play a little bit like normal, at least a little while lol i'm so tempted aaaaaaaaaaaaaa
2 notes
·
View notes
Text

Little Haiti
Models. @reinelcoto@steve_similien@nathankenrick
Agency. @umodelsnyc
Styling. @mikestallingsny
Photography Assistance. @felipeabella_13
Special Thanks. @[email protected]
1 note
·
View note
Text
A guide to extracting a CC Shepard’s headmorph as a model (for beginners)
Are you a humble CC (Character Creator) Shepard user (like me)? Do you want your Shepard’s head as a 3D model (like me)?
Luckily for all of us, there is a Blender script for that, thanks to mustbetuesday (which I assume is their username; it’s the name of their website anyway). While there is a tutorial on their website on how to use it, it doesn’t go into detail on certain steps of the process (and also it mentions having to manually install UModel and use it to find and export the model, which isn't really necessary these days as Legendary Explorer makes all of that easier).
So here is a different tutorial, written in a way that beginners to ME modding and/or the tools required are able to follow. If you already know how to use these tools, you can pretty much just skim this guide. The guide mentions both OT and LE, but the files mentioned/used will be from the LE version. Note that for the sake of simplicity, I will only cover extracting the model itself and extracting textures.
(btw this is technically part 1 of an overarching guide on mesh swapping an NPC with your Shepard, but I figured that it would help to have it as a standalone guide in case people are interested in this kind of thing. Feedback is welcome!!)
Disclaimer: this guide only pertains to ME3. The script should also work with ME2 facemorphs and ME2 head models, but I haven’t really tried it yet. Maybe you can let me know how it goes if you try it with ME2 assets :)
What you need:
A PC copy of Mass Effect 3, or Mass Effect Legendary Edition
Blender version 2.8 (You can grab it here)
A PSK import/export script for Blender (I use this one personally for 2.8)
Legendary Explorer (You can grab it here. Alternatively you can download it via ME3Tweaks Mod Manager under the Tools options)
A ME3/LE3 save of the Shepard you’d like
(ME3 saves are located in Documents/BioWare/Mass Effect 3/Save)
(LE3 saves are located in Documents/BioWare/Mass Effect Legendary Edition/Save/ME3)
ME3 Gibbed save editor (You can grab it here. The recommended version is from Nov. 14, 2015)
Trilogy Save Editor (You can grab it here. Alternatively you can download it via ME3Tweaks Mod Manager under the Tools options)
The Blender head importer script (You can grab it here. Make sure to get the 2.8 version)
The base head model for male/female Shepard (I’ll go into detail on how to get this one later)
PART A: Getting the .me3headmorph
This part requires:
ME3 Gibbed Save Editor
A ME3/LE3 save
Open the ME3 Gibbed Save Editor. It should look like this when you first open the editor:

The save editor will automatically locate the directory for the OT ME3 career files, meaning that when you click Open, it will list all of your careers. This is useful for those using OT ME3; not as useful for those using LE3. Instead, what you want to do is click on the arrow beside the Open button, which will give you two options. The one you want is the “Open from File���” option:

From there you’ll be able to navigate to your saves and open the save you want. By default it’ll open the directory for OT ME3 saves. You may have to navigate manually to the LE3 save directory. While Gibbed save editor was originally made for OT, LE saves have the same filetype and will load normally.
Once your save is loaded, it will show the basic info for that save, like this:

The tab currently open is the Player > Basic tab. Navigate towards the Appearance tab. It should look like this:

What we’re getting here is the .me3headmorph, so you can ignore the other stuff for now.
Click on Head Morph, then “Export to File…”:

Save it wherever you like. It will save as a .me3headmorph file. Great! You now have the headmorph of your Shepard.
PART B: Getting the base head model
This part requires:
Legendary Explorer
You have the .me3headmorph of your Shepard, but you also need the base head model before you can actually apply that data. For this, we’re going to need the CC base head model.
Legendary Explorer (LEX) is the modding toolset for Mass Effect and Mass Effect: Legendary Edition. You can use it to view, browse, edit, or export any file from both the OT and LE versions of the trilogy. LEX has a tutorial wiki covering a variety of modding topics for those who want to try modding the game, but for now all we’re going to do is export a 3D model.
When you first open Legendary Explorer, it’ll look like this:

Click on the “Meshes & Textures” tab. You will get these programs:

Open Mesh Explorer (abbreviated as MSH). You’ll get this:

(If it’s your first time using Mesh Explorer, you won’t have anything under “Recently opened items”. Also, read the Welcome page, as it has some useful info.)
To get the head mesh you need, you’ll have to open the Package file it’s contained in. Normally you can search where the assets are located using the Asset Database (a different LEX program), but for the sake of the tutorial I’m just gonna go ahead and tell you the package file you need.
Go to File > Open, and if it doesn’t automatically open to the appropriate directory, navigate to your game’s directory. It should look something like this:
Origin Games\Mass Effect Legendary Edition\Game\ME3\BioGame\CookedPCConsole
(Steam users, refer to your game’s file directory path by right-clicking your game in your library, then go to Manage > Browse Local Files.)
Locate and open the file BIOG_MORPH_FACE.pcc. This is what you’ll see:

There are multiple base head models here, but the one you want ends in _CC (so HMF_HED_PROCustom_MDL_CC and HMM_HED_PROCustom_MDL_CC). The models that start with HMF are the female models, while HMM is the male models. When you click on the models on the left, they will render on the right:

To export these models, right-click on the entry you want on the left, then click on “Export Mesh to PSK with UModel”:

Save it in any directory you want. After that it will ask for the output format. Just select “psk” and click OK.
(btw, if this is your first time exporting with UModel, LEX will automatically install UModel for you.)

Once that’s done, File Explorer will automatically open to the directory you saved your model in. A folder named after the package file you exported the model from will be created, and inside there will be three subfolders. The model will be in the SkeletalMesh3 folder.

Congratulations! You now have the base head model. Now it’s time to put it all together.
PART C: Putting it all together in Blender
This part requires:
The .me3headmorph file you exported in Part A
The head model you exported in Part B
Blender
(Make sure your scripts are installed!! If you don’t know how, follow these instructions (just ignore the “Open Blender 4.0.0” part, it should still apply to 2.8))
When Blender is open, delete all the default items in the scene (the cube, the camera, and the light source). Once that’s done, go to File > Import > your PSK import script, then import your head model. (If you’re using a different script than the one I’m using, there may be an option to scale down your model. Make sure this is unchecked.)
Now your scene should look something like this:

To hide the bones for the head model, click the eye on your imported model on the top right.
IMPORTANT: Once you import the head model, DO NOT MOVE IT!!! This will mess up the face import. You can move the model after you do the import.
If you look on the right of the scene, you should see a section called “Mass Effect Face Importer”, which is located under the Object tab (this tab should be displayed by default). Expand the face importer and you’ll get this:

Click on the file button and navigate to where your .me3headmorph is located. Click “Accept,” and your .me3headmorph’s path will be loaded. When you’re ready, make sure your head model is selected, then click “Import HeadMorph”.
And boom!!! You should now see your Shepard’s headmorph applied to the model. For comparison, here’s the male base head before and after I imported John’s headmorph:

And for further comparison, here’s John’s face in-game:

So there you have it! You now have your Shepard’s head as a 3D model. From here you can save it, export it, edit it, do whatever you want with it. It’s your city now.
….But also I said I’d cover extracting textures so-
PART D: Extracting your Shepard’s textures
This part requires:
Trilogy Save Editor
Legendary Explorer
So you may notice that this guide requires two different save editors. The reason for this is that Trilogy Save Editor (TSE) does not export your headmorph in the filetype required for the script. That being said, It’s much easier to view Shepard’s headmorph data in TSE, hence why we’re using TSE for this part.
(Also, TSE is referred to in a lot of customization mods, so if you use hair or headmorph-related mods you’ve already used TSE in one way or another.)
When you first open TSE, it will look like this:

Click “Open,” and File Explorer will automatically open to Documents\BioWare. Follow the usual steps to getting your save.
When you load your save, it will look like this:

Currently, it’s on the General tab. Click the Head Morph tab to display your selected Shepard’s headmorph.

(Oh yeah, you can also get the file path for your Shepard’s hair mesh if you wanted.)
What’s nice about TSE is that it displays an asset’s file path. The first part of the file path will always be the Package file the asset is placed in.
For textures, click on Texture Parameters to expand the list. To display the parameters for each entry, simply click on each entry to expand it.

In this particular example, HED_Diff is the diffuse texture for Shepard’s face. The package file for this particular diff is found in BIOG_HMM_HED_PROMorph, and the filename for the texture is HMM_HED_PROBase_Face_Diff_Stack. Typically, this means you now have the info needed to open the file in Package Editor and locate the file yourself.
But there’s an easier way, and I mentioned it already: The Asset Database.
On the LEX menu, click the Utilities tab, and click on Asset Database (abbreviated as ADB)

If this is your first time using the Asset Database, you’ll need to actually build the database before you can use it. Each game needs its own database. You should be able to build these by going to Database and selecting “LE3 Database,” then click “Generate New Database”.
Once your databases are generated, the window should look like this:

To look for textures specifically, click on the Textures tab.

Take the name of the texture you need and paste it onto the search bar on the top right. It will automatically filter the file list to the files that contain the name. To view the texture in the middle, click on “Toggle Texture Rendering”.

Whoa, now you can see it! On the left is each individual file containing the name you searched. On the right are the usages – a list of the Package files containing that specific file. (NOTE: Package files from mods are highlighted in red. Vanilla Package files are in black.)
To export the file, click “Export to File,” where you can save it to any directory. You can save the texture as either a PNG, a DDS, or a TGA.
And there you have it! You now have your Shepard’s face textures. You can repeat this for all the textures you need. Note that some of the textures have alpha channels, which will come into play if you decide to edit them. Some textures, such as the eyebrows, may not actually be diffuse but rather normal textures. This is due to the way they’re applied in-game. But that’s a topic for a different guide :)
If you do decide to edit your textures by baking in the colours, you can go back to TSE to view your Shepard’s headmorph again, but this time expanding Vector Parameters. Here’s what it’ll look like:

(All the vector parameters have the option for inputting RGBA values as well as selecting a colour via colour wheel.)
If you’ve gotten this far and successfully followed the steps, then congratulations! You’re well on your way to making self-indulgent content using your beloved Shepard characters and/or learning how to mod Mass Effect in general. If I get around to making more guides (read: if people want them), I’ll get into more detail on other things, particularly on how to mesh swap your Shepard into the game. For now, extra notes:
If you need extra advice on mesh or texture modding, I recommend joining the ME modding Discord. Here’s the invite. There are people there who actually know how to texture/mesh mod better than I can lol
Alternatively, here's the Github wiki for LEX modding tutorials :)
This is mostly a comment, but I am so glad the 2.8 version of the script exists. Back when I first did this I had to use 2.7 and it took a lot longer, especially with the way it affected UV maps. Luckily the 2.8 version doesn’t affect the UV maps, and in fact made this entire process much easier and less archaic.
Incidentally, the reason why I learned how to extract CC Shepards from the game wasn’t even for ME modding. It was for XNALara. Anyway here’s a meme:

32 notes
·
View notes
Text

*shuffles in
All the new shirts in the recent update. I need to make "Rock Out! Anywhere" shirt.
Also, till I get in game, I'm calling the Z-shielding one "Hit here".
----
Edit for Reddit:
To note, I use Umodel for ripping textures out because I like the shirts and sooner or later wish to have all of them be it by my hand or Bethesda finally kicking their ass in gear. (I've made my own "Base Tee" shirt and bought theirs.) See also kicking my OWN ass in gear to make them into SVG's that Cricut design won't wonk out on me with.
For those who want to search themselves, Chai's parts are in the "CC" folder. (Hibiki>Character>CC) and the shirts start at 300.
#Hi-Fi Rush#Hi Fi Rush#Still attempting to find the white tux outfit and not seein it#For those who like the post the blue “baby” shirt and “Rock on” have YET been shown as exclusive soooooo....
44 notes
·
View notes
Text

i ripped this too and got so scared by the umodel preview. pretty eyes
65 notes
·
View notes
Text

Don’t repost (without permission) or Steal my Pictures!
It's been a while 😅...but here i am with a new picture of Kate Marsh...with her Hair down ✨ I don't know if I'll share anything from Life Is Strange again soon... as I have a lot of other things to do... but until then just enjoy this rendering of Kate ❤️
Apps / Program i use: Blender, After Effects, photopea, SNOW, Remini - AI Photo Enhancer and Topaz Video Enhance AI
Model: Extracted by me with umodel
Scene: Prescott Dormitory
Hair: [JINO] HAIR N18 SERA
Hope you like the Picture! ❤️
#life is strange kate#life is strange fanart#life is strange#kate marsh#blender#3d render#lis kate#lis fanart#lis
19 notes
·
View notes
Photo

AMR Queen Lights Set
Note: There is no light E. All the lights are named based on their file names when looked at in UModel, and sometimes the sets skip letters (although it is possibly I just missed it over 2 searches, I will update this post if I do find it)
Light H requires Cottage Living, the rest are BGC
All functional as lights/candles (off-the-grid)
Search “[GHOSTWITCH]” in the catalogue to find all items
Get more AMR items at Mimoto-sims
UPDATE: Fixed LODs
(This project has required a lot of trial and error. If you encounter any bugs, please let me know)
❤Download at SFS (no Adfly or alternatives)❤
#ghostwitchs cc#ts4cc#the sims 4 cc#sims 4#cc#s4cc#ts4#alice madness returns#amr#theres more queensland lights ill be porting but bc the file size is already quite large and those ones are a bit. visceral#theyll be in their own set
114 notes
·
View notes
Text
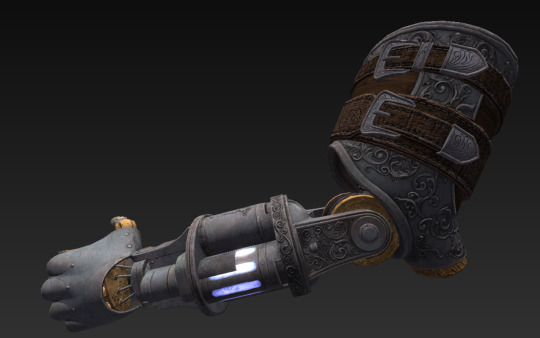
lies of pp experts, please explain this to me or else my sleep will be haunted

?????? am i forgetting something. it's been so long since I've actually played. there are 8 legion arms but the game files have 9
anyway, it's called Shot Gun and it has gallery info. conversely, it's the only legion arm that doesn't have the workshop symbol part inside. you can probably look up more details in fmodel but I'm too tired for that, i just opened umodel for a drawing reference
#lies of p#my sleep is going to be haunted#uhhhhhhhhh reminder to look at this in the morning#i'll post about this more fully on dw i'm just tired I'M TIRED#the swirly designs are so pretty#if this is a scrapped arm i am sad#actually tagging the fandom in case anyone is interested or HAS ANSWERS!!!#俺の
48 notes
·
View notes
Text
the borderlands artist's guide
(this was originally posted on Cohost but I believe it merits reposting here)
hello! are you a fanartist who's into Borderlands or considering getting into Borderlands? do you find the characters difficult to draw?
then do I have the solution for you: references!
...however, it might be difficult to find said references, or at least accurate ones. so here's my guide to such things. i will be going through the 3 big options of finding accurate references in ascending order of difficulty, but don't worry, none of these are too difficult to do.
option 1: artstation
artstation is probably the most straightforward way to get references, as gearbox employees post their official work there. you're pretty much guaranteed to find whatever you need. as a bonus, you might even find concept art that didn't get into the game proper, as well as environments, enemies and props. yes, artstation does also host fanart, but you can easily tell what's official and what's not by the game logo: if it's there, it's official.

while this is easy, it doesn't really let you rotate the character as you please or look at their raw textures. for that, we'll need the second option.
option 2: umodel
umodel is a program that lets you view and export assets of most unreal engine games, borderlands included. however, it works differently for different unreal engine versions. i will only be talking about Borderlands 3 models in this section, as they are easier to access and view.
in order to do so, simply install umodel and extract it from its zip, then start the executable. this will bring up a gui.
in the top bar, select/write the localization of your game files, which should be a folder obviously named Borderlands 3. check the override game selection box, pick unreal engine 4 from the left dropdown and Borderlands 3 from the right dropdown. leave everything else intact. click ok to start the file extraction process.
the files are encrypted, however, and umodel will ask you for the key, which is 0x115EE4F8C625C792F37A503308048E79726E512F0BF8D2AD7C4C87BC5947CBA7. simply paste this string into the box and confirm, and umodel will work its magic. when it's done extracting the files, it will present you with a file browser of basically every game asset. models are located in the Game folder, with NPCs in the NonPlayerCharacters folder and playable characters in the PlayerCharacters folder.
navigate to the folder of whatever character's model you want to view, open it, select the folder named Model, right click it and select open folder content. this finally will open the viewer, which you look through by using the page down and up keys.
this method allows us to look at the models with greater detail, and even view the raw textures. but it doesn't let us zoom in to see even finer details. for that, we'll need the third option.
option 3: deviantart + blender
this option has a few steps. first, go to user kabalstein's deviantart page of Borderlands models. it's full of models ripped straight from the games, converted and made for the xnalara program... but we're not going to be using it. download the models of the characters you want, and unzip them into a folder named appropriately (make sure all the model data is in one folder!)
instead, download blender and xpstools. DO NOT UNPACK THE ZIP THE LATTER COMES IN!!!!!!!!
open blender, go to edit -> preferences, and you'll find the add-ons section. click install, which will open a file dialog. select the xpstools zip. refresh the add-on list, and you should find the addon, which allows you to import and export xnalara files in blender.
then, go to file -> import -> xnalara/xps -> xnalara/xps model, which again will bring up the dialog. select the model folder of the character you want to view, and bam, you can now view them any way you please, thanks to blender's advanced camera controls. you can even turn off all lighting effects and pose them if you need.
i hope this guide was helpful to at least someone, and i eased the fears of at least one Borderlands artist. see you!
23 notes
·
View notes
Note
sorry if this is a silly question, but how did you get the in game assets for conversions (tell me why etc.) i wanted to make some lis conversions for myself and its super confusing!
not a silly question!! i actually made a tutorial years ago, in the video i'm using lis2, but it's the same process regardless of what game it is, as long as it uses unreal engine. the only thing you need to change is which engine version your game uses, which you can find on the compatibility table or you can google "[game name] umodel" and something usually comes up!
youtube
#sorry the video is cringe i was nervous lol and i used the worst recording software#asks#anonymous#nonsims#brandi answers
18 notes
·
View notes
Photo

Collin
@colin.blacksmith
@umodels
Styling. @mikestallingsny
@someoneagency
#juan pablo castro#Mike Stallings#Collin blacsmith#someone agency#umodels#new york city#fashion photographer#Fashion stylist
0 notes
Text
Capturing the ambience of Gears of War (2006)
The original Gears maps have stylized yet beautiful look that still holds up today. This guide will look at the abandonware 2007 Windows release, and the 2006 Xbox 360 original, rather than the remastered Ultimate Edition.

Obtaining the game
If you’re only concerned with capturing the multiplayer maps, you can download the standalone AI Bot version of Gears (it’s also great fun!). For vanilla versions of the game, check out pinned messages in the Gears PC Community discord. Refer to PCGamingWiki for troubleshooting on getting the game running.
Extracting sounds
Use umodel to extract UPKs in Gears’s Sounds directory e.g. G:\Microsoft Games\Gears of War\WarGame\CookedPC\Sounds.
Enabling console commands
Inside your WarInput.ini file:
[Engine.Console]
ConsoleKey=Tilde
TypeKey=Tilde
MaxScrollbackSize=1024
HistoryBot=-1
bEnableUI=True
This will enable the console, with history and output display included.
Capturing footage
Open your console, and use TOGGLEUI command to hide the HUD. ghost and walk will toggle between free camera mode and normal player control, respectively.
You can also load into a given map with open or servertravel, e.g. open <map name e.g. mp_process>.

I found on some versions of the game, this loaded with player-character control, while others loaded into a free-camera mode. I believe this has something to do with Debug vs Retail versions of the game.
It's trivially possible to activate spectator mode inside the editor (see below) by holding Ctrl and pressing the playtest button. However I found this only offered a window display, and there were rendering artifacts on some maps.

Identifying sounds
By passing certain launch options, we can open the game’s editor to inspect how sounds are configured on each map. Example shortcut:
"G:\Microsoft Games\Gears of War\Binaries\Startup (No-Cd).exe" editor -cookededitor -installed
To find each map's random ambient audio events, open the Kismet panel:
Click Level tab in main browser window2. K -> button on the level box
These random sounds emit from a set of target objects on the map, using the options visible in the event’s panel (e.g. below, volume of 0.25 and pitch of 1.0).

We can also use the LISTSOUNDS and LISTWAVES console commands during gameplay to see which sounds are loaded and currently playing respectively. The latter also shows the sound’s current playback volume.

Always take care to note each sound’s configured pitch in the Editor, as it can vary! Indeed, you’ll find that Gears’s maps create their immersive soundscapes by permuting the position and pitch of only a small number of assets.
New Hope project
This is an ambitious mod for Gears 1 which may make the above easier.
Xbox 360 version
The Windows version's presentation differs slightly from this original. Access free camera mode by using Heebo's tools. If you can't get these working, be sure you are running the required version of Xenia Canary. Also enable all Extra Custom Types, and enable MEM_MAPPED in Scan Settings.
Putting it all together
Combine your static positional sounds, randomized Kismet sounds, and captured footage using an editor like Shotcut.
4 notes
·
View notes
Last Seen Blogs

65isagoodage
Untitled

friezas-ship
All aboard

weekfang56
The Journey of Shore 484

floating-in-a-most-peculiar-way
The Stars Look very Different Today

yelpau
Yel