#tumblr beta tutorial
Explore tagged Tumblr posts
Visit Tumblr Blog
Explore Tumblr blogs with no restrictions, modern design and the best experience.
Last Seen Tumblr Blogs


Fun Fact
Tumblr Inc. is using 66 technologies for its website.
Text
1hr painting in 30 sec!
cute lil beta study 🫧
#artists on tumblr#artistsupport#furry art#art#digital art#psychedelicart#trippy art#beta fish#fishblr#fish#procreateart#timelapse#speedpainting#speedpaint#digital painting#painter#queer artist#digital artist#fish painting#fish art#watch me draw#freelance artist#art tips#art tutorial#art study
20 notes
·
View notes
Note
May I ask the software you use to write?
Congratulations on getting so much done!
Thank you so much. And, of course.
I use the Reedsy Book Editor for all of my writing projects, and I've been using it for about three years now. I also have experience with other amazing softwares, and I would love to create more tutorials on them if you need me to.
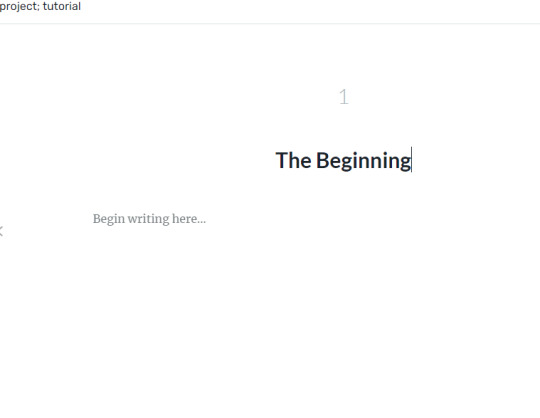
Here's a quick tutorial on how to use the Reedsy Book Editor.
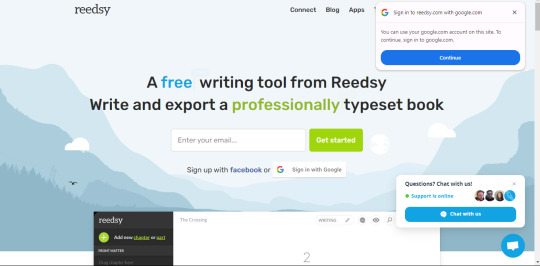
When you visit the website, the first thing you'll come across is this page. It's a completely free writing tool with a fantastic interface. All you need to do is sign up with your Google or Facebook account.
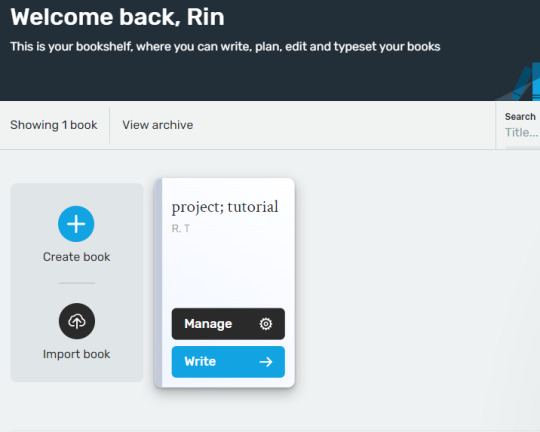
After you've completed the sign-up process and provided some information about yourself, you will be directed to this page. Please locate the "Books" option in the website's header.

Feel free to give your book/WIP (Work in progress) a title. Remember, it's okay if it's not your final title, as you can always change it in the settings of your book later.
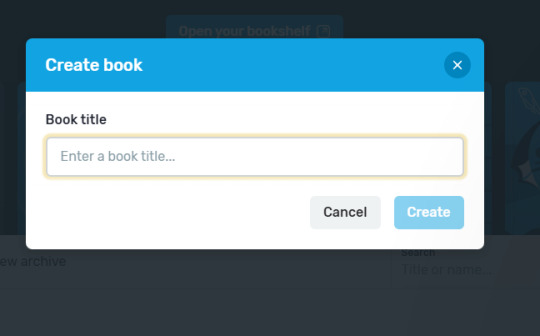
Once you've created it, you can take your time and when you're ready, you can click "Write.”
Once you click "Write," you'll be directed to the next page. There, you'll find your chapters, the space to write your manuscript, and a sidebar with various helpful features provided by Reedsy.
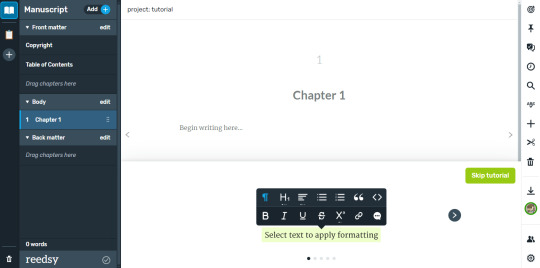
Then, you can choose any name for your chapter that feels meaningful to you.
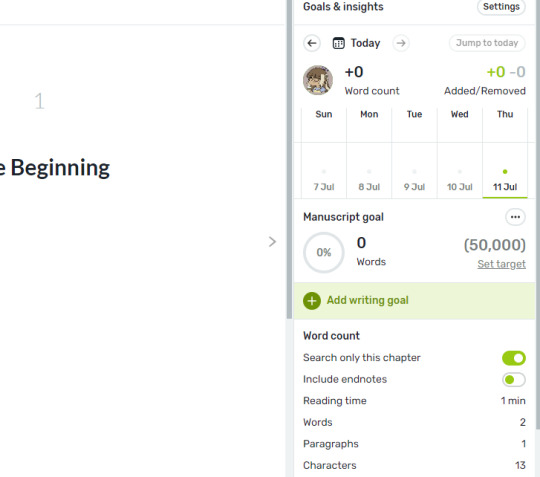
You can also track your writing goals for your specific manuscript or book. This feature provides insights into your writing habits, such as the days you've written and the number of words you've written. You can also set a target word count goal for the manuscript, and you also have the option to set manual writing goals. Additionally, you can check the word count in your current chapter from the bottom of the widget.
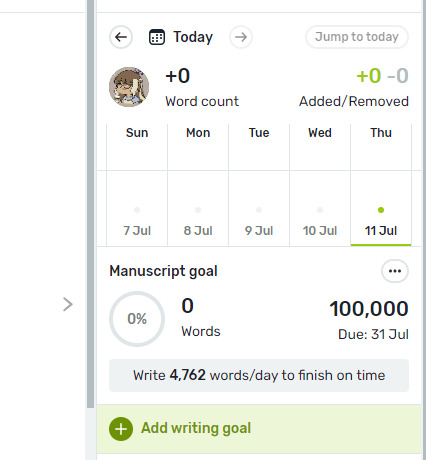
You have the option to set a deadline and choose the days that work best for you to write. This will help Reedsy estimate a realistic word count goal for you.

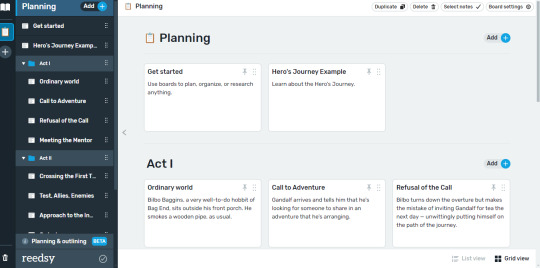
Remember that on Reedsy, there's a new beta feature that allows you to plan and outline your novel without having to leave the website. It offers note cards for you to jot down the plot and scenes from your novel, which can serve as a helpful guide and provide a simple outline to support your writing process.
Also, don’t forget the various features available to you when creating your book in Reedsy. For instance, you have the option to include preset formatted pages such as a dedication page and an epigraph that resonates with your story. These features can add a lot of value to your book, and I encourage you to explore them further.

Hopefully this can help you understand the basics of Reedsy Book Editor. One of my favorite writing softwares that is completely FREE!
Hey fellow writers! I'm super excited to share that I've launched a Tumblr community. I'm inviting all of you to join my community. All you have to do is fill out this Google form, and I'll personally send you an invitation to join the Write Right Society on Tumblr! Can't wait to see your posts!
#writeblr#creative writing#thewriteadviceforwriters#writers on tumblr#writer things#writing#writing tips#on writing#writer#writer community#writing tools#writing resources#writing blog#writing advice#fiction writing#novel writing#author#book writing#publishing#indie author#fiction#reedsy#book editor#bookblr#self concept#bookworm#bookstore#books and reading#reading#book quotes
189 notes
·
View notes
Text
✦ About ✦
Hello! This blog is for transparent renders of official Hoyoverse characters & artworks!
Do not repost/reupload renders on any sites or servers! Instead, please just share a link to the post and not the actual renders.
All renders are free to use (F2U) without credit.
If you prefer Discord, here is a link to my render server !
Requests: Closed! I only post official Hoyoverse art. Due to outside responsibilities, there is no guarantee I will fulfill your request, and there is no estimate of when I will finish.
Other Info:
I do not post or accept render requests for leaked/beta leaked content. However. this blog is not spoiler-free.
It is recommended to download renders from the Google Drive, as I often downsize renders due to Tumblr's size limitations, and Tumblr also automatically compresses images.
To keep this blog organized, I generally do not reply to asks unless they are questions/requests. Even so, I truly appreciate and value every single encouraging message, and I am so glad that these render can be of help!
While all art is official, my renders are not unaltered. Many renders have been edited/redrawn.
Tutorial on how I render in Clip Studio Paint
Tutorial on rendering in Photopea (Free Program!)
Alternative link to my Discord server if main one isn’t working: https://discord.gg/Xjce37rtWp
42 notes
·
View notes
Text

THE SIMS 3 TUTORIAL
HOW TO CREATE DEFAULT REPLACEMENT MOD USING CUSTOM MESH & TEXTURE FOR SIMPLE OBJECT
⚠️ Tumblr has 30 pictures limit, so I cannot include too many pictures. If you want to zoom in the pictures, click the pictures to enlarge, or save the pictures into your PC, zoom the pictures on picture viewer or zoom in the pictures on your mobile phone. ⚠️
----------------------------------------------------
I create this tutorial to make easier to follow because there are older tutorials available before but scattered on internet and usually only say "Export to replace s3asc" without explaining how to export the edited object properly.
My method is using TSR Workshop instead of exporting the object using Sims 3 Object Export/Import plug in because exporting to replace the s3asc using that plug in always giving error notification "ERR: Model has 1 groups; original had 0" and cannot be exported.
For beginners who are very new using s3pe and haven't created default replacement mod before, better start from simple object first.
Simple objects I mean in-game object that has single MODL and single texture with no morphs, no GeoStates, no presets, no CAS colour channels, and easily cloned from OBJD on catalogue. Usually as utensils that Sims holding in their hand, not buy/build objects. For example: Pencil, pan, fork, spoon.
----------------------------------------------------
Tools to prepare:
s3oc
s3pe
Milkshape 3D for bone assignment (Version I use 1.8.5 beta, discontinued by its developer, therefore feel free to download the full version with its license key provided).
Sims 3 Object Export/Import 1.01 by Wesley Howe (Milkshape plug-in. Download msS3ObjPluginsV101.rar )
TSR Workshop (Older version for TS3 only version 2.0.88)
TSR Workshop plug-ins for export.import TSRW Object.
3D Program (Blender/Maya/3dsMax)
Editing images software (Photoshop, make sure you have to install .dds plugin by Nvidia. For free software alternative, you can use GIMP with its .dds plugin)
This tutorial will not teach you how to:
Meshing object ❌
Create alpha texture ❌
Change thumbnails in-game ❌
Install programs and plug-ins ❌
This is how I created Chinese chopsticks replacement mod using custom mesh and texture.
In summary, this tutorial has 10 steps:
Step 1. Clone the Object using s3oc
Step 2. Open S3PE to Copy the Original Resource Code and Export the Files
Step 3. Export the Original Mesh as Base Mesh to .obj format
Step 4. Create Your Custom Mesh
Step 5. Bone Assignment & Create Group
Step 6. Create custom Texture
Step 7. Import the .wso of Edited Mesh on TSR Workshop & Export the package
Step 8. Export MODL file from Package saved from TSR Workshop
Step 9. Finalizing in s3pe & Replacing the Original file with Edited File & Correcting the Code As Same As Default Code
Step 10. Test the CC in your game.
-----------------------------------
✳️ Step 1. Clone the Object using s3oc
Before cloning the object, check the Game Folder for in-game object file location. Settings > Game Folders...
Take a look if the Base Game or Expansion Pack for object file you want to clone is in the right folder. For example, my The Sims 3 game are all bought from Steam, so the location is D:\SteamLibrary\steamapps\common\The Sims 3
If you want to clone object from Expansion Pack, make sure input the folder location. For example, the location for World Adventures EP is D:\SteamLibrary\steamapps\common\The Sims 3\EP1

If you are done, close the pop-up box. You can continue click Cloning then choose Normal Object...
Wait until you get the whole catalogue. Click Search...

For example, I clone object from World Adventures Expansion Pack. You can clone object from Base Game or other Expansion Packs as long it is considered as "utensil" that Sim holding on hand. For example: "Pencil" or "Pan"
Search for text: chopsticks
or if you want to clone object from Base Game, search: utensil
Tick check marks for Resource Name, Object Name, Object Desc then click "Search button"
Search result gives you results with name "chopsticks". Here is the object we are looking for: UtensilChopsticks
We need the OBJD file to clone. OBJD = Object Data.

Click "Clone or Fix" at the right bottom. Then you see the next page to determine if you want to clone with renumber or not. If you want to make default replacement, then do not check the Renumber box. Keep it blank.
Tick check box means the s3oc will generate new resource code for new item. Not tick the check means the s3oc will overwrite the same resource code, it is to replace object you cloned in-game.
I am personally a detailed person, so I usually tick as many as I want: tick "Deep clone" "Missing String Tables" and "Include Thumbnail" to include more details. Then click "Start" to proceed.

It will give you file name [CreatorName]_ObjectName_Number
Then save your package file in "DBPF Package" format in your project folder. Always make folder for any file to make everything organized.
✳️ Step 2. Open S3PE to Copy the Original Resource Code and Export the Files
Open S3pe, locate your package file you cloned from s3oc. Find the MODL of Utensil Chopsticks, Right-Click, "Details..."

On Resource Details, click "Copy TGI" to copy the Resource Code. Type, Group, and Instance will automatically be copied on clipboard. Then open Notepad, Right-Click to "Paste".
Click GRID on bottom of the s3pe (I mark it red on picture), it will give you pop-up box with Data Grid. Click "Resources", it will be highlight blue and there's 3 dots button appeared on the right side. Click the 3 dots button. It will give you TGI Block List Editor.
Inside MODL's TGI Block List Editor only has IMG. You may wondering why, but that's how the game coded. Type, Group, Instance of _IMG inside TGI Block List Editor should be the same as _IMG on the package.
Copy the TGI, Group, Instance to your Notepad.

After you copied code of MODL, do the same for the texture image (_IMG), but only copy the code from Resource Details. You cannot edit TGI Block List Editor for _IMG as the Grid button for _IMG is greyed out.
The main task is the code of your edited mesh and texture should be the same as the code you copied now from original package you cloned with s3oc.
Keep the code on notepad. You will need this code later.
Export the MODL file. Right-Click, "Export to s3asc". The file appears in long string such with name for example: S3_01661233_08000001_B619DB2238C3430B%%+MODL_filebase
Do not rename the file. Save.

Export the texture file. Right-Click "Export > To File..." The file will be saved in .dds format. Do not rename the file. Save.

✳️ Step 3. Export the Original Mesh as Base Mesh to .obj format
Open Milkshape. Import the s3asc file you saved before.
More steps click spoiler tag "Read More / Keep Reading" below
File > Import > Sims 3 Object Import v 1.01 by Wesley Howe

Locate the s3asc file, then the original chopsticks mesh appears.
Click the "Joints" tab. It has 4 codes. Check box "Draw vertices with bone colors" It will show Bone Assignment colors on the original mesh. Yellow on top chopstick and light blue on bottom chopstick. The colours are to make the object has rig and movement following the Sim's interaction.

Take a look at the 4 codes on Joints Tab. You can play around to see which colour of the code will appear, after that copy paste the code to Notepad to make it easier to comprehend.
Click Select from Tools menu, Select Options: Face. On "Right/Left/Top/Bottom 2D View", Left-click make selection of one part of chopsticks. While the part of object being selected (Red), click Joints then Choose "Assign".
0x96239247 --> Yellow 0xFEAE6981 --> Purple 0xCD68F001 --> Light Blue 0xD0DECA8E --> Red
Your edited mesh must have the exact same Bone Assignment colour later. Check again if the code and colour are correct.

You can save object mesh as .obj to other 3D software such as Blender or any other 3D software.
✳️ Step 4. Create Your Custom Mesh
Use the original .obj as base model. While you can create longer mesh or any edited version as you wish.
Make sure the scale and position of the edited mesh is same as base original mesh, because the edited mesh will be used on Sim's hand.

If you are done editing the mesh, export the UVmap.
You can export the uvmap in higher resolution, as long as it is Power of 2. 64x64, 128x128, 256x256, 512x512, 1024x1024, 2048x2048, 4096x4096. I export in 1024x1024 pixels to make the size of texture larger and have more details.
Then export the mesh object in .obj format.
✳️ Step 5. Bone Assignment & Create Group
Open Milkshape. Import the original mesh.
Check the Groups Tab. Original mesh has 1 group, "group 00". Group 00 means it is the main mesh. There is no shadow beneath the object.

Import the edited mesh as .obj file.

My edited mesh has one single name "default" name on the Group Tab. While edited mesh may have a lot of file name scattered on Group Tab. Regroup the file name to simplify your edited mesh into one single name. Select > Regroup.
The main task is replacing the EA's original mesh with your edited mesh.
Before you delete anything, you must do Bone Assignment first to the edited mesh you created.
Your edited mesh does not have Bone Assignment, so it appears white.
Remember the 4 codes you copied earlier in Notepad.

Copy Bone Assignment from original mesh to your edited mesh.
This case, your want to Bone Assign Yellow colour.
Select > Face to select one part of chopsticks of your edited mesh. On Joints Tab, double click the appropriate code 0x96239247 in blue highlight then the code box on the right side of "Rename" will appear 0x96239247. Make sure the code is correct. Then you can click "Assign".

Your edited mesh will appear in Yellow colour. Then do the same for another part of chopsticks.
Select another part of chopsticks of your edited mesh. On Joints Tab, double click the appropriate code 0xCD68F001 in blue highlight then the code box on the right side of "Rename" will appear 0xCD68F001. Click "Assign".

Your edited mesh will appear in Light Blue colour.
Then what's the other code for? With colour purple and red?
Leave them. Let the codes have the same exact codes as appear in original mesh and let the colours only assigned Yellow and Light Blue. The colours are to determine rig for interaction in-game, which only use Yellow as upper part of chopstick and Light Blue as bottom part of chopstick.
You can safely delete the original mesh with name group00 until it remains your only your edited mesh.

Rename your edited mesh to group00. Type group00 on the box then click "Rename" on the left side.

Export to TSRW Object in .wso format. .wso is format with bone assignment on object attached.

Save your .wso in your project folder.
✳️ Step 6. Create custom Texture
Import original texture you exported from s3pe to your editing image software.
Look at the original texture made by EA. 32x64 pixels. It is very low resolution, blurry and stretched, because the texture should be compressed as low as possible by game designer. As player you want it has higher detail to look realistic as possible and your PC of course can handle high resolution content, sure you can make the resolution much higher than EA's.

Import the UVMap you saved from 3D software. For example, UVmap I imported has 1024x1024 resolution. Add your custom texture. Then save it to .dds format in the same name as original texture. Save in separate folder, name it "Edited Texture" to keep it separated from original texture.
✳️ Step 7. Import the .wso of Edited Mesh on TSR Workshop & Export the package
Open your TSR Workshop.
Create New Project > New Import >Next...

Then Browse original mesh by EA in package format in your project folder.
On Open file box, you cannot see .package file because the filter is .wrk (TSR Workshop Project). Choose the .package dropdown.

Then you can see .package file.
Open the .package. After the file is located, then Next. On Project Details I usually skip without giving name of Project Name and Title. Next.
You must have seen green land with white blank sky.
Where's the mesh? It is actually there... just being zoomed in too close. You need to zoom out by scrolling down mouse.
You can see the original chopsticks mesh by EA. You can save the project file in .wrk format. After you save the file, import the .wso of your edited mesh. Mesh tab > High Level detail. Click green arrow folder icon to import. Then your edited mesh will appear replacing the original EA mesh.

As you see, the texture is messed up because the texture is still using original EA's texture. But then you check Textures tab and it has blank dropdown...
I cannot change the texture on this TSR Workshop!
Don't worry, we can replace the texture on s3pe later.
No need to change anything other than importing mesh. Click Edit > Project Contents to save as package.
You will see pop up box with number or files DDS, FTPT, LITE, MODL, OBJD, OBJK, etc. Export > To. package. Give name such as "EditedChopsticks_TSRW"

✳️ Step 8. Export MODL file from Package saved from TSR Workshop
Open S3PE, File > Open package "EditedChopticks_TSRW" that you saved from TSR Workshop.
Export MODL. Right-Click, export. It gives you file name with [StringOfNumber] .model .
Save it on project folder. Keep it organized and separated from original MODL. Name the folder "Edited MODL". Do not rename the file.
✳️ Step 9. Finalizing in s3pe & Replacing the Original file with Edited File & Correcting the Code As Same As Default Code
Open s3pe, File > Open original package that you cloned from s3oc. [CreatorName]_ObjectName_Number
Find the MODL. Right-Click > Replace...
Locate to your edited MODL with filename .model .
Then click Open.
The original MODL of the package should be replaced with your edited mesh.
Do the same for the texture.
Locate to your edited texture with filename .dds
Then click Open.
The original texture of the package should be replaced with your edited texture.
Take a look at MODL's Type, Group, Instance. It has the same code as original MODL in the original package cloned with s3oc (because it has been replaced)
Don't forget to see the code inside TGI Block List Editor.
Repeat step 2 how to check the code. Right-Click on MODL/IMG > Details... and click GRID > Resources > TGI Block List Editor.
The Type, Group, Instance of the _IMG are different compared from IMG from original package clone, which means that is the evidence of edited mesh replaced the original.
Rename the Instance with default/original Instance you copied on notepad from Step 2. Type, Group, Instance should be the same as default/original Type, Group, Instance.

Open notepad with resource code you copied from Step 2. Make sure the Type, Group, and Instance are all the same.
If the codes are the same, then your edited mesh and texture will overwrite the default mesh and texture with the same code in the game. Save, Commit, Save the package.
Check again if the texture is replaced properly. Right-Click on _IMG > ViewDDS.
ALTERNATIVES!
Yes, you can delete unwanted files in your edited package, to keep the package clean. Simply Right-Click>Deleted.
The only files needed in package are: MODL, _IMG, _KEY
They are the only files with your edited mesh/texture including codes to overwrite the default codes.
You can Start new fresh blank s3pe. Right-Click>Import from file...
Locate your edited MODL and _IMG (texture) file.
On Resource Details box, tick mark "Use resource name" > OK.
Make sure all the Type, Group, and Instance of MODL and _IMG including in the TGI Block List Editor are all the same as the code in original package.

Save the package.
✳️ Step 10. Test the CC in your game.
Put the package to your CC folder in your The Sims 3 document folder to see if the CC is working or not.
If the CC is working as your intended, with your custom mesh and texture, then test the animation. Are the chopsticks animation working as the same as original EA's? If the animation are working well too, then congratulations!

Your default replacement are working. Give applause to yourself. 👏
-------------------------------------
QUESTIONS!
Q:
Can I use this tutorial for making default replacement for buy/build object?
A: This tutorial covers basic method of using TSR Workshop and replacing the default codes (Type, Group, Instance), so you will understand the basic principle of doing default replacement mod.
Keep in mind that different object has different case. Buy / build object has MLOD (not just MODL) more than one, texture images more than one, has presets, and CAStable colour channels.
The TGI Block List Editor for buy/build object has a lot of codes, so have to spend a lot of time to do trial-and-error to make the default replacement working properly, because a lot of times the texture doesn't work (still using default EA's texture), or when the object appears right with your edited mesh and texture, after you choose the presets, the object reverts back to your edited mesh with default EA's texture.
Q:
Help! The texture is black! / still using same EA's texture when tested in the game!
A: The texture codes must be not the same. Check the Type, Group, Instance of _IMG. Do the codes are the same like codes in original package? Check the TGI Block List Editor for MODL, is the _IMG inside has the same Type, Group, Instance as in original package.
Q:
Help! The object disappears when tested in the game!
A: You must be replacing OBJD in your package. Do not replace OBJD. Just MODL and texture only.
#tutorial#the sims 3#the sims 3 tutorial#thebleedingwoodland#the sims 3 default replacement mod#modding#s3pe#s30c#TSR Workshop
120 notes
·
View notes
Text
USEFUL RESOURCES (JUNE 2025)
Hey everyone! We've decided to compile a list of various resources that may or may not be useful to both your general writing and group experience! We're hoping to make this a monthly occurrence and to add or take away things as we go when necessary. We hope you find this useful, and please give us feedback through the inbox if you feel like we've missed anything important! Or, if you'd like, feel free to reply to the post with resources that you use that aren't listed that could be added in our next post!
GENERAL WRITING TOOLS
XKit Rewritten - A simple add-on for your browser of choice that makes the writing experience on Tumblr a lot easier. Easy to set up and navigate, helps with things like general accessibility, trimming posts, time formatting, and many other tweaks.
How to Trim Reblogs - A handy and thorough guide on trimming reblogs in the beta post editor with XKit Rewritten.
Discord & Tumblr Notifs Integration - If you have a hard time keeping track of replies, here's a free way of helping with that! A thorough tutorial on how to utilize webhooks on Discord for all of your blogs. With this, you can customize what live notifications you'd like to get (replies, asks, submissions, reblogs, even followers!) for your writing blogs.
Theme Hunter - Want a new theme for your blog and tired of browsing endlessly through various tags? This blog may help! With their endless list of categories, you're sure to find something that meets your standards.
Group Tags Guide - A handy guide for what tags to use in your posts for the group. Here you'll find all of our official tags that, ideally, each member should have tracked if they find relevance in them.
ISOLA SPECIFIC BLOGS
All Caps Isola - All your favorite quotes from the various amazing writers we have in our group! Do you have a penchant for reading threads? Or maybe just feel like specific lines of your own writing are pretty fire? Feel free to submit them all to this blog! More info on how to submit can be found on the blog itself. Helping hands are also appreciated; feel free to inquire on the linked blog!
Isola Requests - Want a castmate but not sure how to go about asking? Or are you itching for a new character to write but unsure of where to start? We have a blog dedicated to fulfilling both of those questions! We broadcast your want ads to both our members and the writing community at large. Feel free to stop by and fill out the form on the linked blog today!
12 notes
·
View notes
Text
An Extended Tutorial on Installing Dramatical Murder RE:Connect
{Author's note: Reddit has banned the subreddit Dramatical Murder, I posted a hefty guide on how to install the Re:Connect game, a semi-sequel / DLC. So I put it here on tumblr, this was from the subreddit.}
Hi everyone, I'm EniaCat! 🐾
Many people are struggling to install Dramatical Murder Re:Connect on Windows, so I’ve created this detailed guide to help you through the process.
(Note: English isn’t my first language, so please bear with me!)
For Mac Users: I don’t have a Mac, but you can refer to this Tumblr post that explains how to play the game on Mac using Wineskin: blonmac.tumblr.com/dmmdsetup2.
Where to Download the Game
DMMD Re:Connect with English Patch: Link: aarinfantasy.com/forum/f16/t176668-dramatical-murder-re-connect.html (Note: You’ll need to create an account to access the forum.)
If you see Japanese text in the CONFIG menu after starting the game, quit and restart it as an administrator.
Alternate Download Link: Link: mkproduction.home.blog/2019/05/29/dramatical-murder-reconnect-english/
This version has an English patch but may still display some Japanese text in the pause menu or settings.
Step-by-Step Installation Guide
Change Your System Region
Go to Control Panel → Region → Administrative Tab → Change System Locale → Select Japanese (Japan).
Important: Do NOT enable the "Beta: Use Unicode UTF-8 for worldwide language support" checkbox. This can cause text glitches in the game.
Restart your computer when prompted.
Install the Game
Download and extract the game files (look for the MW5 blog zip file).
Install UltraISO software and use it to mount the DMMdrc.iso file to a virtual drive.
Go to the Tools menu → Mount to Virtual Drive → Select the ISO file → Click Mount.
Open the mounted drive and run setup.exe. Follow these steps during installation:
Click the button with (N)> to proceed (this means "Next").
Select the circle next to (A) to agree to the terms, then click (N)> again.
Choose your installation folder and proceed.
Uncheck the box with Japanese text to skip installing "soft battery runtime."
Finish the installation by clicking the middle button.
Apply the English Patch
Open the English patch folder and move its files to the game’s installation folder:
Place the video files in the DX sub-folder.
Place the patch files in the main game folder (same folder as DMMdrc.exe).
Extract the crack file (crack.rar) and place the crack .exe file in the same folder as DMMdrc.exe.
Run the crack .exe file as an administrator to start the game.
Fix Potential Issues
If the game crashes on startup:
Right-click the game’s desktop shortcut → Select Properties → Under Target, change SdActi.exe to DMMdrc_crack.exe.
Restart your PC and set your system region back to your country, then to Japan again.
Display Settings and Resolution Fixes
If the game window is too large, off-center, or zoomed in:
Press F to set the game to its original resolution (1024x576).
Adjust settings in the Config menu:
Change to full-screen mode by clicking the first button under "Display."
Turn OFF automatic aspect ratio (buttons marked ON/OFF).
Set to regular display (button below the ON/OFF toggle).
For windowed mode, keep automatic aspect ratio OFF and regular display ON.
Final Notes
If you’ve followed all the steps, your game should now be working! 🎉
The menus (and pause menu, if using the Aarinfantasy patch) should display in English.
I hope this guide helps new users enjoy Dramatical Murder Re:Connect! Have fun! 💙 - EniaCat
28 notes
·
View notes
Text
New Spn Fanart Community 🎨🎉😄
I’m testing out this new community feature here on tumblr. I’ve made an Spn Fanart community for Spn artists of all levels and media types. I figure it could be a good space to share WIPs, chat art with other artists, share tutorials and resources.
Communities seem to act a bit like a group blog that lets members make posts directed at the group and chat privately underneath the community posts. You can also share interesting reblogs from tumblr main. Tumblr Communities are still a beta feature tho, so details are being refined all the time 😄
Spn Fanart is a ship and let ship community. No drama, no disrespecting each other. I am the admin (MidnightSilver (they/them) 👋🏻😄) and the community is a relaxed uplifting space where we support and encourage each other in our art.
➡️ If you would like to join the community you can use this invite link😄:
53 notes
·
View notes
Text

COMO FAZER TEXTOS COLORIDOS/EM DEGRADÊ NO TUMBLR!
[ Como fazer textos coloridos/em degradê no tumblr!]
Faz tempo que queremos fazer um tutorial assim, mas fica uma jogando pra outra e nunca é feito. Então resolvi fazer, de uma vez por todas, uma ask sobre apareceu do buraco negro que é nossa inbox e me fez lembrar do pedido. Eu sei que o tumblr oferece uma seleção de cores, mas elas são fortes e algumas não são boas para leitura (estou falando de você, senhor amarelo); só que o que vou ensinar aqui vai permitir que qualquer letra fique colorida e na cor que estiver no seu coração! Vou ensinar dois jeitos para fazer um texto colorido e personalizado, é uma boa opção para aqueles que gostam de combinar letra + cor do theme.
Antes de começarmos, creio ser importante comentar que apesar de bonito, fontes coloridas/degradê, como as que vou ensinar, não são lidas em alguns leitores de tela - que são utilizados por pessoas com deficiência visual -, segundo esse post, invés de ler as palavras ou frase normalmente, alguns leitores (talvez não todos) vão soletrar letra por letra e pode se tornar difícil entender. Por que estou falando disso? Achei interessante deixar as pessoas cientes! E tem um meio de “melhorar isso”, que é colocando a tradução embaixo sem qualquer fonte, como não uso leitores de tela, infelizmente não sei como funciona, mas é bom ficar informada.
Agora vamos ao nosso tutorial de hoje!

FAZENDO FRASES EM DEGRADÊ!
Você precisa entrar nesse site, porque ele vai te ajudar a fazer um texto com muitas cores! A interface não mostra muito, mas tem o necessário para o que vamos fazer e não, você não precisa entender horrores de HTML para mexer nele, tanto que vou te ensinar o básico, caso deseje adicionar mais cores.
Como pode ver, temos o código e esse quadrado branco, que contém dois retângulos em vermelho e verde. Se você quiser fazer com apenas duas cores, pode pular o que vou ensinar, mas se quiser colocar outras cores, me acompanhe. Digamos que você quer um degradê com quatro cores, mas o código só nos dá duas opções, o que fazer? Simples, veja o print abaixo.

Perceba que aumentei duas linhas entre a “first” e a “last” no código, tanto que notifiquei com as setas vermelhas. Para ter mais opções de cores, você precisa aumentar as linhas, ou seja, como quero quatro cores, adicionei uma linha como “second” e outra como “third” (precisa ser em inglês); só copiar as linhas já existentes, dar um espaço e colar e, claro, mudar os “títulos”. Mas veja que mesmo mexendo no código, continuamos apenas com dois quadrados coloridos e para que o code seja atualizado, você deve apertar no “Run” no menu acima.

Vai atualizar e surgir os quatro campos que desejamos. Eu tentei até dez quadrados de cor e foi, não sei o limite, mas creio que ninguém vai querer um degradê com tantas cores, espero né… Se quiser fazer as cores do arco íris, por exemplo, basta adicionar até o “sixth” e deixar o “last” que vai contar como a sétima cor.


Voltando ao nosso exemplo, com quatro cores, para selecionar as mesmas é só clicar no retângulo e selecionar a cor que desejar. Você pode usar o cursor e ir optando pela cor desejada, mas se você tiver o “code” da cor, só selecionar o “HEX” e colar o código ali. E para chegar no HEX, só clicar duas vezes no “R G B”.

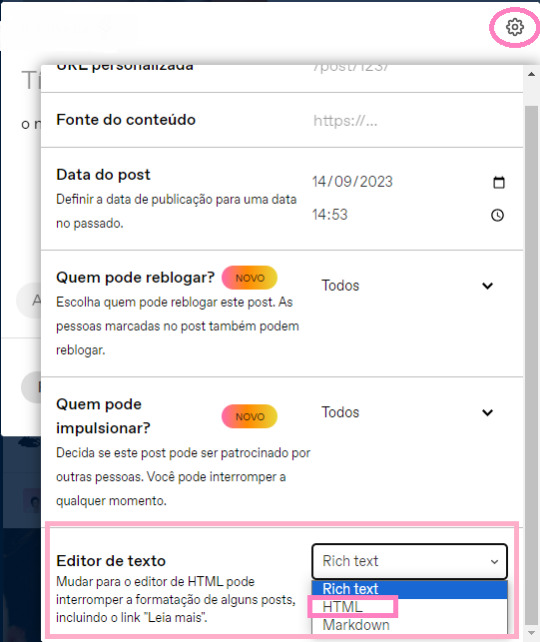
Selecionei essas cores de exemplo e adicionei o texto que desejo, tudo na linha de cima. Não sei se tem limite de caracteres, porque, normalmente, uso apenas para frases pequenas, fica por sua conta em risco tentar. Depois do texto escrito e as cores escolhidas, clique em RUN para que o código apareça na segunda linha (em vermelho no print), você clica ali e dá um ctrl + a e ctrl + c para copiar; agora vamos para o tumblr. Crie uma nova postagem e mude o editor atual para o editor HTML, não vamos mudar de BETA para LEGACY ou vice e versa (nem sei se dá mais). Siga o que indico na imagem abaixo:
Ao selecionar o editor HTML, nós vamos ter essa interface:

Eu prefiro apagar esse código que aparece, porque dá para editar depois. Depois de apagar, você só precisa colar o código do site ali e antes de salvar, dê uma olhada antes, só mudar de HTML para VISUALIZAR. Se o texto ficou colorido, deu certo! Então pode voltar para o Rich Text de novo e ser feliz. Mas Rinn, eu quero colocar em itálico ou em qualquer formatação do tumblr, como faço? Como faz normalmente com os textos comuns, não vai interferir no degradê.
USANDO APENAS UMA COR!
Você não quer fazer um degradê e não gosta das cores disponibilizadas pelo tumblr, mas ainda quer colocar cores em seu blog? Não tem problema, nós conseguimos também! Você pode usar o site que indiquei, só deixar apenas uma linha ou as duas iniciais, colocando a mesma cor em ambos os retângulos; mas quando quero usar uma cor só, uso um carrd chamado ROLEPLAY FORMATTER! que além de colocar cores, também ajuda a formatar uma resposta para thread - ou para o que quiser.
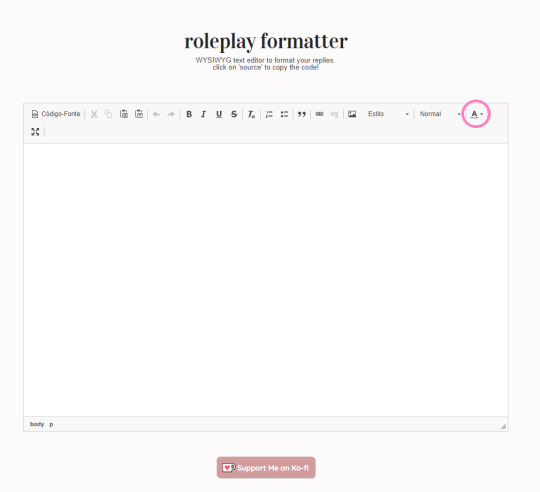
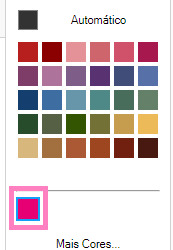
Essa é a interface do formatador, não vou me apegar em como formatar as coisas, se quiserem, posso ensinar depois, hoje vamos falar de cores. Muito simples, você vai clicar onde circulei para aparecer a paleta de cores, infelizmente não temos muitas opções, então só clicar em “Mais Cores” para abrir essa tela.
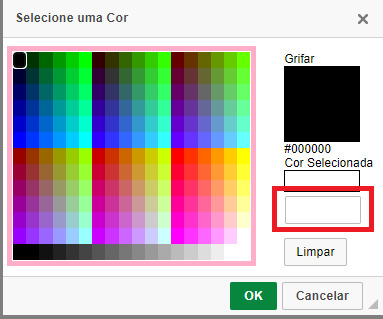
Não tem opção diferente, mas se quiser escolher alguma das colocadas ali, fique à vontade. Normalmente, eu procuro as cores em código em um site que gosto muito. Pesquiso HTML Colors no google e vou no segundo site sugerido, porque acho ele mais fácil de mexer.

Como na imagem, temos esse hexágono com muitas cores; a cor escolhida e como ela fica em bold e afins + seu código em HEX, RGB e HSL; e por fim, a paleta dessa cor com cores mais claras ou escuras. É dali que você pode tirar a cor que deseja e clicando na mesma, vai aparecer como ela fica nas especificações de bold/italic. Quando encontrar a cor que deseja, copie o código dela e cole no segundo retângulo da aba aberta no carrd de formatar - se não copiou a # junto, não esqueça de colocar na frente - e depois só clicar em ok. A cor fica salva para ser utilizada, então você precisa escrever o que deseja e selecionar tudo para adicionar a cor, fazendo o básico, clicando na opção texto (A) e selecionando a cor escolhida.

Como podem ver, selecionei o texto e depois a cor que queria, se quiser adicionar itálico ou bold, fique a vontade, só usar o que está destacado em rosa claro. Se quiser deixar em small, só clicar onde destaquei em roxo e selecionar a opção. Mas como vamos manter a cor pra colocar no tumblr? Simples, sigam esses passos.
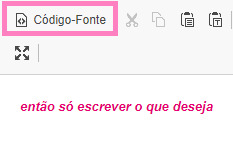

Aperte em “CÓDIGO FONTE” para transformar em HTML, assim vamos ganhar essa “equação” de code, onde: <p> é o começo do código, <i> é o itálico, <b> é o negrito/bold, <small> é para a letra ficar pequena e o <span style=”color: #tantantan”> corresponde a cor que foi selecionada. Dá aquele ctrl + a e ctrl + c esperto e vamos para o tumblr, só repetir o passo referente ao aplicativo no tópico acima e pronto! Agora você tem uma cor diferente na sua dashboard e pode ser feliz.
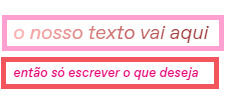
Acabamos nosso tutorial por aqui e eu espero que tenha sido bom para ajudar alguém, inclusive, esse é o resultado final, em rosa temos o primeiro jeito e em vermelho temos do segundo jeito.
#♡ · 🎀 : rinn talks a lot#♡ · 💭 : help#♡ · 🔎 : guides#( tumblr )#exodusmusing#rph br#rph#rp br#♡ · 🌸 by sakura
163 notes
·
View notes
Text
Hello my lovelies! 🦈 You might be asking yourself 'Sea, this is weird, You don't update during the week!' and you would be correct. I was supposed to push this update out by the end of my long weekend as an addition to this; however, due to a bunch of irl stuff I won't go into here, it was delayed. I have endeavoured to rectify it now rather than waiting out the week so peoples' resources are properly showcased. This will not be a common occurrence!
However, as of today (06/04), the following resources have been added to Sea's Community Compendium for XIV Creatives.
FREE COMPANY / COMMUNITY FOCUSED / EVENT SPACES
The Final Fantasy XIV Tumblr Community — A public Tumblr community where you can share FFXIV content and meet other players.
*NOTE. Tumblr communities are currently in beta and cannot be joined/applied to directly at this time. You will need to request an invite from @spotofmummery in order to join. When communities are out of beta, the disclaimer on the Compendium will be removed to properly reflect its public status.
LORE
The Rabanastran Record — A resource on Dalmascan lore, history and additional notes incorporating missing information via FFXII content. Is regularly maintained and updated when new information is given in game/lorebooks or on request. Created and maintained by @stalwart-spirit on tumblr.
Pandæmonium Raid Series Transcript — This is a full transcript of the quest dialogue, battle lines and NPC dialogue from all of P1-12! Created by @divinitymanifest.
MISC
FF14 Battle Portrait Tutorial — Have you ever wanted to create a battle portrait for your WoL similar to the ones you see in Endwalker story events and dungeons? @twitter-sakuranokaze has put together a guide on just how to do it!
CHANGELOG
A 'lore' checkbox has been added to the google form to better reflect the update to the Compendium's sorting. It was the one part of that change I forgot to do, so it's now up-to-date!
Free Company / Community Focused / Event Servers has not been updated to Free Company / Community Focused / Event SPACES to better reflect Tumblr communities and potentially encompass other smaller communities not easily covered by Large-Scale or Misc.
Bookmark links to certain resources have been added/amended. Again, not sure why they broke... but they're working now!
Want to submit? You can either fill out the google form here, send me an ask with the relevant information contained on the Compendium, or join my Discord at SEAFLOOR (21+ only)!
Is my space suitable for the Compendium? Most of the time, yes! Below the read more is some more information/stipulations. Again, all the below information is accessible on the document! 🐡
Below are the following things I do not accept on the Compendium:
Personal/Single-Character LFC ads.
Content intended for or can be used for bullying, harassment and OOC gossip. E.g. ‘Secrets’ blogs, receipts, callout posts, etc. This does not include in-character tabloid blogs used to generate RP.
Communities that do not have an RP/writing element (large-scale exempt).
Anything I find personally distasteful or goes against the spirit of this project.
Common-sense rule applies.
FAQ.
I want to put my community on the compendium but we have an application process. Is this okay?
Yes! Just note somewhere in your application that's a requirement. The only thing that is mandatory for the Compendium is that you must be open to new members or have a public-facing/accessible facet. There's no point advertising a community if no one can join it in some way!
I want to put my community on the compendium but I only have x number of members —
Also totally okay! People don't start with large communities. Activity is a must but, whether your server has two or two thousand members, if you're looking for new people to join, I'd love to help you find people.
I want to put my community on the compendium but I worry its too niche?
Okay, and? If your Eorzean Fishing Alliance has four members but you roleplay every second weekend, I still want to know about it.
What resources/communities can I add if I'm not the owner of them?
Mutual consent is extremely important to me, so anything that isn't a large-scale community OR a publicly accessible resource must be endorsed by the owner/admin/moderators in order to be added to the compendium. I operate under the assumption that a resource posted to a public space (tumblr, googledocs, youtube, etc) is open to all. A large-scale community is one with a significant member count or openly advertises itself as being accessible to everyone for whatever purpose it serves. If in doubt, please get in touch with me. I'm happy to contact your community owners for you!
How active does a community need to be?
If you find a community has not been active in about two/three months, send me a message and I'll take a look at it. Communities have ebbs and flows, especially event spaces that may take hiatuses depending on member interest/life events. I'm not strict in my implementation provided a space isn't dead. If a link or anything is broken, absolutely contact me about that.
I have [insert a question not stated here]?
No drama! Send me an ask or use the #Compendium channel in my Discord!
46 notes
·
View notes
Note
here again to the wizards tower 🗼let down your hat wizard…. I must inquire you for your wisdom for this post: https://www.tumblr.com/mapleleaftag/782018518208151552/yest-this-if-u-wish
8, 11, and 31 💥🔥
tumblr refused to save my draft of this SIGHSSS. okay!!! FUAAAHAAHAAA!!! ASK AND THOU SHALT RECIEVETH THE ANSWERS YE SEEK!!! here are the questions asked!!!
What is my favorite line/section from [what I'm interpreting as a sizable handful of my fics]?
What makes a fic 'successful' in my opinion?
What fic meant the most for me to write?
ok LET US BEGIN
What is my favorite section from a sizeable handful of my fics?
i'm interpreting this how the asker did- that is to say, just putting a bunch i like and going from there. so BEHOLD!!!!!! and brace thyself
the history book on the shelf, is always repeating itself(the seawatt isolation fic)-
And the air chills- the wind slows, ceasing any movement, and the lava stills. If this was only for a moment, to give more emphasis to the other's next words, he'd admit, it was an impressive display of authority. So when the other speaks, it matches the tone of their surroundings- contrasting his previously casual, relaxed tone, Evbo suddenly talks with a much more authoritarian voice, firm and cold. "You are a parasite, Seawatt."
mostly it's just evbos one line but i want to put the context that makes it a little imposing yknow? GAH i hate this version of evbo i've made because i characterize him to be much more of an active asshole as opposed to a passive one. canon parkciv!evbo did a lot of active hating but he's not eggsactly "let me tell my former ally and current prisoner that he's an asshole in the worst way" hating.
moving on from your dead best friend tutorial no borax no glue(the seavbo gore fic)-
He looks to the organ, clasped so tightly in someone's hand, and sees the muscle writhe in the dark. It beats, slowing with time, for a few more seconds, before lying still, and it's such a terrifying sight Evbo can only watch in a stilled silence for its duration. He cannot feel it beating anymore, in fact, it now lays still in Seawatt's hand, a sight that only incites further panic in Evbo-- his chest feels hollow now. Why, why only now, is it hollow?
call this narcissism but i feel like i just described this well... shoutout to my partner, who beta read this and reminded me that your heart wouldn't actually just immediately stop beating once pulled out if you ever find yourself in that situation- it would SLOW and then stop beating. and i find that horrifying myself.......GOD did that added detail enhance the scene
anecdotes from the white rabbit(the vaultwatt hijinks fic)-
It's the perfect crime, he can't help but smile at the thought, you can whack your boss and not lose your job. Think about how rare of an opportunity this is!
putting the entire fic here would be cheating. i find my characterization of guardfriend here a little amusing,,,a strong second place would be his first interaction w/ evbo, which is like 2 seconds after this internal dialogue- where he clumsily tries to hide the fact he was seriously debating whacking his boss with his copy of the very hungry caterpillar. i hjate themb 💔
the strange case of seawatt and clownpierce(i can't fucking believe this even came to my mind at all)-
Perhaps the unsightly part of his appearance was the pristine white porcelain mask adorning his face...it looked to be porcelain, for how it reflected the dim flame of the streetlights, and judging by his next few actions and what may be surmised from them I would judge nor assume anything more. Two cross-shaped slits for his eyes, and a long ear-to-ear cartoonish grin were carved on the front. The man looked to me, after holding a short dialogue with the doctor of that victim, and then looked to me, wherein- either as some greeting or other motion, I could not tell- he raises a hand to the grin and traces his fingers along the outline of it as if to accentuate it. To tell you the truth, good sir, the sight did nothing more than to reinforce the shiver crawling down my spine and my further hatred of the man.
IM PROUD OF IT SOLELY BECAUSE ITS MY ATTEMPT TO MIMIC 1800S PROSE AND I FEEL LIKE I DID WELL 💔💔💔 me and the other 50 or so people who spared it a glance........thank you to those people btw this one's a passion project. the things i do for fanfiction....
mama a girl behind you(the one where pvpevbo dies by zam)-
You Axes, always so full of yourselves," he walks past, clicking his tongue in disapproval. "is this what it took for you to learn you don't decide who lives and dies here? No, no, that falls upon me, see. Keep your chin up- I'll do you a favor, save you the embarrassment, and tell Clown you failed. Feel free to play the waiting game, hope and pray for another Chosen One to come along." Tabi knows he's stifling back laughter. "It'd be fun."
zam dialogue is always so fun because it's entirely batshit and can be summarized by "heartbreaking: the worst person you know just made a good point". unfortunately where he is in the story means he's either DEAD or allied with that DUMB CLOWN and i hate either option. i miss him and his 5 minutes of screen time 💔💔💔
What makes a fic 'successful' in my opinion?
congratulations on bearing my fic related ramblings. anyways-- usually i consider a fic successful when it gets like 100+ hits. bookmarks, comments, or kudos don't eggsactly matter. if it's what goes into one, i find simple twists on popular ships work fairly well in drawing in readers. innovate later and start with a bare concept that's like "what if x character was y?" this is my reminder to do a roleswap au
What fic meant the most for me to write?
chapter 2 of the seawatt isolation fic. mostly because it was my first real continuation that people WANTED to see, but also because it was my first ever experience asking people to beta read. i mostly just wrote on ao3 for funsies....but then.....twas getting Forreal.
THANK YOU FOR READING TO THE END!!! HAVE A SUFFICIENTLY EVIL DAY
5 notes
·
View notes
Note
why does this community have these rules? why are wips and "beginner art" banned?? it seems incredibly strange to name a community as an "oc support group" and yet not allow anything deemed unfinished or unpresentable.
this just feels like building a public gallery of others work. what kind of support group only accepts finished, high quality intermediate work???? what
so the name is a joke. it isnt literal like this clearly isn't intended to be a confessional vent group sort of thing. the space literally is intended to be a public gallery of people's artworks idk whats so confusing about that.
note that we are working on a rewrite of the rules that makes them & our reasoning for them more clear. a big reason is the size of the space; a lot of things that we don't allow here we 100% would (and do) allow in a smaller, more intimate space. but because this is semipublic and has 10k+ users we ask that people post their best work. can you imagine what a 10k+ user discord server with a single channel would look like. because that is effectively how communties work right now. we also don't claim to be the arbiters of good art & don't really define what constitutes as 'beginner' or 'high quality' insofar as you're not like, begging people for art tutorials because, again, this is essentially supposed to be a gallery space. a very casual gallery space mind you but a gallery space nonetheless
i think people have clashing expectations for tumblr communities- which, btw, are very much still in beta and a lot of the quirks of how they work are completely out of our control- and how they think they should be run, which is fine. totally understandable. but like if you're not into a more curated space you can make your own community that's more lax we 100% support you in that. we're not trying to monopolize oc art culture on tumblr people just seem to like the way we run it 🤷♀️
5 notes
·
View notes
Text
New Streaming Schedule (and New Update)

We're back with a Kickstarter update and a new streaming schedule! This December, we're going to git serious: we'll be streaming every week, twice a week (Monday and Thursday) for 2 hours at 3PM PST!
About the Streams
In addition to two new hangout editions of our “Let’s Build our Website” series where we'll finish all that we have pending and add more content to the website, we’ve added a couple new types of stream:
A tutorial write-along, where our project lead will explain how to use PayPal/Stripe links to easily add a tip jar on your Astro website (and compile that information in a blog post).
A learn-together session (possibly more than one), where you can follow an experienced software developer as she tries to learn the intricacies of accepting payments on the web, using the actual Stripe and PayPal APIs.
In addition to these, we’ll look at adding more characters into RobinBoob by scraping AO3 with AO3.js, and we’ll start a new series where we’ll rebuild the RobinBoob's functionality from scratch! After all, like many of our “April 1st projects”, RobinBoob was built in a feverish last-minute rush, and we cannot add some of the requested features without a serious rewrite!
Where to Find Them
We’ll see you this Monday, December 4th at 3PM (see converted time on the schedule) on Twitch, and all throughout December!
First Beta Feedback
And since Tumblr generously allows us to write as much as we want, here's a small sample of the feedback to the first draft of our first issue! You can read more about it under the cut, or get the full details on Kickstarter.
“Unlike other code guides, it's engaging and not dry. [I] wish some of the coding books i read in the past were like the fujoguide cause like. i would have been more into it”
“The guide was really easy to use for the most part, with cute examples and just... really fun!”
“I'm enjoying this, it's approachable and I really like the various ways information is presented; it looks like a legit textbook, like it seems like I could've picked this up from a shelf in Barnes & Noble.”
“I'm really happy at how many cool things are packed here. I have so many friends I will throw this guide at once complete!”
Looking forward to sharing our guide with you all!
30 notes
·
View notes
Note
Hi there. It’s me again. I’m having so many feelings right now. I wanted to thank you AGAIN for your tutorials and your incredible writing inspiration.
I’ve been a fan of your Horizon fics and your writing style for years. The way you capture voices, the way you write smut, the consistency with which you update and finish your fics… And your writing feels so accessible, which I hope you take as a compliment. It’s easy and enjoyable to read while still capturing such incredible emotion and story beats.
I wanted to tell you that I DID IT. I finished my first longfic! 9 chapters, 90,300 words! (It’s called Secret Fandom: Avatar Legend of Korra)
I wrote a story about two characters in a secret relationship. It’s got romance, smut, humor, and the teensiest bit of angst. I’ve had parts of this fic in my head for literally YEARS but I didn’t know where to start or how to actually follow through with this story! But YOU. Your fics. Your writing tutorials! They gave me the courage to buckle down and write it!
I wanted to capture their voices, I DID. I have received numerous comments complimenting the way I portrayed the characters. One person literally said “I could hear her voice in my head” about one of the characters and I just about passed out.
I wanted to finish this fic, I DID. I followed your guide: I knew how I wanted it to end. I outlined. I wrote the story in order. I held on to some chapters here and there to space it out and build anticipation. (I also found a couple of beta readers who helped me TREMENDOUSLY with the editing process.)
I run a blog for the pairing I wrote, and I actually got people reaching out and asking me when I’d have the next chapter and if they could have previews… Just an incredible reception overall to this fic, given that it’s a smaller fanbase.
I just really need to say thank you for the part you played in this. Your writing really did inspire me, in particular Becoming Whole gave me lots of inspiration for the way I wrote and even some parts of the plot (an experienced character guiding an inexperienced character through his first relationship!) and of course your tutorials really gave me a lot of help and insight on how to accomplish what I wanted!
PIKAPEPPA you are a HERO and an INSPIRATION.
Thank you A MILLION TIMES.
MY FRIEND. BABE. MY BELOVED. OMFG I'M SO SO FUCKING HAPPY FOR YOU AND SO PROUD I JUST 😭❤❤❤ I AM IN A GLASS CAGE OF EMOTION!!!
No but forreal OH MY GOD. This is so incredible and momentous and I'm absolutely thrilled for you!! There is nothing like being told that your readers can hear your characters' voices in your writing and I AM SO SO THRILLED FOR YOU 😭❤❤ Also, can I just say, the fact that I've been able to kind of track the progress of your writing journey through the asks you've sent me, and for this to be the culmination of it? I AM OVER THE MOON FOR YOU OMG SERIOUSLY okay I'm going to stop screaming at you I swear. I'M SO HAPPY FOR YOU THOUGH OMG. YOU DID THE THING!!!!!
And also, THANK YOU for saying my writing is accessible, that is absolutely a compliment!! I know that one of the things I look for in a fic is the feeling that you can just breeze through it and enjoy it without getting bogged down trying to decipher complex prose LMAO so I'm thrilled to hear it!!
In conclusion: I am SO FUCKING PROUD OF YOU that you created the story that had been kicking around in your head for years. And I'm thrilled that my tutorials and writing could play a role in that! THANK YOU FOR BRINGING ME ALONG WITH YOUR JOURNEY, THIS MEANS SO MUCH TO ME 😭❤❤❤
Everyone, check out SweetVenom's fic Secret here on AO3! It's Mako/Prince Wu (Legend of Korra), ~90k words, rated E! And if anyone wants a peek at my tutorials, you can find a list of them here on Tumblr!
--all the love from your friendly neighbourhood Pika! xoxo
#fanfic writer's life#pikapeppa tutors#no but the way i smiled and laughed in sheer delight when i read this ask YOU DON'T EVEN KNOW 😭❤❤❤
9 notes
·
View notes
Text
Sky: Checklist of the Light has been updated!
Ver 1.10 (January 15, 2024)
- Boldly shine your true colors: Season of the Nine-Colored Deer has arrived! The four colorful spirits of our tale, as well as the Spirit of Mural to guide our way, have been added to the Current Season tab.
~ The new seasonal area has introduced two new winged light! Adjusted the WL Calculator to reflect this, bringing our total maximum to 226.
- By request of a handful of users, I have added a How to Use tab to act as a quick tutorial to get folks started on their checklisting! I cover the most frequent roadblocks new users have expressed to me, but this new section is open to further additions.
- Removed the "spirits" from Season of Revival.
- Moved the Hopeful Steward to the Season Guide Trees tab.
- Added Season of Moments spirits to the TS pool.
- Adjusted the CHECK/UNCHECK ALL script to accommodate these changes.
* Changing my tumblr url broke the link on the Welcome page. A working link has since been added.
~~
I am under the impression that the seasonal spirits’ prices from beta are still accurate, the servers are such a mess that no one has really been able to confirm them. I’ll post any adjustments needed with the Traveling Spirit arrival on Thursday the 18th.
15 notes
·
View notes
Text
For the Dropbox file to work, you will need to create your Gmail account to download it. It is very easy and this post is
here on Tumblr because nothing has been added, as soon you may need this link to help you install the Ura Zelda mod. This was not easy
to work on and work on, as it took me a long time to publish. Today I will be publishing the download links. Soon, I will provide a video
tutorial in Spanish on how to download and install it. Please do the same thing so you don't make SH**. Oh, Shift.
Don't use complicated methods. If you read it and didn't understand, read it
again and let's move on.
Latest information and updates:
16/10/2024
Exact download links, below:
https://beta-of-light-64-zelda.webnode.page/my-blog-4-articles-tumblr-page/
https://www.tumblr.com/hugo-articles-remix-123?source=share
https://ura-zelda-remix-1-0---the-official-web---hg-design.webnode.page/ura-zelda-alpha-4-windows-download/
2 notes
·
View notes
Text
Assignments Are Out!
Matches have been made and you should have received an email detailing your assigned recipient's wishes. Please check the email associated with your AO3 account ASAP - if there are any issues, reach out to a moderator.
✨ Works are due to the AO3 collection by Sunday, November 17, 2024 at 12pm ET ✨
Visit our website to see the schedule in your local time. We also have a countdown of time remaining!
☆ Reminders
Check out our tutorials:
How to Fulfill Your Assignment - includes how to find & edit your assignment before works are revealed
Keeping it Anon
Giving Treats
Plot elements from the upcoming game are only allowed if your recipient asked for them. Otherwise, requested prompts are only suggestions! You are only required to stick to requested pairings and respect DNWs.
Artists be sure not to use an identifying watermark/signature on your initial post! You can swap the piece out once creators are revealed.
Do not share snippets, WIPs, or post about your work until after creator reveals! If you request/use a beta reader, be careful not to publicly share any details that could give you away (including the beta's name).
Do not add your work to any collections or series that might identify you! Likewise, do not link to your social media until after creator reveals.
If your recipient does not have anon asks on social media, you can contact a mod to get more info/clarification on a request.
Contact a mod immediately if you will not be able to complete your assignment for any reason. You can also request an extension here.
☆ CONTACT
ask | discord | email: [email protected]
Tumblr’s asks are famously unreliable. If you don’t see a response within 72 hours please feel free to resend the ask or send an email.
2 notes
·
View notes