#ts3 face preset editor
Explore tagged Tumblr posts
Visit Tumblr Blog
Explore Tumblr blogs with no restrictions, modern design and the best experience.
Last Seen Tumblr Blogs


Fun Fact
Mobile Tumblr US users spend an average of 4.04 minutes per session on the app.
Text
youtube

Tutorial : Face Preset Editor
After releasing my default replacements presets, I don't want to be the only creator to do so. Having many people share their content is amazing and that alone creates growth of custom content for the Sims 3.
Therefor, I think it is important for me to share my knowledge with you so you can be able to better understand how to use the Face Preset Editor by LazyDuchess and create your own custom presets or default replacement presets
What I'm assuming in this tutorial :
You have S3PE installed
You're familiar with the basics of S3PE.
You know what game files are
You know what a default replacement is
Download - Default Presets Folder :
SimFileShare - GoogleDrive
Questions and Answers
What's in the default presets folder ?
They're the default presets from the basegame and world adventures that I extracted from the game files and organized according to their names and categories
Can I use your already existing face presets default replacements as a base to make my own presets ?
Yes, feel free to use them all, just credit me if you do so ! - Heads Eyes Noses Lips -
Credits :
S3PE
FacePresetEditor
#ts3#sims 3#the sims 3#tutorial#siims 3 face preset editor#sims 3 face presets#sims 3 presets#ts3 face presets#ts3 face preset editor#sims 3 custom presets#sims 3 default replacement presets#sims 3 mod tutorial#sims 3 tutorial#ts3 tutorial#ts3 cas#sims 3 cas#sims 3 create a sim#ts3 create a sim#ts3 mods#Youtube#CAS : Presets#tutorials
165 notes
·
View notes
Text
Blender shortcuts

CAMERA INSTRUCTIONS:
Holding the scroll of your mouse thingy: Will rotate the view
Scrolling the scroll of your mouse thingy: Will zoom in and out
Shift+Holding scroll thingy of your mouse: Change view position
CTRL+Holding scroll thingy of your mouse: Move your mouse and see what it does!
If you have this lil thingy:
Here are some awesome view switchers:
1: Will switch the view to the Front view
CTRL+1: Will switch the view to the back view
3: Will switch the view to the left view:
CTRL+3: Will switch the view to the right view
7: top view
9: Bottom view
5: Change perspective. Great when you’re meshing furniture or creating poses!
Blender Navigation Settings:

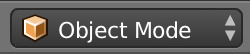
Object mode: Is basically the ‘outside coat’ of your mesh, or well... your mesh! if you Right+click on it, the mesh will be selected.
Note: Don’t scale, rotate, move your mesh in object mode though. It will screw up with your UV map and will throw errors!
Edit mode: Edit mode is basically... what it says, you get to drag around those amazing dots or edges or faces or... even the mesh! :)

Occult geometry: This little button will make your mesh transparent in a very helpful way! This way you’ll be able to select the back vertices that you’d otherwise not see.

Note: This option is only available in Edit Mode.
Add: It has various options, but for meshing the add>mesh>pickamesh it could be really helpful!

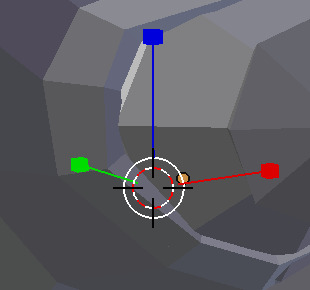
Transformation orientation:
Translate: Stands for moving around the scene/blender


Rotate: Makes you rotate your mesh in the scene/blender.


Scale: Gives you the ability to make your mesh bigger

Viewport shadings:
Note: Not all shadings are compatible with edit mode!
Solid: Is basically your gray-scaled mesh with no textures or anything added! Just let’s you focus on the mesh (edit mode compatible)


Wireframe: Let’s you see the edges of your mesh but the faces will be invisible. This could be nice to see whether something is symmetric on spots that you wouldn’t be able to see in solid mode. You can also select vertices that you can’t select in solid mode! (Edit mode compatible)


Texture: Makes you see the texture you applied on your UV map. To see how this will be helpful for TS3 meshing, click here: X (Edit mode compatible)


Render: Sometimes useful to see how strong your specular map is. However for this, I’d recommend switching it to Cycle render. To read more about what the hell i’m talking about, here you go! x And any tutorial on how to get it game-readyish: X


SHORTCUT INSTRUCTIONS:
Note: All these shortcuts will work in the UV map layout we’ll encounter later on. I’d also suggest copy pasting this list on a text editor so you don’t forget about them.
A: Will select everything Object mode (The view we’re in right now) And will select all the dots (vertices) In Edit mode.
B: Will let you select whatever you want with just dragging the mouse
C: Hey we made the alphabet here Is basically this brush selecting tool. Works great in Edit mode, but I rarely use it in object mode.
CTRL+Rightclick: (Does not work with the UV map layout) Will let you create this circle to select stuff!
TAB: Will let you switch back to edit mode or object mode!
L: (Will only work with Blender 2.70 or later) Stands for ‘Linked’. Will let you select parts of the mesh that are, well linked in a way. Works great with meshes with hard edges or hair meshes!
Shift+Right click: Is selecting one object (In object mode. In edit mode, you’ll be able to select one vertex at a time).
S: Stands for scaling.
S+X: Stands for scaling horizontally
S+Y: Stands for scaling vertically
R: Stands for rotating
G: Stands for grab n move!
G+Y: Stands for grab and moving it up and down
G+X: Stands for grabbing and moving it left and right
CTRL+J: Will join 2 separated ‘groups’ or ‘meshes’ together! Edit mode only!
Spacebar: If you can’t find a specific option, just search it! :)
Recommended settings for TS3:
Setting things up for the sims 3 could be a pain when you have no idea what the game works with and what-not. If you’re not really familiar with creating stuff for games in general, especially the sims 3, I’d definitely check this part out! :)
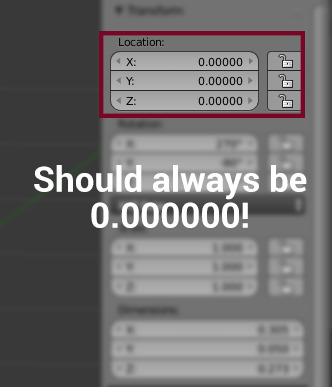
Right navigation side bar settings:
Note: Make sure that the following settings are being checked in Object mode NOT edit mode!
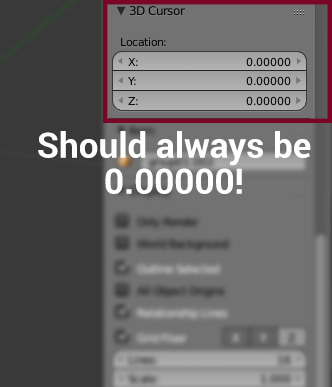
Location: This should always be on 0.00000. Reason why is because else your CC will be say, somewhere under your world when placing it in-game! Or super high in the sky! We don’t want that to happen, eh? ;)
Scale: This one should always be set to 1.000. This is very important! If you scale them up, it will screw up your UV map and Blender will throw tons of errors. If you do want to scale something up, please do this in edit mode NOT Object mode!
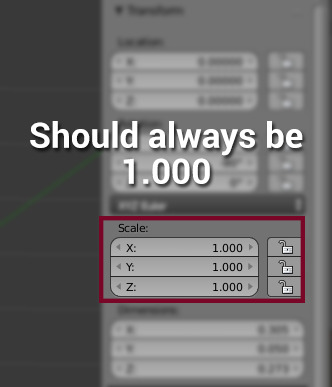
TIP: Scared of accidentally exporting it with these values being not correct or just wanna be lazy/safe? Try ticking these slot thingies before meshing! :) You’ll love them!

3D Cursor: In object mode you always want the cursor to be on 0.0000. This will be helpful when adding an existing Blender mesh! :) If it’s not on the 0.0000, then this could cause issues too with uv mapping.
Shadings: There’s not that much that we need to take care of here, but there’s one VERY important box we have to tick, which is the ‘backface culling’. Reason why is, is that the way it will look like turned on is the way it will look like in-game. Turning it off will NOT fix it!
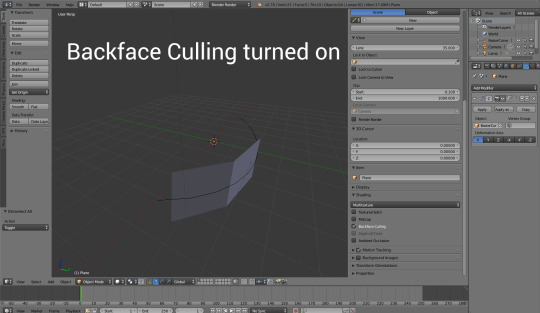
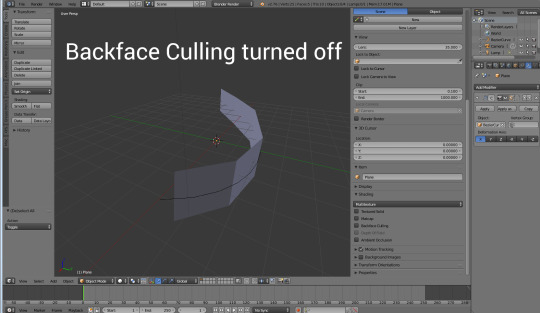
See how when turned on the back is invisible? This is how the plane will look in game if you don’t fix this. But... how *do* we fix it? Let’s go into edit mode!
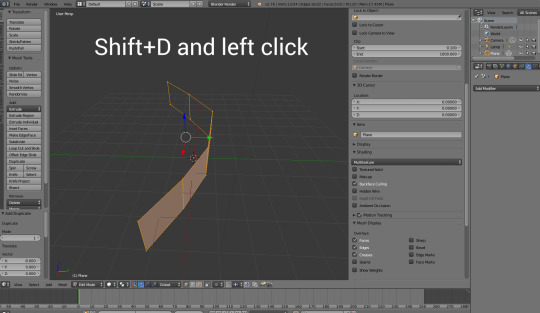
1. We want to duplicate the mesh with Shift+D and then left click to confirm the duplication.
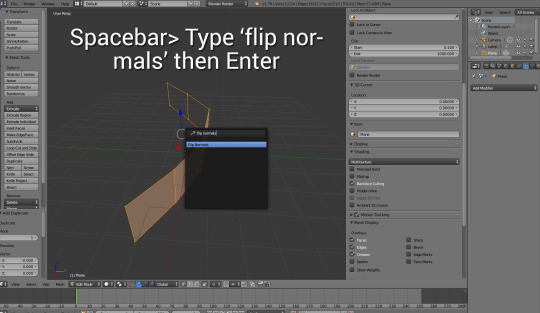
2. Then, we want to use the spacebar which stands for searching certain functionalities, type in ‘Flip normals’ and then press enter,
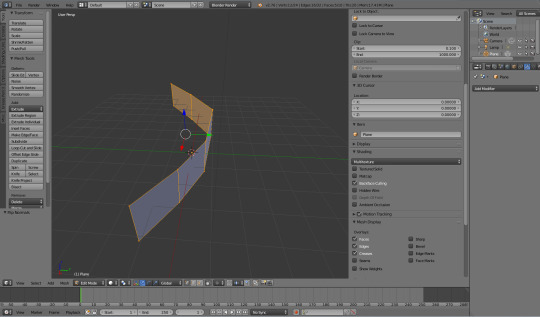
3. And there you go! Now the game won’t make them invisible from the back!
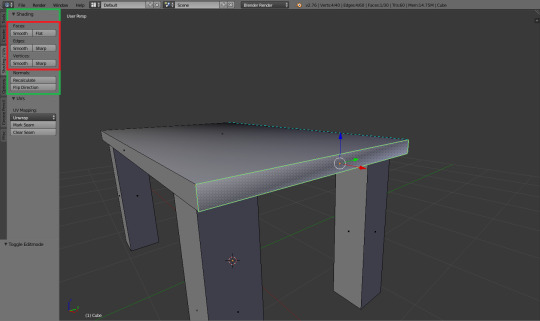
Left side bar navigation:
Shading: This option is only available in object mode. And is very helpful when you just imported a mesh but it doesn’t quite look right. Have a few examples!

Note: This option won’t just affect blender, it will also affect in-game.
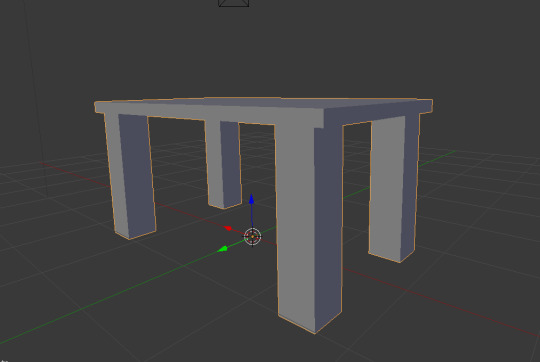
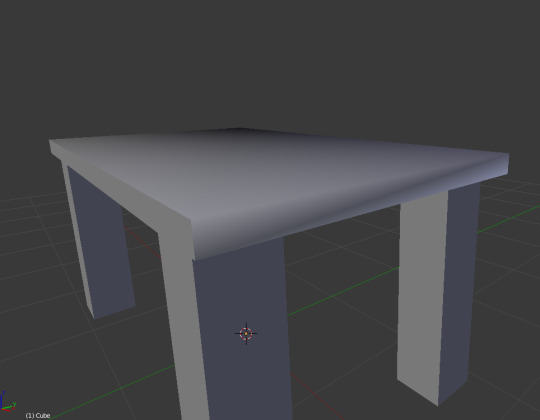
Flat:
Smooth:

Now you think ‘why can’t it just smooth always?!’ well...
Smooth: Oh yuck! it’s 2005 all over again D:

Flat: Yay! it’s table-y! :D
Don’t fancy them all being fully flat or smooth? Let’s get to the next tab...
Shadings/UV>Shadings: This is really helpful for when you’re working on complex meshes! Shoes for example, would probably need this or a specific furniture, or even hair! The most recommended way of doing this is by selecting a few faces and use either the ‘faces: smooth’ or ‘flat’ function
Note: Only shows up in edit mode!
Exporting recommendations
When you’re sure you UV mapped it properly, and your mesh is ready to see the good ol’ milkshape to get it game-ready, the most recommended way of exporting it would be as a waterfront OBJ. OBJ is a really raw export function considered how it doesn’t support bones, which in this case is amazing! Since we don’t do anything with them in Blender when meshing stuff for ts3 :) BUT! There are some settings you want to have in order to export things successfully.
Let’s take a look at this thingy:

For exporting OBJ files:
Apply modifier
Include edges
Write normals
Include UVs
Objects as OBJ groups
Optional: Write materials (Basically your textures)
Scale: should be set to 1.00
Forward: -z Forward
Up: Y up
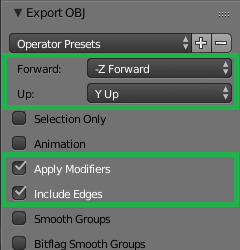
You can even save the setting by clicking on the + next to the ‘operator Presets’ and call it something like ‘ts3 export’ so you don’t have to keep selecting them :)
Helpful guides when you’re a noob!
Now this thing might be super duper long, but does not cover all the things you can do with it! I do recommend watching all or most of these links/videos in order to understand what the tutorials are about and what I’m doing.
NOTE: I occasionally will write down the shortcuts for specific functions but I WILL NOT explain it in my tutorials. They’re written for people with a basic knowledge for at least blender or their chosen 3D program.
Blender starters tutorials:
Interface explanation
Blender fundamentals
Beginner’s course
Awesome UV mapping tutorial
Model with curves
Customized bump maps
Simlicious:
Covering the basics in text
Info about normals
UV mapping to make things ts3 pattern-y good!
Me!:
Render only
Bake less pixelated textures
Fun stuff to look at and follow but optional:
Note: When following specific tutorials about cycle renders (Like making something translucent) These will NOT work in-game. Everything shown in render apart from the specular map, normal map and the diffuse map will NOT work in-game
Blender cloud: Is a really cool platform where you can basically watch whatever you want to gain knowledge on from the professionals! Which, is not your regular youtube videos ;) You won’t be disappointed! https://cloud.blender.org/welcome
Blender free textures: Is a free online database where there are over 1500 free textures you can choose from, for non-commercial to commercial use, all for free! So no copyrighting involved! https://cloud.blender.org/p/textures/
Blender today: Is kind of this awesome newspaper website. everyday you’ll get a new article, some artwork, others awesome tips to improve your work with Blender! http://blender.today/p/
Jayanam: Has some great blender tutorials to maybe give you some ideas for your next meshing mission! :) https://www.youtube.com/watch?v=icABMWGkOn4&list=PLboXykqtm8dydLQFk962346_TrAgzfMCF
Yan’s UV mapping tutorials: I learned a lot by just watcihng these videos! It sure is a recommended video to watch, but watch this one after you know how to UV map! https://www.youtube.com/playlist?list=PLvPwLecDlWRD3F9lVD0ks_sdpxCgxgYm-
Hand-painted Sword by XRG81: Why this one? Well it did teach me the advanced ways of drawing on a texture map instead of just guessing in Photoshop if I did them write! :) And besides! It’s a really awesome way to avoid seams! https://www.youtube.com/playlist?list=PLNHJ5gduZOiWXtbeiZZi3q082bclOHQY4
Tutor4u: Has tons of awesome tutorials on how to work with stuff in Blender!
752 notes
·
View notes