#ts2 fast download
Explore tagged Tumblr posts
Visit Tumblr Blog
Explore Tumblr blogs with no restrictions, modern design and the best experience.
Last Seen Tumblr Blogs


Fun Fact
Tumblr has been banned in Indonesia for providing people with access to pornographic content.
Text
Fast Download List for Skellington's Base Game Repository
I love repository content for The Sims 2. Skell has made heaps of it, which you can find here: https://ts2repositoryproject.tumblr.com/introduction I started a new install, so I needed to download it all again. And to make it easier for me, and perhaps others, I compiled all the SimFileShare download links into a list, so you can paste it into your bulk downloading software of choice, like JDownloader, and get it faster than going through each Tumblr post links.
List of content in the download list:
https://ts2repositoryproject.tumblr.com/post/641995837574201344/whattheskell-shirts-for-amtmem-on-gos
https://ts2repositoryproject.tumblr.com/post/179479018707/whattheskell-pirate-completer-part-1-bgbv
https://ts2repositoryproject.tumblr.com/post/171959878152/man-maid-outfit-separated-no-gloves-frilly-open
https://ts2repositoryproject.tumblr.com/post/167774205945/whattheskell-some-shirts-for-a-hot-date-a
https://ts2repositoryproject.tumblr.com/post/167773946040/bg-underwearseparates-restoration-project
https://ts2repositoryproject.tumblr.com/post/163126959137/whattheskell-ts2repositoryproject https://ts2repositoryproject.tumblr.com/post/162634173150/whattheskell-summer-swag-day-9-manternity
https://ts2repositoryproject.tumblr.com/post/157885514398/whattheskell-sorry-i-missed-a-few-days-i-will (just the custom one)
https://ts2repositoryproject.tumblr.com/post/152549116163/whattheskell-repositober-day-29-bg-maid
https://ts2repositoryproject.tumblr.com/post/152391899593/whattheskell-repositober-day-24-mortimer-goth
https://ts2repositoryproject.tumblr.com/post/152388130918/whattheskell-repositober-day-23-bg-cassandra
https://ts2repositoryproject.tumblr.com/post/152373828984/whattheskell-repositober-day-18-bg-mad
https://ts2repositoryproject.tumblr.com/post/149287826360/whattheskell-repositoried-completer-misc
https://ts2repositoryproject.tumblr.com/post/149287144330/whattheskell-repositoried-completer
https://ts2repositoryproject.tumblr.com/post/149287144330/whattheskell-repositoried-completer
Download links
https://cdn.simfileshare.net/download/2296116/?dl https://cdn.simfileshare.net/download/798424/?dl https://cdn.simfileshare.net/download/435158/?dl https://cdn.simfileshare.net/download/292139/?dl https://cdn.simfileshare.net/download/286151/?dl https://cdn.simfileshare.net/download/286150/?dl https://cdn.simfileshare.net/download/21092/?dl https://cdn.simfileshare.net/download/265613/?dl https://cdn.simfileshare.net/download/186284/?dl https://cdn.simfileshare.net/download/128502/?dl https://cdn.simfileshare.net/download/114259/?dl https://cdn.simfileshare.net/download/115789/?dl https://cdn.simfileshare.net/download/115771/?dl https://cdn.simfileshare.net/download/108521/?dl https://cdn.simfileshare.net/download/108476/?dl
14 notes
·
View notes
Text
Chick-Fil-A Food Stand for The Sims 2

This is a 4to2 conversion from Insimnia, low poly. 11 recipes (7 Burgers, 2 Nuggets, 3 Drinks) are buyable from it. Also children can use it. Found in Party section of Buy Mode.
DOWNLOAD HERE DOWNLOAD HERE SIMLISH VERSION
----------------------------
If you want to support my creations, you can send me a donation with Paypal or Ko-fi ☕ If you want to ask for a Paid Commission, HERE you can find more details. Thank you ❤️
#ts2#the sims 2#sims 2 cc#sims 2 download#the sims 2 cc#ts2 download#4to2#4to2 conversion#buy mode#food#sims 2 food#functional#food stand#chicken#fast food#burgers#nuggets#drink
368 notes
·
View notes
Text


Percy's hungry all the time because he's actually run out of food. Obviously, it's no problem for him to restock his fridge with his own produce, but I figured the other households would run into the same problem soon, too, and I didn't want to allow groceries to be delivered to them without at least making an attempt to run a grocer's.
So Percy starts a business.
This was my first time selling produce through a home business, and I wasn't in the mood to restart my playing session just to put business mods into my downloads folder. Surely, I thought, there would be an efficient way to do this already built into the game. Surely Maxis would not make Percy stock and display individual tomatoes on the stupid tray one at a time.
Yeah, I thought. 🫠
#ts2#ts2 gameplay#emerald pines#emerald pines: season 2#season 2: gill-hendricks#downloaded the produce packing station so fast after this#god bless this game's amazing modding community
12 notes
·
View notes
Text
Icl I lost my mods folder for both ts2 and ts3 last year after building them for like 11/12 years and I was super bummed out and couldn’t bring myself to remake my folder for ts2 again but with the legacy version being released I’ve actually started to download little bits and pieces again instead of playing cc free like I have for a year
#I rebuilt my folder for ts3 fast#bc it was more my save files that I was sad about losing#but I literally could not install anything for 2 outside of the book of talents#otherwise I’ve just been playing without cc#but it’s so easy to find creators and to download stuff for ts2#because the community is different#so I’m back#and my folder is more organised#yaaayyy#thinking of redoing my folder for 4 in some way#not sure yet
0 notes
Text
[TS2] Audio Quality Fix
(Originally made to fix TS2 Legacy audio issues, still improves voice quality)
Hi :)
This mod just converts the speech audio files to a different format, making them sound clearer:
Download on Patreon (Free)
Be warned, it's a 2.5GB zip file as it's ALL the voice lines re-encoded. Patreon servers are pretty fast though.
Just extract the zip anywhere in your "Documents/Sims 2/Downloads" folder.
Should work with all versions of TS2.
420 notes
·
View notes
Text

If you need it, it's here.
Might be because for many years I played TS2 without Seasons EP, but I find the pond fish really creepy - too large, too fast, glowing at night AND there's just too many of them. This doesn't affect fishing animations, those fish models use separate textures.
Invisible TS2 pond fish effects - texture default
Download (SFS)
If you'd like to bring back one or more fish types, open the file with SimPe and delete the empty texture(s). Pic above features catfish.
Enjoy
129 notes
·
View notes
Text
Some late night thoughts on the latest CC-discourse
As a person who only creates custom content once every blue moon, and when I do it is always to fill a need I have in my own game, I can say that it is a great way to approach cc-creation. You'll always get something out of it even if no-one else downloads it because it fills a need for you! Every download, comment or note is just a bonus!
Then again, for some the cc-creation itself is the hobby, not the game and that, I feel, is also okay. Some will create for money or fame, and some for the love of the game. At the end of the day, I think we should be able to coexist even if we don't share the same opinions.
I can also see how some creations feel less inspired and more like fast food/fashion. As an oldie in the community I can honestly say though, that this isn't new. I saw it back in the TS2 days too. But you don't have to put your energy there! You can choose to unfollow, to block, to follow creators that inspire you, curate your feeds, and to take a break from the game and the community when it takes more than it gives.
Please take care of yourselves, your mental wellbeing and your precious free time my friends! 💜
39 notes
·
View notes
Text

119 Timothy Drive
Grid-Adjusted Split-Level ...built with only 1 piece of CC 4 bedrooms - 3 bathrooms - 2-car driveway - back deck - lots of hobby space - unfurnished - pet friendly -
Thank you SimsGirl for sharing this home with me! I don't think I've ever built a house this fast! LOL! ...of course, it is really just an unfurnished shell. But, I had a lot of fun playing with the Grid-Adjuster today. I hope it is what you wanted.
This TS2 House is based on a Real Life Home.
Read more »
Custom Content Included - Simple Passage Modular Stair by HugeLunatic(HL)/Sims2Artists - these need a script file so follow the link and make sure you install them properly!
Lot Size: 40X30 Lot Price (furnished): $60,344
DOWNLOAD @ SFS
Or from MTS and Simblr.
34 notes
·
View notes
Text
A couple of experiments with TS2 loading time
I wanted to test out some things I've commonly heard around the Sims 2 community as ways to affect your load times. Disclaimer: I have a powerful gaming computer so my game loads fast anyways, so there might be small differences that I won't notice that are more obvious on other machines. I don't know how much of this generalizes to everyone's computer! I run the UC with Sims2RPC as my launcher on Windows 11.
My method: I loaded the game and timed how long it took the game to load from the end of the intro movie, to the neighborhood selection screen. I did it 5 times in a row for each different thing I tested and averaged out the times, just to reduce variance as much as I could.
Test #1 - Control
First I just loaded my game with my downloads folder the way it is right now (8.2 GB of pretty disorganized CC) to get a baseline value. Result: 55 seconds average
Test #2 - Do special characters affect loading times?
I used a bulk file renaming program to replace the letter "S" in every filename in my entire downloads folder, with š - if you can't see that character it's an S with an accent mark on it. (I picked S because it's one of the most common letters in English and it's also in some words common in cc filenames like "sims" and "mesh" so I thought it'd be one where I'm hitting almost every file even if I only replace one character.)
Result: 55 seconds average Conclusion: This one surprised me because it's such a piece of repeated common knowledge around the TS2 community, but I think it's unlikely that special characters affect loading times? If nothing changed from turning the vast majority of my CC from files that don't have special characters into files that do.
Test #3 - Do non-CC files in your downloads folder affect loading times?
I remember hearing you shouldn't keep preview pics in your downloads folder, because it'll slow down the game, and I was confused because I always thought it won't even try to read non-.package files at all. So to test this one, I temporarily moved 17.5 GB of photos, videos, and audio files from elsewhere on my hard drive, into my sims downloads folder.
Result: 55 seconds average Conclusion: If tripling the size of my download folder didn't change load time at all when the new files were all non-sims files, I think it's almost certainly fine to keep preview pictures (or zipped-up backups of something you don't want to use all the time, or whatever) in with your CC if it helps you keep track of your downloads.
Test #4 - Merging your CC
I knew this one was going to actually make a difference because I've directly experienced it before (on an older, worse computer where my load times were longer) but I thought I'd give it a go anyways just to see how much difference it made for me. So I merged some of my CC subfolders I knew would be the biggest (clothes, buy mode objects, & hairs) with CC Merger. According to the logs, it went from 4,308 individual files to 148 merged files.
Result: 46.5 seconds average Conclusion: This definitely makes a difference but it will make a lot more of one for people who already have long load times. For someone like me it might not be worth the amount of time it would take to be bundling every little thing I download lol.
A few other things I've heard that I couldn't think of an easy way to test
1- "Default replacements don't affect your load times as much as if you had a custom version of the same thing" - It feels to me like this doesn't make sense because surely the game still just has to read the files but I have no clue how to test this, I'm not about to spend hours gathering up the custom versions of all my defaults just to try it.
2- "The game will load faster if you have shorter file paths / fewer subfolders within the download folder" - I heard of and started doing this long enough ago that all my downloads are already only one or two subfolders deep already. I couldn't think of a quick way to make my folder structure a lot more complicated lol, and I think even if I found out this wasn't true I wouldn't change how I organize my downloads, so I didn't spend time on it.
Everyone draw whatever conclusions you want from this post, I'm not telling you to change how you organize your CC or anything, just wanted to share what I found is true for me specifically, I would be interested to hear other people who have longer load times repeating my tests and see if you get the same results, or to hear people who know more about the programming side of this weigh in, maybe something like the special characters is dependent on your computer or operating system!
#the sims 2#ts2#sims tips and tricks#if anyone wants to try the special characters one for yourself I can explain how to do the bulk renaming thing#I actually really wanted to try this with a longer baseline loading time#but I don't know of anywhere that I can go to download like. a huge bulk file of 10+ gigs of CC that I could put in temporarily
22 notes
·
View notes
Text
Not tagged, but I like this one:
1. What’s your favourite sims death?
Running with scissors
2. Alpha CC or Maxis Match?
Still don't know what it all means. I like all clothes, photoskinned super old clothes, with high quality, but also stuff converted from other games. As long as they have nice shoes and morphs.
3. Do you cheat when your sims gain weight?
No, but this is TS2, I once played TS4 and they got fat so fast... I was like, what is going on here?!
4. Do you use move objects?
Only to help Sims who get stuck. Not to place objects.
5. Favorite mod?
Moniques hacked computer. I use it so much: loans for starters, buying electronics, buying clothes, groceries, fish and produce.
6. First expansion/game/stuff pack you got?
TS1, loved it, so my brother got me TS2. I bought TS3 and TS4 (basegame) but I don't like those Sims.
7. Do you pronounce “live mode” like aLIVE or LIVing?
As in aLIVE.
8. Who’s your favorite sim that you’ve made?
That's my elf Sims that I never shared. (I keep a copy of her in SFS)
9. Have you made a simself?
No, the only Sim I ever made after a "real" person is Rumplestiltskin (OUAT).
10. What sim traits do you give yourself?
I don't play with traits, but I guess Foodie, Perfectionist, MusicLover, AnimalEnthusiast and Loner.
11. Which is your favorite EA hair color?
Red
12. Favorite EA hair?
Mohawk for men, yesss
13. Favorite life stage?
Kids, I love playing them. I don't like teens. I think they're boring.
14. Are you a builder or are you in it for the gameplay?
Both!
15. Are you a CC creator?
Yes
16. Do you have any simblr friends/a sim squad?
No I guess I'm too much of a loner. (Adds Loner to traits..)
17. What’s your favorite game? (1, 2, 3, or 4)
2 definitely!
18. Do you have any sims merch?
I don't.
19. Do you have a YouTube for sims?
Nope
20. How has your “sim style” changed throughout your years of playing?
I changed haircolors - simgaroop to NHS, and a lot of piratewood defaults, guess thats it, still have downloads from 2004...
21. What’s your Origin ID?
What's origin ;)
22. Who’s your favorite CC creator?
There are so many!
23. How long have you had a simblr?
Over 6 years
24. How do you edit your pictures?
I crop and resize.
25. What expansion/game/stuff pack do you want next?
Hobby farm animals (for TS2)
26. What expansion/game/stuff pack is your favorite so far?
Pets (and Uni) (TS2)
22 notes
·
View notes
Text
Pizza Hut Food Stand Functional for The Sims 2

These are 4to2 conversions from Insimnia, low poly. This stands works like my previous food stands; sims can choose between some food/drink options and buy them from the stand to eat/drink them. Found in Party Section of Buy Mode.
DOWNLOAD HERE
-----------------------------
If you want to support my creations, you can send me a donation with Paypal or Ko-fi ☕ If you want to ask for a Paid Commission, HERE you can find more details. Thank you ❤️
#ts2#the sims 2#sims 2 cc#sims 2 download#the sims 2 cc#ts2 download#4to2#4to2 conversion#buy mode#food#sims 2 food#food stand#stand#functional#pizza hut#pizza#fast food
331 notes
·
View notes
Text
Yet another update no one asked for but the sims 3 are FINALLY working again ;_; There's still some minor lag when loading theme/geometric patterns but it goes away quite fast so we're good hehe - now to reinstall all my stuff *cries*
Also the file I downloaded had ts2 and tsm so guess who now has (almost) all sims games 🤭
Also in other news: I attempted to fix my ts3 game and even without cc whenever I use create a style it still gets laggy 😭
Apparently it gets laggy when I load the most heavy categories like theme and geometric, but it's still so weird because this never happened before?? - I had to reinstall my game mid-2024 after my pc got a virus (shoutout to Avast Antivirus for literally *creating* a virus and fucking up Windows to the point my bf had to reinstall it to fix it 🫠) and it's been acting funny ever since, I miss my old game so much I've never IN MY LIFE gotten ts3 to work so nicely and when I finally do Avast had to fuck it all up 🥲
(ps: just in case I still test everything I share or ask others to do it for me to make sure it works and won't break anyone's game due to my own game's issues hehe)
#it was tempting to get ts1 too but tbh I'm not even sure if I'll play ts2#might take this as an opportunity to clean my cc folder a bit but half the stuff in there isn't easy to find anymore ):#kyra's ramblings
20 notes
·
View notes
Text

Patterned Recolors of HugeLunatic's Contempo Curtains
The moment I shared the previous recolors I made of these curtains by @hugelunatic, I decided that I could use a few sheer options more too. I ended up with 10, these have some transparency so you can vaguely see through them. Great for covering bathroom windows.
Download (SFS) (alternate) - files are compressed and the mesh is included. 256x512 textures, the patterns are freebies from various graphic resource sites.
#ts2#ts2cc#sims 2#s2cc#the sims 2#the sims 2 download#dl buy#i work fast when i'm procrastinating lol
413 notes
·
View notes
Photo

Nepheris’s (almost all) default face templates made non-default
So here’s something I’ve been working on since... 2 months, or something? Because I always need more non-defaults, and I used to have this set before I changed to the current defaults I use. So I started this project!
As I opened the defaults, some of them missed some lod resources. I don’t know how important they are, but I thought better safe than sorry, so I didn’t make those. It’s still 25 out of 28, which is... a lot.
Sorry for the awful preview btw, you can watch how the faces actually look in the default post, here!
I tested them more or less, but please tell me if you find any borkage!
Most importantly, have fun! :)
Download - Alternate
#ts2#sims 2#sims 2 download#dl face template#at least now i'm pretty fast at it#but i don't want to see face templates for a while#but yes i'm planning to non-default more sets
231 notes
·
View notes
Photo


Fast Lane Cars for The Sims 2 By Shasta and Gingers
To be honest I didn’t seen those two cars coming :P Those conversions were mostly done by amazing @shastakiss but Shasta had some problems with converting it and she asked me if I could help her. I’m very happy that it all went that way because I had so much fun working with Shasta. I hope that soon we’ll be able to share with you some more results of our cooperation. Enjoy ♥
DOWNLOAD
#the sims 2#the sims 2 cc#the sims 2 download#s2cc#ts2#ts2 download#sims 2 car#ts2 tumblr#the sims 2 tumblr#the sims 2 car#the sims 2 cars#simblr#download#sims download#3t2#3t2 conversion#fast lane stuff#sims 2 buy#sims 2 car download#sims 2 cars download#maxis match
758 notes
·
View notes
Text
Introducing... The Tattooer!
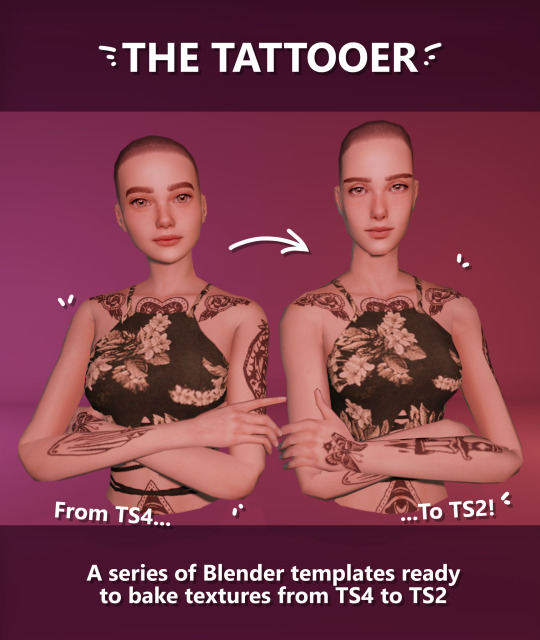
[This version is OUTDATED! Please, check the new version here. I updated the workflow, skipping a lot of unnecessary Photoshop editing. It's way faster! I'll leave this old version and files up though, for archiving purposes. But yeah I still totally recommend you use the new version!]
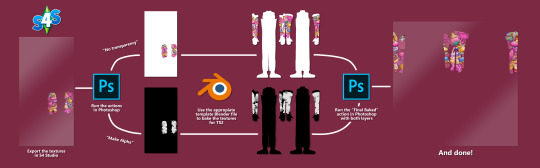
Finally! I’ve been working on this for so long and I couldn’t wait to share it. This is a series of Blender template files already set up to quickly bake textures from The Sims 4 to The Sims 2. Really neat for cc creators! The different Blender files will allow you to:
-Bake body textures from TS4 to TS2 (Female) -Bake body textures from TS4 to TS2 (Male) -Bake body textures from TS4 (Female) to TS2 (Male) -Bake body textures from TS2 (Female) to TS2 (Male) [Bonus!] -Bake head textures from TS4 to TS2 (Face + Scalp) [Experimental]
Check the file names to see which one is which, and the resolution of the baked texture it will give. Download! SFS / GD
Everything you see in the render above was converted using those Blender files. I only did a couple tiny edits to the eyes and lips to fix them. These templates were made mainly to bake and convert tattoos, but there’s more you can do with them if you get creative. I have to say, these are NOT perfect. Check out the eyebrows on the render above. They look a bit wonky compared to the original, don’t they? I left them as is to keep your expectations with these as realistic as possible. Results may vary depending on what you are trying to convert, so! With that in mind, this is all the stuff you will be able to convert almost seamlessly from TS4 to TS2:
-Tattoos. -Other body details such as body hair, scars, freckles, supernatural/occult details… -Body painted underwear and swimwear, as well as some other clothing that’s mostly painted on the body. -Socks, stockings and maybe leggings. -Even skintones! In some areas they will look weird, so I recommend editing and blending them with other existing TS2 skins. -Makeup. Kinda bad but hey it works! Eyeliner and anything that is around the eyes looks terrible for now, but other stuff like blush may look just okay. -Eyebrows and maybe beards. A bit of hit or miss with those. -Hair scalps. Very useful when converting some hairs! Although keep in mind part of that texture might also need to be baked on the face mesh, you know, that hairline makeup stuff.
Got your attention? Nice! Editing some of the textures from TS4 to match the UV mapping in TS2 using a 2D editing program can be incredibly hard. That’s where texture baking in Blender comes to the rescue!
It is recommended you download Blender version 2.91.0, which is the one I use. Don’t worry, it’s free! There’s also 3 Photoshop actions you will need to set up the textures for baking and then putting them back together, because unfortunately Blender doesn’t support transparencies in that baking process, so that takes a couple extra steps to make it work, but I think it’s still pretty fast and easy. And just in case Tumblr manages to blow up or something, I decided to include a pdf with the upcoming tutorial that will guide you step by step with all this process, so if this post gets deleted somehow (I really hope not!), you will still have that pdf as a backup archived.
You can download Blender here. Personally I recommend picking the fourth option, “blender-2.91.0-windows64.zip”, which is a portable version and doesn’t need to be installed. You will also need Sims 4 Studio to extract the original Sims 4 CC textures you want. As for Photoshop… I’m not going to tell you to buy that subscription service and give Adobe some undeserved money, so… yeah, there might be some other options out there to get it (very legit, yes yes).
So, before we begin, let’s clear out some questions you might have. What the heck is this texture baking thing and what does it do? Well, let’s imagine you have a projector and point an image into a blank wall. Then you pick up some brushes and start painting and copying that projected image in that wall. Texture baking is kinda like that when it comes to 3D models. You align two models and match them as closely as you can in shape and form, and once you adjust some parameters and values, Blender does the rest for you: it will give you a new texture for a new model with a different UV map. These files I’m sharing have everything already set up, so it’s a matter of plopping in that Sims 4 texture and you will get that new texture for TS2 in just a few clicks.
This tutorial assumes you know literally nothing about how to use Blender, so if you feel uncomfortable with it, worry no more! This will guide you with pictures showing where you need to click and explaining what is happening. For Sims 4 Studio and Photoshop the process might be a bit less detailed, but still this should be pretty beginner friendly. For this tutorial, I will use some tattoos as an example. Alright, enough with the rambling. Let’s get started!
·EXTRACTING TEXTURES AND EDITING THEM WITH PHOTOSHOP: First things first, you will need to extract as pngs all the textures you want to convert from TS4 using Sims 4 Studio. Once you’ve done that, open them up one by one in Photoshop and run the “No transparency” action. This will remove the alpha channel from the image, getting rid of all the transparency. Go ahead and save a png copy of it. Then run the “Make Alpha” action on those same swatches (from the beginning, make sure you’re not running the action on an already edited swatch!), which will only show the alpha channel of the image in black and white, and save another copy of that. You should have 2 textures for each tattoo swatch. For the “No transparency” action I like to name it BASE (And your swatch number or name), and for the “Make Alpha” action I usually name it ALPHA (And that same swatch number/name). I recommend saving them in different folders named BASE TS4 and ALPHA TS4 respectively to keep it organized. If you want to make this much faster in Photoshop, there’s an automation option in it that allows you to run an action through a batch of files in a folder and then saves it all. I won’t cover how to do it in this tutorial, but you should be able to find it easily on Google by searching something like “Photoshop automate batch”. It’s really powerful and will make your workflow with actions much faster. Definitely recommend learning about that!
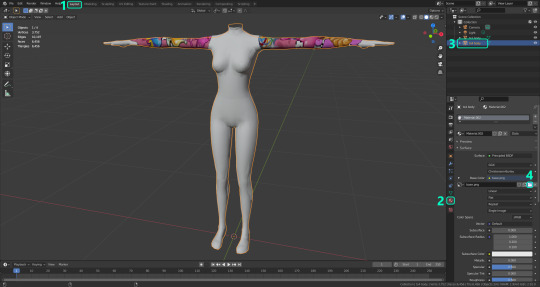
·BAKING THE TEXTURES IN BLENDER: PRELIMINARY STEP 1: CONFIGURING BLENDER’S GRAPHICS SETTINGS: Open your preferred Blender file depending on what you’re going to bake and the desired resolution (in this example I’m going to use the AF-body-4t2-1024 file). Before we start messing around in Blender, there’s one thing you should set up. It is a onetime step, and once it’s done, you won’t need to do it again. So, does your computer have a dedicated graphics card? If you don’t know or you’re not sure, just skip to the next step. Configuring Blender so it uses your graphics card instead of your CPU will make the baking render much faster, so it is recommended you set it correctly. If your computer has a dedicated graphics card, click File (1) > Preferences (2) > and on the window that pops up click System (3) > and select CUDA and make sure your graphics card is there and tick it (4). I have an Nvidia Graphics card but your case may vary. Once you’re done, click on the tiny button on the bottom left corner and Save Preferences (5).
PRELIMINARY STEP 2: CHOOSING THE RENDERING DEVICE: Click on the tiny camera button on the right, called Render Properties (1), and on Device (2) select GPU Compute if it’s not already selected. If you’re not sure if you have a graphics card or not, just select CPU. Then select the Material Properties tab (2) and Save your changes, either by pressing Ctrl + S, or clicking File (4) > Save (5). Okay, time to get into the good stuff!
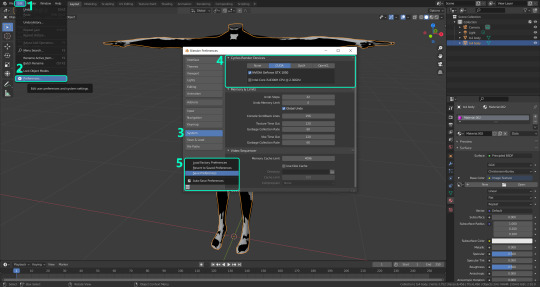
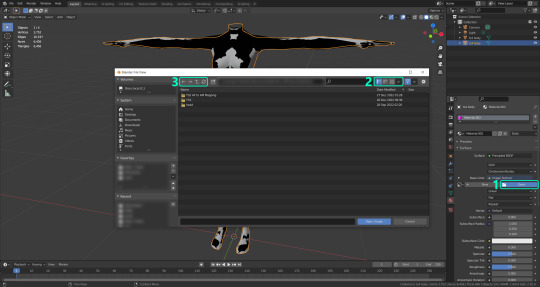
·STEP 1: LOADING YOUR TS4 BASE TEXTURE: In the Material Properties tab, click the folder icon that says Open (1) and on the window that pops up, navigate through your folders and select your first texture. For now we’re going to bake the BASE texture, so go to that folder where you saved the edited “No transparency” image. To navigate easily, the 3 buttons on the top right (2) are for the display mode. They will show your files in list mode, vertical and horizontal, and the one on the right will display the file thumbnails, pretty useful if you want to easily see your images. And the icons on the left side (3) will let you go one folder back and forward, go to the parent directory, and refresh the folder in case you just dropped something new in there. Double click on the image you need and that will load it into the Sims 4 body model, named “ts4 body”.
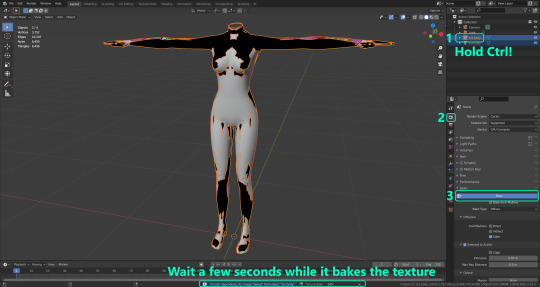
·STEP 2: SETTING UP YOUR SELECTION AND BAKING THE TEXTURE: On the top right of the screen, you will see the names of the 2 models in the scene. Hold the Ctrl key in your keyboard and left click on the “ts2 body” model (1). If you did it correctly, you should see “ts2 body” in a yellowish orange color, and right down below, “ts4 body” should look more like a red orange. If not, try again by clicking first on ts4 body, and then while holding Ctrl click again on ts2 body. Then switch to the Render Properties tab by clicking the tiny camera icon (2) and click Bake (3). Depending on your screen resolution, you might need to scroll down a bit with your mouse to see the Bake button. Wait a few seconds for it to finish. You will see the progress percentage down on the bottom of your screen. Don’t panic if you notice your computer fans start ramping up, that’s completely normal! As I said in the beginning, using your GPU will bake the textures much faster than the CPU.
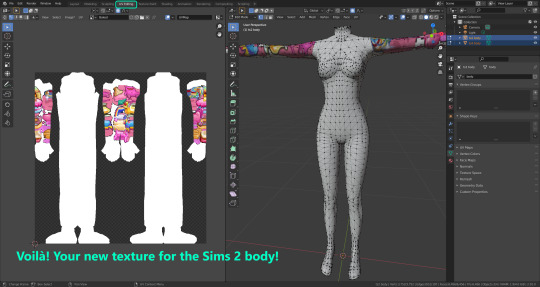
·STEP 3: SAVING YOUR NEW TS2 TEXTURE: Once it’s finished, switch to the UV Editing Mode by clicking “UV Editing” on the top of your screen. And there it is: your new texture! You might have to scroll up your mouse wheel a bit to zoom in and see it in all its glory on the left side of the screen. We’re still not done yet though. You need to save it to yet another new folder (always try to keep your stuff organized!).
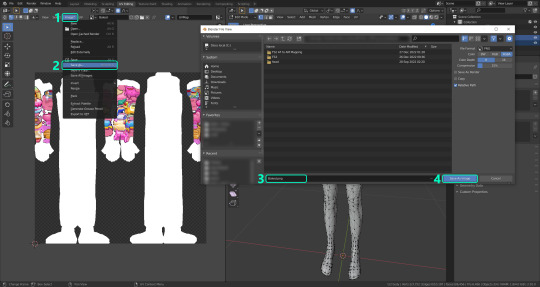
You can save it by pressing Shift + Alt + S, or clicking on Image* (1) and then Save As… (2). That will pop a window where you’ll need to navigate again and save it somewhere. Give it a proper name (3) and hit Enter to save it… well, Enter doesn’t always work for me for some reason, so if that happens just click Save As Image (4). In this case, I personally like to call it something like “BASE TS2”.
·STEP 4: GOING BACK TO STEP 1: Alright! So you have your new baked base texture, but we still need to bake the alpha channel to give it its transparency. In order to go back to step 1 and start the process once again, click Layout (1), go back to the Material Properties tab (2), select “ts4 body” (3) and click on the folder icon (4) to open and load the alpha texture you did in the beginning in Photoshop.
Then it’s just a matter of repeating the process from step 2: bake the alpha channel and save it again as a new image (watch out, don’t overwrite your previous image!). This one I like to name “ALPHA TS2”. When you’re ready to move on, close Blender without saving. If you see a small check telling you it will save some images, make sure you uncheck it, so you will be able to use it again in the future from the starting point with no issues. I don’t think it really matters if you accidentally save your progress in these files, but I like to keep it clean and fresh so I can do the process where I left it from the beginning the next time I open it. And in case you mess up and save somewhere, you can always just delete the .blend file and download the template files again.
·FINAL STEP: PUTTING EVERYTHING BACK TOGETHER IN PHOTOSHOP: We’re almost done! Open Photoshop and drop in both your 2 new baked textures, “BASE TS2” and “ALPHA TS2”. Keep both layers on top of each other and aligned. For that you can enable the snapping in View > Snap to… > All. Rename these layers so the Alpha layer is “ALPHA” and the Base is “BASE”, and make sure ALPHA is on top.
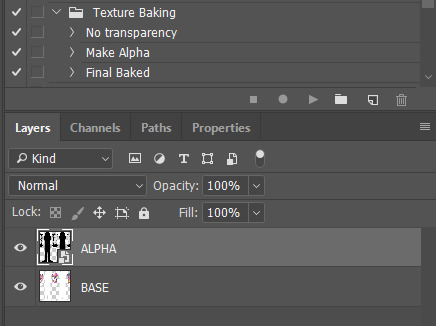
Then run the “Final Baked” action and now for real, it’s finally over! You just fully baked and converted these new textures. Congratulations!
So, to summarize, here’s a small guide with all the steps of the workflow I developed. Once you get the hang of it, baking and converting one swatch of a texture just takes a couple minutes. It really is that easy!
One small note though, some of the baking blend files save the textures with a resolution of 2048x2048 pixels, as clearly stated at the end of their file name. That’s way too overkill, because TS2 only properly supports up to 1024x1024 for most of its textures and you should always resize your final product to that max resolution. I just made those 2048 versions because there might be some really tiny and slim details on some tattoos that may look a little too blurry when baked into a 1024 resolution, so for those cases use that if you want and then resize them in Photoshop. In the Resample mode of the Image Size menu, there are a few options to choose. For the fine details, I like the Nearest Neighbor (hard edges) option, which, even if it looks a bit pixelated, it still preserves most of the texture and quality.

For anything else, I would just directly bake them using the 1024 versions in Blender.
And for the folks who feel comfortable playing around in Blender, this is just the beginning! Texture baking opens a LOT of possibilities, so feel free to move stuff around and edit the models to your liking! If you notice the baked textures look warped or stretched somewhere, or don’t like where some textures are placed in the S2 body, poke around that area moving stuff and then give it another try. The main objective of the baking process is keeping both overlapping models as close in shape as possible. You may also edit and save new copies of the templates, or make new ones from scratch using mine as a reference (keep a close look on those Baking settings and values, I think they work pretty well) and share them if you want to. Go ham, do whatever you want with them! I have plans on making templates to convert body textures from Sims 3 to Sims 2, but for now it’s not on my priorities, so we’ll see when that happens.
Whew! Hope none of this was too confusing. Need help or have any issues with these? Please ask/message me and I’ll be glad to help when I’m able to!
Credits for the CC used in the render demonstration: -Skin by Sims3Melancholic -Eyes by Northern Siberia Winds -Eyebrows by PeachyFaerie -Tattoos by xtc -Top by SerenityCC
And the Tattoo I used for the tutorial can be found here, by ValhallanSim
Last but not least, a huge, special thanks to @elvisgrace for all her help testing this for me. I’ve never shared Blender files, so hopefully everything works as intended and everyone can use them with no weird issues. Fingers crossed! And thank you for reading! Hope you have fun playing with this new toy hehe.
#ts2 tutorial#ts2 resources#ts2 blender#ts2 overlays#ts2 texture baking#4t2 conversion tutorial#i swear blender is the coolest thing ever#yes you can consider this post as blender propaganda
319 notes
·
View notes