#tips to minimize open pores
Explore tagged Tumblr posts
Visit Tumblr Blog
Explore Tumblr blogs with no restrictions, modern design and the best experience.
Last Seen Tumblr Blogs


Fun Fact
The KCSC sent more than 20K requests to delete posts related to prostitution and porn to Tumblr from January to June 2017.
Text
Ditch the Chemicals: Natural Open Pores Treatment
Is your skin crying out for help? Are those pesky open pores making you lose confidence in your selfies? Before you reach for the latest chemical-laden concoctions, take a deep breath and consider the power of nature’s bounty. Ayurveda, the ancient Indian system of medicine, offers a treasure trove of natural solutions for open pores, leaving your skin feeling balanced, healthy, and beautifully…

View On WordPress
#Beauty#blog#enlarged pores treatment#Health#health tips#healthmonastery#large pores treatment#open pore treatment#pore minimizer
0 notes
Text
micro glow up part one⋆.ೃ࿔*:・🧁

in this post we'll be talking about habits and little ways in which u can improve ur health and appearance without doing anything too drastic. a micro-glow up to stay polished…💬🎀


DRY SHAMPOO ;
dry shampoo helps with smell and reducing oil and all in all just a rly super useful tool that i hope we're all taking advantage of! so to use it simply divide ur hair into sections and shake the canister before application.
make sure that u hold it at least 10-12 inches away from ur roots. and then just brush it out and voila. just get the dry shampoo that matches ur hair color. so for me i have black hair so i'd purchase a dry shampoo that is designed specifically for dark hair.
WRAP UR HAIR AT NIGHT ;
create a protective barrier around ur hair at night to prevent frizz. with things like silk wraps and bonnets etc. treat ur hair LIKE A BABY. be super gentle to it so it can be soft and moisturized. if ur hair is more coarse or thick use the dominican tubi wrap.
CHOOSE THE RIGHT SHAMPOO ;
so theres a difference between ur everyday shampoo and a CLARIFYING shampoo. a clarifying shampoo is simply more of a deep clean so if ur using a clarifying shampoo EVERY single day you'll find that ur hair is lowkey straw-like and thats not the move.


clarifying shampoo is a super deep cleanse for ur scalp and u shouldn't be using it every single day…💬🎀
furthermore using a scalp scrub once a week or two weeks to stimulate ur scalp is rly rly wonderful. to just kind of do a deep clean of ur scalp and stimulate blood flow which can also help hair growth.
IF YOU HAVE ACNE ;
i used to have bad acne so i think im qualified to talk EXTENSIVELY on this subject but i won't make this section of the post too lengthy but i think these tips are valuable if ur struggling with acne…💬🎀
♡ invest in a pimple popping tool kit
u can literally get these off of amazon and u can learn to use them via youtube but as long as u store them properly and use them properly u can get rid of whiteheads and black heads safely and most effectively.
when doing an extraction wash ur hands and the area that ur about to extract from to make sure u have a super clean base. also make sure to soften the skin with a warm washcloth before starting. i've found that it minimizes pain.


hot tip : warm water opens pores and cold water tightens pores which is why when doing an extraction its important to use warm water and when ur done wash with cold water…💬🎀
♡ use blotting papers if u have oily skin
♡ invest in adorable and effective pimple patches
THE IMPORTANCE OF FACE MASKS ;
make sure to understand ur skin type/skin concerns before committing to a specific face masks. for example if u have more oily skin use a clay mask once or twice a week, if u have dryer skin go for a hydrating face mask. i rly rly LOVE sheet masks.
ALL ABOUT BROWS ;
wash ur brows with a gentle cleanser and make sure to keep them groomed cuz it makes ur eyes look bigger and gives u a more rejuvenated look. plus it makes u look very clean. dont forget to wash ur brows because washing them stimulates growth + prevents ingrown and painful pimples within or around ur brows.
ALL ABOUT EARS ;
DONT OVERLOOK UR EARS. make sure to clean in and around ur ears. like when ur showering just take ur finger with a little bit of gentle cleanser and just clean the shell of ur ear, the lobe, behind ur ears etc. do this on a daily basis. it literally takes 2 seconds.


and to clean ur ears DONT use a cotton swab. ik it feels rly good sometimes but what it does is just push the wax back into ur brain or whatever so instead take a cotton ball and soak it in some warm water, hydrogen peroxide and mineral oil and just tilt ur head to the side <- so that the opening of ur ear is facing up and hold for about a minute and then tilt ur head back and let the fluid drain out.
#honeytonedhottie⭐️#it girl#becoming that girl#that girl#self care#it girl energy#self love#beauty#beauty tips#beauty regimen#beauty routine#routines#regimens#hyper femininity#hyper feminine#girly#girl blog#girl blogging#beauty secrets#self improvement#self development#hygeine#hair care#skin care#fabulously feminine#fabulous#glamor#glamorous#dream girl tips#dream life
480 notes
·
View notes
Note
I started testosterone without coming out and I’m noticing that i’m just beginning to grow facial hair above my lip. I really don’t want it both because I don’t want a mustache and because I don’t want to have noticeable facial hair/mustache hair. I don’t think it’ll grow very far because of bad facial hair genes on both sides of the family but I’m still worried because I’ve never actually shaved before and don’t want to suddenly have a mustache. do you have any tips or resources?
Lee says:
If you continue taking testosterone, you will continue to experience changes including increased facial hair growth.
Facial hair is a semi-permanent change because it will continue to grow even if you stop testosterone.
I'm using the term "semi-permanent" to describe facial hair growth because it is possible to undergo electrolysis or laser hair removal and stop the hair from growing forever, but this is often not covered by insurance and can be expensive-- you may pay a couple of hundred dollars if you want all of the hair removed and continue taking testosterone.
In the meantime, here are some shaving tips:
Choose Your Tools: Go to the pharmacy and buy a razor! Or buy one online! You can start with a disposable razor or a safety razor, depending on your comfort level. You'll want to replace the razor every now and then since shaving dulls the blade, and it's important that the blade is sharp to avoid irritation.
Preparation: Watch a video tutorial on YouTube! Then wash your face with warm water to soften the hair and open up the pores. You can use a gentle cleanser or just warm water.
Shaving Cream or Gel: Apply a shaving cream or gel to the area. This helps the razor glide more smoothly and reduces the risk of cuts and irritation.
Shaving Technique: Shave in the direction of hair growth to minimize irritation. Stretch the skin slightly for a closer shave if needed. Don't press too hard; let the razor do the work.
Aftercare: Rinse your face with cool water to close the pores. Apply an alcohol-free aftershave balm or moisturizer to soothe the skin.
Regular Maintenance: If you want to avoid a visible mustache, you'll need to shave regularly. How often depends on how quickly your hair grows, but if you continue on T eventually you'll need to shave daily if you don't want to have facial hair and it's possible that you may have visible stubble in the evening.
Other helpful links:
Shaving your face
Facial Hair: Growth and Grooming
Facial Hair & Bearding Infodump
The Modern Man’s Guide to Beards
Hair removal
Other Temporary Hair Removal Methods:
Hair Removal Creams: These can be used to remove facial hair without shaving. Be sure to choose a product designed for facial use and follow the instructions carefully.
Waxing: This is another option, but it can be more painful and may cause irritation. It's best done by a professional.
Luckily, there are plenty of resources out there on facial hair removal. Many trans women have written about it and posted video tutorials, and you can start there, or you could look at resources targeting teenage boys who are learning to shave. Plenty of people shave, including plenty of cisgender women, including many with PCOS, so shaving wouldn't necessarily out you. But the accumulation of testosterone changes over time might.
If you have concerns about skin irritation or want to explore hair removal options, a dermatologist can provide professional advice.
But ultimately, you should consider whether staying on testosterone is more important than staying in the closet. Eventually, it is unlikely that you will be able to have it both ways, and you will need to choose between staying on T and coming out.
You have a right to privacy regarding your medical information and treatments. You are not obligated to disclose the reason for the changes in your appearance to anyone. But that doesn't mean that people won't figure it out anyway, even without you saying anything.
Think about how you might handle increased scrutiny over time, especially as changes become more noticeable. A short-term solution might be lying and claiming you have a hormone imbalance, for example, but could lead to more questions or require the maintenance of a narrative that isn't true. Then you'd have to explain why you aren't getting treated for your fictional condition as the changes progress, and you may end up pretending to be part of a community that you are not which can be offensive to people who actually are dealing with those conditions.
If there's a reason why you aren't coming out and admitting to being on testosterone, that's also important to consider as the risks of being involuntarily outed increase the longer you stay on T.
If you're worried about being kicked out, for example, you can't just hope that you won't be-- you have to be putting a plan into action to prepare for that possibility, including getting a job, saving your money, starting to look for apartments to rent or alternative housing, etc, because you need to operate under the assumption that you will be found out at some point so it's more of a matter of "When" and not "If".
Some people might decide that the safety risks of being outed is not worth the benefits of staying on T if they're in a situation where they would be abused or otherwise put in danger if outed. Having an escape plan is even more important in that situation, regardless of whether you stay on T.
Even if you come out that doesn't mean that you necessarily want facial hair, so shaving or even laser hair removal may be in your future, but I would definitely weigh the risks of being outed against the benefits you hope to get from being on T, then weigh those benefits against the changes that you aren't happy with.
You may decide that you'd like to work with your testosterone-prescriber to try something like switching to a lower dose of testosterone and taking a DHT blocker like finasteride to see if it can slow the changes you're getting so they happen less quickly.
Anyway, my recommendation is start with a trip to the pharmacy, buy some hair removal supplies (whether it's a depilation cream or a razor and shaving cream) and then go to YouTube to figure out how to use it!
If you really want to avoid stubble, a hair removal cream may be your best bet, but it isn't great for sensitive skin and the chemicals are a little scary sometimes.
Also always read the packaging for the manufacturer's instructions, especially for things like hair removal cream, because they can cause chemical burns if you leave them on your face for too long.
Just a refresher for followers who aren't sure about the visible/audible testosterone changes:
Your skin will get oilier and you’ll get more acne for a bit.
If you’re older, you might get male pattern baldness/scalp hair loss.
You’ll get facial hair growth, and more body hair.
You’ll also have increased muscle mass/strength, and it’ll be easier to build muscles.
Your body fat will redistribute to more masculine areas, so your facial shape might change a bit, and fat might collect at your stomach instead of hips for example.
Your period will stop, your clitoris will get a bit bigger, and your vaginal walls will get a bit thinner and things may be drier down there (Read more about that here-- there are treatment options if the internal vaginal changes are painful!)
Your libido will likely increase, but testosterone won’t change your sexual orientation.
Your breast tissue may shrink a bit and get softer but it usually doesn’t change by a full cup size.
Your voice will deepen, and you may or may not get a bit of an Adam’s apple.
Some people experience mood swings, as it is your second puberty. You may be likely to have mood swings if you’re taking T by injections that are 2 weeks apart or more, or your dose is too high.
You will also have changes in things like your cholesterol level and hematocrit, but those changes are something you should talk about with your doctor-- this list is just an overview of the changes that others might notice about you, not changes that require blood work to detect (even though those changes are also super important when it comes to your overall health and a big reason why it's necessary to have a medical professional oversee your care!)
Followers, any tips or resources on facial hair removal for anon?
95 notes
·
View notes
Text
✨How to Minimize the Appearance of Pores✨
Let’s bust a myth real quick: ❌ You can’t erase pores. ✅ But you can make them look smaller.
Here’s how 👇
🔍 Why Do Pores Look Big?
There are two big reasons:
1. Collagen loss Your pores start deep in your skin as a bowl shape, supported by collagen. When that collagen breaks down (from age, sun, stress, etc), the structure weakens — and the pore opening stretches out.
2. Buildup inside the pore Excess oil, dead skin, and grime get trapped inside the pore, stretching it from the inside out. The result? That “large pore” look we all hate.
🧴 Ingredients That Actually Help
Niacinamide – Boosts collagen, controls oil Vitamin C – Brightens + supports skin structure Retinol – Speeds up cell turnover + tightens pores Salicylic Acid – Deep cleans clogged pores Glycolic/Lactic Acid – Gently exfoliate surface gunk
✨ Microneedling can also boost collagen and firm up the skin
☀️ Don’t Skip Sunscreen
UV rays destroy collagen = bigger pores over time. SPF every. single. day.
🧼 Other Tips:
Remove makeup before bed (seriously!)
Avoid comedogenic ingredients
Be consistent — skin takes time!
💡 Healthy skin ≠ poreless skin Pores are normal, but clean + supported pores look so much better.
Reblog to save, and follow for more real skin science 💕
#skincare #pores #niacinamide #retinol #acidskincare #spftips #tumblraesthetic #skincaretips #skincarecommunity
youtube
4 notes
·
View notes
Note
Gregory
Can you give me tips about your makeup
Also
You’re better then that stinky poopy head Craig
Thank you so much! I know I am so much better than that supreme shitstain <3
If you're looking for makeup tips, you're asking the right person!
Start with a Clean Canvas:
Begin your makeup routine with a clean and moisturized face to ensure a smooth application.
Use Primer:
Apply a makeup primer to create a smooth base, minimize pores, and help your makeup last longer.
Choose the Right Foundation:
Select a foundation that matches your skin tone and undertone. Test it on your jawline for the most accurate match.
Blend, Blend, Blend:
Blend your foundation and other face products seamlessly into your skin for a natural finish. A makeup sponge or brush can be helpful for this.
Concealer Technique:
Apply concealer in a triangular shape under your eyes to brighten and conceal dark circles. Use a shade slightly lighter than your foundation.
Set with Powder:
Set your makeup with a translucent powder to control shine and increase the longevity of your look.
Contour and Highlight Strategically:
Contour areas like the hollows of your cheeks, jawline, and sides of your nose. Highlight the high points of your face, like cheekbones and the bridge of your nose.
Blush Placement:
Smile and apply blush to the apples of your cheeks for a youthful and lifted effect.
Eyebrows Frame the Face:
Fill in your eyebrows to frame your face. Use a pencil, powder, or gel, depending on your preference.
Eye Primer:
Apply an eye primer before eyeshadow to enhance color payoff and prevent creasing.
Transition Shade:
Start your eyeshadow look with a neutral transition shade to create depth and seamlessly blend other colors.
Define Your Eyes:
Use eyeliner to define your eyes. Experiment with different styles, like winged liner or tightlining, to achieve the desired effect.
Lash Curler Magic:
Curl your lashes before applying mascara to open up your eyes and create a wide-awake look.
Mascara Application:
Wiggle the mascara wand at the base of your lashes and then comb through to the tips for voluminous lashes.
Lips:
Exfoliate your lips for a smooth application of lipstick or gloss. Consider using a lip liner to define your lip shape.
Choose Lip Colors Wisely:
Select lip colors that complement your overall makeup look and outfit. Consider your skin tone and the occasion.
Setting Spray:
Set your makeup with a setting spray to lock in your look and keep it fresh throughout the day.
Clean Your Brushes:
Regularly clean your makeup brushes to prevent breakouts and ensure smooth makeup application.
Experiment and Have Fun:
Makeup is an art form, so don't be afraid to experiment with colors, techniques, and styles. Have fun expressing your creativity!
Natural Lighting:
When possible, apply your makeup in natural lighting to ensure that you get a true sense of colors.
Use these tips wisely, slay queen!! I just know you'll turn out BEAUTIFUL!! (Not that you weren't already ;) )
-Gregory_Cutie_Pie_3rd
#craig tucker#craigfluencer#hellpark#south park#south park edits#southpark#sp#underworld park gregory#gregory cutie pie vrs craig the real tucker#team gregory cutie pie 3rd
18 notes
·
View notes
Text
Epoxy Flooring: The Ultimate Guide for Durable & Stylish Floors
Epoxy flooring has become a top choice for residential, commercial, and industrial spaces due to its durability, versatility, and sleek finish. Whether you're renovating a garage, upgrading a showroom, or improving your warehouse, epoxy flooring offers a long-lasting and visually appealing solution.
In this comprehensive guide, we’ll explore what epoxy flooring is, its benefits, applications, types, installation process, and how to maintain it—plus tips for choosing the best epoxy flooring contractors near you.
What Is Epoxy Flooring?
Epoxy flooring is a surface coating made by mixing resin and hardener. This chemical reaction creates a rigid plastic material that is strong, resistant to wear and chemicals, and bonds extremely well to concrete surfaces. It’s commonly used as a protective and decorative floor finish.
Benefits of Epoxy Flooring
Epoxy floors offer numerous advantages over traditional flooring materials:
1. Exceptional Durability
Epoxy can withstand heavy loads, high traffic, and mechanical wear, making it ideal for industrial and commercial settings.
2. Chemical & Stain Resistance
Perfect for garages, kitchens, and workshops, epoxy resists oil, grease, acids, and other harsh chemicals.
3. Low Maintenance
With a smooth, non-porous surface, epoxy flooring is easy to clean—just sweep and mop as needed.
4. Aesthetic Appeal
Available in a variety of colors, patterns, and finishes (e.g., gloss, metallic, flake), epoxy adds a modern, polished look to any space.
5. Cost-Effective
When you factor in its lifespan, minimal maintenance, and protective benefits, epoxy flooring provides excellent value for money.
Common Applications
Epoxy flooring is used across a wide range of environments, including:
Residential garages and basements
Commercial kitchens and restaurants
Showrooms and retail spaces
Warehouses and factories
Medical and healthcare facilities
Schools and sports halls
Types of Epoxy Flooring
Choosing the right type of epoxy depends on your space and requirements:
1. Self-Leveling Epoxy
Creates a seamless, level surface—great for warehouses, garages, and kitchens.
2. Epoxy Flake Floors
Includes decorative flakes for texture and style; often used in garages, showrooms, and locker rooms.
3. Metallic Epoxy Floors
A high-end option featuring metallic pigments for a marbled, luxurious look.
4. Quartz-Filled Epoxy
Combines epoxy resin with quartz grains for enhanced slip resistance and durability.
5. Anti-Static Epoxy
Ideal for sensitive environments like electronic manufacturing facilities.
Epoxy Flooring Installation Process
While DIY kits are available, professional installation ensures durability and a flawless finish. The typical process includes:
Surface Preparation Grinding or shot-blasting the concrete to remove contaminants and open pores.
Crack Repair & Priming Filling cracks and applying a primer to ensure proper adhesion.
Epoxy Application Applying one or more layers of epoxy coating, depending on the desired finish.
Curing Time Allowing the floor to cure for 24–72 hours before use.
Epoxy Floor Maintenance Tips
To keep your epoxy floors looking like new:
Sweep and mop regularly
Clean up spills immediately
Use floor pads under heavy equipment
Avoid abrasive cleaners
How to Choose the Right Epoxy Flooring Contractor
To ensure long-lasting results, choose a contractor with:
Proven experience and portfolio
High-quality materials and equipment
Transparent pricing and warranties
Positive customer reviews
Epoxy Flooring: FAQs
How long does epoxy flooring last?
With proper care, epoxy flooring can last 10–20 years or more.
Is epoxy flooring slippery?
When dry, it’s not slippery. For added grip, choose flake or quartz finishes.
Can epoxy be applied over tiles or old concrete?
Yes, but surface prep is crucial. A professional will assess and prepare the surface accordingly.
Final Thoughts
Epoxy flooring offers a sleek, tough, and cost-efficient solution for both homes and businesses. Its blend of performance and aesthetics makes it a smart investment for anyone looking to upgrade their floors.
Ready to Transform Your Floors?
If you're looking for professional epoxy flooring services, contact a local expert today to request a free quote and site inspection.
0 notes
Text
Best Facial Treatment for Glowing Skin
Introduction Does your skin look dull and tired despite your best efforts? In a bustling city like Hyderabad, with its harsh sun, pollution, and fast-paced lifestyle, achieving glowing skin can feel impossible. But the good news is — the right facial treatment can transform your skin safely and effectively.
In this guide, you’ll learn:
What the best facial treatment for glowing skin is
Why it’s becoming so popular in India
Key benefits you can expect
Who it’s best suited for
Tips before you begin, and why choosing the right clinic matters
Whether you’re preparing for a wedding, a big event, or simply want to boost your confidence, keep reading to discover how you can achieve a healthy, radiant complexion.
What is the Best Facial Treatment for Glowing Skin? A facial treatment for glowing skin is a professional skin care procedure designed to deeply cleanse, exfoliate, hydrate, and rejuvenate your skin, leaving it fresh and luminous.
Unlike a regular salon facial, medical-grade facials performed at aesthetic clinics are tailored to your skin type and concerns, using advanced techniques and dermatologist-approved products.
For example:
If your skin is dry and flaky, a hydrating facial with hyaluronic acid can plump and smooth.
If your skin has pigmentation or dullness, a brightening facial with vitamin C or mild peels may be recommended.
If you have clogged pores or acne, a deep-cleansing facial can purify your skin gently.
At Le Sweden Clinic, our skin experts carefully assess your skin and recommend the ideal treatment plan that delivers visible, lasting results — without harsh chemicals or downtime.
Why It’s Gaining Popularity in India & Hyderabad Indian skin faces unique challenges:
Intense UV exposure leading to tanning and pigmentation
Air pollution causing premature aging and dullness
Stressful work-life routines that disrupt skin health
Cultural preference for glowing, healthy-looking skin at weddings and festivals
In cities like Hyderabad, where both professional and social appearances matter, more people are turning to professional facials that go beyond temporary results. They’re also becoming more popular because:
Non-invasive and safe for all skin types
Tailored to individual skin needs
Backed by advanced technology and trained professionals
In short — it’s not just a luxury anymore. It’s part of smart self-care.
Key Benefits You Should Know Here’s what the best facial treatment for glowing skin can do for you:
Instant Radiance: Removes surface impurities, leaving your skin brighter.
Deep Hydration: Nourishes skin at a deeper level, making it soft and supple.
Detoxification: Clears out clogged pores and reduces toxins from pollution.
Anti-Aging: Stimulates collagen production, reducing fine lines and sagging.
Event-Ready Skin: Perfect for brides-to-be or special occasions.
Boosts Confidence: When your skin glows, you feel better about yourself.
These benefits go beyond appearances — healthy skin also reflects your overall wellness.
What to Expect from the Treatment Here’s a step-by-step look at what typically happens during a professional facial session at a reputed clinic like Le Sweden:
Skin Analysis A skin specialist examines your skin type and discusses your concerns and goals.
Cleansing & Exfoliation Gentle yet thorough cleansing followed by exfoliation to remove dead skin cells.
Steam & Extraction (if required) Opens up pores and removes blackheads/whiteheads safely.
Targeted Treatment Depending on your skin needs — application of serums, masks, or mild peels.
Massage & Relaxation Stimulates circulation and relaxes facial muscles.
Moisturizer & Sunscreen Locks in hydration and protects your skin post-treatment.
The session usually takes 45–90 minutes. There’s minimal to no downtime, and you can return to work or daily activities right after.
For best results, a series of treatments may be recommended every 4–6 weeks, along with proper home care.
Who It’s Best For Wondering if this treatment is right for you? Here’s who can benefit the most:
Young Professionals looking to combat stress and pollution-related dullness
Brides-to-Be and Grooms who want flawless skin on their big day
Working Mothers who want quick yet effective skin rejuvenation
Men who want to maintain healthy, clear skin
Anyone Preparing for an Event such as parties, interviews, or photoshoots
Even if you’re simply looking to pamper yourself, a facial can be a great way to refresh your skin and mood.
Expert Tips Before You Begin Before you book your appointment, here are some expert-backed tips:
Know Your Skin Type: Discuss your skin concerns honestly with your aesthetician.
Don’t Overdo It: Once a month is usually enough — too many facials can irritate your skin.
Avoid Sun Exposure: Before and after your facial, minimize sun exposure and always wear sunscreen.
Skip Harsh Products: Don’t use strong exfoliants or retinol a day before and after your session.
Choose a Certified Clinic: Not all facials are equal. Look for qualified professionals and hygienic facilities.
Common Myths — Debunked “Facials are only for women.” — Not true. Men benefit just as much.
“They cause breakouts.” — If done correctly, facials cleanse your skin and reduce breakouts.
If you’re unsure where to start, book a consultation to get a personalized plan.
Why Le Sweden Clinic is Trusted in Hyderabad At Le Sweden Clinic, we’re committed to helping you achieve your best skin, safely and beautifully.
Here’s why thousands of clients in Hyderabad choose us:
Experienced Team: Certified dermatologists and skin therapists
Advanced Technology: We use only the latest, medically-approved equipment and products
Personalized Care: Every treatment is tailored to your unique skin needs
Safe and Hygienic: Clean, welcoming environment in the heart of Jubilee Hills
Proven Results: Clients often share how their confidence has grown along with their glow
Visit LeSweden.com to learn more or book your session today.
Final Thoughts Glowing skin isn’t just about looking good — it’s about feeling good. With the right facial treatment, you can nourish, repair, and protect your skin from the daily challenges of life in Hyderabad.
Take the first step toward healthier, more radiant skin. Book your free consultation at Le Sweden today. Visit our Jubilee Hills clinic or explore more treatments at LeSweden.com.
Your skin deserves expert care — and so do you.
0 notes
Text
Discover the Secret to Glowing Skin with photo Facial Treatment at Maya Aesthetica, Bhopal
In an age where our appearance is intricately linked to our confidence and self-expression, maintaining healthy, glowing skin has become more important than ever. However, factors like sun exposure, stress, pollution, and aging can leave our skin dull, pigmented, and prone to premature wrinkles. Fortunately, Maya Aesthetica – The Skin Care & Beauty Clinic, located in the heart of Bhopal, offers the revolutionary Photo Facial Treatment to help you reclaim your skin’s natural radiance.

💡 What is a Photo Facial?
A Photo Facial (also known as IPL – Intense Pulsed Light Therapy) is a non-invasive cosmetic procedure that uses light-based technology to penetrate deep into the skin layers. This light stimulates collagen production and targets unwanted pigmentations and damaged skin cells, helping rejuvenate the skin from within.
Unlike conventional facials that work on the surface, Photo Facials are designed to treat underlying skin issues like:
Sun damage
Hyperpigmentation
Age spots
Redness (rosacea)
Acne scars
Fine lines and wrinkles
This therapy is ideal for people seeking clearer, smoother, and more youthful-looking skin without downtime or surgery.
✨ Key Benefits of Photo Facial at Maya Aesthetica
At Maya Aesthetica, the Photo Facial Treatment is administered using cutting-edge equipment by trained skin care professionals. Here's how it can transform your skin:
✅ 1. Reduces Freckles, Blemishes & Pigmentation
Uneven skin tone caused by sun exposure or hormonal changes is effectively reduced. The light targets melanin clusters to break down pigmentation safely and evenly.
✅ 2. Lightens Fine Lines & Wrinkles
By stimulating collagen and elastin production, this treatment improves skin elasticity, reducing the appearance of wrinkles and giving the face a firmer, lifted look.
✅ 3. Tightens Open Pores
The treatment minimizes enlarged pores by promoting collagen synthesis, giving you smoother, refined skin.
✅ 4. Removes UV Damage & Sun Tan
Photo Facial therapy helps repair the skin’s cellular structure damaged by harmful UV rays. It is an ideal solution for those with sun-tanned or photoaged skin.
✅ 5. Enhances Skin Glow & Freshness
With regular sessions, skin appears fresher, brighter, and more youthful. The improved circulation and collagen boost leave a noticeable glow.
🧖♀️ Why Choose Maya Aesthetica?
Maya Aesthetica is a trusted name in skin and beauty care in Bhopal, known for providing state-of-the-art treatments with exceptional care and results. Here’s what sets them apart:
🌿 Scientific & Personalized Approach: Treatments are customized according to your skin type, concern, and goals.
🧑⚕️ Experienced Professionals: The clinic is run by certified and trained aestheticians who understand the science of skincare.
💎 Advanced Equipment: They use industry-leading IPL devices and modern techniques for safe and effective results.
🧼 Hygiene and Comfort: A clean, calming, and luxurious setting ensures your safety and relaxation during every session.
Whether you’re preparing for an event, dealing with stubborn pigmentation, or simply want to rejuvenate your skin, Maya Aesthetica has you covered.
📍 Location and Contact Details
Clinic Name: Maya Aesthetica – The Skin Care & Beauty Clinic Address: 📍 4/5, 2nd Floor, Aamer Complex, M.P. Nagar, Zone-II, Bhopal, Madhya Pradesh
📞 Contact Numbers for Appointment:
+91 99931 96039
+91 93011 52008
0755-4902226
📲 Connect With Us Online
Stay updated with skincare tips, before-after transformations, and seasonal offers:
Facebook: https: //www.facebook.com/mayaestheticabpl/
Instagram: https: //www.instagram.com/mayaaesthetica.bhopal/
Twitter: https: //x.com/mayaesthetica
YouTube: https://www.youtube.com/@MayaAesthetica
🗓️ Book Your Radiant Photo Facial Today!
Why wait to feel confident in your skin? Rejuvenate your face, reverse years of skin damage, and rediscover your glow with a Photo Facial at Maya Aesthetica.
✨ Get Radiant. Get Confident. Get Photo Facial! Call now or visit the clinic to schedule your session. Your glowing skin awaits.
0 notes
Text
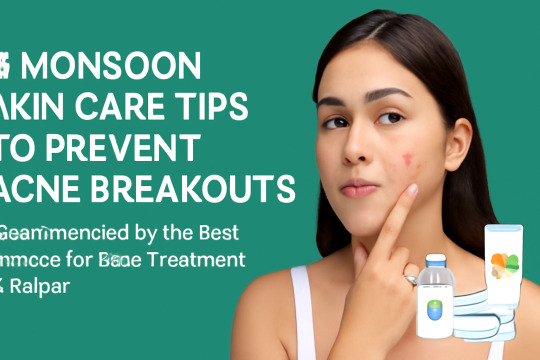
6 Monsoon Skin Care Tips to Prevent Acne Breakouts, Recommended by the Best Doctors for Acne Treatment In Raipur
The monsoon season, with its cool weather and soothing rains, might look like a relief for your skin. But for acne-prone individuals, it can be a test of patience. The higher humidity, wetness, and shift in environmental conditions might make your skin respond in curious ways. The mixing of sweat, oil, and bacteria may clog your pores, resulting in acne outbursts.
To keep you with clear and healthy skin this monsoon, we've outlined six must-do tips for skincare as advised by the Best Doctors for Acne Treatment In Raipur. These professional tips will not only prevent breaking out but also keep your skin fresh, clean, and radiant throughout the rainy weather.
1. Regular Cleansing is a Must
Amongst the most important steps of any skincare regime, particularly during the monsoon, is cleansing. The air's humidity enhances the secretion of sebum (skin oils) and sweat. When this excess moisture mixes with dust and pollutants, your pores become clogged, and your skin becomes more prone to acne.
Professional Advice from the Best Specialists of Acne Treatment In Raipur
Wash your skin twice daily — morning and evening — using a gentle, non-comedogenic cleanser to remove excess oils, dirt, and bacteria. Steer clear of abrasive cleansers which dry out the skin from its natural oils since this may cause irritation and more breakouts.
Why It's Important:
Cleansing clears out impurities and excess oil, leaving the pores open and minimizing the chances of acne breakouts. With monsoon, your skin would be more prone to clogged pores, so cleansing your skin regularly becomes essential.
2. Moisturize Your Skin, But Gently
Even though the monsoon is humid by nature, the skin is still not getting enough moisture to remain in equilibrium. But most people commit the mistake of not using moisturizers believing that the air is humid enough. But not using moisturizer makes your skin over-secret the oils, resulting in clogged pores and acne.
Professional Tip from the Best Doctors for Acne Treatment In Raipur
Apply an oil-free, water-based moisturizer that won't clog your pores. Gel moisturizers are perfect during the monsoon months because they moisturize the skin without leaving it oily. A moisturizer with added ingredients such as hyaluronic acid can retain moisture yet keep the skin matte.
Why It's Important:
Even in the monsoon, your skin requires moisturizing. Selecting an appropriate moisturizer balances oil production and prevents your skin from getting parched, which may result in irritation and more acne.
3. Exfoliate Using a Gentle Exfoliator to Get Rid of Dead Skin Cells
Exfoliation of the skin on a regular basis is essential to shed dead skin cells and ensure they don't clog your pores. During the monsoon season, the higher humidity tends to make dead skin cells accumulate more rapidly, which clogs pores and brings on acne.
Top Doctor's Expert Tip for Acne Treatment In Raipur
Exfoliate weekly or biweekly with a mild exfoliator that is safe for acne skin. Steer clear of rough scrubs, which can irritate the skin and exacerbate acne. Salicylic acid or alpha-hydroxy acids (AHAs) chemical exfoliants are favored by most Skin Specialist In Raipur because of their anti-acne properties.
Why It's Important:
Exfoliating makes your skin smooth, gets rid of dead skin cells, and avoids blockage of pores. This process is particularly important in the monsoon season, when wet weather can lead to skin build-up.
4. Never Skip Sunscreen – Yes, Even in the Monsoon
Even if the sun may not be as strong during monsoon, UV radiation has the capability to travel through clouds and harm your skin. Long-term exposure to sunlight is going to lead to dark spots, pigmentation, and further-acne scar worsening. Hence, sunscreen is still necessary even on rainy days.
Doctor's Tip of the Best Acne Specialists In Raipur
Choose a non-comedogenic sunscreen with an SPF of 30 or more. Mineral sunscreens with zinc oxide or titanium dioxide are often a better choice for acne skin or sensitive skin. Put sunscreen on 15 minutes before going outside, even on cloudy or rainy days.
Why It's Important:
Sunscreen protects your skin from damaging UV rays, so you prevent additional damage and scarring of the skin. The rainy season does not immunize you against UV damage, so sun protection is a year-round essential step in your routine skin care.
5. Be Well Hydrated and Follow a Balanced Diet
During monsoon, internal health is usually not given importance by the people, assuming that skin issues are all superficial. Your diet and water intake, however, contribute a lot towards maintaining healthy skin. Your skin may become dry and make your skin over-produce oil, which clogs pores and aggravates acne.
Tip from the Best Dermatologists for Acne Treatment In Raipur
Drink plenty of water throughout the day to keep your skin hydrated. Include water-rich fruits and vegetables in your diet, such as cucumbers, oranges, and berries. Avoid consuming oily and spicy foods, as these can trigger acne flare-ups.
Why It’s Important:
Good hydration supports the skin’s natural barrier, preventing it from becoming dry and irritated. A healthy diet helps to balance your hormones and reduce acne-causing inflammation.
6. Maintain a Clean Environment
Cleaning your surroundings is usually neglected in a skin care regimen, but it plays a very important role, particularly during monsoon. Moisture and humidity create an environment where bacteria grow on surfaces, which can readily be transferred to your skin. Towels, pillow cases, and even make-up brushes can harbor bacteria and oil that can lead to acne outbursts.
Professional Tip from the Best Doctors for Acne Treatment In Raipur:
Replace your pillowcases every two to three days, and wash your face towels and makeup brushes frequently. It is also advisable to avoid touching your face with dirty hands or applying unclean items on your face.
Why It's Important:
Keeping your environment clean ensures that your skin isn’t exposed to bacteria and oils that can clog pores. Cleanliness is essential to prevent acne during the monsoon season when bacteria growth is more likely.

Conclusion
Keeping a good skin care routine while it is monsoon season is the best way to avoid acne breakouts and keep your skin healthy. Following these six professional tips can help you prevent common errors and keep your skin clear even on the most humid days of the year. From routine cleansing and moisturizing to safeguarding your skin from harmful UV radiation, these easy steps can make a big difference in your skin's health.
But if you continue to battle acne breakouts even after adopting a routine, perhaps it is time to take the advice of a Skin Specialist In Raipur or a Top Skin Specialist Near Shanker Nagar. Expert advice and customized treatments can treat underlying problems and give you the clear, radiant skin that you deserve.
Remember, SRA is the Best Doctors for Acne Treatment In Raipur, providing world-class acne treatments and professional care to assist you in realizing your skincare objectives. With their help, you can guarantee that your skin will be healthy and acne-free throughout the year.
#best skin care products#best skin specialist#dental treatment#best dental clinic near me#skin treatment#skin specialist#bestdoctorsforacnetreatmentinraipur#skincare#hydrafacialtreatmentinraipur#cosmetologistinraipur
0 notes
Text
Ditch the Chemicals: Natural Open Pores
Is your skin crying out for help? Are those pesky open pores making you lose confidence in your selfies? Before you reach for the latest chemical-laden concoctions, take a deep breath and consider the power of nature’s bounty. Ayurveda, the ancient Indian system of medicine, offers a treasure trove of natural solutions for open pores, leaving your skin feeling balanced, healthy, and beautifully…

View On WordPress
#Beauty#enlarged pores treatment#health tips#healthmonastery#large pores treatment#open pore treatment#pore minimizer
1 note
·
View note
Text
Patchouli Body Butter: Nature’s Gift for Glowing, Nourished Skin
If you're searching for a luxurious, natural way to pamper your skin, Patchouli Body Butter might just become your new skincare favorite. Rich in moisture, packed with healing properties, and infused with a scent that’s as grounding as it is exotic, this body butter is more than just a moisturizer—it’s a holistic experience.

In this post, we’ll explore what makes patchouli body butter so special, its benefits, and how to use it for the best results.
🌸 What Is Patchouli Body Butter?
Patchouli Body Butter is a creamy blend of natural butters (like shea, cocoa, or mango) and patchouli essential oil, often combined with nourishing carrier oils such as coconut, jojoba, or almond oil. The result is a deeply moisturizing, aromatic skincare product designed to hydrate, protect, and rejuvenate your skin.
Patchouli itself is a tropical plant with a deep, musky aroma. It’s been used for centuries in traditional medicine, perfumery, and spiritual practices. When infused into body butter, patchouli’s soothing and aromatic properties are combined with the deep hydration of natural oils—giving you the best of both worlds.
💧 Benefits of Patchouli Body Butter
1. Deep Moisturization
Thanks to its rich natural butters, patchouli body butter provides long-lasting hydration. It's perfect for dry, cracked, or rough skin—especially during winter or in dry climates.
2. Anti-Aging & Skin Rejuvenation
Patchouli oil is known for stimulating cell regeneration and reducing the appearance of fine lines and wrinkles. Combined with antioxidant-rich butters, this body butter helps keep your skin soft, plump, and youthful.
3. Healing and Anti-Inflammatory
Have irritated or sensitive skin? Patchouli has natural anti-inflammatory and antibacterial properties that can help calm skin conditions like eczema, psoriasis, or minor cuts and blemishes.
4. Naturally Aromatic
Forget artificial fragrances—patchouli offers a natural, earthy, slightly sweet scent that lingers beautifully on your skin. It's often used in aromatherapy to reduce stress, anxiety, and even promote better sleep.
5. Eco-Friendly Skincare
When made with organic, cruelty-free ingredients, patchouli body butter is a clean beauty option that’s gentle on your skin and kind to the planet.
✨ How to Use Patchouli Body Butter
Using patchouli body butter is simple, but a few tips can help you get the most out of it:
🛁 Apply after a warm shower or bath, when your pores are open and your skin is slightly damp.
💆♀️ Take a small amount and massage into the skin using circular motions until absorbed.
🧴 Focus on dry areas like elbows, knees, and feet, but it’s gentle enough for daily full-body use.
🕯️ Bonus: Use it before bed as part of a nighttime relaxation ritual—the aroma is deeply calming.
⚠️ A Few Notes Before You Buy
Do a patch test if you're trying patchouli for the first time—especially if you have sensitive skin or allergies.
Choose products labeled 100% natural or organic, and avoid those with synthetic fragrances or parabens.
Not everyone loves the scent of patchouli—it’s earthy and strong. If you’re unsure, try a small sample before committing to a full-size jar.
🛍 Where to Buy
You can find patchouli body butter at:
Natural beauty stores
Online retailers like Etsy, Amazon, or independent skincare brands
DIY recipes if you enjoy making your own skincare products at home!
Look for versions with minimal ingredients, high-quality essential oils, and ethical sourcing.
🌿 Final Thoughts
Patchouli Body Butter is more than just a moisturizer—it’s a nourishing treat for your body and your senses. Whether you’re drawn to its skincare benefits or its rich, grounding aroma, it’s a great addition to any natural beauty routine.
If you're ready to embrace the magic of nature on your skin, give patchouli body butter a try. Your skin—and your soul—just might thank you.
0 notes
Text
12 Monsoon Skin Care Tips for Glowing Skin All Season Long
Monsoon season can be harsh on your skin. The excess humidity, sweat, and pollutants can trigger acne, dullness, and clogged pores. But a few smart skincare steps can help you maintain healthy, glowing skin—naturally. Here are 12 effective tips and True Derma product recommendations that actually work.
1. Cleanse Gently but Thoroughly
Monsoon sweat and humidity attract dust, which clogs pores and causes breakouts. Cleanse your face twice a day to remove dirt and oil. Avoid harsh soaps that strip away moisture.
Use: 👉 True Skin Clarifying Face Wash – A gentle formula that deep cleanses without drying, perfect for daily use during humid days.
2. Exfoliate 2–3 Times a Week
Exfoliation helps get rid of dead skin cells, clears pores, and removes surface grime that builds up from sweat and pollution. But don't overdo it—2–3 times a week is enough.
Use: 👉 True Skin Tan Remover Scrub – Gently buffs away tan and dullness, revealing fresh, glowing skin underneath.
3. Keep Your Skin Hydrated
Even if your skin feels oily in monsoon, dehydration is common underneath. A lightweight moisturizer keeps your skin balanced and prevents oil glands from overproducing sebum.
Use: 👉 True Skin Hydra Glow Gel – Non-sticky, fast-absorbing gel that hydrates without making your skin greasy.
4. Never Skip Sunscreen
Cloudy skies still let UV rays through, which can damage your skin and cause pigmentation. Always apply sunscreen before stepping out—even on rainy days.
Use: 👉 True Skin Instant BB Cream SPF 30 – Combines SPF protection and light coverage for a natural glow.
5. Use a Vitamin C Serum
Vitamin C helps even skin tone and fights damage caused by pollution and UV rays. It also brightens dull skin and reduces the appearance of dark spots.
Use: 👉 True Skin Vita C Serum – Enriched with antioxidants to boost radiance and fade spots naturally.
6. Let Your Skin Breathe
Avoid heavy foundations and thick creams during monsoon. Stick to breathable skincare and minimal makeup to prevent blocked pores and sweat buildup.
Tip: Use a BB cream or just a light serum and sunscreen during the day to keep your skin light and fresh.
7. Use a Skin Balancing Toner
A toner helps balance skin pH, tighten pores, and remove any leftover oil or makeup. It preps the skin to absorb your next steps better.
Use: 👉 True Skin Pore Perfect Toner – A refreshing toner that calms the skin and reduces the look of open pores.
8. Wash Your Face After Getting Wet in Rain
Rainwater often contains pollutants that can irritate your skin. If you get wet, make sure to cleanse your face and reapply moisturizer to avoid rashes or breakouts.
Tip: Carry a small face mist or travel-sized cleanser when you're out in unpredictable weather.
9. Don’t Forget Night Care
Your skin heals while you sleep. Use a nourishing night cream to repair skin damage caused during the day and wake up with fresh, glowing skin.
Use: 👉 True Skin Revitalizing Night Cream – Deeply hydrates and restores your skin overnight.
10. Avoid Touching Your Face Often
Humidity already makes your skin more sensitive. Touching your face frequently transfers bacteria and dirt from your hands, increasing the chance of acne or irritation.
Tip: Keep your hands clean and use tissues or a clean towel if you need to wipe sweat.
11. Eat Light and Stay Hydrated
A balanced diet rich in fruits, vegetables, and water improves skin texture and glow. Cut down on fried and spicy food during monsoon, which can increase skin inflammation and oiliness.
Tip: Include hydrating foods like cucumber, watermelon, and coconut water in your daily routine.
12. Stick to Natural, Non-Comedogenic Products
Your skin needs gentle care during monsoon. Always choose products that are free from harsh chemicals, fragrance, and comedogenic ingredients that can clog your pores.
Explore: 👉 The full True Derma Skin Care Collection – Clean, natural, and effective skincare for glowing skin in any weather.
Final Thought: With these 12 easy tips and the right products, monsoon skin problems won’t stand a chance. Stay consistent, be gentle, and let your natural glow shine through this rainy season!
0 notes
Text
🛏️ Pillow Perfection: How to Choose the Right Pillow for the Best Night’s Sleep
Introduction A good pillow isn’t a luxury—it’s a necessity for healthy sleep. The right pillow supports your spine, relieves pressure, and helps you wake up pain-free and refreshed. Yet, many people underestimate its importance and continue sleeping on pillows that are either too flat, too firm, or simply worn out.
In this comprehensive pillow guide, you'll learn how to pick the perfect pillow for your sleep position, body type, and personal preferences. Whether you're a side sleeper, back sleeper, or stomach snoozer—there’s a pillow for you.

🧠 Why Pillows Matter for Your Health
A good pillow plays a major role in sleep quality. Here’s how:
Spinal Alignment: Keeps your neck and spine in a neutral position.
Muscle Recovery: Reduces tension in neck and shoulder muscles.
Breathing Support: Helps reduce snoring and sleep apnea symptoms.
Skin Health: A clean, supportive pillow minimizes acne and wrinkles.
🛑 Poor pillow choice can lead to:
Morning stiffness
Neck and shoulder pain
Interrupted sleep
Headaches and fatigue
💤 Types of Pillows: What Are Your Options?
Pillow TypeDescriptionBest ForMemory FoamContours to your head and neck shapeSide/back sleepers needing supportLatexResponsive, breathable, hypoallergenicHot sleepers, eco-conscious usersFeather/DownSoft, plush, natural fillStomach/back sleepersPolyester (Fiberfill)Affordable, lightweightOccasional use, budget buyersBuckwheatFilled with hulls for firm supportHot sleepers, eco enthusiastsCooling GelInfused with gel for heat dissipationHot climates or night sweatsAdjustable PillowsRemovable fill to customize heightCombo sleepers and picky sleepers
😴 Choosing a Pillow by Sleep Position
1. Side Sleepers
Best Pillow: Firm & thick
Why: Keeps neck aligned and shoulders relieved
Top Picks: Memory foam contour pillows or adjustable loft pillows
2. Back Sleepers
Best Pillow: Medium firmness, thin to medium loft
Why: Maintains natural curve in neck without tilting head forward
Top Picks: Cervical pillows or latex pillows
3. Stomach Sleepers
Best Pillow: Soft & low loft
Why: Prevents neck strain from excessive head lift
Top Picks: Down, feather, or flat memory foam pillows
🌿 Specialty Pillows You Might Love
Cervical Orthopedic Pillow – Designed for neck pain and spinal alignment
Pregnancy Pillow – Supports belly, back, and legs during pregnancy
Anti-Snore Pillow – Designed to open airways and reduce snoring
Wedge Pillow – Ideal for acid reflux, post-surgery support, or reading in bed
Body Pillow – Full-body support for side sleepers or pregnant users
🧼 Pillow Maintenance Tips
A good pillow can last 1–3 years with proper care. Here’s how to maintain it:
Use a pillow protector to guard against dust mites and spills
Wash pillowcases weekly (use hypoallergenic materials if needed)
Fluff daily to redistribute fill and maintain shape
Check for clumping in fiber or down pillows every few months
Replace when:
It feels lumpy
It doesn’t bounce back when folded
You wake up with new aches or sneezing fits
⏰ When to Replace Your Pillow
Memory Foam: Every 18–36 months
Feather/Down: Every 18–24 months
Latex: Every 3–4 years
Polyester: Every 6–12 months
💡 Tip: Hold your pillow at both ends and fold it. If it stays folded, it's time for a replacement.
🔍 Pillow FAQs
Q: Can the wrong pillow cause neck pain? A: Yes. A pillow that’s too high or low can push your neck out of alignment, leading to strain.
Q: Is memory foam safe? A: Most high-quality memory foam pillows are CertiPUR-US certified, meaning they’re made without harmful chemicals.
Q: Can pillows cause acne? A: Dirty or oily pillowcases can clog pores. Wash your pillowcases at least once a week.
Q: Are expensive pillows worth it? A: Higher-end pillows often last longer, offer better support, and are made from healthier, safer materials.
🛍️ Recommended Pillows for 2025
BrandTypeBest ForPrice RangeCoop Home Goods OriginalAdjustable memory foamCombo sleepers$60–$80Tempur-Pedic TEMPUR-CloudSoft memory foamSide/back sleepers$79–$119Beckham Hotel CollectionDown alternativeBudget buyers$40–$60Saatva Latex PillowNatural latex + down alternativeHot sleepers$135–$155Sleep Number ComfortFitAdjustable + shredded memory foamPremium luxury$99–$159
🎯 Final Thoughts: Your Pillow, Your Sleep Partner
Your pillow plays a key role in your nightly recovery. Choosing one that suits your sleep position, comfort preference, and body type is the simplest way to improve sleep quality. Don't underestimate the power of a supportive, breathable, and well-designed pillow—it could be the difference between tossing and turning or sleeping like a dream.
0 notes
Text
Why You Deserve a Jacuzzi Bath in Style Self-Care & Fashion Tips
🛁 Benefits of a Jacuzzi Bath for Self-Care
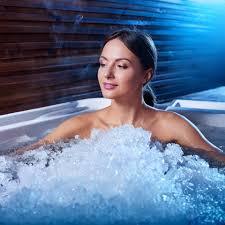
Ultimate Relaxation: The warm, bubbling water soothes tired muscles and calms the mind.
Stress Relief: Hydrotherapy helps reduce cortisol levels, easing anxiety and promoting mental wellness.
Improved Circulation: The jets stimulate blood flow, helping with detoxification and muscle recovery.
Better Sleep: A Jacuzzi bath before bedtime can improve sleep quality by relaxing the body.
Skin Health: Warm water opens pores, helping to cleanse and hydrate the skin deeply.
👗 Styling Your Jacuzzi Bath Experience
Luxurious Bathrobes: Choose soft, plush robes in calming colors like pastel blue, lavender, or cream.
Cozy Towels: Invest in thick, absorbent towels to wrap yourself in post-bath comfort.
Chic Slippers: Slip into elegant, comfortable slippers to maintain the spa vibe.
Mood Lighting: Use scented candles or LED lights to create a calming atmosphere.
Soothing Music: Curate a playlist of your favorite relaxing tunes to enhance the experience.
💧 Fashion Tips for a Stylish Bath Time
Silk or Satin Sleepwear: Opt for breathable, soft fabrics that feel gentle on your skin.
Minimal Makeup: Keep your skin natural and fresh during your bath routine.
Hydrating Masks: Apply a face mask while soaking to nourish and pamper your skin.
Hair Care: Use a nourishing hair mask or oil treatment to rejuvenate your hair during bath time.
Accessorize Lightly: A simple headband or hair clip keeps hair away while adding a touch of style.
🌿 Enhancing Your Self-Care Routine
Aromatherapy: Add essential oils like lavender, eucalyptus, or chamomile to your bath for calming effects.
Bath Salts & Bombs: Use mineral-rich salts or fragrant bath bombs to detoxify and uplift your mood.
Hydration: Keep a bottle of infused water nearby to stay hydrated throughout your bath.
Journaling: Post-bath, jot down your thoughts or gratitude to boost mental clarity.
Skincare Ritual: Follow up with moisturizer or body oil to lock in hydration and softness.
🌟 Why You Truly Deserve This
Taking time for yourself boosts overall well-being and self-confidence.
Stylish self-care practices make relaxation feel indulgent and motivating.
Prioritizing your mental and physical health leads to a happier, more balanced life.
Embracing luxury at home, like a Jacuzzi bath, redefines everyday self-care.
💡 Final Tips for a Perfect Jacuzzi Bath Experience
Schedule regular Jacuzzi sessions to maintain a consistent self-care habit.
Keep your bath essentials organized and accessible for a hassle-free routine.
Experiment with different bath scents and music to find your favorite combo.
Share the experience with loved ones occasionally for bonding and relaxation.
Enjoying a Jacuzzi bath in style isn’t just about luxury—it’s about honoring your body and mind. Combine fashion-forward self-care tips with the healing power of hydrotherapy to feel rejuvenated and radiant every day.
If you want more information, you can check our full blog
0 notes
Text
Pimple Removal Treatment In Vizag | Swarna Cosmo Care
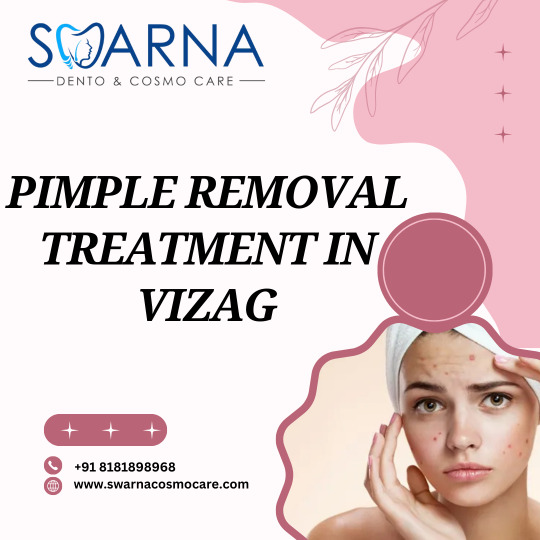
Pimples are more than just a skin issue—they can affect your confidence, mood, and how you present yourself to the world. If you're living in Vizag and struggling with stubborn acne or recurring breakouts, it’s time to explore the most advanced and effective pimple removal treatment in Vizag. At Swarna Cosmo Care, we specialize in personalized skincare solutions that not only treat pimples but also rejuvenate your skin and restore your natural glow.
Understanding Pimples: Causes and Types
Before diving into treatments, it's important to understand why pimples form in the first place. Pimples develop when hair follicles become clogged with oil and dead skin cells. Factors like hormonal changes, stress, poor diet, pollution, and improper skincare can all contribute.
There are several types of pimples:
Whiteheads: Closed clogged pores
Blackheads: Open clogged pores
Papules: Small red, tender bumps
Pustules: Pimples with pus at the tips
Nodules and Cysts: Deep, painful lumps beneath the skin
The severity and type of acne determine the most suitable treatment method. That’s why Swarna Cosmo Care offers comprehensive consultations before recommending a specific pimple removal treatment in Vizag.
Why Choose Pimple Removal Treatment Instead of Over-the-Counter Products?
While it’s tempting to rely on drugstore solutions or DIY remedies, they often fail to address the root cause of the issue. Over-the-counter products can sometimes aggravate your skin, leading to more breakouts, redness, or scarring.
At Swarna Cosmo Care, we offer medically-approved, dermatologist-tested treatments tailored to your skin type and the type of acne you're dealing with. Our expert dermatologists and cosmetologists utilize cutting-edge technology and evidence-based procedures for long-lasting results.
Advanced Pimple Removal Treatments Available at Swarna Cosmo Care
We provide a wide range of pimple removal treatment in Vizag options to suit various skin types and concerns:
1. Chemical Peels
Chemical peels use controlled acids to exfoliate the top layer of the skin, helping unclog pores and reduce inflammation. This treatment is excellent for blackheads, whiteheads, and mild acne.
Benefits:
Removes dead skin cells
Unclogs pores
Stimulates new cell growth
Reduces pigmentation and acne scars
2. Laser Therapy
Laser therapy targets bacteria and reduces sebum production. It's a non-invasive method that treats both the pimples and the scars they leave behind.
Benefits:
Kills acne-causing bacteria
Improves skin tone and texture
Minimally invasive with no downtime
Ideal for moderate to severe acne
3. Microneedling
Microneedling, also known as collagen induction therapy, uses fine needles to create micro-injuries in the skin, stimulating collagen production and healing acne scars.
Benefits:
Reduces acne scars
Evens out skin tone
Promotes skin renewal
Minimal recovery time
4. HydraFacial Acne Treatment
This advanced multi-step facial deeply cleanses, exfoliates, and hydrates the skin while extracting impurities.
Benefits:
Deep pore cleansing
Hydrates and nourishes
Suitable for sensitive skin
Safe and effective for regular use
At Swarna Cosmo Care, we combine these techniques with personalized skincare regimens and medical-grade products for optimal results.
The Swarna Cosmo Care Advantage
When you opt for a pimple removal treatment in Vizag at Swarna Cosmo Care, you’re choosing more than just a treatment—you’re investing in a healthier, more radiant version of yourself.
Here's what sets us apart:
Expert Dermatologists and Cosmetologists: Our team comprises skilled professionals with years of experience in cosmetic dermatology.
State-of-the-Art Facilities: We use the latest technology and equipment to ensure safe, effective, and comfortable treatments.
Customized Treatment Plans: Every individual’s skin is unique. We provide tailor-made solutions to suit your specific skin needs.
Post-Treatment Care: We offer comprehensive post-care guidelines to help maintain results and prevent future breakouts.
Affordable Packages: Our services are priced reasonably, and we offer value-packed treatment plans to make glowing skin accessible for everyone.
Frequently Asked Questions (FAQs)
1. Is pimple removal treatment painful?
Most treatments involve minimal discomfort. Our team ensures all procedures are done with utmost care and precision, often using numbing agents when necessary.
2. How many sessions are required?
This depends on the severity of the acne and the chosen treatment. On average, clients see noticeable results within 4 to 6 sessions.
3. Are there any side effects?
Side effects are generally mild and temporary, such as slight redness or sensitivity. Our post-care guidance ensures swift recovery.
4. Can teenagers undergo these treatments?
Absolutely. We offer safe and effective solutions tailored for teenage skin, which is often prone to hormonal acne.
5. Will the pimples come back after treatment?
While no treatment can guarantee permanent results, regular maintenance sessions and following a good skincare routine greatly reduce the chances of recurrence.
Maintaining Clear Skin After Treatment
Getting a pimple removal treatment in Vizag is just the beginning. Long-term results depend on a consistent skincare routine and a healthy lifestyle.
Tips for Maintaining Acne-Free Skin:
Cleanse twice daily using a mild cleanser
Avoid touching your face frequently
Follow a healthy diet rich in fruits, vegetables, and water
Use non-comedogenic makeup products
Protect your skin from the sun with sunscreen
Manage stress through activities like yoga or meditation
Our dermatologists at Swarna Cosmo Care also guide you through selecting the right skincare products for your unique skin type.
Why Vizag Residents Trust Swarna Cosmo Care
Vizag is quickly becoming a hub for wellness and aesthetic services, and Swarna Cosmo Care stands out as a leading provider of skincare solutions. Our mission is to offer high-quality, result-oriented treatments in a friendly, comfortable environment. Whether you’re battling mild breakouts or severe cystic acne, we have the right pimple removal treatment in Vizag to bring your skin back to life.
We believe beauty comes from healthy skin, and our passion lies in helping you achieve it.
Book Your Free Consultation Today!
Don’t let pimples dictate your self-esteem. If you're searching for an effective pimple removal treatment in Vizag, look no further than Swarna Cosmo Care. With our cutting-edge technology, experienced professionals, and customized treatment plans, you're just one step away from flawless, radiant skin.
Visit us at Swarna Cosmo Care in Vizag or call us to schedule your consultation today. Your journey to clearer, healthier skin starts here!
Contact Details:
CONTACT US;
8181898968
EMAIL ID;
ADDRESS;
5th Floor, Bharath Towers, 5th Line, Dwaraka Nagar, Visakhapatnam, Andhra Pradesh, 530016
#swarna cosmo care#dark circle treatment#best skin care treatment#permanent lip colour correction#microblading treatment in vizag#skin care in vizag#pimple treatment in vizag#dark circle treatment in vizag#swarna cosmo
0 notes
Text
Painting Garage Floor to Resist Oil Stains and Tire Marks
The garage is one of the most functional yet often overlooked areas in a home. Whether it’s used for parking, storage, or DIY projects, it takes a daily beating—especially the floor. Between oil drips, hot tire pickup, and ground-in dirt, unsealed concrete can become stained, dusty, and damaged over time. That’s why painting your garage floor isn’t just a cosmetic upgrade—it’s a smart move to protect and preserve.
In this article, we’ll explore why painting your garage floor is an excellent way to resist oil stains and tire marks, how to do it correctly, and what types of coatings offer the most durable results.
Why Paint Your Garage Floor?
Bare concrete is porous, which means it easily absorbs liquids like oil, antifreeze, and brake fluid. Over time, these spills seep in, leaving behind unsightly stains and unpleasant odors. In addition, hot tires can cause a condition known as “hot tire pickup,” where melted rubber adheres to the floor and lifts the surface coating.
Painting your garage floor creates a protective barrier that:
Resists oil and chemical penetration
Reduces dusting and surface erosion
Minimizes tire marks and abrasion
Improves lighting with a reflective finish
Enhances overall appearance and property value
According to a 2024 home improvement survey, painted garage floors increase resale appeal by 5–10%, especially among buyers looking for functional and clean garage spaces.
Choosing the Right Floor Paint or Coating
Not all floor paints are created equal. Choosing the right product for your needs is essential for long-term durability and stain resistance.
1. Epoxy Paint
Epoxy is a two-part coating made from resin and hardener. It chemically bonds to concrete, offering excellent resistance to oil, chemicals, and abrasion.
Pros:
Durable and long-lasting (up to 10 years)
Resistant to stains and tire marks
Glossy, showroom-like finish
Cons:
Requires extensive surface preparation
More expensive than standard paints
Needs proper ventilation during application
2. Polyurethane Coatings
Often used as a topcoat over epoxy, polyurethane offers UV protection and added flexibility. It's ideal for garages with exposure to sunlight and heavy wear.
3. Concrete Floor Paint
Acrylic or latex-based paints are cheaper and easier to apply but generally don’t hold up as well under heavy vehicle traffic or chemical exposure.
Pro Tip: If your main goal is resisting oil stains and tire marks, epoxy is the industry gold standard for garage floor protection.
Steps for Painting a Garage Floor to Resist Stains and Tire Marks
Step 1: Surface Preparation
Proper prep is the most important step. Without it, even the best paint will peel or bubble.
Clean the surface thoroughly: Use a degreaser to remove oil spots. Power wash the area and let it dry completely.
Etch the concrete: Acid etching or mechanical grinding opens the pores in the concrete for better paint adhesion.
Patch any cracks: Use concrete filler to repair chips or gaps.
Allow full drying time: Moisture in the slab can ruin the finish.
Step 2: Priming (Optional but Recommended)
A primer enhances paint adhesion and helps seal the surface against moisture. Some epoxy kits include a built-in primer, while others may require a separate step.
Step 3: Mixing and Applying Epoxy
Follow the manufacturer’s instructions carefully. Typically, you’ll mix the resin and hardener and then have a limited working time (pot life) before the mixture begins to cure.
Use a roller for smooth, even application.
Apply in thin coats to avoid puddling or bubbling.
Add color flakes or anti-slip grit if desired.
Let the first coat dry 12–24 hours before applying a second layer.
Step 4: Curing Time
Curing is different from drying. While the surface may feel dry in a few hours, full chemical bonding can take up to 72 hours. Avoid walking on the surface for at least 24 hours and driving on it for 3–5 days.
Maintenance Tips for Painted Garage Floors
To keep your freshly painted floor looking pristine and functioning properly:
Clean spills immediately with a soft cloth and mild soap
Avoid harsh chemicals that can break down the paint
Sweep or dust mop weekly to prevent abrasion from dirt and debris
Use mats under tires if your garage experiences extreme heat
A well-maintained epoxy-coated floor can last up to a decade with minimal upkeep.
Common Mistakes to Avoid
Skipping prep work: The number one reason for paint failure.
Using interior wall paint: Garage floors need coatings designed for heavy-duty performance.
Applying too thick of a coat: Leads to bubbling and poor adhesion.
Ignoring moisture tests: Moisture seeping through concrete can destroy a paint job.
Final Thoughts
Painting your garage floor is one of the smartest upgrades you can make to protect against oil stains and tire marks. It not only boosts the visual appeal of your space but also adds a functional layer of defense against wear and tear.
By choosing the right coating—especially epoxy—and following proper preparation and application techniques, you’ll create a garage floor that stays cleaner, performs better, and looks great for years to come.

1 note
·
View note