#this is just my preset with no editing btw
Explore tagged Tumblr posts
Visit Tumblr Blog
Explore Tumblr blogs with no restrictions, modern design and the best experience.
Last Seen Tumblr Blogs


Fun Fact
70% of Tumblr users say the Dashboard is their favorite place to spend time online.
Text

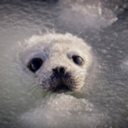
i played this game for so many sim days but still couldn't replicate this exact weather/light conditions 🥲 rip i lost the opportunity to take more screenshots and now they will never be this beautiful again
#this is just my preset with no editing btw#also the roof borked itself at some point and i can't get it back to normal#ts4#the sims 4#copperdale#ts4 scenery#ts4 vanilla#vanilla sims#ts4 build#dl: 1 town square terrace
128 notes
·
View notes
Text


ts4 // sifix allie recolor
i recolored the allie dress by sifix a longgggg time ago for personal use, and i use it all the time in my game, so i decided why not upload it for others to use? 🌻💜
unedited, reshade-free preview pics of the dress can be found here!
details:
original mesh is required!
37 swatches, all patterns 🎨
download:
simfileshare (no ads) - dress
as always, please let me know if you have any issues or if you have any suggestions! otherwise, i hope you enjoy! ✨
#s4cc#ts4cc#sims 4 cc#ts4#sims 4#the sims 4#ts4mmcc#s4mmcc#s4mm#maxis match cc#simblr#holocene.package#btw my reshade IS still messed up so if you see any distortion on the dress in the edited pics...#it's just my reshade preset glitching after i updated the software and to the dx11
47 notes
·
View notes
Text
michael (they/them) , for @birdietrait's coven of simblrs !
more info under the cut!
got turned a month ago
21, in college for art history
no one except kyra knows they're a vampire
fears themselves at times
powers are underdeveloped, only power is slightly advanced hearing
got turned by their ex (yikes!)
doesn't like drinking from humans
#ts4#ts4 edit#my sims#oc: michael wilburn#coven of simblrs#i imagine that kyra and mike would have an older-younger sibling dynamic#kyra would be nurturing at times but very annoying as well#these screenshots are my first time using gshade!#btw#this is sumahama by wilderbees just slightly edited#im gonna be messing around with presets and stuff for a bit#locust.png
10 notes
·
View notes
Text


obsessed with the del sol valley lighting
#this is dons house. btw hehe#this is just using my reshade preset and the sunblind lighting mod no extra editing in photoshop#it makes taking screenshots so easyyyyy#screenshots#four to one extras#mine
17 notes
·
View notes
Note
hi nic!! do u have a tutorial on making gif packs?? i've been trying to look for tutorials and i think i just overwhelmed myself so i dont know where to start :((
omg hi!! i know a tutorial for this method exists, but i cannot seem to find it 😭 i'll go ahead & make one for you ! beneath the cut, you'll find my gifmaking process + all my favorite gif resources. i think something good to note is that every gifmaker i know does it a little differently, so you may prefer other methods like screencap clipping or video-to-layers. i think these tutorials by pochunts would be super helpful if you wanted to explore other options <3 here's the gif i made in the tutorial btw :p

how to make gifs using photoshop's video timeline (+ extra resources):
(if you want to follow along directly, i'm using this video.)
1) download your video. i use this website (cobalt). for the cleanest final product, try to use videos that are 1080p or higher.
side note: if you're downloading something other than mp4 files, you'll need a file converter- i use handbrake for this. this tends to come up if you're downloading tv shows!!
2) open your video in photoshop. (not import, just regular file > open)
this is what mine looks like now. our layouts may look a little different because mine is tuned to my job too.
if you're new to photoshop, go ahead & pinpoint a few things: your toolbar (yellow), actions panel (pink), adjustments panel (green), layers panel (blue), and video timeline (red). if you don't see these panels, go to window in your topbar & click the names.

general photoshop tip... go to photoshop > settings > preferences and 'up' your number of history stats. this will give you more 'undos' if you mess up rather than hitting a wall :p i have mine set to 75!!

3) convert to smart object. with your base layer protected, right click > convert to smart object, or go to layer > smart objects > convert to smart object. this basically allows you to make changes while keeping the base properties in tact!! you'll notice your timeline change from blue to purple.
bc i use this so often, i made the shortcut cmd+f. you can do the same by going to edit > keyboard shortcuts if you'd like :p


let's focus on that timeline for a moment... get familiar with the split button (red), zoom buttons (yellow), work area (green).
the split button is how we'll divide the video into clips, which will become our gifs. the length of your clip will vary. i just try to fit a completed action into one clip if that makes sense!!
the zoom buttons allow you to move through the video a little easier. this will end up being a personal preference thing. i usually zoom until frames are broken up by 2's (02:00f / 04:00f / etc - shown 2 pics down) but it also depends on the length of the video
the work area defines what will export when you hit save. later on, you'll want to make sure your adjustment layers cover the entire work area.

4) clip your video. skim through your video and pick a scene you'd like to gif. split at the beginning and end by clicking the scissors, so you have something like this. i'll pick three clips for the tutorial.
as a general note, i will clip the entire video in one go, save as a psd, then move onto sizing/coloring/sharpening/etc

go ahead & delete the layers you won't be using as clips. i would rec saving as a psd at this point to save urself the grief of any photoshop crashes since u have now clipped a video to your heart's content!!

5) now, onto sizing your gifs.
first you'll use the crop tool (pink, toolbar). you can input your desired size to keep the scene in ratio (in the pink squared boxes). this is up to personal preference again, i use 260x150.
once you choose a size, you can click the menu the green arrow is pointing to, scroll down, and define a new crop preset.

adjust image size. go to image > image size and type the size you decided. make sure it's set to pixels and that you have the in-ratio button (pink) clicked.

6) next, sharpen your gif.
as you're just starting out, i would suggesting using an action. i have my favorite options in this tag! to keep us on the same pace for this tutorial, i'll use this one by svgarboo.
using an action: click into your actions panel (red), click the options button (yellow) and choose 'load action', use the arrow (green circle) to open your action's folder and choose the playable option (green box). with your layer selected, click the play button (pink).
NOTE: if your play bar isn't over your active layer it won't apply
your video should look a little better & your layer should now look like this over in the layers panel:

if you want to make adjustments, double click the options buttons (pink) and adjust opacity to your liking.
7) coloring your gif. i could not begin to make a coloring tutorial bc i hate how mine turn out 90% of the time </3 BUT there are some beautiful tutorials in here ... I WILL SHOW U HOW TO PLACE THE LAYERS STILL !!!
add a new group (pink) & drag it above video group 1. it will float above your clips on the timeline. this is where your adjustment layers will go! i'm including a screenshot of my adjustment layers so you have an idea.


8) exporting your base gifs. adjust your working area bars to the beginning and end of each clip. go to file > export > save for web. i'll attach a screenshot of my export settings.

WHEN MAKING ADDITIONAL GIFS, REPEAT STEPS 5-8 AS NEEDED. because you used smart objects, you can use ctrl+t/cmd+t on your gif layers to resize instead of cropping each time.
9) adjusting gif speed. open your exported base gifs. you'll see that your video timeline has changed to a frames timeline.
go to options (pink) > select all frames. with all frames selected, click the dropdown arrow (yellow) and adjust your time.
timing will depend on a case-by-case basis. i usually go 0.05, 0.07, or 0.09. play around with speeds until the motion seems fluid and natural. my gif is around 110 frames long so i'm doing 0.05.
10) export again, using the same settings as step 8.
YOU CAN SET UP ACTIONS TO HANDLE STEPS 9 & 10 IN BATCHES. lmk if u would want a tutorial on that :p
now i have 3 finished gifs!!


11) uploading your gif packs. i think hosting directly on tumblr is going to give you the best loading time. and by that i do mean, just uploading gifs to a tumblr page 🙂↕️ if you choose to use alternate hosting sites like imgbb or gifyu, make sure you back your gifs up with a zip file on google drive.
76 notes
·
View notes
Note
I too recently got baldurs gate 3!!! Your characters are very pretty! I’ve only messed with the mod manager thing, haven’t tried installing mods from other sources. Have any recommendations?

hey @starrystarstars, thank you!
hmm let's see... I got most of my mods from nexus and patreon, here's a list from my favourite stuff (in no particular order, better check all posts for the requirements, compatibility and load order)
btw I don't use Vortex, only the bg3 mod manager
Skintones
Astralities' Skintone Expansion
Astralities' Fantasy Skintone Expansion
Astralities' Sublime Skintones
Astralities' Wondrous Skintones
Head Presets
Dark Urges
Resting Gith Face
Linkon's Finest
Ellian's heads
Alexa
Elgoth
Everdawn
Hans
Mythral
Naelyn
lokelani's Durge - Seth
lokelani's lovely lads
lokelani's lovely lads - Revamped
Makeup, Scars & Tattoos
Tattoo collection by Mari
Centipede Tattoo
Gradient Tattoo
Cyber Tattoo
Ruki's Neck Makeup
Cosmetic pack by Mari
Mari's scars
Mari's makeup
Eyes
Astralities' Glow Eyes
Demon Eyes
Feywild Eyes
Understated
Hairstyles + Colors
Astralities' Hair Color Collection
Astralities' Hair Color Overhaul
Astralities' Hair Color Supplement
Bububull's hair pack 01
Bububull's hair pack 02
Hijimare hairs
Noctis Hair
Hair Pack by Ren
Dissidia Hair
Tav's Hair Salon
Vessnelle's Hair Collection
Yves Hair Gallery
Softer Hair (100% recommend. It still works, just put it at the bottom in bg3mm)
Voices
Meadow (Tav Voice) (not 100% done, but still a nice addon for the cute and shy Tav types)
Horns & Misc.
Astralities Fluffy Ears
Bunny Ears & Tail, Fox Ears, Cat Tails (there are several files on their Patreon, I can't remember anymore which one I installed sry)
Antlers
Horns of Faerun
Horns of Plenty
Some New Horns
Glitzy Horns
Male Body 1 for Tav
Appearance Edit Enhanced
Clothes & Accessories
Ghouls Custom Piercings
Piercing Edits
Ellian's trinkets + Camp Ver.
Lip Chains
Serpentine Piercing Edits
Trips' Accessory Collection
Misc mods by Toarie
Clothes by Ren (I downloaded almost everything, it would take too long to list all of it lol)
Basket Full of Equipment
PK Clothes and Armours
Bladesong Garment
Dress Of Devotion
Lilith's Armors
Cherrshen's Corset Outfit
FANG's Dress
Clothes by Opheliiia
Clothes by Hijimare
Astarion's Gear
ReShade Presets & FreeCam Mod
Shades of Faerun
Otis' Camera Tools
There are many more amazing mods but my brain feels fried. I didn't include some overrides, fixes and improvements, because I think ya'll stumble over those sooner or later anyway.
Hope that was helpful, happy modding!
27 notes
·
View notes
Note
how do you take such nice screenshots?? ur sims always look amazing
hello! :D first of all, thank you so much for the compliment :’)
01. graphics settings SO i have my graphics on high which definitely plays an important role imo :o) here's a screenshot of my settings.

fortunately, my game still runs pretty well even with higher settings :') if you noticed, i have edge smoothing turned off and that's because the reshade i'm currently using needs it to be turned off so that it'll look better lol. but i do recommend you turn it on if you're not using reshade :)
02. lighting mods & reshade presets lighting mod are basically mods that change the game's lighting. here are some i'm currently using and highly recommend!
no blue v2 (i have the gameplay version) - removes the blue tint when taking screenies
no glo v2.1 - removes halo effect on your sims
immersive cas lighting (neutral spotlight) - removes the green/blue backlights in cas
sunblind lighting mod - overhauls the in game lighting and makes it so much more realistic
boho dreams - my favvv preset ever! i did do some tweaking to fit my preferences but tbh i don't know what i did lol i just made a copy of the original preset and messed around with the settings until i like what i see!
03. taking screenshots & depth of field (DoF) i have this camera mod (mts) buckley that gives you more control of the tab mod camera. this makes taking screenshots so much easier as it adds more angles and also the camera doesn't bounce like it usually does :) i like having my screenshots to have blurry backgrounds and i do that by using the DoF shader on reshade! my DoF settings are untouched btw. sometimes i'll mess around with the bokeh and see what i find pretty :)
04. editing i made this tutorial on how i edit my screenshots ages ago, but i pretty much still have the same process :) the only difference is that i play around with the colours now! i honestly have NO idea what i'm doing LMAO but if it looks nice, then i'm happy with it 🙂↕️
and that's basically all the tips i have for you! a good piece of advice would be to experiment with everything. try taking a screenshot from a different angle than you usually do or lookup some editing vids on youtube and try it out! practice makes perfect :)
25 notes
·
View notes
Note
hey salty! i've been a fan of the channel for a little while now, and i just wanted to tell you that you've inspired me to get out of my content burnout (even though i've only made streams as of now but it's whatever). your videos are super funny, and it's made me want to get into editing more than ever. i just wanted to ask how you made certain aspects in your videos, like having the little characters pop up and make them super expressive like in the HYAAs and the friendlockes (the new one was super good btw!) or the way you edit stuff in general. i just like how much care and effort is made for these videos and i wanna do something like it. sorry for the long ask btw it's not intentional lmao
Thanks so much omg, and I’m glad your diving deeper into editing!
It’s kind of difficult ro fully dive into with a simple Tumblr ask, and I’ve been meaning to do some short form editing tutorials on the side channel, but I’ll try my best to make a brief overview so you can look up the proper terms on your own for now!
There’s 3 different ways I can make stuff move and shake.
The simplest are Plug-Ins. I use Adobe Premiere for editing, and you can use free templates and plug ins and drag them onto images/footage on your timeline to do pre-made edits.
For shaking, I use these plug-ins that were made for the original Deadpool movie! Really cool that these are available for free online, super cool and accessible for anyone! And while they are made for premiere, I’m pretty sure there are other software that can also use it!
https://premierepro.net/deadpool-handheld-camera-presets/
Then there’s Keyframing. This is a bit more complex and nuanced, but most editing softwares have the feature. It’s basically the manual moving of assets. The best thing about certain software, is for keyframing, all you have to do is set the points you want the image to move and the application does the rest for you and fills in the movement.
Like, if I place one keyframe on a picture where it’s on the left of the screen, and one keyframe where it’s on the right side of the screen, the software will make the picture move from left to right!
Finally, After Effects!
Compared to normal editing software, After Effects has a heavy focus on shorter visual edits instead of entire videos, but using it in combination with normal editing software can lead to some more complex edits! However in turn, After Effects can feel much harder to learn.
In After Effects, you can program/set a “Wiggle” effect on clips to get the sort of movement I have during “Have You Heard About” videos where the avatars wiggle around! I’ve made my own reusable transparent clips of each Avatar wiggling for ease of access and editing each episode.
Hope that this short break down points you in the right direction! Again, I’d love to talk more in specific about this stuff in some unscripted side channel videos, so I’d anyone has any questions on how to do stuff, let me know! I’m not a “massive brained” editor or anything, but I can def showcase how to do some stuff in the future!
Have a good one!!
113 notes
·
View notes
Note
Hello! I’m a long time follower and I noticed that your screenshots got better in terms of quality! 😁 Did you get a new PC? And do you have any tips on how to take better gameplay screenies/editing? Thanks! Hope you have a lovely day 💕
Hi Noni and thanks. Hope u have a lovely day where ever u are too ❤
Btw, I recently answer the same or might be slightly same as this ask and also I include some tips how I take my screenshot. Its still the same method I use but here are more related what u ask or u can just refer both.
1st, I have a laptop and a PC (my husband gave me his old PC and upgrade it for me). If I'm at home, I will use my PC more then my laptop cause recently I did upgrade my graphic card for both Laptop and PC for my IRL work, also I use DX11 for the sims and I recently use re shade in my game that why my screenshot look better quality but I'm not really call my screenshot look that better, I'm still play around with taking screenshot here and there or don't be shy to ask other simmers their tips too and I upgrade my sims camera overhaul. I have a few part of how I have a better screenshot, since I'm too perfectionist and sometime I do have "Jealousy" in me, when I see other simmers have more better quality of screenshot 😅. So this is what I call "what works for me" and hope it's work for u too.
Choosing the right Re shade / G-Shade Preset
Choosing the right re shade / gshade are the second most important for me or maybe every one will agrees with me and not every reshade preset suit your style. I've try a lot of preset and end up stick with what i'm currently use. So choose wisely.
Gameplay, Build, Interior and Exteriors screen shot:
Recently there's a rain in the house bug that haven't being fix yet, so I use UI cheat to clear the sky cause it will effect my screenshot and the screenshot will look not good for me. I don't really edit my gameplay screenshot. It's all from my re shade that I use (u can check my previous ask regarding this). I only edit my screenshot when the picture look dark or enhance it but so far I already love what my re shade gave. And last I don't really play with my sims in their house, i use to bring them out to a community lot or somewhere that have an outdoor light and play with in game time too. I already explain this in the previous ask post.
Cas screenshot for Sims submission / intro post / Look book
I only use SRWE to take cas screenshot and my setting size are 2000 X 1500 or 3000 x 2500 (this will make your screenshot more HD or sharpen look).
What I use for editing my post.
I use Canva and Pixlr for editing cause its have everything and easy for me if i need anything from template to editing. I'm not use to PSD since it's give me alot of time to figure out 😅.
and that it from me and hope this tips work with u and thanks for noticing my changes of my screenshot 💜
10 notes
·
View notes
Note
What apps do you use to edit your photos? Love your acc btw!!!
tysm love! i mostly use gshade, and my preset is called serenity by misslollypopsims. thats what adds that background blurs and the color schemes :) for storytelling, i usually use canva! and i actually just posted a template <3
9 notes
·
View notes
Note
do you have any recommended gshade presets?
Almost all Reshade presets work with Gshade too! a little tip, with gshade you don't really need to worry about downloading anyone's recommended shaders, Gshade already has everything one needs in it. also if your game doesn't look like the reference photo's it's likely they edited them so don't let yourself get too frustrated. Any who, here are a couple of suggestions:
I would love it if y’all shared your suggestions in the comments, too! Ty💖
Ghibli waters and Comic-book are similar to my personal presets💖
here are some world overrides I also rec for more aesthetic: fluffy clouds / @apricotrush 's food & appliances are just lovely💕
︶︶︶︶︶︶︶︶︶︶︶︶︶︶︶︶︶︶︶︶
this is a little tutorial on a graphics overhaul, you don't need to do this!!! but I wanted to share this info incase some preset shaders don't show up quite right in somebody's game and/or someone wanted better graphics. big thanks to hazelminesims btw!
this page & link is in her recourses:
#I'm so sorry about all the tong clicks my mom was baking chocolate cake & it made my mouth salivate like a river!🙈#seyvia replies#anon ask#sims community#gshade#presets#simblr
34 notes
·
View notes
Note
hi! im the anon that asked about mods? i was wondering for basic gameplay mods but mostly character mods that you recommend? i want to make my characters are true to themselves as i can in my head!
so my essentials for gameplay/utilities* are definitely:
improved ui (i also use the addon to hide the little buttons at the bottom during dialogue if i can’t use them)
increased carry weight (i use x10 so i still have a boost but it still means i’ll have to actually organize things at some point)
script extender
tutorial chest summoning
*i don't have mod fixer because i use the version of the basket of equipment mod that has it included, and it's updated regularly, unlike the original.
for character design and creation, i have:
toarie’s face presets (essential for me; almost every character i make uses one of these presets, with caelum and iaira being the exceptions)
tav’s hair salon + icon patch (also essential; ALL of my characters use hairs from this one)
neon's assorted hairs
boring dyes + boring pastel dyes + boring npc dyes (once again, all of my characters use dyes from one of these)
basket full of equipment (i use the nsfw version but i’m linking the sfw version just to be safe)
extra gear + vendor addon
black nails (another essential for me bc of my love for masc characters with polished nails; there is one for fem frame tavs as well)
less defined abs/no abs/smooth & more thin male body (choose only one of these; if you use the black nails, don't choose no abs, as they overwrite the same file!)
all of astralites' hair and skin color expansions
glow eyes (i only have this active for caelum's save and disable it before i open any other save; it gives glow eyes to all non-human eyes and i recommend only having it active for characters you want to have glowing eyes to prevent issues with your save opening after the recent patch)
all of kailime's eyes (work great with glow eyes btw)
trip's + jerinski's piercing edits
22 notes
·
View notes
Note
Hi! Can I asked what program was used to make the system relationship chart? It was from around December
hi! that was made with draw.io! they have a browser version and an app version, both of which are free! this is our most recent version of it, btw...

it's kind of a steep learning curve if you're not used to mindmapping stuff already. i'm going to go a lil into how we made some of our assets just in case that's specifically what you're looking for!
to make the person badges like we have,we took some preset assets and grouped them together! (and you can then save it to the scratch pad to make using it again easier)


So, if I wanted to, for instance, add myself to the chart...


you have to right click the image a few times until you get the edit image prompt (because at first it'll grab the whole group, then the circle, THEN the image, but it's just funky sometimes lol). insert said image. change the name by double (left) clicking a few times (and resizing it because my name is long rip)
and then the hard part is finding out 1) why you're here (the reason behind life the universe and everything yknow how it is) and 2) where you can squeeze yourself in on the graph. for simplicity's sake, i'm just going to say that i split from balthazar.

when you hover over an element, it'll show that it has these little x's or arrows where you can click and drag...

to connect people! to get your lines fancy or whatever, you gotta mess with 'em in the format tab

you can then add your element to the line itself (and remove the arrow head so it doesn't look weird...)


and there you have it! the world's most difficult yet satisfying system chart ever :'D
#✨#Anonymous#(( kristofer 📚 he/xe ))#sorry you activated my gatekeeper gene (read: loving to put things on a chart)#also ours is soooooo not nearly done still which is why i wasn't even on it#i only got to the system a few years ago and we're still in the like... highschool years of the chart fhaskjdfha#anyway! hope you enjoy anon!!!
10 notes
·
View notes
Note
Hi!
I just came across your Tumblr and I really like your screenshot style and Reshade. Do you mind sharing any information about the reshade you use an any tips you have? 
fangirling so hard right now!! I cannot believe you’re asking ME about my reshade. you inspire me so much 🥹🫶🏼
I use a slighted edited version of the money and milk reshade preset (I use gshade btw) and I do very little editing:
1. Sharpen: topaz clean (@deathbypufferfish settings) —> smart sharpen —> unsharp mask
2. Smooth: I use the “smooth” action from this set
3. Noise (just a little bit)
I use photoshop btw and I’ve made all these into an action so it’s easier & faster to edit a bunch of screenies. Let me know if you want specific settings for any of these. I’ve been away from my laptop all week which is why I haven’t included it this post.
13 notes
·
View notes
Note
What reshade preset do you use? if you do not mind me asking :) It makes your game look absolutely gorgeous <3
Hi! If you're talking about what I use for sims 3, then I use the preset called "wildberries&cream new" from this collection here! I did adjust my settings though, like adding MXAO and adding a LUT shader (as well as adjusting brightness and contrast while editing screenshots), so just keep that in mind if it doesn't look the same in your game. :)
btw, if you're not talking about sims 3, please let me know and provide one of my screenshots as an example so I can help you! thanks so much!
4 notes
·
View notes
Note
i’m not sure if anyone’s asked this before, but what are the benefits of using reshade postprocessing to recolor bg3 vs editing after collecting screens/footage in a program like photoshop? is it for consistency? just out of curiosity, and thanks in advance if you answer this btw! your stuff is always so gorgeous 💕
It depends on what you prefer. I don't like editing in photoshop that much, I just use it to sharpen the eyes and other details, as well as add watermarks. I find reshade makes recolouring so much easier and consistent, so I don't have to constantly try to recreate any edits i would have done in post-processing for every screenshot/gif.
I also use depthdarkness a lot, which is easier than editing it in afterwards on photoshop. Again, it just depends on what you find easier! I also just like playing with my reshade preset cause it makes the game look pretty <3
3 notes
·
View notes