#standfan
Explore tagged Tumblr posts
Visit Tumblr Blog
Explore Tumblr blogs with no restrictions, modern design and the best experience.
Last Seen Tumblr Blogs


Fun Fact
Tumblr’s reach among the 26-to-35-year-olds in the US is 11%.
Text
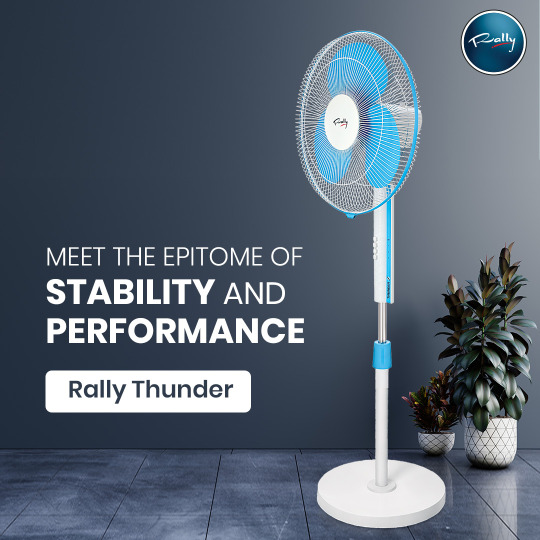
Best Pedestal Fans Online - Rally Appliances
The stylish stand fan with a smart remote for matchless breeze control. Choose your comfort with the power of breeze control!
0 notes
Photo

🐤 @grshimamura 💓 ついに#しまむら底値セール ‼️✨ 服がまさかの¥110で驚きます😳 #しまむら子供服 はもちろん, メンズもレディースも¥110‼️ (※¥330〜¥500も豊富✨) その中で見つけた貴重な#おしゃれ家電 💓 📸カメラ型で可愛い#扇風機 🌀✨ まだまだ夏の暑さで#アウトドアに大活躍 ‼️ #ハンディーファン USB充電タイプ 〈¥1419→SALE ¥330〉 インスタ映えしそうなほど可愛いのに 三段階調整で風量もパワフルで大満足✨ 4〜5時間の充電で11時間使用可能‼️✨ ストラップ付きで#首掛けファン はもちろん, #スタンドファンにもなるのが良い😍💓 #しまぱと戦利品 といえるでしょう✨ 店舗によって異なりますが、 多くは本日から#しまむらセール ¥110〜‼️ 気になる方は閉店前に急げ🏃♀️💨 ※午前ですでに品薄状態です💦 #しまむら購入品 またアップしますね♪ . . . #しまらー #プチプラコーデ #キャンプ女子 #アウトドア部 #扇風機大好き #ハンズフリーファン #しまむら値下げ品 #handyfan #standfan #セール情報 #shimamura #gu #しまパト隊 #uniqlo #しまむら#outdoor_summer_camp https://www.instagram.com/p/CUHdGPJFNUM/?utm_medium=tumblr
#しまむら底値セール#しまむら子供服#おしゃれ家電#扇風機#アウトドアに大活躍#ハンディーファン#首掛けファン#スタンドファンにもなるのが良い😍💓#しまぱと戦利品#しまむらセール#しまむら購入品#しまらー#プチプラコーデ#キャンプ女子#アウトドア部#扇風機大好き#ハンズフリーファン#しまむら値下げ品#handyfan#standfan#セール情報#shimamura#gu#しまパト隊#uniqlo#しまむら#outdoor_summer_camp
1 note
·
View note
Text


Beat The Summer Heat and Turn your Place into an efficient, comfortable and healthy space. Click this link for the product info: www.anbisolutions.com
#anbigroup#outdoorstandfan#fan#ourdooraircooler#aircoolers#smalldeskfan#clipfan#deskfan#forsummer#coolers#summer#standfan#cooling#summerheat
1 note
·
View note
Text
How to Repair a Stand Fan
Typically, the more reliable components of a stand fan are the base, fan and motor. Conversely, the more unreliable components are the height and angle-adjustment mechanisms on the tube of a pedestal fan. A broken fan-blade assembly is easily replaced with a new one. If the motor is noisy or doesn't work, you should take the fan to a repair shop. Repairing a wobbly tube or worn adjustment mechanisms that don't remain tight is not difficult. In a short time, your fan will be circulating the air to your liking.

1
Unplug the power cord for the stand fan from the electrical outlet.
2
Tighten the screws that secure the circular flange at the lower end of the tube to the top of the base, using a screwdriver. If the lower end of the tube fits into the base, tighten the large locknut at the base of the tube with adjustable pliers.
3
Loosen the height-adjustment knob at the tube and allow the fan to lower to the lowest setting. Fully loosen the knob and pull the knob and attached threaded stem out of the bracket at the tube.
4
Slide a lock washer onto the end of the threaded stem and against the base of the knob. Insert the stem into the bracket and stop when the end of the stem is in the gap between the inner edges of the bracket. Fit a lock washer onto the end of the stem at the gap. Screw the stem fully into the bracket using the knob. Raise the fan to the desired height and tighten the knob.
5
Ask an assistant to hold the fan steady to fix the angle-adjustment for the fan. Loosen the adjustment knob and pull the knob and attached threaded stem out of the adjustment bracket. Repeat the previous step to install two lock washers on the stem, and tighten the knob.
youtube
1 note
·
View note
Text

One of the Best Industrial Blower Manufacturer in Gandhinagar
With the valuable assistance of skilled team of professionals, we are engaged in manufacturing an extensive range of high quality Industrial Blower.
Product description:
Available with pressure of 50 mm w.g. up to 2000 mm w.g, our offered range is used in chemical processing plants, textiles, ceramic and cement industries.
Specifications:
Capacity : 100 m3/hr to 300000 m3/hr
Features:
Corrosion-resistance
Superior performance
High-efficiency
#exhaustfan#fan#ventilation#industrialblower#ventilationfan#ventilationsystem#industrialfansandblower#kipas#standfan#wallfan#axialfan#blower#kipasangin#kipasindustri#centrifugalfan#industrialventilation#kipasanginportable#katsufan#katsufanindonesia#causeurventilationmatters#kipasportable#japantechnology#teknologijepang#heavydutyfan#jualkipas#jualkipasangin#katsu#centrifugal#industrial
0 notes
Photo

Boil Fresh, Hot Water Anywhere! Start Enjoying Afternoon Tea & Coffee At Any Time! It is completely collapsible for easy storage and travel. The travel kettle is your best friend whether you’re home, camping, on vacation, road trips or anywhere.
For more information : 011- 49873693 WhatsApp Us : +91- 9667977791
#@SwaarishInternational#electriccookingpot#foldable#folding#foldingkettle#cooking#cookingpot#garlic#garlicpress#handpressjuicer#juicer#coffee#coffeeblender#coffeetime#wholesalers#retailers#standfan#vacuumcleaner#carvacuumcleaner#cars#siliconelid#h2owaterbottle#waterbottle#Importer#householdproducts#personaluse#corporategifts#kitchenware#personalcare
0 notes
Photo

🔥Yong Ma YF 18 WB🔥 . 🔹Timer 🔹Wall fan 🔹Daya 48 W 🔹Remote Control 🔹Ukuran Kipas 16” 🔹Kecepatan putaran 1260 RPM . 🏕jogja🏕 . #kipasdindingmurah #kipasdinding #wallfan #kipasmurahponorogo #kipasdindingponorogo #kipaskenix #kipas #kipasmiyako #miyako #kipasangin #kipas3in1 #kipasangindinding #kipasmurah #kipasanginmurah #kipasremote #kipasmeja #kipasberdiri #standfan #deskfan #miyakoindonesia #fan #kipasanginmiyako #tjr101 #berniagabali #denpasar #bali #kotamas #kotamasbali #perabotrumahtangga #perabotrumah (di Jogja Istimewa) https://www.instagram.com/p/CAF0PocAkT-/?igshid=1kmey78du3q87
#kipasdindingmurah#kipasdinding#wallfan#kipasmurahponorogo#kipasdindingponorogo#kipaskenix#kipas#kipasmiyako#miyako#kipasangin#kipas3in1#kipasangindinding#kipasmurah#kipasanginmurah#kipasremote#kipasmeja#kipasberdiri#standfan#deskfan#miyakoindonesia#fan#kipasanginmiyako#tjr101#berniagabali#denpasar#bali#kotamas#kotamasbali#perabotrumahtangga#perabotrumah
0 notes
Photo

#standfan#factory#cantonfair#visit#foshan#africa#18inchfan#16inchfan. Any of you coming to canton fair and want to visit my factory? Please contact with me anytime +8613710193019 thanks. https://www.instagram.com/p/B3ddXNxHLeL/?igshid=qbj9nwm6oftl
0 notes
Photo

Portable Folding Stand Fan USB Rechargeable Table Fan Air Cooler Landing Fan Personal Air Cooler Outdoor 4 Modes from www.acebuygo.com #fan #portablefan #foldingfan #standfan #usbfan #rechargablefan #landingfan #foryou https://www.instagram.com/p/B20tUi6DFWw/?igshid=yeij3bmo1mdx
0 notes
Text
Pedestal Fans - Buy Stand Fans Online at Best Price in India - Rally Appliances
Rally's Windy is a stand fan like no other! With a powerful motor and high-quality blades, Windy is sure to remind you of Lakshadweep winds!

0 notes
Photo

Stand fans Good Quality. Ready now. #fan #standfan #electricfan Sales Manager: Mr. Allen WhatsApp/WeChat: +86 135 8058 8957 https://www.instagram.com/p/ByUFD8NgnZG/?igshid=u54corzbu33g
0 notes
Photo

مروحة ستاند من"جيه إي سي" اليابانية ، مروحة عمودية مقاس 16 بوصة مزودة بمؤقت مع 3 سرعات مختلفة بين المنخفضة / المتوسطة / العالية مع محرك نحاسي عالي الأداء، اطلبها الان من موقع متاجر دوت نت " منتجات أصلية فقط"
Stand fan from Japanese brand "JEC", 16 inch equipped with timer and 3 different speeds between low / medium / high with a high-performance copper motor, order it now from mattajir.net "only original "
1 note
·
View note
Link
HVLS fans differ from residential ceiling fans with regard to diameter, rotational speed, and performance- know the features Check the link : https://youtu.be/wyfBGkM9wPE
Contact us : www.proarchinfra.com
#ceilingfan #ceiling #ceilingdesign #ceilingfans #interiordesign #HVLS #renovation #ceilinglight #homedesign #homestyle #design #interiors #wallfan #fans #stretchceiling #vaultedceiling #ceilingdecoration #venusfans #highceiling #livingluxe #interiorandhome #standfan
5 notes
·
View notes
Text
FAN Repair
I had accumulated three floor standing fans which had stopped rotating. Had cleaned and oiled its shaft bearings and even changed the squarish capacitor but still not turning. Was about to throw them away when I thought "... what's the harm in dissecting them, I could learn something from it...!!"
I had asked a few servicemen and all I got was a short "...there's an internal thermal fuse...". I trawled the web for months but just could not find any info on where the fuse was and how to replace it. Finally I decided to sacrifice one of the fans and dissected all the wires going into the windings.
From this came the schematics of the fan, but only up to the motor windings.
This instructable comes in 2 parts: (I)Troubleshooting and (II)Fuse replacement.

Cross head screw driver Flat tip screw driver Scissors or Pen knife Soldering Iron and some Solder Some string about 0.5mm in diameter Spare wire, about 60cm long Capacitor 1.4uF 450VAC (if required) Thermal Fuse 130degree C, 1A, 250Vac (note: I could only find a 2A 130deg replacement @$1.50SGD a piece from the local electronic component shops. Sorry I don't have equivalent part number from Mouser, RS n Digikey)

WARNING:
If you are NOT trained in electrical repair, please STOP here. It would be wise to spend the money for a replacement fan and give the faulty one to someone who knows. We are dealing with 250VAC, so be extra careful. You proceed at your own risks.
The Schematics :
At this juncture, I assume you know and have verified that the timer and speed selector are working fine (i.e. voltages are present at output of the speed selector (grey, orange and red wires)), see schematics and picture.
The colors of the wiring used in my fan may be different from yours, so make a note.
Troubleshooting the Thermal Fuse :
1. Disconnect power to the fan. 2. Open up the control unit cover. 3. Take your time to trace the wiring and note down its color and location. It should be similar to the schematics above. 4. Using the spare wire, connect from point “A” to “B” to shunt the fuse. For my case, “A” was the blue “neutral” wire on the terminal block and “B”, the grey wire on the big squarish capacitor. Once done, make sure your fan (without the blades of course) is resting properly and securely as we are going to power it up. 5. Connect and power up the fan motor. If the fuse is faulty, the motor will rotate, mine did. If it did not, it might also be that point “C” was used instead of “B”, since you could not know which terminal it was. No worry. 6. Disconnect power. Move point “C” to “B” and power up the fan again. If it still would not rotate, it’s likely the capacitor. 7. Disconnect power and remove the spare wire.
Replacing the Capacitor:
1. Disconnect power. 2. De-solder (or cut) the wires at capacitor terminals and connect them to a new capacitor (same type). 3. Power up the fan. If the motor still refuses to rotate then I believe the problem is with the motor windings and it's time to say bye-bye to the fan.

Removing the Thermal Fuse:
Disconnect power to the fan before proceeding.1. To make fuse replacement easier, we need to free the motor from the control unit keeping its wiring harness as long as possible. The harness has 5 wires going into the motor housing. By tracing this harness, starting from the motor housing, I found the Ground (green/yellow) and Neutral (blue) wires ending at a terminal block and another three (grey, orange, red) ending at the speed selector.2. Remove the Ground and Neutral wire (no cutting required) from the terminal block. De-solder the grey, orange and red wires at the speed selector, note their location first. (You may have noticed that I cut the whole harness about 10cm from the motor…big mistake...but that was way before I decided to do this!!)3. Using a flat tip screw driver as a lever, pry the motor housing mount rod away from the control unit.4. Remove the oscillating unit and detach the capacitor.5. Remove the metal housing screws. Carefully remove the rotor and the windings slowly by giving it enough slack from the harness.
0 notes
Text

We “Binal Air System” are the reputed Manufacturer of a huge assortment of High Pressure Blower, Conveying System Blower, Industrial Blower, Industrial Exhauster, Roof Ventilation, Tube Axial Fan and Ac & Ventilation Blower
#exhaustfan#fan#ventilation#industrialblower#ventilationfan#ventilationsystem#industrialfansandblower#kipas#standfan#wallfan#axialfan#blower#kipasangin#kipasindustri#centrifugalfan#industrialventilation#kipasanginportable#katsufan#katsufanindonesia#causeurventilationmatters#kipasportable#japantechnology#teknologijepang#heavydutyfan#jualkipas#jualkipasangin#katsu#centrifugal#industrial
0 notes
Photo

The manual juicer is made up of high quality aluminium and maximum keep the original flavour of juice. There is no need to worry about rust during use. For more information 011- 49873693 WhatsApp Us : +91- 9667977791
#SwaarishInternational#handpressjuicer#juicer#standfan#vacuumcleaner#carvacuumcleaner#cars#siliconelid#h2owaterbottle#water#waterbottle#Importer#householdproducts#personaluse#corporategifts#kitchenware#personalcare#BulkOrder#IndianImportingCompany#ImportingInIndia#wholeseller#retailor
0 notes