#sorry for these mp4 gifs i just. you know
Explore tagged Tumblr posts
Text


846 notes
·
View notes
Note
I have no idea if this is a tv show, a movie, whatever. I don't even know what it's called, but I NEED to know if you have the full video of the production of Much Ado About Nothing with David Tennant and Catherine Tate, please
i typically don't have googledrive space for content outside of panel shows and contemporary britcom, but we all love david & catherine so much and that show is so iconic... i must
i added it to the david tennant folder under collections, which is on the non-panel show masterpost. sorry it's just mid res 720p mp4 but i hope that works!
btw for clarity it's a recording of one of the performance during the show's run at wyndham's theatre in london in 2011!
ps catherine tate didn't have to be so babe in it but she did and my eyes are very grateful


i don't have blackadder up atm because i'm hoping the new bluray rips will be out asap and i'd like to take a look at the quality of those! blackadder is infamously pretty low res and i want to make gifs 😠🥲🥲 but if you need it asap you can request it on r/tv_bunny and someone will def have a link!
omg i actually giffed that in 2018! i remember i was so drunk cuz i watched it after a new year's party so the whole episode felt like a fever dream LOL like so many juice eps do...
but i tried to make a slightly better one for you so here you go! free to repost :)

25 notes
·
View notes
Note
Sorry if you’ve answered this question before, but how do you make your gifs?
With an outdated version of photoshop and a lot of patience 😤 my messy process under the cut
let's say i have this movie downloaded in .mp4 i open it in windows movie maker - or any other software that lets you do quick and easy edits and whatnot but me i use wmm even tho it's obsolete i knoooow leave me alone - cut the scene i want to gif out and save it into this tiny little file
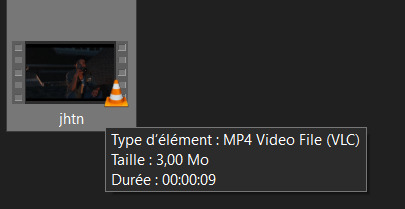
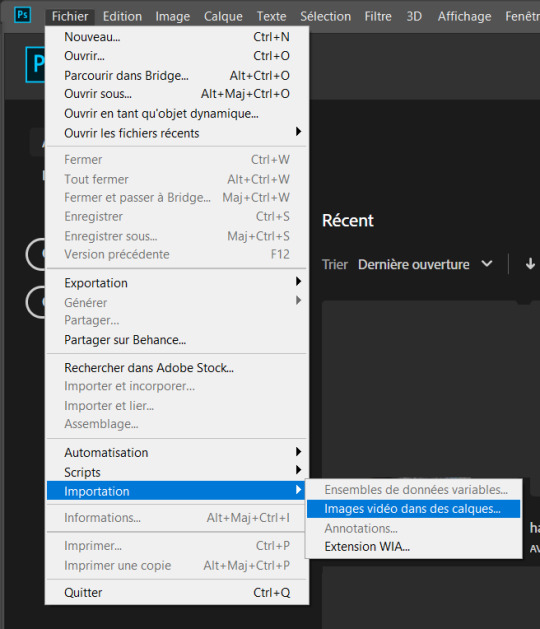
then i open photoshop and go into import > video frames into layers (i may be a little bit off in how things are called on PS in english, but they should be in the same places anyway)
this little popup will open

since my file is exclusively the thing i want to gif i don't need to bother with the little arrow-ish things underneath the video player, they're there if you need to shorten your thing or like cut into it.
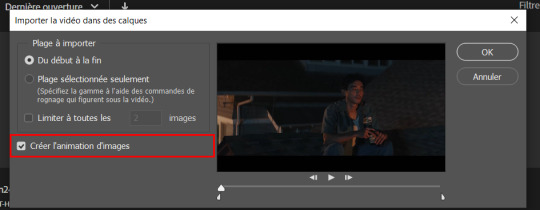
this bit here needs to be checked like this, it'll set up the gif animation or whatever. so yeah then click Ok
bim bam boom photoshop will open like this
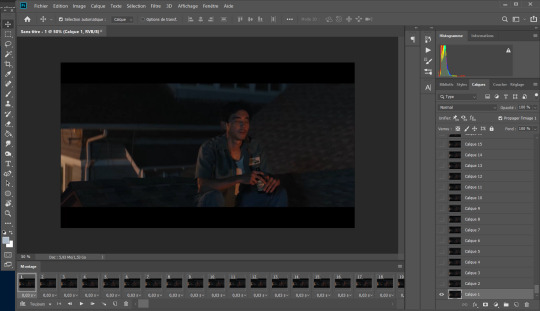
big scary image with many tiny scary images, so first of all what i do is get on the cropping tool

this will show up in the toolbar up top

and in there you set the dimensions of the gif, 1 gif in a gifset that takes up the whole post has to be 540px wide for 2 gif next to each other it's 268px wide and i can't remember 3 by 3 but i never do that so whatever who cares.
once you've set up the dimensions you want, you got this grid thing to move around and set however you want it to be
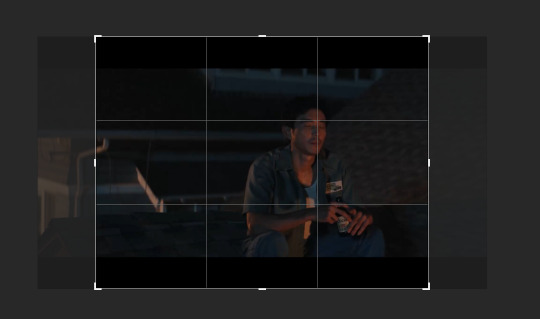
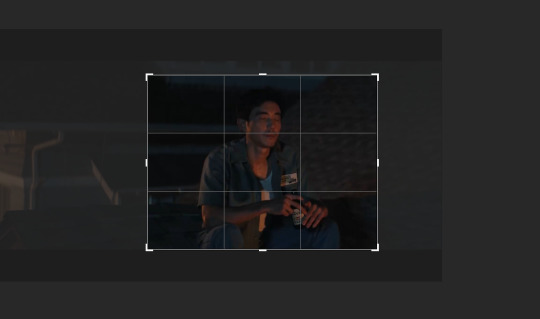
and then you wait as it painstakingly takes its time to do it
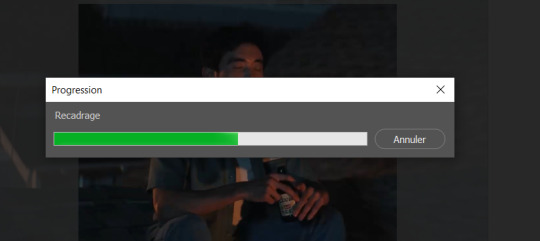
boom! it's done!

so that's your gif raw and unprepared without any filters or whatever, no length, no speed, nothing!
down there you've got the frames of the gif, depending how long is it'll be either a lot or very very short, in this case it's 277 frames, so already you know it's not gonna be just one gif but probably two or three - which i knew btw that's on purpose!!

first thing i do when all the cropping and setting up is done is scroll all the way through the frames to see if there's a bit that won't make it into the gif, and here, there is
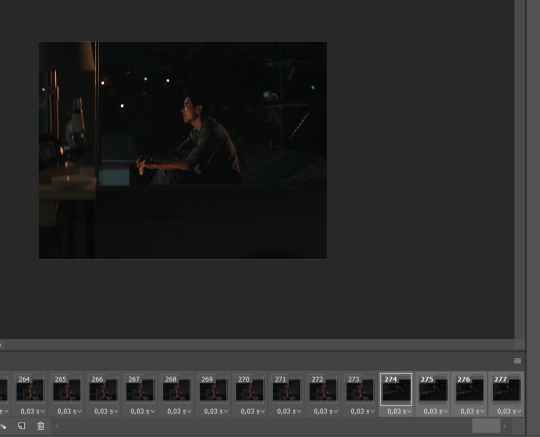
these last four frames show a different bit of the scene because i cut shit very messily and don't check before opening photoshop but you know! trust the process! so make sure to select the unwanted bunch and delete them
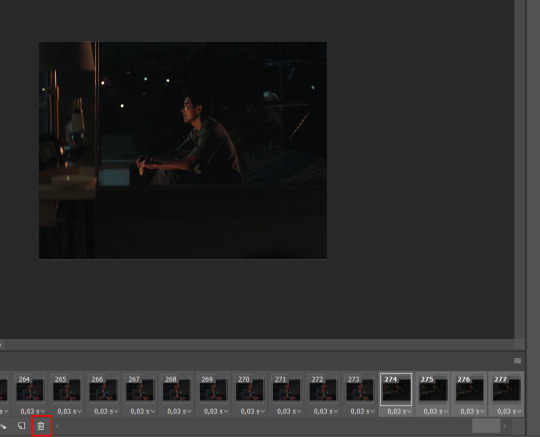
so now hurray the gif is 273 frames and it's only the one scene i want

and now the fun not fun starts!
to the right you got these, the layers
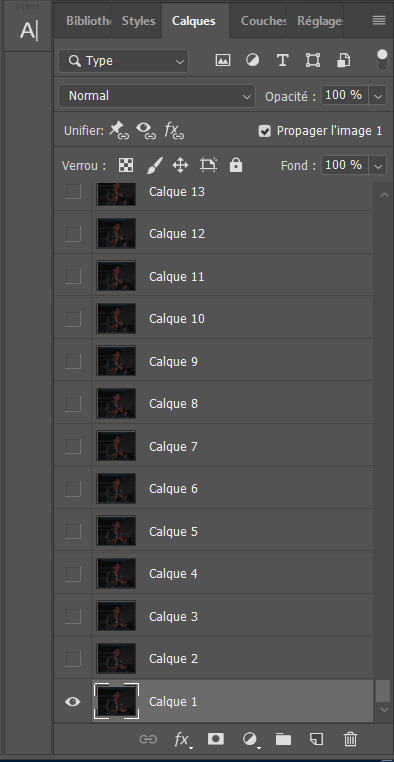
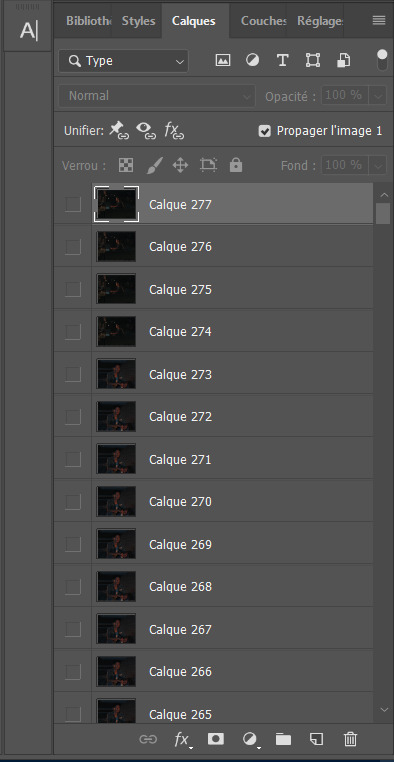
so you gotta scroll all the way up and NOT forget to click on the very last layer before you start playing around with filters and all that

this little guy right here is my bestien he's the only one i use when editing gifs, fuck everybody else on that row. when making gifs i mostly just use a combination of those three things, brightness/contrast, vibrancy and photo filters
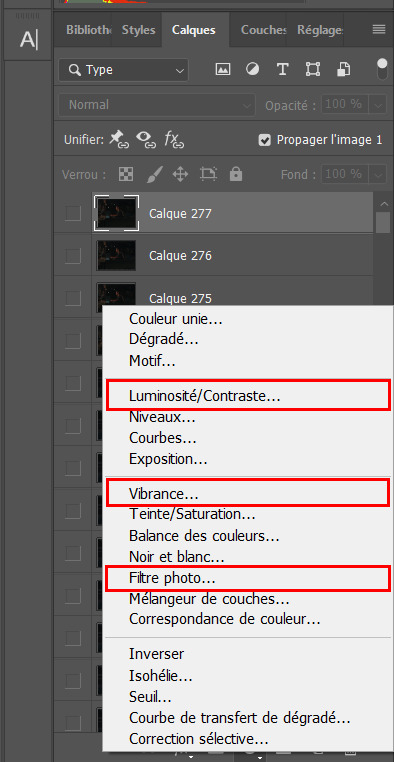
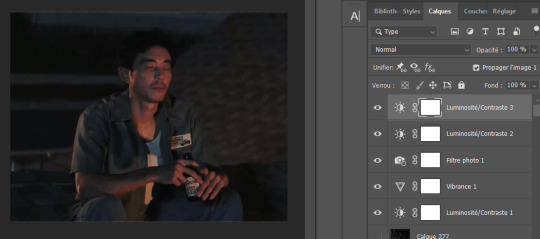
so anyway, let's fool around with those little things and make a gif (i realize now the scene is very dark and it will look very ugly but never mind! we carry on) so there a bunch of random settings added - you gotta make sure they are all the way on top of everything or else they just won't appear on every single frame
what i do then is probably very stupid and there's probably a better way to do it, but MY PROCESS, so i divide the amount of frames i've got by the number of gifs i want to make in a set, so 273/3 that's 91 (thank you google), so we look back down at the frames

and then scroll aaaaaalllll the way back to frame 91 (if you hold shift and use the wheel it'll be much faster) and while still holding shift pressed down click on frame 92
that will select every frame from the last to that and we delete that shit


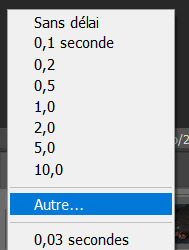
so now we only have 91 frames and that's one gif. so let's save it! but wait, no you forgot to do something! see the 0.03s? that's the gif speed or whatever, idk how it works but 0.03s is too fast, me i usually use 0.05s so what you do next is select every one of those frames you've got left and click the little pointing down arrow, that'll open that

click Other... and then set it as the speed you want
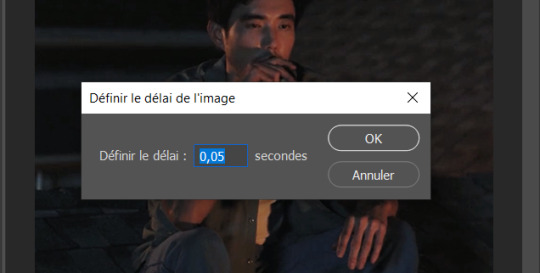
ok so your gif is at the correct speed NOW you can save it so it's file > export > save for web
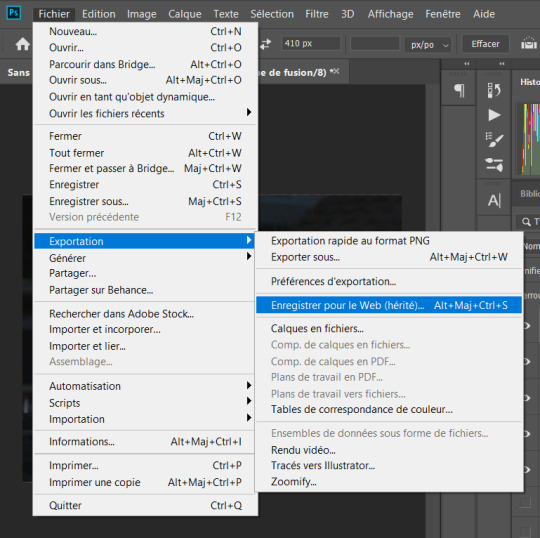
this new popup will appear
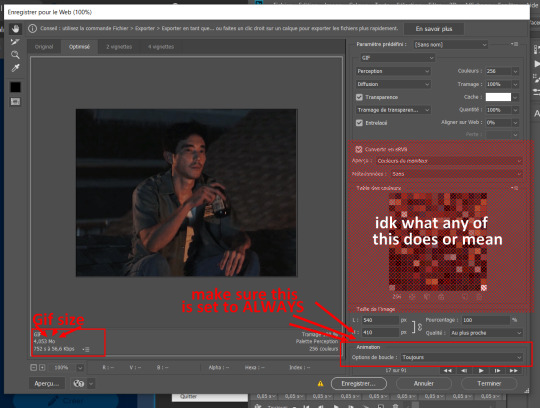
currently as of 2024 gifs can't be bigger than 10Mb/Mo, this one is 4mo

so we're good we're fine. so then you just click save, name the file whatever you want and VOILAAAA, a djeef!

(and then undo the delete and repeat everything for the other two gifs you'd want to make in that set)
7 notes
·
View notes
Note
hiiiii i really love ur gifs so much !!!!! im trying out some effects recently and i really like the third gif here : https://www.tumblr.com/khaotunqs/732573928879472640/i-cant-live-without-you-sand-me-neither?source=share how did u make this!!!! <3 (if its ok for u to share)
hello!!! thank you so much! 💖💖💖
here is the set anon is referring to!
here's me being way too long-winded about how i made that gif:
note: this assumes you use photoshop, and that you already know how to make gifs. i work primarily in timeline, so everything i talk about is specific to that method.
this wasn't super complicated, i don't think? i used @cal-kestis's tutorial on motion blur transitions with timeline to get that shift effect. i didn't make any adjustments of my own, since i liked the end result.
i made the two gifs that i wanted to shift between, and then clipped and blurred according to nik's tutorial. this is what my timeline looks like once i had my clips chunked:
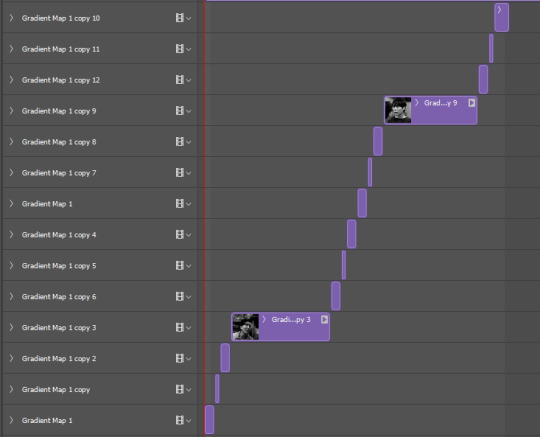
once i had the two gifs in the motion blur transition, i wanted to add something to give it a 'shining' quality, if that makes sense? i used this light leaks video on yt to make that happen!
since the video is an .mp4, i was able to open it up directly in ps, which i always do when i can, since it means to don't have to take screencaps of it. it automatically opens as a smart object and i can get the entire clip so i can move it around in timeline to get a segment that i like over the gif.

i set the video group to 'screen' and added a gradient map with my focus colors (green and yellow) on top of that. i created a clipping mask to clip the gradient map layer to the video group so the gradient map would only be applied to that specific layer. i set the gradient map layer to multiply (i found 'screen' made the whole gif too light).
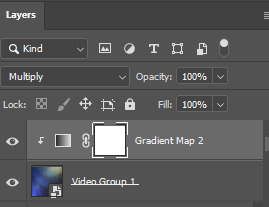
so there's the gif part (i think i remembered everything?). now on to typography!

'you think i want you as my' and 'of course not' are in quicksand, bold, 10.5pt. 'boyfriend' is a font called pinch my ride, regular, 60pt. i changed the case for 'b', 'r', and 'd' from lower to uppercase bc i just thought it looked better!
in blending options, i added a gradient overlay in my focus colors and set the angle to -90 as i wanted a even lined gradient. i set that gradient overlay to 'hard light' and then set the layer to 'difference'. then (i'm sorry this is so long) i copied that text layer. went into blending options again, deselected the gradient overlay and drop shadow, selected 'stroke' and went with a 1px white stroke set to 'outside'. back in the layers, i set the fill to 0% so only the stroke was visible. once i had the stroke, i shifted that layer down and to the right (five cursor strokes each).
i converted my timeline back to frames (god bless @anyataylorjoy's action for this step) and tadaaaa:

i am truly terrible at tutorials, so i really hope this made some kind of sense! you can always send me another ask <3 thank you for asking, and happy giffing!
4 notes
·
View notes
Note
Hi! Sorry if this has already been asked, but I looked through your tags and did not see it previously mentioned. Do you have a gif tutorial for this post? https://www.tumblr.com/starklystar/726552560907026433/composed-by-david-arnold-good-omens-season-2?source=share
Thank you! 😁
hi!! glad you liked that gifset 💙 so, if you've looked through my previous tutorials, you'll know i use a very unconventional method of gif making, which consists of two steps: 1. make the main gif in photoshop, and 2. add all other elements in powerpoint.
to make the main gif in photoshop, here's a very comprehensive tutorial!
for the first gif in my soundtrack gifset, the main gif is the underlying gif of crowley and aziraphale:

then, i open up powerpoint to a blank presentation, and i change the slide size using custom slide size to be in the aspect ratio that i want it to be in -- for a square like this, i usually stick to 14 cm x 14 cm, but it doesn't really matter what size it is as long as it's the right ratio.
the next step is to make the template you want. for the soundtrack gifset, all i did was to make a square at the center, turn the fill to no fill, and the borders to white. to get the squiggly lines as outlines, you go to Shape Format > Outlines > Sketched, and then you choose the style you want.
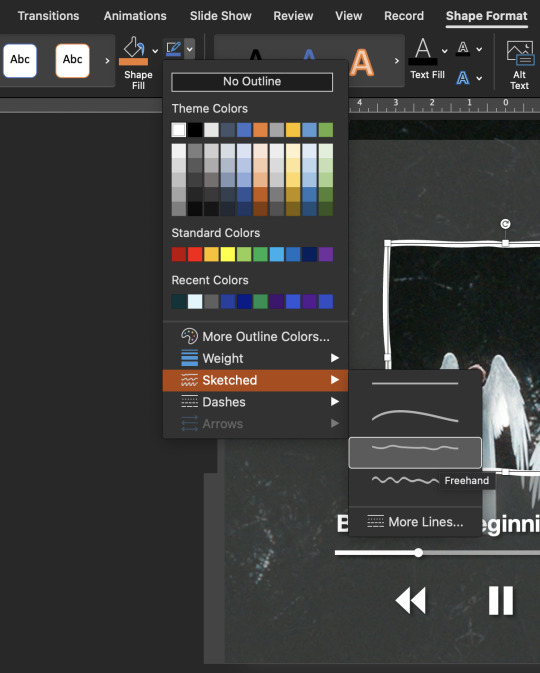
then, i made four rectangles around the square, removed the outlines, filled it with a very light grey color, and changed the transparency to 70%
after that, i added in the "progress bar" for the music, which was just one long line that i set to have a dark grey outline with transparency set to 50%, overlayed with a shorter white line and a tiny circle. the pause and rewind and fast forward symbols come from powerpoint icons, and i added the text using simple text boxes! i also added a shadow effect to everything to make things stand out. finally, i insert the main gif and send it to back so that it's behind everything. alternatively, you can also insert a video clip into the slide, and send it to back, and it'll play exactly as a gif.
this is what each component looks like in powerpoint!
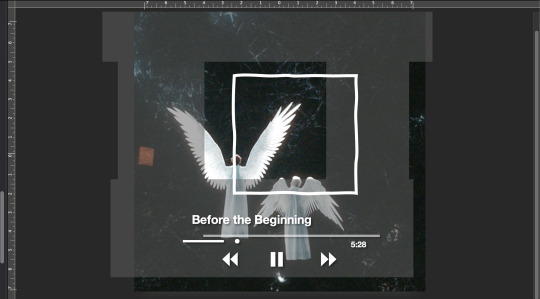
and if i move things back to their right alignment, it turns into what the final gif looks like!

finally, you export the powerpoint as a gif. you need to do this slide by slide, and you adjust the number of seconds for how long the main gif takes to run. for the gif quality, i usually go for medium or large, and if it's too large to upload to tumblr, i compress the gif via photoshop
alternatively, if you don't have the export as gif function in powerpoint, you can export the powerpoint as a video (.mp4) and then turn the video to a gif again using photoshop!
feel free to message me if you need any more details 💕
#resources#tutorials#asks#anon#i truly hope it helps!#it's a deeply unhinged way to make gifs but i promise you it works#you can also add transitions and animations to spice things up!#good omens
5 notes
·
View notes
Note
HI sorry for randomly appearing in your askbox but i need to know. how did you make this gif. it holds so much power to me

i made it a video first (using capcut) then i looked for a mp4 to gif site nd just downloaded the gif from there, i dont think i have the site anymore </3
5 notes
·
View notes
Photo

Pairing: Bang Chan x female reader
Genre: romance, smut
Warnings: idol!Chan, mature content, kissing, masturbation
Word Count: 2.465
Taglist: @straytannies @chrisbbgrl @changlix-mp4 💖

"It's okay, baby, the studio is soundproof."
Chan stayed inside of his car for a moment, he was clearly taken aback. He explained that, as much as he wanted to stay the night at your house with you, he couldn't because he had to be in his studio early in the morning. You felt your face burning while he explained that to you, completely ashamed. But you were lowkey relieved. What would you do if he accepted your invitation to spend the night at your apartment? You knew for sure what you wanted to do, but you didn't know if it would really happen. Days went by and you didn't see Chan anymore, however, you texted him all the time. I mean, not really all the time since he would be too busy to answer sometimes. You completely understood that and you knew that this would be your life if you dated him. But it was a small price to pay to date someone like Bang Chan. "Dating? Did he ask you to be his girlfriend?" Mia asked. You were, as usual, at her house. "Well, not yet, but I hope he does!" "Y/N..." Mia looked at you with that face she always made when she was concerned about something. "What?" you asked when you saw her expression. "Just don't create too many expectations. I don't want you to get hurt." "I am not creating expectations." "Y/N, you are talking about dating him when he never said anything about a relationship. Just try to keep your feet on the ground, okay?" "Fine," you frowned.
Mia's words made you feel disheartened, especially because you knew she was right. You were dreaming about a future with Chan by your side. But you had to be honest to yourself, it was hard to not create expectations when it came to Chan, especially when after you kissed him. His kiss had so much passion like he was starving and you were the last piece of food he had. You decided that you would try to keep calm and not get so ahead of yourself. You knew you were looking too eager because whenever Chan would answer you, you would text him back as soon as possible. You tried to take some time to answer him, and it was pure torture. On the next day, Chan texted you in the morning but he advised you that he would have a busy day and he wouldn't be able to answer you soon. You decided to use it as an incentive to keep it cool. After work, you washed the dishes, folded your clothes, cleaned the mess. All of the stuff that you have been too lazy or too occupied to do. Suddenly, you heard your phone buzzing. You glanced at your phone, somebody was calling. You went to the kitchen counter, where was your phone. It was Chan. It was the first time he called you ever since you met him and the thought of listening to his voice made you feel butterflies in your stomach. You tried to keep calm. Don't answer him right away, make him wait. Is it silly? Maybe. But it was what you were trying to do. And trying was the right word because you managed to wait for five seconds before answering him. "Hello?" "Hey, Y/N. It's Chan," the beautiful man said. "Oh, hi Chan." "How are you doing?" "I'm fine. How are you doing, Chan?" "I'm tired," he sighed. "I'm sorry for not answering you today, I had a really busy day." "Oh, it's okay, I had a busy day too. You know, cleaning the house and stuff," you tried to sound just a little bit nonchalant. "That sounds tiring," he giggled. "Listen, I was thinking about something." "What is it?" "I'm gonna keep busy for a few days since we are working really hard on our next comeback, but I really wanted to see you. I was thinking that maybe you could come to my studio tomorrow? If you want. We can see each other and spend some time together." You didn't know if it was only in your head but you could almost hear the longing on his voice. "Are you sure? I don't want to interrupt your work, Chan." "I am very sure, Y/N. You are definitely not going to interrupt me. You can even help me to write some songs," he laughed. "Okay. At what time should I go?" "Is 11 am good for you?" "Yes." "Okay then, I'll text you the address. I can't wait to see you, baby." You swallowed hard. You wanted to play hard to get but Chan wasn't helping it. "See you there, Chan." You threw yourself on the couch and closed your eyes. He called you baby. B A B Y. You were shaking. Why did he have to be so charming? And so cute? And so sexy? You were going insane. You barely managed to sleep that night, thinking about him. That didn't stop you from feeling excited the next day. You took a long shower. You wanted to look good, to smell good. You wanted to look irresistible. You wanted Chan to look at you and to go crazy for you. It was getting a bit cold, so you decided to wear a white fleece sweatshirt, it was warm and fluffy, and it would help you to not feel cold since you decided to wear a skirt to show your curves. A short one. And some boots. You chose to wear some light make-up, you wanted to look good but natural, you styled your hair and you were ready. The studio was in JYP's building. You obviously have never been there before, so you were lost when you entered the place. You texted Chan who helped you with some directions but you still had to ask for help from some people that were walking around. You finally ended up on a white, long corridor. There were a lot of doors on each side. You knocked on the fourth one. "Y/N!" an enthusiastic Jisung said when he opened the door. "Hi," you quietly answered, smiling. "Come in." Their studio was not too big but not too small either. You didn't have a parameter for comparison since you have never been to one before. Changbin was inside of the booth and it looked like they were recording something. "Let's try this part again," Chan said on the microphone to Changbin. Both Chan and Changbin waved at you when they saw you in the studio. "Y/N, sit here for a moment, we are almost done," Jisung suggested, pointing to a black leather couch. Watching Chan working was so hot. He was wearing a black Stray Kids t-shirt, blue jeans and, a cap. The most basic outfit ever but he still looked gorgeous. Changbin started his part again. His strong and passionate voice sang the lyrics of the song they were working on. You watched in awe, you were never going to get used to how talented they were. You waited for half an hour before they finished. Chan was clearly happy about the results, a proud smile standing on his face. "Tomorrow we will record Jeongin's vocals and then the recording for this song will be done," he said. Changbin and Jisung started to pack their stuff to leave. You were scrolling through your phone while they talked so you weren't paying much attention. "See you tomorrow, bro," Jisung said to Chan. "Bye, Y/N." "Bye, Y/N," Changbin said after Jisung. You sighed heavily. You were alone with Chan. "Did you enjoy the song?" Chan turned his chair around to face you. "By the bit that I heard, yeah! It's really nice how Changbin and Jisung can sing so well when they are also rappers." Chan smiled, his expression showed that he appreciated the way you complimented his friends. "Come here, let me show you something," Chan said, getting another chair so you could sit by his side. Chan showed you his equipment, he briefly explained how to use it. You just nodded, barely understanding what he was trying to explain. "That sounds very fascinating," you smiled. "I'm gonna teach you how to produce music so you can work with me every day," he giggled. "I wish I could, but that sounds very difficult, Chan." "I'm sure you would be good at it, you are very smart." Chan licked his lips. "Is it weird if I say that I missed you, a lot?" he asked, nervously twisting the rings on his fingers. And there goes your plan of playing hard to get.
"No, it wouldn't be weird because I also missed you." You rubbed your hands together, the anticipation was eating you alive. Chan smiled, relieved. Your eyes wandered from his face to his arms. You bit your lips. You loved his veiny arms. "Aren't you cold?" "Not really." "I'm a little cold, I should have put on pants instead of a skirt." "Come here," Chan said, getting up from his chair. He walked to the couch, tapping on it, inviting you to sit by his side. You sat by his side. "Can I hug you?" he asked, leaning forward with the cutest face. "Yes," you smiled. Chan turned you around, making you face him. He pulled you closer to him, putting your legs on his lap. He put his arms around you. He had the dumbest smile on his face and you loved it. "I'm gonna warm you up," he whispered. Chan ran his nose through your neck. "You smell so good," he said. "Do you like it?" you purred. "Yeah." He gave you a peck on your neck. You bit your lips, holding a whine. He kept kissing you, your cheek, your ear, your neck. Soft small kisses everywhere. He finally reached your lips and kissed you. It was soft a first, a sweet slow kiss where you just enjoyed each other lips. Chan grabbed the back of your neck to guide the kiss and in no time, the kiss deepened. His tongue played with yours while he put his other hand on your waist. He looked like he wanted more but he also wanted to be respectful. You bit his lip and Chan whined. You craved him so badly, you took your legs off his lap so you could sit on it, straddling him. You kept kissing him and Chan didn't waste time, running his hand on your thighs. You were intoxicated by love and desire and all you wanted was to be with him. You kissed his neck, biting on the soft skin, making Chan buckle his hips up. He rubbed his erection on your clothed folds and you whined. Your hands ran to his belt, undoing it. Chan watched while, with shaky hands, you opened his pants and freed his dick. He sighed when you grabbed it. He was leaking precum and you licked your lips. Chan held hard onto your waist, trying to hold back his moans. "Y/N," he whined. You loved how vocal he was. The hands that were holding tight on your waist went to between your legs. Chan touched your heat and moaned when he saw how wet you were. He pulled your panties to the side and started to run his finger on your folds. It was your turn to moan, closing your eyes while he teased your clit. One finger started to slowly enter your hole, it was uncomfortable at first but Chan knew what he was doing when you felt him touching your g-spot. "I want you to call me baby again," you whined.
“You like when I call you baby?” he teased you with the dirstiest expression while he looked into your eyes.
“Y-yes.” "Fuck, baby, don't stop." Your hand worked harder on his shaft as you were getting closer. Your high approached embarrassingly fast, but it wasn't a surprise by the way Chan was working on your g-spot while rubbing the palm of his hand on your clit. Chan was also moaning in your ear and that was the hottest thing you have ever seen. "C-chan," you moaned once you came on his finger, whining against his neck. Your sloppy hand kept rubbing on his dick. Chan grabbed your ass and you saw his legs shaking a little while he moaned. He came, making a mess on your hand and on his pants. He grabbed your face and kissed you, a long wet kiss. "Fuck," Chan whispered, with a smile on his face. "I have some napkins, hold on." You got up from his lap, adjusting your skirt and your panties. Chan handed you a napkin and you cleaned your hand while he cleaned his pants. That's when you heard knocking on the door and you panicked. You didn't stop to think that you were in Chan's studio and anyone could hear you. You widened your eyes, looking at Chan, but he looked calm. He opened the door and talked to the person for a moment, then closed it again. "Uhm, Chan?" "What?" "Do you think someone heard us?" Chan giggled. He went in your direction and hugged you. His warms were around your waist while he kissed your neck. "It's okay, baby, the studio is soundproof." You sighed, putting your head on his shoulder. "Are you going to keep calling me baby?" you asked, looking at him with innocent eyes. "Of course!" Chan said with a wide smile. "You are my pretty baby." Chan kissed you and you chuckled against his lips. You stayed with Chan for a while, watching him working but you decided to leave because you didn't want to bother him. Chan insisted that you would never bother him and wanted you to stay, but you would have to leave anyway since you had to buy groceries for your home. Leaving was very difficult because every time you would walk to the door, he would start to hug and kiss you. The first thing you did once you got home was to call Mia. "MIA!" you yelled. "Ouch, don't yell. I was sleeping." "Guess what Chan and I did today?" "Sex? You fucked?" she asked, excited. "Well, kind of." "What do you mean kind of?" "We masturbated each other. And it was fucking hot." "Good for you, girl, good for you." "That man is really talented with his fingers," you both laughed. "Hey, remember when you told me that his favorite juice flavor is pineapple and he drinks it all the time?" "Yes?" "Well, Y/N, I heard that if men ingest some pineapple before oral sex, their cum can taste better." "That's interesting," you said, biting your lips. "Guess you should found out by yourself and then tell me if it's true." "Guess I should."

A/N: Thank you for reading!
#stray kids#skz#stayhavennet#bang chan#chan#bang chan smut#chan smut#stray kids smut#skz smut#bang chan fanfic#chan fanfic#stray kids fanfic#skz fanfic#bang chan romance#chan romance#bang chan imagine#bang chan au#stray kids au#skz au#bang chan x you#bang chan one shot#stray kids one shot#skz one shot#bang chan x female reader#bang chan x y/n
228 notes
·
View notes
Note
pls pls pls make a gif tutorial, ur gifs are so hq and pretty i cryyyyyy
omg thank you so much that’s so kind of you🥺 and of course!!

1. getting the clips
most people use caps and load them into photoshop as multiple dicom files i think? whatever that method is, i don’t use it lol instead i use this cute little app called avidemux:

i work with a macbook so i don’t know if it’s available for windows or what the alternatives for windows users are, sorry :( anyway i use this to trim the clips i want (it’s amazing because you can go frame by frame and choose exactly the ones you want) and save them as mp4, which is very useful since most tv/movie files i encounter are in mkv format. needless to say make sure you’re working with hd files, possibly 1080p!!
2. importing into photoshop
when i have all my clips ready, i import them one by one into photoshop, like this:

this is what you should have now:

3. making the actual gif
first thing i do is convert to timeline, then i select all the layers and convert them to smart object. i crop (making sure i stay away from the borders so that i avoid those little white lines!), resize, and sharpen the gif. maybe from now on the steps are the same as the other method, but just in case they’re not, here’s what i do. after doing everything i’ve just described, i flatten the frames into clips, like this:

then i convert back to frame animation and hit make frames from layers:

i delete the first frame, then select all the other ones and set the frame delay to 0.05s and the gif is ready :)

all you have to do is add your coloring and you’re done!

pls don’t use this gif :D
4. saving the gif
there are quite a few different settings: you can choose pattern or noise, selective or adaptive based on your preference. these are my settings:

i usually go back and forth between selective and adaptive depending on what looks best on the specific gif
as always, if something is unclear just let me know and i’ll try to explain better!! <3
#Anonymous#ask#ps related#tutorials#resources#ps tutorial#yeahps#ps resources#completeresources#itsphotoshop#allresources#quirkyresources#dailyresources
72 notes
·
View notes
Photo

So, since I got a couple of asks about making a manip tutorial, I’m going to walk you guys through how I made the Sofia Martinez x Diego Hargreeves gif that you see above! I use photoshop on mac for all of my gifs, so it may look different on other computers, but the theory is the same (I don’t know what version of photoshop it is lmao, I got it free through school)
This is admittedly not my best gif ever but it was less complicated than a lot of what I make so it seemed like a good one to make a tutorial for! Details are below the cut since this is super long
1. So first I start by loading the first of the two gifs! If you’ve never used photoshop before, you can do that in “file”
NOTE: If you already know how to get a gif loaded then you can skip ahead to step 4, and if you know how to get the gif to only include the frames that you want then you can skip to 6!
(Ik most people will use premade gifs but I make all of mine from scratch so I included that in this)
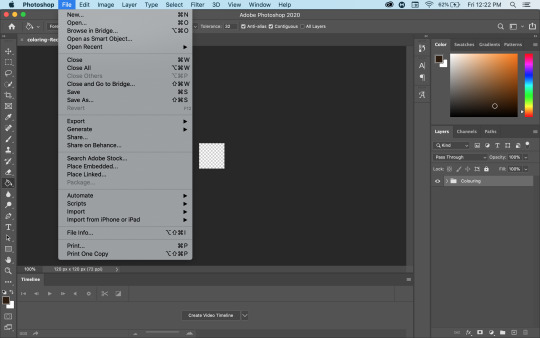
2. So I know that different people load gifs differently, but I always go with import video frame to layer! It opens my files and I find the mp4/mov file that I want to load from!
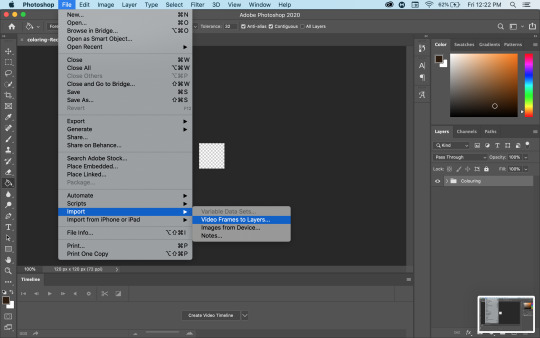
3. So I forgot to screenshot this originally which is why you can sort see the final result lmao but anyways then I go and select what part of the file I want! Now I’ve used this Diego scene in a lot of edits so I know exactly where I want it, but finding the exact moment sometimes takes a bit more time/attempts before you get exactly what you want!
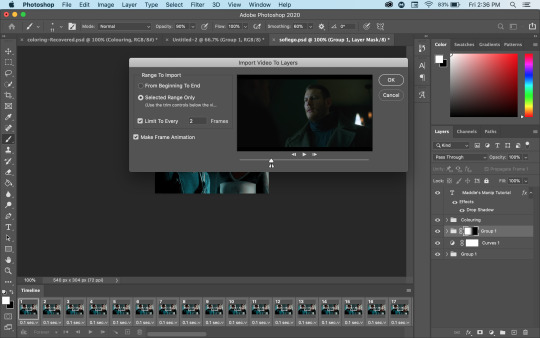
4. So now that I have a gif, you can see my timeline at the bottom! The first step to making an actual gif is to go through the timeline and delete all of the frames that you don’t want! In my case, that includes all of the Luther frames that came before this scene! And I decided to make this a 50 frame gif, so once I had 50 frames of Diego, I also deleted everything after that!

5. So once you get just the frames that you want, go to your layers on the side and delete all of the layers that are no longer in your gif! After that I make the remaining layers into a group because I find gif making a lot easier when everything is in groups lmao!
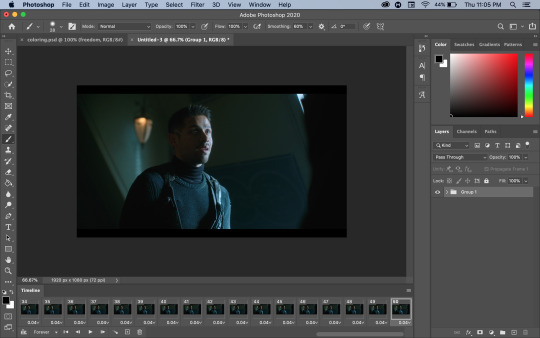
6. Then I like to create the curve layer! This may look different on pcs but on mac you go to the layers dropdown into new adjustment layer to curves!

7. For creating the curves that I want, use the highlight (circled pink) and lowlight (circled yellow) eyedrops! I start with the highlight and I click on what I want to have as the lightest point of the gif (in this case, Diego’s neck), then I use the lowlight and click on what I want to be the darkest point (in this case, his harness)

7b. Now, if you want to change any of the curves from there, you can click on where it says RGB and choose which colour to adjust! If I want the entire thing to be brighter then I’ll go through each colour and increase them all by the same amount; if I want to make one colour stronger or weaker then I only change that one!
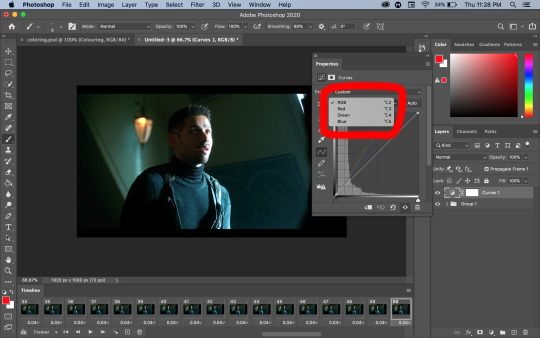
7c. in this closeup you can see where the numbers are on the bottom! I only ever adjust the input number, I don’t touch the output at all! Once you’re on a specific colour, click on the square at the top (highlight) or bottom (lowlight) of the curve to determine what you’re adjusting!

NOTE: Don’t assume that these will be your final settings! Once you combine the gifs and we get to the real colouring, they will definitely be changing! But I personally prefer having the base curves already done and then adjusting things later rather than trying to start it later!
After that, I repeat the process to make the second gif, and now we get to making the manip!
So my Diego gif is bigger (1920x1080) than my Sofia gif (1280x720), so I’m going to be moving his gif onto hers!
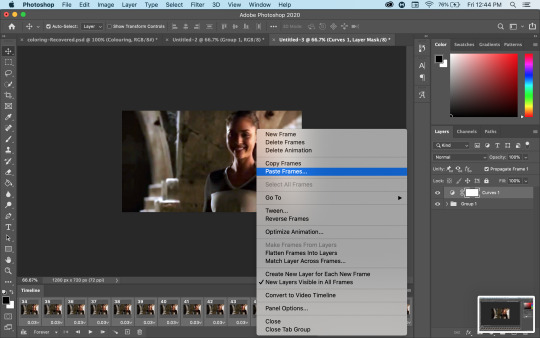
8. So to copy the gif you’ve made, select all of your frames and then click the three little lines on the bottom right of your timeline! Make sure you’ve selected all of the frames
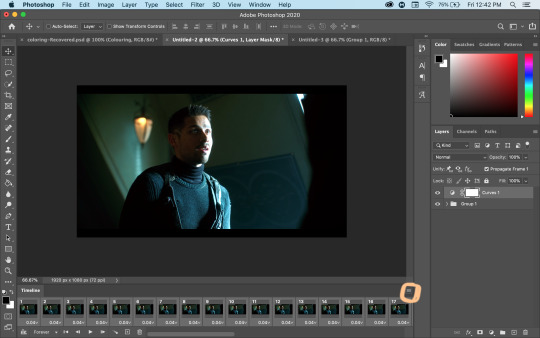
9. Then, you can choose the copy frames option!!
Note: I should have done it sooner but I forgot; at this point make sure that your curves layer has been moved into the group so that it copies with everything else!

10. So then we move to our other gif, and again we make sure that we’ve selected all the layers, and we click the three little lines again! Make sure that you’ve selected the top layer of the gif so that the layers from the other gif will go on top of it!

11. This time, we’re going to choose to paste frames, and when the pop up appears, make sure to select “Paste Over Selection”! That’s what will put the gif you copied on top of the gif you have selected!
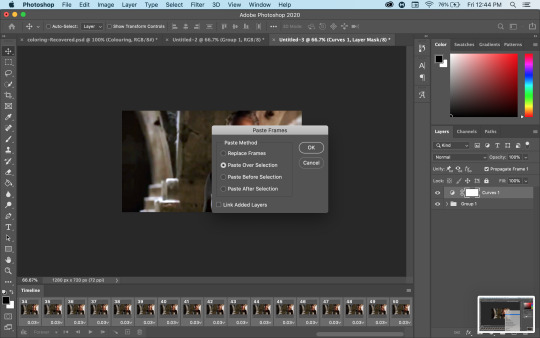
12. so now we this! At this point I can’t see the gif underneath it, so we’re going to create a layer mask (circled in orange in the second screenshot) and get to really making the manip!
NOTE: this will actually say add layer mask, but when I press the command key to take a screenshot it switches to vector, sorry about that!


12b. Circled in orange here is the layer mask! This is the layer that we’re going to do all of the editing on now to make the other gif visible!
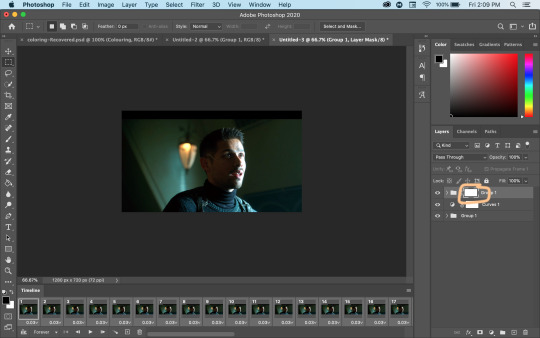
13. Now, because of the size difference between the two gifs, I decided to move the Diego gif to be fully centred to start! So I used the free transform tool and just dragged it over! This won’t be its final size or position, but it means that when I go back to editing the layer mask, I’ll be able to see more of the Sofia gif to know what I want to change!
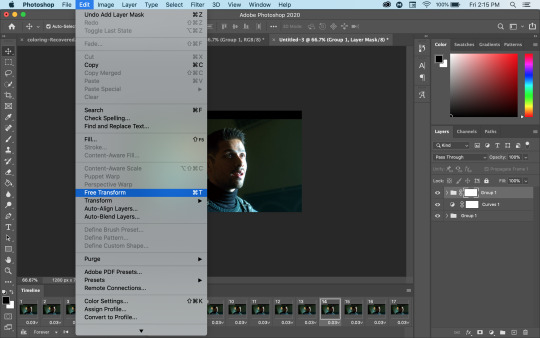
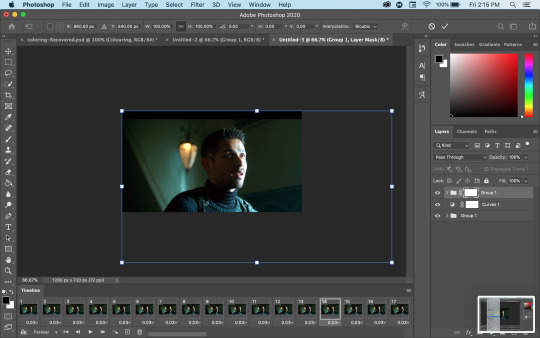

14. So now that it’s more or less where I want it for now, it’s time to get my brush! I always start off with a big brush (better for the fast, imprecise work that I do to start) with 0% hardness! I almost always use 0% hardness unless I need a really defined edge. Make sure that your foreground colour is black and then just paint on the layer mask until you can see the bottom group! If you accidentally hide more than you meant to, just switch your foreground colour to white and paint over it, which will re-reveal it


15. So now that I can actually see the entire Sofia (Lindsey) gif, I’m going to go back to the free transform tool and resize/move the Diego gif until they’re roughly the same size! Then I’ll go back to my layer mask (still with black as my foreground colour) and paint over the mask until it’s as visible as I want!
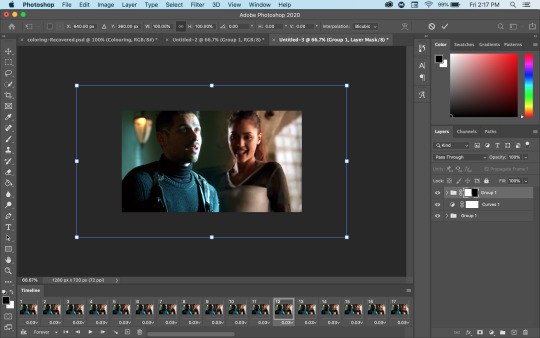

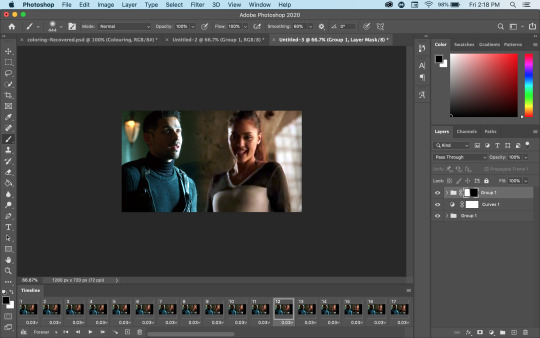
15b. Now I found the entire gif was too far to the left for my liking, so I selected both groups and went back to the free transform tool and just moved everything to the right until it was more centred!

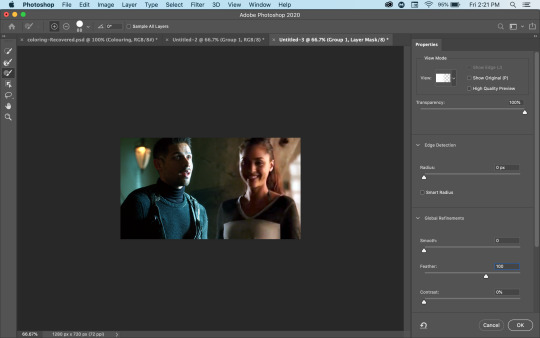
16. So now I have a manip that I like, but the lines are still harsher than I want them to be!! So I go and right click on the layer mask and choose the Select And Mask function!

17. Now this brings us to a new menu, where we can work more on the mask! I like to use the feather function (you can see where the box is highlighted blue) to soften the edges of the manip! I usually start with 50px and either lower or increase the number until I like the way it looks! I can’t describe exactly what it does but it makes the edge softer and the manip looks more blended
18: Now it’s time to colour the gif! So I have my psd open here, so I right click on the group and choose duplicate group, and then for the destination, I choose my manip (untitled 3, in this case!)
NOTE: I use a colouring PSD that was shared with me, but you can find colourings all over tumblr and deviantart — you don’t even need a psd, you can make your own or just play around with different adjustment layers until you like it!
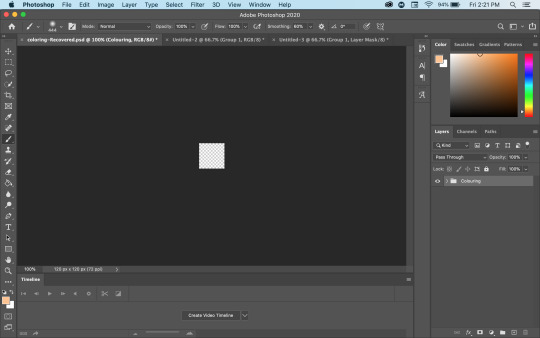


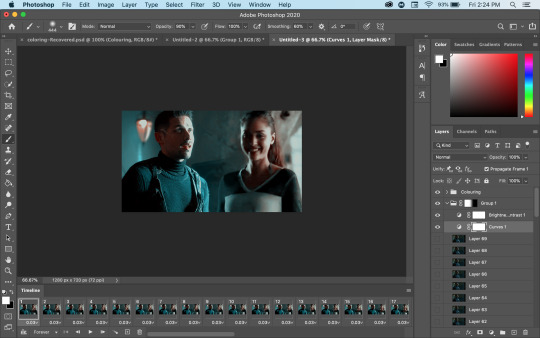
19. Now I go back to my manip file and oof, if looks way worse like this! So I go back to those curve layers from the beginning and adjust things until it looks better and matches better! For Sofia, I made the green and blue curves stronger, and for Diego I made the red stronger! For Diego I also added a brightness/contrast layer to lessen the harsh contrast!

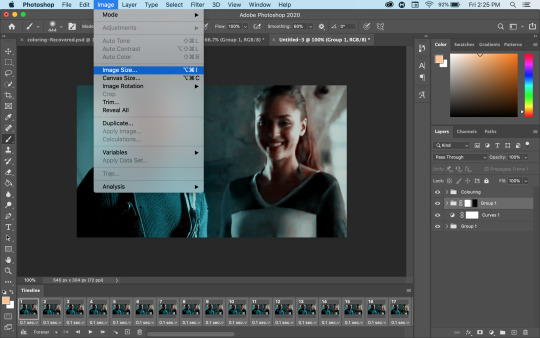
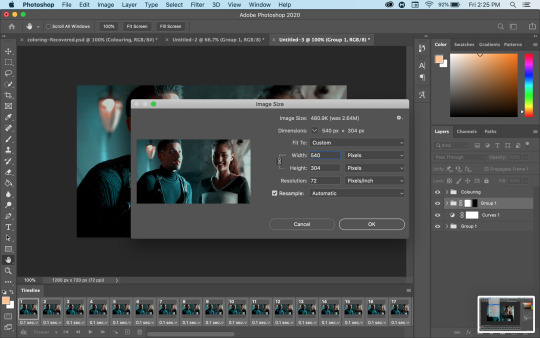
20. Now it’s time to resize the gif! Tumblr limitations don’t allow gifs wider than 540px (no height limit that I know of), so that’s what I set mine to! Then it automatically changes the height to keep the ratio the same!
21. Now when I make my gifs smaller, I always end up with this awkward little empty space on the edge, so we go back to our layer mask, now with white as our foreground colour, and just using a small brush we will that in again so it looks normal!


22. then we save!!! Go to file > export > save for web, and then you’ll get the first save popup (the big one), click save, and then you get the smaller one and you can name it whatever you want!

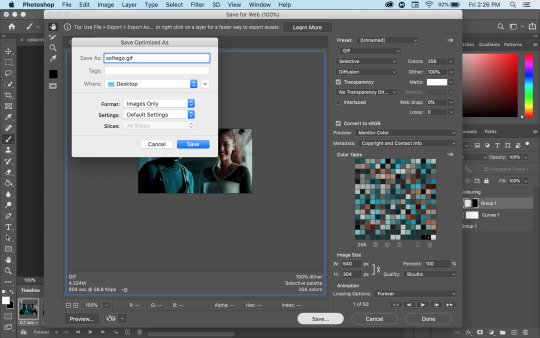
23. and now we have a gif!!!!

I really hope this tutorial helps at all! If you ever have any questions about this tutorial, feel free to shoot me a DM or an ask and I’ll try to clarify; and if you’d ever like to know how I do another type of edit or a specific edit, shoot me an ask and I’ll try to put together a tutorial!
Happy creating y’all!!!
85 notes
·
View notes
Text
yes and no
[tom holland x reader]
summary: even soft angels like our baby boy tom can have bad days. but it’s all about how you react to them, how you treat it at the end of the day. tom will come to learn that no matter how difficult the acting community can be, the answer will always be a yes form you.
add yourself to my taglist :)

“tommy? is that you?” you turn down the volume on the tv and sit up as you hear the garage door shut and keys slam on the counter. you almost jump at how loud it is, starting to take smaller steps into the kitchen. it’s like walking on egg shells not knowing what’s got him so angry, and it’s even scarier trying to talk to him about it.
he may be an angel, but when something pisses him off, he’s a scary dude.
you see his dark figure maneuver around the kitchen, pulling out a bottle of beer from the fridge and chugging it down quickly. “hey, hey, hey,” you whisper and flick on the lights, placing your hands above his shoulder and spinning into him a little.
he looks you up and down, a mouthful of beer still waiting to be swallowed in his mouth, no expression at all. he gulps as you slide your hand up his neck and cup his cheek. “you okay?” you say as he gulps and brushes you off of him. at first, you’re shocked. even when he’s mad, he never tries to get past you. he’s never this silently angry, never so annoyed that he doesn’t speak back to you.
“yeah, yeah. i’m fine.” he grunts and takes another swig of is beer.
“how’d the audition go?” you sit into your hip and fold your arms, watching him walk around you and out of the kitchen, the bottle of beer still in his hand.
he doesn’t answer.
you scoff and follow him out, catching up to his quick paces before he plops himself down on the couch, his legs lazily bent up to his chest and his arms slung over his knees.
“tom.” you say strictly and walk in front of him. but he still doesn’t even look at you. you can see the rage in his eyes, the annoyance in his jaw and you just know something went wrong. “what happened, baby boy?” you kneel in front of him and touch his cheek, calling him the name that always gets him all soft and fluffy. but he doesn’t change at all. he doesn’t smile, he doesn’t flinch, he doesn’t even turn his gaze to you.
“nothing happened.” he whispers under his breath and clenches his jaw again.
you both sigh, two very different sighs. yours because you’re frustrated and worried that you won’t be able to get to him and help him. his because he’s hurting but he doesn’t wanna open up to you, even though he knows he should.
“you know you can talk to me.” you brush your fingers through the shorter parts of his hair on the side of his head. “that’s what girlfriends are for.” he looks at you, but only for a second.
then he’s back to being all cold and distant. like how stupid men do.
“c’mon,” you take a deep breath and exhale it when your voice cracks a little as you take the beer from his hands and place it on the coffee table. “i’ll make you some tea,” you sing and massage behind his ear like he’s a little puppy, climbing onto the couch and sitting on your knees beside him. “and we can bring the nice blankets out here and cuddle,” you almost catch a smile on his lips but it stops when you add on, “and talk, maybe?”
“i don’t want to talk about it.” he frowns and pouts like he hasn’t gotten his way.
“please!” you beg softly and tug on his shirt. “you seem upset and i don’t wanna go to bed when i know you’re grumpy.” your thumb brushes over his bottom, pouty lip, making him glance at you for longer than before. “i don’t like grumpy tommy.” you shake your head and smile at him.
“talk to me. please, baby?” you press your lips softly below his cheekbone.
he exhales through his nose, finally getting used to the fact that you won’t leave him alone unless he tells you what’s up. “i didn’t get it.” is all he says. his voice is soft and drained and raspy, coarse and tired and sad.
“i’m sorry.” you’re the one pouting now.
“yeah,” his eyes go wide as he stares straight forward. “and i thought it went great....” you listen. “i thought i was so close to getting it, but the guy stopped me and told me i wasn’t right for the role.”
you gasp a little, knowing how damn good your boyfriend is, ready to mess a bitch up for making his small and sensitive side come out.
“and i didn’t wanna tell you because...” he takes a pause and gulps a little, looking down and clinking his nails together.
“why?” you encourage him to finish the sentence.
“i didn’t wanna tell you because i don’t want you to see me as a failure.” a failure? tom holland, your boyfriend, a failure? ah hell naw.
he takes in the look on your face, immediately regretting saying it because now he knows it’s stupid. “i know it’s true and i know that you’re gonna say something cheesy like ‘you’ll never be a failure to me’ but i just wanted to make you happy. and avoid one of these angsty nights.”
“thomas. you know not everyone’s gonna say yes to you? you’re gonna be rejected sometimes.” he watches the way your face looks when you speak so honestly to him. “no matter what those dick-head casting directors think of you, just know i’ll always say yes to you.”
“that’s the cheesy thing i was talking about.” he chuckles and smiles at you, purely.
“shut up, i was trying to help.” you hit his chest, but laugh along with him.
“and you did.” he smiles though another sigh.
you pull him closer, resting his head on your chest as you float down into the cushions of the couch.
“tommy?” you call while tracing your fingertips up and down his neck and through the messy strands of curls he has.
“mhmm?” he groans.
“i love you, you know.”
“yeah, i know.”
@gingertalksshit @tomhollandae @taliaa-gracee @blitchen @esoltis280 @shelteredheart @yeahbutmarvel @unicorn-princess-1999 @super-fire-breathing-girl @littlebookbengal @softhollandhoe @dangerousluv1 @misformarvel @hazuki22 @farewelldarling @timelordsdoitbetter @mysticsthinking @tomsfireheart @mottergirl99 @mikalaka @xoxoholland @lilackimmi @yolimalopez01 @phoenix-fire-fangirl @the-claire-bitch-project @tomhollandimagines @hollandsmuse @currentlyfangirrling @barely-emily @r-ivertales @highly-cynnie @komorebi-mp4 @acciorinn @lafayettes-baguettes-1 @wtfholland @bibibucky @naybeirao @necromancer-inwell @tai-holland @wombatholland @highlady-of-night @shortgiraffes @teenwolfsdream @voidfanfiction @ironspideyboy @teenwolfsdream @freehoagiehairdopeach @spideyxboy
#tom holland#tom holland fanfic#tom holland imagine#tom holland x reader#tom holland oneshot#tom holland au#tom holland series#tom holland drabble#tom holland fanfiction#tom holland fluff#tom holland angst#tom holland smut#dom!tom#sub!tom#boyfriend!tom
1K notes
·
View notes