#some of the color got washed out when I converted to png. of course.
Explore tagged Tumblr posts
Text
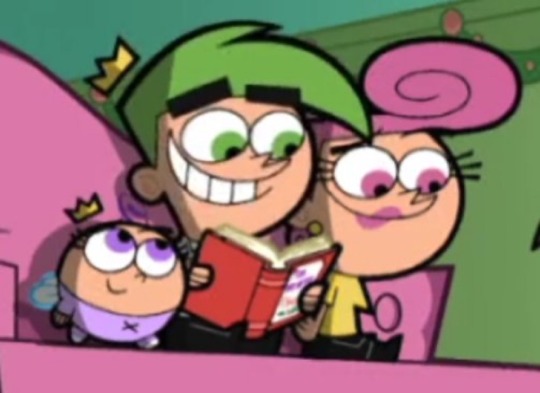
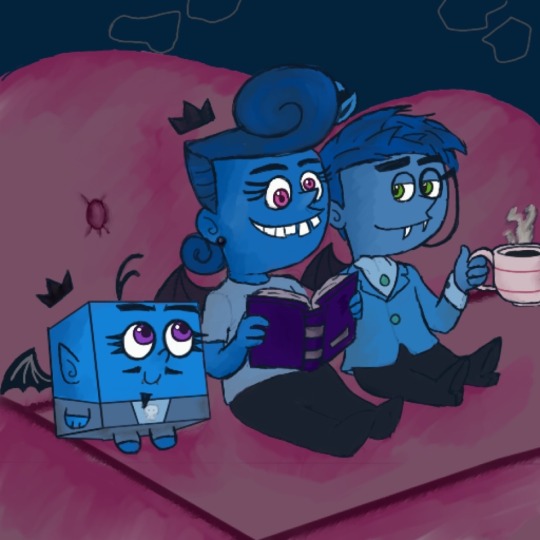
coswan and poof/peri but I make it about them
#fairly oddparents#fairly oddparents fanart#fop fanart#anti cosmo#anti wanda#irep anticosma#fop foop#fop irep#my art#some of the color got washed out when I converted to png. of course.#I just love them a lot. and the idea of foop/Irep being a mama’s boy#obviously they all love each other but. silly little mama’s cube#silly little doodle from me while under the influence on hhsgsgjdkd
58 notes
·
View notes
Text
Tu... torial? Pt. 5.
Final part of my tutorial! This is a little all over the place, because that’s how I am in this stage of editing. Also I didn’t proofread this...
Open this in dashboard for best view of the screenshots.
Disclaimer: I have no formal training for any kind of graphics stuff, I work in an office as a receptionist - I serve coffee for a living. I am absolutely self taught and while I consider myself pretty comfortable with photoshop, that doesn’t mean that there isn’t about a gazillion of other things that can be done that I have no idea about. There are people far superior than me in the Sims community. This is just how I do it, with techniques I have picked up through the years. Some things I go over in these will be pretty basic, some things a little more unorthodox. Disclaimer 2: My edits take time. This is what I do to relax, one edit takes several hours for me. Sometimes days :))) Disclaimer 3: My photoshop is in Swedish, which is my first language. I tried my best to find the English translations for every step that I do.
Tools used: The Sims 4, Adobe Photoshop 2020, One by Wacom Pen Tablet (very basic and unfancy).
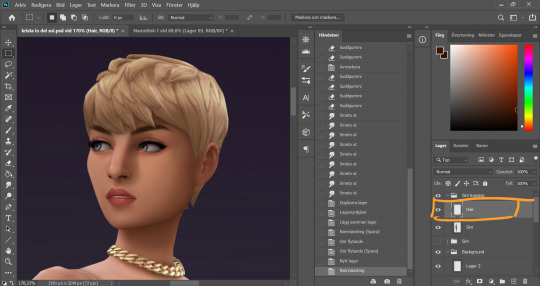
It´s hair time baby! I very much enjoy drawing hair on sims. I make a new empty layer on top of my base Sim layer.
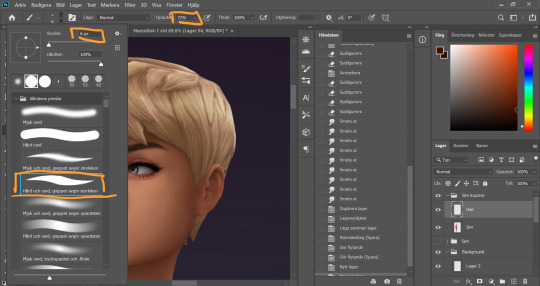
This is where having a drawing tablet makes a huge difference. We need the brush to be sensitive to pressure to get the effect of hair strands. I chose a hard brush, small small size (how small depends on the picture size of course, but I usually land somewhere 6-9 px)
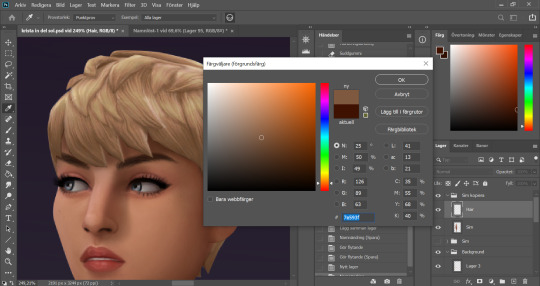
I pick up a color from the hair, I usually starts with a medium light color.
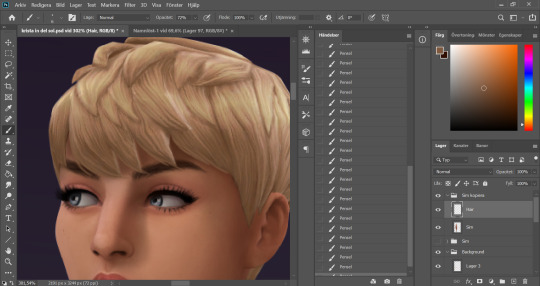
I start by drawing strands around any tips of the hair so they don't look quite so solid. I do this part with both short and long hairs. Hot lazy tip: straight unlayered hairs is the absolute easiest. This is a layered hair so I start with the bottom and work my way up. I pick up different colors from the hair as I go along, to add dept.
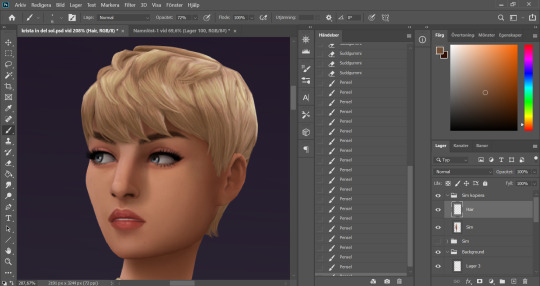
Continuing up in the hair and add strands to the pointy bits.
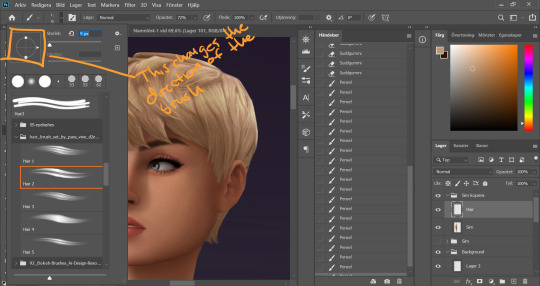
When I feel like the pointy bits have been softened I select one of my hair brushes. I use these ones by Para Vine.
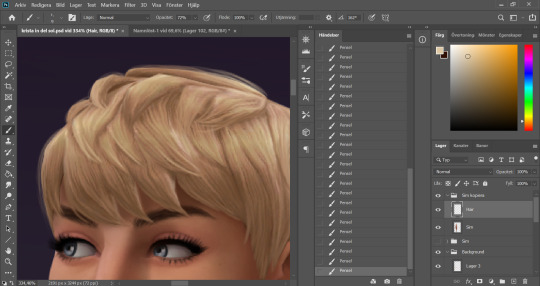
I start painting "around" the hair with one of the lighter colors picked up from the hair, changing the direction of the brush every once in a while for a more natural result.
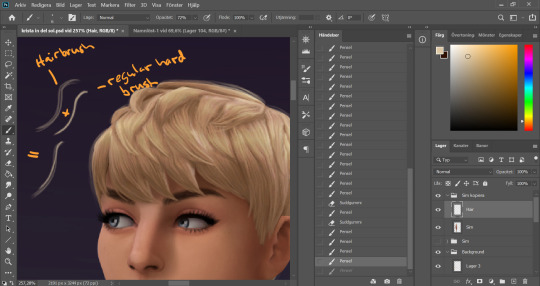
After this the hair is looking a little fuzzy, so I'm going to go back with my small harder brush to fill these parts out.
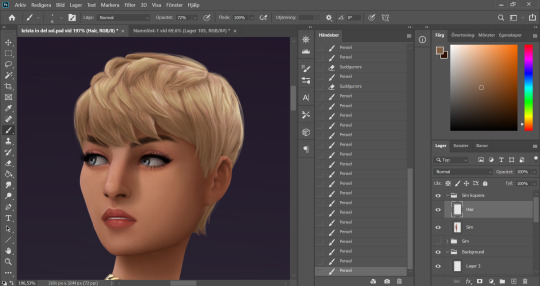
I don't add a lot of them, just small bits here and there for filling.
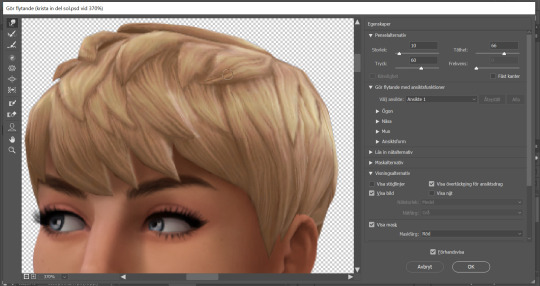
This is a little overkill but... now we have some of that "squary" thing going on in the hair as well that are still showing through our painted layer. Now we could paint over these, but painting can actually be overdone and I wan't to keep the hair recognizeable because the creator put a lot of work into it! So I go into liquify and smooth over any wonky lines still showing, just slightly.
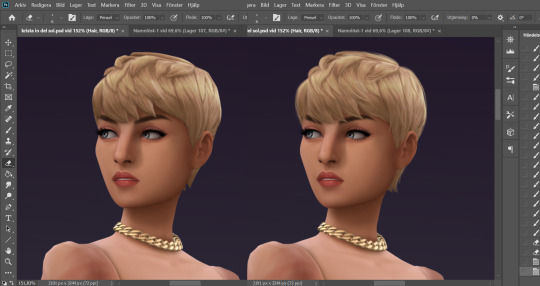
A comparison of before and after hair. Still recognizeable, but softer.
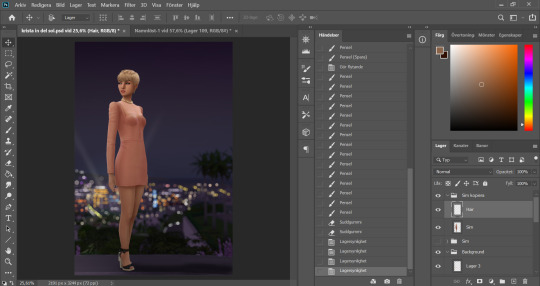
This is our result so far. We've come a long way, but we're not done.
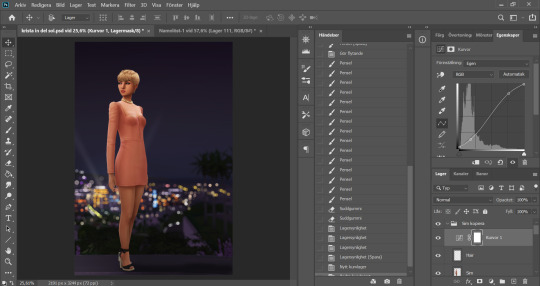
At this point (or actually sometimes sooner) I add an adjustment Curves layer, this will not end up in the finished image, this is just to give me an idea of what the image might look like with more contrast (which we will add later). I keep this at the very top of the layer panel and turn this on and off as I go. Very important to have it turned off if we are going to eyedrop a color and use that to paint, since it would pick up the wrong hue if we have it turned on.
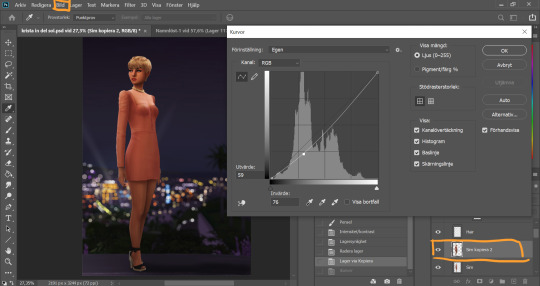
Now I still want the front of my sim to be a little darker to fit my lighting, but I don't want to go over with any more shadow. So I duplicate my Sim layer, and go to Layer -> Adjustments -> Curves. This will only change the active layer, as opposed to creating an adjustment layer down in the Layer panel that will change all layers below it. I drag the curve down a bit to make my new Sim layer darker.
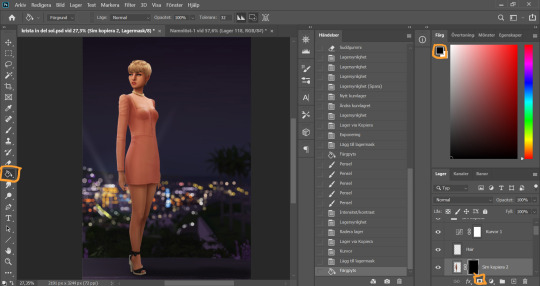
I add a layer mask to my new Sim layer, and bucket fill it with black color so the new layer gets hidden.
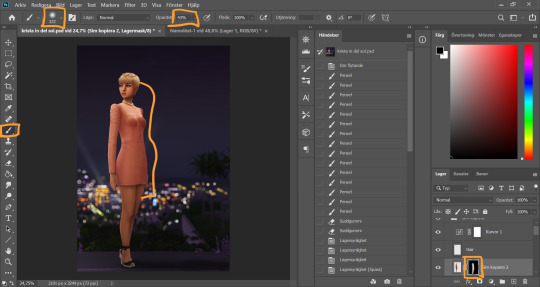
I chose an absolutely HUGE soft brush, with medium opacity, and starts painting white on the areas where I want the new darker layer to be showing. And blend by going back with black where the line is to harsh.
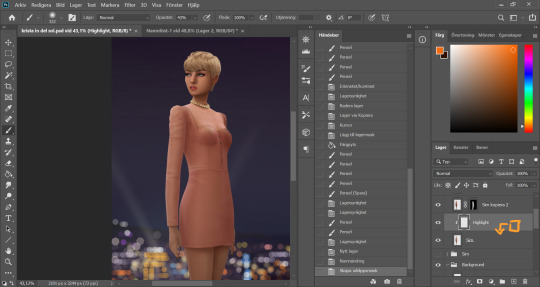
Time to add some highlights. I create a new empty layer between my two Sim layers, and add a clipping mask by holding Alt and hovering on the line between the new layer and my bottom sim layer, until the little square with the arrow symbol comes up and then click. This will make whatever I do on my new highlight layer, only show up on the areas where the layer underneath is filled.
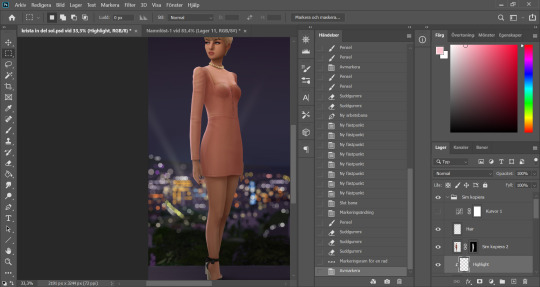
Time to paint. I disable the curve adjustment layer for this. I choose a bright color, in this case a light pink because I didn't want a contrasting color for this picture. I go with a big soft brush around the edges where I want my highlight to hit. In this case, the arm, the hand, the arch of the back and the calf. I didn't add anything to the face in this picture because I didn't like the way it looked, but usually a little highlight to one of the cheeks is just *chef's kiss*
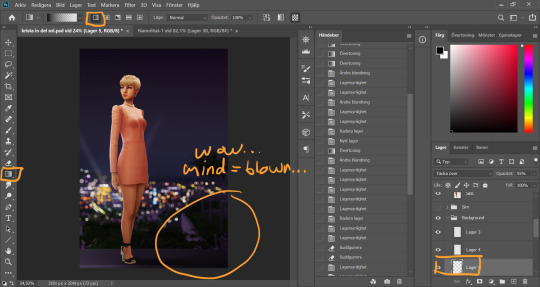
And somewhere around here I got really stuck and really struggled to follow with this tutorial. I felt the picture was lacking something and I tried several different things. I added light rays, tried creating different light sources, there was a moon at some point. But I ended up with just a simple additional gradient shadow down in the right corner (on a new layer down in the Background layer group). Life changing…
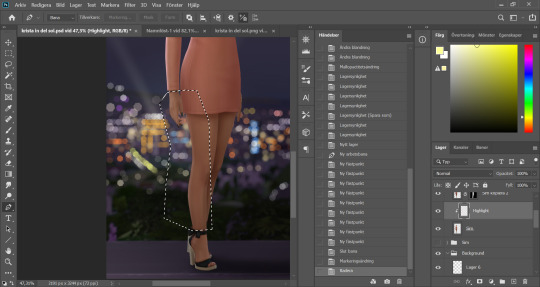
And then I didn't like the pink highlight on the skin (sigh, this is how I work, but it’s not recommended to be this indecisive) so I removed that and added a more beige-yellowee highlight instead. And forgot to take a picture after the highlight was added....
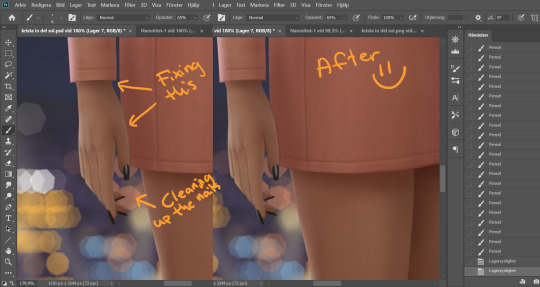
And now I go into nitpicking mode. I add a new empty layer on top of my Sim layer, I add it under the highlight layer so it automatically takes on the clipping mask of the Sim layer, I name it Clean-up Crew and go in to refine anything slightly wonky. Picking up colors with the eyedrop tool and going over flaws with a tiny brush.
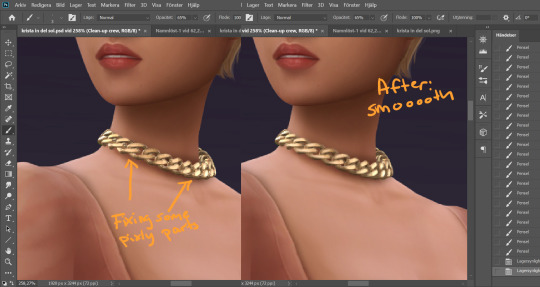
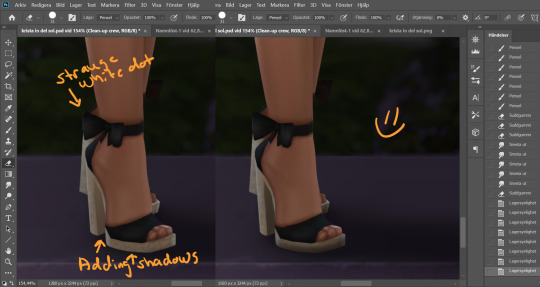
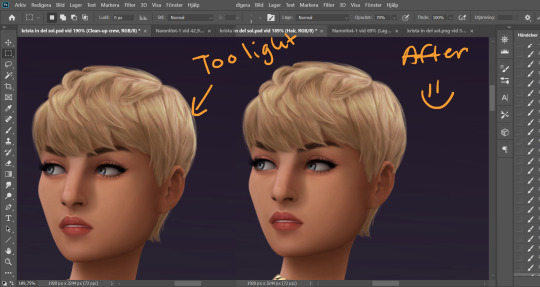
When I fixed this little light area on the back of her head I left the Clean-up Crew layer and went to my Hair layer instead, because I still have that separate and it's above all the other layers.
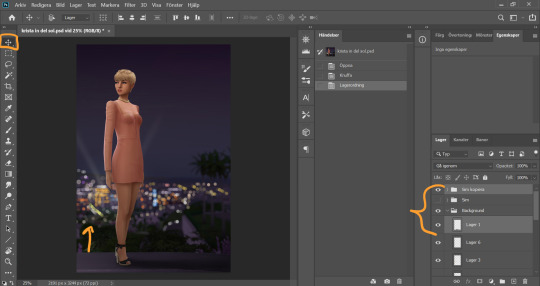
I thought my sim was a little too far down in the picture so I moved her up by selecting my whole Sim layer group and the layer on which I have her ground shadow, chosing the move tool and pushing them up. This will move all the layers in the Sim layer group as well as the ground shadow layer equally.
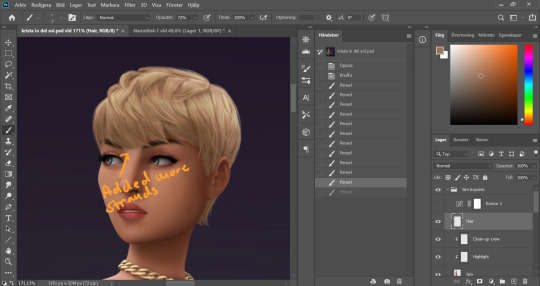
I'm telling y'all, nitpicking mode could go on forever. Added more strands to the bangs.
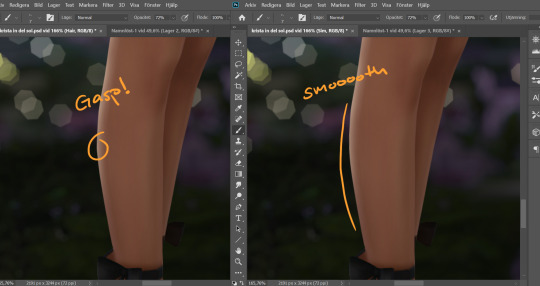
Noticed a little pointy part on the calf, so I wen't into Liquify on the base Sim layer and smoothed that out. Since the highlight layer has a Clipping Mask corresponding to the Sim layer, the highlight stayed in place.
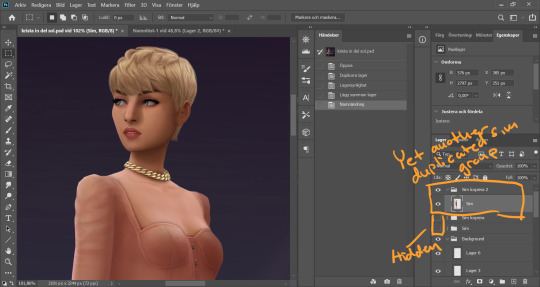
I duplicate my Sim layer group once more, and merge the layers within this group. So now the Hair, Highlight and Clean-up Crew is all merged onto the Sim layer. I hide the previous Sim groups.
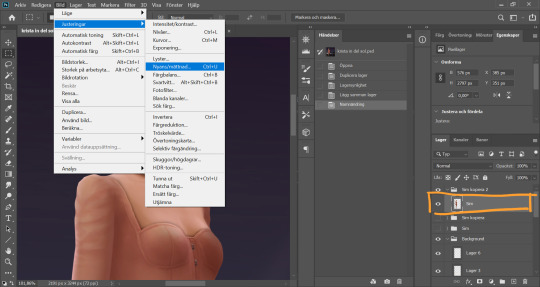
With my new Sim layer selected, I go to Image -> Adjustments -> Hue/Saturation. I want to make my Sim a little less bright so it will match the background a bit better.
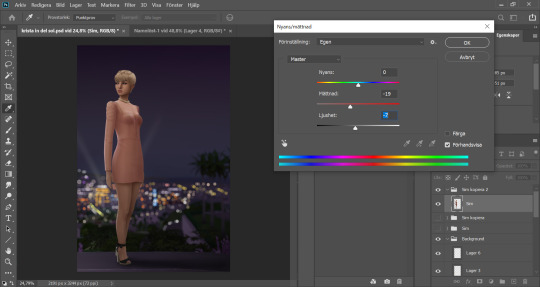
I drag down the Saturation and Brightness slider a bit until I like what I see. After this I save my whole image as a PNG-file because from now on I want to edit the whole picture but still want to keep this psd-file as it is for anxiety purposes. Important: I disable my curves layer before saving this as a picture, I don’t want that brought with me into the next steps because I will be adding new curves there.
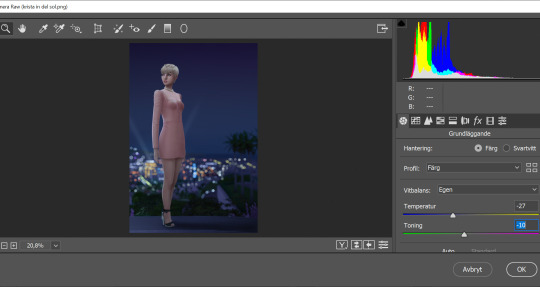
I open my new saved PNG-file. I go to Filter -> Convert for Smart filters. This will allow us to go back and change any filters we add to this layer. I go to Filter -> Camera Raw Filter and for some reason this window opens up humongus. I start by dragging down the temperature. How much depends on the picture, usually more if it's nighttime.
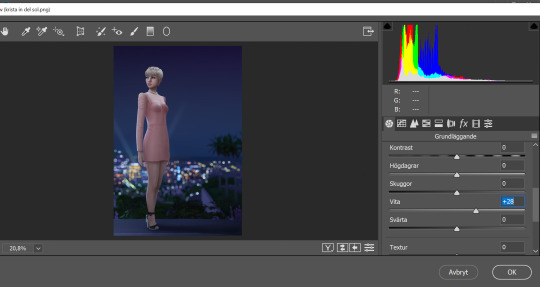
I pull up the Whites a bit for a cleaner look.
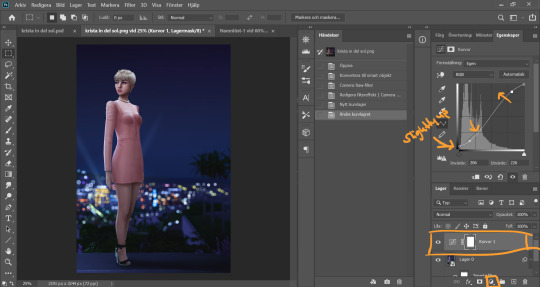
Now I add a Curve Adjustment Layer. Now you can add Contrast in the Camera Raw Filter as well, but I prefer the curve layer because I like to control the different levels. This way I can make my darkest parts a little brighter, giving just a little washed out flair to it all.
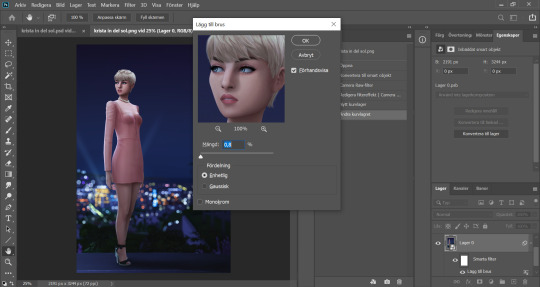
I select my background layer again and go to Filter -> Noise -> Add Noise and choose a level that I think looks good. This just brings the picture together a bit more. Also vintage vibes :)))
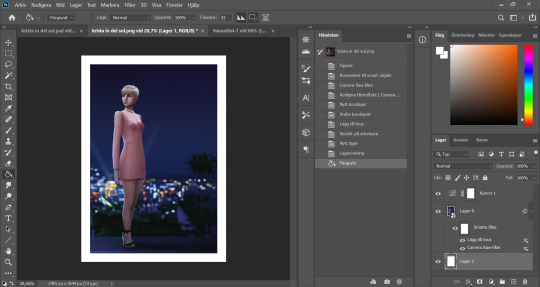
I add my frame (because it´s my aestethic and I think it looks cool on tumblr) by resizing my workspace and adding a filled white layer underneath the background layer.
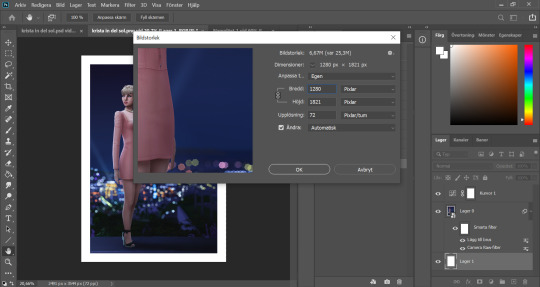
I resize my picture (Image -> Image Size) because we don't need it to be huge.
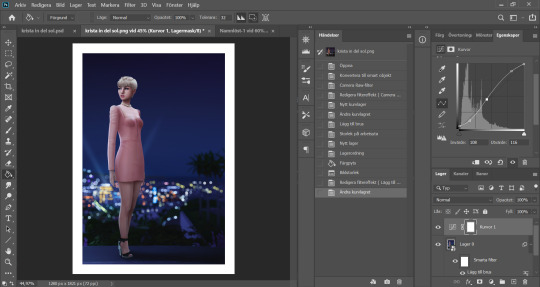
And they I just fine tune the Filters and Curves until the end of time :’)))
And that is that my friends! That’s the end of the tutorial! I hope you could follow somewheat and that someone found it useful. Thank you for reading and never be afraid of contacting me if you have any questions :) I’m very friendly.
63 notes
·
View notes
Text
Double Moons - Default Replacement Mod
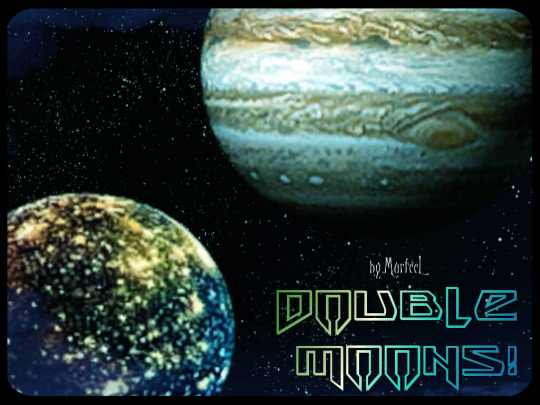
“One small step for simmers, one giant leap for Murf!“
I’ve always wanted something like this in my game, and my 2018 New Years Resolution is to learn to make new things, so here we are: double moons for y'all to use in whatever world you want! :D
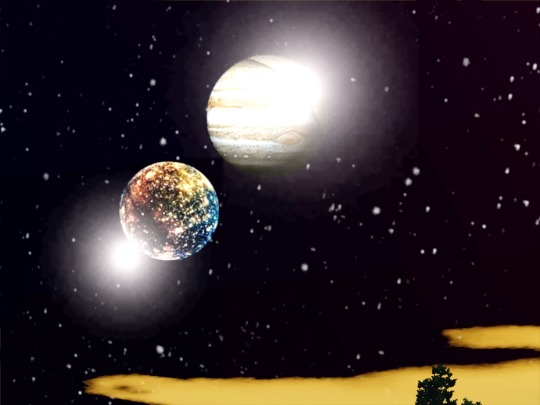
Jupiter and Callisto
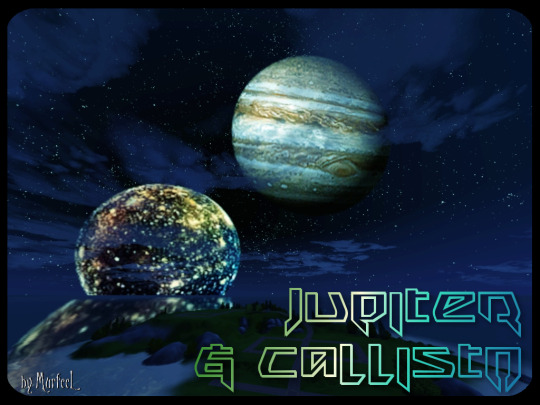
There’s phases included for those of y’all with Supernatural Lunar Phases turned on.
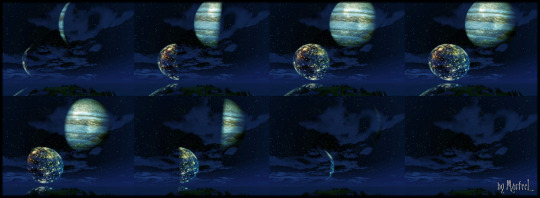
(HD view here)
Included is a 2000 and 4000 size file - the pics show only the 4000, which is effing huge in the sky -- you have zoom all the way out to see it all.
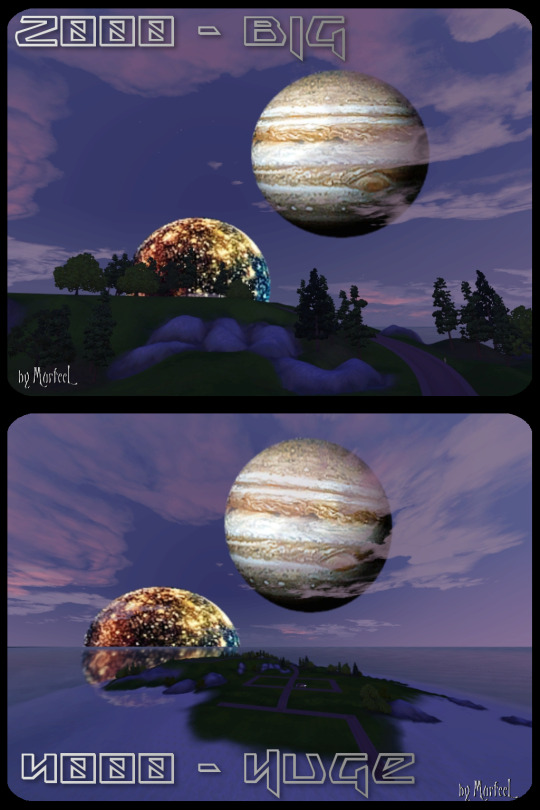
So, yeah, you get choices in case you want it to appear that your worlds closer (4000) or farther away (2000) from the crap in the sky.
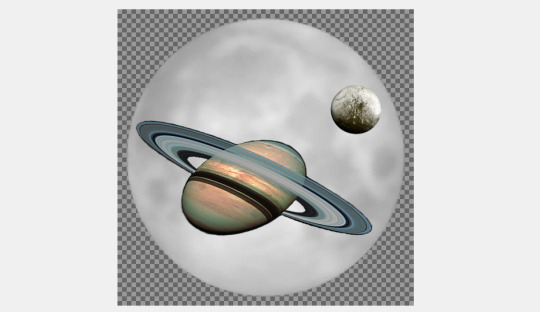
Saturn and Iapetus
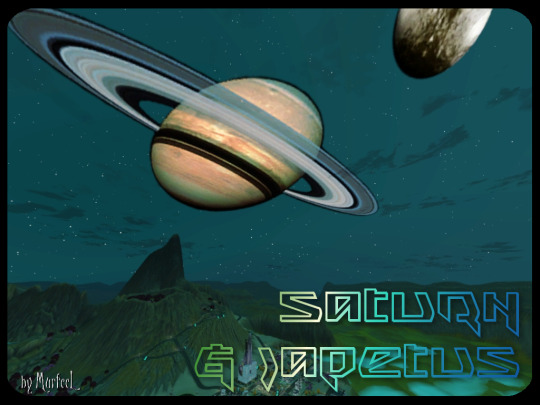
Included again is a 2000 and 4000 size file - the pics show only the 4000 flavor, which is effing huge in the sky -- you have zoom all the way out to see it all.
Here’s the only picture I took of 2000:
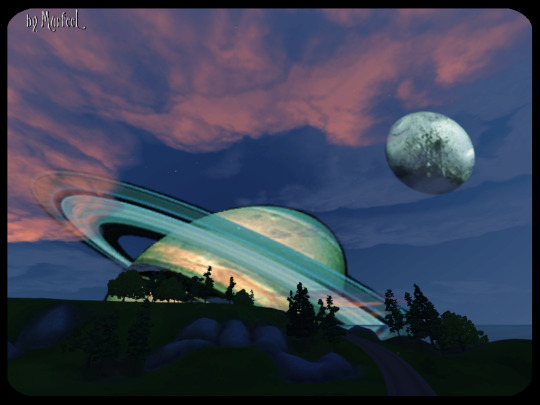
There’s phases included too for those of y’all with Supernatural Lunar Phases.
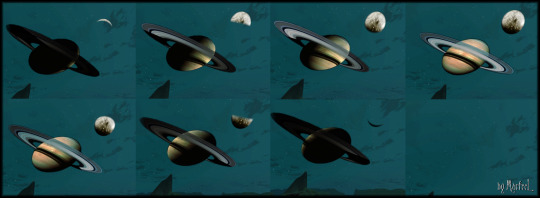
(HD view here)
For Saturn I converted a Skyrim moon replacement mod - I edited out the Earth from all the phases, and I changed the colors because I’m gaudy like that. Then I added Iapetus because reasons. :P
You only need the Basegame for this mod to work -- though you won’t be able to use any of the lunar phases without the Supernatural EP, just the Full Moon. Which is the best phase anyway, so who cares!
This will conflict with any mod that alters all these files:
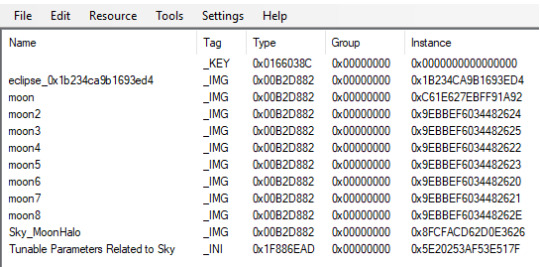
YOU CAN ONLY USE ONE FILE AT A TIME.
Download 2000 & 4000-size moons (package files): SimFileShare
Download (beta version) 1000-size moons: https://murfeelee.tumblr.com/post/170633556094/so-murfeelee-asked-if-anyone-had-tried-out-her
And as a little something extra, I decided to make this post double (lol) as....
☽✶•.¸(✶•.¸★¸.•✶´)¸.•✶´☾ ☆«´¨`•°°•´¨`»☆ ☽.¸.•✶(¸.•✶´★`✶•.¸)`✶•.☾
Welcome to Murf’s School of Crap and Crap-Making!
School Motto: Prepare to be tortured! For Science!
Lesson #12: Jumping Over EA’s Moons to Make Your Own!
☽✶•.¸(✶•.¸★¸.•✶´)¸.•✶´☾ ☆«´¨`•°°•´¨`»☆ ☽.¸.•✶(¸.•✶´★`✶•.¸)`✶•.☾
I dunno about y’all, but I have never seen this done before; people making multiple moon replacement mods rather than just one. So I figured I’d walk those interested through the process -- though really it’s barely any different from making the zillion other moon replacement mods already out there.
All you need is S3PE and a .dds texture image program (GIMP/Paint.net/etc).
You can download EA’s moon textures in the MTS thread here.
Ready? Here we go!
So what you do is open up the EA textures in an image program -- on this new godawful Windows 10 Dell laptop I haven’t secured a pirated copy of Photoshop yet, so I’m settling on GIMP for the interim (which in my limited experience has been a piece of crap with DDS files. So I have to use Paint.net in order to make the dds properly, but yeah, I’m using GIMP right now).
So open EA’s textures -- start with the full moon one (especially for y’all without the SN EP).
Though this tutorial only covers making Twin/Double moons, it works for adding however many moons you freaking want.
And it doesn’t even need it to be round/moon-shaped!
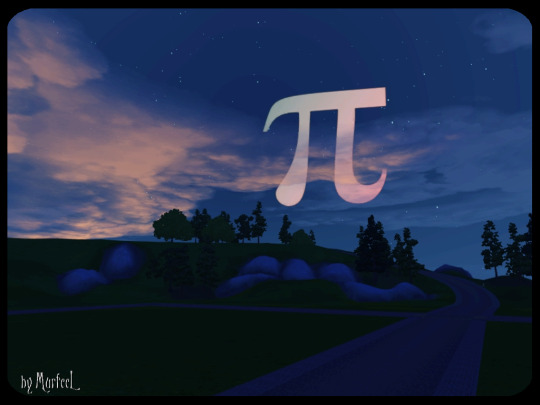
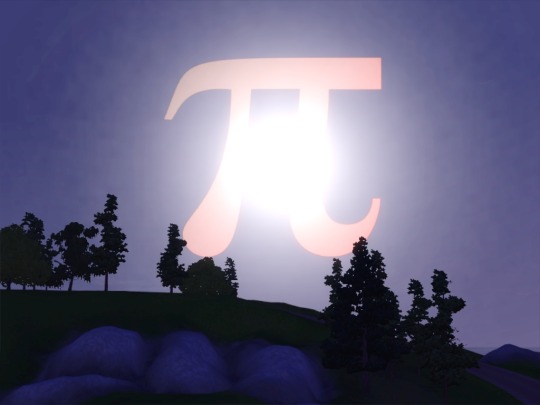
Pi in the Sky. Cuz I’m a little snot, that’s why! :P
(If you’re somehow desperate for Pi in the Sky, you can DL the beta version here -- there are no phases included, and it’s pink. Cuz of course. :P)
Size In DDS Layers
The key is to have your image fit inside the limits of EA’s default full moon.

If your image is too big and goes over the moon’s edges, you’ll end up with the BS cropping I initially suffered through:
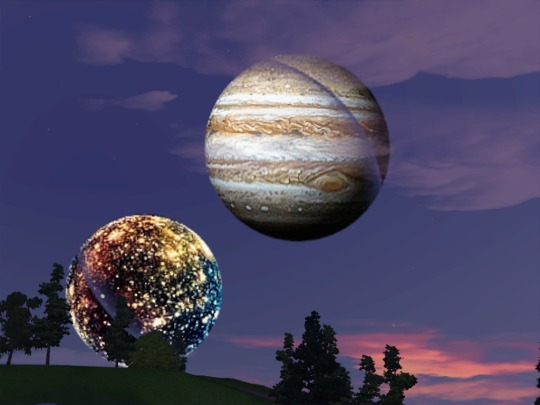
Again: It doesn’t matter what image you use, as long as it fits within EA’s moon.
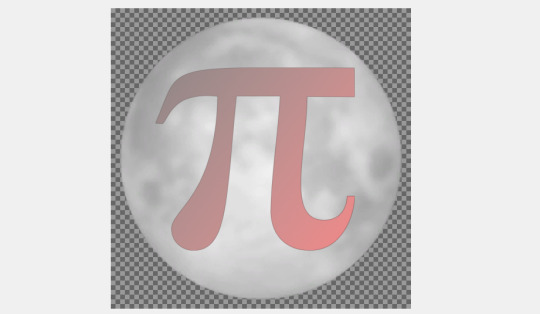
My Steps
This is nothing new for y’all familiar with making regular moon replacements. I just wanted to show how I do it in GIMP, cuz alpha channels in GIMP confused THE EFF out of me with all their Floating Anchor BULLSH!TE and I could barely find any help online navigating this nonsense.
I did each of the moons separately, then pasted them together when I was done. So I’m only gonna walk through making one of the moons, not both - same steps y’all.
Start with opening one of EA’s moon phase images, then open your first moon you want to use. Make sure they’re the same size this time. It’ll look like this:

Now Hide the custom moon layer, and go into the Channels tab. Where it says Alpha Channel, right-click it and select Channel to Selection.

The little marching ants dotted lines will move around the image, so you’re good.

Go back to the Layers tab, and this time Hide EA’s moon and Show your custom moon, so you see the marching ants on yours.

Now right-click your custom moon’s Layer and select Add Layer Mask. It’ll give you a bunch of options -- choose Selection.
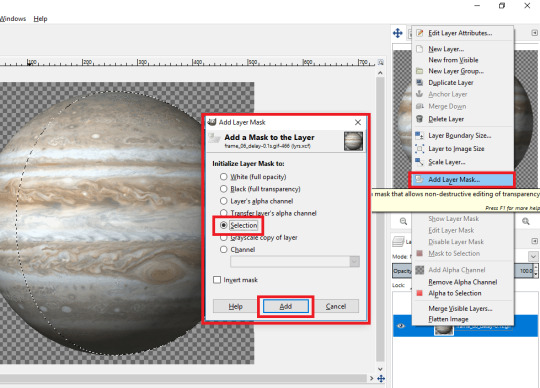
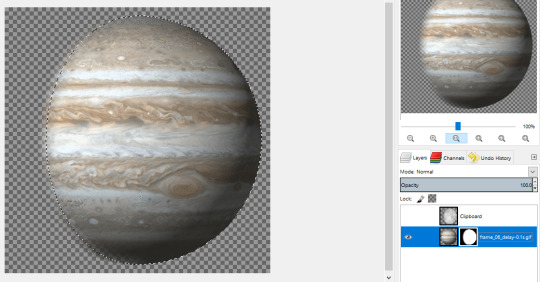
Wash Rinse Repeat for your second moon, arrange the two of them however you want on the canvas, then Merge the Layers together into one.
And remember -- when you’re done you have to rescale everything so they fit together within the frame of EA’s full moon.
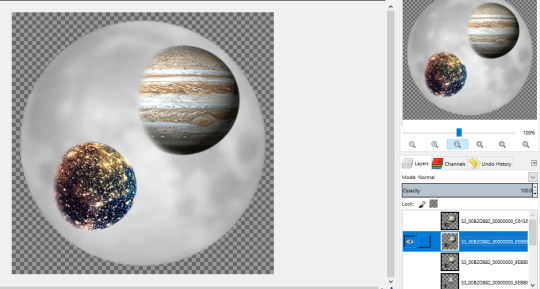
The texture resolution quality is gonna BAIL on you, so you’ll need to use stuff like Sharpen and Contrast, in order to bring back some of the original quality.
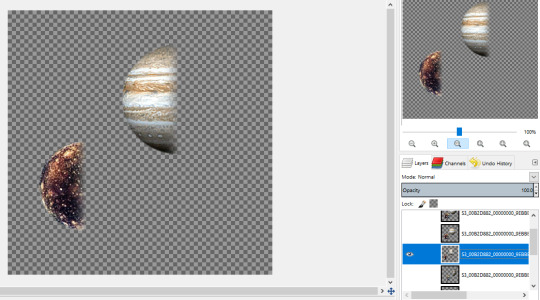
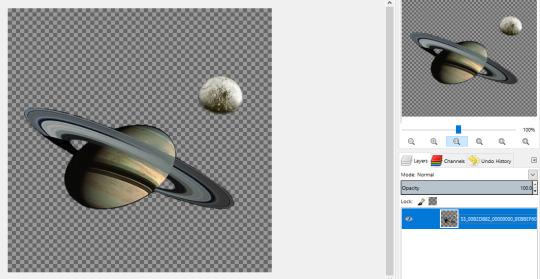
It’s a bit tedious cuz you have to do this for every effing phase (7 phases -- the New Moon one stays clear cuz duh).
When you’ve got your phase finished, and you’re ready to save it as a DDS file, there’s an issue. In Photoshop and Paint.net, what you see is what you get when you save a file. DDS files need their dimensions to be multiples of 256 or whatever -- 256x256, 512x512, 1024x768, 2048x2048, etc. Try any other multiples, and things like TSRW will crash on you -- quickly.
So here comes GIMP when you try to save a dds image with a transparent background: rather than just saving the image as it is, GIMP will for whatever reason wrap around the actual image, not the whole canvas. So when you save it, if your image is only 325x418 on a 512x512 canvas, then 325x418's the dimensions GIMP’s gonna save your dds as -- WHICH IS BAD!!!
I have ZERO clue how to fix this issue, so what I’ve done is save the images as a PNG, since GIMP saves them with the transparency and dimensions just fine. Then I open the png in Paint.net, and export it out as a DTX5 dds.
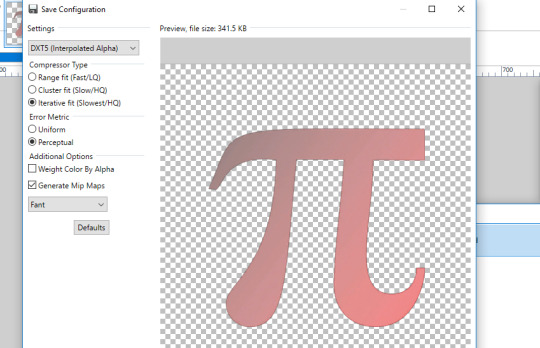
THERE! Boom! The precious time lost scratching my frikkin head over GIMP’s strange way of dealing with Alphas!
Size In-Game
Now as you can see, your finished moons are gonna be however many multiple times smaller than EA’s moon, even if you use 512x512 dimensions rather than EA’s standard 256x256.
You fix this in the SkyCommon.ini file that alters the Moon Radius parameters.
(S3_1F886EAD_00000000_5E20253AF53E517F_Tunable Parameters Related to Sky%%+_INI.ini)
Find EA’s in something like C:\Program Files (x86)\Electronic Arts\The Sims 3\GameData\Shared\NonPackaged\Ini.
Import it right into S3PE, right-click it, and click Notepad, so you can edit it.
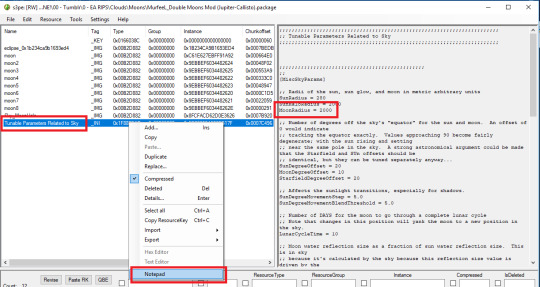
The only thing you need to touch is where it says Moon Radius = 200. Increase the number and the moon looks bigger in-game. Decrease the number and the moon size gets smaller.
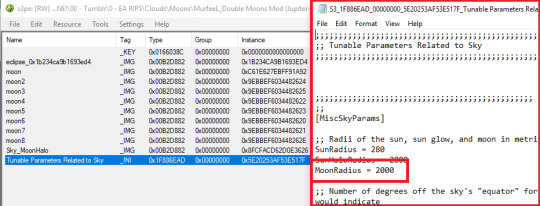
If you’re squeezing all these moons into your dds, and you’ve got like 2 moons that are 10x smaller than EA’s moon, then you should increase 200 to 2000 -- that’s my mindset.
Whatever number you choose, when you’re happy click Save and exit out of Notepad, and it’ll ask you “Resource has been updated. Commit changes?“ so click Yes. Then Save your package again.
So that’s the whole size & texture thing. ^_^
The Glow Thing
You‘re gonna have to modify EA’s Moon Glow texture so that it’s perfectly transparent.
(EA’s default one is included in the MTS post here. I included the clear one I modified in the DLs.)

Otherwise you’ll end up with this hot mess:

I tried to do The Most and actually make a real edit of the glow -- but it was actually The Least. U_U
Just freaking get rid of it, whatever.
So yeah, when you’re done, just open up S3PE and Import in all of the .dds textures, plus the .ini. S3PE will then auto-generate a _KEY file for you, just leave it. Save your work as a package file, and that’s it!
Now go forth and do the moon walk! (^0^)/

105 notes
·
View notes