#solid oak flooring.
Explore tagged Tumblr posts
Visit Tumblr Blog
Explore Tumblr blogs with no restrictions, modern design and the best experience.
Last Seen Tumblr Blogs


Fun Fact
130K people were victims of a chain letter scam that affected Tumblr in May 2011.
Text
what do u do on days u wake up feeling empty and the only things that stir smth up in ur brain and body are memories of times/places that are long gone…. like what am i supposed to do with that….. i don’t feel like a person today i just wanna wake up in my childhood bedroom and smell the way it smelled in winter but i can’t do that so i just go through my day feeling vaguely nauseously unsettled and untethered…. and that doesn’t feel fair but i don’t know what can be done about it
#i know i sound like a broken record but i miss my trees. i miss feeling like i’m home. i miss feeling safe in my body.#i miss the owls and doves that fill the morning by my grandma’s old house and the smell of the co-op and the river#and the way the mountains look surrounding the valley. protecting me.#i miss the feeling of my hands on the window in winter and reading my favourite books for the first time i miss chris i miss my old bed#i miss myself. i feel like i’ve been lost for years#sometimes i wake up distracted and i fill my brain with anything i can find and i cheat the system and i feel things#for a little while. if i keep moving fast enough i forget that i’m lonely. i forget that i’m lost#but sometimes i stop and it catches up to me and i have to sit on the floor#sometimes i realise how far from home i am in every sense of the word and i feel like a child lost in a supermarket#except this time no one is coming to find me if i just stand still#i wake up and everything i can think of that would make me happy is a mirage#i wake up and the music isn’t enough and i want to start pedalling backwards and i feel like i’m floating very fast downstream#and there’s a waterfall looming somewhere in the distance and i can’t grab a log#im not gonna fall off. nothing is ever bad enough for anyone to worry about me drowning. but i am still very wet and very far from home#so what. do. i. do. ?#when i was a kid we lived in a house that had a very large oak tree out front (this was before the house with the willow tree)#at the base of the oak tree was a small fairy pond. we moved in during winter and it was frozen solid and u couldn’t see anything in it#but come spring it melted and we discovered the fairy pool was chock full of marbles of all colours and sizes. hundreds of them.#it was so thrilling to know they’d been waiting for me all winter to find them in the warmth. where are the marbles now#is anything waiting for me? is anything hiding in the frozen pond?#@the universe: i need a little help now pls. pls send me something small and colourful i wasn’t expecting. hundreds of them. or just one.#i am open to it all#because i can’t go back in time and smell my childhood bedroom in winter. and i will not go over the waterfall. so bring me marbles#~ signed yours truly. ps tell the trees i’m still the same
18 notes
·
View notes
Text
Lignum Solid Oak Real Wood Flooring
Lignum Solid Oak 18x90mm Wood Flooring at FloorsOnlineUK

The Lignum Solid Oak 18x90mm Real Wood Flooring At FloorsOnlineUK The Lignum Pure solid collection offers solid oak in a choice of two widths, 90mm.
Explore more about on Lignum Oak Real Wood Flooring right now!
2 notes
·
View notes
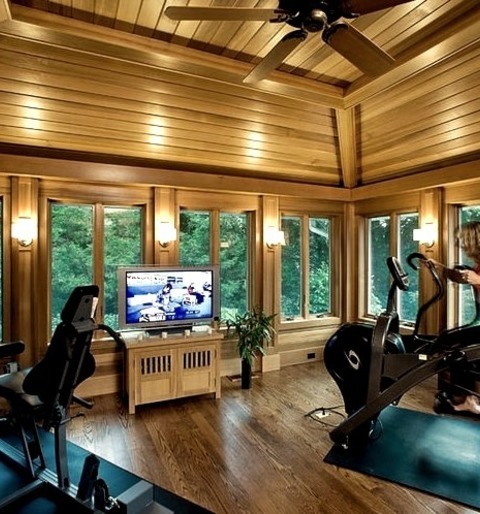
Photo

Multiuse (New York)
#Multiuse home gym - mid-sized contemporary medium tone wood floor multiuse home gym idea with brown walls flat screen#sturdy solid wood#wood flooring#slanted ceiling#fitness#white oak#tv stands
3 notes
·
View notes
Text
Must-Have Flooring Accessories: From Underlays to Trims and Beyond
Flooring accessories are crucial for enhancing the longevity and appearance of your floors. While flooring materials like wood, vinyl, or tile are the main elements, flooring accessories play a vital role in creating a polished and functional finish. This guide walks you through the must-have flooring accessories that will elevate your flooring and help you achieve a flawless look in your space.
Underlayments: Setting the Foundation for Comfort and Stability
Underlayments are materials installed beneath the primary flooring to provide additional cushioning, stability, and sound absorption. Available in foam, rubber, cork, and felt, underlays are chosen based on the type of flooring and desired features. For instance, foam underlay is ideal for laminate floors, adding softness and reducing noise, while cork underlay offers natural insulation and anti-microbial benefits for hardwood floors. Underlays also help smooth out subfloor imperfections, leading to a more even surface. By investing in the right underlay, you can increase comfort underfoot and prolong the life of your flooring.
Floor Trims and Molding: Aesthetics and Seamless Transitions
Floor trims and molding create smooth transitions between rooms and provide a finished edge to floors. These accessories come in various styles, such as T-moldings for equal-level transitions, reducers for uneven levels, and end caps for meeting doorways. Not only do they improve aesthetics by hiding gaps, but they also protect edges from damage. Choosing a trim color and finish that complements your flooring can tie a room together beautifully, adding a professional look to any flooring installation.
Baseboards and Skirting Boards: Framing the Floor
Baseboards, or skirting boards, are installed along the wall at floor level to cover gaps between the wall and flooring and protect the wall from scuffs. Typically made from wood, MDF, or PVC, they come in a range of designs to match various interior styles. Whether you prefer a minimalist or ornate look, baseboards add structure and sophistication. Regular maintenance, like cleaning and touch-up painting, can keep baseboards looking fresh and contribute to the overall aesthetic appeal of your flooring setup.
Floor Adhesives: Ensuring Secure Installation
Floor adhesives are crucial for securing tiles, vinyl planks, or other flooring types that need bonding to the subfloor. There are different types of adhesives designed for various flooring materials, each offering specific benefits in terms of moisture resistance, flexibility, and strength. Using the right adhesive is essential to avoid shifting, warping, or loosening over time. For DIY enthusiasts, choosing high-quality, easy-to-apply adhesives ensures a more durable and stable installation, preventing potential flooring issues down the line.
Grout and Caulk: Filling Gaps for Strength and Style
Grout and caulk fill the spaces between tiles, providing structural stability and a finished look. Grout is generally used for larger gaps, while caulk is better suited for narrow spaces. These materials come in various colors to match or contrast with the flooring, allowing you to personalize your floor’s appearance. In addition to aesthetics, grout and caulk prevent moisture from seeping under tiles, reducing the risk of damage. Properly sealing and maintaining grout can keep floors looking clean and polished for years.
Floor Protection Pads: Preventing Scratches and Wear
Floor protection pads are small but mighty accessories that shield floors from scratches and scuffs caused by furniture movement. These pads, usually made from felt or rubber, attach to the bottoms of furniture legs, offering a barrier between furniture and flooring. They’re particularly essential for hardwood, laminate, and tile floors prone to scratches. Installing floor protection pads can reduce noise from furniture movement, prolong the life of your floors, and reduce the need for frequent refinishing or repairs.
Door Bars: Smooth and Stylish Floor Transitions
Door bars are metallic or wooden strips placed in doorways where two different flooring types meet. Available in various finishes like brass, chrome, and wood, door bars provide a polished look while protecting the edges of flooring. Door bars can also accommodate slight height differences between two floors, preventing tripping hazards and ensuring a seamless flow between rooms. Installing door bars is a small investment that can make a significant difference in the overall look and safety of your home.
Stair Nosing: Safety and Style for Staircases
Stair nosing enhances the safety and durability of staircases by providing a non-slip edge and reducing wear on stair treads. Made from rubber, metal, or wood, nosing is designed to be slightly elevated from the stair surface, creating additional grip for foot traffic. Besides safety, stair nosing can also serve an aesthetic purpose by providing a cohesive look that matches your flooring style. Investing in stair nosing can prevent accidents, prolong stair life, and add a professional finish to stair installations.
Floor Sealants and Finishes: Long-Lasting Beauty and Protection
Floor sealants and finishes protect floors from moisture, scratches, and daily wear while enhancing their natural beauty. Whether you have hardwood, stone, or concrete floors, applying a high-quality sealant can preserve color and texture while adding a glossy, matte, or satin finish. Regular sealing helps prevent stains, reduces maintenance needs, and can even add resale value to your home. By choosing the right sealant for your flooring type, you can enjoy durable and beautiful floors for years.
Radiant Floor Heating Mats: Luxury and Warmth
Radiant floor heating mats add comfort and warmth to tile and stone floors, making them perfect for bathrooms, kitchens, or cold climates. These mats are installed beneath flooring and emit gentle, even heat that radiates upward. Floor heating systems are energy-efficient, reducing the need for additional heating sources. Although an investment, radiant floor heating enhances comfort and adds luxury, transforming spaces into cozy retreats during colder months.
Conclusion
Flooring accessories might seem secondary to the main materials, but they are integral to achieving a perfect finish and extending the life of your floors. From underlays and trims to stair nosing and radiant heating, each accessory enhances comfort, durability, or style in its unique way. Whether you’re installing new floors or upgrading existing ones, choosing the right flooring accessories can ensure a polished, professional look while adding value to your home. Investing in these small but impactful details can make all the difference in creating a functional and visually appealing space.
#laminate stair nosing#lvt stair nosing#wooden door bars#amtico stair nosings#laminate flooring stair nose#laminate flooring stair nosing#self adhesive stair nosing#oak nosing for stairs#radiator pipe rose#waterproof vinyl stair nosing#karndean vinyl doorbars#amtico vinyl doorbars#waterproof door bars#wooden stair nosing#wooden door bar#stair nosing laminate#vinyl stair nosing#flooring accessories#wooden nosing for stairs#solid wood door bars#click vinyl flooring doorbars#laminate floor stair nosing
0 notes
Text

Solid Oak Parquet Hardwood Flooring
0 notes
Text
Best Stylish Wooden Flooring Designs for Bedrooms in India

Lamiwood Designer Floor provides or say create a cozy and elegant atmosphere with wooden flooring in your bedroom. From herringbone patterns to oak finishes, wooden flooring adds warmth and sophistication to any room. Explore a range of wooden flooring designs with us that fit for modern and traditional bedroom styles. Visit Lamiwood wooden flooring solution in Gurgaon and find the best rates per sq ft and upgarde your space with premium materials. Get connect with our experts at - +91 – 99995-00117
Website - https://www.lamiwood.in
#bedroom with wooden flooring#outdoor wooden flooring#wooden flooring herringbone#wooden flooring manufacturers in india#herringbone wooden flooring#wooden flooring dealers near me#engineered wood flooring#herringbone pattern wooden flooring#oak wooden flooring#wooden flooring designs bedroom#wooden flooring india#wooden flooring noida#solid wooden flooring#wooden flooring shop near me#wooden flooring rate per sq ft#cost of wooden flooring in india#wooden flooring room design#lamiwood wooden flooring#wooden flooring solution#wooden flooring living room#wooden flooring for balcony#kitchen wooden flooring#wooden flooring for office#wooden flooring kitchen#outdoor flooring
0 notes
Text
#solid european oak flooring#oak flooring#solid oak flooring#solid european flooring#european flooring#european oak flooring#vienna woods
0 notes
Text
Embrace Elegance: The Timeless Appeal of Blackbutt Engineered Flooring.
Blackbutt engineered flooring epitomizes sophistication and durability, making it a popular choice for homeowners seeking to elevate their interior spaces. With its distinctive grain patterns, warm hues, and exceptional strength, Blackbutt engineered flooring offers a perfect blend of beauty and functionality. Let's explore the enduring allure of Blackbutt engineered flooring and discover why it's a preferred option for discerning homeowners.

The Beauty of Blackbutt
Blackbutt timber, native to Australia, is renowned for its stunning aesthetic qualities. Its warm golden tones and distinctive grain patterns create a sense of natural elegance that enhances any room. Whether you prefer a contemporary or traditional aesthetic, Blackbutt engineered flooring adds a touch of timeless beauty to your space, making it a versatile choice for a variety of interior design styles.
Exceptional Durability
One of the key benefits of Blackbutt engineered flooring is its exceptional durability. Engineered wood flooring is constructed with multiple layers of wood veneers bonded together, resulting in a stable and robust product that can withstand heavy foot traffic, moisture, and temperature fluctuations. With proper care and maintenance, Blackbutt engineered flooring retains its beauty and integrity for years to come, making it a wise investment for your home.
Sustainability and Eco-Friendliness
In addition to its aesthetic and durability, Blackbutt engineered flooring is also an environmentally friendly choice. Blackbutt timber is sourced from sustainably managed forests, ensuring responsible harvesting practices and minimal environmental impact. By choosing Blackbutt engineered flooring, you can enjoy the beauty of natural wood while supporting sustainable forestry practices and reducing your carbon footprint.
Versatility in Design
Blackbutt engineered flooring offers versatility in design, allowing you to create a custom look that complements your unique style and preferences. Whether you prefer wide planks for a modern, spacious feel or narrow boards for a more traditional look, Blackbutt engineered flooring can be tailored to suit your aesthetic vision. Its smooth surface and uniform appearance make it easy to coordinate with a variety of decor styles and color schemes.
Conclusion: Elevate Your Space with Blackbutt Engineered Flooring
Blackbutt engineered flooring combines timeless beauty, exceptional durability, and eco-friendliness, making it an ideal choice for homeowners looking to enhance their interior spaces. With its natural warmth, stunning grain patterns, and versatility in design, Blackbutt engineered flooring adds a touch of elegance to any room. Invest in the enduring allure of Blackbutt engineered flooring and elevate your space to new heights of sophistication and style.
For More Information Visit - https://timberfloormelbourne.com.au/
Contact US - Phone - 0466579384 Mail ID - [email protected] Timings - 7am - 5pm
#Engineered Timber Flooring#Spotted Gum Timber Flooring#spotted gum floorboards#Solid French Oak Flooring
0 notes
Photo

Dallas Family Room Loft-Style An illustration of a mid-sized family room with white walls and a medium tone wood floor in the minimalist loft style
0 notes
Photo

Open Family Room Large trendy open concept medium tone wood floor and brown floor family room photo with white walls
#fsc certified#white oak#real wood#unfinished engineered wood#wide plank flooring#unfinished solid wood
0 notes
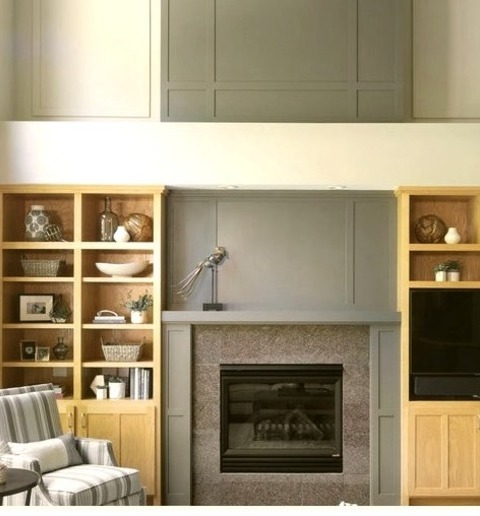
Text
Contemporary Living Room - Home Bar

Example of a large, modern, open-concept living room with a bar, gray walls, a two-sided fireplace made of plaster, a fireplace with a brown floor, and a wall-mounted television.
0 notes
Photo
Multiuse New York Multiuse home gym - mid-sized contemporary medium tone wood floor multiuse home gym idea with brown walls
0 notes
Text
Open in Minneapolis
Example of a huge transitional open concept dark wood floor and brown floor living room design with gray walls, a standard fireplace, a tv stand and a stone fireplace
#refinished wood flooring#two story fireplace#solid wood flooring#exposed beams#two story great room#soffit#painted oak
0 notes
Text
Engineered Oak Timber: The Pros & Cons of Oak Timber Flooring
Engineered oak flooring consists of a thin hardwood top layer, known as a veneer or wear layer, over reinforced composite plywood core layers. Sometimes, plywood can be replaced with oriented strand board (OSB), formed of wood strands glued and crushed together. Engineered wood gives a homeowner the look of a solid wood floor at a lower cost.
In comparison, solid wood flooring - the second most prevalent type - is made entirely of solid wood. This flooring is usually more expensive than engineered oak timber flooring, but it also lasts longer because it can be refinished multiple times.
Pros Lower Cost
Everything about engineered wood flooring is less expensive than solid wood flooring. However, this is only true for similar wood species; for example, an engineered oak floor may be less expensive than a solid oak floor. However, an engineered oak floor can be cheaper than a solid one.
Temperature and Moisture Resistance
Despite composite core layers, oak-engineered flooring is less open to temperature and moisture fluctuations than solid wood flooring. Though there may still be some warping—typically, if moisture concerns (such as a standing pool of water) are not addressed—the quantity of swelling and shrinking is significantly less than that found in a solid wood floor.
Environmentally Conscious
You should go with European oak flooring if you are worried about the environment. These flooring utilise less hardwood per board than solid wood floors, which might be a decisive factor in choosing exotic or uncommon wood species. These floorings are eco-friendly and sustainable because they use less harmful glue to connect layers and produce little to no sawdust. However, this varies from business to company, so check the environmental certifications of the manufacturer you purchase from.
Cons Limited Resurfacing
Because of the veneer layer, oak timber flooring can only be sanded and refinished a few times before the hardwood erodes and reveals the core layers. The width of the veneer layer determines the number of times you can resurface. A 1/6-inch layer, for example, will outlast a 1/16-inch layer.
High Level of Maintenance
Since the surface layer of an engineered wood floor is composed of hardwood, you will need to constantly maintain your floor to keep its quality—exactly as you would with a solid wood floor. Fading, scratches, and dents are all frequent problems with wood floors, but they may be lessened and avoided using correct preventive measures.
Low Quality
Some manufacturers may employ inferior materials in their flooring to save time and money, resulting in floors with low structural strength. Before selecting a manufacturer, conduct a thorough investigation.
Maintenance and Care
Your engineered oak flooring requires similar maintenance as a solid wood floor. Regularly sweep and gently mop the floor as needed, and do your best to avoid dents and scratches (pro-tip: attach felt to the bottoms of your furniture to resist them from damaging the floor every time you shift a chair.
Use doormats or rugs in heavy traffic areas, and stay away from harsh chemicals and excess water if you don't want your floor's finish to flake off. Also, sand your floor only if you are sure the veneer layer is strong enough to bear the aggression of refinishing, or else, you will expose the core layers.
Conclusion Even though solid wood floors typically last longer and are more temperature and moisture-resistant, engineered and solid wood floors need roughly the same amount of upkeep. Suppose you are on a tight budget and want to practise environmental responsibility without compromising a great hardwood floor's elegant, classic look. In that case, oak-engineered flooring is an excellent option.
At Timber Floor Collective, you will get various flooring options for your home. For more queries regarding engineered oak flooring in Sydney, contact us, and we will immediately assist you.
#European oak flooring#oak timber flooring#engineered oak flooring in Sydney#oak-engineered flooring#engineered oak flooring#engineered oak timber flooring#Engineered oak flooring#Timber Floor Collective#Sydney#solid timber flooring#engineered timber floors#hardwood flooring
0 notes
Text
A Complete Guide to Engineered Wood Flooring: Benefits, Styles, and Installation
Engineered wood flooring has become one of the most popular choices for homeowners and interior designers due to its combination of durability, aesthetic appeal, and ease of installation. Unlike traditional hardwood, engineered wood consists of multiple layers that improve its stability and resilience, making it ideal for modern homes that need to balance style with practicality. This guide will walk you through everything you need to know about engineered wood flooring, from its construction and benefits to the various styles available and the best methods for installation. Whether you're looking to upgrade a single room or outfit your entire home, engineered wood flooring offers a versatile and cost-effective solution.
Engineered wood flooring is designed to offer the aesthetic beauty of real hardwood combined with modern technology to enhance durability and ease of installation. It consists of a top layer of real wood veneer, supported by multiple layers of plywood, fiberboard, or high-density fiberboard (HDF). These layers are pressed together under high pressure to create a plank that mimics solid wood but is more resistant to changes in moisture and temperature. This construction makes engineered wood an excellent choice for various environments, including areas with fluctuating humidity, such as basements or kitchens.
The growing popularity of engineered wood floors can be attributed to several factors. Firstly, it offers a wide range of design options, as the top layer can be crafted from various wood species, including oak, maple, and walnut. Secondly, it’s easier to install than solid hardwood, as it can be installed using floating, glue-down, or nail-down methods. Lastly, its cost-effectiveness, especially when considering long-term durability and maintenance, makes it a smart investment for homeowners.
Understanding the Construction of Engineered Wood Planks
The construction of engineered wood flooring is what sets it apart from traditional hardwood. The top layer, or "wear layer," is a thin slice of real wood that provides the visual and tactile qualities of genuine hardwood. Beneath this layer, the core consists of multiple layers of plywood or high-density fiberboard (HDF), which are stacked in a crisscross pattern. This structure gives engineered wood its enhanced stability and resistance to warping, bending, or shrinking, which can occur with solid wood in humid or dry conditions.
The thickness of the wear layer varies, typically ranging from 1mm to 6mm. Thicker wear layers allow for the floor to be sanded and refinished more times, extending its lifespan. Meanwhile, the core layers are designed to enhance structural integrity. The crisscross pattern of the plywood layers minimizes expansion and contraction, making it ideal for environments with fluctuating temperatures. The base layer, typically made from softwood or another hardwood species, adds further stability to the plank.
Benefits of Engineered Wood Flooring
Engineered wood flooring offers numerous benefits over traditional solid wood and other flooring options. One of the primary advantages is its dimensional stability. Unlike solid hardwood, which expands and contracts with changes in temperature and humidity, engineered wood is less prone to these fluctuations due to its layered construction. This makes it suitable for installation in areas where solid wood would typically not be recommended, such as basements or rooms with radiant heating.
Another key benefit is its versatility in design. Since the top layer is real wood, engineered flooring offers the same authentic appearance as solid hardwood, allowing you to choose from a wide range of species, finishes, and textures. Additionally, engineered wood is available in wider plank sizes, giving homeowners more flexibility when creating their desired aesthetic.
From a cost perspective, engineered wood is often more affordable than solid wood, especially when considering the long-term value. It also requires less maintenance and, depending on the thickness of the wear layer, can be sanded and refinished several times over its lifespan. Engineered wood planks are easier to install, making them ideal for DIY projects or quicker installations in both residential and commercial settings.
Engineered Wood Flooring Styles
Engineered wood flooring comes in a variety of styles, each suited to different design aesthetics. Some of the most popular styles include classic, modern, rustic, and distressed finishes. Classic engineered wood floors, like oak and maple, offer a timeless look that works well in both traditional and contemporary spaces. These floors often have a smooth finish and are available in various shades, from light to dark, allowing you to match the flooring to your interior décor.
For a more modern look, wider and longer planks are trending, as they create a streamlined, spacious feel. Exotic woods like bamboo and teak are also gaining popularity, adding a unique and luxurious touch to modern interiors. Rustic and distressed styles, on the other hand, provide a more textured and natural appearance, with features like hand-scraped surfaces and wire-brushed finishes that give the floor a weathered, lived-in look.
Customization options for engineered wood also include various finishes, from high gloss to matte, and different edge profiles, such as beveled or square edges, allowing for a truly personalized look.
How to Choose the Right Engineered Wood for Your Space
Choosing the right engineered wood flooring for your home or office requires careful consideration of factors like room usage, foot traffic, and existing interior design. If you’re installing flooring in a high-traffic area such as a hallway or living room, consider opting for engineered wood with a thicker wear layer that can withstand frequent use and be refinished multiple times. For spaces prone to moisture, like kitchens and basements, engineered wood with water-resistant core materials will perform better than traditional hardwood.
Your choice of wood species will also influence the overall look and feel of the room. Light-colored woods, such as oak or ash, can make a space feel larger and more open, while darker woods, such as walnut or mahogany, can add warmth and elegance to the space. The plank size and finish should complement your existing furniture and décor. For smaller rooms, wider planks can make the area appear more spacious, while narrower planks may be better suited to larger spaces to create a balanced look.
Conclusion
Engineered wood flooring offers the perfect combination of beauty, durability, and flexibility, making it a top choice for homeowners and designers alike. Its layered construction provides enhanced stability, making it suitable for a variety of environments, while its diverse styles and finishes ensure a perfect match for any interior design. Whether you're looking for a cost-effective alternative to solid hardwood or need a flooring solution for high-moisture areas, engineered wood delivers both performance and aesthetic appeal. With proper care, this flooring option can provide decades of use, making it a wise investment for any space.
#jordans flooring#jordans wood flooring wimbledon#pro tek flooring#flooring wimbledon#wimbledon flooring#jordan wood#bespoke wooden flooring#wandsworth wood flooring#wandsworth flooring#bespoke wood flooring#woodflooring#engineered wood flooring london#wood flooring#wooden floors london#hardwood flooring london#parquet flooring#engineered wood flooring#herringbone flooring#laminate flooring#lvt flooring#luxury vinyl flooring#oak flooring#engineered herringbone#engineered wood#solid wood flooring#white oak flooring#wood laminates#real wood flooring#grey wood floors
1 note
·
View note
Photo
Dublin Living Room Home Bar Inspiration for a large contemporary open concept medium tone wood floor living room remodel with a bar, white walls and a wall-mounted tv
0 notes