#so much backstitch
Explore tagged Tumblr posts
Text

This really illustrates the difference backstitching makes.
I hate backstitching. It's tedious and, at times, can be difficult to find the right spot. This pattern has been especially so because not only does it switch between 1 and 2 strands, the lines keep ending in between the holes.
And yet, as much as I hate it, I love the results.
8 notes
·
View notes
Text

Deadly Aquarium SAL: Exhibit #5
A zoanthid coral.
23 notes
·
View notes
Text


Visible Mending: Puppy Edition
#to be fair that gray dog bed is almost 20 years old the puppy didn't tear it so much as it wore out enough to start pulling stuffing through#sewing#visible mending#mending#patching#my puppy didn't destroy the top bed my neighbor's pup did and they were going to throw it out so I asked if I could take it for my porch#I think it fixed up nicely#I also took a dog bed my parents' puppy ripped and fixed it to go in the back of my car but I didn't take any photos#someone nearby was giving away unexpected puppies back in April if you're wondering why everyone seems to have puppies#blanket stitch#backstitch#ladder stitch
17 notes
·
View notes
Text
Another installment in the ‘Tim erased himself via time travel Saga’, this time featuring Conner Kent and the Core Three(?)’s reaction to learning why they always felt something was missing
#my writing#my fanfic#tim drake#Conner Kent#a backstitch in time#I posted this last night and pretty much flopped into bed the second after I hit post lol so it’s only getting put up on tumblr now
15 notes
·
View notes
Text

Halfway done with the hedgehogs :3
#fortune's crafts#I decided to do the backstitch on the ladybug and surprisingly it turned out well#it definitely looks better with backstitching#which is a shame because I hate backstitching xD#need to stop buying kits with so much of it ^^’’
3 notes
·
View notes
Text
All i do these days is backstitch and watch atla
2 notes
·
View notes
Text
I feel like knowing how to sew basic backstitch is really like the #1 most important thing in our modern society
#i bought a moncler down coat for $100 because the zipper was broken and just#... got another zipper for $25 and sewed it on myself#by hand#with a basic backstitch#you can fix so much with imperfect stitches and a little gumption#for context that is a $2k down coat for like $150 incl shipping#because 'the zipper is broken boohoo!'#i even put the branded zipper pulls back on the replacement zipper took me 3 hours
0 notes
Text
I was excited to dabble in some crochet this evening (for the first time in years) but turns out I gave *all* of my wool to charity in the big clear out ready for the move. oops. of course I suddenly want to use it now it's gone. why am I like this
#I guess this means I have to continue with the cross stitch project that I started over a year ago#but it is now on backstitching and turns out I hate it!! what an annoying process!#takes too much brain#i like cross stitch because it's just cross cross cross. easy peasy. don't make me count outside the grid i beg of you#i'm so tired but my brain is really amped and I need to do something with my hands while i watch x files!
1 note
·
View note
Text
not to be dramatic but I'm starting to feel the need to quilt the way some of you talk about needing to get into the ocean
#i need it. i need to poke myself and plan quilts and feel the way the fabric bunches up#i need to backstitch and hold the needle in my teeth and make my lips bloody from fucking around w it too much#i need to quilt for hours and then have the status effects kick in. i need to smell the iron and burn my fingers#i need the blisters from pulling needles and the dents from not using a thimble#quilting makes me feel the same way reading tarot cards makes me feel. i feel small but important and useful#i can't do much but i can make a quilt. i can make it sturdy and sew it by hand.#i love this. i never ever thought i would love it like this but i do#also: quilting for hours and then exercising makes me feel accomplished in ways i didn't think was possible#AND i can do it while watching my little shows#anyway. i have three days off of work. im going to get so bloody and i am so excited#it wouldn't be a quilt without some blood in it
1 note
·
View note
Text

Fall Fun - Mill Hill kit
The last beaded kit for a while. This one was tough - I'm not sure if I got a weird kit or what, but the given colors weren't matching up with the pattern/pictures. The one downside to these small kits is that they don't label the floss by number or name. The cute little purple bead flowers make up for it, IMO.
#cross stitch#stitching#crafts#beading#kit#pumpkins#crow#signpost#i really do love the curly vines and whatnot#backstitching adds so much to a piece#and i forgot the crow has little french knot toesies xD
1 note
·
View note
Note
Any tips on learning to make buttonholes? I've been putting it off for.... *checks notes* like three years.... but better late than never and all that. I don't have any fancy machines so I gotta do it by hand but that seems right up your alley.
Thanks!
It IS up my alley, yes, I do most of my buttonholes by hand!
I'm actually part way through filming an 18th century buttonhole tutorial, but I expect it'll be a few more weeks before I finish that and put it on the youtubes, so in the meantime here's the very very short version. (The long version is looking like it'll probably be about 40 minutes maybe, judging by how much script I've written compared to my last video?)
Mark your line, a bit longer than your button is wide. I usually use a graphite mechanical pencil on light fabrics, and a light coloured pencil crayon on dark ones. (I have fabric pencils too, but they're much softer and leave a thicker line.) You may want to baste the layers together around all the marked buttonholes if you're working on something big and the layers are shifty and slippery. I'm not basting here because this is just a pants placket.
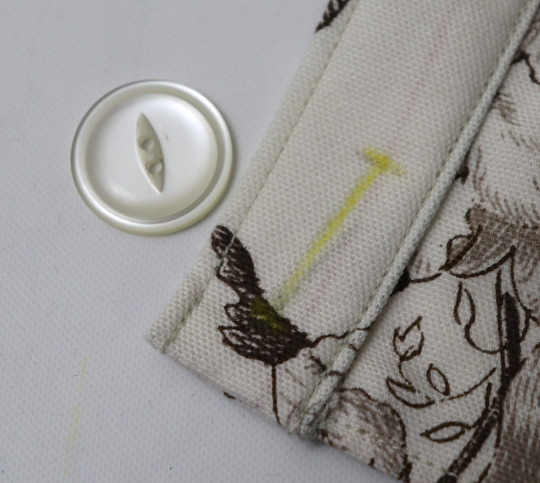
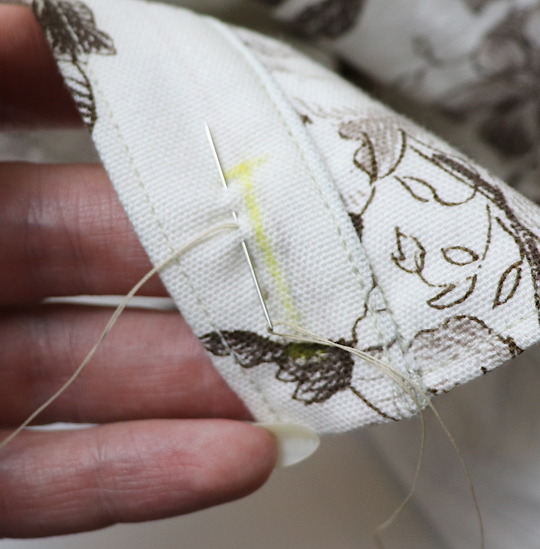
Do a little running stitch (or perhaps a running backstitch) in fine thread around the line at the width you want the finished buttonhole to be. This holds the layers of fabric together and acts as a nice little guide for when you do the buttonhole stitches.
Cut along the marked line using a buttonhole cutter, or a woodworking chisel. Glossy magazines are the best surface to put underneath your work as you push down, and you can give it a little tap with a rubber mallet if it's not going through all the way.
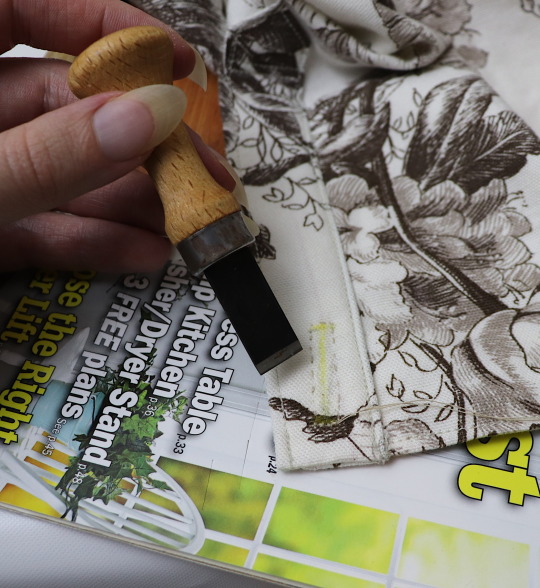
I'm aware that there are some people who cut their buttonholes open using seam rippers, and if any of them are reading this please know that that is abhorrent behaviour and I need you to stop it immediately. Stop it.
Go get a buttonhole cutter for 10 bucks and your life will be better for it. Or go to the nearest hardware store and get a little woodworking chisel. This includes machine buttonholes, use the buttonhole cutter on them too. If you continue to cut open buttonholes with a seam ripper after reading this you are personally responsible for at least 3 of the grey hairs on my head.
Do a whipstitch around the cut edges, to help prevent fraying while you work and to keep all those threads out of the way. (For my everyday shirts I usually do a machine buttonhole instead of this step, and then just hand stitch over it, because it's a bit faster and a lot sturdier on the thin fabrics.)
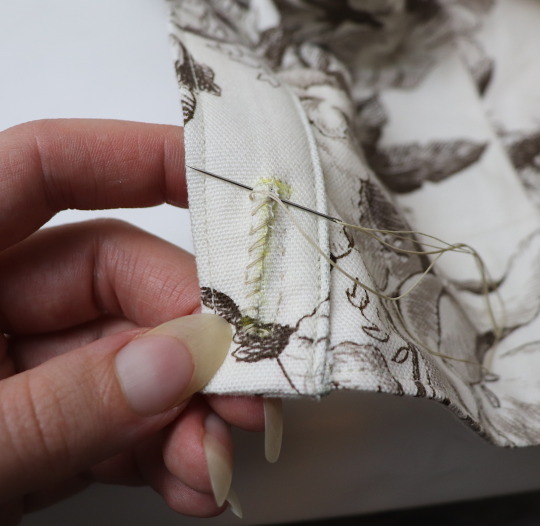
I like to mark out my button locations at this point, because I can mark them through the holes without the buttonhole stitches getting in the way.
For the actual buttonhole stitches it's really nice if you have silk buttonhole twist, but I usually use those little balls of DMC cotton pearl/perle because it's cheap and a good weight. NOT stranded embroidery floss, no separate strands! It's got to be one smooth twisted thing!
Here's a comparison pic between silk buttonhole twist (left) and cotton pearl (right). Both can make nice looking buttonholes, but the silk is a bit nicer to work with and the knots line up more smoothly.
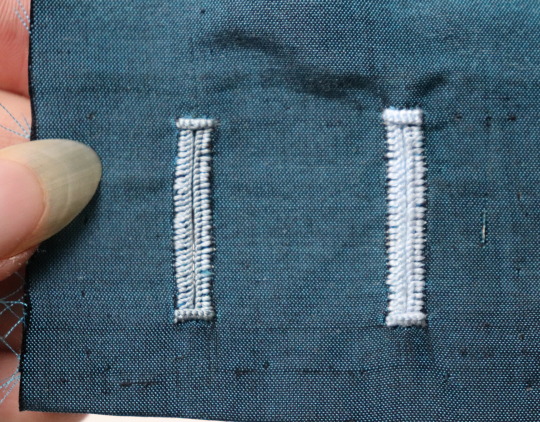
I've actually only used the silk for one garment ever, but am going to try to do it more often on my nicer things. I find the cotton holds up well enough to daily wear though, despite being not ideal. The buttonholes are never the first part of my garments to wear out.
I cut a piece of about one arm's length more or less, depending on the size of buttonhole. For any hole longer than about 4cm I use 2 threads, one to do each side, because the end gets very frayed and scruffy by the time you've put it through the fabric that many times.
I wax about 2cm of the tip (Not the entire thread. I wax the outlining/overcasting thread but not the buttonhole thread itself.) to make it stick in the fabric better when I start off the thread. I don't tend to tie it, I just do a couple of stabstitches or backstitches and it holds well. (I'm generally very thorough with tying off my threads when it comes to hand sewing, but a buttonhole is basically a long row of knots, so it's pretty sturdy.)
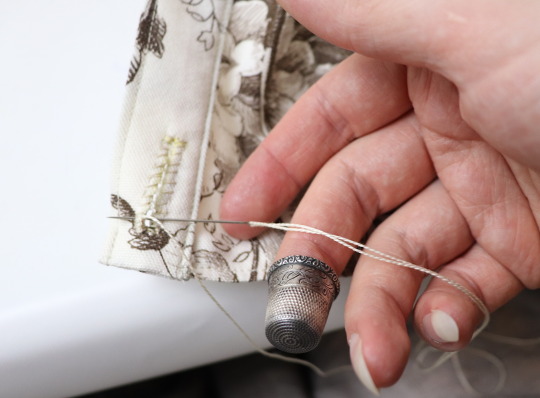
Put the needle through underneath, with the tip coming up right along that little outline you sewed earlier. And I personally like to take the ends that are already in my hand and wrap them around the tip of the needle like so, but a lot of people loop the other end up around the other way, so here's a link to a buttonhole video with that method. Try both and see which one you prefer, the resulting knot is the same either way.
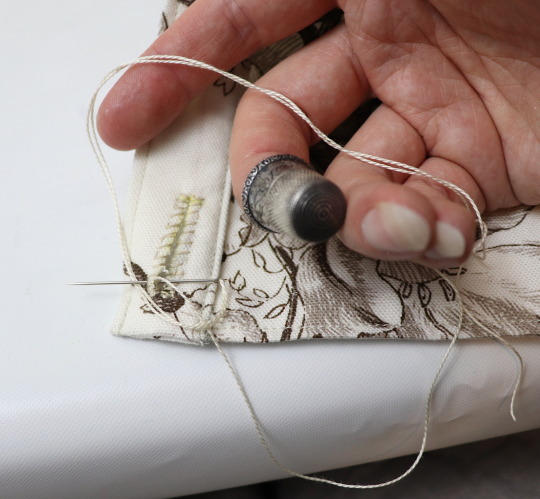
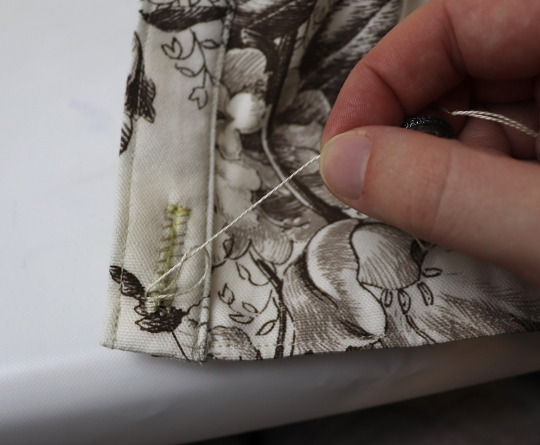
Sometimes I can pull the thread from the end near the needle and have the stitch look nice, but often I grab it closer to the base and give it a little wiggle to nestle it into place. This is more necessary with the cotton than it is with the silk.
The knot should be on top of the cut edge of the fabric, not in front of it.
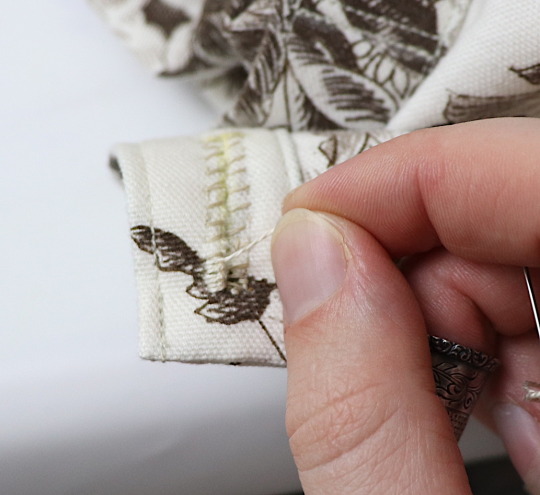
You can put your stitches further apart than I do if you want, they'll still work if they've got little gaps in between them.
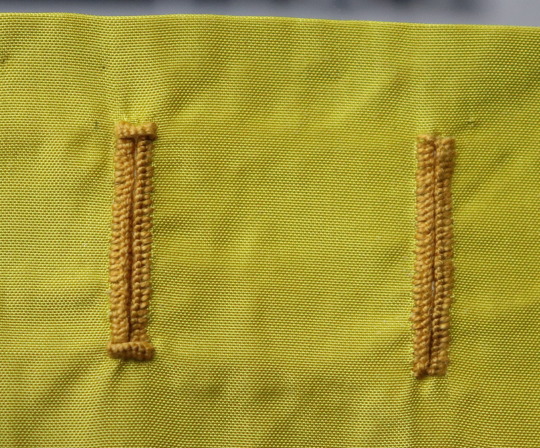
Keep going up that edge and when you get to the end you can either flip immediately to the other side and start back down again, or you can do a bar tack. (You can also fan out the stitches around the end if you want, but I don't like to anymore because I think the rectangular ends look nicer.)
Here's a bar tack vs. no bar tack sample. They just make it look more sharp, and they reinforce the ends.
For a bar tack do a few long stitches across the entire end.
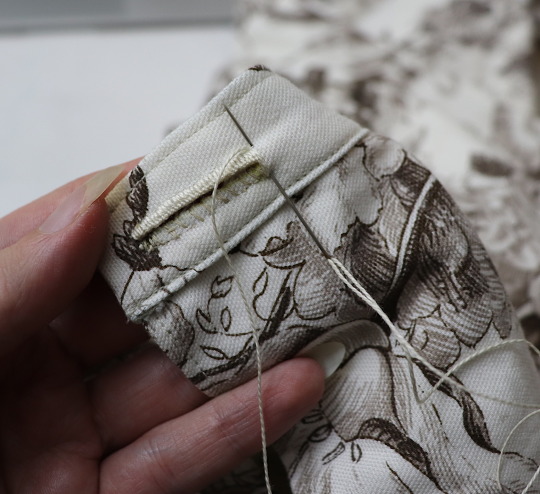
And then do buttonhole stitches on top of those long stitches. I also like to snag a tiny bit of the fabric underneath.
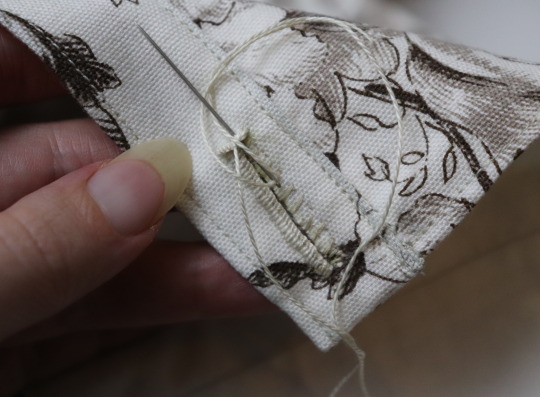
Then stick the needle down into the fabric right where you ended that last stitch on the corner of the bar tack, so you don't pull that corner out of shape, and then just go back to making buttonhole stitches down the other side.
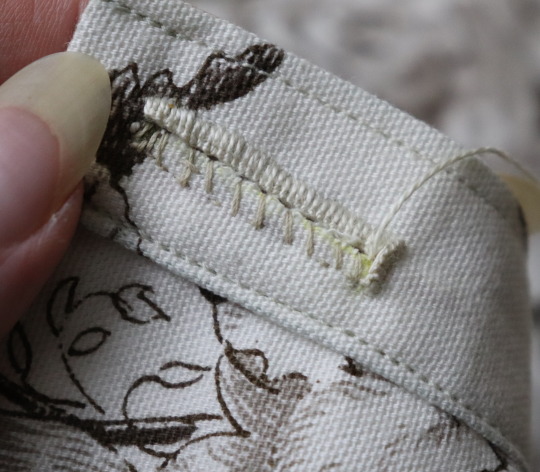
Then do the second bar tack once you get back to the end.
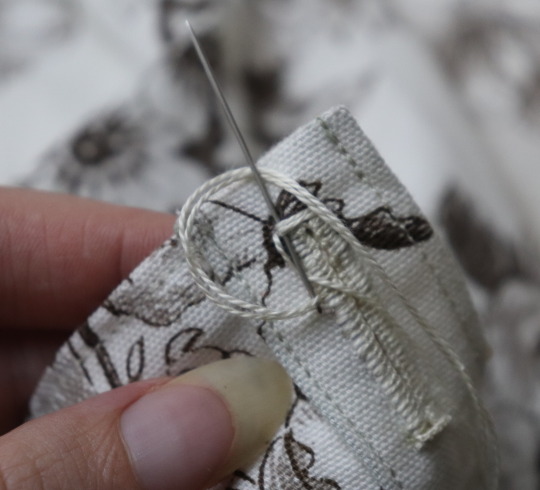
To finish off my thread I make it sticky with a bit more beeswax, waxing it as close to the fabric as I can get, and then bring it through to the back and pull it underneath the stitches down one side and trim it off.
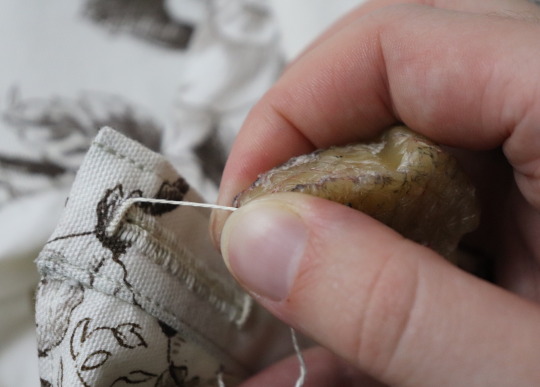
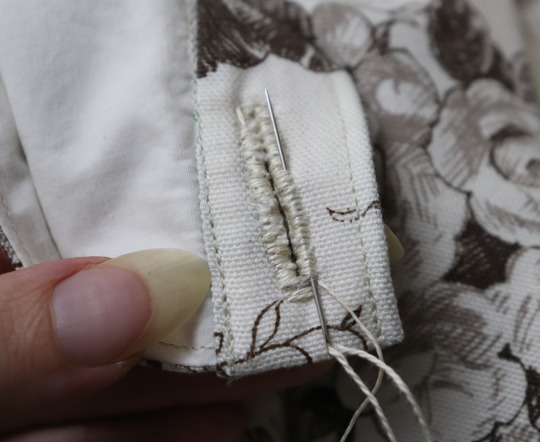
In my experience it stays put perfectly well this way without tying it off.
Voila! An beautiful buttonholes!
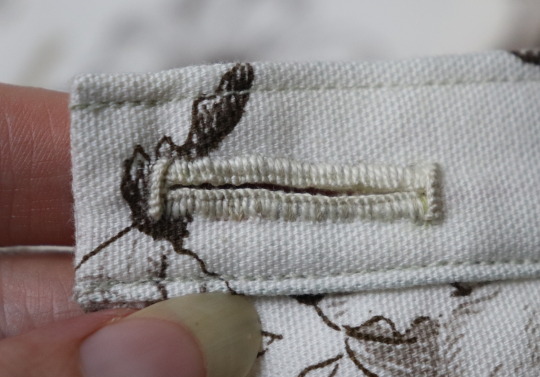
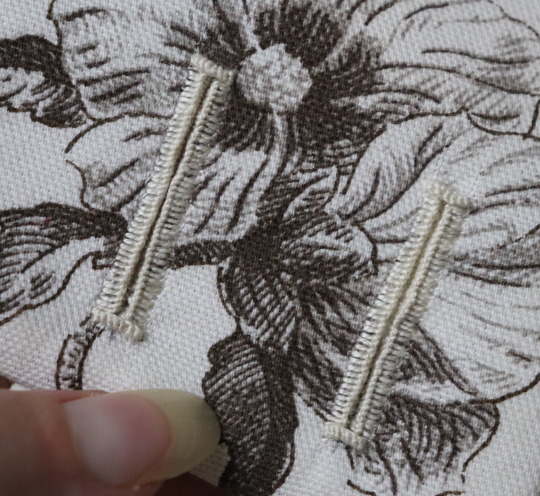
If you want keyhole ones you can clip or punch a little rounded bit at one end of the cut and fan your stitches out around that and only do the bar tack at one end, like I did on my 1830's dressing gown.
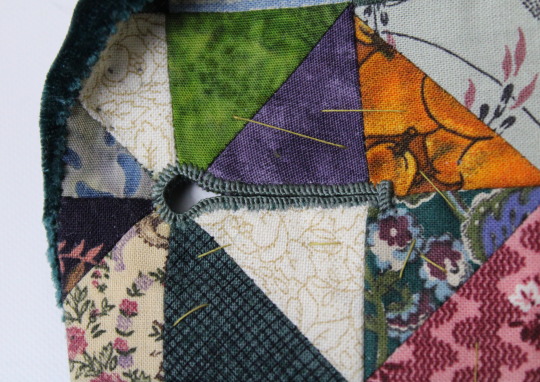
(I won't do that style in my video though, because they're not 18th century.)
Do samples before doing them on a garment! Do as many practice ones as you need to, it takes a while for them to get good! Mine did not look this nice 10 years ago.
Your first one will probably look pretty bad, but your hundredth will be much better!
Edit: Video finished!
youtube
And here's the blog post, which is mostly a slightly longer version of this post.
#ask#buttonholes#sewing#hand sewing#sewing tutorial#I've been procrastinating on the video this week#I want it done! I don't want to work on it I want new projects! I want to cut out more gloves!#currently forcing myself to do the last few buttonholes on these pants and then maybe I can cut out new gloves? as a treat?#but I hope I get some filming done tomorrow too
4K notes
·
View notes
Text
WIP Wednesday!
Sometimes it's funny how only being partway done can temporarily change the tone of a piece. It will eventually say "I'm not here to be just average, I'm here to be awesome"
Pattern by the awesome stitchrovia on Etsy.

8 notes
·
View notes
Note
Do you need a sewing machine to start making shirts and vests? Is hand sewing an option worth considering, or should I invest in a machine, in your opinion?
That's really a matter of personal preference!
Do you need a machine? Absolutely not! Every garment ever made before the 1840's was sewn by hand, and a lot of them after that too. I've sewn many garments completely by hand, including the early 18th century tiddy-out-violinist shirt, these bright orange breeches, and this green waistcoat.

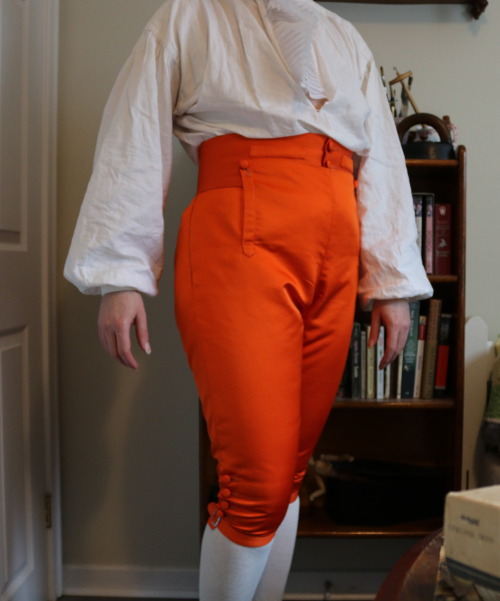
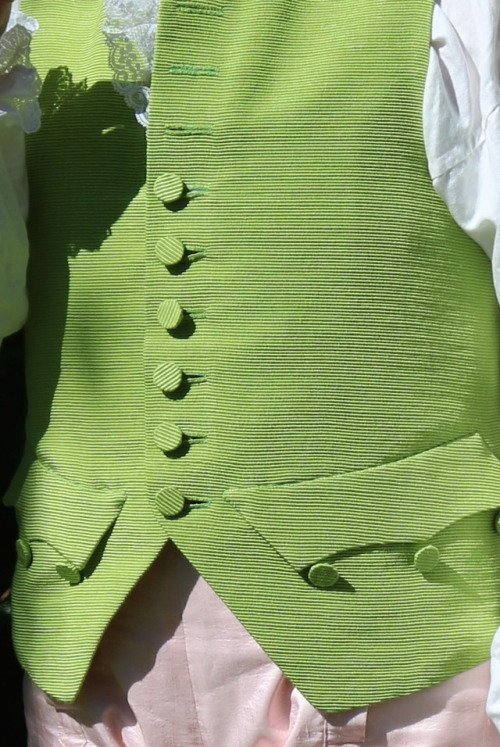
Is it nice to have a machine? I think so, but again, individual opinions vary!
One of the costumers I follow sews everything 100% by hand because she finds it meditative and isn't interested in using a machine at all. Some people hate hand sewing and prefer to do everything by machine, with maybe a bit of hand finishing if they absolutely can't avoid it.
I do about a 50/50 split overall, maybe skewing a bit more towards hand sewing. I like to do pants, shirts, and nightgowns mostly by machine with some hand finishing, but for jackets and waistcoats I usually do considerably more hand sewing than machine, because I like 18th century tailoring techniques and think they give a nicer looking result. I do most of my buttonholes by hand, or I do them by machine first and then cover them in hand stitching.
Most people who sew do at least some of it by machine, but again, I don't know which way you prefer to work, so I'd suggest trying out both to see how you feel abut them.
For hand sewing, I suspect a lot of people hate it because they're using shitty needles and/or shitty thread, and perhaps haven't found good resources for hand sewing techniques.
Here's a post of hand sewing advice that I found quite helpful a decade ago. Use good needles because the eyes of the cheap ones have jagged edges and will ruin your thread! Use nice thread because the wrong kind will be twisty and tangly and will fray more!
Thimbles are good and useful, and typically they go on the middle finger of your dominant hand, and you use them to push the needle. I prefer metal thimbles and dislike using leather ones, but some people prefer the leather ones, or rubber ones.
The metal ones come in sizes, and I don't know how to find out your size aside from trying them on in person, but I know I'm a size 11.
One very important thing is that if you're hand sewing a garment, look for hand sewing specific instructions on how to do the construction techniques you're going for. A lot of the time when someone nowadays is trying to figure out how to hand sew a thing they'll just try and copy the machine sewn version, and a lot of the time that's inefficient and more difficult and the result looks worse, because machines and hands work very differently!
This is something I'm going to briefly discuss in the outro to the very long shirt video I'm working on, because it's so very common, and I've done it too! On several of my earlier hand sewn shirts I didn't know to turn the edge in on the front slit and do a little narrow hem, so I instead sewed on a facing for the front slit and cut and turned it, just like I'd seen on machine sewn shirts. This made it about 3x more time consuming, and the result was much bulkier and looked worse.
I've got so many more things to say about sewing but it's almost bedtime and I don't want to make this post too long.
For machine sewing, again there's a lot of personal choice. Some people like newer machines, some people like vintage or antique ones. I'm one of the ones who prefers solid metal vintage machines. I grew up using an old cast iron Singer, and the newer domestic machines just feel so plasticy and insubstantial to me. I'm used to ones that just do straight stitch and can also go backwards, but some people are perfectly happy with ones that can't even backstitch.
I do think that for a beginner the vintage machines are a better deal, because if you're patient and look around for a while you can snag one for really cheap at a thrift store, yard sale, facebook marketplace, etc. Also they're mostly metal and therefore harder to break.
I recently got a Pfaff (from I think the 1960's?) at an estate sale for 25 bucks. The zig zag mechanism is stuck and needs fixing, but I cleaned & oiled it up and it works just fine for regular straight stitching.
There are SO MANY online resources for how to clean, oil, and fix vintage sewing machines, especially the more popular brands, and a lot of the time cleaning & oiling is all they need. Read the manual and get an oil bottle with a nice long pointy thing so you can reach all the parts, and get some compressed air to whoosh out the fuzz. If it's old and hasn't been used in years, turn the hand wheel and observe every single place where metal rubs against metal, and Make It Greasy There.
(If you don't have the manual, you can often find those online too. I even found the service manual for my new-old Pfaff! I have the original users manual, but this one's for the people doing repairs.)
Oh this post is getting much too long! If you don't know yet if you like machine sewing, try seeing if you can use one without owning it, perhaps at a sewing class or in a makerspace. I know some libraries can loan out machines. A sewing class would probably be a good idea actually, if there are any available where you live!
Much like how you'll have a bad time hand sewing if you've got shitty supplies and no proper instructions on good techniques, you'll have a bad time machine sewing if it's not oiled well and if the tension is uneven.
There are so so very many things to learn about sewing and I hope I'm not making it sound too overwhelming, because I promise it's not if you take it one step at a time!
Also, when someone who's been sewing for a long time says "You may think you can ignore (piece of sewing advice), but actually that's bad and you will regret it", they're usually right. Oh, how I regret not learning to use a thimble years earlier than I did...
Sorry this post is so long, I hope it's helpful!
Basically, there's no one best way to sew anything, and you should try different stuff and see what works best for you, because everyone has different preferences.
539 notes
·
View notes
Note
hi! i’m self taught in embroidery and am trying to get better. how do you stitch words? specifically the ones that look like handwriting and not serif fonts. the way that you make each stitch blend with the next looks so closely to writing with pen that i had to zoom in to figure out it was even embroidery. thank you and have a good week!
Hey there! I tend to use one of three stitches for stitching out text - stem stitch, backstitch, or split stitch. It depends on what I'm going for with the design and the scale of the work. Given the timing of this ask, you probably want stem stitch specifically.
Not entirely related to types of stitches but general advice. I often find that newer embroiderers tend to leave too much space between stitches. Finding the balance is key, but the best way to describe how stitches should look is that they are overlapping each other slightly when you are actually stitching it. Otherwise you get gaps. This is true especially of stem stitch and long-and-short stitch. It'll look correct and smooth and even when it's all stitched out though.
219 notes
·
View notes
Text
Every time I sharpen a knife I am astounded by the control and perception you can exert on the world with your hands. You're just rubbing some metal over a rough flat surface, but you can tell when the surface is slightly not flat by a few micrometers because the blade will scrape across it unevenly. You can perfectly follow a curved edge to set an even grind by pure feel of friction, even with confounding factors like an uneven stone and haphazardly applied water as lubricant.
You can maintain a consistent angle and reset that angle multiple times as you flip from side to side, you can feel out that your draw length is the same and you feel a kind of innate wrongness when you don't draw long enough on one side as the other. I'm not even particularly good at this and I can get a shaving edge on my knives in a few minutes.
Like, I do other hand crafts, sewing, sure, I can sew a 2mm backstitch seam all day, but there's so much obvious visual feedback to help you do it, here you are on a mode of operation that cannot be perceived visually pretty much at all, and it works!
#knife#redid the edge on my pocket knife and I've gotten much better at handling D2#helps that these stones are much finer than my old ones#but I mean you can get a shaving edge on Inox with a particularly flat river stone I have done it
209 notes
·
View notes
Text
Okay Tim Drake lovers.
We’re making a Batfam fic board.
Tim-centered.
I’ll add my faves here with a couple notes.
Y’all, the comments section is free. Fill ‘er up!
Tim-joins-late-Fics
- How to Accidentally Acquire A Brother by 172
!!UNFINISHED!! Last update in 2022. I’m so sad.
Tim and Jason centric.
I have so much love for this one. The soft growth Jason shows. Tim getting love but being so afraid. Ugh. Tim’s relationships with Ivy and Babs and Jason and aaaaggghhh
- A Backstitch in Time (series) by Megaerakles
Beautiful idiots. On the shorter side, each installment is a new POV.
Timetravel!!!
- The Buzzard (series) by FlightL3ss_Bird1029
I’m not as sure how I feel about this one.
One finished work, others actively updating.
- Dizzy Edges by @jojosquires
!!Unfinished!! Actively updating.
Timetravel! Speedsters being introduced! Soft Jason! Soft Dami! CASS!!!
- Blackbird Singing in the Dead of Night by britishparty
I’d say !!unfinished!! Warning still applies.
Two finished works, but the story is not… conclusive? Concluded?
Deathstroke takes and trains Tim Drake.
Tim and Jason centric second story.
- cards on the table by mgootd
Holy COW have I mentioned I love Tim joins late fics because I LOVE Tim joins late fics.
Tim as a fortune teller, knowing the Wayne’s secrets but staying Out Of It™️. Drake turned street brat.
Tim, Jason, Steph are probably the biggest figures here.
Actually finished. It’s beautiful.
- Tim Drake’s Photo Album (series) by mgootd
My heart. This may be my favorite finished work. And yes, I WILL forever refer to Tim as “bug” now. Thank you, Jason.
I can’t wait to see what else gets added to this series!
- 1-800-GOTHAM by goldfishinabag
!!UNFINISHED!! But updating regularly.
Holy. Cow. This is beautiful. The personalities at play. The Batfam interactions. Yes. Please.
- The Drakes’ Spoiled Brat by @batfambrainrotbeloved / yellow_sprouts on AO3
!!UNFINISHED!! Updating regularly.
First off, this one. If you read none of the others, this one.
Thank you for leading me back into the ways of TRUE Batfam brainrot (*cough cough* beloved).
On the edge of my seat for the next chapter on this.
Batfam Miscellaneous
- Cor et Cerebrum by @audreycritter
All well over 600K words are straight up golden.
This is the one of the only OC heavy fics I’ve truly fallen for, and Kiran Devabhaktuni is such a MOOD.
The Batfam takes are PHENOMENAL. The interpersonal relationships, the trauma dealings, the whole thing. 10/10.
- Undercover and Undercover:Gotham by InvalidStuff
Batkids working together for each other. Every time. BatDad is STRONG. Cuteness overload. Fluff in the sense that punching someone for your siblings is the fluffiest feeling ever.
- Mama Bird (but its your big brother ready to fight god) by @batfambrainrotbeloved / yellow_sprouts on AO3
!!UNFINISHED!!
Batboys protecting batboys.
Disclaimer: Abusive Batman. (At least hyped on fear toxin, hinted at more regularly so far, but unsure.)
- How Rare and Beautiful It Is to Even Exist by popsummer
https://archiveofourown.org/works/27766969
Cassie’s POV. Tim’s funeral.
I cry every time and have read it at least 4 times.
Update: I have now read the rest of the series and they all HURT but worth it.
#batman#tim drake#batfam#batfamily#damian wayne#dick grayson#jason todd#red hood#robin#dc comics#fanfic#night wing#cassandra cain#batgirl#Oracle#barbara gordon#spoiler#stephanie brown#Red Robin#kon-el Kent#Conner Kent#superboy
86 notes
·
View notes