#so i made up a watery solution of black acrylic paint
Text
I am failing winning failing at pen surgery right now
#ok so if you would like the full story#basically i have a limited number of ink cartridges for my pens#so i was like#i need to refill them rather than chuck them#so i made up a watery solution of black acrylic paint#and refilled the cartridge#for a while everything seemed great#until disaster struck#the acrylic paint had dried#clogging up two of my three pens#and pen surgery is required to free them of this cruel fate#as now even if i put ink in it wont work as the tubes and all that are blocked sooo#im trying to ressurect at least one of them buuutt#yeah#writing#writer's problems#writing prompt#fountain pen#fountain pen drama#pen surgery
0 notes
Photo
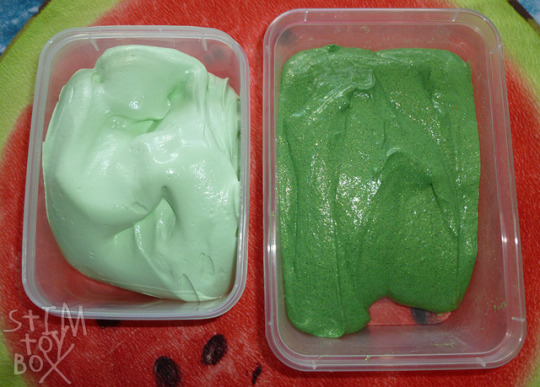
DIY Stim Toys - Butter Slime Update
Earlier this month I bought Daiso paper clay, and I finally had time to try it out in a slime. I want to talk about it a bit, because I ended up with the best stimming slime.
A lot of slimes seem to be made and discussed more with Instagram and YouTube in mind, good for display and occasional playing, but when I make them, I don’t find them to be that good in a practical sense for regular, daily stimming. Glitter slimes still leave odd bits of glitter on my fingers, floams leave tiny polystyrene balls on the floor, fluffy slimes lose their thickness after use, many slimes are still a bit sticky or oozy, etc. In terms of being easy to transport (no risk of oozing out of a container, not needing a bowl or plate under my hands) and making a minimum of mess, I’ve struggled to find the perfect slime.
Just before I found the Daiso clay, I’d tried adding shaving foam and cornflour to a regular white-glue slime to see if it would thicken it up (the dark green slime on the right) into something like a butter slime. And it did; it’s much thicker than a regular slime. It’s lost much of it’s fluff after use, though, and it’s quite oozy and a little sticky. If you want a thicker slime and can’t get Daiso clay or Model Magic, it’s probably worth trying, but I don’t love it.
The slime I made with the Daiso clay (the light green slime on the left) is amazing for stimming, It’s thick, it’s non-oozy and non-sticky, it holds a shape for a short period of time meaning you can mould it like dough, it’s smooth and spreadable, it’s the stretchiest slime I’ve ever handled and it squishes in your hands so wonderfully. It only leaves a slight watery residue on your hands (no shreds of slime) and it’s so thick it will never leak from a container, making it safely portable. It’s this perfect combination of playdough, putty and slime combined in a thick, fluffy, smooth body that just invites squishing, poking, moulding and smoothing. It allows for so many different hand movements and is the most mess-free slime I have ever handled.
It honestly feels like a better, fluffier version of my Blu Tack putty!
My recipe was very simple:
1 pack of Daiso paper clay
2/3 of a cup of white PVA glue
1 teaspoon of borax dissolved in 1 cup of water, added in small amounts as necessary
Food colouring
I mixed the glue and food colouring, and then added the activator solution slowly. Once my slime had come together--and the Lincraft Creative Mates glue I use results in a very jiggly slime for some reason--I kneaded in the clay, a small bit at a time. It took me about twenty minutes of kneading to get all the clay worked into the slime, so be prepared for a fair bit of work (it did make my wrists and shoulder flare). It takes a while to work out the lumps, but once they are, you get a thick, smooth butter slime.
I’ll note that it took me a whole tube of green gel food colouring to get that colour--the white Daiso clay makes the colour fade a lot. You’re probably better to use coloured Daiso clay if you want coloured slime, or use a cheap water-based acrylic paint to colour the slime.
I am honestly in love with this slime--it is the most wonderful thing to handle while watching TV. I absolutely recommend trying it for stimming, especially if you want an every-day use slime. I’ve played with it four times in two days!
Image description under read more cut:
[image description: two green slimes, sitting in two rectangular containers made from clear plastic, the containers resting on a round, red and green watermelon slice pillow. The slime on the left is a very pale green and has a thick dough-meets-pudding type consistency, holding its shape when folded back in on itself. The slime on the right is dark green, studded with fine black and silver glitter, and while it is thicker than normal slime, it is slowly oozing across the bottom of the container.]
#stim toy#stim toys#Daiso#Australia#photo#text#slime#butter slime#tutorial#DIY#stimtoybox#mod K.A.#long post#very long post#flash#glare
34 notes
·
View notes
Text
Watercolour Wednesdays : How to Paint Lips
New Post has been published on https://easythingstodraw.net/watercolour-wednesdays-how-to-paint-lips/
Watercolour Wednesdays : How to Paint Lips
youtube
Watercolour Wednesdays: How to Paint Lips-Easy Things to Draw
This is a water color painting of lips. I just really wanted to go through a different basic part every week. We will see where it goes.
Also, don’t forget to check another tutorial Books I Love #1 – Easy Things to Draw
Hello guys and welcome to a Wednesday watercolor, in this tutorial we will all learn together, since, I this tutorial will try to leave the comfort zone that I have with watercolors. Today we’ll go over how to draw a mouth that you already know we’ll do essentially with watercolors.
One thing I find great about watercolors is that they all come together, it’s not like the oil and the acrylics where you have to buy all the colors separately, in the watercolors comes a good amount of colors together, on the set I’m using come also with a small brush incorporated, I think this set is very good to start because they are not very expensive, buy a palette with a decent amount of colors can range from $15 to $20 dollars.
Now the first thing we have to do to start painting is to prepare our colors, take some water with our brush and rub in the brown color, then we leave the paint that grabbed our brush in one of those little palette areas, then to our brown we add a little bit of black to make it darker…
You must be careful in not adding too much, now I’ll start with the line art and I’ll make with my brush the cupid bow on top, I don’t want to get too wet in this, you can do it, but I’ll go more dry, under the cupid form I’ll put the bottom of the lip, if you want to know more about the lips…
I’ll talk a bit about them, these have two fat pads on the lower lip and on the top has a form similar to an “M” because in the middle of them is the filtrum. Now I’ll let my drawing dry a bit and start mixing darker colors, I will try to go with an orange-brown color and I’ll add those colors until I get to the level that I need, as I said earlier be careful when you are adding the black.
What I usually do is start vaguely until it gets darker and darker, then I start shaping the lip area and it depends on the types of lips where the lights will hit.
Now I’ll go for a wash, which in other words, It would be that to the color I had previously, made it a little brighter with more water and I apply it all over the part of the lower lip and on the filtrum that is above the upper lip, after letting dry that layer, to the color we had previously prepared we add more black and we put it in the places that we find necessary, as for example in the middle of the lips and under the lower lip.
Once done this I think it is necessary to add a little more color to our lips, so I mix some red with orange and also with a lot of water, as I want it to be a light color and I apply it all over the brown area.
Then I take a little more orange and dissolve it until it is quite watery and apply it to the area of the jowls, chin, and at the top of the mouth…
When what I did before is a bit dry I’ll go to apply more black, one thing that I said before about this medium is that I like it and I hate it, I like it because it’s difficult to use and gives you More dexterity for other types of paint and also the feeling of having more control when you are painting…
Another technique that can also be used with watercolors is to incorporate Prismacolor, these pencils are called watercolor pencils, but that’s something I want to teach you in another moment…
Now I will use darker colors to mark the center of our lips more and also on the edges of our upper lip to make it a little darker. A while ago we painted the jowls, chin and the top of the mouth with a watery orange, now to that same color we added a little more orange to make it darker and applied it to the top of the lip, close in the part of the filtrum to give it a little more shadow.
I think I should add a little more color to my lips, so I take some red with my brush and dilute it until it’s a lighter color and apply it to the lips.
I also think it needs a little bit of dark, so I add a little more darkness along the sides of the lower lip and also in the middle of the lips, adding more darkness has been always my solution. In places that are very dark, I add some water with my brush to soften it a bit, to move things around and also to manipulate the edges, that’s one of the good things about using watercolors, you can fix it if you make a mistake…
And that’s basically it, I know that using watercolors is not the easiest thing in the world, but with enough practice, you will be able to master it, hopefully, this can help you and see you in another tutorial where I will guide you to paint or draw step by step.
Also where I’ll teach you how to draw easy things and how to improve your drawings. It is also good to know that these tutorials are aimed at everyone, no matter if you are a beginner or a more experienced artist, it is always good to review certain things.
Another thing I also like to talk about his experiences that perhaps happened to you or it will happen to you as an artist, goodbye and see you later.
BUY an ARM PENCIL CASE: http://arm-adillo.com
Hey guys for more information on upcoming events, contests and freebies, join our email list. SPAM FREE. Click Here to Sign Up!
Also, don’t forget to check another tutorial Books I Love #1 – Easy Things to Draw
#easy things to draw#easy things to draw for beginners#easy things to draw now#easy things to draw step by step#how to paint#how to paint for beginners#learn to draw#Watercolour Wednesdays#Howto & Style#New
0 notes
Last Seen Blogs

pelsmartin10
Untitled

mar-sama
こんにちは
pelsmartin10
Untitled
astroyongie
𓂀 𝕂𝕡𝕠𝕡 𝔸𝕤𝕥𝕣𝕠𝕝𝕠𝕘𝕪 𓂀

camkablam
sir those are my emotional support little guys