#snapmaker
Explore tagged Tumblr posts
Visit Tumblr Blog
Explore Tumblr blogs with no restrictions, modern design and the best experience.
Last Seen Tumblr Blogs


Fun Fact
In 2020, Tumblr had 29.4 million users in the US.
Text

Snapmaker 40W Laser Module Review: Testing and Settings
Featured designs: Vectorportart, Luban Library
3 notes
·
View notes
Text
Esplora il mondo di Fox Maker's per tecnologia all'avanguardia, stampa 3D, automazioni intelligenti, domotica innovativa e robotica avanzata. Scopri offerte esclusive e prodotti di alta qualità. #LifeOfMakers #Tech #FoxMakers
0 notes
Photo

This is my first go at cutting acrylic with the laser. Quite pleased with the outcome. Not as much smell from the cutting as I thought there would be. This is 3 mm frosted black acrylic. I managed to get four sets out of a sheet with room in the middle to make a transformer for the grandson. :-) I also had to work out how to use ink, scape to make the little loops for the chains. Good brain training :-). Next stop some really fancy plant labels. #snapmaker #Acrylic #KeyRing #LUBAN #Inkscape #snapmakerLUBAN #laser #lasercut (at Belmont, New South Wales, Australia) https://www.instagram.com/p/Cqm1mnlvxCa/?igshid=NGJjMDIxMWI=
0 notes
Photo
Love me

Part of last nights production. The #Snapmaker 1 vs #CR10S print size is amazing. . . #3Dprinters #production #steampunkgoggles #brassrootsleather https://www.instagram.com/p/B0TSagfjuXB/?igshid=hvac0vor9guo
1 note
·
View note
Text
DIY: CC1101 Module for Flipper Zero
Your Flipper Zero comes with an internal CC1101 module for SubGhz functionality, but if you want to increase the range, you can build an external module quite easily.


The CC1101 module I used above cost around USD3, and the AMS1117 5v to 3.3v step down power supply buck is around USD0.5. You will also need some male and female headers, prototype board and wires. You can find all these parts in Amazon, Aliexpress, etc.
There are several different CC1101 modules, so please refer to this page for the wiring schematics for the module you are using. The only difference with my design is that I am using an AMS1117 step down power supply buck to convert Flipper Zero 5v to 3.3v so that this module can be smaller since everything sits over the GPIO 1-8 of Flipper Zero, and it also makes this module hot swappable.
My wiring connections and modules are as follows:


First, we cut the prototype board and headers to the required size.


Next, we solder the male and female headers, and the AMS1117 module in place and connect them accordingly. It would be a good idea to use a multimeter to double check that you have all the connections wired correctly and nothing is accidentally touching each other when they shouldn’t.


Now we can insert the CC1101 module and connect it to Flipper Zero, and run some tests. Open SubGHz > Radio Settings > Module and select “External”. Now you can use it like how you normally use the SubGhz functions.

That’s it! Now we can move on to designing a case for this. I used TinkerCAD and printed it on my Snapmaker 2. My 3D files are over here, but you might need to modify it to your needs.


Here is the final result.


Hope you found this tutorial useful. Happy making!
If you enjoy stuff like this, check out our Makers & Hackers Exchange Facebook group if you haven't already done so!
5 notes
·
View notes
Text
Daily Giveaway Roll & Freebies– February 13th-15th 2025
The @Versatileer Daily 💟 Giveaway Roll & Freebies 💘 February 13th to February 15th Welcome to the Versatileer “Daily Giveaway Roll” A daily listing of giveaways, ending daily midnight Pacific Time. Brought to you by Versatileer: Daily Giveaway Roll – 02/13/25 – 02/15/25 Expiring 02/13 – 2 a.m. until 2 a.m. Hue Hunt Giveaway Worldwide Snapmaker’s Layered with Love Giveaway Worldwide $25…
0 notes
Link
Hey, Have you entered this competition to win cash / 3D printer yet? If you refer friends, you get more chances to win $1000 USD / Snapmaker Artisan Premium 3-in-1 3D Printer :) To Join: https://gleam.io/bzEcp-RZuPpMw6nS?l=https%3A%2F%2Fgleam.io%2FbzEcp%2Fsnapmaker-superpower-giveaway
0 notes
Photo

Hey, Come and join Snapmaker Egg Hunt to win "eggcellent" prizes!
0 notes
Text

Snapmaker Announces the Snapmaker Orca Project [$] https://3dwithus.com/snapmaker-announces-the-snapmaker-orca-project
0 notes
Photo

Hey, Come and join Snapmaker Egg Hunt to win "eggcellent" prizes!
0 notes
Photo

Reindeer Husky!
One of my best multi color prints so far! I promise my dog was only annoyed for a moment with these reindeer antlers on XD It uses 4 colors, with a total time of about 6 ish hours to print! I'm getting the hang of the process! It is a bit lengthy, but I'd love to integrate these into some final products down the line! While they're cool on their own, it needs to be part of something to really make it POP This is the first multi color print that successfully uses the PrusaSlicer without massively under-extruding on the Top,, bottom, and infill lines. I think I was just trying to get my machine to run way too fast(Snapmaker 2.0 at 80mm/s print speed.) To remedy this without intensive tuning, I took advantage of a really cool setting in Prusaslicer called Maximum Volumetric speed. Setting this correctly, while setting all your printing speeds to 0 will allow the slicer to automatically create efficient speeds that are fast while maintaining constant nozzle pressure using the maximum volumetric speed as a constraint., It worked BEAUTIFULLY. Turns out my recommended printing speeds are around 30-40mm/s instead of the 70-90mm/s I was pushing my printer to. Youch. Someone get me a voron printer lol. Want one of those fast bois.
Posted using PostyBirb
0 notes
Text
Snapmaker Ray es la mejor grabadora y cortadora láser de 40 W
Snapmaker Ray es la mejor grabadora y cortadora láser de 40 W que podrás comprar en la tienda de @snapmaker.
En el mundo de la fabricación digital, la innovación nunca se detiene, y Snapmaker, el reconocido fabricante de herramientas de fabricación digital, está a la vanguardia de esta revolución. Hoy, estamos emocionados de presentar su última creación, la grabadora y cortadora láser Snapmaker Ray. Este dispositivo de última generación combina precisión, potencia y facilidad de uso para cambiar la…

View On WordPress
0 notes
Photo

Hey, Snapmaker launched their brand new laser engraver and cutter, Ray. Enter this we will get a chance to win a free Snapmaker Artisan! It is worthwhile. Have you entered this competition to win yet? If you refer friends you get more chances to win :)
0 notes
Text
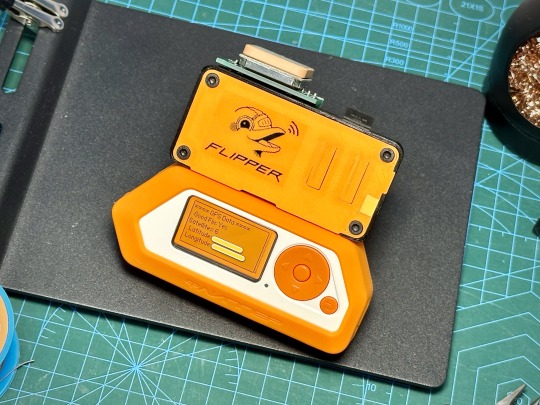
DIY: GPS Backpack for Flipper Wifi Dev Board
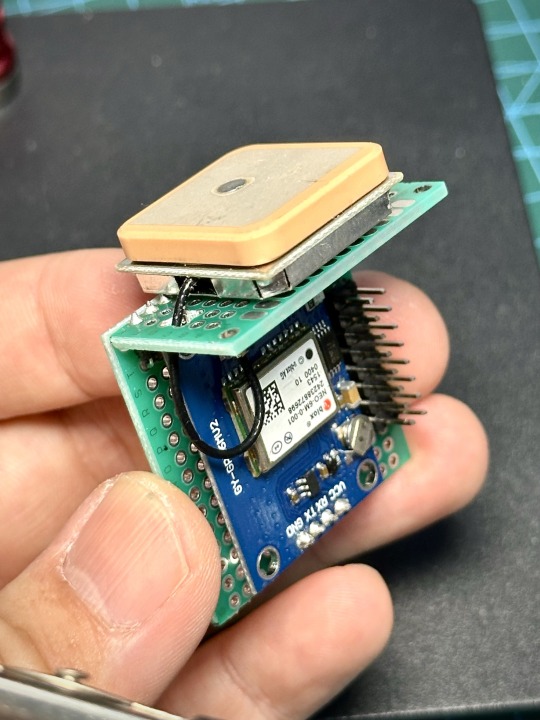
Having experimented with adding a GPS to the Flipper Zero Wifi Dev Board previously, I finally settled on a backpack layout which allows the ceramic antenna to be position right on top for the best reception. I started with a 4cm x 6cm prototype board which I cut into two pieces and soldered them together using right angle header pins, followed by adding 8 double row header pins. These 8 double row header pins will attach to the back of the Wifi Dev Board.


Next is to solder the GPS module into place and connect the required pins as listed below.
GPS -> Wifi Dev Board VCC -> 3V3 RX -> IO21 TX -> IO9 GND -> GND
I am using the ublox NEO-6M module (GY-GPS6MV2) which you can get from places like Aliexpress for less than USD3.


Finally, make a small hole on the top prototype board and insert the antenna cable and connect it to the GPS module. Use some double sided foam tape to stick the antenna to the top.

That's it for the GPS module. Now we need to solder on the female header pins to the Wifi Dev Board. We can now securely attach the GPS module to the Wifi Dev Board.


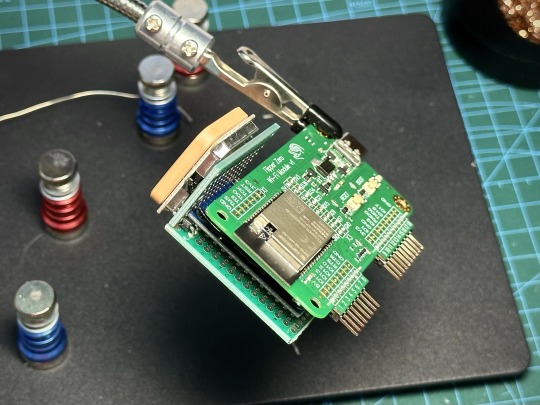
With everything tested and working, we can move on to designing a case for the GPS module to give it some protection and make it look like a finished product. I printed the case on my old Snapmaker 2.0.


Here’s how it looks like attached to the WiFi Dev Board.
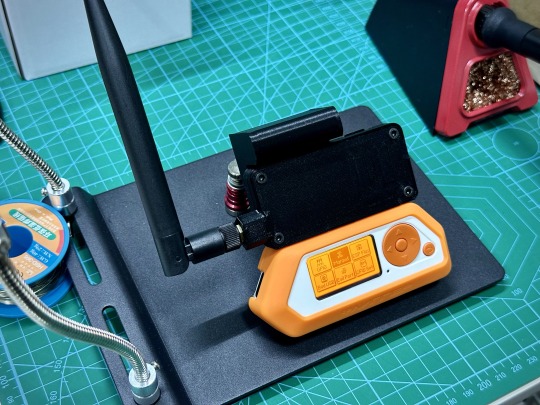

Having completed this build, I have to admit I am not too happy with the way the WiFi Dev Board sticks up from Flipper Zero. This layout makes the whole thing kinda delicate and the board don’t feel very secure, especially with both Flipper and the board being in cases that lessens the amount the pins stick into the holes. Now, I am thinking about redesigning the entire thing again .. Haha.
1 note
·
View note
Photo

Hey, Snapmaker launched their brand new laser engraver and cutter, Ray. Enter this we will get a chance to win a free Snapmaker Artisan! It is worthwhile. Have you entered this competition to win yet? If you refer friends you get more chances to win :)
0 notes
Text
Discover the Ultimate 3D Printing Experience with Snapmaker
Welcome to the world of 3D printing, where imagination becomes reality. If you’re looking for the best 3D printer that combines versatility, quality, and ease of use, look no further than Snapmaker. Revolutionizing the industry, Snapmaker has set a new standard for 3D printing, and here’s why it’s the ultimate choice for both beginners and experts alike. Unmatched Versatility: Snapmaker stands…
View On WordPress
0 notes