#slipstitches
Explore tagged Tumblr posts
Text

Wooow look at that! A Ponysona redesign! Meet SlipStitch they/she KidCore pony who loves to crochet. Mostly invested in making foal blankets and an accompanying toy to match.
9 notes
·
View notes
Text
Slipstitch
A new Sinner Sona for Hazbin Hotel, Slipstitch

His only real demonic power is being able to summon Demonic Stitches that do not perforate what they attach two, and try to draw the two surfaces they are attached to together regardless of Slip’s input. It’s not string control, it’s specifically *stitches*.

He can abuse this tho for grappling and slamming over short distances like here with some unnamed sinner
His design is based on several things I consider core to my personality, and what I consider my own “sins”.
Firstly, a scar above his stomach and heart, where I have actually had feeding tube surgery and regularly get heart check ups for my bad heart. My left hip goes out, so he has a hoof there. And my hands are bad from a connective tissue disorder, and my overall condition will only get worse with time
So, a broken toy, patched itself together and carried on.
In addition, IRL I was raised very conservative and Mormon. Now an apostate, I purposefully sought out the occult, the lewd, and the “monstrous” to remake my identity in opposition to how I was raised. In other words: blasphemy. Stitching demonic parts to patch up what I tore off of myself
Combine that with some Envy, Sloth, Lust, and Gluttony, and you get the plush rabbit with demonic grafts and a desire to push their body past its limits, trusting they can just patch themselves up. The kind of Pride I exhibited when I went to get my degree even though my doctors said it was unwise
Was a fun character to design! Hazbin Hotel Sinnersonas are a fun way to self reflect
What’s yours ?
2 notes
·
View notes
Text
Sewing themed metal band called Slipstitch
5 notes
·
View notes
Text
Made myself a new hat today, hopefully it will not be as sweaty as my furry hat. I modeled it after a neat hat I saw that I didn't have the money to buy a pattern for. So I just made a slouchy hat from YouTube, added a stripe, and crocheted a red leaf and sewed it on.


#crochet#mine#hat#red leaf#the red goes all the way around#crocheted slipstitches on an already-created piece is awkward#it's a nice rusty red all over#chuffed
2 notes
·
View notes
Text
starting over sucks, but sometimes it'll work out even better than you expected and it'll look nicer
#ramblings#i picked up stitches wrong along a slipstitch edge#and i knew it would bug the hell out of me so i started over#losing hours of work#but already it looks much nicer and my colors match up better :)
0 notes
Text

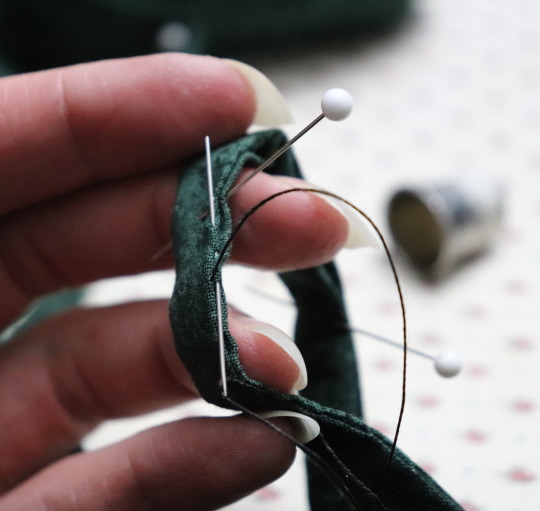

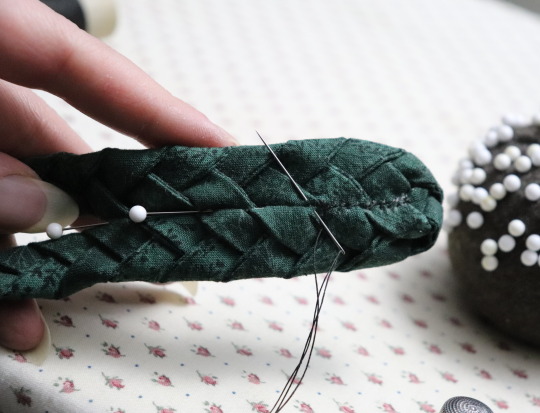
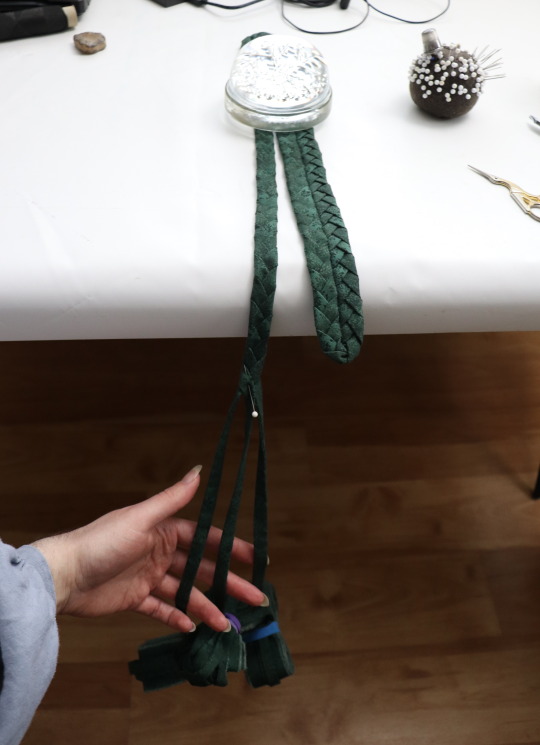

I started working on a braided rug earlier this month, using some of the quilting cotton that I have too much of. It's inspired by some very old rugs that my grandparents had. I'm tearing the fabric into 4 cm wide strips, double folding it and slipstitching the edges together, then braiding it and whipstitching the edges of the braid together, around and around. I also pressed the fabric strips carefully after tearing them, and have been pressing the rug every time I go around the ends to prevent it from warping. It's coming along slowly and is currently 16 cm wide. I've used up almost one metre of fabric so far, and am about to switch to a different piece of green cotton.
7K notes
·
View notes
Note
Hi! I just saw your quilted butterflies photo, and I was wondering if you would willing to share how to make them, or link to a tutorial? They're gorgeous and I'd love to try, but i don't know the right search terms to find those, i think.
Oh absolutely! Everyone needs an easy craft to do right now. This will be a photo tutorial, so if you need a video the search terms are "origami butterfly bookmark". The instructions will be pretty similar.
*If you are using a sewing machine a single butterfly should take between 15-30mins, and if hand stitching my guess is ~1hr
Tools: -2 Scrap fabrics or 2x fat quarters, one for the main/outer fabric, one for the inner contrast -I recommend quilting cotton, though any easily ironable, non-stretch fabric will work -ruler and marking tools -scissors OR rotary cutter and mat -Pins (if desired) -Thread in a matching OR contrast colour - depending on preference -Iron and Ironing board - You can use a piece of cotton folded into a thin pad in a pinch as long as it's flat!
Step 1: Cut out two rectangles. You can make the butterflies as big or small as you'd like, as long as it's in keeping with the 2:3 ratio. For me, I like to use 4" x 6" rectangles. Use your marking tools to mark out the rectangle on the back/wrong side of the fabric, then cut them out!
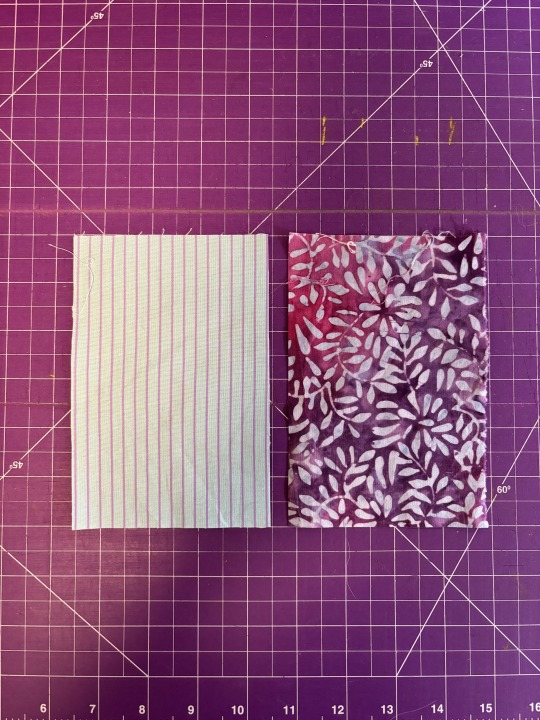
Step 2: Put the rectangles on top of each other, with right/patterned sides facing each other. Make sure all your corners and edges line up. Pin in place if using pins. (in this example one of my fabrics has the pattern on both sides of the fabric)
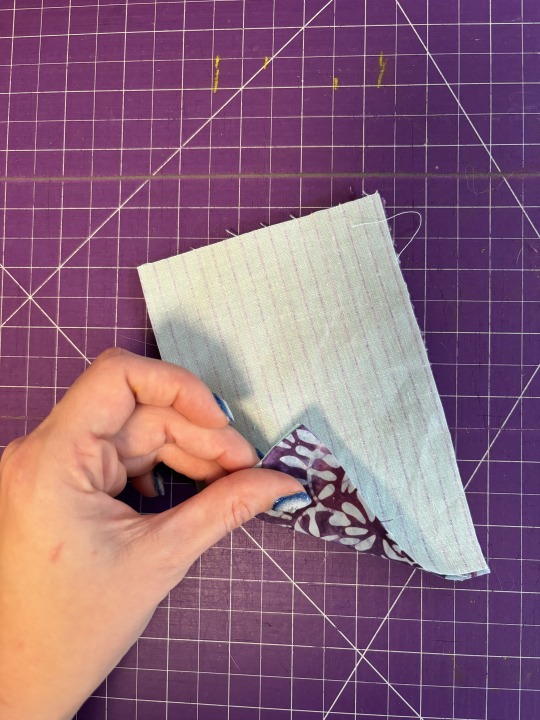
Step 3: Sewing! Mark a 2" gap on one of the short edges. If using hand needle mark out 1/4" distance from the edges. Sew. If using a machine, line up the edge with the 1/4" inch mark and sew. (Image is completed stitching, not placement on machine)
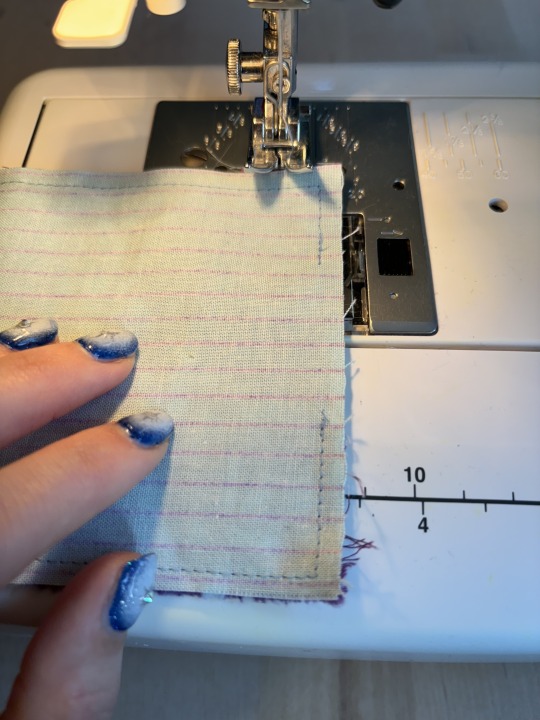
Step 4: Trim the corners without cutting into the stitching line, then flip the fabric inside out through the 2" gap you left. Make sure to stick your finger or something blunt but pokey -like a chopstick- into the corners to make sure they are nice and crisp!
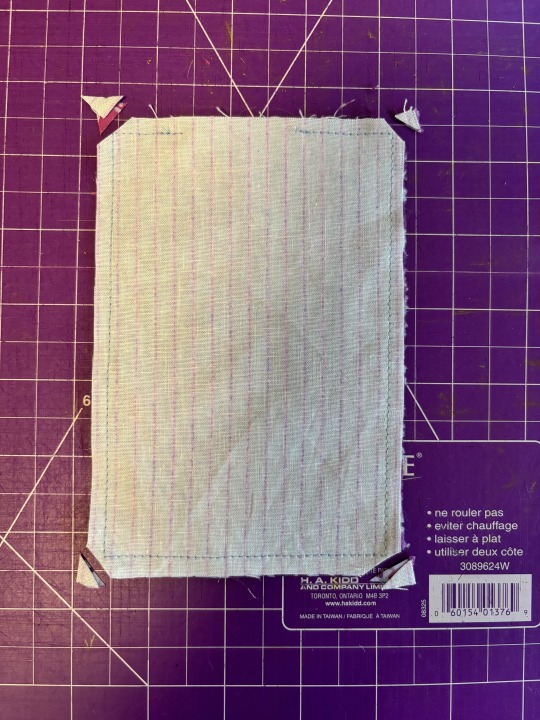
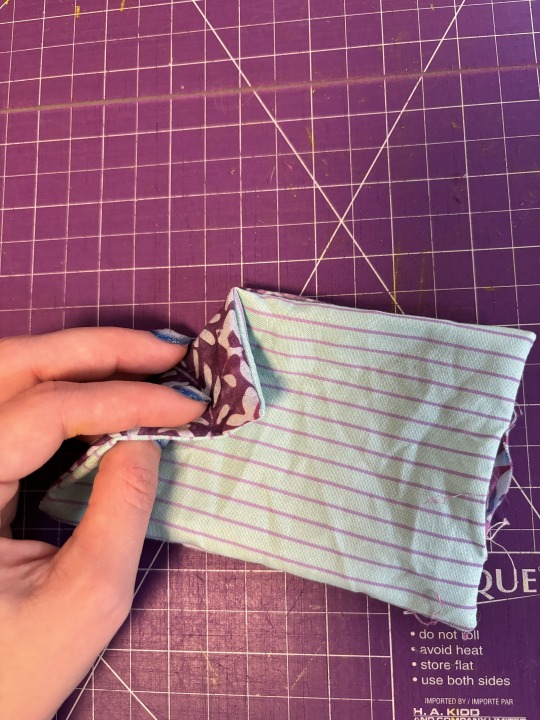
Step 5: Press all your frustrations out by pressing that fabric! Get it nice and flat and crisp! Make sure you've folded in the edges of the 2" gap to match the seam allowance of the already-sewn edges before you press. Then, if hand sewing, slipstitch the gap closed. If using a machine, set your fabric at a 1/8" distance and sew around the edges, effectively closing the gap and giving you a lovely topstitch detail.
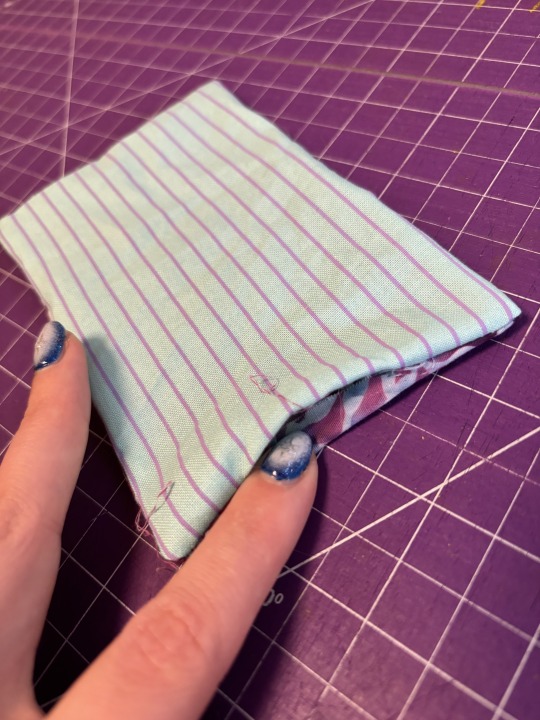
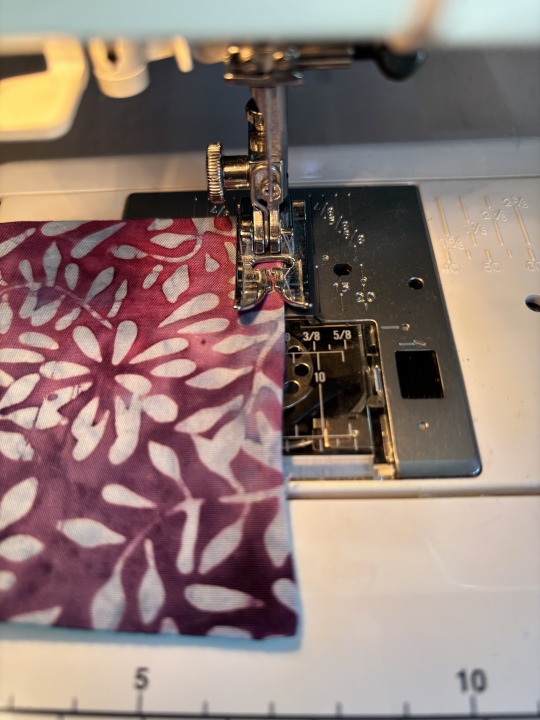
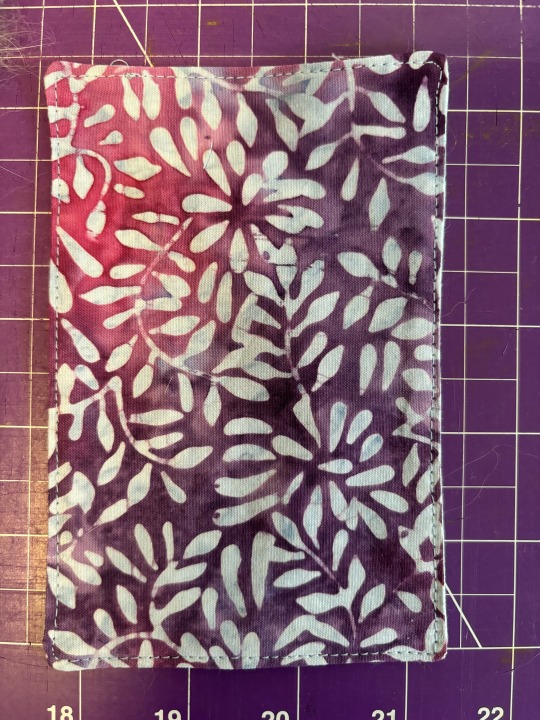
Step 6: Let's start folding! First move we're going to make is folding it in half, bringing the short edges together. Keep in mind, whichever fabric is on the outside will be the main fabric of your butterfly, and what is on the inside will be the contrast! Press hard! Then, make sure the edges you just brought together are facing you for the next step.
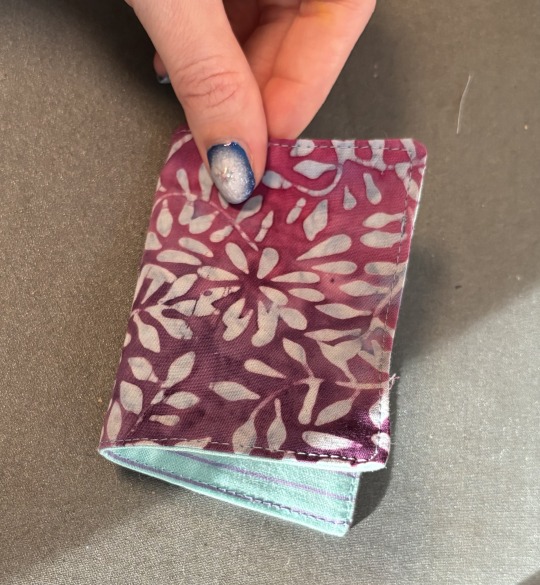
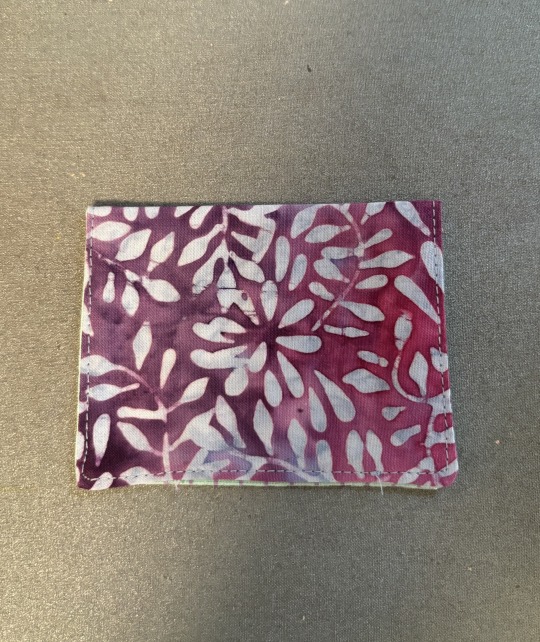
Step 7: Take the top fabric of the right open edge and bring it to the left side of the open edge. It will tent up in the corner, use this and press that tent down until you have what looks like a triangle of the outside fabric on top of two rectangles of the contrast fabric. Press! (I forgot to take pics of the whole process with the first one, don't mind the fabric switch).
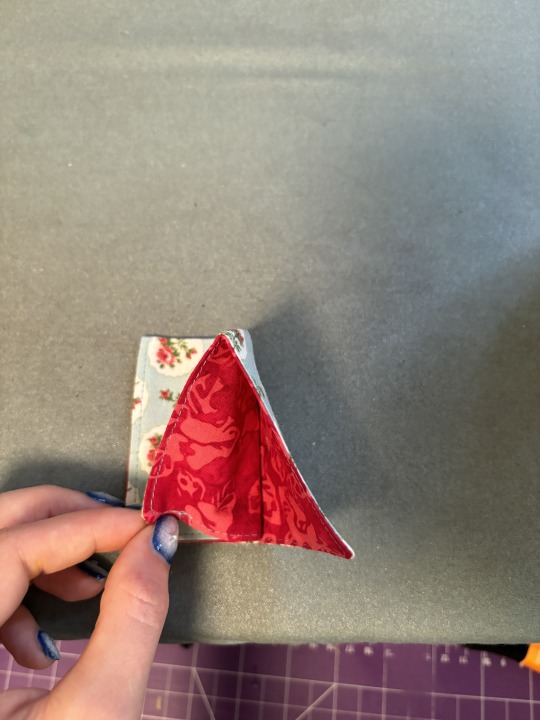
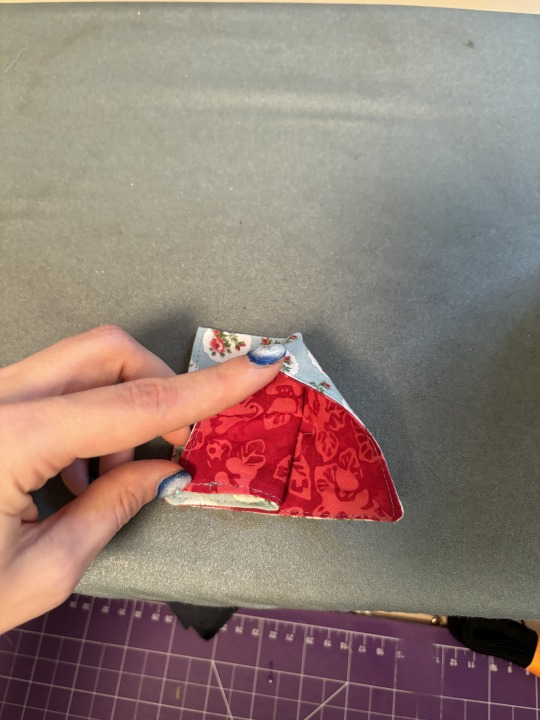
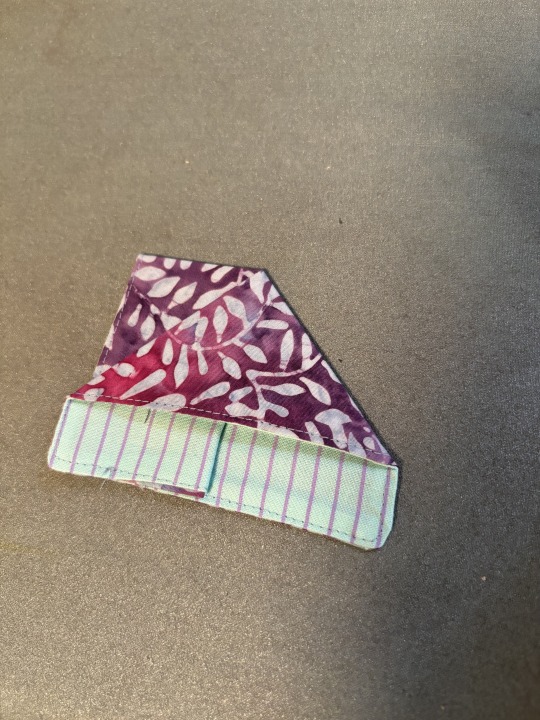
Step 7.5: Flip your butterfly and repeat step 7 on the other side until you have a strange looking triangle like this.
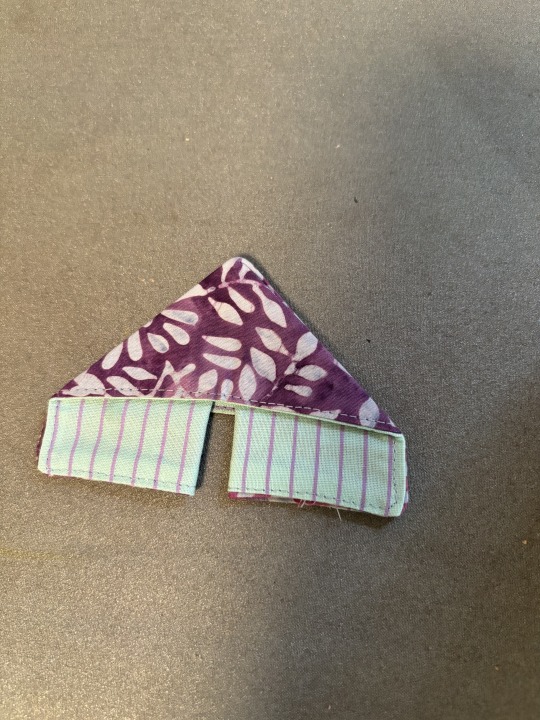
Step 8: Take the inner corners of the contrast fabric and fold it up towards the outer fabric. The bigger this fold, the more contrast fabric you will see in the final butterfly. Press.
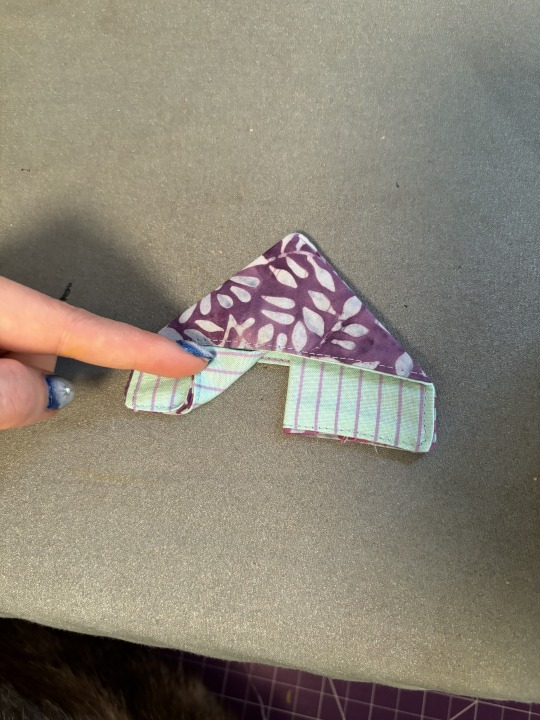
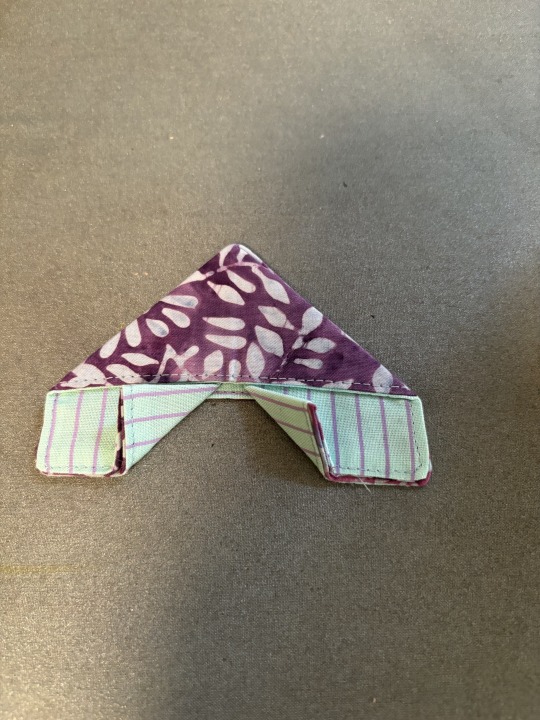
Step 9: Take the tip of one of the corners you just pressed up and bring it back to it's original position. Do not press. Gently press down on the tip of the corner, letting the fabric unfold. The butterfly wing should unfold, with the contrast fabric showing in the centre. Adjust until you have as much contrast showing as you'd like, then press hard. Repeat on the other side.
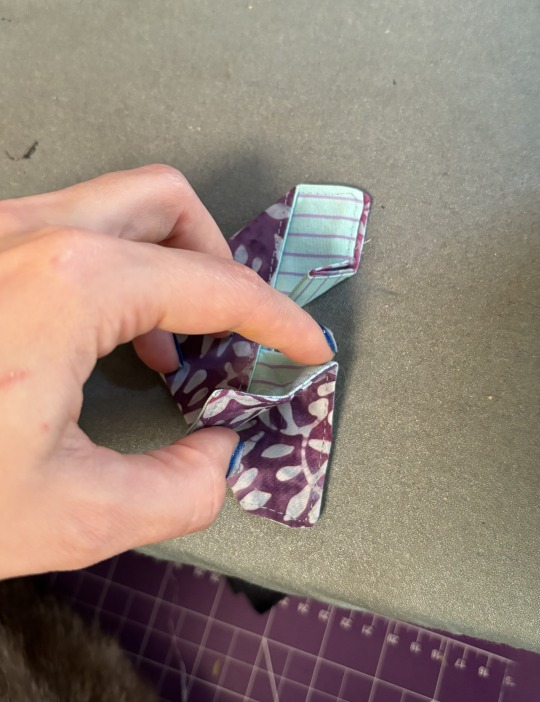
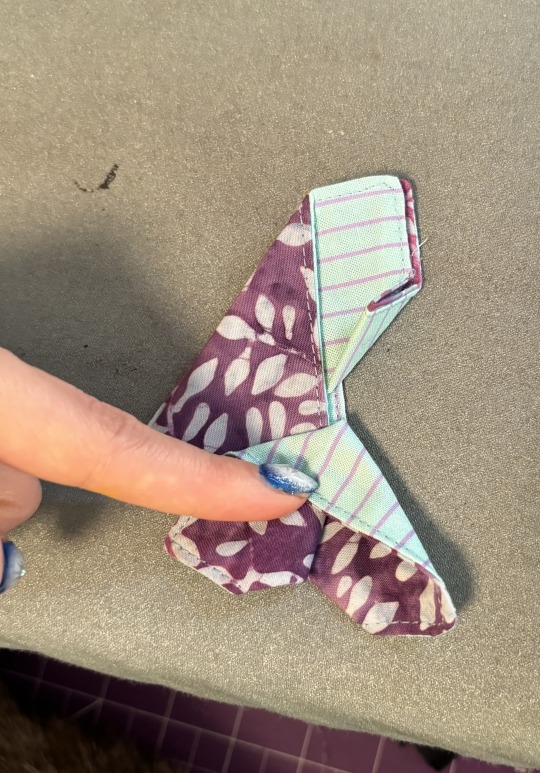
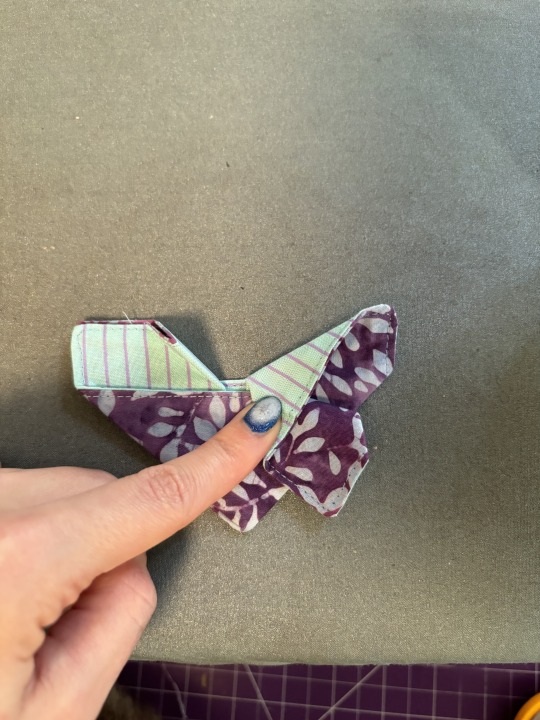
Congratulations!! You now have a butterfly!! You can make a garland, stick them on hairclips, or simply put them on your windowsill to keep you company! If you want to ensure that your butterfly doesn't unfold, you can add a small hand stitch in the centre of the two triangles that make up the "body" of the butterfly right along where the topstitching is.
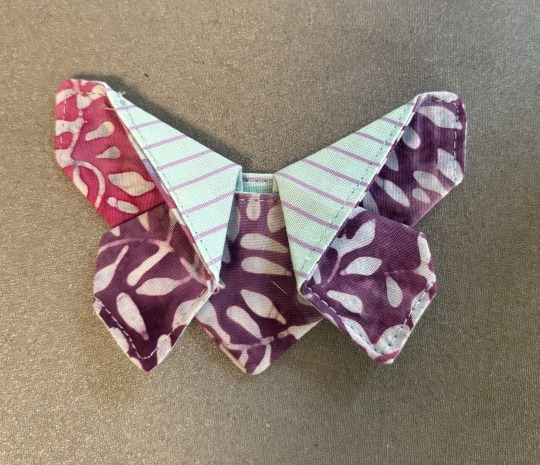
Hopefully this was clear to follow, but if you have any questions, let me know!
217 notes
·
View notes
Text
Finished the heel and gusset, now Im gonna make a fitted instep with slipstitch ribbing and a smooth top. Im really happy with how the sparkle yarn really has a grounding effect on the other colors :3

162 notes
·
View notes
Note
hey if you write a pattern for the chilchuck amigurumi I will buy it instantly
ive gotten multiple asks about this, so ill just answer them all here in one go.
i wrote down everything while i was working on it, but i theres some stuff that i would do diffrently and i also didnt take a lot of process pics so it wont be a full proper pattern for those reasons, but ill add all that i have under the cut!
i dont want any compensation, but if you wanna do me a favor you can donate to esims for gaza, unrwa, any of these gefundme's, or another trusted charity of your choice.
now to the pattern! i would love to see the results of anyone making a squeakychuck, feel free to tag or dm me :)
the dimensions of this depend on the size of ur squeaker and yarn, i had a 4ish cm squeaker and somewhat thick 4/8 cotton yarn (kinda 6/8ish thickness). depending on ur yarn and squeaker u might need to follow a different pattern for the body.
if youre using a different body base pattern, the tunic and blouse pattern are pretty easily adjustable. ill add some notes for that at those sections of the pattern. ill also link some videos i used at relevant sections.
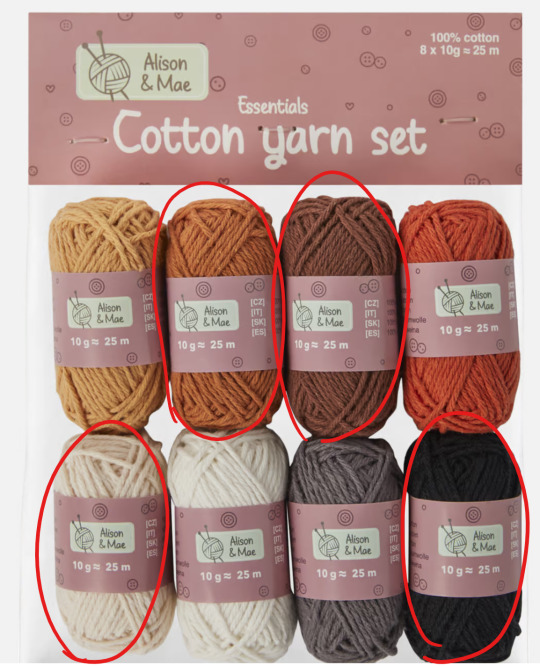
if theres an Action store near where u live, see pic below for the yarn i used for the skin, reddish brown, black and light brown. i got 3 of these but 2 packs was enough. the dark brown and creme were from my stash. i also got the squeaker from a donut dog toy from Action.
-
abreviations list (all in us terms):
mr = magic ring
sc = single crochet
hdc = half dubble crochet
slst = slipstitch
ch = chain
bobble = 5 double crochet in one stitch
4inc = 4 sc in one
4 inc = increase in the next four stitches
BLO = back loop only
FLO = front loop only
what you need:
-skin color of choice yarn
-creme/white yarn (normal for body, thin for blouse)
-greyish creme (for boot flaps)
-black yarn
-dark brown yarn
-light brown yarn
-reddish brown yarn
-green yarn
-4 tiny buttons (for arm joints)
-cardboard (for shoe sole
-3.5mm hook
-squeaker
-needlefelt needle
-stuffing
-stitchmarker (optional, i always mark the first stitch of the round)
-
once again disclaimer, this is not a propper pattern, this is just what i wrote down while i was crochetting. it may not nessecarily be the best way to do it. i wanted most clothes to be removable, but you have to partially disassemble the doll if you want to remove them. if you dont like how something looks or works ur free to do whatever you want. big fan of fucking around and finding out personally.
if you have any questions feel free to dm me, might take me a while to reply though.
-
SQUEAKY CHUCK PATTERN 3.5mm hook
head (skin)
r1: sc 6 in mr
r2: (inc) x6
r3: (sc 1, inc) x6
r4: (sc 2, inc) x6
r5: (sc3, inc) x6
r6: (sc4, inc) x6
r7: (sc 5, inc) x6
r8-15 : sc 42
r16: (sc 5, dec) x6
r17: (sc 4, dec) x6
r18: (sc3, dec) x6
r19: (sc2, dec) x6
r20: (sc 1, dec) x6
r21: sc 12
slst, fasten off
ears x2 (skin)
r1: sc6 in mc
r2: (inc) x6
r3: (sc, inc) x6
r4-6: sc 18
r7: dec 9. slst fatsen off.
Body - leg up (skin, black, thick creme)
start with skin
r1: ch 6, inc in 2nd from hook, sc 3, 4inc, sc 3, inc
r2: inc 2, sc 3, inc 4, sc 3, inc 2
r3: inc 3, sc 5, inc 6, sc 5, inc 3
r4: BLO sc in all
r5: sc 3, dec 2, sc 3, dec 2, sc 6, dec 2, sc 3, dec 2, sc 3
r6: sc 1, dec, sc 4, dec 6, sc 4, dec, sc 1.
r7: sc 6, dec 3, sc 6
stuff
-r8 dec, sc in all
change color to black [color change video]
r9-23: sc in all
1st leg: fasten off
2nd leg [joining legs video]:
r24: sc7, ch 1, sc join in 1st leg after last sc, sc13, sc1 in visible v loop of ch1, sc 7
r25: sc7, sc 1 in remaining v loop of ch1, sc21
r26-31: sc 28
r32: sc 7, change color to creme/white, slst 1, sc 20
r33-35: sc 29
r36: (sc 8, dec) x3
r37: (sc7, dec) x3
r38: (sc6, dec)x3
add squeaker
r39: sc21
r40: (sc 5, dec) x3
r41-42: sc18
r43: (sc 1, dec) x6
fasten off
Arms (skin, dark brown)
i made the arms movable with button joints, but after looking at some videos i discovered that what i did is not called a button joint and i dont have a video explaining it, so i hope this drawing helps.
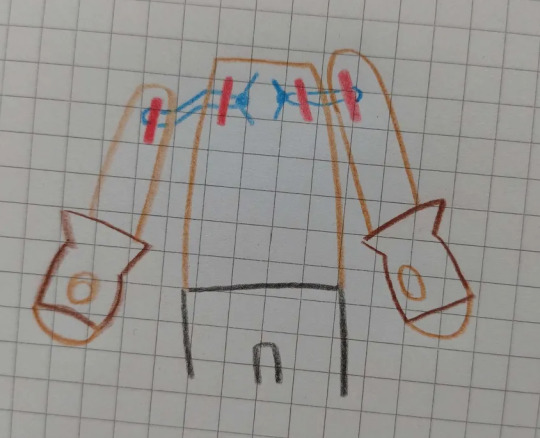
the red bits are the buttons inside of the arms and body, and the thread (blue for clarity, i matched it w the skin) should be pulled tight and finished off with a double or tripple knot inside the body.
or you could just sew on the arms that also works. but wait with doing that until youve finished the blouse as the hands dont fit through the sleeves. i have a seperate section on assembly at the end of the pattern.
start with skin
r1:sc6 in mc
r2: inc x6
r3(sc, inc)x6
r4 : sc 18
change color to brown
r5: sc 18
1st arm r6: sc 3, bobble, sc 14.
2nd arm r6.2: sc 14, boble, sc 3
[i matched the top loop to the bobble color but i think it would look better if u didnt]
r7: sc 18
r8: (sc 4, dec)x3
r9: (sc 3, dec)x3
r10 sc12
color switch to skin (you might want to do this a round earlier, i didnt initially plan on making the gloves flared, and this color change part can sometimes be seen and look kinda weird)
r11-14: sc 12
r15: (sc4, dec)x2
r16-19 : sc 10
r20: (sc3, dec)x2
r21: sc8
insert button joint
r28: (sc2, dec)x2
slst, sew shut
glove flare (dark brown)
r1: ch 15, slst join LONG TAIL
r2: (sc4, inc)x3
r3: sc4, inc, sc8, inc, sc 4
r4: sc 2, slst fasten off
sew 2 rows below thumb bobble
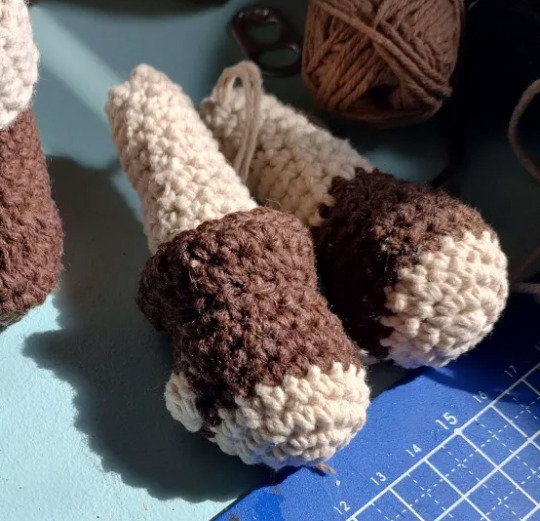
boots (light brown, dark brown, greyish creme) [video]
these are removable but they dont go on easily, so you gotta patiently massage the feet in there.
start with light brown
ch 7, start in 2nd from hook:
r1: sc 5, 3inc, sc 4, inc
r2: inc, sc 4, inc 3, sc 4, inc 2
r3: inc, sc 5, hdc inc 7, sc 5, inc 2
r4: slst fasten off. sew in holes/tails, fray ends for flat gluejob. trace onto cardboard for sole.
switch color to dark brown
r1: BLO join slst, BLO sc in all
r2-3: sc in all
glue in sole
r4: sc 8, dec 5, sc 12
r5: sc 7, dec 4, sc 10
r6: sc7, dec2, sc 10
r7-10: sc in all
switch color to greyish creme
r11-12: sc in all
r13: slst, FLO sc in all
r14-16: sc all
slst fasten off
flip the greyish creme flap over.
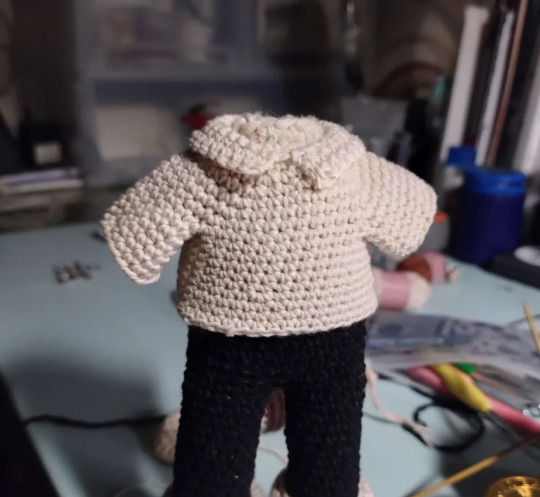
blouse (thinner creme)
this is a standard raglan pattern, if you need the whole thing bigger/smaller you need to have more/less chains at the beginning. this change also carries over to the collar. the increases are evenly spaced for me, and unless your doll has a very broad chest this shouldnt have to change.
if the arms need more space you need to either add more rows to the r3-7 part and/or add more chains in r8 (this part should fit pretty sugg around the body)
i was experimenting a bit w using BLO to minimize the gap where the sleeve and body seperate (r8). it worked p good but you can ignore it if you dont understand it and just sc in all.
(edit: if this confuses you, understandable. I answered an ask abt it here but feel free to ask if its still unclear)
r1: ch24, slst join.
r2: (sc 5, inc) x4
r3-7: inc in first of previous inc. last row should have 10 sc between increases.
r8: sc5, blo sc 1, ch 5, blo sc join in 1st of next inc, sc 11, blo sc1, ch5, blo sc join in 1st st of next inc, sc 5
r9: sc6, blo sc 1, sc 5, blo sc1, sc11, blo sc 1, sc 5, blo sc 1, sc 6
r10-13: sc in all (36)
r14: (sc8, inc)x4
r15: sc in all (40)
slst finish off
Sleeve
r1: join mid armpit, slst ,sc2, sc in the leftover bits from the BLO stitches, sc 11, sc in leftover BLO bits, sc2
r2-6: sc in all
collar
join left-middle front, sc 7, inc, sc8, inc, sc 7. turn
r2: sc7, inc, sc 10, inc, sc 7. turn
r3: sc8, inc, sc 10, inc, sc 8. turn
cuffs
r1: join mid body-facing side, FLO sc 20
r2-4: sc 20, slst fatsen off
Tunic (red brown) [tunesian entrelac crochet]
if you want to make this bigger i recommend keeping the same square layout, but making the squares bigger. its a bit of measuring and math to figure it out.
the tunic is made in tunesian crochet and i dont really know what written patterns for that look like so i hope this makes sense.
for a single square:
r1: ch4, start in 2nd back bump from hook. pull up a loop from ever back bump. you should have 4 loops on your hook total. simplestitch in all
r2-4: simplestitch in all.
r5: slst in all. fasten off
for the slanted parts i did the decrease by pulling through the middle 2 loops in one go on the back pass
this is how the full thing should look, its worked from bottom left to top right.
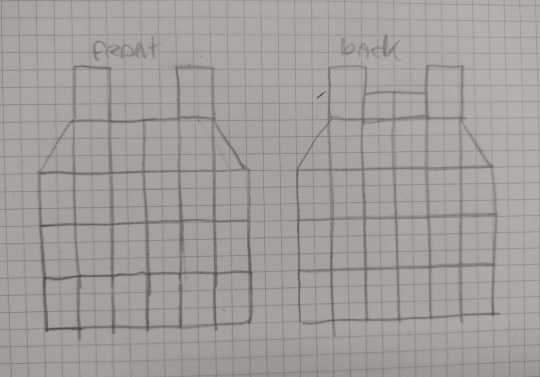
sew together the shoulders together, then sew in all of the ends
:) good luck
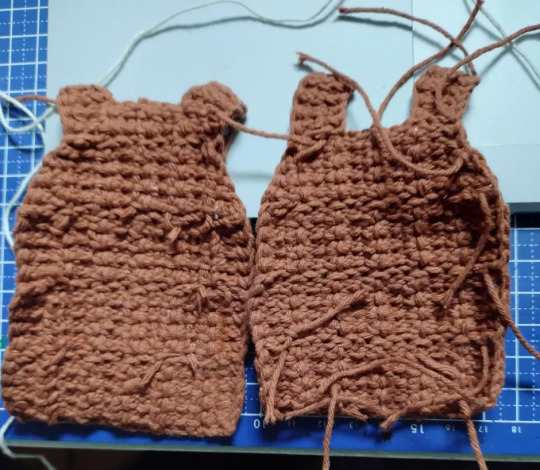
tunesian crochet has a tendancy to curl, so if you used cotton i def recommend blocking it
i defined the grid a little bit with a dark brown pencil.
cowl (green)
BLO sc 7, repeat till desired lenght, then BLO slst join the last row to the first.
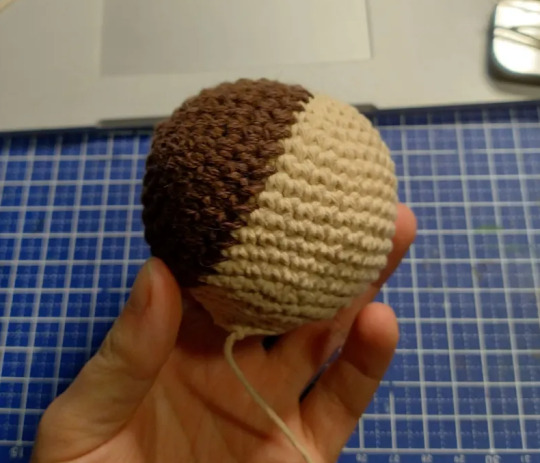
scalp undercut bit (dark brown)
r1: sc 6 in mr
r2: (inc) x6
r3: (sc 1, inc) x6
r4: (sc 2, inc) x6
r5: (sc3, inc) x6
r6: (sc 4, inc)x6
r7: sc36
sew on back of the head (recommend doing this before the ears and face, see end for more detailed assembly instructions)
hair (reddish brown) [hair video]
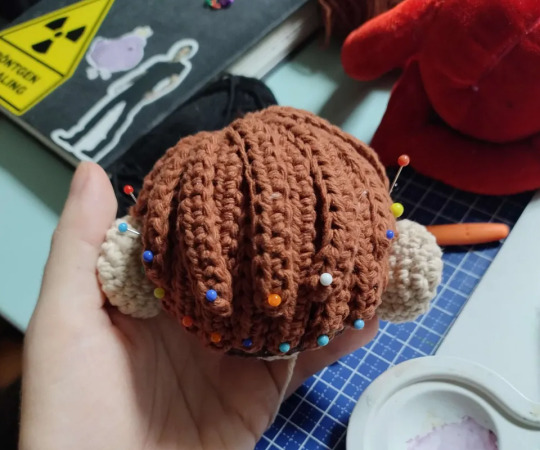
disclaimer, this is kind of a mess. the lenghts didnt line up the way i intended so i improvised by adding loose strands and spent a lot of time pinning every strand in place before glueing them down.
i used bison kit contact glue since its sturdy, transparant, flexible and waterproof. you can use hot glue as well, i just personally dont like it because its bulky.
r1: sc 21 in mc. join BLO slst
r2: ch 12, sc in 2nd from hook, gdc10, BLO slst join
r3: ch 12, sc in 2nd from hook, gdc10, BLO slst join
r4: ch13, sc in 2nd from hook, hdc 11, BLO slst join
r5: ch13, sc in 2nd from hook, hdc 11, BLO slst join
r6: ch 14, sc in 2nd from hook, hdc 12, BLO slst join
r7: ch16, sc in 2nd form hook, hdc 14, BLO slst join
r8: ch 18, sc in 2nd from hook, hdc 16, BLO slst join
r9: ch 18, sc in 2nd from hook, hdc 16, BLO slst join
r10: ch 14, sc in 2nd from hook, hdc 12, BLO slst join
r11: ch 12, sc in 2nd from hook, hdc 10, BLO slst join
r12: ch 10, sc in 2nd from hook, hdc 8, BLO slst join
from now on, join in the FLO's of previous round
r13: ch10, sc in 2nd from hook, hdc 8, FLO slst join
r14: ch10, sc in 2nd from hook, hdc 8 , FLO slst join
r15: ch12, sc in 2nd from hook, hdc 10 , FLO slst join
r16: ch12, sc in 2nd from hook, hdc 10 , FLO slst join
r17: ch14, sc in 2nd from hook, hdc 12 , FLO slst join
r18: ch16, sc in 2nd form hook, hdc 14, FLO slst join
r19: ch 18, sc in 2nd from hook, hdc 16, FLO slst join
r20: ch16, sc in 2nd form hook, hdc 14, FLO slst join
r21: ch14, sc in 2nd from hook, hdc 12 , FLO slst join
1x ch 6, sc in 2nd from hook, hdc 4
2x ch8, sc in 2nd from hook, hdc 6
2x ch 10, sc in 2nd from chain, hdc 8, slst in same, fasten off.
2x ch 12, sc in 2nd from chain, hdc 10, slst in same, fasten off.
3x ch14
pin all in place until it looks good, tie +glue loose strands first. then glue back pieces, crown, and lastly bangs/ top back layer. some of the lose strands go behind the ears, one is the left sideburn, and the rest is to cover up the crown. these pics are the best i can do as a guide, this was my first time doing this so i was struggling lol.
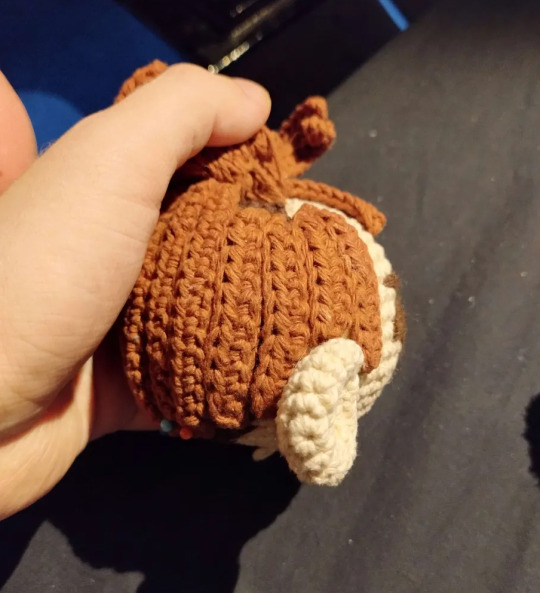
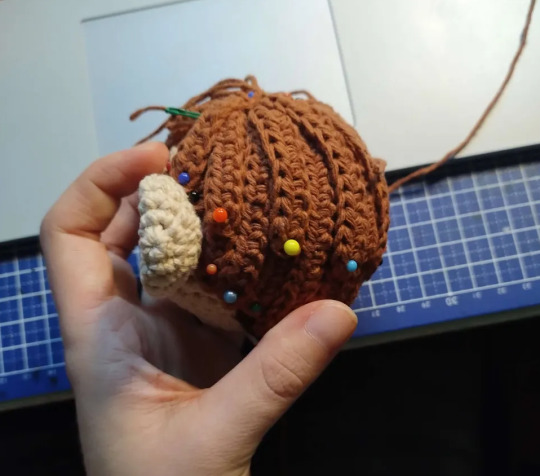
i didnt fully glue down the bangs and the top back layer bc i thought it would be fun if u could ruffle his hair, but my friend who i gave the plush to has significantly abused him (its been 2 days) and his hair is a mess so im gonna have to glue it down again lol. might as well do it all the first time if u plan on throwing him down the stairs or something.
Face
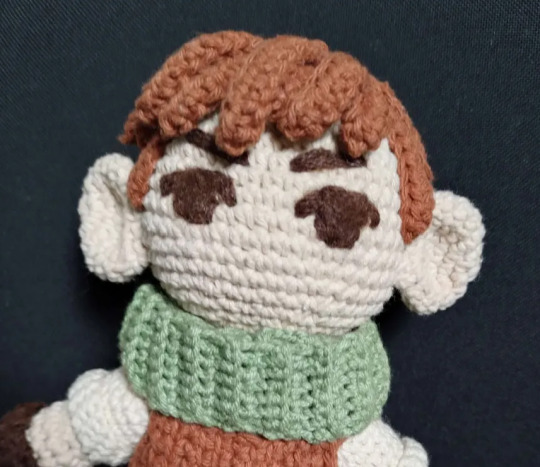
for eyes + eyebrows, embroider outline with dark brown, then needle felt [video] the inner parts w unraveled dark brown fluff. the dark brown i used was probably acrylic. cotton doesnt really work well for this.
Belt and pouch (dark brown)
the belt is a 3 strand basic friendship bracelet! [video]
sew together the ends and hide it with by sewing the pouch on top.
i didnt write down the pattern for the pouch, but from the top of my head its the same start as the squares for the tunic
r1-9: simple stitch in all
r10: simple stitch 1, decrease by putting your hook through 2 vertical bars when pulling up a loop, simple stitch edge 1.
r11: slst in all, finish with a long tail
use tail to sew together the sides, and sew the pouch onto the belt. use some yellow thread to make a button.
ASSEMBLY.
put on the blouse, put the arms in their place and finish the button joints.
put on the tunic, lace the sides with dark brown yarn, finish with a knot and hide the tails underneath the chest part of the tunic.
slide on the belt and boots.
sew the scalp undercut bit to the head
sew the ears to the head
tie + glue the loose hair strands behind the ears
glue the back of the hair
glue the back of the hair
glue the middle circle part of the hair
glue the top back layer and bangs
sew the head to the body
put on the cowl
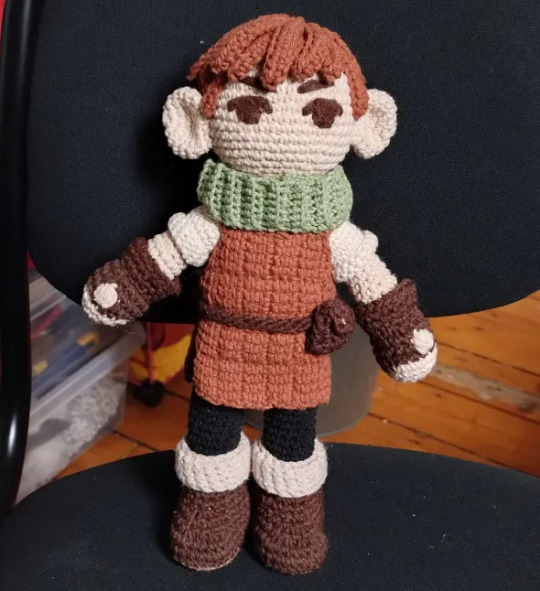
i hope this is somewhat clear, feel free to dm me is you have questions.
enjoy your squeakychuck :D
350 notes
·
View notes
Text


returned to the pacific ocean for the first time in twelve years! promptly collected too many cool shells and bones, which gave me an excuse to improvise a bull kelp mermaid's purse out of a variation on slipstitch. the purse is now loaded up with rocks to keep it stretched as it dries out.


469 notes
·
View notes
Text

Clown Ruff, a free crochet pattern designed by Slipstitch Hollow on Ravelry.
#crochet#full pattern#crochet pattern#free crochet pattern#fiber art#fiber crafts#clothing#ruffles#clown
35 notes
·
View notes
Text

Love my little pony…………..sona
2 notes
·
View notes
Text

Slipstitch working a pole in pentagram city
0 notes
Text
furby faceplate
I don't really know how to do this

2 eye pieces
MR 8
inc x 8 (with HDC)
[hdc, inc] until you have 21 stitches, tie off

top
ch 4
SC x 3, ch 2
SC x 4, ch 2
SC x 5, ch 1
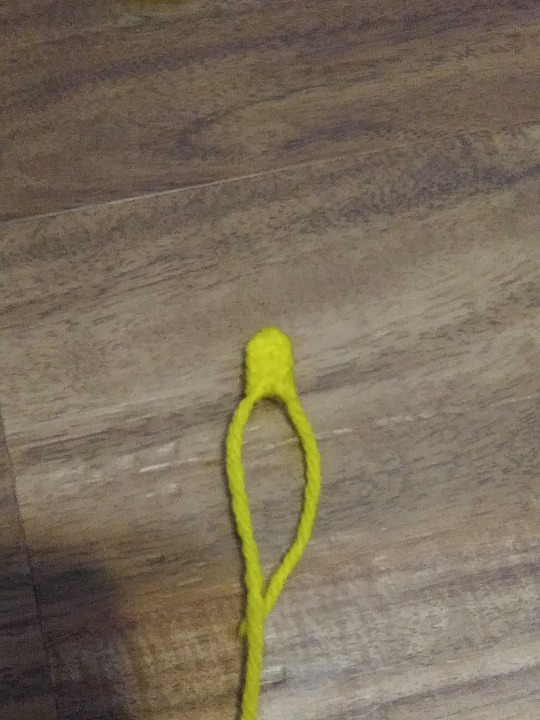
DC x 3, slipstitch, DC x 3, slipstitch, DC x 3, tie off
middle piece
ch 4
hdc x 3, tie off

beak piece
MR 8
inc x 8 (with HDC)
[hdc, inc] until you have 20 stitches
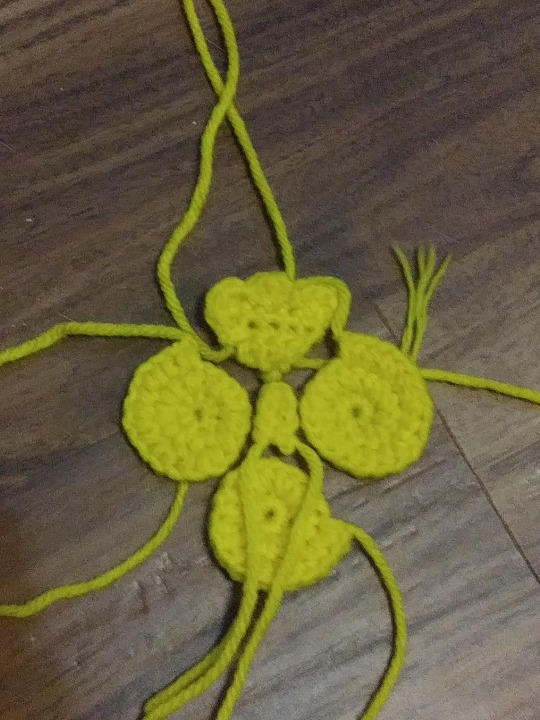
sew them bitches
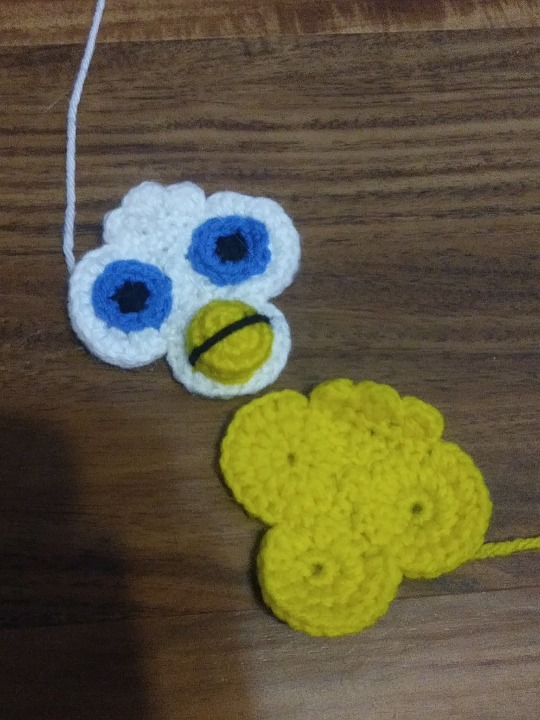
the eyes are
MR 6, inc x 6
and I don't remember the beak but it was very simple
132 notes
·
View notes
Text

Nina Mingya Powles, Slipstitch, Illustrated by Nina Mingya Powles with cover art by Antonia Glücksman, Guillemot Press, Cornwall, 2024


#graphic design#art#poetry#visual writing#illustration#book#cover#book cover#nina mingya powles#antonia glücksman#guillemot press#2020s
14 notes
·
View notes
Text


A new rug post, since the old one got very long.
I'd been picking away at this project occasionally for a little over a year, and finished it a couple weeks ago! I was inspired by some very old rugs my grandparents had, and copied the construction I saw on them, but with quilting cotton instead of wool. It took about 4 and a half metres of fabric, and the finished thing is 109 cm by 74 cm. I didn't track my hours so I have no idea how long it took, but it's probably more than a hundred.
I tore the fabric into 4 cm strips along the straight grain, double folded and pressed them using the pin method, and slipstitched the edges together with heavy linen. I braided them and whipstitched the braid to itself, round and round and round. The only machine stitching is in the little tiny seams that join the ends of the strips together. I added a few at a time, and even then the ends were very annoying to manage while braiding.
Now it lives on the floor next to my bed, and will help me not have as much dust and dirt on my feet.
774 notes
·
View notes