#sewing & alterations
Explore tagged Tumblr posts
Text


Refitted the sides and waist on some (women's) BUSINESS pants I got from a charity shop a while back
(let out and lowered the waistband, took in the sides, fully redid the waist pleats & darts, fully had to resew the pockets)
I'm very happy with how they came out ^^
#and just in time to attend various job fairs I'll be going to over the next few weeks too!#sewing#sewing alterations#pants#suit pants#men's fashion#trans#(also lowkey obsessed w my arm in that second pic exercise is paying off in gender euphoria let's GO)
13 notes
·
View notes
Text
So this is something I altered. I made it a bit shorter and added a slit in the side to around my knee so that it didn't feel so restrictive and more freer. I have a few others that I altered but don't have pictures of the after just yet. I blurred the background a bit.

#artists on tumblr#queer artist#fashion#alterations#before and after#sewing#my fashion#being myself#proud work#dress#sewing project#sewing alterations#artist on instagram
3 notes
·
View notes
Text
Something incredibly satisfying about knowing your craft and the confidence that goes with it. Just the casual “yeah I could make that”. Want a band tee? Yeah I can embroider my own with the lyrics I want. Bridesmaid dress too long? Yeah I can hem it. Need new slippers? Yeah I can crochet a pair (and give them bunny ears). And of course it’s not perfect but nothing beats that feeling of being able to craft your own solution with your own two hands
#this was prompted by watching nerdforge on YouTube#which I highly recommend they just made an office with a bed that moves as required because they wanted the space#and the “well we want this so we’re going to make it attitude#I aspire to#due to space and resources I’m stuck with limited textile arts but want to and will learn more#want to also sew my own clothes but see above re space#so doing mending and alterations for now which is still satisfying!!!#plus being able to make all your friends presents#rambles#crochet#embroidery#seeing#questwithambition
2K notes
·
View notes
Text
@mxbuster replied to your post “Being a part time alterations tailor may be a very...”:
Omg you are amazing. If you ever want to do a tutorial…….
Sorry for the delay, I put the photos in a folder on my desktop and immediately forgot they existed.
Alrighty, here is how I shorten modern jacket sleeves.
First I should note that:
I work for a suit store that doesn't take very many outside alterations, meaning almost everything I alter is from the same few brands and I'm used to a specific construction. Other jackets from other brands may have different construction, but it shouldn't be too wildly different.
All the jackets I work on have false buttonholes, or none at all. If you've got one with functional buttonholes (statistically unlikely, but not impossible) you're kind of screwed, unless you need to shorten it by so much they'll all be turned to the inside.
The amount you need to shorten it by should already be marked on the sleeve, or you should have a measurement written down. The salesmen leave a little chalk line for me.
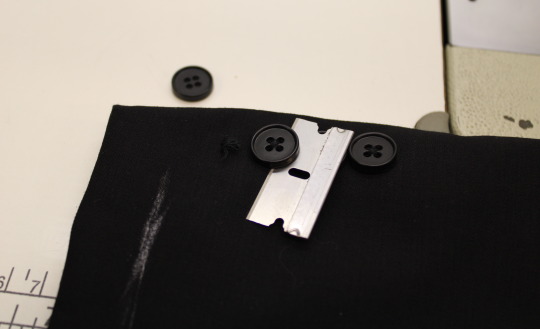
Start by cutting the buttons off. (Both this shop and my previous job use razor blades for this kind of thing, so I can only assume it's common in the professional tailoring world.)
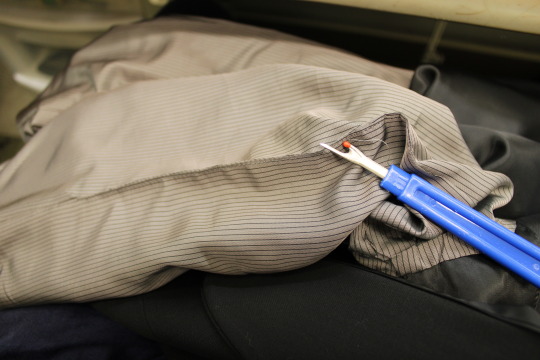
Then turn the sleeve inside out. There will probably be a section on the lining seam where the 2 edges have been topstitched closed. Carefully pick this out with a seam ripper on both sleeves. If it doesn't have this, just open a section of the seam, but not too close to the end of the sleeve.
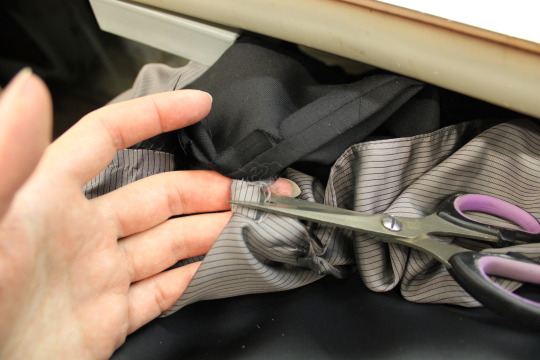
Often the sleeve lining will be tacked to the outer sleeve's seam allowance in a few places, and you can cut these if they're in the way.
Now you can easily pull out the threads that were holding the buttons on, and can remove the false buttonholes if there are any.
Most of the buttonholes on the jackets I do at work are chain stitch, which means they're easy to pull out quickly once you get one end loose and can un-chain them, but some of them aren't and take a lot longer. I especially hate the ones on the sport coats that have a little contrasting bar tack at the end, those ones are the WORST and take forever to pick off.
There's a seam holding the ends of the lining and outer fabric together. Cut it off.
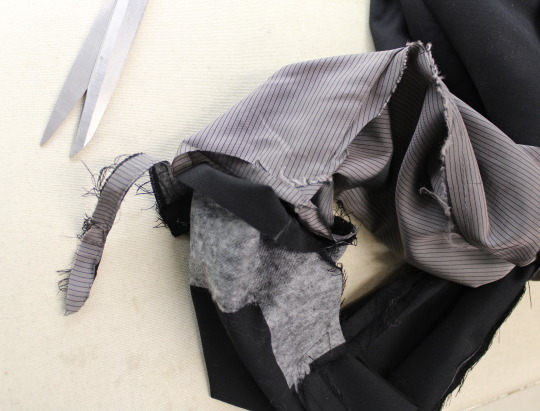
On jackets with a particularly loose fabric there may be a bit of blindstitching around here holding the end up, same as there is inside a dress pants hem, and you should remove this first. It's big and loopy on the inside and you can find the end and pull on it to make it come apart, just like the string on a potato bag.
There's probably also a bit where the edge of the jacket sleeve is stuck in place with a bit of fusible tape, so pull that apart. Cut through the threads where the seam allowance is sewn to itself, and pick apart the seams that form the corners of the vent.
(I use the razor blade for this too, by pulling the 2 halves of the seam in opposite directions and cutting the threads in between, but you'll probably want to use a seam ripper.) Don't cut the top part of the seam on the vent though, that bit where the seam allowance juts out to provide extra material for the overlap should still be sewn shut, as you can see at the top of the photo below.
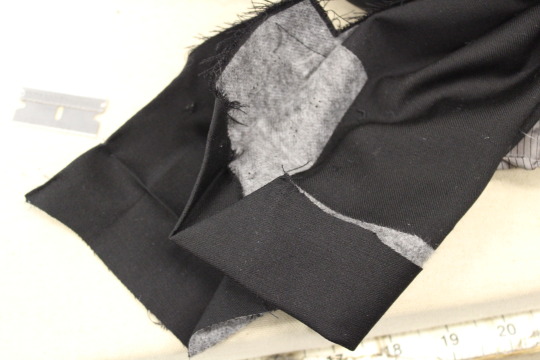
Turn the sleeve back right side out and mark the new line all the way around. At work I mainly use wax chalk which disappears as soon as you iron it, but regular chalk works too, it'll just take a bit more work to brush it all off after.
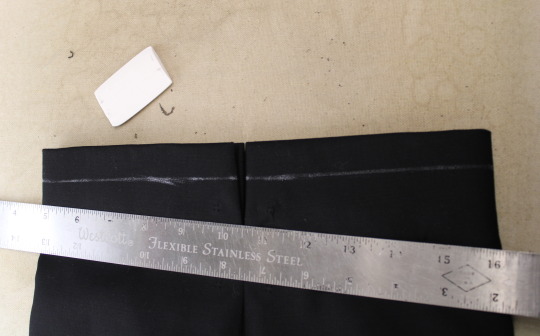
Press out all the creases from the old seams at the corners. (I have to be careful not to get steam on my wax lines, or else they'll disappear.)
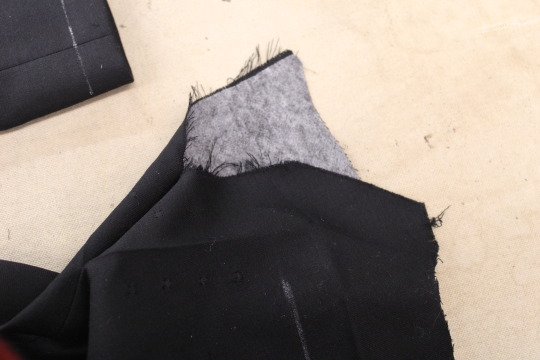
Now press the end of the sleeve in and make the new crease. Sometimes I press out the old crease first, if it's far enough away from the marked line, but sometimes not.
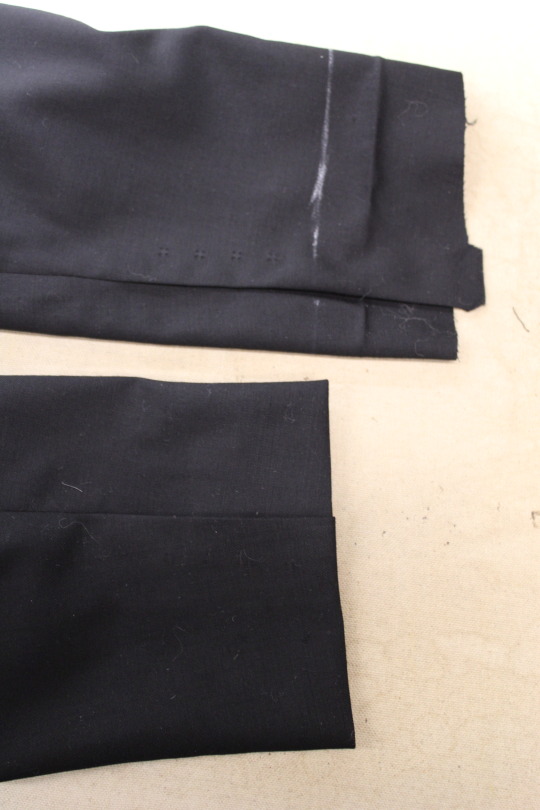
I like to press both layers of sleeve at once in the middle, avoiding squishing the sides, and then I press each of those side bits using this little dense pillow thingy we have at work. It's kind of like a tailor's ham but small. You could easily make one and fill it with scraps, it's a useful thing to have. Make sure the overlap & underlap are facing the correct way.
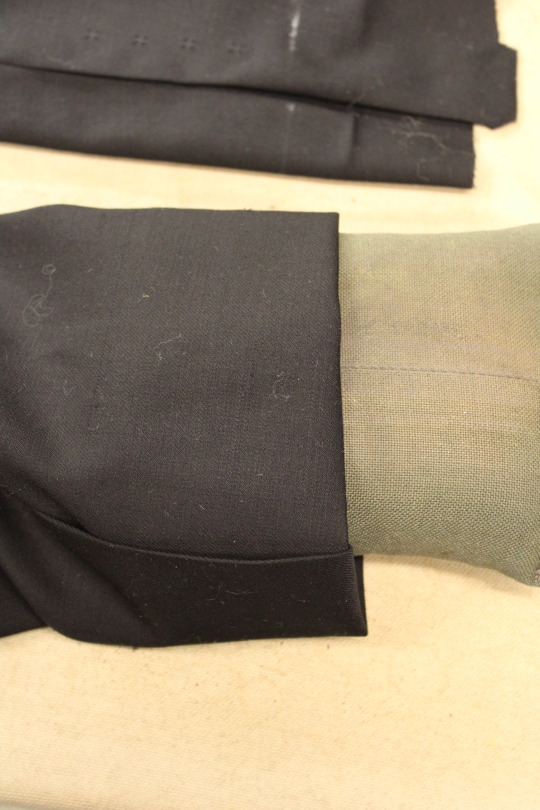
I then straighten out the sleeve and see how the lining length looks. The end of the lining is usually quite wrinkled, so I press it first.
Here the lining is barely protruding, so I didn't trim anything off, but if there's more than about 1.5 cm sticking out past the sleeve then I'll trim that excess off.
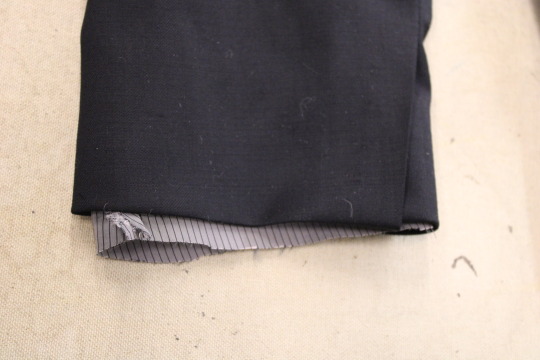
Turning the sleeve back inside out, trim any excess off the folded up bit. I try to keep this bit about 4.5 cm wide, so this one just needed a little bit removed.
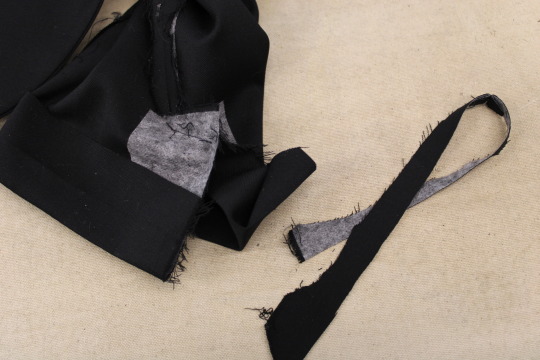
At this point you may want to add a bit more fusible interfacing to the button area, but it usually goes pretty far up, so I only do this if I'm shortening the sleeve by a LOT. (And if I'm shortening it by that much then there probably isn't enough overlap left to redo the vent.)
Now there should be creases showing where the new vent corners will be. On the underlap side I mark a little + right where I'll start sewing there.
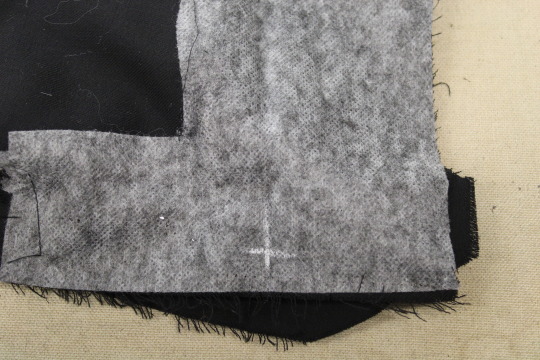
And on the overlap side (the one with the mitred corner) I mark a diagonal x and then draw a line over the whole corner with a ruler, like so.
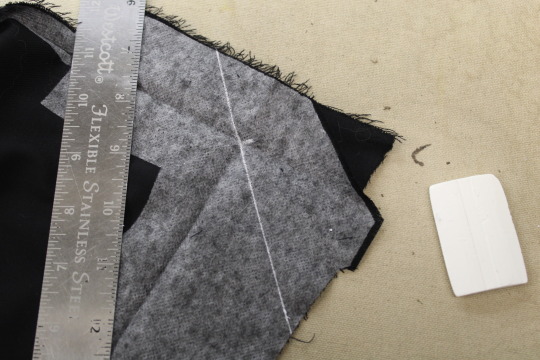
That is NOT your stitching line!!
This corner isn't perfectly square, it's a slightly wider angle. So when I fold that corner right sides together and match up the lines I start sewing from the tip of that marked line at the fold, but I veer off at a slight angle (in the direction of the seam allowance) and end about 4 mm out from it.
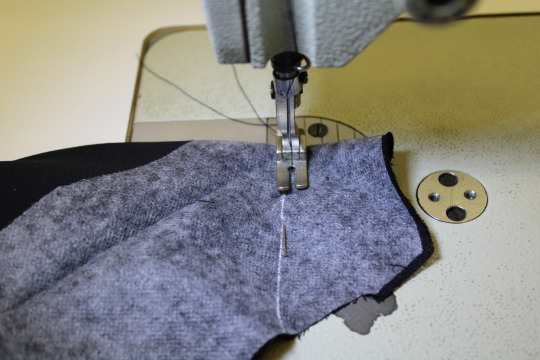
It's not very clear in the below picture, but you can hopefully see it.
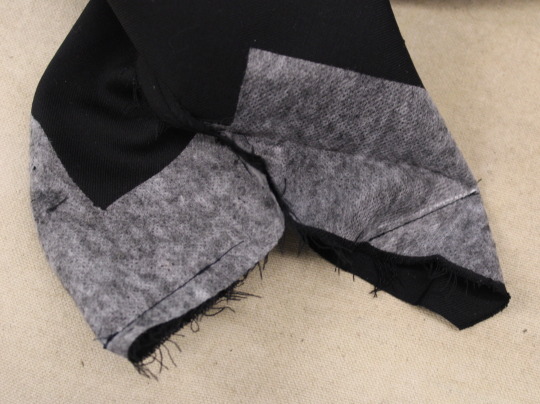
Flip those 2 corners right side out, turn the whole sleeve right side out again, and press those corners nice and flat. I use the little sleeve pillow for this too.
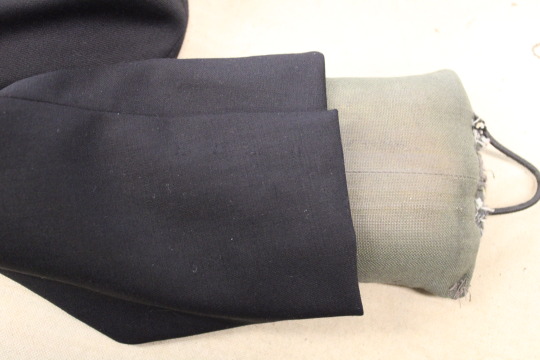
Then you can pin the overlap shut just the way you want it to sit, turn it inside out again, and carefully re-pin it so the pin is on the inside, before removing the first pin.
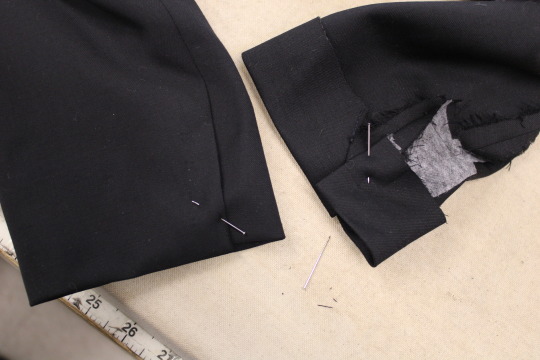
(I actually skip this step and just pin it from the inside and go straight to the rest of the sewing up, and then press the corners after the lining is closed up, but I've done hundreds of these at this point so you'll probably want to do it this way.)
Sew the two halves of the vent together so that it'll stay closed. Just a tiny spot of backstitching on the seam allowances, like so.
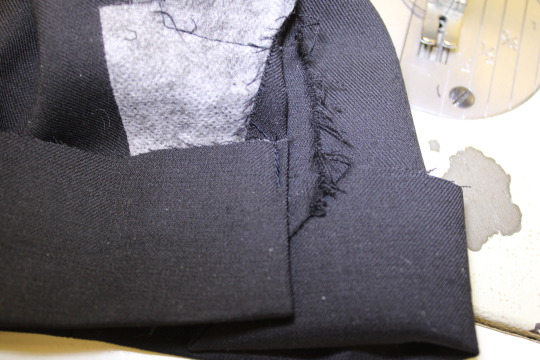
Now you can match up the ends of the lining and outer sleeve and reattach them. I always start with the seam opposite the vent, since the vent side doesn't line up precisely.
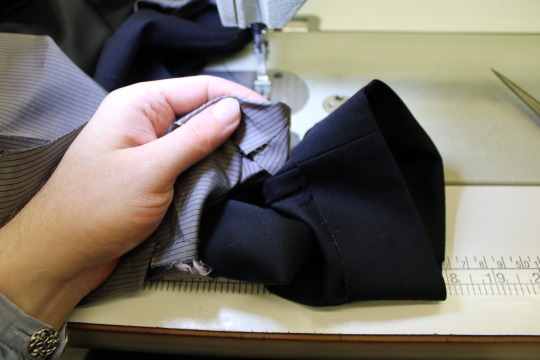
I put them together like this, right side to right side, and pull those ends out through that opening in the lining before pinning it closed.
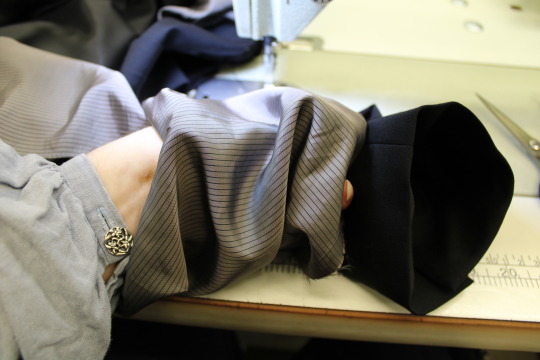
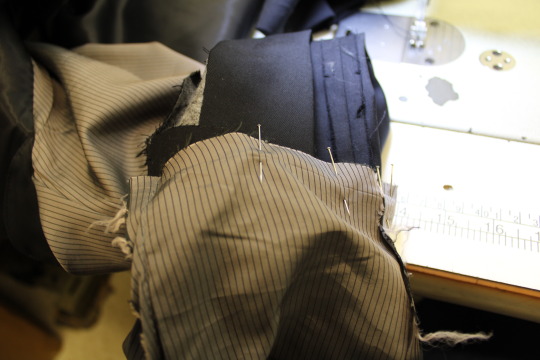
Then sew it, starting and finishing on either side of the vent.
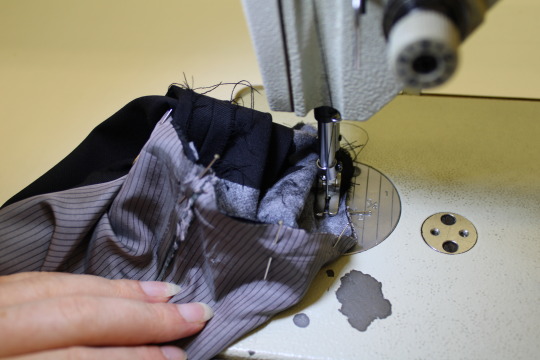
There will likely be a small gap between the ends of the seam, since the vent is in the way, but this doesn't matter.
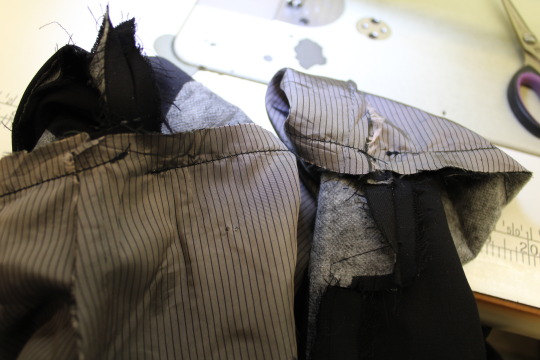
On the non vent side, clip into one of the seam allowances right below the seam.
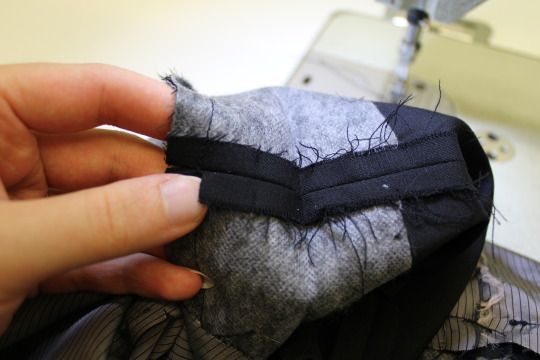
Fold that seam allowance right sides together, keeping the rest of the sleeve out of the way, and sew it to itself. This is the same bit of stitching you removed earlier in the process, and it helps to keep the end of the sleeve from sagging.
If the seam allowances are too small or frayed you can also just turn it back right sides out and stick a bit of fusible tape in there.
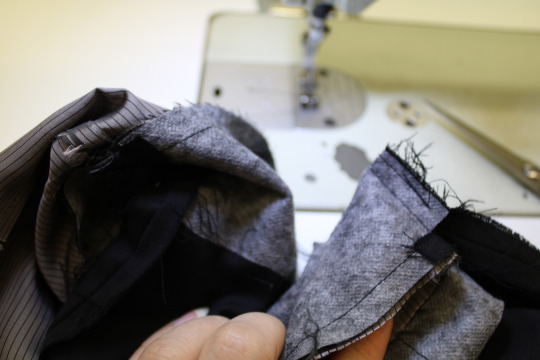
Stuff everything back so that it's right sides out but the sleeve itself is still inside out, and redo that topstitching on the linings. (Or do it for the first time if there wasn't any. You may want to press the lining first if you don't have two nice creased edges.)
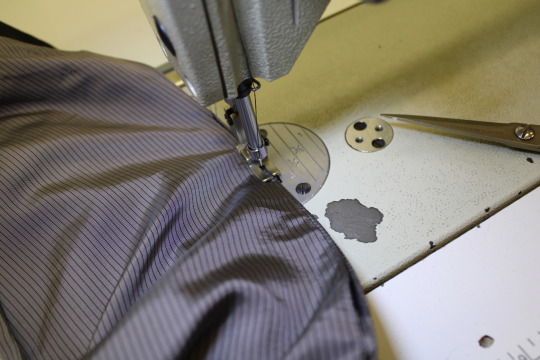
If this is your own personal nice jacket you might prefer to slipstitch it closed by hand, or to instead machine sew it closed from the inside and hand sew the lining back to the end of the sleeve, but I'm obviously not going to do that for my very low paying alterations job.
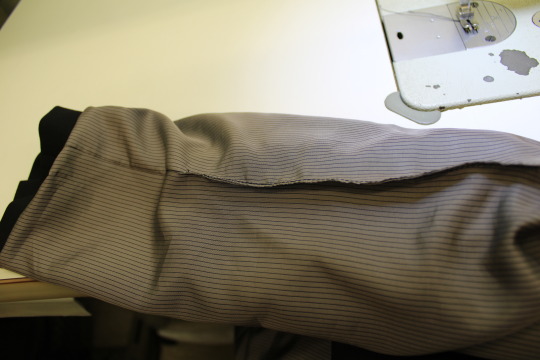
Turn the sleeve right sides out, sew the buttons back on, and you're done!
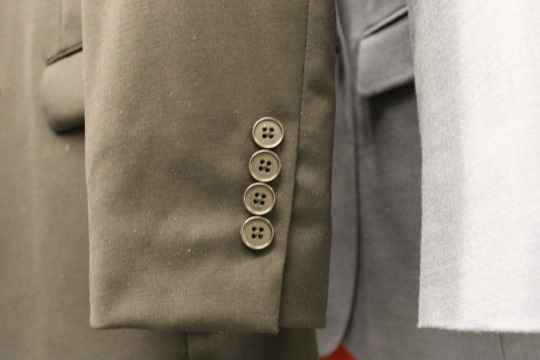
Nice mitred corner and all!
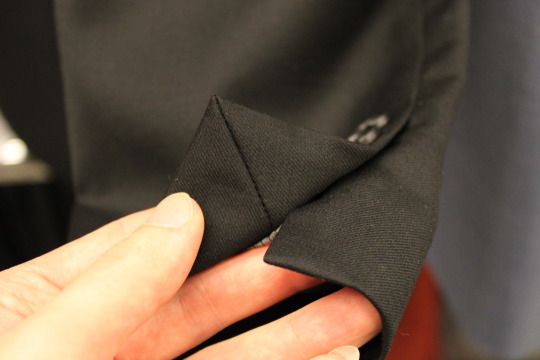
The first time I did this it took me over 2 hours because I didn't know what I was doing, but 5 years later I've got it down to about 45 minutes.
If the sleeve needs to be shortened by so much that there isn't enough overlap material left to redo the vent, then I just sew it shut and fold the whole thing up. I have to add new interfacing behind the buttons, as mentioned. For this I also need to turn it back right side out before I close up the lining, so I can stick the not-vent-anymore area to itself with some fusible tape.
Sometimes I have to lengthen sleeves, and for that the process is fairly similar, except of course I have to carefully unpick the seam at the end of the sleeve instead of cutting it off, and I sew an extra strip of fabric to the end. (I keep a box of cut off ends from some of the pants I've hemmed for this.)
For that you also need to use fusible tape for both seam ends, because when you've added an extra bit on you can't sew the seam allowance to itself. The amount you can lengthen a sleeve by is limited, since you need to make sure the new piece of material is entirely folded to the inside and out of view.
I hope this helps and makes sense!
221 notes
·
View notes
Text
turned this dress into a shirt and legwarmers set

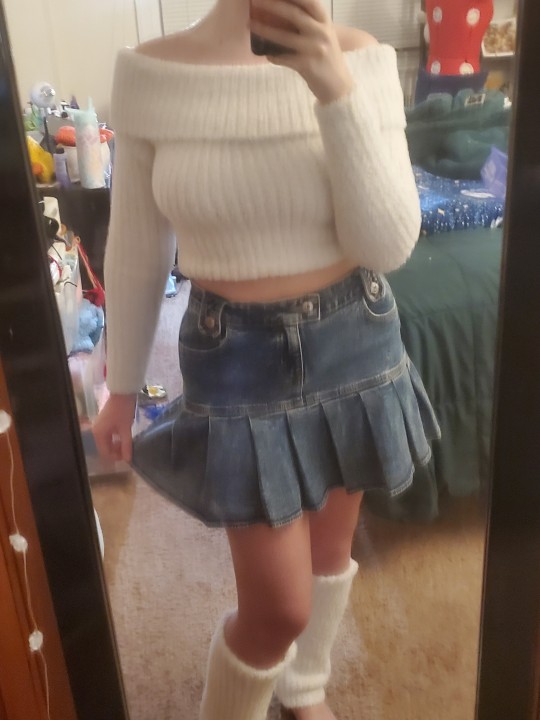
the original dress (i got it months ago and never wore it bc i do not like wearing bodycon dresses)
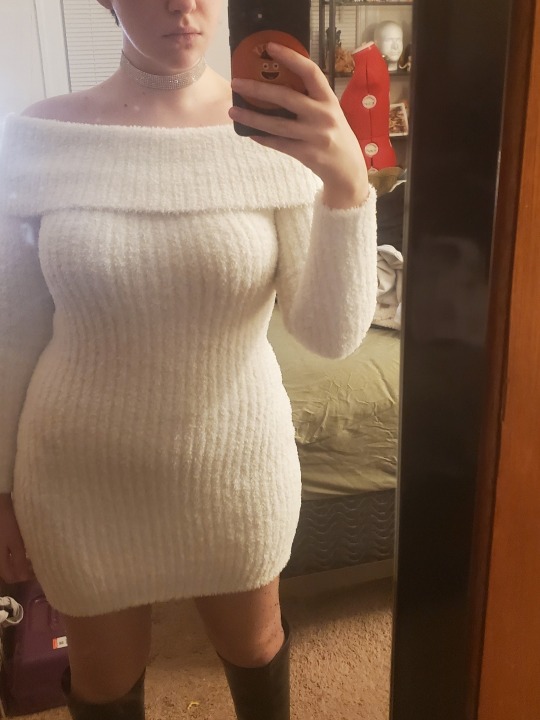
just a fun little experiment
254 notes
·
View notes
Text
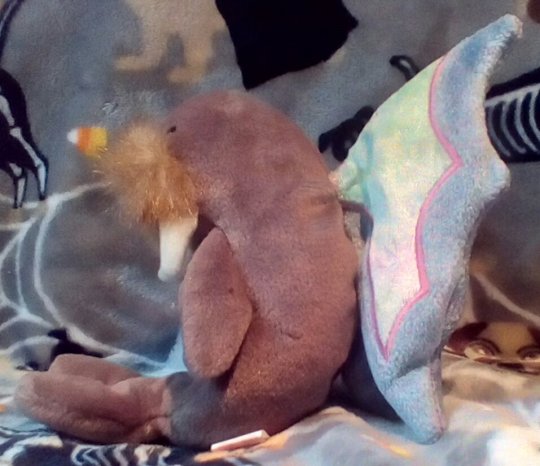
Walrus Fairy modified TY Beanie Babies hybrid plush by Cat's Chimerical Creations


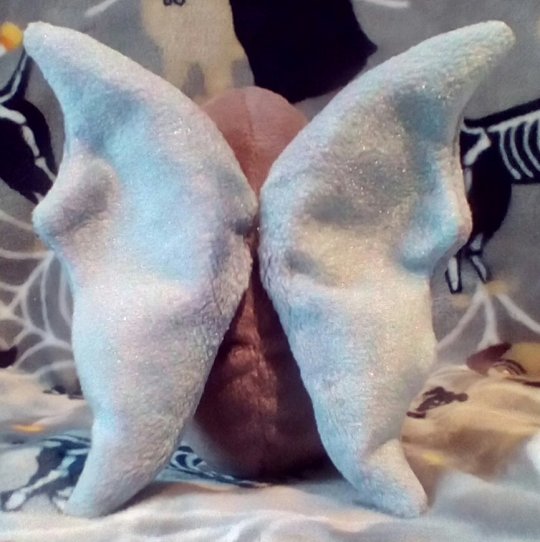
Like what I do? Please consider supporting me here: https://ko-fi.com/catschimericalcreations
#catschimericalcreations#frankenplush#diy plush#custom beanie babies#fairy walrus#walrus fairy#walrus vs fairy#fairy vs walrus#plush modification#plush taxidermy#repurposed soft toys#upcycled beanie babies#altered plushies#mutant plush#hybrid plush#plush chimera#conjoined plush#toy story sid#sewing life alchemist#ty beanie babies
187 notes
·
View notes
Text


yayy post-canon loop designs DONE!!! first one is after they've re-joined the party but are still adjusting, and the second is later when they're more settled and confident.
i knew i wanted to give them a style that's loose and comfortable, but unique and fun; something that can fill a similar niche to siffrin's canon outfit in both style and fit, while remaining totally aesthetically distinct. so i went in a mori kei direction!
design note rambling under the cut
immediately post-canon, loop sticks to dark and black clothing, avoiding siffrin's signature white-on-black. they try both long loose dresses and tighter leggings/turtlenecks, trying to figure out what feels the least weird to wear on their pure-craft-energy body, and end up layering them both. snug and enveloping! they refuse to wear a cloak, but end up just draping their favorite black blanket over their shoulders instead. it's a nice rich lightless, and soft, but still thick enough to block the shine of their head. good for staying cozy or hiding.
after they join up with the party, loop eventually decides fuck it, i can't just define myself in opposition to siffrin, why does he get dibs on our favorite colors. so they start adding white back into their wardrobe! after odile helps them figure out how to craft their body to feel a little more solid, they don't feel like they need to stay so multi-layer covered up anymore, but at this point it's habit. they're still enjoying lightweight fabrics, and getting into fun textures. they don't like the way full pockets affect the drape, so they use a couple bags to store their magpie'd items instead.
once the bodycrafting is more-or-less-done they feel a lot more comfortable in their body, and start to even kinda enjoy how striking their star skin looks among other shades! they still tend to layer, but they no longer need all the layers, and they'll leave the blanket at home in favor of lighter-weight shawls or scarfs that they can still hide their face in. they wear more black and white now, but not in a super high-contrast way; they wear more midshades than siffrin, and less patterns than isabeau. it's all about the variety, lightless and darkless and everything between, draped fabric and lace and ruffles and accessories! their favorite necklace is made out of their five favorite rocks (one to represent each party member, they're finally willing to admit aloud), and they've switched to one nice big bag with plenty of pockets for their various things.
siffrin stuck with the same old outfit for a long time. but just like how having their body forcibly changed made them desperate to change it themself, loop's more experimental and particular about their fashions now as well. they're figuring out who they are, and by the stars they're gonna go full self-expression about it!
#in stars and time#isat#isat loop#in stars and time loop#loop#silverstarsart#loop refuses to let isabeau make clothes for them#but they do let him teach them how to alter their clothes and even sew from scratch#mirabelle loves to take them shopping for silly accessories#and she knits lace for them#bonnie got them the cool bag with custom pockets for their art supplies and everything#and ofc odile did the heavy lifting on all that experimental not-quite-body-crafting#get loved idiot :3#isat spoilers
101 notes
·
View notes
Text
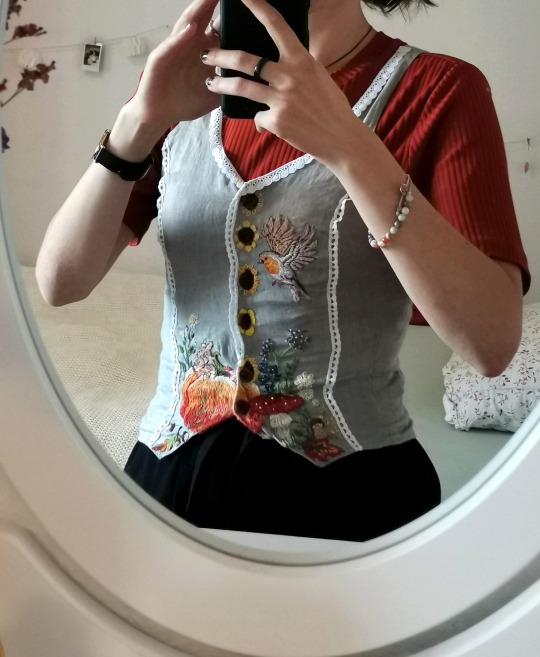
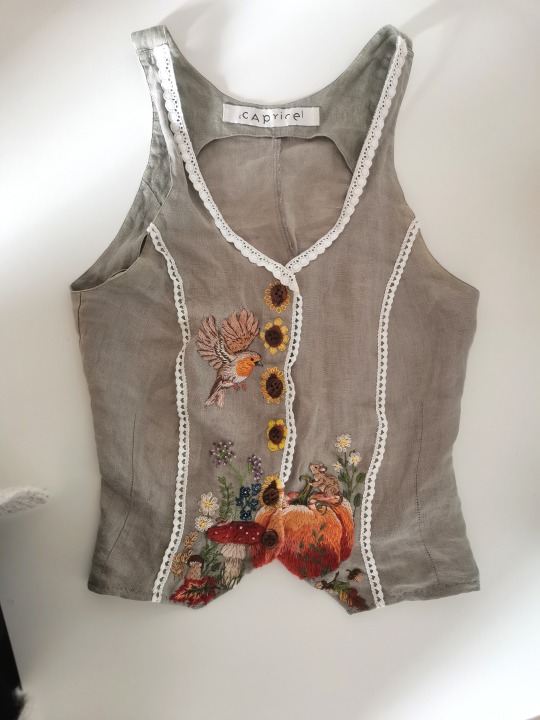
#Autumn is here!#My quarantine project is done just in time#Embroidery#My art#I try things#fibre arts#Cottagecore#Autumn#Ignore how wonky the seam at the bottom is#I don't know how to sew and i don't have the patience to look up tutorials#Altering this to fit me was the hardest part#And I'm kinda proud of the result
371 notes
·
View notes
Text


More progress on my green jacket......... I did the overlaid panels on the chest/pocket/collar ages ago, but I've been putting off the sleeves because. I wasn't sure if I wanted to keep them or not lol.
But I think it's turning out good! Mismeasured a bit between the panel width and the cuff extension but a cute pleat fixes everything :3c
#fiber arts#sewing#battle jacket#alterations#diy clothing#i have one more sleeve to re-cuff but im tired#next up is some brassy spikes if i can ever get this damn website to work lololol#green jacket#crafts
430 notes
·
View notes
Text
Here is the process of me making a trans blahaj for my qpp! I'll try and post the pattern too (when I figure out how).
PART ONE:
First I used a seam ripper to unstitch a regular blahaj (evil, I know.)
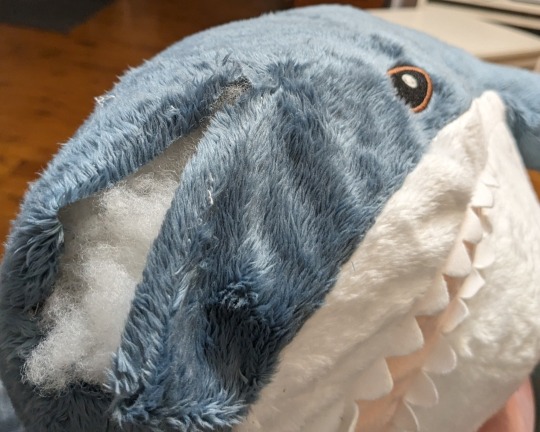

Next I separated all the pieces and traced them onto a big sheet of paper (including a 1 cm seam allowance). The exception was the white stomach/mouth piece which I just reused on the trans blahaj instead of making another.
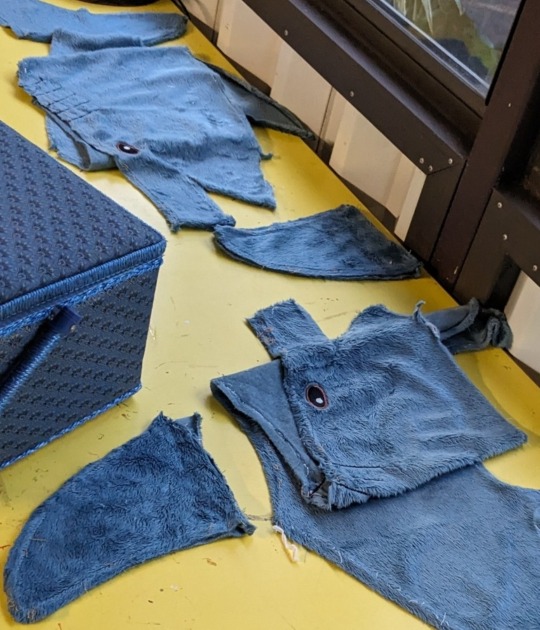
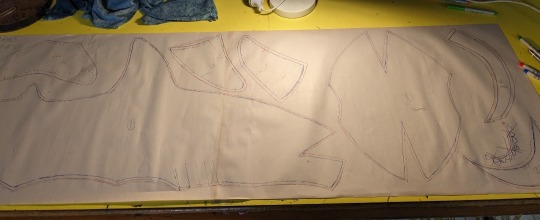
To make the trans blahaj pattern, I taped the first pattern to a glass door to make a makeshift lightbox, then traced the pieces, altering them slightly where there needed to be additional areas in different colours (e.g. the single side piece was traced as two separate smaller halves so I could have one half light blue and one pink, as were the fin and tail pieces.)


On to part two...
#qpr#queerplatonic#alterous attraction#queerplatonic relationship#alterous#lgbtqia+#qpp#love#transgender#blahaj#trans blahaj#beyou blahaj#sewing#craft#project#art#ikea#ikea shark#ikea plushies#trans#blahaj trans#transmasc#transfem#aroace#acearo#demisexual#demiromantic#aromantic#asexual
171 notes
·
View notes
Text


shortened (by like 20cm 😭) & put gussets (made from the cut-off fabric 😎) into one of my old shirts 👌
it fits much better now
3 notes
·
View notes
Text
How I added a bustle to make a skirt larger:
My friend bought this Abilletage skirt, but it was a bit too small for them. They asked if I could alter it for them. I have very minimal sewing skills, but I accepted the project (because im a pushover). So here's how I did it.
First I had them put the skirt on and measured the gap. The skirt had a zipper and they couldn't zip it all the way. There was a 7 inch gap.


I bought 2 yards of this very light bamboo cotton fabric that reminded me of chiffon. I wanted the fabric to flow because I wasn't confident I could make something structured.
I cut out an 8 inch "box" of fabric to act as the base (i stacked 2 bc the fabric was a little transparent) Then with the rest of my fabric, I cut 5 rectangles out to be each bustle layer. I used the gathering foot on my sewing machine to ruffle them up (i had to learn how to change the foot and tension, there are multiple youtube videos that were helpful)
I also made sure to finish my hems with a double fold hem. This made it look very professional!


I made sure everything lined up before I altered the skirt. Then, the scary part! I seam ripped the skirt. I did not want to mess with the zipper, so I used the front seam. Then I added the plain 8 inch "box" on without the ruffles sewn on. I attached the ruffles by handsewing.
(before and after) it isn't very clean looking, but it's on the inside plus there's no raw edges showing!


I didn't make a new waistband, I just folded over the top ruffle and stiched the sides closed.

And here's the final result! I think it makes the skirt more classy, plus it fits bigger now! I know it doesn't look absolutely perfect, but I thought this might inspire some of you to try it yourself and gain some experience like I did!
Thank you for reading!
#egl community#egl fashion#lolita fashion#egl sewing#lolita sewing#diy lolita#diy projects#lolita alterations#lolita blog#journal#jfashion
43 notes
·
View notes
Text
Again I don't know who needs to hear this, but accept your grandparents' hand-me-downs. Even if you think they'll be frumpy, just try them on. You might be surprised.
Also remember that your grandparents were young once and a lot of what they used to wear has come back into vogue. So just try them on in the bathroom. A belt around the middle can go a long way, too. If you don't like them, just thank your grandparents and say they're not for you.
If you do like them, show it off to your grandparents. They will be absolutely tickled pink that their favourite jacket/blouse/pants/etc. from 40+ years ago is going to good use (their grandchild).
What's more is if the clothing is that old and still intact, it's probably very good quality and will last you a long time too.
#grandparents#hand-me-downs#anti-fast fashion#inherited clothing#also if you have some sewing ability you could alter clothing that almost but not quite fits you
27 notes
·
View notes
Text
Being a part time alterations tailor may be a very boring dead end barely above minimum wage job with no benefits, but on the plus side it's physically impossible for robots to steal it from me.
226 notes
·
View notes
Note
Hello! Do you have any advice on how to take in the shoulders of a shirt? All my button-ups are too large on my twink frame. Thank you!
Hello! Shoulders can be a tricky spot, but I have some ideas. I'm assuming you mean the shoulders of the shirt are too wide for your shoulders. While I don't think an oversized button-up is a bad look on a twink, wanting a well-fitting shirt is completely understandable. I personally have the opposite problem, but I've costumed plays where I had to take things in for my actors.
To make the arm seams sit up on your shoulders, you basically need to remove the wedge of fabric that's hanging past the edge of your shoulder. Put a pin on the yoke of the shirt at the point of your physical shoulder. This should be where you want the arm seam to end up. Then, bring the top of the current arm seam in to meet that pin. There should now be a wedge of unnecessary fabric on the inside of your shirt.
You'll probably have to fuss with the shirt quite a bit to make the entire armscye go farther in. However, if you're also taking in the side seam of the shirt, it should give you more room to work with. Try to put any weird bubbles or ripples in the fabric down underneath your arm where it matters less.
When you're finished sewing the arm seam in place where you want it, you'll probably have a big flap of fabric on the inside. If the bulk doesn't bother you and you want the shirt to be re-adjustable, leave it alone. If it does bother you, you can cut it off. You can finish the new raw edge with bias tape or with a serging-type stitch.
I hope this helps! Please let me know how your finished product turns out. Go forth and make stuff!
27 notes
·
View notes
Text
Sam Hensley’s Creamthing made from repurposed plush by Cat’s Chimerical Creations


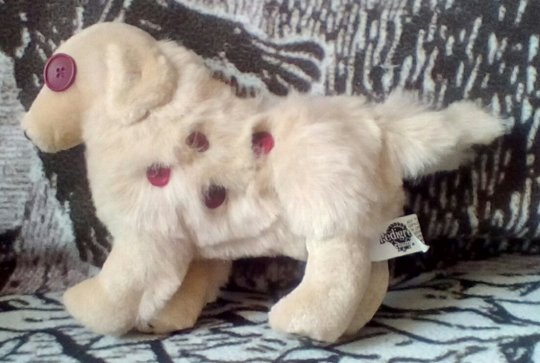
Absolutely obsessed with Creamthing by @samsketchbook so I made one out of an old charity shop stuffie!
And remember, you can unlock one fun fact about any repurposed Beanie Baby hybrid plush beast of your choosing by donating over at https://ko-fi.com/catschimericalcreations!
#catschimericalcreations#creamthing#sam hensley art#sam hensley#samsketchbook#creature design#weird plush#weird dog#frankenplushie#altered plushie#upcycled plushie#plushie modification#chimera plush#mutant stuffies#mutant dog#hybrid plush#toy story sid#sewing life alchemist#randimals#creepy cute#guro
501 notes
·
View notes