#seeing how they fit together and how they use (or don't use) seams to shape things
Explore tagged Tumblr posts
Visit Tumblr Blog
Explore Tumblr blogs with no restrictions, modern design and the best experience.
Last Seen Tumblr Blogs


Fun Fact
Tumblr was attacked by a cross-site scripting worm deployed by the Internet troll group GNAA on Dec 3, 2012.
Text
Hey y'all! What are your favorite brands (or small creators) of stuffed animals? As far as brands go, the ones I can think of off the top of my head are Jellycat, Douglas, Aurora, and Gund (and squishmallows, but I am not a big fan of the mochi minky/extra soft stuffing/sorta-spherical plushie style) but I know there have to be more I'm just not thinking of
#the person behind the yarn#I like plushies partially for the 3D puzzle aspect of it all#seeing how they fit together and how they use (or don't use) seams to shape things#and the sorta spherical plushies are like. much simpler#sometimes simple is good! but these days I rarely ever buy simple plushies#because like. I could make those#also I am so used to working with 2 way stretch minky#that touching 4 way stretch minky feels weird???#it's like thinking your drink is dr pepper and you take a drink and it's pepsi#like. not inherently terrible! but a weird moment of almost uncanny valley
15 notes
·
View notes
Text


@roykiller07 There's been some costumes on display on mannequins, which might help staring at the technical details for how Electra fits together? It's easier to see when not on a living actor!
John Napier's basic concept is "toy - trains" - like action figures, the joints are emphasised as the joints are needed to allow the rigid mechanics to move! This is the opposite of his work on the musical "Cats", where almost all the seams, the joints between fabric even, are eliminated or hidden to make the performers as smooth and fluid as possible. For Starlight, we don't have fluid, we have chonky!
The German costumes are duplicates of the Broadway costumes made by Parsons-Meares in 1987, the Parsons-Meares costumes were used as the basis for all productions except the original London production in 1984 - and now the 2024 Wembley production. (Though I believe a few makers who worked on the London show in its later years did also work on the Wembley costumes, but not in a design/supervisory role, so things like construction methods probably didn't get carried across.)
Anyway! The Classic Broadway / Bochum costumes by John Napier rely heavily on a basic bodysuit, often padded and quilted, with belt, vest, elbow, kneepads, gloves, thigh pads, etc, attached.


Here's Espresso's basic suit, knees and thigh patches remain connected - Espresso's performer has to quick change between the engine and the gang costumes. there's a zip the full length of the leg so he can change without removing skates!


The coaches are a bit different of course, being lighter, more shapely.


The coaches have leotard and leggings, with plenty of anchor points to hold the other pieces in place.
As to what it all means? That's quite a different question! The original designs are mostly collages of photos of trains, they're meant to get the idea of the mechanics across rather than being a literal representation in most parts.

Generally it's understood that the bands around ankles etc are springs, the big shock absorbers. Elbows have buffers, the coaches arms and legs have windows - their shoulders are the carriages.


I'm sticking to the Broadway/original Bochum designs here - the original London were very experimental and done on a shoestring budget. They poured money into the Broadway designs - it was the 1980s after all! Later costumes have had less overall concept behind them, they just "Look like Starlight Express". And the Gabriella Slade costumes? I have no clue. but they're shiny.
206 notes
·
View notes
Text


Wanted to use up my final scrap yarns and practise colorwork knitting so I made some legwarmers yeehaw
So to start; to make these I bastardized the shit out of the Lunar-socks by Heinikki Design. The backside of the sock has this pretty star pattern, so I took that part and used it alone for these legwarmers. Did have to figure out how to do the seam/transition between rows, which was a lil tricky, but, eh, I think I did a decent enough job. The seam is visible (you can see it in the first photo, on the left one) but it's about as subtle as I could get it with my stitch count/pattern repeat
But yes. I had these leftover yarns from the vertical stripe cardigan I made last fall. And I thought making legwarmers with them could be fun; I wasn't entirely sure what I'd be able to make with the scraps because I wasn't sure what the yardage was (colorwork eats up yarn differently than basic knit). So I figured with legwarmers I could just make them as long as I wanted/was able to with the yarn I had, and I could just stop whenever I was about to run out/felt they were long enough. Also, with socks I get a bit sad/worried it might be a waste of time because socks will wear down and will end up with holes (holes can be fixed but that also takes time and effort). Also I have no idea how to knit socks and I went into this wanting to practise colorwork, not shaping/sock knitting. But with legwarmers, I just need to knit a tube, and because they're worn on your legs, they won't/shouldn't wear down too fast. (Also I have plenty of other small clothing items that I just don't need more of, but I don't have any legwarmers)
As mentioned though, the key thing for me going into this project was that I wanted to practise colorwork. My only previous experience with colorwork is the anatomical heart sweater that I made last year, but that one was an intarsia project. I hadn't done an all-over colorwork project like this before, and I really wanted to try that, but also a whole ass sweater is a big undertaking and quite scary. I wanted to try something smaller so it'd be easier to practise, but also because if the project was turning out like shit, I wouldn't feel as bad if I had to frog it etc.
So yeah, I started by just doing the ribbing and figuring out how big I needed/wanted these to be so they'd fit on my legs (something I do hand-in-hand because god knows I always have to redo the cast-on/first few rows a few times before I get the size right). After that I did the pattern bastardization and just. Got to work. I did not check how long it took me to make these but it did take its sweet ass time. I do feel like it took me a while just to learn how to hold my yarns and get used to having to move my stitches along and "reset" the yarns around my fingers to get the tension right every few seconds.
But eventually, I got the hang of it. And I'm glad to report I was able to make these legwarmers the perfect lenght. I had divided my yarns in half before starting (I feel like it helps ensuring both items have enough yarn/I know when to stop knitting lest I run out) and went back-and-forth with both warmers for a while until I got to the bottom ribbing. Then I ran out of black yarn on one of warmers, and so I had to attach the other end of the other black yarn ball to finish both. By the time I was done (like 3 rows shorter than the top ribbing, sad but it's fine) and had cast off both legwarmers, I had like 30 centimeters worth of black yarn left in total between the two, holding them together. Like holy shit I had JUST enough to make these. (I do still have a smidge of yellow yarn left but nothing much)
And, yeah. I think they turned out pretty good!
Now, key complaints; I shouldn't have done stretchy bindoff on the ankle, it flairs out so much when I would've preferred the cuff tighter there. My mistake. I also didn't do any decreases on these, mainly because I didn't want to spend time figuring out how to do shaping on legwarmers, so they are a bit loose above the ankle (would be fine if the ribbing was tighter). And I did do some mistakes with the colorwork here and there. But. I came here to practise doing colorwork. The keeping of tension etc had intimidated me for such a long time I had been scared to try colorwork. With that in mind, I think these turned out pretty good! Like, quite decent! And I feel like I've finally overcome The Mountain of Colorwork, like I feel like I could take on a sweater now or something (probably not but a guy can dream lol)
#Moon posting#Yarncraft Diary#Yarnblr#Knitblr#Also made a really ugly crochet bag with random scrap cotton yarn but literally not even worth showing lmao
14 notes
·
View notes
Text
Four blouses
A year ago I bought a metre of some very lovely and expensive Liberty Tana lawn. It sat in my small sewing stash until I could find a pattern for it. Eventually I settled on the Perennial Blouse. I was drawn to the simplicity of the shape, which lets the pattern shine will still being fitted and not the giant sack with elastic waist which seems so common in Indie patterns and which I have many many bitchy thoughts about.
I made a quick toile and found that as usual I needed to take length out of the body. It's designed to sit at the natural waist and I have a rather short torso. That's why it looks like a crop top but I swear it's not, that's just how short my upper half is! For reference I am 5'6" (167cm) and yet need a 32in (81cm) inseam, I really am mostly leg.
I made the cap sleeve version, and it was a quick and fairly painless project that is really elevated by the beautiful finishing on the inside and the thoughtful pattern elements, such as a button hole guide and separate pattern pieces for any interfacing, a well as properly drafted armscyes (the amount of armscyes that are symmetrical makes me weep).
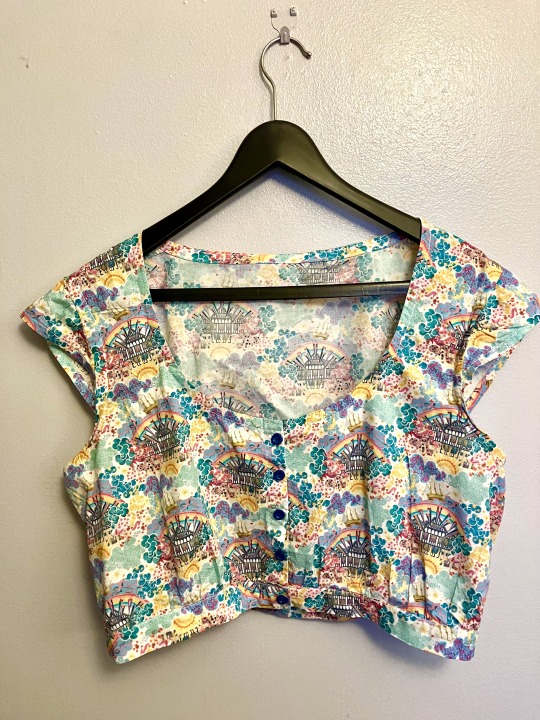
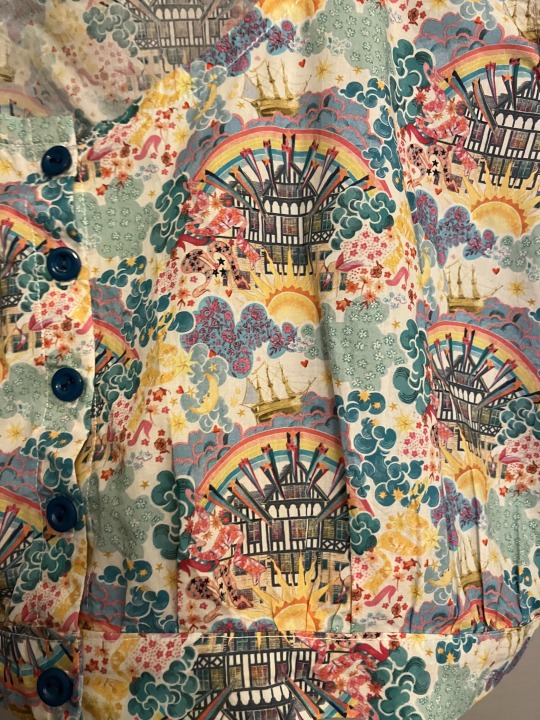
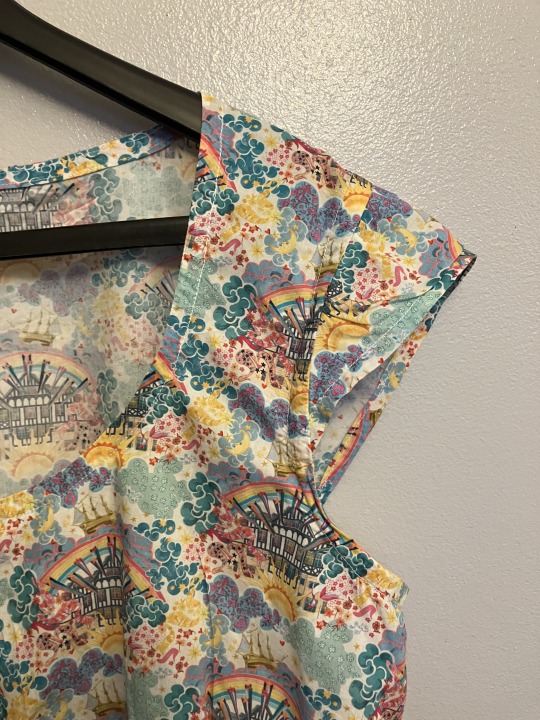
Here's some close ups of the pattern and the cap sleeves. I was very happy with the pattern. It's very economical for fabric, taking under a metre, and it really lets the print shine. In fact I was so happy I uh, went a bit wild
I had to give away almost all my handsewn shirts this year as my upper chest and shoulders no longer fit comfortable in them (swimming regularly will do that, and my high bust measurement has always been out of whack for standard pattern sizing anyway). So I wanted restock my handsewn blouses, and I knew I liked this pattern. So I made more.
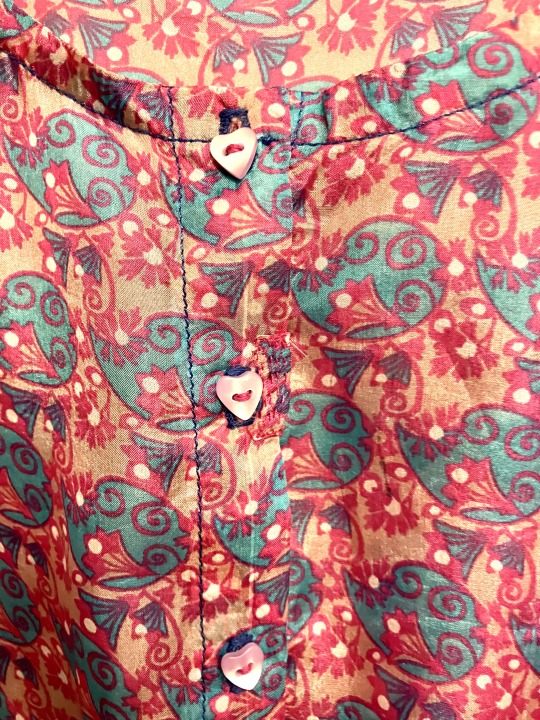
This is a white cotton broiderie anglais, For this one I raised the scoop neck about 1.5 cm, and lengthened the body by a cm. I love the contrast of the orange buttons. I made the bias tape from some plain white polycotton because the embroidery on the body fabric would mean it was harder to use.
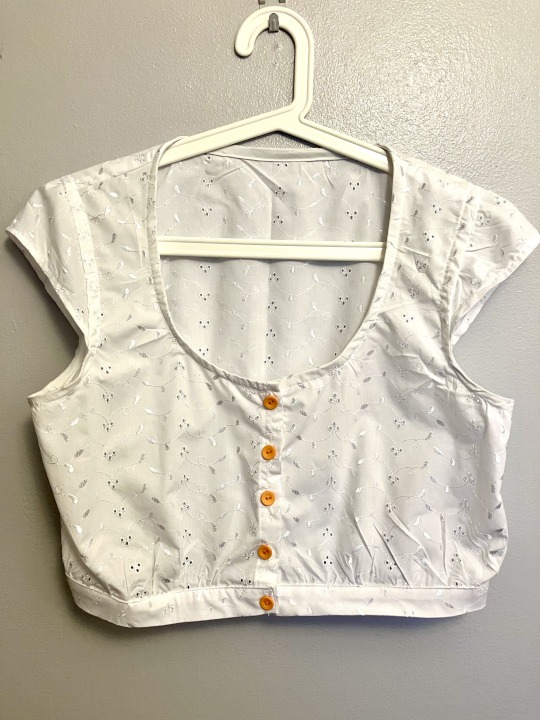

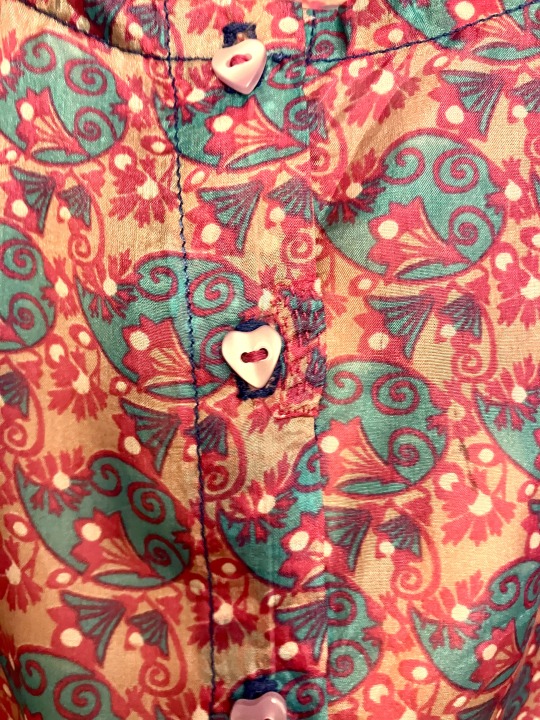
I've added pictures of the inside for this one. As you can see there are no raw edges anywhere in this blouse, which I LOVE. The seams are all french seams and the neckline/sleeve seam/armhole are all bound with an understitched bias facing. It makes the inside SO neat and tidy. So many patterns skimp on the seam finishing, instructing you to serge or overlock them (I don't have an overlocker nor any desire for one). And really if I wanted seams that were overlocked together, why would I bother making my own clothes. It's a seam finish I hate! I really appreciated the time put into the pattern to make the inside nice.
Next up is this fun orange number that I made as part of a Star Wars bounding outfit (I was BB-8). A lovely embroidered lawn which was SO lovely and well-behaved to work with. I cut it on the cross-grain so I could have the embroidery and cut work running parallel to the button bands

And lastly, this one in silk. It was a NIGHTMARE to work with. It's whisper-thin and slippery and semi-sheer. I gave it gelatine bath which did help to somewhat stabilise the fabric as I cut and sewed it but it also made it super staticky. I think I should have used more gelatine because although it was slightly papery it was still slippery and seemed to stretch and deform if you so much as looked at it wrong.
(Wait, I can hear you say. Gelatine? Like the stuff sweets are made of? Yes! It's a way of stabilising very find or floppy fabric. You mix gelatine and hot water (I used a ratio of 1 tsp to 500ml water), soak you fabric, and let it dry, whereupon you iron it, and cut out your pattern. It washes right out of the fabric when you are done).
The fabric fought me every step of the way. I was nearly done when I slipped cutting a buttonhole and ripped a tear in the button band. I had to do a small patch job and you can TOTALLY see it but I'm hoping the pattern makes it less obvious.
The finished blouse is wonderful to wear though, so light and elegant so I think it is worth it.
12 notes
·
View notes
Text
i haven't even finished the 21 days fics but i keep thinking about a future scenario of the minimoni one where jimin DOES find his limit like he mentions near the end (maybe he's getting winded too easily or he's tired of buying new clothes all the time or he's just really into his current size) and starts maintaining rather than actively gaining. and now that he's not so focused on the feeding aspect all the time, he gets to focus more on what it's really like to live in this new, fat body.
he goes to the gym and instead of taking it easy on a too-full stomach, he remembers the musclepig videos he used to watch and admires how now his own bulging stomach squashes against his thick thighs on the leg press.
he goes out dancing with his friends and rather than making sure he keeps himself supplied with the most caloric drinks all night, he takes to the dance floor almost immediately to bounce and shake and feel his ass jiggle to the beat, along with his belly that's hanging perfectly out of his crop top (because why should he have to change how he dresses for the club just because he's fat now? he likes crop tops, he's gonna wear a crop top!).
he shops for new outfits in specialty stores more often than not, because standard sizes in korea only size up to slightly chubby at best. most of the time, he has to buy clothes online, and when they arrive in the mail, he strips down right in the living room to give namjoon a fashion show. if the clothes fit, then great! if they don't, then it's still exciting to marvel at the way jimin's fatter body bulges out of places it never used to: sleeves that are too tight and squeeze the little wings of flab on his biceps, inner thigh seams that stretch and crackle when he tries to pull them up. that old, overgrown company t-shirt is practically a crop top by now, difficult to pull down to cover his pudgy overhang even with the cotton stretched to its limits.
at work, there are people now who never knew him skinny. to them, he's always been pear-shaped, chubby jimin. new hires and transfers are always surprised when they see the wedding photo washi-taped to the cabinet above his desk, taken just a few years ago, rail-thin jimin absolutely tiny in comparison to namjoon, who he's outweighed for a while now. they don't say anything, but he notices how their gazes fall to his thighs that take up the entirety of his desk chair and his belly that bulges over his waistbands to rest on top of them.
namjoon is just as affectionate as ever. jimin hadn't been sure how to approach him with the initial decision to start to maintain rather than continue to gain, but it was met with immediate enthusiasm and love. their nights are still spent cooking together, but jimin doesn't end the day out of breath from stuffing. in bed, he takes time to notice and admire how far namjoon's arms reach out now to pull him closer, and that when he lays on his side, his belly lays on the stretch of sheets in front of him.
jimin just takes up so much more space now than he used to, and it's exciting. the tight fit in his desk chair at work. the wide fit pants he has to special order because he's still short but he's got fat hips and a round ass. the way that he doesn't quite take up two seats on the bus but definitely can't fit anyone next to him (and okay, he feels a little bad for that one sometimes; he'll offer up his seat to expectant parents or elders or kids and stand instead if he has to). the fact that he and namjoon haven't been able lay side-by-side on the couch for a while and if they want to cuddle on it, one has to be on top of the other (and how that's usually namjoon anymore unless he particularly feels like being crushed because jimin has 80 pounds on him now).
jimin looks back at the version of himself who had just realized he'd accidentally put on weight, who thought he'd have to lose it to feel good until he realized he didn't have to lose it, and then he looks at himself now, the happiest he's been and also the fattest he's been. when he'd first talked about hitting limits, he thought that day would be met with dread and discomfort, but he likes this limit. his body feels good like this, thick and heavy and fat and his.
#bts feederism#chubby bts#fat bts#chubby bt5#fat bt5#chubby jimin#i was just gonna make this a short post but it turned into a whole mini au lol
18 notes
·
View notes
Text
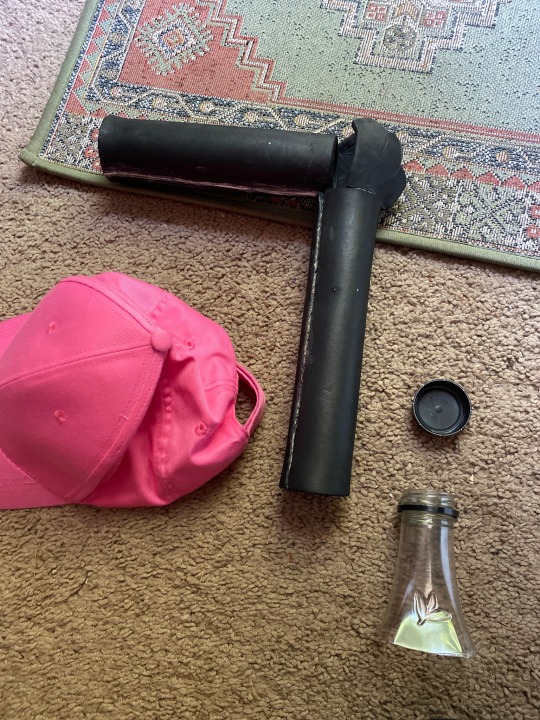
MASTER SHAKE'S STRAW FOR COSPLAY
EVA foam (I used 6mm thickness) first time using Eva foam? https://youtu.be/dN3NHy7Asqc?si=xw5WCLOEKci1tYAp
youtube
youtube
Contact cement (for EVA foam)
Respirator and/or a well-ventilated area like outside
Heating gun or an iron
Exacto knife/Hobby knife
Kwik seal
Clear Plasti dip
Acrylic Paints
—————————————
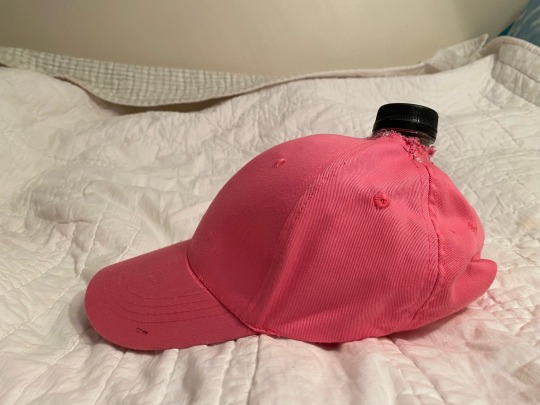
Pink structured baseball cap (Velcro backing works best imo)
Lipton ice tea bottle
Needle and thread
Scissors
—————————————-
If you have prior experience with using Eva foam this is relatively a light project. Eva is great for armor and prop cosplay, it’s light and durable. If this is your first time using Eva foam I highly recommend watching KamuiCosplay on YouTube she goes over the basics and what you need to know about Eva foam, heat sealing it and priming it.
This is my first time making a step-by-step thing, i don't have every photo for each step due to being in a time crunch.
EDIT: for cosplay something called like the 5 foot rule (someone please correct me if I’m wrong) where it’s you make something big enough to be noticeable from a couple of feet or more because thats how far away people are going to see you at a con.
____________________
Inside of hat
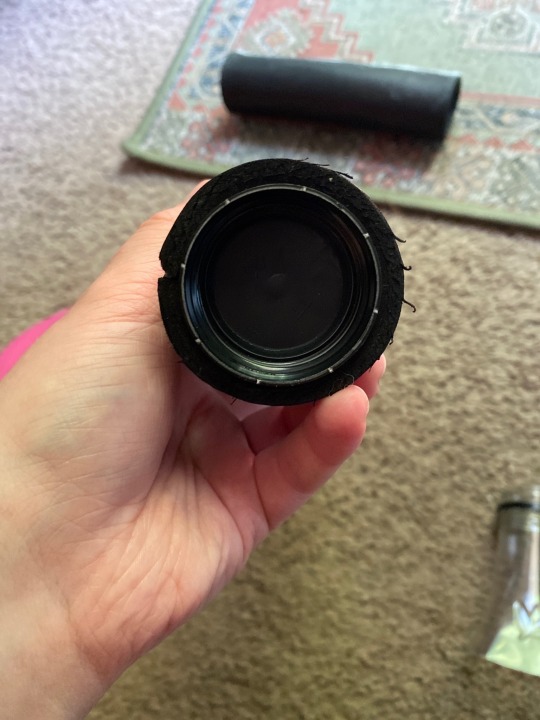
1 Empty Lipton iced tea bottle (using the neck up from the bottle)
Extremely important to not lost the cap and to keep the rest of the lid and twist part intact along with the long neck of the bottle (cut the neck just above the body of the bottle) The circumference of the cap will be used to measure the circumference of entirety of the straw. I am not good with math so what i did was tape the edge of a piece of paper and gently rolled it until it met with the paper again
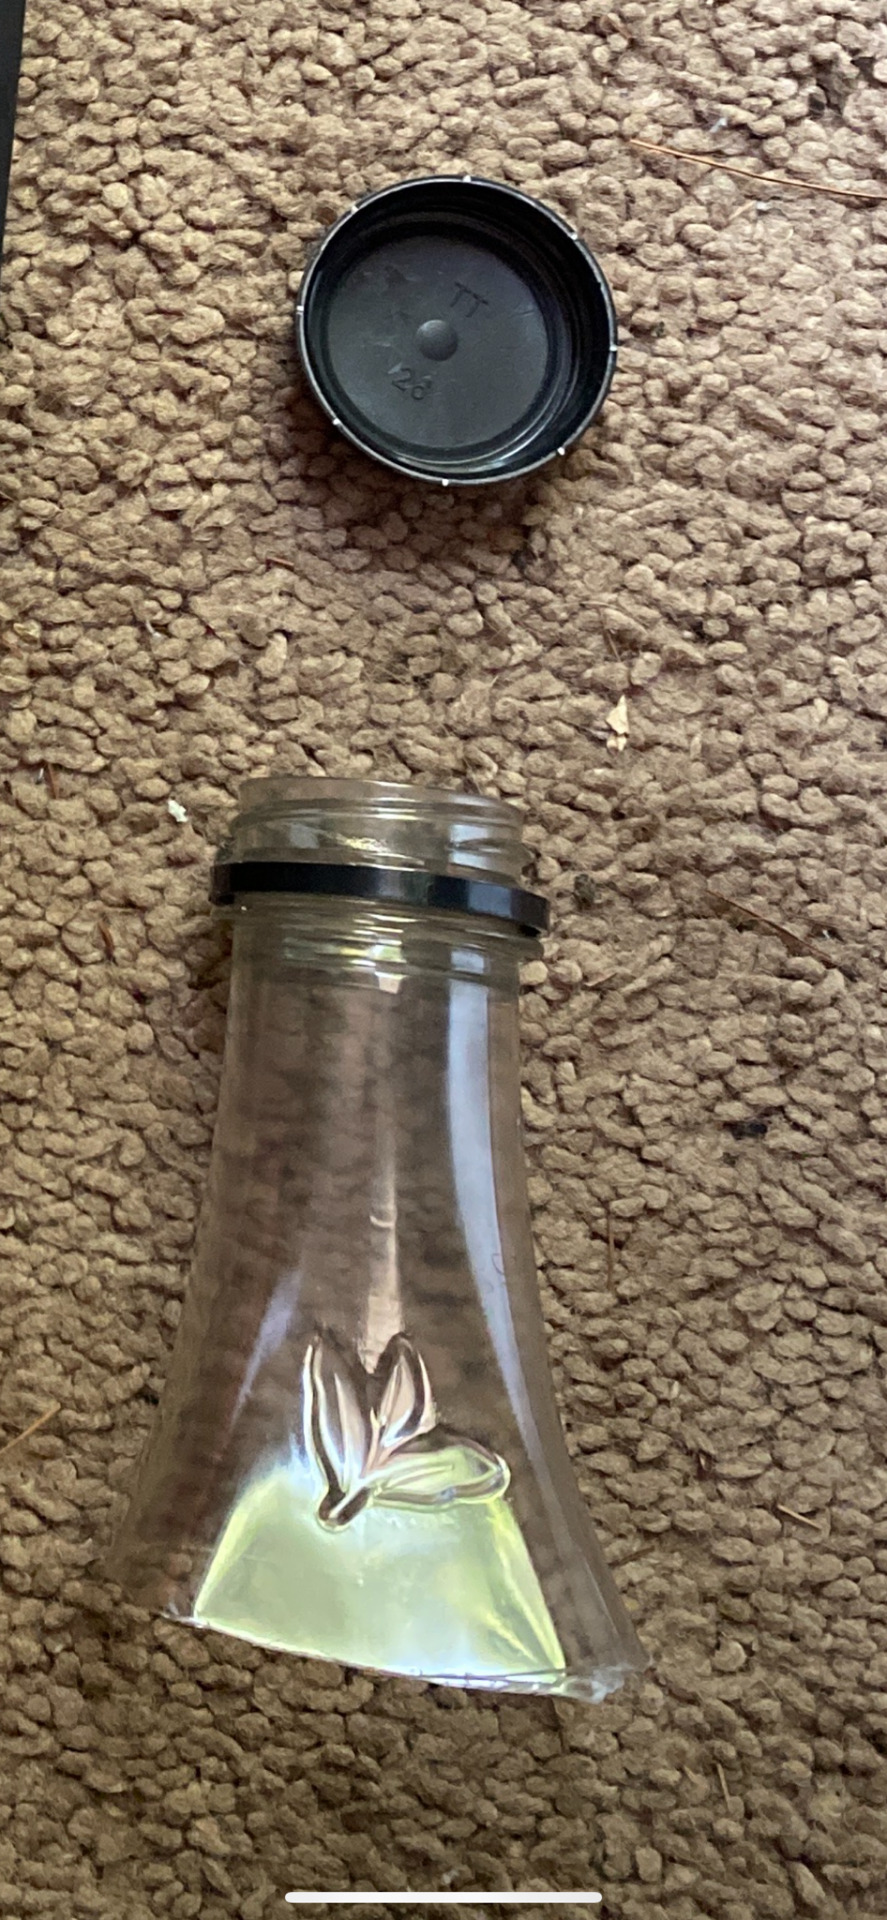
The neck of the bottle will be cut into 4 sections length wise; these flat sections will lie inside of the hat and on top of your head. This is where to use a heating gun or an iron. In my case I only had an iron available to me. So, I took parchment paper between the iron and the plastic and heated it and bending them back one by one. Be sure to either sand or heat the cut corners so they don’t cut into you or the hat. I was under a time crunch so most of this prop was half assed
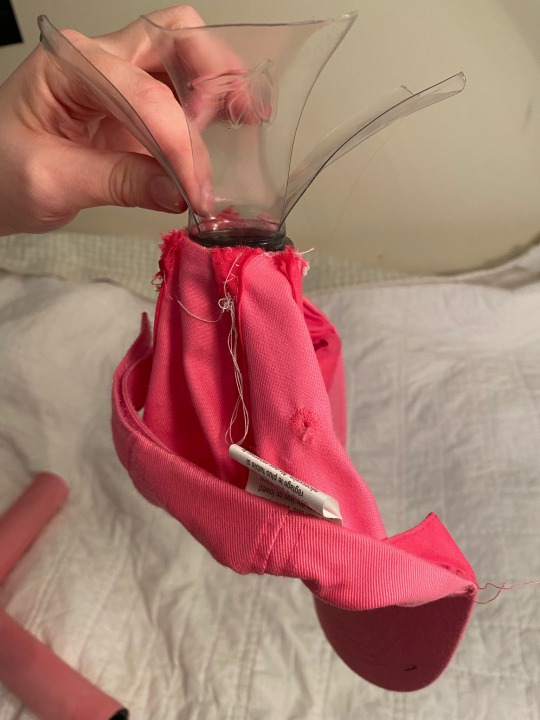
The flat parts will be used for support and keeping the straw upright
The twist and cap part of bottle will be used as a base to hold the straw in a “up” position
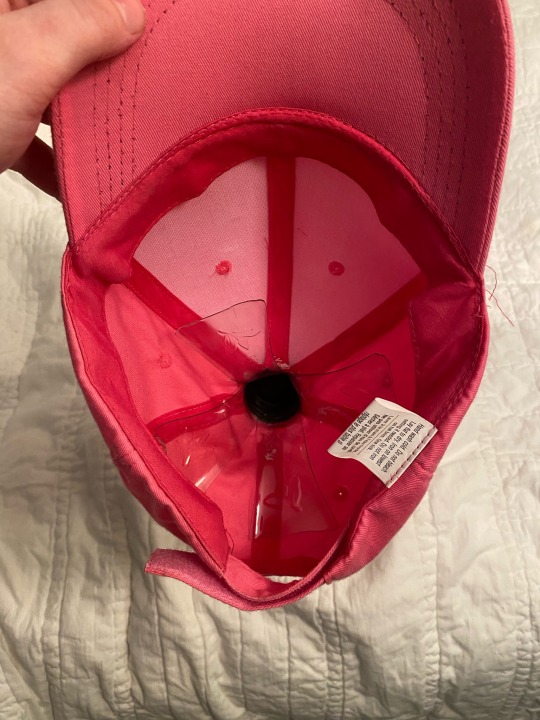
Very important to have a structured hat, it will help give support.
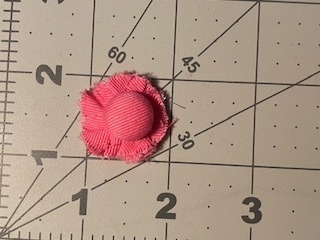
The button on the hat will be cut out, It seems small BUT this is where the bottle will be pushed through the hole in the hat.
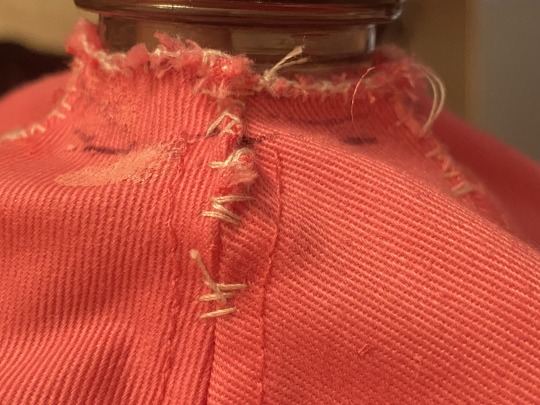
After a hole is cut, much smaller hole than the circumference of the cap. This will be so the hat will be fitted around the neck of the bottle. Push the top of the bottle through so it’s just the twist part showing. KEEP THIS IN WHILE SEWING. Start to stitch below the cut to keep the seams of the hat secure and together.
heres how to start a knot: Basic Hand Sewing - Tying a Starting Knot (youtube.com)
heres how to finish off with a knot: Basic Hand Sewing - Tying a Finishing Knot (youtube.com)
i did the blanket stitch so the hat was fitted around the neck of the bottle. like the picture above the plastic support is now fitted onto the hat. So, if the hat gets knocked off of you or anything the prop will still be in one piece!
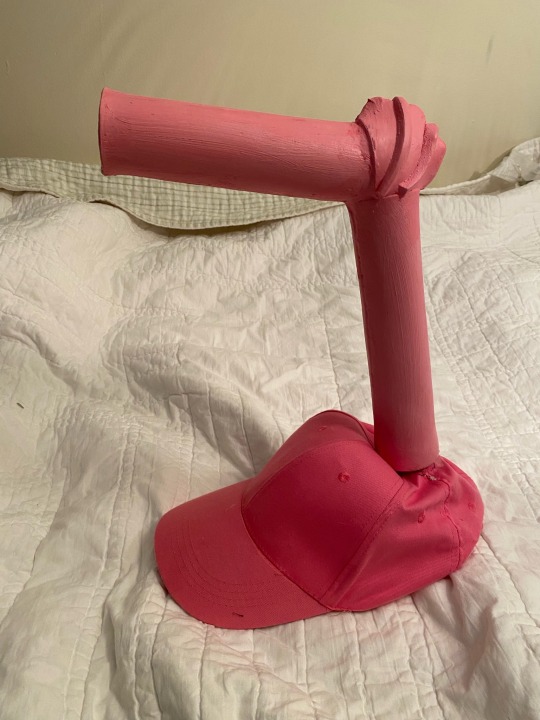
Building the straw
The foam will shrink a bit due from the heat making make a snug fit on the cap. When this happens, after the contact cement has been applied and the foam has been shaped to your desirer Kwik seal is good for filling those cracks in. when the whole thing is glued together there will be some spaces where the bendy part meets the top straw, i honestly filled it with a bunch of Kwik seal and painted it over. Once it's all glued this is where Plasti Dip comes in, it help seals in the foam from the acrylic paints. it takes a few layers of Plasti Dip i think i used 2-3 layers with 30 mins in between dry time. I also diy some metallic paint with eyeshadow to make it glisten in the sun.
Below are the mesuments of how long the bottom and top straw should be. (8 inches and 3/4ths) 9 inches basically VVVVV
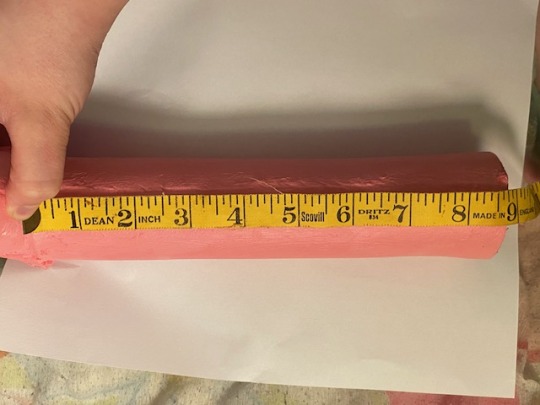
this is the bottom half of the straw (7 1/2 inches to make it easier)VVVVVV and the bend of the straw, it will be 2 pieces. I really struggled with the bendy part. if anyone else finds a better way to make it please tag me ill add it onto this
the top half of the straw is short so when the straw is glued inside the "bendy" part of the straw so it may seem shorter when all put together. I don't remember much of putting the straw together to due outside stressors and con crunching
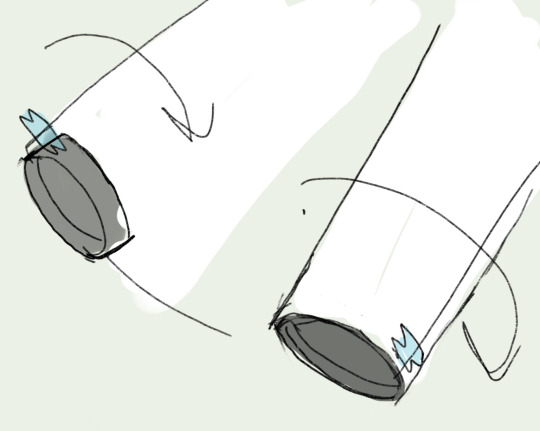
After the foam has been cut heat it up, you should see it seal itself. when its hot get it into a round tubelike shape, it make take a few times depending on what tool you're using (heating gun or iron) MAKE SURE YOU DO NOT MELT THE CAP!! while its still warm fit the cap in one end of the straw so it keeps that shape. i did not glue the straw to the cap. the foam will be tight enough for it NOT to need glue and now if needed it can be broken down for easier storage.
but it was basically heat shaping the bend of the straw, it was 2 sperate pieces that were beveled inward, heated and shaped and then glued. after that the upper straw piece was inside and when it was ready, it was heated and then glued finally. I glue some scrap pieces of foam on the bend to give it more wrinkles,,,i honestly don't know why i did that i was already mentally checked out
Sooo i think thats it for the tutorial. Hopefully i covered everything best I can. Feel free if you guys have found better ways to build this prop, all i ask is that DONT put it behind a paywall and please tag me/credit me when sharing and reposting.
It’s not required but is appreciated if you leave a kofi for me https://ko-fi.com/zimvatt
#Youtube#eva foam#cosplay#cosplay props#master shake#aqua teen hunger force#athf#cosplay tutorial#athf master shake#demonpikmin#kofi#buy me a kofi#props#cosplaying#convention#aqua teen forever#art#artists on tumblr
15 notes
·
View notes
Note
Hi! Would you mind talking a little about how you made your pants? I'm in the same boat of not being able to find tripp pants in my size. I LOVE what you did and definitely want to try making a pair myself but I don't really know where to start
YES i can talk lots about it!! in fact i can draw some about it as well!
i'll put it all under a cut since it's gonna be a Long Post! and heres the pants we are talking abt btw
so i started with 2 pairs of skinny jeans. generally skinny jeans in plus sizes are easier to find because they think we are scared of looking any bigger (and since they're out of style lately you'll likely be able to thrift them very easily, but really any cut of full length jeans will work). the first pair (jeans 1) should fit how you want at the top, but it wasn't as important if the legs or the second pair (jeans 2) fit because we'll be chopping those up.
i cut them into segments as shown, though you could do more or fewer:

then i cut each leg 'ring' that i've made open and laid them all out flat. i also took the pockets off of jeans 2, and set aside the rest for scraps. you'll have something like this:
essentially what i'm going to do is attach 2 legs together to increase the circumference - the reason i cut strips is so i can mix and match colours to make it more interesting and look more intentional! i swapped them around like this:

then i sewed the strips back into 4 leg pieces. keep in mind for this whole project i am sewing with exposed seams to minimize bulk/be comfortable on the inside/look more grungy, so not a lot of this is gonna be turning stuff inside out and i'm actually being a little bit messy with my lines on purpose. i did 2 passes of zigzag stitch right next to each other over every seam for stretch and strength. also, unless you have 2 of the exact same pairs of pants they're probably not gonna perfectly match at the edges, this is okay because we'll be trimming the rough edges next - the top of the leg should match 1/2 the circumference of the legholes of jeans 1 (and if you want to make that circumference bigger you can use a scrap to add a triangle shaped dart to the outside seams of the jeans):
it may feel weird to be removing width when we want them wide, but don't forget we've essentially doubled the width of the entire leg here. i wanted a very straight leg that matched my thigh circumference all the way down, so i pretty much just cut a straight line, but if you have enough material to make it flare out at the bottom and you want to do that, definitely go for it! you could even reattach the leg upside down if the 2 ankles combined happen to be enough to match your thigh, but i liked keeping the original bottom hem on mine so i kept it right side up.
from there i sewed the legs up and attached them back to jeans 1. i did mine so that the checkered seam was in the front but you could rotate them a bit to just have it stripey in the front if you wanted. then I applique'd the extra pockets on. this would probably have been easier to do before sewing the legs fully into a tube, but i wanted to make sure they were placed exactly how i wanted so i had to complete the jeans first to see.
i also sewed 4 tiny loops on the front and backs of the shin area using the belt loops from jeans 2 so i could clip on some lil chains. theres so much more you can do tho!
phew, i think that's everything i did!
if anyone makes a pair of pants with this tut i would LOVE to see!!!!!!!!!!!!
60 notes
·
View notes
Text
Hi everyone!!
Lots of people asked for the pattern I used for my Joel and Lizzie dolls, but due to my mental unwellness, my "pattern" was actually a chaotic blend of multiple patterns, as well as my own spontaneity.
Nonetheless, I am going to attempt to explain the method to my madness in this post! (Fair warning, it will get long.)
(If you actually want to try to recreate this please PLEASE reach out to me!!! I can go into way more detail and do diagrams and whatnot if you really wanna see the full idea!!!)
I'm gonna do my best to divide this up into sections based on how I made them, but because I modified a lot of things and Joel and Lizzie are clearly not the same, it may get a little muddled along the way, but here goes!
The Bodies
First thing's first, this is the link to the tutorial I used for the basic body shape. Super great video, easy to understand, fantastic starting point for any doll!! :D
For Joel, I followed the tutorial pretty exactly, minus that middle seam for a belt. I changed colors for the boots, pants, and coat and kept all the measurements the same.
For Lizzie, I modified her pattern to be a little bit bigger bc haha funny tall wife. On parts of the pattern where the stitch count stayed the same, I added a few more rows to make them longer. I added 4 rows to the legs, 3 rows to the chest, and two rows to the arms.
Like this!
listen I had to visualize it somehow-
I also did a gradient for Lizzie's arms/legs/tail! Here is the video I used to figure out how to do it (I don't have the measurements for where I changed colors I'm sorry I'm goofy </3)
Also, here is a link to a post where I half-heartedly liveblogged the early stages of making them. You can kinda get a rough idea of where I changed colors for different parts of their outfits, etc. but I only got two steps, really- oops.
The Clothes
Now, this is the part where I documented virtually nothing, but honestly, it still turned out just fine!
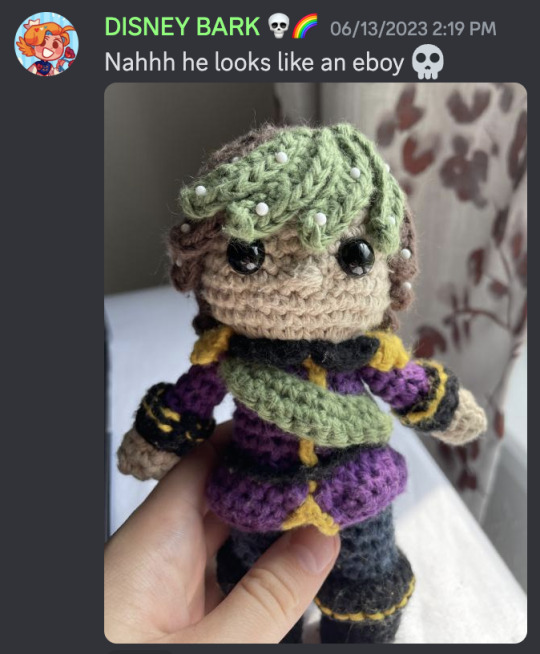
For Joel, I made boot and sleeve cuffs by just single crocheting a chain to fit around his arm/leg and adding a couple of sc (single crochet) rows. Then I sewed the ends together with a long yarn tail, used thinner gold yarn to add some detailing (look up backstitching! it works really well!!), and sewed the edges on.
His coat ends were made in the same way, but bigger, and instead of sewing the edges fully together, I only connected the top stitches when I was attaching it. And because I'm a messy sewer, I easily hid the seam with a black sc-chain belt :)
The gold details of his coat is also a sc-chain just sewed on. The edges at the bottom... were sorta a sc-hemming type deal-? I don't know, I winged it and I don't like how it turned out </3
The shoulder pads I actually can tell you! It's 5 sc in a magic circle, sc around, and then I picot stitched around in each stitch. Then I tied off a long tail and sewed it onto the top of the arms before I attached them. The badge/flower is the same pattern, but without the sc round in between the mc and the picots.
The sash was a little wonky doing it as a full loop the whole time, so it was basically a long rectangle and when I was attaching the ends together I did it under the shoulder things so it wouldn't be bulky and ugly on top. I think it's decently easy to understand from the pictures in the original post, but if not lmk! (if any of this is coming across at all then bless you tbh.)
The collar is just two rectangles I sewed side by side, they don't continue to the back at all bc they were ugly /lh
And this is the tutorial I used for the crown! I threaded a little piece of green yarn through to make the jewel and tied a knot in the back :)
For Lizzie, I literally made the skirt up as I went along, but it was roughly based on this video. I started with a sc chain to get the right size, then made it a rectangle for a couple of rows (maybe like four?) before joining it together. (That way, I could make the skirt separately and still be able to get it back on her when I was done without being too tight!)
At some point, I picked a stitch as my "center point" and started going back and forth from about that point instead of completing the full circle, doing half double crochets close to it, then double crochets, then triple crochets, then back to dc and hdc as I got close to it again. I think I did about 6-8 for each stitch type section? The GOAL was to make the skirt's hem asymmetrical, which worked, but it's hard to explain bc I literally made it up.
Then I made another sc chain for the belt thing after I attached it :)
The top detailing is also a sc chain, but with some joined yarn above the arms for extra color. There's also bits of yarn that are supposed to be straps, but you can't really see them in any of the pictures, so that's optional rip.
For the frilly hem, I joined the yarn at the "center point" and basically just worked around the whole hem repeating (1 dc, 2dc inc) to make it all wavy and fun!
The Hair
The pattern I based the hair off of was from this kpop star doll that I was originally going to base my entire Joel doll off of.
The difference is I changed the lengths of the strands (I did it based off looks, so all of them are slightly different in length to look more natural) and also color changed the very front few strands of Joel's hair to be green. I also put two strands in a few of the back stitches instead of just one so they completely covered the back of the head (so there are 15-16 strands instead of 14.)
To attach the hair, I used pins to mark out where I wanted to place each strand. Here's a quick progress shot I sent to my friends:
Now, I wasn't smart, and used long pieces of thread from tying off the "hair mop" to sew all the strands onto the head individually. It took forever and make it kinda messy in the back because of weird overlapping. If I could redo it now, I'd use fabric glue or something to glue each strand so it lays flat, although if you don't have it or want to avoid the potential mess, sewing it does in fact work just fine.
Extra Bits (mostly for Lizzie)
Lizzie's tail is more or less the same as her arm, but it starts thinner and goes for longer at the end. For the frilly edge, I remember using a crochet beta fish fin design, but I can't for the life of me find it in my history now?? But it was essentially joining the yarn a few stitches from the point and crocheting (hdc, dc 2x, tr, dc 2x, hdc, dc 2x, tr) and mirroring it on the other side so it looked like this:
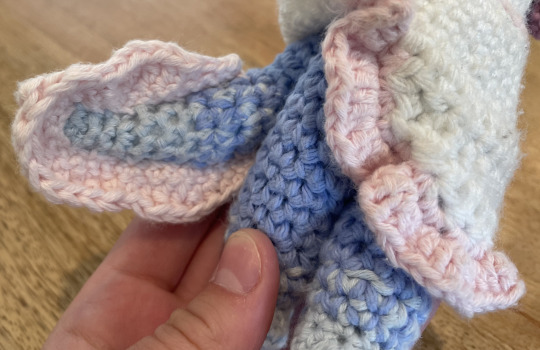
Here's a closer view of both the tail and the skirt's hem.
Lizzie's fins were made by making a magic circle, chaining 4 and sc-ing back, and slip stitching back into the circle three times to make the three points. Then I joined onto one point with the lighter color and sc-ed along to the other point to make it more detailed.
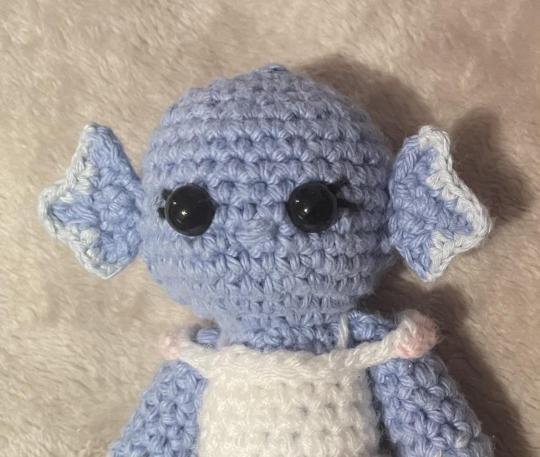
Here's a cursed image I sent to my friends of bald Lizzie and her fins.
Lizzie's space buns were a fever dream to me because I made them at 1 am, but I did something that looks similar to this puff stitch flower with only three "petals." I attached it to the head and then used a short chain of another color to add some color and detail.
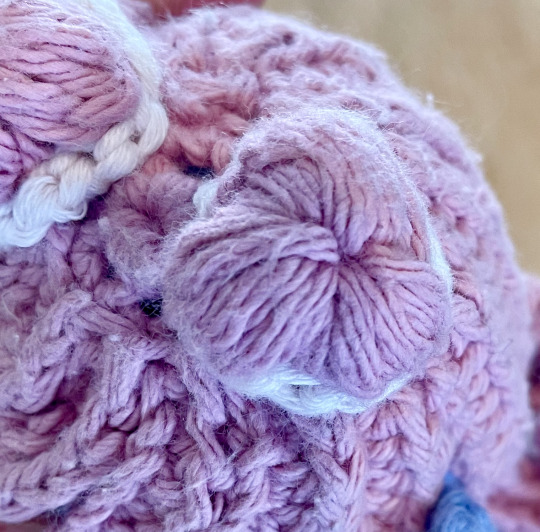
Here's a view of a bun from the top.
---
I think that's just about it! If I missed anything or want to know how I did something better, please please PLEASE reach out to me!!
I'd love to go into more depth on things, but I predict this post will top off at 5 notes so I don't really want to spend hours explaining something that'll go completely unseen /lh
Nonetheless, I hope you enjoyed this little insight into the inner workings of my brain! Feel free to share and tag me in anything if you decide to try to do this yourself.
Cheers!! <3
#WOO I DID IT.#hope you enjoy this it took forever AHSJDSA#pho.posts#pho.doodles#<- bc it's from my project haha#when i eventually make a dl pearl i'll document it better so you can see it in action haha#empiresblr#empires smp#esmp s1#smallishbeans#joel smallishbeans#ldshadowlady#lizzie ldshadowlady#jizzie#crochet#amigurumi#amigurumi doll#pho.crochets
30 notes
·
View notes
Note
I saw your scrap blanket post and wanted to ask: how do you knit a scrap blanket? how do you knit several rectangles together? My aunt crocheted several knitted stripes that are about 1,20m x 20cm together, but the difference in texture between the knitted parts and the crocheted rows is .. difficult.
Do you mean this post?
I actually ended up scrapping this scrap blanket because the yarn weights were getting just too different from one another. I also just wasn't working on it, and decided the yarn would be better used in other scrap blanket projects anyway.
I tend to crochet my blankets overall (I can't imagine that many live stitches), so they're a little bit more wieldy to put together… but I also abhor seaming and avoid it absolutely as much as possible, so my scrap blankets tend to be continuously growing monstrosities.
Because you used two different fiber arting techniques ("my aunt crocheted several knitted stripes") I'm not sure which craft your aunt actually did! If the stitches you can see in the stripes look like little v's (or little horizontal bars), then she knitted (and purled) them. If it looks like a wide variety of stitches you find difficult to accurately describe, she probably crocheted them.
Texture differences aren't necessarily a bad thing in a scrap blanket, unless you really happen to really dislike one of the textures. At that point, if you're making the blanket for yourself, I would just omit those pieces.
In either case, whether the stripes are crocheted or knit, seaming pieces together is essentially the same concept: you just use some kind of seaming technique either with a tapestry needle or by using a crochet row to attach them to one another. The tricky part comes with trying to line the stitches up—which! if you're making a scrappy, patchworky blanket, you don't have to do, and it just adds character to it, imo!
The other tricky part comes in if the stripes your aunt made are of different yarn weights. In that case, I would probably advise picking up stitches along the border and then knitting or crocheting (your craft of choice) at least one row of border around each piece you want to use, individually, all in the same weight yarn. So all your borders will be the same weight even if your individual pieces aren't. That should make your seaming process a bit easier.
If you've got different size pieces to put together, you'll have to do a little planning before seaming them all together so you can arrange them in a way where they all fit to form the shape you want. This may mean making and adding in new scrap pieces to make up any different in length or width—but again, that just will add to the patchwork charm.
It's hard to say anything more specific without seeing what the pieces look like, so I hope this was somewhat helpful!
#yarn#handmade#knitting#yarnblr#fiber art#fiber arts#fiber artist#knit#crochet#crocheting#anon#anonymous#anon ask#scrap blanket
13 notes
·
View notes
Note
Awesome job enhancing the vibe! Even though you didn't keep it, may I ask how you got the hair tuft to be the right shape? I recently worked with faux fur to create a new tail for one of my plushies and I'd like to make a little mohawk/emo bang thing as well but not sure how to approach it
Thank you!
The way I do hair for plush is by creating a "toupee" with the specific measurements of the bear's head. I first decide the overall shape of the hair I want; for Jaxx I wanted a mohawk shape that started at a point in the back but widened to cover his forehead in the front. I measured the length of his head from the point I wanted the fabric to start to the point where I wanted it to end, keeping in mind that the fur would fall forward about an inch or two past where the fabric itself ended. I then measured the width of the space on top of his head between his ears so that the front edge of the hair was about that wide at the forehead.
I used these measurements to create a triangle template that I traced onto the fabric, cut out, pinned and sewed to Jaxx's head with a hidden stitch, folding the edges under as I go. :) The fur I use has a slightly stretchy backing, so I don't need to make any darts for the fabric to fit the curve of his head, but I did round off the corners at the front of the hair piece because I realized it looked super weird with those sharp edges, so probably you want to round the corners on the front part of whatever shape of hair you make.
I once did a Doctor Who bear commission and I made a little square "toupee" for that one. For just a small tuft (like you would see on a Simba plush) you can take two wide, short rectangular pieces, sew them together with the fur on each side facing upwards and see along the top of the shape (be sure to tuck the fur inside as you sew!) and then turn right side out. Sew this piece into the seam on the top of the head. The important parts for making "hair" for a plush are measuring to make sure the shapes are the right size, and choosing fur that has a more flexible backing with a bit of stretch! Furs with thicker, stiff backing will be much harder to use, and you would need to add darts to make sure the fabric follows the shape of head.
For some plush, depending on what kind of hair you want to make, you can even use synthetic wig wefts! I replaced my Fluttershy's hair with kanekalon hair because it's higher quality than the hair she came with, and she's my favorite pony so she got a bit more love than the rest c:
2 notes
·
View notes
Text
New sewing project
I just realized that I haven't taken any pictures of my new sewing project -- while I'm sitting here wearing the nearly finished dress, lol. That's how quickly it's come together, which is just wild after all the months I spent on the last dress I made.
I'll take some pictures in the daylight tomorrow, but I figured I'd document a little of the process now, before getting back to work and getting the sleeves on. Also there's matching pants, and those just need their waistband casing and ankle cuffs and they'll be done too.
Oh yeah, and the fabric only arrived like three days ago. xD
The motivation behind this project was to sew something for wearing around the house during the winter -- something cozy for these darker months when all I feel like wearing is long witchy dresses and cozy layers. I don't have any costuming events to plan for, and this is a dress I've really wanted the last few years, so Jack encouraged me to actually draft the pattern and get the thing made so I can start wearing it already.
The concept is a cozy winter dress in a sort of pseudo cotehardie look -- maybe more Victorian Pre-Raphaelite medievalism than anything that would work at an SCA event, but in that sort of direction. I have just enough of a wool allergy to make wearing it next to my skin completely unbearable, and since I'm not trying for historical accuracy, I can really use any fabric I want. I prefer to use only natural fibers (or synthetics made from natural fibers, like rayon and viscose) in my wardrobe whenever possible, and I knew I wanted this dress to be heavy, warm, and soft inside.
After a bunch of searching around online, I found a 100% cotton sweatshirt fleece weighing in at about 7oz per square yard. I ordered a sample of the charcoal gray color, which turned out to actually be more of a slate blue-gray, but that suited me just fine. The sample washed and dried well, and stayed soft inside without pilling, so I knew I had a winner. That just meant I had to actually draft a pattern to match what I was thinking. I pinned a bunch of things on Pinterest, all kind of revolving around this sort of look:

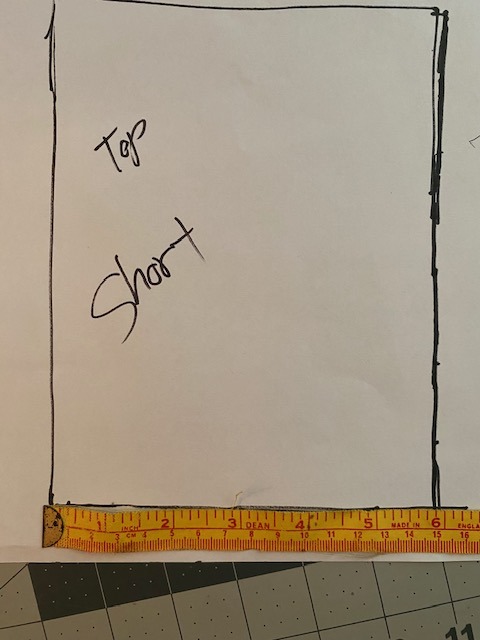
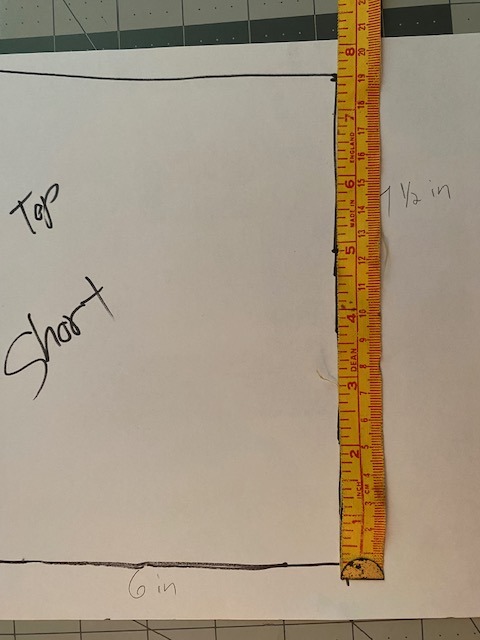
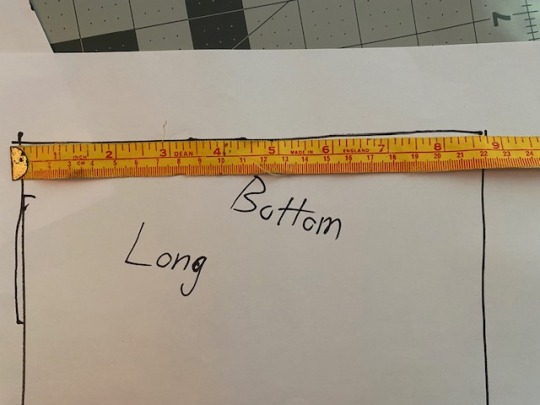
I thought about using a typical cotehardie pattern with triangular skirt gores, but since I knew I didn't want any sort of closures, lacings or otherwise, and because I was going to be working with a stretch knit, I decided I didn't want to try to mess with the accurate historical way of making dresses like these and just stick with a tried and true princesses seam pattern that I know fits me.
So I ended up adapting my pattern for Rhaenyra's red dress to draft this one. I kept the basic 10 panel shape, but drafted out the center front seam, and added some height to the tops of the sleeves so I can properly set them in (rather than lacing them on with some shoulder showing). I raised the neckline in the back to the nape of the neck, and rounded both the back and front necklines, rather than the V-shape of the Rhaenyra dress.
I also added a tiny amount, like 2mm, to each seam from the waist up, so that I could pull the whole thing over my head and not have to worry about a zipper. And I widened the skirts a bit from the hips down, since I'm not trying to replicate a screen-used look, and so I could have even more swish in the skirt. The wider skirts (and heavier fabric) also allowed me to put invisible pockets on the side-front seams, which the Rhaenyra dress really couldn't handle.
I also decided to draft some matching pants to wear underneath the dress, for those days when I really can't get warm. I used a pajama pants pattern that I drafted last year, widened the legs a bit so they're straight up and down, and raised the waistline a tiny bit so I can put a wider piece of elastic into it. I also drafted out the side seam pockets, since the dress itself will have pockets. I may yet go back and add welt pockets to the back of the pants, but we'll see.
The pajama pants I based the pattern on generally fit pretty well, but the only problem with them is that they're so wide at the ankle that they like to creep all the way up to my knee at the slightest provocation and leave my lower leg rather cold. Since these fleece pants will be even wider, and since the point of this is to be warm and cozy, I knew I wanted the ankle to come in nice and close. But I also didn't want to gather the lowest edge, since the fabric is so heavy.
After looking around at a bunch of pictures and patterns online, I figured what the hell, I know what I'm doing, and these are really only going to be worn under the dress (or other long skirts) anyhow, so even if they end up weird looking, who cares. With a bunch of math I drafted two extra pattern pieces that basically form a 3/4 skirt for the bottom of each pant leg, with the 'waist' of the 'skirt' around my ankle, and the circumference sewn to the end of the pant leg. The result is fluffy and round and ridiculous, but I think will suit my needs quite well.
Once I had all of my pattern pieces drafted, I laid them out on the floor at half the 64" width of the fabric, and then measured how much length I would need, rounding up a little for the ~5% shrinkage that happens when the fabric is washed. I placed my order just over a week ago, on December 9th, and it arrived -- all 6 yards and 5 pounds of it -- on this past Thursday, the 14th.
I washed and dried it on Friday, then started cutting out all the pieces (26 in total, for the dress and the pants) that afternoon. I'd also ordered cotton thread in a coordinating color, and that didn't arrive until yesterday afternoon, by which point I had most of the pieces cut out. Last night I pinned as many of the seams as I could and this morning I wound a bobbin and tested out my tension and stitch length on a scrap piece of fabric and then got straight to sewing.
To say this came together faster than the last dress would be a massive understatement, lol. The Rhaenyra dress is two layers of silk, both of which wiggled around and refused to stay on grain, frayed easily, and needed all the raw edges finished and fully enclosed. This winter fleece dress is shaped nearly identically, but the fleece fabric doesn't fray at all, doesn't slip and slide when I cut it, and generally has a pretty easy to find grainline. The only piece that gave me any trouble was the center front, since it doesn't have a straight outer edge to align with the knit, and for that one I just thread-traced straight down the canyon between two lines of knitting, and then lined up the center of the pattern piece with that, easy peasy.
So after three days of actual cutting and sewing, I am sitting here in something that is decidedly dress-shaped, and wonderfully warm and soft and cozy. I still need to attach the sleeves, tack down the pockets, and then hem the sleeve ends, neckline, and skirt hem, but I'm feeling like I might actually be able to accomplish most of that tomorrow.
For the pants I need to sew on the ankle cuffs and turn under the waist casing and add elastic, both of which should be pretty quickly done. I should be able to have both done by the middle of this week, I think, unless something major comes up, with work or otherwise. We've got a big rainstorm coming in this week, after a few warm days, and winter solstice on Thursday, so it would be lovely to actually be able to wear this by then.
My long-term plan for this dress, besides just wearing it around the house all winter long, is to make other pieces to layer over top of this, both for fashion and for function, sideless surcoats and vests and aprons and such. I might end up making a second fleece dress out of another color eventually, but even then I would want all the pieces to be interchangeable.
The look I'm going for is something I haven't seen anywhere else, but I'm thinking of it as sort of medieval cottagecore, or practical 14th century historybounding, all influenced by Pre-Raphaelite paintings and my own take on mori kei and strega fashion. Layers and long full skirts, body-skimming through the torso but not tight, practical and functional but still witchy and a bit unusual, all in natural fibers and the colors most commonly found in my closet already.
I'll take some photos of the dress in progress in the daylight tomorrow, and more pictures later in the week once it's finished. Provided I can actually talk myself into taking off the nearly-finished dress, which has been so very cozy and comfortable while I've typed up all of this, lol.
#my sewing#winter fleece dress#solstice dress#2023 mood#historybounding#14th century historybounding#medieval cottagecore#medievalism#cotehardie#sorta#pictures in this post are all sourced from Pinterest#many thanks to the creators for inspiring me in this wonderful and ridiculous project!#RRD cosplay#in that the pattern for this one is descended from that one
6 notes
·
View notes
Text
Late 1890s Corset Part 2 - Mockups
March 11, 2021

[Image ID: a photo of Alex's torso wearing a navy and red corset mockup, split down the middle to show the left half wearing the poorly fitting first mockup and the right half wearing a well-fitted third mockup.]
Pattern Selection
I had my heart set on a Symington pattern from the start (because heaven forbid we make things easy on ourselves), and I knew I was aiming for the late 1890s, so I was able to significantly narrow down my pattern search just like that.
Doing research into materials and costs (and my limited spending money) narrowed things down one step further - I needed a pattern I could make as a single-layer corset, aka no fashion fabric (aka no beautiful, expensive silk), aka no cording.
Because of these limitations and my own sense of style I was able to narrow down my choices to five patterns which I traced in Illustrator, printed, cut, and assembled into five small paper corset models. I used those to get a sense of the shape created by the original pattern and make my final pattern selection based on the shape and how difficult it might be to construct. I ended up going with the Symington pattern that has instructions (though we'll see later whether or not I end up following them).
From there I followed the Wicked Rain Studio tutorial on scaling a pattern to your measurements to create my pattern. I had measured the paper model incorrectly on the first go-around and created some... alarming shapes. Once I re-measured it, though, and re-did my math the process went really smoothly! (Note to self: consider switching to the metric system! Converting decimals to fractions of an inch is hard!) I did make a slight adjustment to the process, though - I added an underbust line, so I would know approximately where to end the bust curve. I didn't measure around the underbust, just the distance from there to the bust and waist lines.
After I drew out the pattern I double-checked my bust, waist, and hip measurements, cut the pattern out, and 'walked' my seams to make sure the seams and measurement lines matched. Thankfully, everything matched pretty well!
Mockups
Then I gathered my supplies - I had a mostly-suitable mockup fabric in my stash, heavy-duty zip ties to use as bones (admittedly not ideal, but I already had them and I'm on a budget), and stash ribbon for boning channels. Then I borrowed some 'hacks' I've seen other people use, including using grommet trim/tape instead of setting grommets for the lacing and using a heavy-duty zipper which will be reinforced with zip tie 'bones' instead of a busk. Because I don't know the height of the corset yet, I didn't want to buy bones or a busk only to have them be the wrong length!
At long last, it was time for mockups! I traced my pattern onto the fabric and cut the pieces out with a generous 2" seam allowance on the sides (you don't need seam allowance at the top and bottom edges), and then thread-marked the seam lines and the bust, waist, and hip lines. I made the seam allowances so wide so that I could make any adjustments on those pieces instead of cutting new pieces since I don't have much mockup fabric left.
My first mockup went together quickly (minus some thread tension issues), but had some glaring fit issues. It was too large overall and left me with no lacing gap. Even completely laced it was slightly too large in the waist, but was slightly too snug in the hips (I suspect this was because I had used my full hip measurement instead of my high hip measurement, which is where my hip bones stick out and sits about 1.25" higher than the hip measurement I had taken). The front of the corset was also too long - it came up higher on the bust than I liked and was long enough that the bones stabbed me in the legs when I sat down.
To account for these issues, I took 1" at the bottom of the center front (evening out at panel 3), 1.75" at the center front top (evening out at panel 4), 2" off the bust and hip lines all around and 3" off the waist (all spread evenly across each seam). I then remembered that I needed more room in the hips (aka hip spring) at certain seams, so I added a bit back to those seams. The pattern pieces were re-traced, re-thread marked, and re-sewn into mockup #2.
The second mockup seemed to fit a lot better, with the only glaring error being an uneven lacing gap - about 2" at the top, which I wanted, but almost 5" at the bottom, which is way too much. I wore the corset mockup around the house for a few hours that evening to understand how the corset would feel after being worn for a few hours, and I'm VERY glad I did that. The pattern encourages a slightly conical shape sloping from the underbust to the waist, and it seems that my lower two ribs are NOT amenable to that (I have a decidedly rectangular rib cage) and I started to experience discomfort in that area after about two hours that was bad enough by hour four that I had to remove the corset entirely. I expect to wear my corset for hours at a time for events and such, so this had to be fixed. (I was uncomfortable enough that I forgot to get photos of the second mockup, and put it back on briefly a few days later.)
On the bright side of things, I decided I had my pattern close enough to the final that I went ahead and ordered my busk, boning, and lacing cord! I put off making my third mockup until those arrived so that I could practice inserting a busk and also so that I could have one lacing cord instead of three mismatched stash ribbons.
[Image ID: a 3/4 view of ALex's torso wearing a navy and red corset mockup, with three mismatched ribbons tied around the waist.]
My adjustments for the third pattern included evening out the bust curve and adding width to the waist and hip of pieces 1-4. I also had to shorten the height of the back panels (piece 6) to account for the fact that I underestimated how long the spiral steel bones on either side of the lacing needed to be, though that adjustment didn't make it into the mockup as I didn't want to remove and reattach the grommet strips.
The third mockup gave me a much more consistent lacing gap (though still not completely parallel, it got narrower at the hips), but slightly less waist reduction. I wore it around the house again to see how my ribs felt, and it was really comfortable! I had it on for four hours in the morning and another five in the afternoon (with about an hour break in between for a nap). Lacing it up was infinitely easier with a proper lacing cord!
Finishing Up
Ultimately, I was content with my third mockup and deemed that my final pattern! I took apart my final mockup, ironed the pieces, and compared them to the pattern to ensure wearing hadn't warped them (it hadn't).
That means I'm ready to start on the final corset!
My next blog post will go over the construction of the final corset and material costs. Then there will be a fourth and final post looking at flossing and decoration and the final reveal. I can't wait to see how my first corset turns out!
4 notes
·
View notes
Text
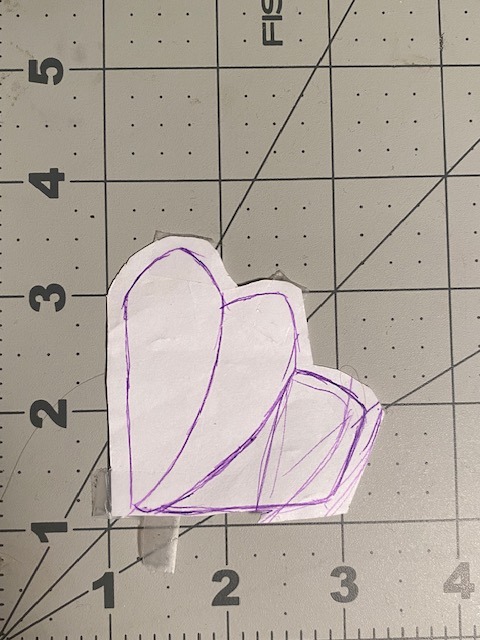
I still need to add cuffs to the sleeves, but I'm rather pleased with how this mock-up has turned out.

Theoretically, I understand how Astarion's shirt is supposed to go together, based on how it looks in the video game. Practically, I was quite flummoxed on a couple of the details because ????? why would you put a shirt together like that. (I jest; I just have Strong Opinions on historically-flavored fantasy clothing.) So it's very nice to painstakingly hand stitch slap some fabric together and put it on him to see how it works in three dimensions.
(Costuming notes under the cut)
A. The front body can be narrowed by ~3mm each side. In my reference images, the shoulder seam looks like it's pressed to the sleeve rather than to the body.
B. I had the genius idea* to make the seam for the yoke to the front of the shirt a tuck. If my final fabric is more opaque, that's a neat little cheat. If my final fabric is as translucent, I think I'll go for a two layer yoke. Just to make my life more difficult.
(*not at all because I cut the front piece and yoke too narrowly the first time and didn't realize until after I had sewn them together and didn't want to redo all that sewing. Nope.)
C. A lesson in humility: I decided to work on this from memory rather than look up my notes, so the neckline is… all wrong. I do like the size and the collar behaves as it should, mostly. But I put it all together in the wrong order. Ah well. Now I know. It's actually given me some better ideas for how to put all those layers together.
D: The sleeves don't have a cuff but I think I'm bang on with the effect I want: his sleeves are pushed up, not rolled, with the cuff flipped up. There's no evidence of closures on the cuff.
E: Final fabric choice is giving me fits. I do have a light, worn-looking cotton fabric that I think could give the "this was nice 200 years ago" vibes, but also might be a a bit rustic. The polycotton I used in the mockup is quite crunchy. Alternatively: how do I weather a doll shirt??
F: Alas, I didn't take a picture of the back but I am 95% happy with it. The back is gathered to the yoke and there's a pleat in the center back. I did a 1.5:1 ratio for gathering, but it doesn't seem to be quite enough. (Part of the issue is that I am impatient with gathering so it never turns out nicely, but I think it's a little too narrow.) I can always cut off the sides if a 2:1 ratio seems too much.
G: I hate set in sleeves so I did my usual straight sleeve+gusset. If I arrange the shirt very neatly, the gusset is hidden. I might experiment with a trapezoidal shaped sleeve for ~more authentic lines~.
.........
I told you I have Strong Opinions on costumes.
"I am going to make a mock up of this shirt," said I. "It's a mock up so I don't need to sew nicely, I just need to get the fabric together."

teehee tiny stitches
2 notes
·
View notes
Text
Chrysalis Gown
I think this first appears in Episode 14. It's in-between some scenes with the Honey-coloured gown, during the early process of transformation. This one seems to be for more formal, business occasions.

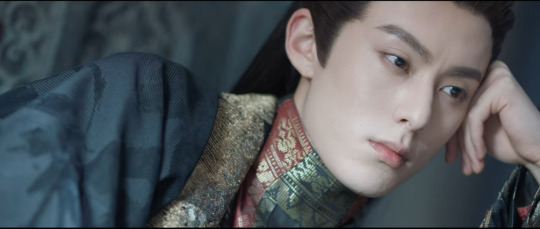
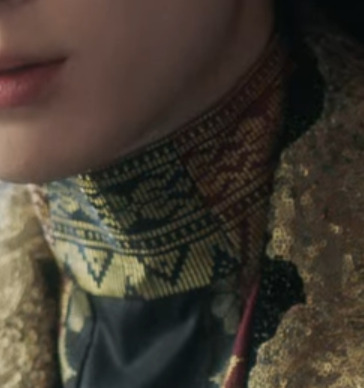
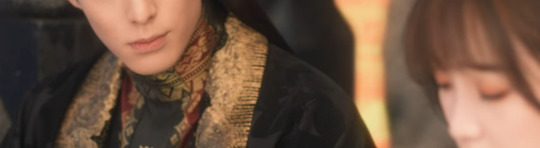
We get a well-lit view of the absolute bunfight of colours and patterns going on here. The shirt is particoloured, in red and green, both woven with gold in identical patterns, and cut and pieced together in this high, tight, stiff collar.
It bothered me that the patterns don't fit together at the neck at all well. I felt like something this magnificent should be pattern-matched more harmoniously than it is, with that seam between red and green in such a prominent place at least trying to look more symmetrical. The outer gown looks green here, with a sort of damask needlecord texture. In most shots it looks black.
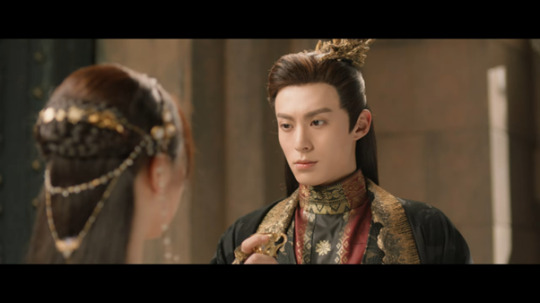
The outfit returns in Episode 26, by which time we know that the consequences of the transformation have hit. We get a nice view of the structure here. The visible parts are the undershirt or tunic (actually two different ones), a very full pleated skirt, a splendidly gold-patterned wrap-around robe that's very tightly fitted to the waist and emphasised with a belt, and then this spectacular gown that might be green or black, with the giant explosions of gold embroidery. And an asymmetrical gold crown.
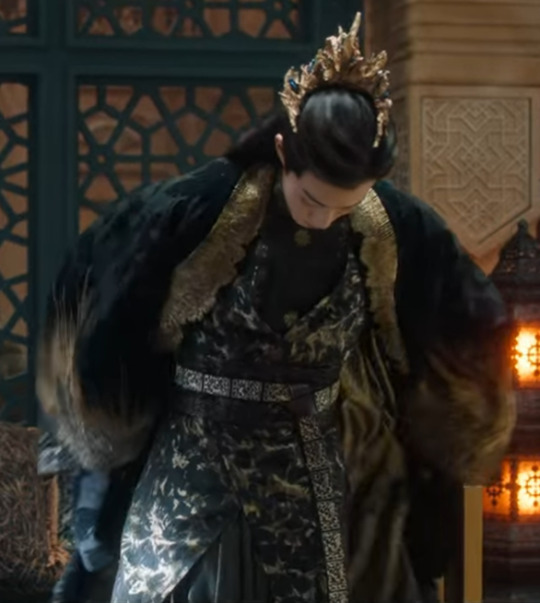
It's his most magnficent outfit, far more visually intimidating than the black-and-gold fighting gown he wore in Episode 9, and he wears this repeatedly when he knows his actual power is severely weakened.
The gold edges of the gown seem to be made of thousands of tiny sequins, and they're not just gold, there are hints of green to give it depth - and the gold extends beyond the pattern, like dust.
There are actually two different shirts. The red-and-green one in Episodes 14 and 27, and this black-and-gold one in Episode 26 which is a different colour of the same pattern, with no red-and-green pieces, less tightly fitted to the neck, and pieced differently. You can see almost all of the V shape and the little plant shape in the lower part of the pattern, which you can't in the red-and-green.
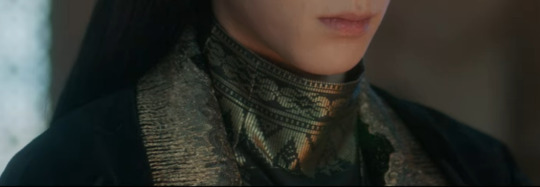
I think this is an error, because the next scene is supposed to be a direct continuation of the scene above, but we go back to red-and-green. You have to look hard to notice it though.
The texture of the gold on the gown is amazing. The effect in a shot like this is to make the hands look incredibly delicate and insubstantial.

He wears this outfit, with the red-and-green, for the qin duet with absolute madlad Changheng in Episode 27. And to fidget huffily and keep quiet while XLH dumps Changheng immediately after.
This is the scene where I reflected that if he was going to kill anyone, he'd be wearing the Hunting Dress. So this is what he wears when he wants to intimidate, and would probably prefer deadly violence if it were up to him, but can't or won't actually do anything but glare.

What a wonderful look for going on a date and being horribly, horribly embarrassed about it. Look at the gold on the inside of the sleeves! The sleeves of the outer gown seem to be lined with gold.

And the confession to Xunfeng.

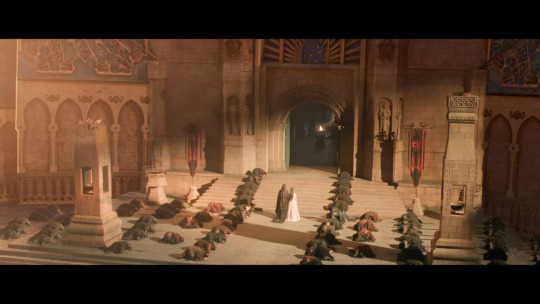
At the end of Episode 28, he wears this to experiment with stubborn self-destruction:
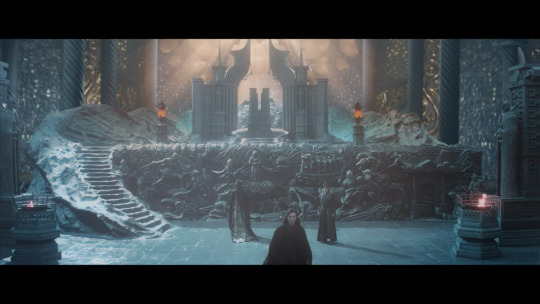
And it stays with us through the whump scene, during which the crown symbolically falls off, and we get a good look at the texture. Like all his crowns and armour, it looks like something that grew on a tree, possibly as a result of insect attack. It's much prettier than the ones the fairy tribe wear. I'd like to know how this was made.

then the triumph:
And the disaster. Where we glimpse how heavily patterned the train is. The pattern makes it look as though it belongs to the robe underneath, but it's hanging straight from the shoulders, and we saw the robe has a belt, so I don't quite understand the structure here.
I call this this Chrysalis gown because it reminds me of the splendid protective costumes that certain butterflies and moths put on while they are tearing themselves apart and remaking themselves into a totally different shape.
Which seems to be the point, so perhaps the rather eye-watering pattern bunfight and the way none of the patterns fit together at the neck, are exactly as they should be.
The DFQC costumes master post is here.
89 notes
·
View notes
Text

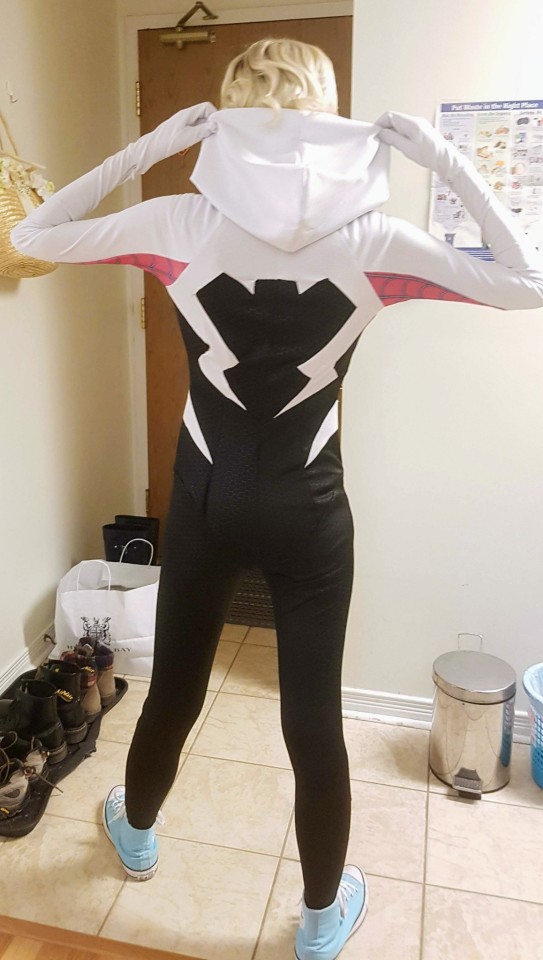
This is a Spider-Gwen jumpsuit I made!
Happy Halloween! I made this bodysuit and I'm super happy with it!
I'm gonna break down step by step what i did but I'm NOT a professional cosplayer or seamstress or fashion designer or anything. This is just to document what I've done in case it could help somebody else!
Materials used:
Scuba hex white (2 yards, available at Joann or Cosplay Fabrics International)
Scuba hex black (2 yards, same as previous links)
Web pattern on Spoonflower (make sure to order it printed on spandex!)
Three zippers (one for the bodysuit, two for the arms)
7mm snap buttons for the collar
Wig from @ardawigscanada so I don't actually have to style it as I am lazy and bad at wig styling
Step One: PATTERNING

I used several patterns as a base:
Yaya Han's Ultimate Bodysuit Pattern for the general design (McCall's M7217)
The Yaya Han pattern with a baseball jersey shirt for the arm sleeves (McCall's M7554)
McCall's M7486 for the hood (or you can trace a hood from a sweater of your choice)
Step Two: DRAFTING
First I tested out the bodysuit pattern solely on its own on some cheap stretchy fabric just to make sure it fits. I find that their smallest size fits me well as I am definitely a very stringy person. But the bodysuit was a bit short so i needed to extend the torso parts.
Then I trace out new patterns and draw the Spider-Gwen design on top of them, and cut.
BUT WAIT THERE'S MORE!!!
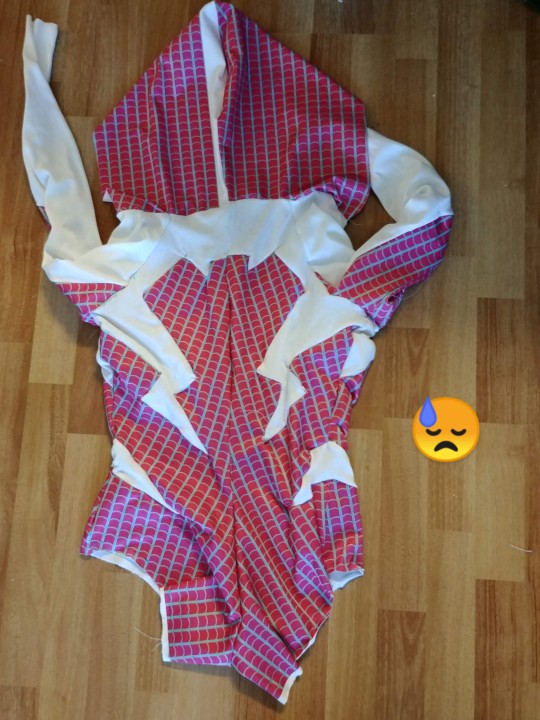
I wasn't sure if that would fit me either so I made ANOTHER mockup of the pattern I drafted out of scrap fabric (basically the web pattern I ordered but in the wrong size because I am dumb and I don't check things). Turns out this was a GOOD IDEA because this came out too loose! The fabrics I got were veeeery expensive so I'd rather be safe than sorry!
Step Three: COMMENCE SEWING! (AND HAIR PULLING)
After making the adjustments to my paper patterns, I held my breath and started on the bodysuit proper. Hoping that I don't fuck everything up.
I started with the easy stuff, which were the front panels:
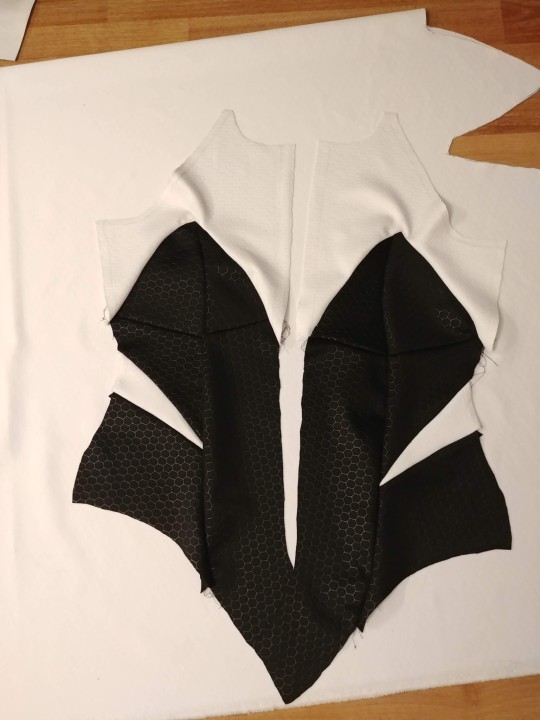
So far so good! I didn't use any special types of stitches, just regular straight stitch. I read that other cosplayers may use zigzag stitches for stretchy fabric but I have very little sewing experience and I do NOT trust my sewing machine at all. Just do what you're comfortable with and you'll be fine!
And important note! Make sure you stretch your fabric slightly while sewing! It's supposed to be a stretchy suit after all!
Back panels were a pain, but I got it done... there was a lot of thread pulling and hair pulling and questioning my life choices involved.

then I sewed the sides together! The white and black parts don't align perfectly but you can't really tell in this picture 😅
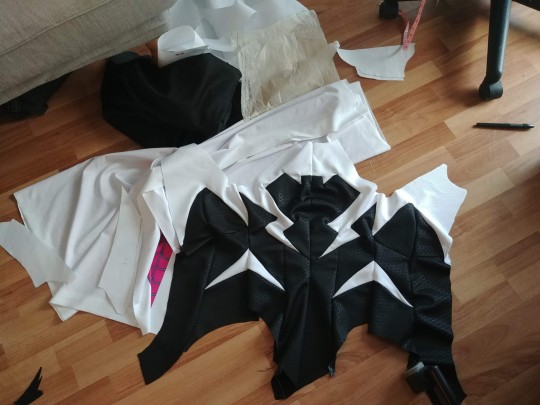
After that, I sewed the web parts onto the sleeves and the sleeves to the shoulders. That part went surprisingly smoothly so I'm just going to move on. Sorry for the lack of images but there's a photo limit on this website.
Step 3.1 Gloves!!!
Okay so I got a separate pattern for the gloves and also left them to basically the last minute to finish as they're so goddamn difficult!
This tutorial helped me out so much!!!

As you can see in these pictures, my first attempt came out a bit too loose. But it was an easy fix. I just had to take in the thumb and the pinky and it fit reasonably well on my hand.
And I also installed zippers on the seams of my sleeves so I can easily remove my gloves while still keeping them attached to the jumpsuit. This is why this project needed three zippers.

Step 3.2 Collar
And finally, the collar. This almost made me gave up on the entire project.
Right after I sewed the hood on, I was well on my way to finishing, or so I thought!
Because I was combining two different patterns with two different types of collars, I needed to figure out how to make them fit together. there were many MANY failed attempts.
Eventually what I did was I cut out two curved trapezoid shaped things out of the white scuba fabric, sewed that to the top of where the hood connects to the bodysuit, and then sewed the collar on top of that. This made sure that the fabric actually conforms to my neck area.
I placed down a t-shirt to trace the curvy trapezoids, and also make sure you measure your neck area appropriately!
CLOSING THOUGHTS
So yeah that's basically what I did. I admit I was too lazy to dye my flats in order to make her ballet flats but I'm sure that's easy compared to this mess! Anyway my Converses worked in a pinch.
Thank you for reading! Good luck and Happy Halloween!
#spider gwen#spider gwen cosplay#into the spider verse#spiderverse#itsv#cosplay#cosplay tutorial#sewing#sewing tutorial#stuff i made
118 notes
·
View notes
Text
Words [ should? ] mean little. Spun together in dissonance with own feelings, plucked apart one syllable at a time, while wanting to evoke a certain feeling, wanting to craft a certain end product, pieced together out of shapes that don't quite fit this or that way and are still exemplary for a creation good enough to sit in between them for whatever little space Suguru had left to remain there. Words should mean little. Should brush themselves off of him like the water splashed by fishes scattered never had a chance to reach Satoru no matter the surprise [ wishful thinking? ] he had managed to install just offering this or that sonorous note. Words should mean little. Meant far too much to a man who lived off of them - realises easily how much Satoru tried to keep it all contained, together, yet doubts that this was done out of a certain reason.
Hard to believe someone who had left him with no word of acknowledgement of his own that he could grasp for and carry with him like the marks likely faded. Hard to believe someone who spent the better part of their togetherness just continuously hurling insults at him, thinking likely it won't matter, thinking likely he would forgive.
Laughable right? That he had already. " Is that so. " Recognised the sentence and implication but without any question added. Wouldn't matter, without staring out over the water, trying to find something in the distance blushing with the colours of a green-lit shore-line, drawing up and down like a painting, in smeared up discordant colours of green and red and yellow, autumn drawing to winter, drawing to spring, turning into summer, months passing as if nothing, seeing easily with the twins running to and fro. Good thing they met today. Good thing he offered today. Good thing that he left the girls within the cult to be looked after today. " Sure, I wouldn't have offered otherwise. " Words of lull and perceived perfection crafted together, placed in front of those with no brain and no understanding, to be plucked up from the table when all these little trinkets - one just like the other - had been scrutinized and analysed and treasure was to be seen as 'better' than the others before. Even though they were all discardable rabble, trash to be thrown away, one single nice word could sway the heart, make it grow and burst at the seams; that is at least what would happen any other place than here.
Doesn't feel like playing games, pulling it out too far, so rises to a stand again. " I don't live far away, but maybe you know that. " ---Maybe you do not? Who knows, leaves it for him to decide the outcome to find a solution to the presented problem. Testing on his own when their test should be mutual at best. It's an assumption like any other; dropped like a glass bauble shattering on the ground, thought over not, in those immaculate eyes of the Honoured One, because why wouldn't he know? [ why wouldn't he know? ]. " It's quieter there too, nobody who can see us. "

Stops if Satoru doesn't follow right away now that the invitation had been given, tilting head to the side almost in manners long lost, years forlorn to reanimate them again for whatever it was worth lingering in the air between one another. I love you was such a stupid thing to say, churning his stomach now that he remembers the last time he had spilt all these contents--- Starts. Stops. Like the onset of a heart failure. " You can tell me whatever you want when we have a quieter surrounding, hm? "
acknowledgement of self-failings were just scattered parts of a sum. for the time, it'd felt nice and charitable to leave with his best intentions all bundled in his palms in meager sizes, tasks taken on like sweating out a fever or spitting up something spoiling his stomach and letting it all lead him by the nose in the promise of betterment after the woes, progress, happiness ; it was just splitting himself open, not knowing how to suture up the aftermath. i messed up, i'm messing up ... so what comes after that ? even a shot in the dark dead set on a bullseye was a limp bandaid fix, a guessed right answer. if he felt any feeling perpendicular to suguru's, saying so wouldn't have made him any happier to hear not if he counted it as bullshit. counted satoru as insincere, stupidly mixed up, looking more for what little of the past still clung to the dark of his lashes than for the eyes beneath them. and what was worse than ... not knowing if he was wrong or not. if there were grounds to argue when the instinct for rebuttal that'd always made a second home up and down the channel of his throat, just . choked itself to silence, now. lumped tight, grated his voice to nothing. he'd gone biding time returning to form, restlessness passed from fists and fingers in plucking up missions for the hell of it ( and pausing, thumbing souvenir gifts, leaving empty handed every time ) easier to wash up the muck of a couple dozen cross city curses than it would've been to wedge himself back into place over there with no more certainty to offer than the last day he'd left.
a long leg swayed, water rippling at the tip of his shoe. a guy with space wrapped like a second skin'd never came away too many wounds to lick, and the ones at his collar faded back to colorless nothing par for the course for shortlived stuff. eroding things, dams dislodging ; satoru'd slumped so far towards his left side's beam that he'd knock his temple for the silence sliced like butter, pulling bright eyes up over black lenses, surprise splashed in a whip across the drooped dull of his face. not quick enough to scoot, and fingers turned pink in the cooling air bit into the wood, tensed where they'd brushed, a short laugh clouded in a fog. the fish scattered, run off by the dip of his wet laces.

❝ i can only make up so many stories about what a slippery con you are. ❞ ( 's like you want us caught this way, bastard ) but, always so keenly aware. eyes always opened. there was nobody else around to note the damning proximity, the hands of the strongest gripping, fidgeting where he sat. something in his face cracked open, hairline fractured. caution like a blanket folding down his shoulders when he turns his head, looks off to the opposite end. ❝ if i want ? if you want. ❞
#godsbox#★ [ ic ]#★ [ ic ] geto suguru#★ [ 02 ] godsbox satoru / suguru#[ you can move them further to his appartment if you want! ]#★ [ private verse godsbox ] gates of heaven
2 notes
·
View notes