#screw mount antenna
Explore tagged Tumblr posts
Visit Tumblr Blog
Explore Tumblr blogs with no restrictions, modern design and the best experience.
Last Seen Tumblr Blogs


Fun Fact
In 2020, 27% of US Tumblr users had an annual household income of over $100,000.
Text

#2G External Antenna#2G Outdoor Antenna#IoT Lora LPWAN#868MHz Antenna#433MHz Antenna#915MHz Antenna#925MHz Antenna#865MHz Antenna#GPS-GNSS ANTENNA#External GNSS GPS#Magnetic Antenna#Screw Mount Antenna#Adhesive Mount Antenna#GNSS GPS Marine Antenna#Internal GNSS GPS
0 notes
Text
youtube
0 notes
Text
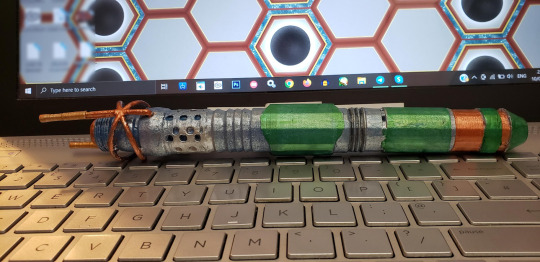
So last year when the 15th Doctor's Sonic Screwdriver was revealed...
A lot of people were going on about how it doesn't look enough like a screwdriver. It made me think "well, what does a Sonic Screwdriver look like?" And the more I thought about it, the more I thought, ultimately, you can get away with a lot with the Sonic Screwdriver so long as it's at least cylindrical.
So I opened up Maya and made a bunch of pieces and swapped them in and out until...
I had designed my own Sonic Screwdriver. Quite proud of it, too!
But to fabricate it, all I could really do was 3D print it, and while it's lovely for a hunk of plastic it just doesn't do anything.
So I asked a wizard.
Custom Sonics are absolutely amazing at making Sonic Screwdrivers. I sent them 3D turnarounds, photographs, and design documents and good (time) lord did they knock it out of the park.
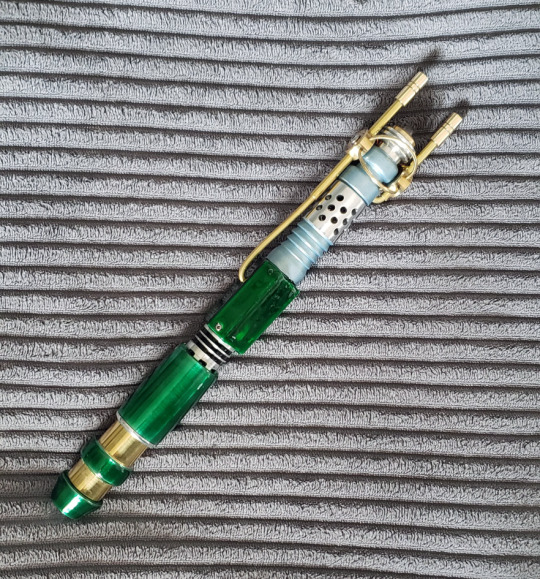
Look at this!
It's absolutely beautiful!
Machined in real metal, with brass accents and durable resin grips, and fitted with lights and sound. Its weighty but light, feeling good in the hand.

I feel like it certainly measures up to other Sonic Screwdrivers!
I am so happy and so proud to have this in my collection.
If you want your own Sonic Screwdriver, definitely consider Custom Sonics for replicas, original designs, or to get a quote on your own custom design! (I'm not being paid to advertise, I promise lmao)
About the design:
I wanted this to look like the original Sonic Screwdriver had been built upon over the years, rather than simply being replaced. So there are elements of the Sonic Screwdriver seen in the Classic series acting as a base for the design, with everything else added on over the top.
Thinking of how the Doctor might improve on that original design in-universe, I thought about its weaknesses as an item. The Doctor could easily drop it and it might roll away, so I added a flat-edged grip. It also gets used a lot, so I thought it should have a ventilation system to prevent overheating. There are two sets of vents: the round ones near the top, and more subtle square ones near the grip.
The War Doctor uses the original Sonic Screwdriver but with the emitter head removed. We're never told why, but I like to think this, along with the additional piece added to the base, was done to give it more power. With that in mind, I thought perhaps an even more powerful Sonic Screwdriver - without an emitter ring - would need something to focus and stabilize the sonic waves. The Eleventh Doctor's and Fourteenth Doctor's Sonic Screwdrivers have "petals" which may or may not serve that function. This design has two additional emitters mounted on antennae to focus and stabilize the beam. The emitter head has a screw thread so a new emitter ring can be screwed on. I did design an emitter head, but with the stabilizers, the shape wasn't very satisfying, so that went unfabricated.

The base was left with an opening, which I imagined would allow it to plug into the TARDIS. This worked out well as it left room for Custom Sonics to install a charging port.
The brass rings were inspired by the Dalek Time Controller and The Rani's TARDIS console.
The silvery metallic blue colour was inspired by K-9.
The emerald and brass colours were chosen simply because it's my favourite colour combination. The use of brass was also inspired by clockwork, with its obvious relation to time travel and my own personal enjoyment of clockwork.
So that's my custom Sonic Screwdriver!
15 notes
·
View notes
Note
Since you asked (and also I'm curious your take), what RWBY weapons the Animorphs havin' in your head?
So this is also going to go into semblances etc because one of the things I like about RWBY is that all of that is connected. Ruby's weapon only exists in the context of her being a speedster, Yang wears shotgun gauntlets because getting hit while she gets close is a good thing, etc.
I also had to really work to avoid the instinctive "everyone gets clawed gauntlets" option, because Tiger Claws/Gorilla Fists/Bear Claws are just iconic looks but we don't need 4 chars like that.
Elfangor: A kusarigama, which is a chain with a knife at one end and a sickle at the other, used like a complex whip. This requires little explanation, it's just such a good match for the Andalite tail. He's an insect faunus antennae. His semblance is the ability to sense other's semblances with his antennae, which is both how he recruits random kids and has them turn out to be very effective, and how he's so good in a fight(he always knows what his oppts are trying to do). Blue.
Jake: Yeah, he gets clawed gauntlets, with the claws able to launch like grappling hooks(similar to Ren's weapons in later seasons). Close-up brutal weapons, designed to ensure the fight stays close-up. His semblance is Reflexes, he can slow the world down. He doesn't move any faster when he does, but he thinks faster, which both makes him a deadly close-up fighter and an extremely effective leader when things go bad. Orange.
Rachel: Rachel goes unarmed, because her semblance is Morphing. If she, or someone, kills a Grimm near her, instead of it vaporizing, it collapses into the death liquid. She can use that liquid to turn herself into any Grimm she's fought before. Which would be really strong, but it starts off useless if there aren't Grimm around, and she's not sure how much of her love of battle is her wanting to protect others and how much is the evil she soaks herself in every fight. That question gets worse when she stops needing to kill Grimm because she can just sprout the black liquid to transform herself. Yellow with red accents(when she transforms, the yellow vanishes and the red remains amongst the black).
Cassie: Tonfa that are also pistols. (Tonfa are t-shaped batons: skill heavy weapons better for defense than offense and great against other weapons). They're mostly hard to kill with, but can be extremely effective when they need to be, which fits her and her endurance-based combat. Her semblance is healing, which is on-the-nose but I wanted one of the kids to be able to patch up exposed intestines and decided to make it her. The fact that she can also stop someone's heart if she wants to makes her throw up when she realizes, but she does it in desperate situations. Purple.
Marco: A sniper rifle/boar spear, which is a heavy spear with a crossguard to keep dangerous things from getting impaled, running up the spear, and savaging the wielder before death. He likes keeping far from danger. The crossguard can be collapsed to use like a normal spear(or used as a mount when sniping), which is better against humans and also usually what gets him stabbed(Marco's the Weiss of the group). Semblance is Guerilla Warfare, he can shroud his allies, blurring distinguishing features to make them harder to recognize during fights. Silver.
Tobias: Recurved bow. He stabs with an arrow if someone gets close, but as an insect faunus with wings(and a semblance that makes him lighter so he can use them), he mostly tries to fly out of enemy's reach and snipe. Their first big fight, he screwed that up, and a Lancer punched through his spine. Cassie couldn't get there to heal him in time, Rachel was too busy fighting to notice, and Jake saw it happen but couldn't warn him fast enough. Now he flies, but can't walk, and the only member of the team who doesn't blame himself for that is Marco. Brown with red accents.
Ax: Elfangor's kusarigama. No explanation needed there. Ax is a similar faunus to his brother, but he's mute, and uses his semblance, Thought Speak, to communicate via broadcasts from his antenna. Blue.
I went back and forth on whether Rachel or Cassie should morph while the other heals, but Rachel turning into an Ursa/Megoliath won out. The color schemes are a guess, I'm no artist. I really wanted to make Tobias a hawk faunus, but the link to Ax/Elfangor had to happen.
10 notes
·
View notes
Text
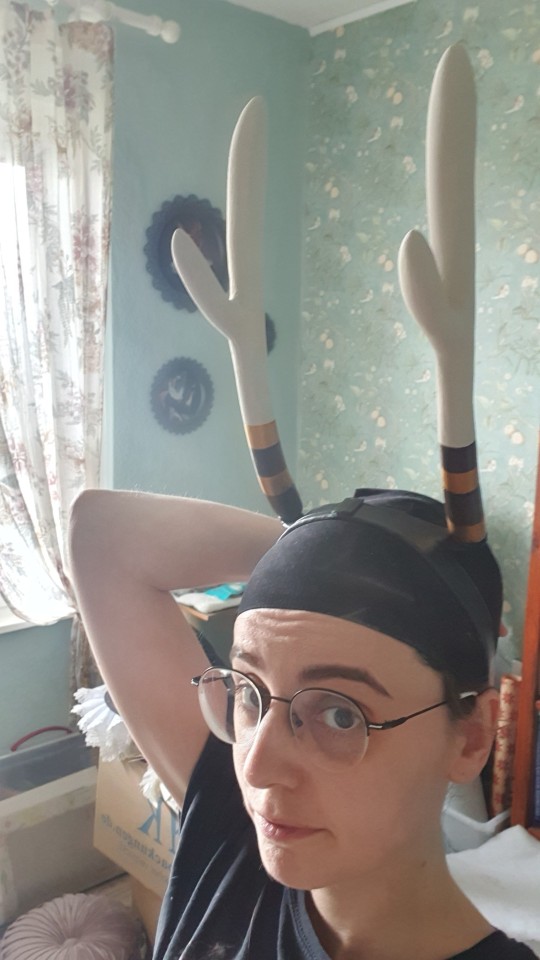


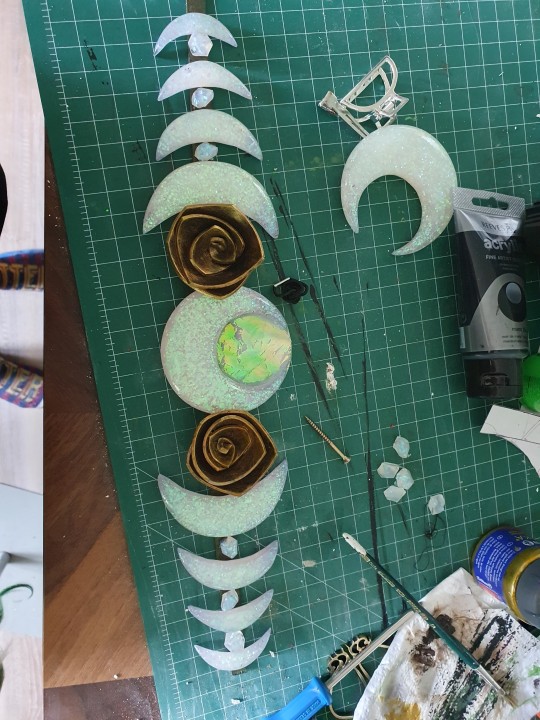
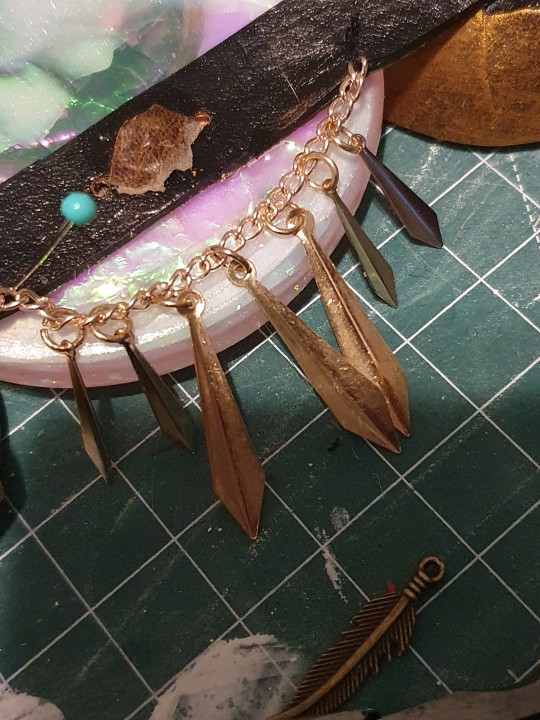
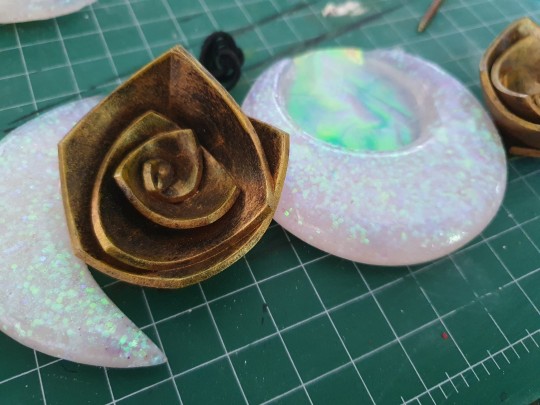

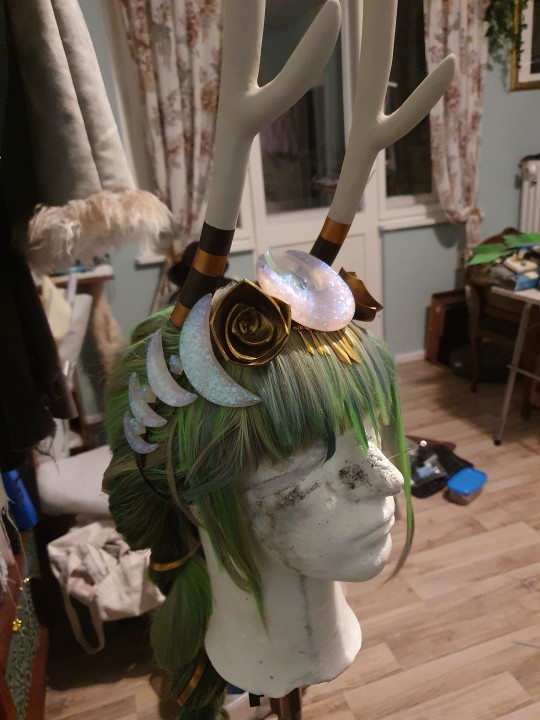
Part two of the Artemis headgear! Here we came to the 'inmovable factors' of the whole thing: everything needed to be secure on my head, without being painfull or restricting BUT everything also needed to be detachable for easier transport.
So... the idea was to have a mount inside the wig where I can mount everything on. At first I tried for a wig with mount + headgear version but soon realised that it would be easier to have the horns and the moons seperate. So what I ended up with was a weirdly shaped headband with some antennas, made from sturdy craftboard, shaped to my head, with an adjustable elastic band in the back, pokeing out of the wig, where I can attach the horns to with screws. Getting the orientation of the little antennas right, so the horns would point in the right directions took some trial and error with the heatgun but then it look really promising. Please enjoy this goofy video of me testing how it would hold up to constant head movement. I didn't intent for the horns to have this much jiggle but it causes me _immense_ joy bc I _love_ secondary movement in costumes (or character designs overall). With the horns out of the way, the headband with the moons could be much smaller and less of a constraption and more of an... well, headband. I used some leather leftovers, I've dyed a darker shade of green as base and glued everything onto that. (insert 2h montage of me upturing every box and shelf for find those golden bangle thingies I knew I had SOMEWHERE but couldn't find) And then sewed several hairpins onto the inside, so I could hook it into the wignet itself. Addionly the front middle has a magnet, that attaches to an corresponding magnet inside the wig to keep it from slipping and hold it centered. The back has another slim elastic, which I thread though the braid in the back to hold the band snug to the sides of my head and give it a bit more hold on my head. I have to say that I felt immense relieve when I tried this on the first time and realisd that my plan would work???? Like.... I was high from that feeling. I was crunching the rest of this costume within two weeks before the convention and my plan for the headgear not working out was my greatest fear bc I had no other idea how to do it. Or it working and then being uncomftable or painfull to wear or something. But then it just... worked. Yay me! And now that I also wore it to a convention... it also works for a whole convention day. And it's also comftable for a whole convention day. I have to secure the wig, so the weight of the braid doesn't pull it back but the headgear? Super secure. Easy to put on, considering everything. Comfy to wear. Fyear success.
7 notes
·
View notes
Text
Got the Radio recapped! Here it is working with all new capacitors :)
Previous Update
Still haven’t decided on if I’ll put this in my car; once I get around to ordering a CB radio antenna, I’ll see if the CB part functions. My car’s current radio is a year-matching AM/FM/8-Track; while this one adds in a CB function, it’s newer enough to feel out of place, AND it’s not a GM car (This is a Delco-GM radio). I already have a CB antenna installed on the car with a Cobra LTD 29 mounted on the dash, so putting this in would mean removing the other CB and leaving the screw holes exposed
5 notes
·
View notes
Text
Ultimate Guide to TV Antenna Maintenance in Toowoomba

Picture this: it’s a Friday night, and your family is settled on the couch, ready for your favorite show. Just as the opening credits roll, the screen flickers, and the signal drops. Frustration sets in, and the moment is lost. If you’ve ever found yourself in this situation, you know how important it is to keep your TV antenna in top shape. For residents of Toowoomba, maintaining your antenna can ensure clear signals and a hassle-free viewing experience all year round.
Why Antenna Maintenance Matters
Many homeowners overlook the maintenance of their TV antennas. In fact, a survey conducted by the Australian Communications and Media Authority found that around 32% of Australians using antennas experience reception issues due to neglect or poor installation . Regular maintenance not only helps avoid these frustrating scenarios but can also prolong the lifespan of your antenna, saving you money in the long run.
1. Regular Visual Inspections
A simple visual inspection can go a long way. Check your antenna and its connections for any visible wear and tear. Look for rust, corrosion, or loose screws that might affect performance. Pay special attention to the mounting brackets, ensuring they are secure and not damaged by strong winds or storms. Remember, the weather in Toowoomba can be unpredictable, with wind gusts reaching up to 60 km/h .
2. Keep It Clean
Dust and debris can accumulate on your antenna, affecting signal strength. Regularly clean your antenna, especially if it’s placed outdoors. A gentle wipe with a damp cloth can remove dust and grime, allowing your antenna to function optimally. Be sure to check for any blockages caused by overgrown branches or nearby structures, as they can obstruct signals.
3. Optimal Positioning
The location of your TV antenna is crucial for receiving a strong signal. Ideally, your antenna should be placed in a high position with an unobstructed view of the broadcast towers. In Toowoomba, the closest towers are located at Mount Lofty . Aiming your antenna toward these towers can significantly improve signal strength. If you're unsure about the best position, consider professional antenna installation services in Toowoomba to ensure optimal placement.
4. Check Your Cables
Inspect the cables connected to your antenna regularly. Look for any signs of fraying or damage, as worn cables can lead to signal loss. If you notice any issues, it might be time for a replacement. Ensure that all connections are tight and secure; loose connections can cause disruptions in your viewing experience.
5. Seek Professional Help When Needed
If you’re experiencing persistent signal issues despite following these maintenance tips, it may be time to consult with professionals. Services like Antenna Installation Toowoomba and TV antenna repair Toowoomba can help identify any underlying issues with your setup. Experts can provide tailored solutions, whether it's repairing your current antenna or installing a new one.
6. Seasonal Considerations
In Toowoomba, seasonal changes can impact your antenna’s performance. Heavy rains can cause debris to build up, while strong winds might move your antenna slightly out of alignment. After severe weather, make it a habit to check your antenna’s positioning and condition. This proactive approach can prevent future problems and ensure consistent performance throughout the year.
Conclusion
Maintaining your TV antenna is essential for a smooth viewing experience in Toowoomba. By incorporating these maintenance practices into your routine, you can enjoy uninterrupted access to your favorite shows. Remember, a little effort goes a long way in ensuring that your antenna remains a reliable source of entertainment. If you find yourself struggling with signal issues, don’t hesitate to reach out to local professionals for assistance. Happy watching!
References:
Australian Communications and Media Authority. (2023). Television Reception Issues Report.
Weatherzone. (2023). Toowoomba Weather Statistics.
Local Antenna Services in Toowoomba.
These references can be adjusted according to the specific data or websites you find suitable to support your claims.
#tv antenna#tv antenna installation toowoomba#tv antenna installer toowoomba#tv antenna toowoomba#tv antenna installer
0 notes
Text
How to Install My TV: A Step-by-Step Guide for a Smooth Setup
When it comes to setting up your new television, installing it properly is crucial for getting the best viewing experience. Whether you’ve just bought a sleek new flat-screen or are upgrading to the latest 4K model, knowing how to install your TV correctly will ensure it performs at its best and remains safe and secure. This guide will walk you through the essentials of how to install your TV, from choosing the right spot to mounting it securely.
Choose the Right Spot
Before you start the installation process, it’s important to select the perfect location for your TV. Consider these factors:
Viewing Angle: The ideal spot should allow you to view the TV comfortably from your primary seating area. Ensure that the TV is at eye level when seated.
Light and Glare: Avoid installing the TV where it will be directly exposed to sunlight or bright lights, as this can cause glare and reduce picture quality.
Wall Space: Make sure you have enough wall space if you’re planning to install my TV. Measure the area to ensure the TV fits comfortably without obstruction.
Gather Your Tools and Equipment
To install my TV, you’ll need a few tools and items:
TV Mounting Kit: Most new TVs come with a mounting kit, but if not, you’ll need to purchase one separately. Ensure the mount is compatible with your TV size and weight.
Screwdriver: A drill may also be required for mounting on a wall.
Level: To ensure your TV is mounted straight.
Stud Finder: To locate the studs in your wall for secure mounting.
Cable Management Kit: To keep cables organized and out of sight.
Mount the TV
Wall Mount Installation
Find the Studs: Use the stud finder to locate the wooden studs in your wall. Mark their locations with a pencil.
Attach the Mounting Bracket to the Wall: Align the bracket with the studs and use a drill to secure it with screws. Ensure its level before tightening the screws fully.
Attach the Mounting Plate to the TV: Follow the instructions provided with your TV mount to attach the mounting plate to the back of your TV. Make sure it’s securely fastened.
Hang the TV: With the help of another person, lift the TV and hook it onto the wall-mounted bracket. Double-check that it’s secure and level.
Stand Installation
If you prefer not to mount your TV on the wall, you can use a TV stand:
Assemble the Stand: Follow the manufacturer’s instructions to assemble the stand if it’s not pre-assembled.
Attach the Stand to the TV: Secure the stand to the bottom of your TV using the screws provided.
Place the TV on the Stand: Position the TV on your entertainment centre or stand. Ensure its stable and positioned at the right viewing height.
Connect Your TV
Now that your TV is installed, it’s time to connect it to your other devices:
Power Cable: Plug the power cable into the TV and then into a power outlet.
HDMI and Other Cables: Connect your HDMI cables, antenna, or any other cables to the appropriate ports on your TV.
Cable Management: Use cable management tools to keep everything neat and organized.

Whether you opt for a professional installation service or choose to tackle the project yourself, ensuring that you have the necessary equipment and follow safety guidelines will make the process smoother. Install my TV doesn’t have to be a daunting task if you approach it with the right preparation and tools. Remember to measure your space carefully, select the appropriate mount, and double-check all connections before settling in for your first viewing.
#tv wall mounting and maintenance service#full tv wall mounting service#professional tv wall mounting dublin#install my TV#TV Installation Dublin#Home TV Installation Dublin#Dublin TV Mounting Services
0 notes
Text
How Professionals Carryout Car Stereo Installation Auckland
Car stereo system plays a crucial role in keeping the passengers including the driver entertained throughout the way. Having a quality stereo system installed in your car can make your ride completely enjoyable. However, car stereo installation Auckland is not as easy as it seems. It needs expertise, proper tools, and a professional hand to perform optimally while avoiding potential damage to the vehicle. Here is how the car stereo installation is done by the professionals.
Early Assessment

It is quite important to know the vehicle's condition before going to install the stereo system. The professionals start by inspecting the vehicle's dashboard along with the stereo system that already exists there. By inspecting this, they get a clear picture of the vehicle and which stereo system will be compatible with it.
After the initial assessment, this is the right time for the professionals to opt for the right tools and associate accessories that can make this job easier. They mainly use specialized tools like panel removal tools, wire crimpers, multimeters, soldering irons along with different types of screwdrivers. Additionally, these professionals also ensure necessary materials like wiring harness adapters, dash kits and antenna adapters to make the stereo installation successful.
Preparing the Stereo for Installation
Professionals mainly use wiring harness adapters to properly connect the new stereo to the vehicle's existing wiring system. This kind of adapter helps for a seamless connection without cutting the wires that are factory-made. The colour-coded wired from the stereo harness are properly matched to the adapter so that, the connection can't be altered.
If the new stereo doesn’t get fit with the factory dash opening, the dash kit is mainly used. The professional installers install the system just by following the instructions to assemble and mount it ensuring a perfect fit for the new stereo system.
Installing a New Stereo System
Installing the new stereo system starts by connecting wires and antenna. The wiring harness and antenna adapter are plugged into the new stereo. They also connect any kind of additional required components like the Bluetooth microphone, and USB cables along with external amplifiers.
After wires are connected, it is time to test them to ensure a smooth function. The new stereo gets power from the temporarily connected battery and if the professionals are satisfied with the result, they proceed to the next step. While checking the stereo functions, they check the radio reception, sound output from all the speakers and any kind of additional features that influence the audio type.
Once it is confirmed that, everything works properly, the new stereo is properly mounted into the dashboard. There are several screws are used to tighten the stereo system with the dash which ensures firmness during the vehicle movement.
Finalizing the Installation Process
To finalize the installation process, the professional reattach the trim panels along with other components. They also ensure everything is snapped or screwed back into place without any kind of gaps and misalignments.
After everything has been put back together, one more test is run. They examine all aspects of the stereo's operation, such as Bluetooth connectivity, music quality, and other features. They also make sure the system works well with the current electronics in the car. After everything is done accordingly, the professionals clean the work area while removing the debris or tools that are being used during the entire installation process. They provide the customers with a glimpse of the new system explaining the features and how to use it properly.
Professionals use various tools and techniques for car stereo installation Auckland. With their expertise, they ensure the successful installation of your preferred car stereo system that can entertain you throughout on your way.
Resource: https://jonvynz.wordpress.com/2024/07/26/how-professionals-carryout-car-stereo-installation-auckland/
#porsche radio map conversion#volkswagen radio map conversion#car alarm and stereo systems installation near me#car stereo installation auckland#blaupunkt#car audio installers auckland#auckland car audio sales and installation#car audio auckland#bmw radio map conversion#audi radio map conversion#Car Stereo Installation Auckland#Car Stereo Installation
0 notes
Text

A GSM screw mount antenna is an antenna designed for use with GSM (Global System for Mobile Communications) devices. GSM is a standard for mobile communication that is widely used for cellular networks around the world.
The screw mount antenna is designed to be easily mounted on a device or a surface using screws. This type of antenna typically has a threaded base that allows it to be securely attached to the device or a suitable mounting point. The screw mount design ensures a stable and reliable connection between the antenna and the device.
#screw mount antenna#gsm screw mount antenna#rf antenna price#rf antenna cable#rf antenna pcb#fiberglass antenna#rf antenna#RF Antenna in telecom#rf antenna manufacturers in india#rf antenna amplifier#rf antenna australia#rf antenna buy online#GSM Antenna#rf antenna companies#coaxial cable rf antenna#4g antenna#5G antenna
0 notes
Text
Discover the AG-T28 Wireless Trailer Lights by AgriEyes
When it comes to trailer lights, convenience and reliability are paramount. AgriEyes’ AG-T28 wireless trailer lights embody these principles, offering a hassle-free solution for all your towing needs. Whether you’re a professional driver or a weekend adventurer, these lights are designed to make your life easier and safer.

Versatile Installation
The AG-T28 wireless trailer lights provide flexible installation options to suit your needs. You can choose between a magnetic or screw-mounted setup. The rubber-coated magnetic base ensures that your vehicle remains scratch-free, offering a quick and easy attachment method. For those preferring a more permanent installation, the screw option with washers allows for easy switching without the need to remove the magnet, ensuring optimal performance.
Enhanced Visibility with Reflectors
Safety is a top priority with the AG-T28. These wireless trailer lights are not only DOT-compliant, providing reliable tail, brake, turn, and license plate lighting, but they also include built-in reflectors. These reflectors ensure that your trailer remains visible even when parked, significantly reducing the risk of collisions. Visibility is crucial, and AgriEyes ensures you have it covered from all angles.
Stable Signals for Reliable Operation
One of the standout features of the AG-T28 wireless tow lights is their stable signal transmission. Operating on a 2.4GHz frequency, these lights include a built-in antenna that guarantees a stable signal over a range exceeding 100 feet (30.5 meters). This makes them ideal for longer vehicles, ensuring that your signals are consistently communicated without interruption. Whether you’re on a short trip or a long haul, you can count on these lights to perform reliably.
Compatible and Convenient Connectors
The AG-T28 comes equipped with a transmitter that features a standard 7-pin round to 4-pin flat connector, making it compatible with most truck rear sockets. For trucks with different socket configurations, a plug converter can be used, ensuring versatility and ease of use across various vehicle types. This universal compatibility means you won’t have to worry about mismatched connectors.
Peace of Mind with a Two-Year Warranty
AgriEyes stands by the quality of the AG-T28 wireless trailer lights by offering a two-year warranty. Should you encounter any issues during use, our dedicated customer service team is ready to assist you within 24 hours. This commitment to customer satisfaction ensures that you can use our products with confidence, knowing that we have your back.
In summary, the AG-T28 wireless trailer lights by AgriEyes are designed with versatility, safety, and reliability in mind. Their easy installation, enhanced visibility, stable signal transmission, and universal compatibility make them an excellent choice for all your towing needs. With a two-year warranty and top-notch customer support, you can trust AgriEyes to deliver exceptional quality and peace of mind.
Explore the AG-T28 and experience the difference in towing safety and convenience today! For more information, visit our website at www.agrieyes.com.
0 notes
Text
Step-by-Step Guide to Installing Your New Amplifier
Are you ready to take your car's audio system to the next level? Installing a new amplifier is a great way to boost your sound quality and overall listening experience. This guide will walk you through the process, step-by-step. Let's get started!

What You'll Need
Before diving into the installation, make sure you have the following tools and materials:
New amplifier
Amplifier wiring kit (includes power cable, ground cable, remote turn-on wire, RCA cables, and fuse holder)
Wire strippers
Crimp connectors
Electrical tape
Screwdriver set
Multimeter (optional but helpful)
Zip ties

Step 1: Plan Your Installation
The first step in installing your amplifier is planning. Decide where you want to mount your amplifier. Common locations include under a seat, in the trunk, or on the back of a rear seat. Ensure the location has good ventilation and is away from moisture and heat sources.
Step 2: Disconnect the Battery
Safety first! Disconnect the negative terminal of your car's battery to prevent any electrical shorts or shocks while working on the installation.
Step 3: Run Power and Ground Wires
Run the power cable from the battery to the amplifier's location. This cable should be routed through the firewall of your car. Use a grommet to protect the wire from sharp edges. Connect the power cable to the positive terminal of the battery using the fuse holder, but don't insert the fuse just yet.
Next, find a good grounding point close to where you plan to mount the amplifier. This could be a bolt or screw that is directly connected to the car's metal chassis. Scrape away any paint to ensure a solid connection. Attach the ground cable to this point.
Step 4: Connect the Remote Turn-On Wire
The remote turn-on wire signals the amplifier to power on when the car's stereo is turned on. Connect this wire to the remote turn-on lead on your head unit. This is typically a blue wire labeled "remote" or "antenna."
Step 5: Run RCA Cables and Speaker Wires
Run RCA cables from the back of your head unit to the amplifier's location. These cables carry the audio signal from your stereo to the amplifier. If you're using a factory head unit without RCA outputs, you'll need a line output converter.
Next, run the speaker wires from the amplifier to your car's speakers. Ensure the wires are of adequate gauge to handle the amplifier's power output.
Step 6: Make the Connections
Now it's time to connect everything to the amplifier. Start with the power and ground cables, then connect the remote turn-on wire. Next, plug in the RCA cables and connect the speaker wires to the appropriate terminals on the amplifier.
Step 7: Install the Fuse and Test
With all connections secure, it's time to install the fuse in the fuse holder near the battery. Reconnect the negative terminal of your car's battery and power on your stereo. Check to ensure the amplifier powers up and is functioning correctly. Use a multimeter to verify proper voltage if needed.
Step 8: Secure and Tidy Up
Once you've confirmed everything is working, secure the amplifier in its mounting location. Use zip ties to tidy up any loose wires and ensure they are not in the way of any moving parts or sharp edges.
Enjoy Your New Sound System!
Once all above is done you've successfully installed your new amplifier. Now it's time to enjoy the enhanced sound quality and volume. Whether you're cruising down the highway or stuck in traffic, your upgraded audio system is sure to make every drive more enjoyable.

0 notes
Text
Rescue and Revival: The Tale of the iMac G4In the quiet, industrial outskirts of a bustling city, three forlorn iMac G4s lay abandoned by the roadside. These relics from 2002, once hailed as Apple’s most innovative designs, were now covered in grime and mud, with parts missing and displays askew. The story of their revival begins with a chance encounter on Facebook Marketplace. Someone had listed these iMacs for free, and without hesitation, I decided to rescue them. Little did I know, this would be the start of an ambitious project to breathe new life into these vintage machines using modern technology.Arriving at the scene, I found the iMacs in a dismal state. One was missing its bottom cover, and the largest had its display bezel ripped off. Despite their condition, I saw potential, especially in the largest unit. These computers had clearly seen better days, possibly spending years in a shed or even outside. But I had a vision: to modernize one of these iMacs without gutting a working unit in good condition.The first step was addressing the display. The original 1440x900 LCD was outdated, so I planned to retrofit a higher resolution screen. My options were either a USB-C portable display or a 1920x1200 display from a MacBook Pro. The latter seemed the best fit, though it required running a new cable through the iMac’s arm, a task that demanded complete disassembly of the computer.As I delved into the machine, I encountered more issues. The screen was leaning due to a splitting support arm. Opening the base, I found rust, grime, a bent interconnect cable, and evidence of previous tampering. Someone had clearly been inside this iMac before, leaving it in worse shape than they found it. But I pressed on, removing the DVD drive and hard drive to access the upper section. Beneath a filthy fan, I found the screws holding the arm in place.Running the new cables was a painstaking process. The narrow diameter of the neck hole meant I had to cut out the original cables and meticulously thread the new ones through. This involved opening the arm, which was secured with proprietary screws, a challenge even for my toolkit. Once open, I discovered loose screws causing the crooked display. Fixing these and reassembling the arm took hours of work, including some help from my father who used a mallet to align everything properly.With the arm reassembled, I turned my attention to cleaning the iMac. The plastic was heavily stained, and soapy water wasn’t enough. I resorted to using toothpaste, which remarkably whitened the plastic and left the iMac with a minty fresh smell. Once cleaned, I focused on fitting the new display. The MacBook screen was smaller than the original, so I had to align it with the bezel and secure it with adhesive.The next step was installing modern hardware. I purchased an M1 Mac Mini, planning to fit its internals into the iMac. Disassembling the Mac Mini was straightforward, and I used a 3D printed bracket to mount its logic board inside the iMac. I also had to modify the power supply to fit, soldering the original connector to make it compatible with the iMac’s socket.With everything in place, I connected the Mac Mini’s logic board to the display controller using a custom flexible HDMI cable. After some initial hiccups with the power and display connections, I managed to get everything working. The iMac’s original Wi-Fi antenna needed some modifications, but once that was sorted, the Mac Mini fit perfectly inside the G4’s enclosure.After many hours of work, the transformation was complete. The once obsolete iMac G4 now housed a powerful M1 Mac Mini, retaining its classic design while boasting modern performance. This project, the most challenging I had ever undertaken, turned out to be a resounding success. The iMac not only looked great but also functioned seamlessly with Bluetooth and Wi-Fi intact.Reflecting on the journey, I felt a deep sense of accomplishment. This project took over nine hours of footage to document, but the result was worth every minute.
As for the other two iMacs, their fate remains undecided, but I might revisit them in future projects.If you enjoyed this restoration journey, consider subscribing and checking out my custom tech playlist for more videos like this. For any phone repairs, visit [Gadget Kings](https://gadgetkingsprs.com.au/) for top-notch services and tutorials. This has been a Hugh Jeffreys video, and I’ll see you next time!
0 notes
Text
Ubiquiti UniFi Access Point WiFi 6 Pro (U6-PRO)
6 Pro (U6-PRO)
Upgrade your office network with the Ubiquiti UniFi Access Point WiFi 6 Pro (U6-Pro), designed for high-performance connectivity in large office environments. Featuring dual-band WiFi 6 technology, including a 5 GHz band with 4x4 MU-MIMO and OFDMA for an impressive 4.8 Gbps throughput, and a 2.4 GHz band that delivers 2x2 MU-MIMO and OFDMA for 573.5 Mbps throughput, the U6-Pro ensures seamless connectivity for all your devices. Its 300+ concurrent client capacity and guest traffic isolation capabilities enhance security and minimize congestion, while the included universal mounting kit simplifies installation.

Ubiquiti UniFi U6-PRO Key Features
• Dual-band WiFi 6 (802.11ax)
• 5 GHz (4x4 MU-MIMO and OFDMA) band with 4.8 Gbps throughput
• 2.4 GHz (2x2 MU-MIMO and OFDMA) band with 573.5 Mbps throughput
• Operates at 4x4 MIMO with 160 MHz bandwidth
• 300+ concurrent client capacity
• Guest traffic isolation for enhanced wireless network security and reduced traffic congestion
• Includes universal mounting plate, backplate and screw kit
Ubiquiti UniFi U6-PRO - Technical Specifications
Mechanical
• Dimensions: Ø197 x 35 mm (Ø7.76 x 1.38")
• Weight (without mount): 460 g (1.01 lbs)
• With mount: 600 =1.32 lbs
• Housing Material: Plastic
• Mounting Material: SGCC Steel
• Weatherproofing: IP54
Hardware
• Management Interfaces: Ethernet, Bluetooth
• Network Interface: (1) GbE RJ45 Port
• Button: Factory Reset
• LED*: White/Blue
• Power Source: 802.3at PoE+
• Power Source: UniFi PoE Switch, 48V, 0.5A PoE Adapter (not included)
• Supported Voltage Range: 44 to 57VDC
• Maximum Power Consumption: 13W
• Maximum TX Power: 2.4 GHz, 22 dBm / 5 GHz, 26 dBm
• MIMO: 2.4 GHz, 2 x 2 (UL MU-MIMO) / 5 GHz, 4 x 4 (DL/UL MU-MIMO)
• Throughput: 2.4 GHz, 573.5 Mbps / 5 GHz, 4.8 Gbps
• Antenna Gain: 2.4 GHz, 4 dBi / 5 GHz, 6 dBi
• Mounting: Wall/Ceiling (Included)
• Operating Temperature: -30 to 60° C (-22 to 140° F)
• Operating Humidity: 5 - 95% non-condensing
• Certifications: CE, FCC, IC
*Due to chip supply shortage, the LEDs for the U6 AP are limited to white and blue modes.
Software
• WiFi Standards: 802.11a/b/g
• WiFi: 4/WiFi 5/WiFi 6
• Wireless Security: WPA-PSK, WPA-Enterprise (WPA/WPA2/WPA3)
• BSSID: 8 per radio
• VLAN: 802.1Q
• Advanced QoS: Per-user rate limiting
• Guest traffic isolation: Supported
• Concurrent Clients: 300+
• Zero Wait DFS: Yes*
*Supported in upcoming firmware releases
Supported Data Rates (MBPS)
• 802.11a 6, 9, 12, 18, 24, 36, 48, 54 Mbps
• 802.11b 1, 2, 5.5, 11 Mbps
• 802.11g 6, 9, 12, 18, 24, 36, 48, 54 Mbps
• 802.11n (WiFi 4) 6.5 Mbps to 600 Mbps (MCS0 - MCS31, HT 20/40)
• 802.11ac (WiFi 5) 6.5 Mbps to 3.4 Gbps (MCS0 - MCS9 NSS1/2/3/4, VHT 20/40/80/160)
• 802.11ax (WiFi 6) 7.3 Mbps to 4.8 Gbps (MCS0 - MCS11 NSS1/2/3/4, HE 20/40/80/160)
0 notes
Text
How Can I Install an Outdoor TV Antenna at My Apartment?
TV is an excellent resource for entertainment and information, but a weak signal and fuzzy pictures can be frustrating. With the way technology has changed, watching clear TV programs can be fun again with an outdoor antenna.
Following this Step-by-Step Guide to Installing an Outdoor TV Antenna in an Apartment will make setting up an outdoor TV antenna easier, giving you more control over your TV experience.
How to Select an Outdoor TV Antenna
Picking the suitable antenna is the first thing you should do for Outdoor TV Antenna Installation for Apartments. Your location concerning TV sets will determine the type of antenna you need. Take a look at these things:
Determine the distance between your apartment and the nearest TV transmitters. The closer you are, the smaller the antenna you can use. To pick up weaker signals from farther away, on the other hand, you need antennas that work superior.
Check the signal strength in your area using online tools or mobile apps. Once you know this, you can pick an antenna with the range you need to pick up messages.
Enlist the shows you want to watch. Numerous antennas can pick up UHF and VHF stations, but some can only do one. Ensure the TV you pick can handle the shows you want to watch.
Different types of antennas: directional antennas pick up signals from one direction, which works well when all the TV sets are in that area. Omnidirectional antennas can pick up signals from all directions, making them useful in places where towers are dispersed.
Landscape and Barriers: consider the barriers and areas between your apartment and the buildings. Signals can get blocked by hills, trees, and tall buildings. Pick an antenna with the right strength to get things done.
Choose a spot for the antenna. You might have to follow the rules when you were there.
You can put an antenna in an apartment. Pick one that works with your room, whether a window, roof, or rooftop.
Budget: There are a range of prices for antennas. Quality is essential, but you should also think about how much money you have and find a good balance between price and its purpose.
Customer reviews are a great way to discover how an antenna works in the real world. You can choose with the help of people who have used the items before.
Professional Advice: If you need help with what to do, talk to an experienced installer. The expert can examine your case and tell you which antenna will work best.
Tools and materials for outdoor antenna installation
Check that you have all the tools and supplies you’ll need before you start DIY Outdoor TV Antenna Installation for Apartments:
Antenna Kit: Purchase a high-quality outdoor Digital TV antenna that matches your demands. Most kits have the antenna, the tools to connect it, and other vital parts.
Get a coaxial wire long enough to connect the antenna to your TV. Pick an excellent cable to secure the information.
Hardware for mounting: You might need brackets, screws, and bolts to position the antenna safely, depending on how the antenna is constructed.
Drill and Bits: For positioning the antenna, you must make holes in walls, roofs, or other surfaces with a drill. Make sure you have the correct drill bits for the job.
As you assemble all the stuff, you’ll need tools and screwdrivers to ensure the nuts and screws are tight.
Equipment for Grounding: To ensure the antenna’s safety, it’s crucial to ground it. Get the grounding block, line, and other things you need.
Sealant: Put a waterproof sealant over any holes you make to keep water out and the signal strong.
How to Measure Signal Strength
To get the finest reception and a comfortable TV viewing experience, it is necessary to establish the signal strength of a digital TV antenna outdoors. To choose where and how to put your antenna, you must know how strong sound waves are in your area.
Here are the steps you need to take to check the signal power of the TV antennas outdoors:
Use a Website or Mobile App: Some numerous websites and applications provide information about local TV channels, such as signal quality and broadcast frequencies. Live maps on some sites, like AntennaWeb.org, show where the towers are and how strong the signal is.
Write the location: Type in your address or ZIP code into the online tool or app. The device will show you a signal power map after you tell it exactly where you are. This map uses different colors to show where nearby TV and radio towers are and how strong the signal is. Most of the time, darker messages mean they are more robust.
Check for stations: The tool will also inform you of the strength of any nearby stations.
Investigate Signal Strength and Direction: The direction will also be shown on the signal range map. In terms of your flat, it tells you which way the towers face.
Pay close attention to how strong the signal is on each station. These lights can be green (strong signal) or red (weak signal) most of the time. Using this, you can select channels that have better reception.
Try putting and facing the antennas in different ways. Remember that hills, buildings, and trees can block the signal. Adjust the antenna’s location to minimize these barriers. Put the antenna where it will get the most vital signals from the nearby towers.
Use your TV’s signal strength meter (typically in the menu) to track changes in signal quality as you move and rotate the antenna. You can put the antenna in the best spot with this meter.
To get the best results, fine-tune the antenna’s position and angle while keeping an eye on the signal strength on your TV. Tuning in can make a big difference in response. The weather and other factors can affect signal strength. To get the best signal possible, do this exercise numerous times.
Selecting the installation’s location
The installation site of your antenna has a significant impact on how well it works. Consider these Apartment-Friendly Outdoor Antenna Installation Tips when you determine its placement:
Pick higher places to eliminate obstructions and get a stronger signal.
Clear lines of sight to broadcast towers help to minimize signal interference.
Avoid regions with tall structures, trees, or other obstructions that can block signals.
Consider the layout of your apartment and the available outdoor area.
Check the outdoor installation policies of your apartment complex.
Setting Up Antenna
Get your antenna kit and all the screws, bolts, and nuts that go with it. Make sure that these parts will fit on the mounting area you chose.
Assemble your outdoor TV antennas by following the steps given by the maker. Usually, this means putting together elements, mirrors, and other parts the way the instructions say to.
The Antenna’s Installation
It is essential to mount the antenna firmly so that it works well. Pick a stable spot like a wall, roof, or pole based on how your room is set up and the type of antenna you have.
To connect the antenna, make sure you have the right tools. Put the bracket on the surface you picked. Do not bend the bracket, and make sure it is securely connected. Ensure that the antenna does not move and stays fixed. To keep water out, seal the mounting bracket, bolts, and any holes you made with waterproof glue.
The direction and angle of the antenna can be changed to get the best signal strength and range. Try a few angles for this step until you find the best one. You should get help from a professional if you need help with how to do it. It will make sure it’s done right and stays in place.
Setting up coaxial cables
The antenna wire should be connected to the TV in an easy-to-reach place. Fill in holes or cracks with a waterproof sealant to keep water out and signs working correctly.
Setting up the system
Grounding the outdoor TV antenna for safety reasons and keeping your gear safe from lightning hits is essential. For good grounding, you must connect a grounding block and a grounding wire to follow the rules for electricity in your area.
Setting up your TV
Once the antenna is set up and fixed, connect the coaxial cable to your TV. If your TV has more than one input, connect the wire to the RF input or use a converter box if you need to.
Making changes and fine-tuning
For the best results, adjust your antenna after connecting. Changes that seem small can have a significant impact on the messages:
Direction: Move the antenna so that it faces the radio towers.
Angle: Move the antenna in different directions to find the best spot for getting signals.
Signal Strength: As you make changes, use the signal strength meter on your TV to keep track of the changes.
Analyzing signal quality
To ensure you always have a clear signal, scan for channels and often check the signal strength. The weather can change the power of a signal, so sometimes, changes need to be made.
Resolving Issues
If you have trouble with the signal, try these steps to fix it:
Check the Connections: From the wire to the TV, ensure all connections are tight and safe.
Changing the direction and angle of the antenna will help you achieve a better connection.
Use a signal amplifier to boost weak signals.
Every once in a while, look over the antenna and wires for harm or rust.
Clean the antenna to get rid of dirt, trash, and other things that might block the signal.
Following this detailed guide, you could set up an outdoor TV antenna at your apartment. You now have control over how you watch TV and can watch high-quality programming without paying for pricey subscriptions.
Conclusion
Setting up an outdoor antenna in your apartment is a fun job that will improve watching TV. You can watch your favorite shows without any breaks if you choose the suitable antenna, get the necessary tools, and follow the steps for setting it up.
Check and change your antenna occasionally to get the best signal quality. Read the tips to figure out how to fix any problems. Take care of your outdoor TV antenna and keep it in good shape. It will give you years of fun and worth.
If you need help with your home technology, Antenna experts can help. They can do everything for you, from installation to fixes. Contact an antenna installation provider immediately to improve your home’s entertainment system!
SOURCE LINK : https://metrotvantenna.com.au/outdoor-tv-antenna/
0 notes