#sandpaper manufacturer
Explore tagged Tumblr posts
Text

Hook And Loop Sandpaper Sanding Sponge
0 notes
Text

When you buy sandpaper in bulk from an estate sale
3 notes
·
View notes
Text
Essential Epoxy Resin Art Supplies Every Artist Needs
When it comes to creating stunning resin artworks, having the right tools and materials is essential. Epoxy resin art supplies play a crucial role in bringing your artistic visions to life, and choosing the right ones can make all the difference in the final result. From high-quality epoxy resin to vibrant pigments and safety equipment, let's explore the Essential Epoxy Resin Art Supplies Every Artist Needs
High-Quality Epoxy Resin:
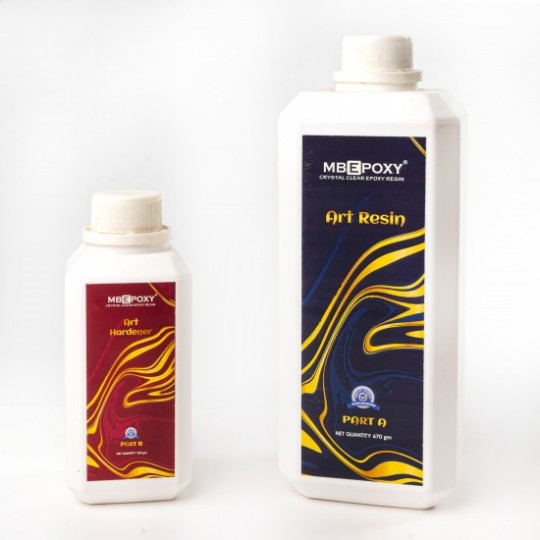
The foundation of any resin art project starts with the epoxy resin itself. It's imperative to use epoxy resin specifically designed for art applications to ensure optimal results. Look for resins that offer clarity, UV resistance, and minimal yellowing over time, as these qualities will preserve the integrity of your artwork. Whether you're creating paintings, jewelry, tabletops, or sculptures, a versatile epoxy resin will provide the perfect medium for your creative endeavors.
Pigments:

Adding vibrant colors to resin artworks is where the magic happens, and the right pigments can elevate creations to new heights. Liquid pigments, mica powders, and alcohol inks are popular choices for coloring epoxy resin. These epoxy pigment are specially formulated to be compatible with epoxy resin, offering a wide range of hues and allowing artists to express their artistic vision with unique designs.
Colorants:

In addition to pigments, colorants play a crucial role in resin art projects. They help achieve desired hues and effects, such as translucency or opacity. Whether using liquid colorants, powder colorants, or specialty additives, selecting the right epoxy resin color enhances the overall aesthetic of resin artworks and allows artists to experiment with various techniques and finishes.
Mixing Tools and Containers:
Achieving the perfect consistency and eliminating air bubbles are crucial steps in the resin art process, and having the right mixing tools and containers is essential. Silicone measuring cups, stirring sticks, and graduated mixing containers ensure accurate ratios and smooth blending of epoxy resin and pigments. These tools are durable, easy to clean, and designed to help you achieve flawless results in your resin art projects.
Molds and Forms:

Molds and forms are indispensable tools for shaping resin artworks and creating intricate designs. Silicone molds, resin casting molds, and reusable molds offer endless possibilities for creating unique shapes, textures, and patterns in your resin pieces. Whether you're making functional items like coasters and trays or decorative pieces like jewelry and sculptures, the right molds and forms will help you bring your artistic vision to life.
Safety Equipment:

Working with Epoxy Resin Art Supplies requires taking safety precautions to protect yourself from potential hazards. Nitrile gloves, safety goggles, and a respirator mask are essential safety equipment that provides protection against skin contact, eye irritation, and inhalation of fumes. It's also crucial to work in a well-ventilated area to minimize exposure to harmful vapors and ensure a safe working environment.
Finishing Tools and Supplies:
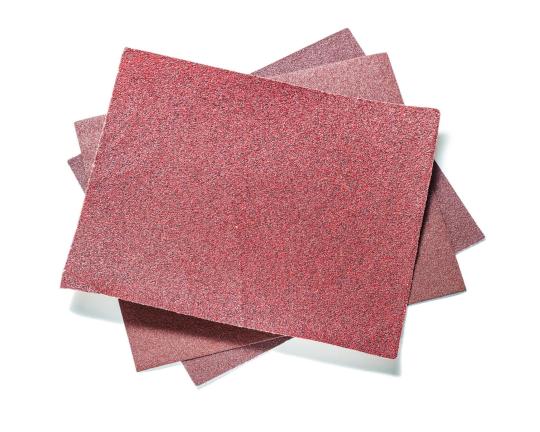
Once your resin artwork is complete, finishing tools and supplies are necessary for achieving a professional-looking finish. Sandpaper, polishing compounds, and resin-compatible sealants are essential for smoothing surfaces, enhancing gloss, and improving durability. These finishing touches add a level of refinement to your resin art pieces, making them stand out and command attention.
Work Surface Protection:
Protecting your work surface is essential to prevent damage and ensure easy cleanup during resin art projects. Using a disposable plastic sheet or silicone mat provides a protective barrier against spills and stains, safeguarding your tables, countertops, and other surfaces. This simple yet effective measure makes cleanup a breeze and allows you to focus on unleashing your creativity without worrying about damaging your workspace.

Having the right epoxy resin art supplies is crucial for creating stunning resin artworks that capture attention and inspire awe. From high-quality epoxy resin to pigments, molds, safety equipment, and finishing tools, each essential plays a vital role in the resin art process. For top-quality Epoxy Resin Art Supplies that meet all your artistic needs, consider MB Enterprises as they are known for being one of the resin manufacturers. Their range of products is designed to help artists unleash their creativity and bring their artistic visions to life. Invest in the best supplies and watch your resin artistry flourish like never before with MB Enterprises.
#High-Quality Epoxy Resin#epoxy pigment#epoxy resin color#Molds and Forms#Nitrile gloves#SandPaper#Epoxy resin art supplies#resin manufacturers
3 notes
·
View notes
Text


This felt like an obligatory reblog
How holes in jeans are made
#it’s really only the big brands and manufacturers that use laser technology to distress jeans#denim is also one the most toxic and most wasteful processes regardless with the indigo dying and water usage#sandpaper and box cutter will get the job done if you gonna diy!#the above notes r comments from this very twt thread i find helpful
911 notes
·
View notes
Text

⭒ Shishiba x fem reader
⭒ tags: fluff for perverts • heavy petting • emotional foreplay • pda • exhibitionist Shishiba • reader is a “honeypot” spy • secret relationship • canonically disabled Shishiba • praise • pleasure d-m Shishiba • mild jealousy and possessiveness
⭒ umm I had no idea how to end this before it got too long lol my bad I may redo the ending but enjoy it for now. I did not proofread this either lol

Shishiba has a fierce set of ethics and rules about how he performs in his job. He doesn’t get upset when people close to him die because he knows that’s just the nature of the job. It’d be hypocritical to be upset at death when you kill people for a living. It’d be even more hypocritical to hate experiencing violence when you operate as violently as possible. Any feelings that conflicted with the nature of his work were deemed pointless, selfish, and ridiculous. He threw them away and fulfilled his duties without a shred of insincerity. Or he did before meeting you, anyway.
It’d been a few months since you’d turned him into a hypocrite. He still remembers your first meeting like it was yesterday. The way you sauntered into the Order’s dining room when the chairman gave his cue was burned into Shishiba’s mind. Your dress was pitch black and a perfect fit for your curvy body; accentuating all the right things. Your hair and makeup were flawless—he couldn’t stop his eyes from flicking to your glossy lips as the chairman introduced you.
“She’ll be gathering intelligence from extremely high profile targets that have a weakness for the flesh.”
Suddenly the unbelievable beauty made sense. You’d essentially be used as bait and work in tandem with at least one member of the Order to eliminate targets when you weren’t gathering information. At first he resigned himself to not being able to pursue you at all, but after two missions with you he started convincing himself that something strictly physical wouldn’t be a problem. How shortsighted and stupid of him.
You two have been working your latest target for the last month, a ceo that turned out to be the host of a human auction, and not a second went by where jealousy didn’t try to consume Shishiba whole. Due to his low casualty rate and high discretion you were paired up often and for long stretches of time. He couldn’t bring himself to be rude or cold with you for too long but God knows he tried so hard to resist you in the beginning.
He tried to write you off, figuring your sweet personality and elegant demeanor were manufactured for your job. The more time you spent with him, the more he saw that you were a true natural charmer. In fact, he noticed that the way you speak to your targets and the way you speak to him differed only slightly. You didn’t praise him or stroke his ego in any way and never tried to manipulate his feelings or thoughts. That last part didn’t change when the two of you started fucking either. You weren’t shy about letting him know you enjoyed his mouth when it was clamped around your pussy and would even tell him you thought of him when you took targets to bed. The problem was that you did it so matter-of-factly. As if it should be obvious enough to not need saying that you enjoyed him more than the scumbags. He was desperate for the emotional side of you, even if it was fake.
Every second you spent in the hands of someone else was sandpaper to his soul. Hearing the playback of your intelligence gathering sessions made him want to tear someone apart. Your voice dripped with a cocktail of lust, respect, and adoration made specifically for the target. Flirty giggles punctuated your responses and the subtle, almost chaste physical affections you’d give them to solidify the fantasy often force him to disable the visual feed.
You were never so intentionally emotional with him and he refused to let yet another despicable man enjoy his idea of heaven without experiencing it himself. You came back to the safe house after your latest session with the ceo. Shishiba noticed that your hair was in a different style and your lips were swollen. He couldn’t help but picture you suckling on the fingers and cock of the ceo and had to turn away to hide his reflexive grimace. Your heels clattered against the floor as you slipped them off with a relieved sigh.
“Welcome back,” Shishiba said without facing you, choosing instead to make it seem like he was searching in the near-bare fridge for something. “Anything to report?”
“In three days there will be another auction. Our goal should be to identify the guests—specifically the bidders—and eliminate our current target. If we can set up to probe or eliminate others, that’s a bonus.” Your voice sounded softer than normal with exhaustion leaking through.
“Excellent work. We should go out to eat and celebrate.” Shishiba closed the fridge after coming out empty handed. “There’s nothing to eat here anyway.”
“Sounds good to me. It’ll be nice to spend time with someone who doesn’t make my skin crawl.” You said the last part more to yourself than to him but he saw an opening and took it.
“Such high praise,” he said sarcastically as he walked towards you slowly. He held his left hand out to you—two sleek black prosthetic fingers reflected the soft light—an offering of gentle affection. A code between you two ever since you first came close enough to notice he wasn’t just wearing a half glove. Genuine curiosity and concern for him gave your voice a comforting quality. He didn’t feel weaker or defective under your gaze. You didn’t probe him about how he lost the fingers. He extended his hand and you took it wanting a better look, next thing he knew he was taking off your clothes. Now every night he’s blessed to be inside you begins this way.
He nuzzled his face into your neck while his left hand interlocked yours and his right snaked around your waist. Your scent flooded his nostrils, your perfume an intoxicating mixture of sandalwood, marshmallow, chocolate, and coffee. Bittersweet and sharp, the best way to describe it and it’s wearer. You whined softly as his lips moved over your neck, soft licks and bites peppered between kisses.
“If you keep this—mhm—up any longer, anywhere decent to eat will close.” You failed to stifle a moan as his hand gripped your ass in the middle of your protest. “Let me shower and we’ll go.” Your right hand had found its usual home in his hair and as you pulled away you cupped his face. He kissed your cheek and shooed you off to the bathroom.
Shishiba gripped your thigh as he drove through the foggy streets. Once you two arrived at the restaurant he was the perfect gentleman, opening doors and pulling out your chair. The change of pace in men was refreshing. Sure, he enjoyed your body but he wasn’t disgusting about it and he wasn’t irredeemable like the men you usually see on the other side of the table. In fact, he was so sweet in secret that he made sugar look like salt. You had decided to order some lily raspberry sake for yourself since you didn’t have to see the ceo again for a few days. Shishiba didn’t think you drank at all, so this made him curious.
“Is it good?” He asked as you lifted the cup from your lips.
“Very, I’ll have to pace myself.”
“Lightweight?”
You gave him a soft “mhm” as you took another sip. Maybe you’d become surprisingly honest and he could ask you to give him exactly what he wanted. You two continued to talk and laugh even on the walk back to the car. It felt like a real date to both of you, but you wouldn’t be the first to admit it. As he opened the car door so you could get in, you ran your index finger across his jaw and gently traced a small circle around his scar. He didn’t want to, but he pulled away from your touch and stared at you hard. The immediate pout you gave him nearly disarmed him though.
“Don’t look at me like that. Someone could see us.”
“Who cares who sees anything?” You locked eyes with him and watched his cheeks turn light pink.
“You’re drunk. Get in the car, please.” You pouted again but complied. He shut the door and got in the driver’s seat. He didn’t reach for the keys or anything—he just stared at the steering wheel for a second. You got nervous that pretending to be more intoxicated than you actually were was backfiring, so you went to tell him but he cut you off with a confession of his own.
“I… Will you talk to me the way you do your targets?” He blurted out but didn’t look at you. Now you feel like maybe you did drink too much.
“What do you mean?” You tiled your head in genuine curiosity and reached out to touch him so he’d look at you.
“You know. The way you talk to them with desire and passion…” He looked like he was asking you to do something so unspeakable. It made you giggle a bit.
“You want me to be sweet to you?” You had a fire building in the pit of your stomach, you let genuine desire coat your throat before you spoke again. “Oh, Shishiba… why didn’t you ask me sooner? You know I’ll do anything you ask me.” You let lust soak every last bit of your speech and his reaction was priceless.
“Yknow… you’re really dangerous.”
That’s all he could manage to say before his lips crashed against yours. Your tongues didn’t dare part before it was necessary. You slid across the bench seat to snuggle into his arm, making sure to gently press your breasts into him. He started the car and drove in the direction of the safe house. He had his right arm around your shoulders, occasionally ghosting his fingers over your neck—he knew that teasing touches really turned you on and the sake wasn’t helping at all.
“Shishiba,” you cooed up at him. “I can’t wait, will you pullover?”
His eyes flicked towards you and then back to the road. His silence was deafening and that intense look on his face made you squeeze your thighs together in hopes of getting some relief. His fingers brushed over your neck and ear again as the car peeled onto the gravel of the roadside. He cut the headlights off and then turned to face you completely. His expression was hard to read. The eyes were still lustful but his telltale smirk was nowhere to be found. You reached for him and he grabbed your hand only to set it down on the seat with his loosely in it. A sigh left him and you could feel rejection threatening to bubble up in you when he finally spoke again.
“You remember the rules we agreed to follow with each other? What’s gotten into you?” He wasn’t actually scolding you but it sure felt like it. You had two options now: answer him seriously or double down on his request.
“Nothing besides you,” you replied while looking at him through your lashes. “Maybe we should change the rules. Or just break them.” You let your fingers dance against the palm of his hand. Everything about you made it hard for him to think rationally. His eyes roved over your face and body with more feelings than he’d ever had before.
“Then let’s start with the one that keeps me from telling you,” In one fluid motion he had a grip on your chin and was running his thumb over your bottom lip. “How beautiful you look when you beg me not to stop.”
He kissed you before you could say anything else. Hands roamed your body hungrily and squeezed away as they traveled to your chest. His words made your entire body hotter than the sake did. You leaned against him and spread your legs more, hoping he’d read your mind. He laughed at your desperation for his touch. He gave you the relief you wanted, slipping his fingers past your panties and swiping them over your clit and folds.
“You’re soaked already. Did you miss me that much?” He chuckled lowly as you moaned in reply. Once he slipped his fingers inside, you knew it’d be a long time before you made it back to the safe house.
94 notes
·
View notes
Text
Kuro-Shit Haul (Late Sep.)
The merchandise shown in this post was all sourced from Japan and is related to the Public School Arc of the series.
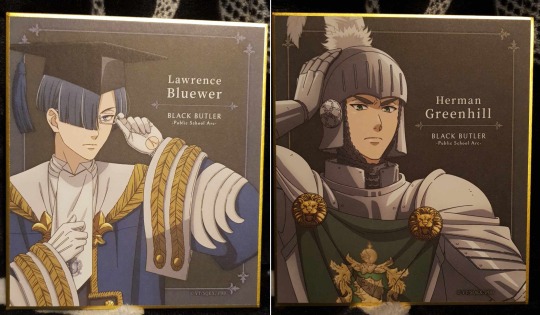
Starting with the set of shikishi artboards produced by MOVIC.
I loved that the art shows each person in their representative formal attire for each house, as could be seen during the opening ceremony for the cricket tournament.
The character line-up is pretty much the same as with previous merch for this season: Sebastian and Ciel, followed by the P4 - and our bonus character of Soma.



Next up, a set from the musical rather than the anime.
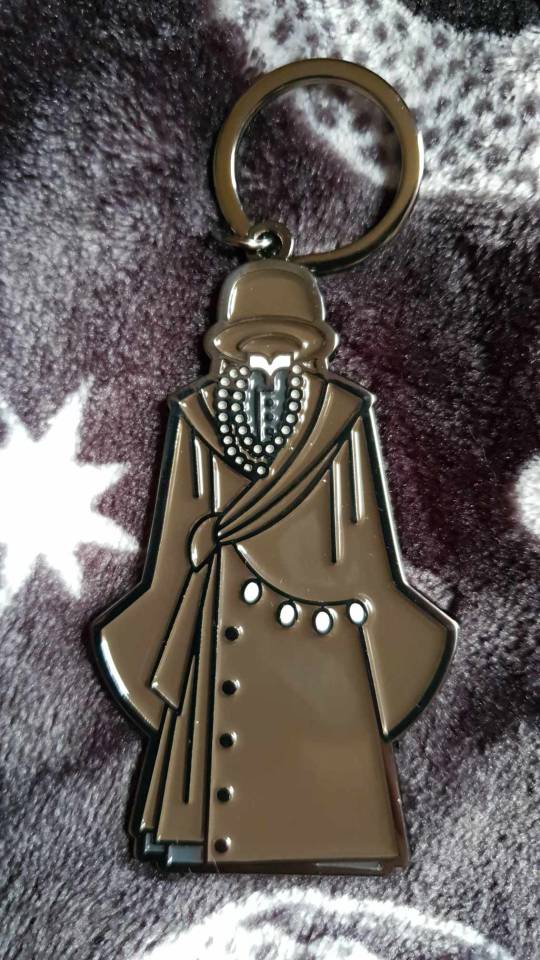
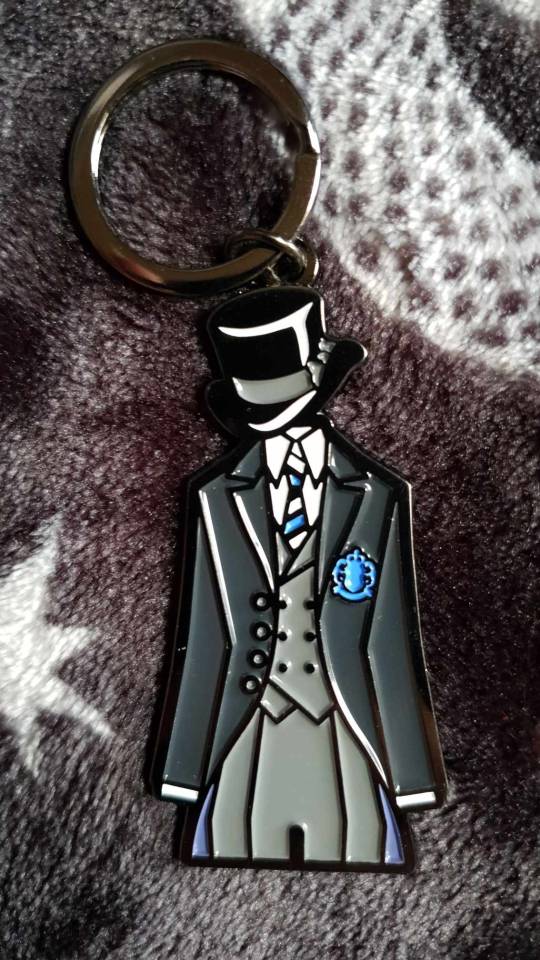
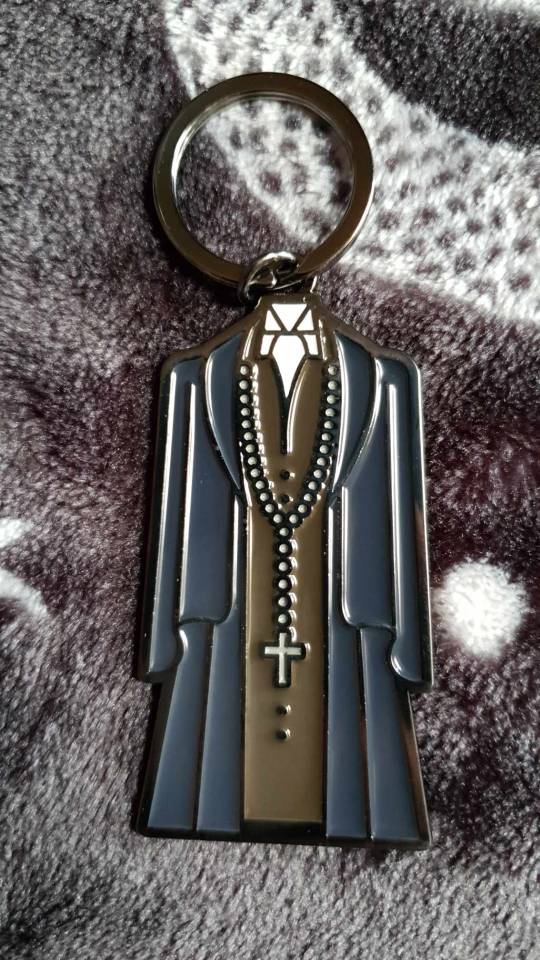
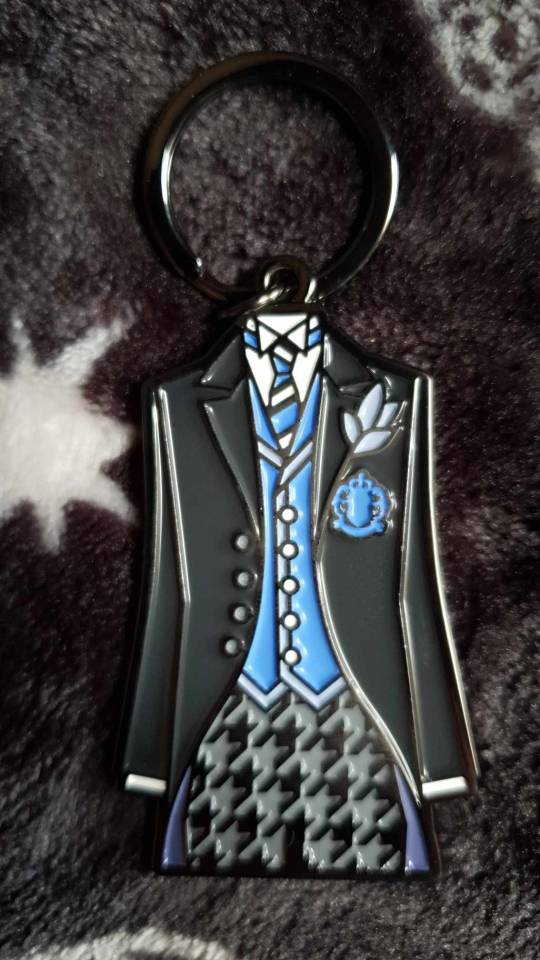
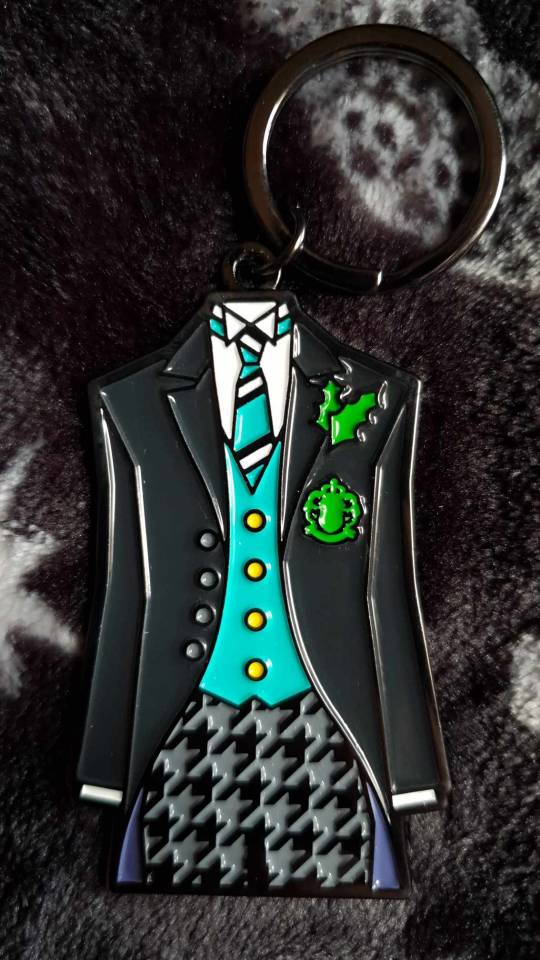
The Secret of the Public School 2024 Musical were selling Enamel Keychains of the outfits and I absolutely fell in love with them!
(The only thing to keep in mind is that they are a magnet for dust and fingerprints!)

Again, the main six characters we have come to expect but with a bonus character of The Undertaker this time; not sure why he is in those clothes, especially as he doesn't have his mourning locket at this point in the story either but it still is a very nice piece of merchandise.


Next, is the 3rd Japanese release DVD for Season Four of the Kuro Anime.
We have Herman Greenhill and Gregory Violet gracing our outer case this time and the inner illustration is another landscape shot this time of the Thames River.


Included inside the case are:
Episodes 6, 7 and 8 on the Main Disc, A soundtrack Disc, Information booklet and mini pop-up illustration.

The Soundtrack disc is labelled Vol. 2; The Vol. 1 disc was included with the first boxed DVD.
As a side note, a full list of the 19 tracks can be found within the information guide.
Moving onto the guide, inside are a breakdown of the individual episodes, what appears to be an interview and a couple of promotional art pictures in the back.

And lastly, my favourite part of each DVD is the bonus mini Pop-up scene. This particular one is named "Afternoon Break".
Depicting the characters in the Swan Gazebo, Violet is sketching in the foreground, in the middle we have Ciel contemplating his next move.

... and in the background we can find Sebastian... in a tree...

The very last item, is a "Project-Black-Butler" Tea set!
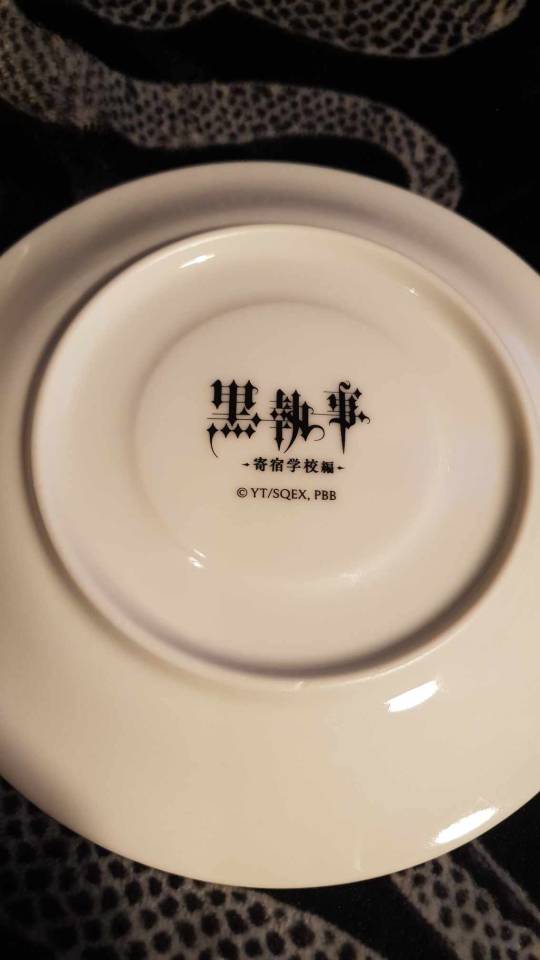
The set includes a Boarding School Edition Cup and Saucer, manufactured by MOVIC in partnership with Aniplex.

Recently, Aniplex held an online lottery, in which the "A" Prizes were themed cups for each house and one relating to the Main characters.

If I had infinite Money and space, I would happily purchase and display all six, however I feel that this separate one encompasses all of the elements tastefully into one commemorative piece.
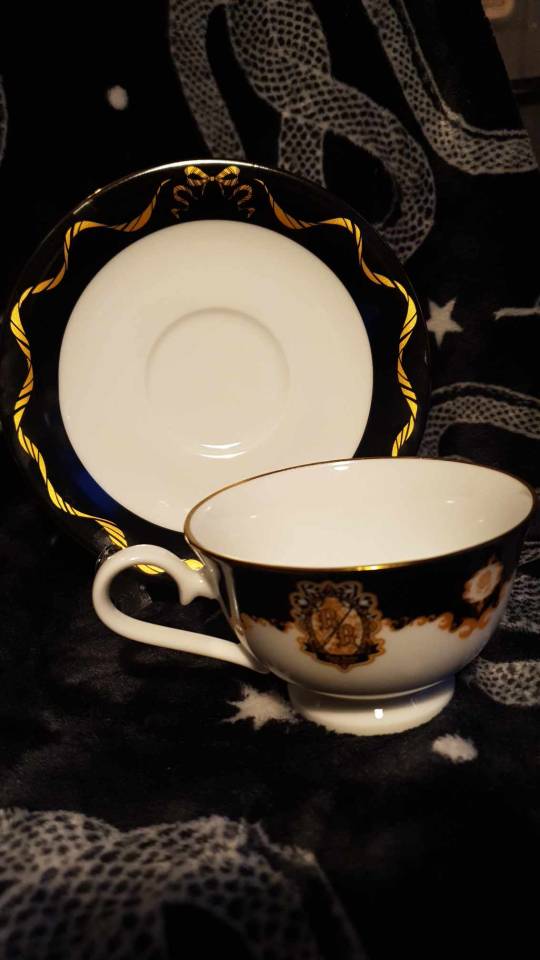
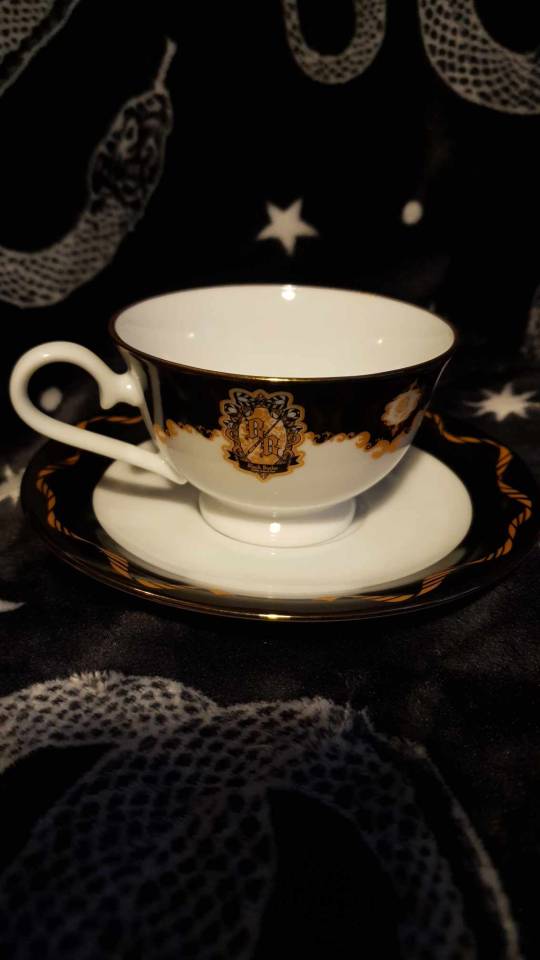
The teacups pattern begins with a cameo motif wrapped in striped ribbon, there are two fountain pens crafted into the design with a large font initialling the item as Black Butler.
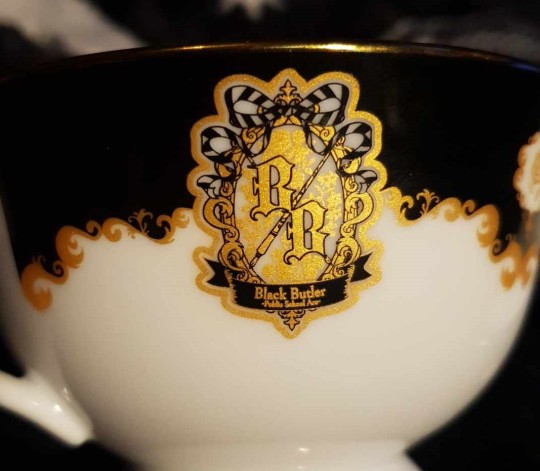
Subsequently, as you work your way around the cup, each house is honoured by their respective flower bordered with more filigree.
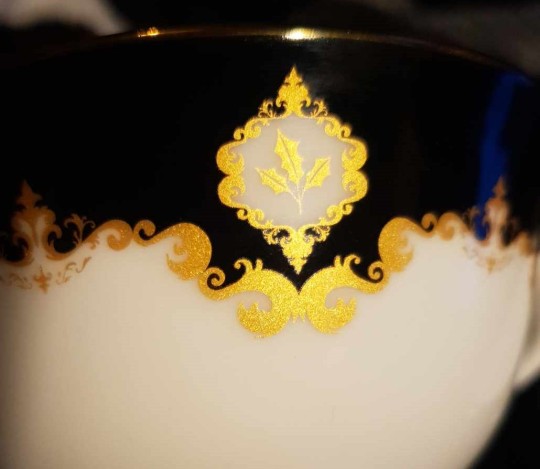

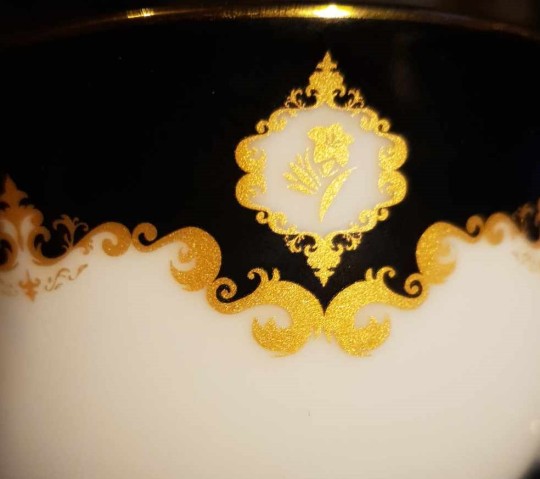
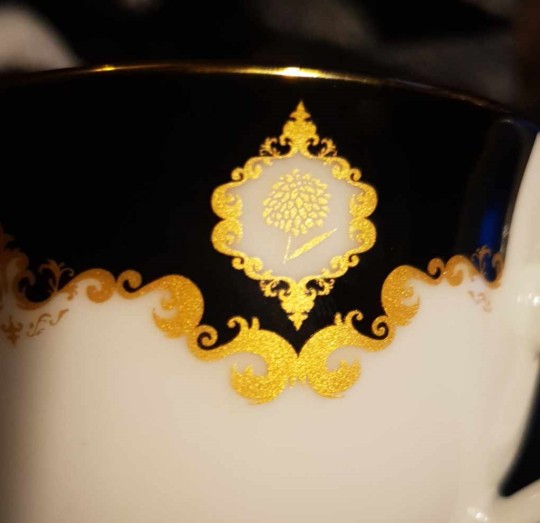
The only thing worth mention, is that the gold sections are gritty, like a fine sandpaper to the touch and had left gold streaks on the inside of the box from production. As a decorative piece I am sure that this would cause no issue. However, if someone were handling this item excessively or using it to drink from I am not sure that the pattern would remain intact as it seems to be some sort of transfer as opposed to painted.
#black butler merch#black butler#kuroshitsuji#public school arc#sebastian michaelis#ciel phantomhive#p4
17 notes
·
View notes
Text
Have you ever been in a public washroom, or even at a friend's house, and realized they cheaped out on toilet paper? Doctors are united in their consensus: rough-feeling, inexpensive toilet paper sucks. It might even kill you, they imply strongly. Don't worry, though, there is a solution, and it doesn't even involve awkwardly asking someone to spend a buck on TP.
Introducing the Seat Safety Switch Solutions Bath Products Softener Mill/Pulper. Sure, that name is pretty long, but we have to be extremely specific because of our battle with our former manufacturing firm, which has now renamed itself to Shenzhen Safety Switch Solutions and is kicking the shit out of us in the market. Don't worry about how long the name is, because you're gonna want one, and everyone at the store will know exactly what it is when you ask. If they pretend like they don't, they're just hiding one in the back, so they can take it home when their shift is over. Ask louder.
Here's how it works. When you're at your friend's place, you can use this device to convert the nasty cheap toilet paper into smoother, baby-soft toilet paper. All you have to do is cram a whole pile of it in there, and then the portable mill will re-process the toilet paper into a much thicker, higher-quality weave. Give us a few more bucks and we'll even put in a diamond-quilting option. You're worth it.
Sure, it takes a lot of toilet paper on the input. It'll take about two rolls of the cheap paper to make a single square of the good stuff. You won't need as much, though, and you're not paying for it. What you are paying for, and our lawyers insist that we be extremely explicit about this aspect of it, is the fuel to run the V8 engine that operates the mill. Don't worry. I know what you're gonna say: isn't that heavy and loud? We combed the junkyards to find the smallest V8 (a mere 4.4L) and stuck a couple coffee cans on the ports for a muffler. As long as you keep it topped up with fuel – we do have a propane conversion kit, for a couple extra bucks – it can have your ass wiped in less than an hour.
Overall, these disadvantages are worth it never to feel the discomfort of sandpaper on your butthole, ever again. And if you're especially cheap, you may even realize that you can convert all that unwanted junk mail around the house into toilet paper, too, but our lawyers would caution you against doing so and will expressly state that we do not endorse such an act. Just give it a hearty thumbs-up.
172 notes
·
View notes
Note
I apparently can’t sleep at all but also I just thought of more things for the vampire thing.
What about sickle cell disease? The one where red blood cells become curvy? Does that give it a different texture? Or taste? On that note what about blood cancer? Would the mutilated and excessive growth be like eating a cow that had way too much growth hormone (the hell am I saying?) or something like that? Do humans taste like curdled milk in either case? Following milk analogies, would sickle cell be like curdled while cancer spoiled? High blood pressure and low blood pressure, anemic people, bone marrow (I think that’s where blood cells come from. If not, shut up, and also just replace it with wherever blood cells are manufactured) growth, any number of blood related conditions, dyslexia dementia dyspraxia dysentery why the hell am I not remembering it diabetes (there we go), and so many more, how do they affect it? I’d give my theories but again, it’s really late but the damn possiblities?!
I had to add this on before I forgot but this is part of the giant vampire thing I sent at midnight (aka 3 hours ago. I’m gonna down like 4 Red Bulls tomorrow to combat the lack of sleep lol)
Hope you’re having better luck at sleep (or idea coming up) than I am
-idk
This is wild! And so fascinating to think about. I'd think that sickle cell blood would taste vastly different than regular blood due to the altered structure of the blood cells (maybe the texture would be more rough/slightly like sandpaper because of the weird shape? I have no idea how that works)
Or I wonder if certain medical conditions would make blood taste better to vampires? Like high blood pressure or something. There's so many possibilities!
2 notes
·
View notes
Text
My friend @eaglehorn has asked me to help her make some already-awesome game pieces even more exciting! We'll be painting this tray of minis together and I figured I'd take the opportunity to post a step-by-step of the process for anybody who wants to personalize their own board game minis for the first time. We'll keep everything beginner-friendly and bring all these models to a tabletop standard with lots of photos along the way. I'll tag all the posts in this series #KP2023SCY to make them easy to find, and I'll create an Index post that links to all of the others when the series concludes. If there's a part of the process you'd like to see specifically, hit me up in the comments and I'll do my best to cover that topic!
Preparing to Paint
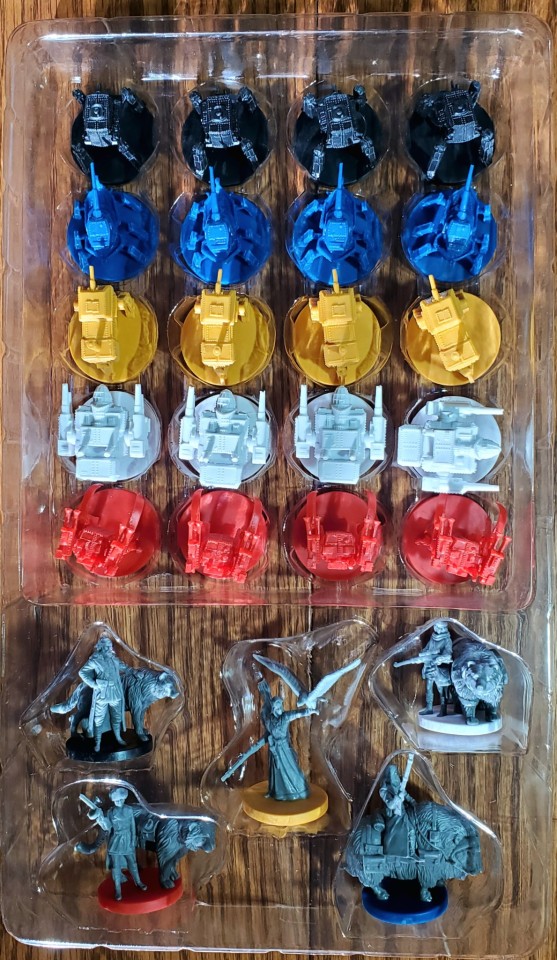
These are from Scythe, and look at all those rivets! These are beautifully sculpted and molded figures with no obvious mold lines, so we can skip the step where we use an old hobby knife or sandpaper to grind away the extra plastic that we don't want.
The packaging also protected them well during shipping, so the deformations are few and slight. We could straighten out any badly bent parts if we needed by applying some heat. I use some hot water - about 50C (100F) is hot enough to soften the plastic but not so hot as to burn the skin. Hold the bent part in the water for 20-30 seconds, then bend it just slightly past where you want it. I find most minis spring back slightly over the first few days after this treatment. You'll need to hold the part in place as it cools, and this bit can be made faster with some cold water if you like.
Next, I give all the figures a bath in cool soapy water followed by a rinse in clean water and a light scrub with some isopropyl alcohol. I use dishwashing soap because it gives a very clean rinse. We're making sure we get any hand oils, dirt, plastic dust, and left over manufacturing residues off of the surface. This helps the paint to stick better and keeps the finished minis looking amazing for much longer.
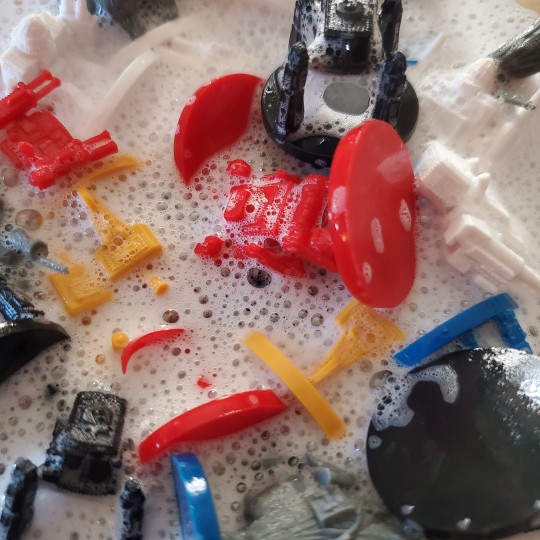
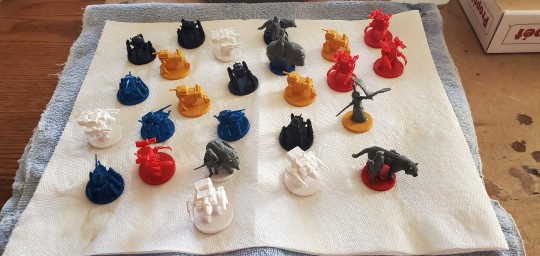
Next step: Priming (goes live 2023NOV21)
#Scythe game#board games#minis#miniatures#mini painting#painting minis#miniatures painting#painting miniatures#art#step by step#KP2023SCY#how to#board game customization#customizing board games
17 notes
·
View notes
Text
Aluminum Boat Maintenance Q&A: Expert Insights

As an aluminum boat owner, you know that proper maintenance is key to ensuring your vessel's longevity and performance on the water. However, with the unique properties of aluminum, there are specific considerations to keep in mind. In this comprehensive Q&A, we'll tap into expert insights to address some of the most common questions and concerns regarding aluminum boat maintenance.
Cleaning and Protecting the Hull
How should I clean the aluminum hull of my boat? According to experts, the best way to clean aluminum boat hull is to use a dedicated aluminum boat hull cleaner or a mild soap and water solution. Avoid harsh chemicals or abrasive cleaners, as they can damage the aluminum's protective oxide layer. Regular cleaning helps prevent the buildup of salt, dirt, and other contaminants that can lead to corrosion. Experts recommend using a soft brush or cloth to gently scrub the hull, paying extra attention to areas where dirt and grime tend to accumulate, such as around hardware and fittings. Rinse thoroughly with fresh water after cleaning to remove any residual soap or cleaner.What's the best way to protect the aluminum hull from corrosion? Applying a high-quality aluminum boat wax or sealant is crucial for protecting the hull from corrosion. These products create a barrier against moisture, salt, and other corrosive elements, while also enhancing the boat's appearance. Experts recommend waxing or sealing the hull at least once a year, or more frequently if you use your boat in harsh conditions. When selecting a wax or sealant, look for products specifically formulated for aluminum boats. These products often contain additives that help inhibit corrosion and provide additional protection against UV rays and other environmental factors.
Dealing with Dents and Scratches
How can I repair minor dents in my aluminum boat? For small dents, you can often use specialized aluminum dent repair tools or techniques, like suction cups, to gently massage the metal back into shape. However, for larger or more severe dents, you may need to seek professional assistance from a reputable boat repair shop or mobile fiberglass repair service near you. Aluminum Boat Hull Repair: Unraveling the CostsWhat's the best way to remove scratches from an aluminum boat? Depending on the depth and severity of the scratches, you can try using a fine-grit sandpaper or aluminum polish to buff them out. For deeper scratches, you may need to consider professional assistance, as they may require more extensive repair work, such as welding or patching. When addressing scratches yourself, start with the finest grit sandpaper or aluminum polish, and work your way up to coarser grits if necessary. Be sure to follow the manufacturer's instructions and take care not to over-sand or create additional scratches or swirl marks.
Corrosion and Electrolysis Prevention
How can I identify and address corrosion on my aluminum boat? Corrosion often manifests as pitting, discoloration, or flaking on the aluminum surface. To address it, you'll need to remove the affected areas, either by sanding or using a chemical treatment, and then apply a protective coating or paint. In severe cases, you may need to seek professional assistance for more extensive repairs or even partial replacement of corroded components. Identifying corrosion early is key to preventing it from spreading and causing more significant damage.What causes electrolysis in aluminum boats, and how can I prevent it? Electrolysis is a form of corrosion caused by electrical currents passing through the aluminum and the surrounding water. It can be prevented by ensuring proper bonding and grounding of your boat's electrical systems, as well as by using sacrificial anodes or zincs to protect the aluminum from galvanic corrosion. Restoring Aluminum Boats: Addressing Frequent Concerns
Leak and Hole Repairs
How can I repair a small hole or leak in my aluminum boat? For minor leaks or holes, you can often use a marine-grade epoxy or aluminum patching compound to seal the affected area. However, for larger holes or more extensive damage, you may need to seek professional assistance for welding or patching services.Can aluminum boats be repaired if they have significant hull damage? Yes, in many cases, even severe hull damage can be repaired on aluminum boats. Reputable boat repair shops and mobile fiberglass repair services can often perform welding, patching, or even partial hull replacement to restore the structural integrity of your vessel.By following these expert insights and addressing common concerns, you can keep your aluminum boat in top condition and enjoy many years of safe and enjoyable adventures on the water. Remember, proper maintenance is key to preserving the longevity and value of your aluminum vessel.
3 notes
·
View notes
Text
Scrimshaw: The Folk Art of the Western Sailor
There is nothing more synonymous or representative of whaling in America and Europe than scrimshaw. Scrimshaw is the practice carving or engraving of pictures onto whale bone, teeth, and baleen most prevalently. They are windows into the daily lives and wants of Western seamen, as well as faithful depictions of whaling vessels done by the sailors’ own hands. This essay will delve into the materials and manufacture of these items, and what they can reveal about the men they were created by. The focus will primarily be on American-made art, though among Western cultures there is not considerable variation in the production of scrimshaw. Instead, the stylistic variation of the art form is due more to the skills and materials available to whalers, a further reflection of their social standing and the cultural contact on board sailing vessels. Through analysis of the motifs, materials, and complexity, the historical archaeologist can learn invaluable information about the whaling industry and the lives of sailors.
While the usage of whale bones and the bones of other marine mammals for art has a deep and extensive history, the specific kind of bone carving that became synonymous with classic scrimshaw emerged uniquely from the tradition of whaling in the Western world beginning in the 17th century. Among Western traditions, scrimshaw had European precursors, notably early medieval Viking carvings and 11th- and 12th-century votive carvings in European monasteries. The more modern version of scrimshaw was influenced by other bone carving traditions indigenous to both Europe and the Americas but has its own distinct style and hallmarks. The primary distinction is the difference in the relationship depicted between the hunter and the prey whose body is used as the art medium. As author Michael Dyer of “Scrimshaw” explains, Indigenous Arctic people have always had a closer relationship to the animals they hunted, having depended on them for food and subsistence. The Western whaler did not have that same connection to the whale they were hunting, “theirs being a purely commercial enterprise.” Their carving styles are more akin to a “trophy” of the animal, instead of an homage.

Figure 1: Busk carved and engraved by whaling master Alden Sears (1739–1803), American, sperm whale skeletal bone, 1766. New Bedford Whaling Museum, 2001.100.648.
The art focused on in this report will follow the Western, Euro- and American-descended traditions of scrimshaw from the 18th to the 19th centuries. The majority of knowledge about scrimshaw comes from American collections. Very little research has been done by other countries, even those with sizable collections. The Western practice of both carving and engraving pictures and scenes onto whale bone emerged among whalemen in the late colonial era, maturing in the 1820s and ‘30s. Sailors onboard whaling vessels were allowed to take the “hard byproducts” from the whales they processed, since they had little to no commercial value. These byproducts included sperm whale teeth, ivory from both whales and walruses, skeletal whale bone, and baleen. The earliest dated example of a carved sperm whale tooth comes from a British whaleship named Adam, the piece is dated to 1817. Alternatively, the first known American example of scrimshaw was a carved busk made from whale panbone and dated to 1766. This panbone busk would begin a long and diverse era of American art.
All a whaler required in order to make his own scrimshaw was a piece of whalebone, a sharp sail needle or other cutting implement, sandpaper, a blackening agent, and time. The blackening agent mostly used was lampblack, easily found in the oil lamps or the tryworks onboard. Other colored pigments could also be used, but they were harder to come across; mainly consisting of verdigris, handmade fruit and vegetable dyes, and ink bought from Asia. The process for engraving begins with the polishing of the bone with sandpaper in preparation for carving. After a design is drawn onto the bone, it is engraved with a needle or knife, and the black or colored pigments are “applied to the lines or dots and wiped away.” The bone is then polished a second time to remove any excess pigments and to reveal the design. Differently colored sealing wax could also be used to highlight certain elements, such as thinly scored lines.

Figure 2: Engraved sperm whale tooth by Frederick Myrick in 1829, depicting the American ship the Susan as well as an eagle and shield. Nantucket Historical Association, 1918.0015.001.
Scrimshaw is regarded by many as the folk art of the whaleman. As opposed to many other kinds of sailors, whalers had a lot of downtime on whaling voyages. After the Napoleonic Wars, the American whaling industry rose to prominence and reached its peak in the 1820s. The prevalence of whaling also logically coincided with the peak of scrimshaw production. This was due to “longer voyages, larger crews, and over-manned ships,” not to mention the abundant bounties of whales they were processing, creating the perfect conditions for plentiful scrimshaw production. When not actively working, the one thing the whaler had in abundance was time.
During the height of the whaling industry, the average voyage was three years long. When they were not busy chasing or processing a whale, they were allowed leisure time to follow creative pursuits. Carving scrimshaw was one way to escape the boredom of the open ocean. The artistic pursuit of these engravings also reaffirmed a collective identity onboard a whaling vessel. As the art form was unique to the occupation, it was taught by and to other sailors. This is seen in the subjects mostly depicted in scrimshaw, as they are maritime in nature, many artists depicting the ship they were currently working on. For many, “the act of creation built and reaffirmed their shared seafaring identity, transferring skills gained through work into the creation of art and they shared ideas with each other about the art that they made.” It was a way to connect to other sailors as well as a way to connect back to the home they had left behind.

Figure 3: Anonymous engraved sperm whale skeletal bone, depicting a whaling scene, circa 1840s. New Bedford Whaling Museum, 2001.100.1067.
Though made during leisure hours, scrimshaw could be decorative or practical, and they often were both. Many whalers carved tools such as bodkins, seam rubbers, serving mallets, and others. With a mind on their home, some made gifts for family members, such as “massive numbers of yarn-winders, pie crimpers, hair pins, and work boxes.” A common gift for female family members or sweethearts was a busk for a corset made from panbone or baleen. The busks were commonly decorated with domestic scenes of life back on land, as well as natural designs, ships, and sometimes whales and scenes of whaling. Though they would be removed from larger society for years at a time, whalers still tried to keep up with the trends and their peers back home.

Figure 4: Anonymous swift, American, sperm whale ivory, sperm whale skeletal bone, baleen, tortoise shell, cloth, nonferrous metal fastenings, circa 1840s. New Bedford Whaling Museum, 2001.100.684.
In the middle of the 19th century, canes became incredibly fashionable masculine symbols, and sailors of all ranks tried their hand at making them. They applied their skills at carving toward stylistic handles depicting varied subjects of ranging complexity. A common motif appearing on the ends of canes was a clenched fist, which was “a common design in folk art, representing frustration, resistance, or solidarity.” This could be revealing about a sailor’s sentiment toward his lot in life on board the ship, as there were large disparities between the common sailor and those in positions of power, even in the types of scimshaw they were able to create.
One of the forms of scrimshaw that was less accessible to the average sailor was the complex construction that went into making a swift or yarn winder. They were made up of thin, carefully riveted pieces of panbone that can collapse or expand as a whole. Because of their architectural complexity and relative size, most sailors would not have had the materials or space to make one themselves, and the only swifts made onboard were generally done by the ship’s captain. Other complicated and beautiful scrimshaw objects include watch hutches and birdcages, not to mention the skill that went into carving a small pie crimper, which was a relatively common scrimshaw item.
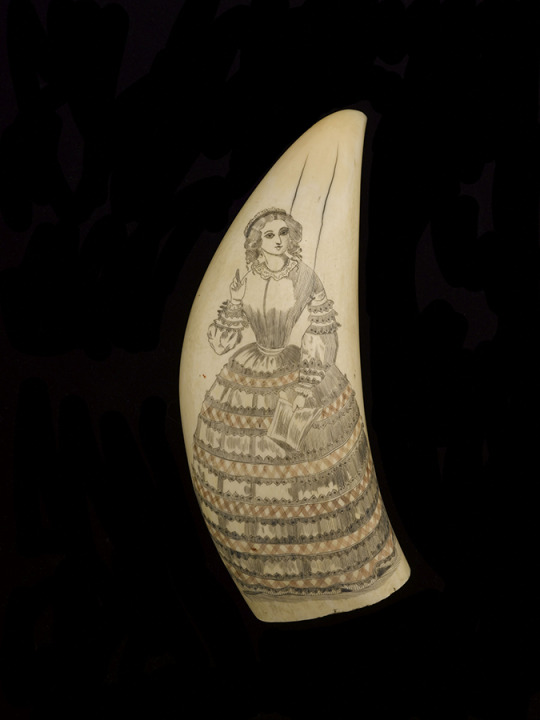
Figure 5: Anonymous engraved sperm whale tooth, depicting a woman wearing a fashionable dress and holding a book. Nantucket Historical Association, 1925.0007.004a
The subject or theme of many engraved teeth and panbones “was of a nautical theme, depicting harbor scenes, great battles at sea, or men and ships in pursuit of the mighty whale.” In addition to artworks depicting their daily lives, there were those that longed for the home they had left behind. Mostly those included depictions of sweethearts or family they had left behind on land. Whalers “carved toothpicks, whistles, and pipe-tampers in the shape of female legs, and they etched and sketched figures of women half-clothed.” However, most surviving scrimshaw depict the whaling ships themselves, or scenes from the whalers’ daily lives.
While the art of scrimshaw was mostly limited to Western whalers, the style was inspired and influenced by many cultures within and touched by the Western world. As previously mentioned, they drew heavily from previous techniques of bone carving from Northern Europe. They were further inspired by other cultural influences during the peak of the whaling industry. Cultural contact between American whalers and Inuit people in the Western Arctic resulted in altered styles among both groups. For example, some American scrimshanders began making detailed carvings on traded walrus tusks, and Inuit carvers began making cribbage boards using both traditional Arctic carving methods as well as the newer Western forms to sell them as souvenirs to Western visitors. Traditionally, Indigenous Arctic art was easy to tell apart from Western scrimshaw due to the motifs and scenes depicted, until the allure of selling to Western buyers forced them to change their style. However, relief carvings made from bone and ivory are rarely seen in the Western tradition. In addition to their Arctic counterparts, American whalers were influenced by many other cultures they encountered.

Figure 6: Anonymous carved walrus tusk, circa 19th century. Depicts two walruses and a sled pulled by dogs. Nantucket Historical Association, 1961.0033.001.
Whaling vessels were incredibly diverse places, including Americans from different backgrounds such as African American seamen, as well as plentiful Portuguese from the islands of Cape Verde and the Azores. Whaling crews would also take on sailors from ports they visited in other European, Latin American, and Pacific ports, with Pacific Islanders contributing greatly to the American whaling industry. This is mostly due to whaling vessels taking on replacements in Pacific waters for American sailors who had deserted while on “liberty,” or leave, in port. Pacific Islanders were also attractive to whaling captains because they could be paid less, and they “had reputations among American captains for bravery and boat skills.” Many of these men, both poor White sailors, and many of the non-White sailors, could not read nor write, eliminating them from the written record of history. They could, however, carve and create art that still exists today in the form of scrimshaw.
Evidence of this cultural sharing with Pacific Islanders is exemplified most by the addition of carved coconut shells to the American whalers’ repertoire. Coconut shell objects were traditionally produced in many different forms throughout Oceania, parts of Africa, and in many areas in the Indian Ocean. The favored form among American sailors were coconut-shell dippers and spoons, with handles fashioned from typical scrimshandering materials. Unfortunately, this impactful art form was harvested from finite materials and eventually had to come to an end.
The whaling industry was brought to a rapid end by the discovery of “rock oil” in the ground, which rapidly replaced the need for whaleships and whalemen. The declining whale population and the American Civil War also exacerbated the death of the industry. The few remaining whalers were raided heavily by Confederate Naval ships during the Civil War and made most whaling ventures incredibly unprofitable and undesirable. Along with the eventual demise of whaling led to the cessation of any scrimshaw made from whale products. Author John Erickson of “Scrimshaw” argues that the tradition of scrimshaw lived on in the Americas through the engraving of powder horns, as they use similar techniques, but do not depict any of the hallmark nautical imagery that is typical of whaling scrimshaw. Despite limited opportunities, the traditional maritime form of scrimshaw did continue, though at a much more reserved rate during the 20th century.
However limited, there are still parts of the world that continue to hunt whales, whether legal or not. Thus, it follows that there are still versions of scrimshaw that are practiced today as well. In the past 30 years, the traditional folk art of scrimshaw has had a surge in popularity, and with many authentic examples being housed in private or public collections, fakes and reproductions are rampant. Many use authentic materials, even going as far as recreating traditional styles to create “authentic” scrimshaw to fool buyers. Others use synthetic materials to mass-produce these artifacts, which are called “fakeshaw” by experts. These fakes have the potential to disrupt the historical record, as many include fake names and dates. Since the carvings were often made by regular seamen, they create a snapshot into the lives of ordinary men living in the Western world, including their desires and priorities.
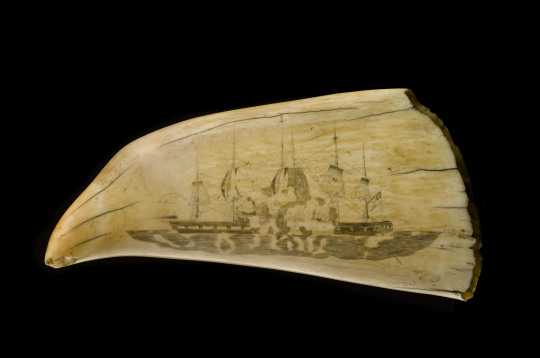
Figure 7: Anonymous sperm whale tooth engraving depicting two ships battling at sea. Nantucket Historical Association, 1962.0035.005.
Scrimshaw can provide the archaeologist and history with invaluable information such as information about the names and even locations of some whaling vessels. If dated and signed, several works by the same artist could create a clear picture of a voyage or sailing route. Additionally, many works of scrimshaw include accurate depictions of their ships, so accurate that “some can be identified by the rig, hull design and type of boats as naval vessels or whaleships.” Images of flags on the ships can also point to nationality, and other details can possibly point to a relative date, though that is much harder for the researcher to be certain of. While scrimshaw is unlikely to survive a shipwreck, it can still offer the historian valuable information about whaling voyages.
By analyzing the motifs, materials, and complexity of scrimshaw artifacts, details of the whaling industry and whalemen themselves can be illuminated. The themes depicted in this folk art reveal sentiments sailors held about their lives, profession, and even those they had left behind. The manufacture of the scrimshaw can reveal the materials and tools made available to the seaman and what skills he had picked up from his fellow sailor. Overall, the art and skill of scrimshaw is more than symbolically representative of the whaling industry, as they are physical records of the men who lived and worked on these vessels.
Works cited:
Creighton, Margaret S. Rights and Passages: The Experience of American Whaling, 1830-1870. New York: Cambridge University Press, 1995.
Dyer, Michael P. "Scrimshaw." Academic Press, (2018): 841-845. https://www-sciencedirect-com.uri.idm.oclc.org/science/article/pii/B9780128043271000170.
Erickson, John. "Scrimshaw." Westview 16, no. 1 (November 1996): 36-39. https://dc.swosu.edu/westview/vol16/iss1/13?utm_source=dc.swosu.edu%2Fwestview%2Fvol16%2Fiss1%2F13&utm_medium=PDF&utm_campaign=PDFCoverPages.
Luecke, Mirelle. "Exploring the Sea as Studio: The Importance of Labor and Leisure in Sailor Folk Art." The Journal of Modern Craft 14, no. 1 (2021): 57-71. https://doi.org/10.1080/17496772.2021.1912268.
New Bedford Whaling Museum. “Art and Literature: Overview of Scrimshaw.” Accessed Mar 24, 2024. https://www.whalingmuseum.org/learn/research-topics/whaling-history/art-and-literature/.
New Bedford Whaling Museum. “Scrimshaw: Scrimshaw Gallery.” Accessed Mar 24, 2024. https://www.whalingmuseum.org/exhibition/scrimshaw/#pp-toc-6109979c2c807-anchor-0.
West, Janet. “Scrimshaw and the Identification of Sea Mammal Products.” Journal of Museum Ethnography, no. 2 (1991): 39–79. http://www.jstor.org/stable/40795035.
#lukas goes to school#potentially doxxing myself if anyone from my class follows me lol#age of sail#long post#scrimshaw#archaeoblr#history#whaling#whalemen#american history#whaling history
5 notes
·
View notes
Text

Abrasive Sponge Sand For Cleaning And Woodworking
0 notes
Video
youtube
A Few Suggestions For Removing Wallpaper
As a professional in the home improvement industry I am asked often "What is the best way to remove wallpaper?" This is a challenge for most homeowners. In this article I click here will tell you what I believe is the best method for removing wallpaper.
To begin with, if the wall behind the wallpaper has been previously painted or primed it will make it much easier to remove but if it is unpainted drywall that is when the job becomes more difficult. I start by telling you this is because you can easily damage your walls if you attempt to remove wallpaper from unpainted drywall. If this occurs you will then have to repair the wall with joint compound which is a completely different project all together. Just remember, after you remove the first section of wallpaper from the wall and if the wall is unpainted you will need to take extra care so as not to cause any damage to the wall.
The items you will need to get started is wallpaper remover solution which is readily available at most paint or hardware stores, metal scraper, squirt bottle or garden sprayer and sandpaper.
1. The first step is to prepare by removing all furniture away from the wall and cover it with plastic drop cloths or tarps. Unless you are in an area with tile floors, make certain to cover all flooring with drop cloths.
2. To begin, start in a corner and pull a piece of wallpaper from the wall. Often you can remove the wallpaper easily and all you have left to remove is the glue residue. But most of the time you will be able to remove some areas and be left with some spots which you will have to apply wallpaper removal solution and invest some extra labor to remove. Remove as much as you can while dry, but remember to be careful and remove it slowly so as to not damage the drywall.
3. Fill your squirt bottle or garden sprayer with the wallpaper removal solution according to the manufactures direction. Begining at the top, spray the wall in four foot sections. Repeat this step about three times, until the wall is completely saturated. Do not use too much because if it gets too wet it can cause damage.
4. Take your scraper and gently start scraping away wallpaper and glue residue from the wall. Be careful not to gouge the wet drywall with your scraper.
5. Repeat these steps until all of the glue and wallpaper are removed.
6. If you are left with stubborn glue residue take your sandpaper and sand it away. You can start out with a rough grit sandpaper and as the glue is dissolved you can use a more fine grit sandpaper. Prepare to use several sheets of sandpaper because the glue will begin to cling to the sandpaper and lessen its effectiveness.
2 notes
·
View notes
Text
I haven't been spending much time online lately cuz I can't use my phone at my new job and I'm spending a lot of time with my partner and socializing with ppl in person....but tbh im really reaching the point of burnout.
Last week I took the entire week off to visit my mom and brother for the first time since my maternal grandmother passed away and even though it was nice to see them and like, show face as a member of my family for once, we also spent part of mothers day with my brother's assistant who hes been having a years long affair with. I tried to talk to my brother about some of the shit I do with my partner to address our relationship goals and build our communication (we do a cringe app...) and he like, defeatedly tried to give me this empty and unused relationship memories photo album activity book that someone gifted them several years ago :(
Our mom was caretaker for her mom for the year or so before she passed away, so she's also traumatized from that and reasonably worried that my brother and I aren't put together enough as adults to care for her in the same way. There's no way I could have canceled my visit, but about a week beforehand my partner was fired from his job, and I don't earn paid vacation time for the first year at my new job, so my constant begging for money to cover rent thruout the trip didn't help.
Also had a little genocide conversation with her and it was so hard. I've never got along with my step-dad for a long long list of reasons, and even though the personal stuff has gotten easier to deal with, his job is like. He is actively involved in weapons manufacturing. Having to ask my parents for money right now feels like swallowing sandpaper -_-
Anddd to make matters worse one of the other HR ppl came back from medical leave and I finally got to meet her and she's a transphobic racist old white lady who already ratted me out for "yelling at her" and " making her feel small" for asking her to use the correct pronouns for my department leader. Who then asked me to apologize. Can't though because she called out for our shift together tomorrow to avoid my sjw ass. Honestly the conversation I had with her was some of my best work in terms of like, maintaining a calm and controlled demeanor, and she even thanked me for being one of the good ones, so I'm a little surprised. I dunno if this is the right job for me tbh, feeling very unsupported by my lead ✊😔 viva LGBT pride and solidarity
2 notes
·
View notes
Text
Day's Languishes
We realize the same day that the day is today, take wayward notes out of pockets, peruse and find them useless and let them go and wind or injury or time sends them away, or it's some sign we're moving, it's this thing going on with its inertia and the let-goes left behind seeming like a storm. Day storms off, we startle like it's a storm, we get left behind eventually but at times try to hold on, at times find aching fingers or wind or sand so resolute as to be second-string sandpaper doing its best at an impression of grit that comes with intent, or is manufactured and sold in reams. Eventually the day gangs up on us, gets other days in on the bit, has a long way to go and a lot of ways to cut ties and we're not the only ones trying to forget or regretting almost everything. Day takes up a newspaper, confirms the passage of time, and vanishes, languishes in what gets away from it outside of what's intentionally let go.
2 notes
·
View notes
Text
How to Build Your Own 'Augmented Super Wife Supersoldier From The Future' Funko Pop.
A Semi-Coherent Guide By RC.
This is a long one. A loooooooong one.
I meant to do this like two and a half years ago, but in the spirit of keeping this fandom's head above water, and the fact I'm at the hospital (nothing serious!) with nothing to do for the next couple of hours, I'm doing it now.
So if, like me, you are still bitter that Grace and Dani didn't get official Funkos, or official *anything* due to manufacturer short-sightedness, why not say 'fuck it' and build yer own?
This rambling tutorial will attempt to demonstrate how to build Grace from the 'when they start to kill me, run' scene.
Like, literally that bit 😋.
Anywho. Let's do this!
You will need:
- Funko Pop DIY (female)
- Polymer clay (eg. Sculpy, Fimo, CosClay). I'd advise against cheapo no-name alternatives purely because in my experience the baking times/temperatures stated are absolute garbo. Also, polymer clay will give off quite gnarly fumes while curing, so better to use a trusted source. But if cheapo's all ya got, it's all ya got.
Other modeling materials you might consider instead of polymer clay include...
Epoxy clay (eg. Milliput, Apoxie Sculpt, The Army Painter 'Green Stuff', even something like J-B Weld or similar 2 part plumber's/repair putty).
Plain ol' air drying clay (eg. DAS, FimoAir, Gedeo).
You could even whip up a batch of 'cold porcelain', or an oven cure salt dough from ingredients you probably already have at home. Make sure you clear coat any salt dough creations properly after curing as over time ambient moisture may mess with it.
Each option above has its own pros and cons. Do your research if you aren't sure. Me? I used Fimo.
*ahem* Carrying on...
- Masking tape
- Hobby knife
- Pin vice
- Kebab skewer (wooden), or styrene rod
- Paint brushes
- Primer (plus dust mask if you're using a rattle can indoors)
- Sandpaper (around 400 grit oughta do it but you could probably go 200 either side of that and get a good result)
- Acrylic paints (optional: Posca PC-1MR pens in black and white for fine detail).
- Crafter's heat gun, or a hairdryer
- Varnish/clear coat.
Optional extras: Airbrush, spray booth/cardboard box, rotary tool, oven thermometer, artist's/cake decorating turntable, UV resin, silver leafing pen, jeweller's files, jeweller's wire, acetone, superglue or 5 minute epoxy, a lil piece of sponge, pearl mica powder, scavenged Funko Pop head 😈.
Step One: Grab your Funko DIY and separate the head from body using heat to soften the vinyl enough to wangle it off the neck post. Shoving it in a mug of hot water for a few minutes should do the trick. Make sure to dry out the head as much as possible. Last thing you want is mould growing inside it. This is Terminator, not The Last Of Us 😉. Alternatively you could use your heat gun/hairdryer, but I explain in Step Six why the water bath approach is a better option (imho) at this early stage.
(You are giving this entire thing a quick read through before you start, right? I dunno about the rest of you but I like to have at least a basic idea of the work ahead before I get stuck in. Saves finding out you're missing a necessary tool/material at an inopportune moment and all).
Stop rambling, RC. Sorry. It's easier to be succinct when you haven't lost half your photos 🤦♀️. Moving on...
If you don't wanna attempt to sculpt the hair yourself you can, as I did, take a kitbashing approach instead of using the supplied DIY head. Grab one of the many commercially available Funkos with a decent approximation of the hairstyle you want and then go Step One on em. Buy 'pre-loved', buy BNIB, dig one out of a dumpster, steal one from your lil cousin, it doesn't matter. Procure as your time/budget/situation dictates. Improvise where necessary.
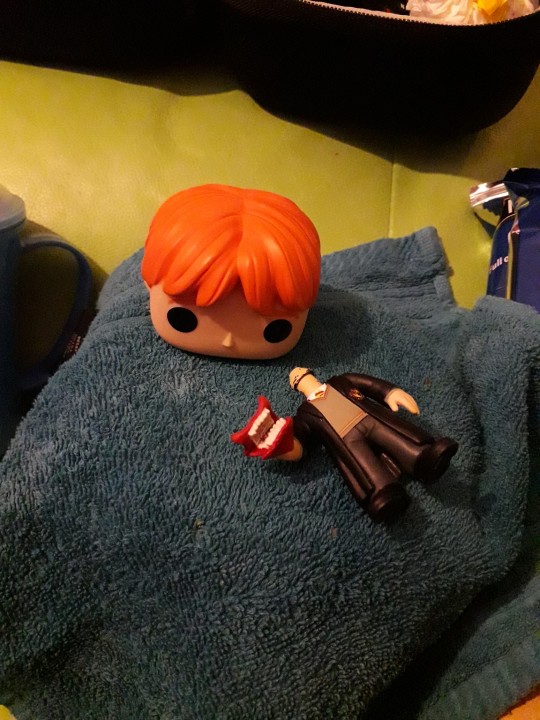
Sorry, Ron. I need your floppy hair. I do not need your clothes.
Or your boots. Or your motorcycle.
...😋
Step Two: Take the body of the Funko DIY and mark out the position of the tank top and the cuffs of the jeans. These will be used as guides for when you add the clay.
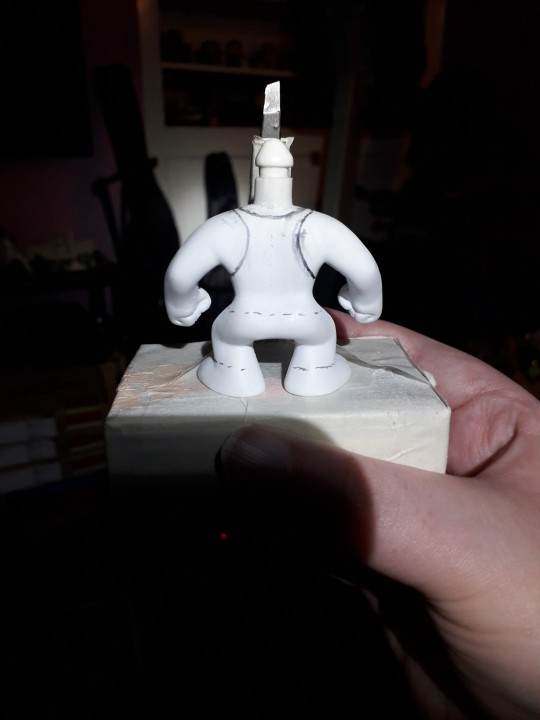
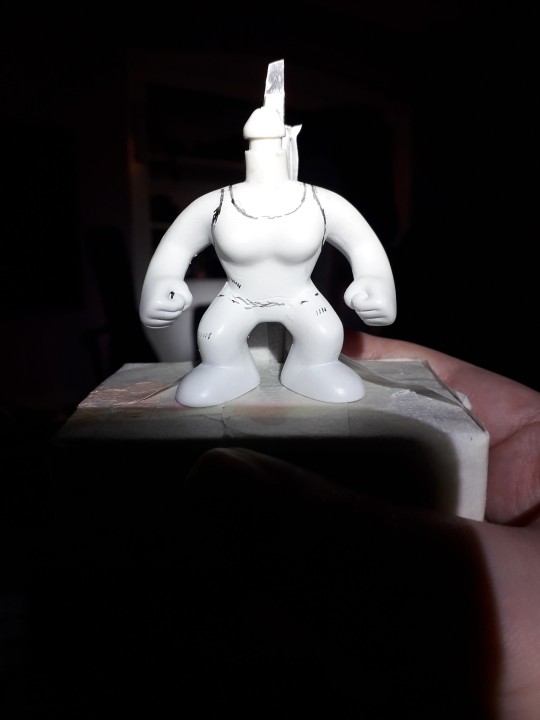
At this point I used a pin vice to drill the hole thru the fist for the rebar. If you're a crazy person you could use a rotary tool with an appropriately sized bit attached.
To make the rebar I fashioned a mould from a drinking straw and filled it with UV resin. Because I'm awkward. A wooden kebab skewer, or some hobbyist's styrene rod (eg. Evergreen Scale Models) would work just as well. Just cut it to size, paint it silver and you're golden. I used a metallic leafing pen. You use whatever you've got handy. Doesn't have to be shiny. A flat grey acrylic would work just fine.
Use jeweller's files and sandpaper to make small adjustments to the hand hole and rebar respectively in order to get a good press fit. There's always glue if you overdo it 😉. But don't add the rebar to the model just yet, as you're gonna need room to manoeuvre for the next bit.
Step Three: How do you make it look like your figure is wearing clothes when you don't have much real estate to work with?
You fake it, that's how.
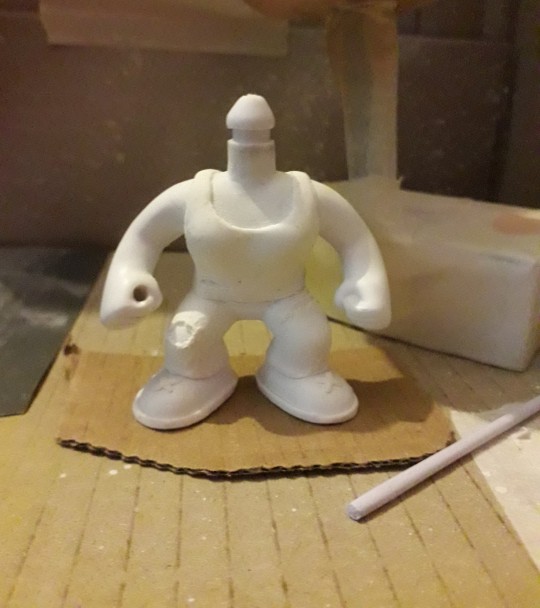
You do not need to model an entire set of clothes! It's an arse ache, and we're all about working smarter not harder on the RC channel.
So, take your modeling compound of choice, roll a chunk of it out to the desired thickness, and then cut into strips, say 2-3mm wide. Use your best judgement here.
Now, using the jeans as our example, wrap a strip around the bottom of the leg where the cuff would sit. Cut off any excess and blend out the join. Just give it a lil rub and it's like it was never there. Like magic! You should have a nice defined edge at the bottom, just above the foot. Now see the top edge of your lil clay strip? Well, you wanna start pushing and flattening the clay to blend the edge right out so it fades back into the body.
Repeat for the other leg, and the bottom of the tank top. The straps are relatively simple, tho the bits that pass under the arms can be fiddly due to lack of space. Use a hobby knife to shape and crisp up those edges and then blend out the extraneous edge. Same thing with the neckline.
Run a strip around each foot to form the soles of the boots, and a lil 'x' on the top of the feet to give the impression of laces.
For the rips in the clothing you can simply gouge out a little of the clay. If there isn't any on that part of the model (the knee for example) roll out a little wormy dealie (for you North of the Border fans 😉), position it as needed, blend out the edges, then gouge as required.
If you're playing on hardcore mode, this might be the time to start piling clay on the Funko DIY head and sculpting the hair. You may prefer to leave it til the head's re-attached tho. It depends on the material you're using. If you don't think it'll stand up to a bit of manhandling while pushing the head back onto the body, save this step til that bit's done.
Cure according to the clay manufacturer's instructions. The vinyl will not melt at the temperatures required to cure polymer clay, but if you don't wanna risk it or you don't wanna use your food oven to cook plastic, with all the gnarly fumes and stuff, I've given you plenty of air dry and/or non toxic alternatives. Consistent temperature is key with polymer clay. Undercooked, it's quite brittle. An oven thermometer comes in handy here if you've got one.
Step Four: Primetime!!! Some like to brush on primer, which is fine if you're painting a fence or throwing gesso on a canvas. Not so fine if you're painting a figurine imho. I mean, unless it's Cassandra from Doctor Who. A good rattle can of spray paint is what you want ideally, but again, it's about what you can afford/wangle/manage with your crafting space, so feel free to ignore me and brush away!
First rule of Primer Club: several light coats are better than one heavy coat. Second rule of Primer Club: knock each coat back a lil with sandpaper before applying the next one. Third rule of Primer Club: sit your rattle can in a warm water bath for five minutes before shaking it up to improve flow.
You can get primer specifically for plastics but while I would recommend it, it's not absolutely necessary.
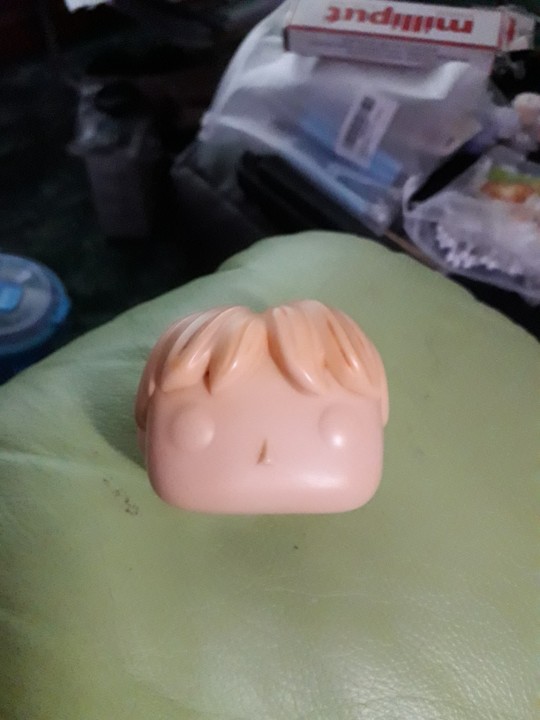
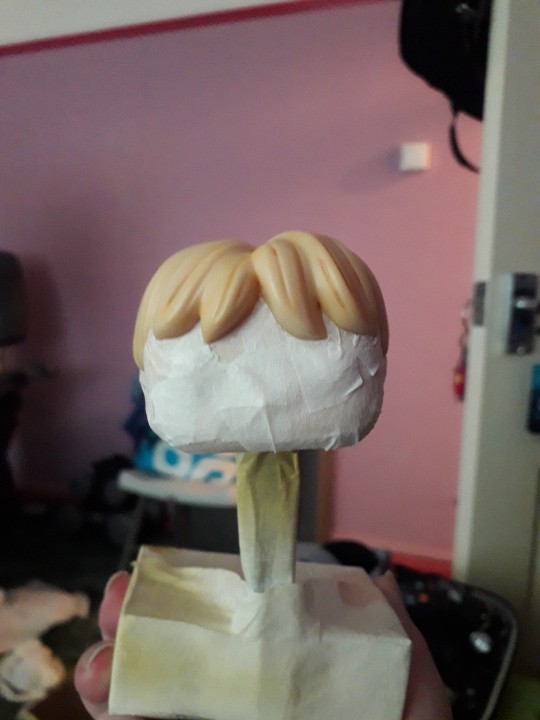
A scavenged head may need masking off if the base colour already matches the skin colour of your character. Save yourself a bit of painting innit. You can get really tight, clean edges against the hairline with a hobby knife. If the hairstyle, hair colour, and skin colour match straight outta the box? Congrats! Why are you even reading this? 😜.
That thing in the background is a portable spray booth (that other thing is a turntable). A cardboard box is also a portable spray booth if you want it to be. Only thing it doesn't have is an extractor fan. So put on a dust mask, and open a window or work outside.
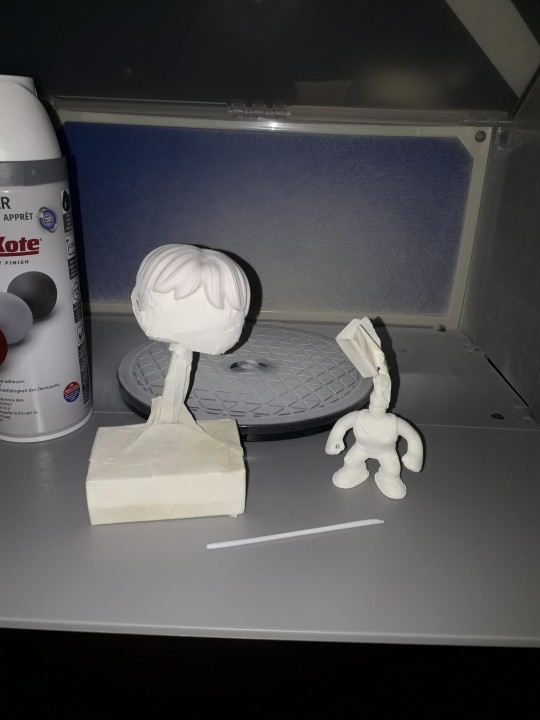
The DIY figure comes primed outta the box, so if you're using the DIY head and are planning on sculpting the hair after re-attachment you don't need to prime it. Unless you want to.
Step Five: Time to paint that shizz. You don't need me to walk you thru this bit, right?
Right?...
Masking is your friend if you don't trust your ability to freehand with a brush. If you're masking over a part you've already painted and are afraid of pulling the paint off, you can knock the level of tack on the tape down by sticking it to yourself (or your clothes) a couple of times before applying it. Some prefer to add a light layer of clear coat to 'lock in' the underlying paint. It's like a real life 'save point'. Some people do both. Some use masking fluid. Some use silly putty/blu-tac/plasticine. Play around, see what works. You do you.
I painted Grace's eyes blue coz Grace is extra and so am I. I threw a lil bit of pearl powder in there to add a subtle shimmer, as I thought going full metallic blue might be a bit too extra.
Lady Funkos have eyelashes. Don't forget the eyelashes.
(I nearly forgot the eyelashes).
A fine tipped Posca pen comes in handy here if you've got one.
Ditto the eyebrows, tho those aren't just for the ladies obvs.
For Grace's augmentation scars, again I recommend a Posca pen but a brush will do.
DO NOT PAINT THE NECK POST. Don't even varnish the neck post. Keep that bitch masked up until you're ready to reattach the head. Like, you can get away with painting the very bottom if you're worried the bare plastic will show even with the head attached, but that's it. Any more will be making a rod for your own back.
You have a choice now. Whether to weather your figure. I chose to add that extra level of detail as it made sense to me. Use a combination of dark washes, dry brushing, and/or sponge stipling to add dirt, blood etc. If ya want.
When you're happy with your paint job, give everything (except the neck post!!!!) a couple of layers of clear coat.
Step Six: When it comes to reattaching the head you probably don't wanna be dunking anything in water by this point, just in case. So we're gonna soften the neck post (and around the base of the head if necessary) with hot air instead. Use a hairdryer if you don't have a heat gun. DO NOT use an industrial or decorator's heat gun for the love o' god. That shit's meant for stripping paint, not gently warming vinyl figurines. It'd be like using a nuke to shake a cherry tree, and you'd likely burn yourself. A hairdryer is more than capable of doing the job.
Why did we not use the hairdryer for Step One? To be honest there's nothing stopping you if that's what you wanna do, but as you don't have direct access to the bits that need softening at that point you will have to wait for the heat to penetrate. You could be doing other things in that time by letting a water bath do the work for you.
Now, however, you do have direct access, so you'll probably find you only need to blast the hot air for 10 seconds or so.
Step Seven: So, you've got the head re-attached, and your paint job is finished and clear coated. That means it's time to add the rebar. If you went a bit too far with the drilling or sanding now's the time to get your glue on. As an final extra touch you can spiral some thin jeweller's wire around the length of the rebar to make it look more rebar-y. I didn't do this bit as the wire I had in my possession at the time was too thick for my tastes.
But whether you opt for that or not, congratulations on making your very own Grace Funko Pop!
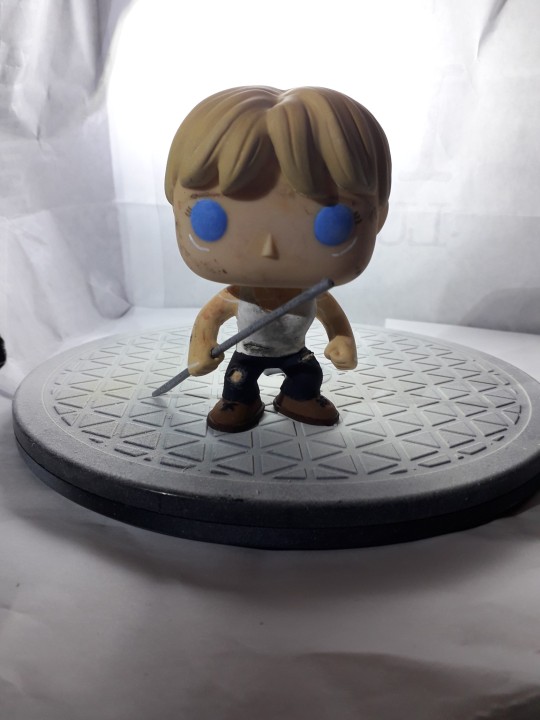
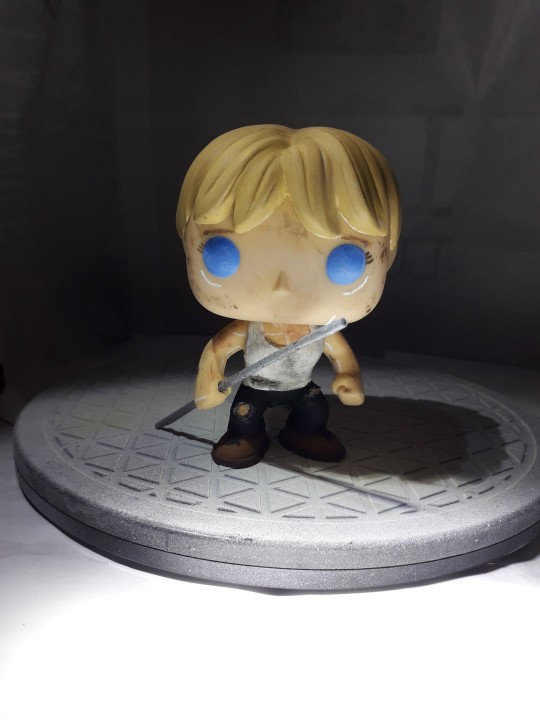
I'm still planning on making security guard and future war versions of Grace, and at least one version of Dani. Yeah, I've been saying that for the last two years, but it's still absolutely happening, trust me.
Anyway. That'll do it. If you have any questions, or you need further explanations or recommendations etc. y'all know where to find me.
8 notes
·
View notes