#repair surface pro 4
Explore tagged Tumblr posts
Visit Tumblr Blog
Explore Tumblr blogs with no restrictions, modern design and the best experience.
Last Seen Tumblr Blogs


Fun Fact
Tumblr was acquired by Yahoo for $1.1B in 2013.
Text
Surface Pro 4 là một trong những dòng laptop 2 trong 1 phổ biến của Microsoft, nhưng không ít người dùng gặp phải lỗi giật màn hình, nhấp nháy hoặc rung sau một thời gian sử dụng. Lỗi này gây ảnh hưởng nghiêm trọng đến trải nghiệm, làm gián đoạn công việc và có thể dẫn đến hỏng hóc nghiêm trọng nếu không khắc phục kịp thời.
Vậy nguyên nhân nào khiến màn hình Surface Pro 4 bị giật? Làm thế nào để khắc phục và ngăn ngừa lỗi này? Bài viết dưới đây sẽ giúp bạn hiểu rõ hơn về vấn đề này và đưa ra những giải pháp hiệu quả nhất.
0 notes
Text

Microsoft Surface Pro Repair Services in Dubai, Sharjah - UAE
#surface pro repairing#microsoft laptop repairing#microsoft repairing service center#authorized microsoft service center#The Best Surface Pro Repair Service in Dubai Sharjah. Authorized Microsoft Surface Pro Screen repair. Microsoft Surface Pro 4#5#6#7#7+#8…etc.#https://www.f2fixing.com/surface-pro-repair-service-center-in-dubai-sharjah/
0 notes
Text
!! PLEASE SHARE AND REBLOG THIS POST ASAP !!
Update: 7/9/2023 (I will update the listings if they are added to the stores.)
Drawing Tablet Buyer's Guide 2023
Are you looking for help to get into digital art? Are you confused for what models would you pick? Do you want success in your art career? Then this blog is for you. These are the buyer's guide for artists who wanted to take approach on digital art. As always, you don't need a latest and greatest tools just to make good art. Your handy mouse and a trusty old tablet can do fine art at the time. My Intuos 4 L still works today, even if it was released on 2009.
Here are the basic categories you'll fit into: Beginner, Intermediate and Professional.
Beginner - This is where you start making digital art for the first time.
Intermediate - These are experienced artists who are on mid-range level at a greater value.
Professional - These are same as intermediate but who are on to take approach an high-end level to mimic the meaning art.
There are three types of pen tablets for you to decide. These have pros and cons on these tablets.
Pen Tablet - A pen tablet doesn't require a screen and can benefit for a user experience such as good posture, portability and pricing, but this requires hand-eye coordination as this type of tablet has a steep learning curve and drawing on it feels unnatural to use.
Pen Display - A pen display is a monitor that can be drawn into. It is easier to learn how to use pen displays and can mimic a sketchbook you were drawing. However, there are issues such as bad posture, expensive pricing and limited portability. Sometimes, your hand gets in the way through pinpoint cursor while drawing.
Pen Computer - These are pen tablets that can be used by themselves and don't require a computer, it can be portable for travel use. However, they are very expensive, limited to none upgradability, difficult and costly repairs and have a short battery life. As such, I do not recommend getting these pen computers for these reasons above and instead look for other mobile tablet alternatives such as iPad Pro, Surface Pro 8 or Samsung Galaxy Tab.
Here are the list of drawing tablet recommendations based on three categories.
NOTE: Prices may vary due to sale discounts so I only put links to the official store from drawing tablet brands so I'm gonna keep the original price for future references. However, Amazon is safer for returns and good units and eBay is the way to go for second hand offers.
If you're an osu! player looking for a pen tablet, I'd suggest getting an Intuos Pen and Touch Small 2013 (PTH-480) on eBay. One by Wacom Small (CTL-472) has the same performance yet cheaper. The only good alternative that doesn't suck is Gaomon S620. I recommend getting OpenTabletDriver for that purpose.
If you want to invest digital art, I highly recommend getting a medium size tablet for larger hand gestures.
Beginner
Pen Tablet: $30-100 Range
Wacom:
One by Wacom Small (CTL-472) - $49.95
One by Wacom Medium (CTL-672) - $99.95
Huion:
Huion HS611 - $79.99
Huion Inspiroy H1161 - $89.99
Huion Inspiroy 2 S/M/L - $49.99 - $89.99
Huion Inspiroy H640P - $49.99
Huion Inspiroy H950P - $59.99
XP-Pen:
XP-Pen Deco Fun XS/S/L - $29.99- $49.99
XP-Pen Deco 01 V2 - $59.99
XP-Pen Deco M/MW - $49.99 - $69.99
XP-Pen Deco L/LW - $69.99 - $89.99
Pen Display: $170-420 Range
Wacom:
Wacom One (DTC-133) - $399.95
Huion:
Huion Kamvas 12 - $239.99 w/ stand
Huion Kamvas 13 - $264.99 w/ stand
Huion Kamvas 16 (2021) - $419 w/ stand
XP-Pen:
XP-Pen Artist 10 (Gen 2) - $169.99
XP-Pen Artist 12 (Gen 2) - $249.99
XP-Pen Artist 13 (Gen 2) - $299.99
XP-Pen Artist 16 (Gen 2) - $399.99
Intermediate
Pen Tablet: $100-200 Range
Wacom:
Wacom Intuos Small Wireless (4100WL) - $59.95
Wacom Intuos Medium Wireless (6100WL) - $199.95
Huion:
Huion Inspiroy Dial 2 - $139.99
Huion Inspiroy Giano - $199.99
Huion Inspiroy Q11K V2 - $139.99
XP-Pen:
XP-Pen Deco Pro S/SW - $99.99 - $129.99
XP-Pen Deco Pro M/MW - $129.99 - $159.99
Pen Display: $260-1300 Range
Wacom:
Wacom Cintiq 16 (DTK-1660) - $799.95 ($649.95 on Amazon)
Wacom Cintiq 22 (DTK-2260) - $1299.95
Huion:
Huion Kamvas Pro 13 2.5K - $399.99
Huion Kamvas Pro 16 2.5K - $599.99
Huion Kamvas 22 Plus - $549
Huion Kamvas 24 Plus - $899
XP-Pen:
XP-Pen Artist 12 Pro (2019) - $259.99
XP-Pen Artist 13.3 Pro (2019) - $279.99
XP-Pen Artist 15.6 Pro (2019) - $369.99
XP-Pen Artist Pro 16 (2021) - $449.99
XP-Pen Artist 22R Pro (2020) - $599.99
XP-Pen Artist 22 (Gen 2) (2021) - $499.99
XP-Pen Artist 24 Pro (2020) - $899.99
XP-Pen Artist 24 (2021) - $799.99
Professional
Pen Tablet: $140-500 Range
Wacom:
Wacom Intuos Pro Small (PTH-461) - $249.95
Wacom Intuos Pro Medium (PTH-661) - $379.95
Wacom Intuos Pro Large (PTH-861) - $499.95
XP-Pen:
XP-Pen Deco Pro MW (Gen 2) - $139.99
XP-Pen Deco Pro LW (Gen 2) - $179.99
XP-Pen Deco Pro XLW (Gen 2) - $199.99
Xencelabs:
Xencelabs Pen Tablet Small - $199.99
Xencelabs Pen Tablet Medium - $279.99 for standard, $359.99 for bundle, $379.99 for special edition
Pen Display: $800-3500 Range
Wacom:
Wacom Cintiq Pro 13 (DTH-1320) - Formerly $799.95 but less than $379.99 on eBay
Wacom Cintiq Pro 16 (2021) (DTH-167) - $1599.95 ($1529.99 on B&H Photo Video and Amazon)
Wacom Cintiq Pro 24 (DTK-2420) - $2199.95
Wacom Cintiq Pro 24 Touch (DTH-2420) - $2699.95
Wacom Cintiq Pro 27 (DTH-271) - $3499.95
Huion:
Huion Kamvas Pro 16 4K Plus - $899
Huion Kamvas Pro 24 4K - $1299
XP-Pen:
XP-Pen Artist Pro 14 (Gen 2) - $419.99
XP-Pen Artist Pro 16TP - $899.99
Xencelabs:
Xencelabs Pen Display 24 - $1899
Resources:
Brad Colbow: YouTube | Brad.site
Teoh Yi Chie: YouTube | 2nd Channel | Parka Blogs
The Seven Pens: YouTube | Website
#mekkyz' golden award#digital art#drawing tablet#pen tablet#pen display#buyers guide#recommendation#wacom#huion#xp pen#xencelabs#beginners#intermediate#professional
76 notes
·
View notes
Text
Last night Jack and Ali took me to a Minnesota Wild game as my Christmas gift. I had a very good time, despite Arizona blowing away the Wild.
When we first sat down I inwardly groaned. The guys behind us were very talkative and likely drunk. It could only get worse, I despaired. Oddly, as the game went on, and they kept drinking, they actually were funny. I warmed up to them and even laughed at some of the banter. When one of them accidentally bumped my back he apologized genuinely. We talked a little with other fans around us. I enjoyed that.
There were a few fisticuffs on the ice--and one nearly cooked off in front of me. A young brother and sister started to do what siblings do. Eventually a referee (mom) sat between them. They cooled off as well as they would have in the sin bin.
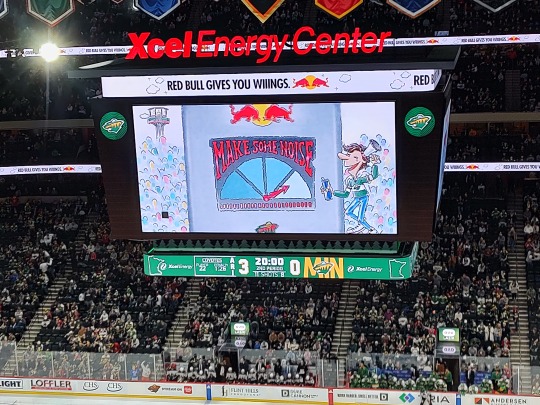
It was free hat night at the Xcel Energy Center. Everyone received a green and gold stocking cap (or "tuque" for the Canadians among us). A lot of those ended up on the ice in the second period after Arizona's fourth unanswered goal.
Traditionally a Hat Trick is to celebrate a single player's third goal in a one game. Fans threw hats onto the ice. I had been unaware of the opposite version, which protests the home team falling behind 4 to 0.
As much as I watch the on-ice action I note the off-ice activities. Years ago, at Minnesota North Stars games for example, a single Zamboni resurfaced the ice between periods. Eventually pro and college leagues added a second machine. I like watching the two "race" at the scorching speed of 5 MPH. Somewhere along the way jump seats were added and lucky fans get to ride along. Last night was pretty blonde passenger night.
Zamboni #1
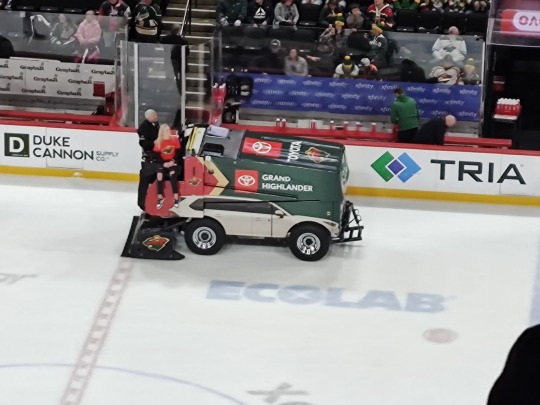
Zamboni #2

There was even a Zamboni #3, though this one didn't resurface ice. It was for advertising (for my favorite grocery store) and allowed more fans to ride along.

During commercial breaks rink workers skate up and down with with shovels, clearing snow and making the surface smooth again. There used to be a handful of skaters who did this. They made one or two passes. Now it looks like a full team of skaters, and they completed multiple passes. Two more workers came out with tool bags. They inspect and repair ice at the goal anchors. Are we far off from mid-period Zamboni resurfacing?
#I miss the old scoreboards with little light bulbs that burned out#The new high-tech scoreboards are pretty cool though#Years ago one or two guys wearing sport coats ran the scoreboard from the scorers box#Now it must take a team of a dozen technicians to run the modern ones (and I bet they're all wearing headsets)
45 notes
·
View notes
Text
Professional Tile Installation in Newark, NJ
Are you looking to revamp your home with beautiful, durable tiles? If you live in Newark, NJ, professional tile installation can make all the difference. While DIY projects can be tempting, hiring a skilled tile installer ensures precision, longevity, and a flawless finish. Whether you want to upgrade your kitchen backsplash, bathroom floors, or living room space, investing in expert tile installation is a decision you won’t regret.

Why Choose Professional Tile Installation?
You might be wondering, "Why should I hire a professional when I can lay tiles myself?" Well, let’s break it down:
Quality Workmanship: Professionals have years of experience and know how to align, cut, and install tiles perfectly.
Longevity: A properly installed tile floor or wall can last for decades without cracking or shifting.
Aesthetics: Uneven tiles, poor grout work, or misaligned patterns can ruin the look of your space.
Time-Saving Benefits: Tile installation can be time-consuming and physically demanding. Hiring a pro saves you time and stress.
Types of Tiles Available for Installation
Before getting started, it’s essential to know your tile options. Different materials suit different areas of the home.
Ceramic Tiles
Affordable and versatile, ceramic tiles work well in kitchens, bathrooms, and even outdoor patios. They’re available in countless colors and styles.
Porcelain Tiles
Denser and more water-resistant than ceramic, porcelain tiles are perfect for moisture-prone areas like bathrooms and laundry rooms.
Natural Stone Tiles
If you love an earthy, timeless look, natural stone tiles (like marble, granite, and travertine) are a luxurious choice. However, they require sealing to prevent stains.
Glass Tiles
Ideal for backsplashes, glass tiles add a modern, reflective touch to kitchens and bathrooms.
Mosaic Tiles
Small but impactful, mosaic tiles can create stunning patterns and accents in showers, backsplashes, and entryways.
Tile Installation Process
So, how does professional tile installation work? Here’s a quick rundown:
1. Planning and Preparation
The installer assesses the area, calculates the number of tiles needed, and selects the right materials for the job.
2. Surface Preparation
A smooth, even surface is essential. The installer cleans and levels the subfloor or wall before applying adhesive.
3. Tile Laying
Using precise measurements, tiles are carefully cut and laid out. Spacers ensure even gaps for grout lines.
4. Grouting
Once the tiles are set, grout is applied between the joints to seal and strengthen the installation.
5. Sealing (If Needed)
For natural stone tiles, a sealing coat is applied to protect against moisture and stains.
Common Areas for Tile Installation
Where should you install tiles in your home? Here are some popular options:
Kitchens: Backsplashes, floors, and countertops benefit from durable, easy-to-clean tiles.
Bathrooms: Shower walls, floors, and vanities look stylish and resist water damage.
Living Spaces: Entryways, fireplaces, and accent walls add character and durability.
Outdoor Areas: Patios and pool surrounds need weather-resistant tiles for longevity.
Finding the Right Tile Installer in Newark, NJ
When hiring a professional, consider these key factors:
Credentials & Experience: Look for licensed and insured tile installers with proven expertise.
Customer Reviews: Check online ratings and testimonials to gauge past client satisfaction.
Detailed Estimates: Get quotes from multiple installers to compare pricing and services.
Tile Maintenance and Care
After installation, proper care keeps your tiles looking brand new:
Regular Cleaning: Sweep and mop tiles frequently to remove dirt and grime.
Use the Right Cleaners: Avoid harsh chemicals that can damage grout and tile surfaces.
Seal Grout & Stone Tiles: Prevent stains and moisture damage with a protective sealant.
Fix Cracks Immediately: Small chips or cracks can worsen over time, so repair them promptly.
Conclusion
Investing in professional tile installation in NJ, is a smart move for homeowners who want long-lasting, beautiful floors and walls. Whether you’re upgrading a single room or remodeling your entire home, hiring an expert ensures precision, durability, and an impeccable finish. So, ready to transform your space with expertly installed tiles? Find a trusted professional today and enjoy the stunning results!
Precise Tile & Stone
11 E Main St, Little Falls Township, NJ 07424, United States
+19739852626
Get Direction From Google Map
0 notes
Text
Professional Exterior Painting vs. DIY: Which is the Better Choice?
When it comes to refreshing your home’s exterior, one major decision homeowners face is whether to tackle the job themselves or hire a professional exterior painting service. While DIY painting might seem like a budget-friendly option, the expertise and precision of professionals like Easy Choice Painting can make a significant difference in the final results. Let's break down the pros and cons of each approach to help you decide.
1. Quality and Durability
A professional exterior painting job delivers a flawless, long-lasting finish. Experts use high-quality paints, advanced techniques, and professional tools to ensure an even coat that resists harsh weather conditions. DIY painting, on the other hand, may result in uneven coverage, drips, or peeling paint due to a lack of experience and the right materials.
2. Proper Surface Preparation
One of the most critical steps in exterior painting is surface preparation. Professionals thoroughly clean, sand, and prime surfaces before applying paint, ensuring better adhesion and durability. Many DIYers overlook this step, leading to premature paint failure and additional repair costs down the line.
3. Time and Efficiency
Painting an entire home's exterior is time-consuming and physically demanding. It requires careful planning, multiple coats, and drying time between applications. A professional team like Easy Choice Painting can complete the job efficiently, often in a fraction of the time it would take an inexperienced DIY painter.
4. Safety Considerations
Exterior painting often involves working on ladders, rooftops, and high walls. Without proper safety equipment and training, DIYers risk falls and injuries. Professional painters are trained to handle such risks safely while ensuring high-quality results.
5. Cost-Effectiveness in the Long Run
While DIY may seem like a cheaper option initially, it comes with hidden costs. Purchasing high-quality paint, brushes, ladders, and safety gear adds up quickly. Plus, any mistakes could lead to costly repairs or repainting. Investing in professional exterior painting ensures long-term value, saving you money on future maintenance.
6. Expert Color Consultation
Choosing the right colors for your home’s exterior can be challenging. Professional painters provide expert advice on color selection, considering factors like sunlight exposure, architectural style, and current trends. This ensures a cohesive and aesthetically pleasing look that enhances your home’s curb appeal.
Conclusion: The Best Choice for Your Home
While DIY painting may work for small projects, hiring professionals like Easy Choice Painting is the best decision for a high-quality, long-lasting finish. With expert skills, proper tools, and safety measures, a professional exterior painting job not only enhances your home’s beauty but also protects it from weather damage for years to come.
If you want a hassle-free and stunning exterior transformation, trust the experts at Easy Choice Painting for exceptional results!
0 notes
Text
Professional Exterior Cleaning Services by Ready Pro Wash LLC
Introduction
Keeping your home or commercial property clean is essential for maintaining curb appeal, longevity, and a healthier environment. At Ready Pro Wash LLC, we specialize in providing top-tier exterior cleaning services, ensuring that your property remains in pristine condition all year round. Whether you need pressure washing near me, window cleaning near me, or gutter cleaning near me, our skilled team is here to handle the job efficiently and effectively.
Our Services
1. Pressure Washing Services
If you're searching for pressure washing near me, you've come to the right place. We use advanced pressure washing techniques to remove dirt, grime, mold, mildew, and other contaminants from various surfaces. Whether it's your home's exterior, deck, patio, or commercial building, our high-pressure cleaning solutions will restore the beauty of your property.
2. Window Washing and Cleaning
Crystal-clear windows enhance the look of your property while allowing natural light to brighten up your space. Our window washing near me services cater to residential and commercial clients. We use eco-friendly, streak-free cleaning methods to ensure spotless and gleaming windows, improving both aesthetics and energy efficiency.
3. House Washing Services
Dirt and algae buildup can make your home's exterior look old and neglected. Our house washing near me services utilize soft-wash techniques to remove stains without damaging your siding or paint. We take extra care in ensuring a deep clean while protecting your property's exterior surfaces.
4. Power Washing Solutions
For tougher stains and surfaces requiring a deeper clean, our power washing near me service is the ideal solution. We tackle heavy-duty dirt, oil stains, and grime on driveways, parking lots, fences, and sidewalks. Using industrial-grade equipment, we deliver outstanding cleaning results, making your surfaces look new again.
5. Gutter Cleaning and Maintenance
Clogged gutters can lead to water damage and foundation issues. Our gutter cleaning near me service ensures that your gutters are free of debris, allowing proper water flow and preventing costly repairs. We clean, inspect, and maintain your gutter system to keep it functioning optimally.
6. Driveway Washing Services
Your driveway is one of the first things people notice about your property. Our driveway washing near me service removes oil stains, tire marks, and built-up dirt, improving your property's curb appeal. We use specialized equipment to deliver a deep clean without damaging your concrete or asphalt surfaces.
Why Choose Ready Pro Wash LLC?
1. Experienced and Professional Team
At Ready Pro Wash LLC, we have a team of trained and experienced professionals who understand the best cleaning techniques for every surface. Whether you need pressure washing or delicate window cleaning, we handle each task with precision and care.
2. Eco-Friendly Cleaning Solutions
We are committed to using environmentally friendly cleaning agents that are safe for your property, pets, and landscaping. Our cleaning solutions effectively remove dirt and stains while being gentle on the environment.
3. Advanced Equipment and Techniques
We use state-of-the-art equipment to provide superior cleaning services. Our high-pressure and soft-wash systems ensure that every surface receives the appropriate level of cleaning, preventing damage while achieving excellent results.
4. Affordable and Transparent Pricing
We believe in providing high-quality services at competitive rates. Our pricing is transparent, with no hidden charges, ensuring that you receive great value for your investment.
5. Customer Satisfaction Guarantee
Customer satisfaction is our top priority. We go above and beyond to ensure that every client is happy with our work. If you're not satisfied with our service, we will work to make it right.
Benefits of Professional Exterior Cleaning
1. Enhances Curb Appeal
A clean exterior makes a lasting impression. Whether you own a home or business, professional cleaning improves your property's overall look, making it more inviting and visually appealing.
2. Increases Property Value
Regular maintenance, including house washing near me and driveway washing near me, helps preserve your property's value. Clean surfaces make your property more attractive to potential buyers and can increase its market value.
3. Prevents Costly Repairs
Dirt, mold, and mildew buildup can cause damage to surfaces over time. Our gutter cleaning near me and power washing near me services help prevent deterioration, saving you money on future repairs.
4. Promotes a Healthier Environment
Exterior cleaning removes allergens, mold, and pollutants that can affect indoor air quality. Regular cleaning reduces health risks and creates a cleaner, safer environment for your family or employees.
5. Saves Time and Effort
DIY cleaning can be time-consuming and ineffective. Hiring professionals like Ready Pro Wash LLC ensures that your property receives a thorough and efficient clean, saving you time and effort.
How to Schedule a Cleaning Service?
Getting started with our cleaning services is easy. Follow these simple steps:
Contact Us – Give us a call or visit our website to request a quote.
Get a Free Estimate – We provide a free, no-obligation estimate based on your cleaning needs.
Schedule a Service – Choose a convenient time for your cleaning appointment.
Enjoy a Cleaner Property – Our team will arrive on time and deliver professional cleaning services tailored to your property’s requirements.
Service Areas
We proudly serve residential and commercial properties in [Your City/State]. If you're searching for pressure washing near me, window washing near me, or driveway washing near me, we are your go-to cleaning experts.
0 notes
Text
How to Prepare Your Vehicle for Sale: Sell My Car BC Tips
Selling your car can feel overwhelming, especially if you want to secure the best price. Whether you're upgrading to a new vehicle or simply looking to free up some cash, proper preparation is key to attracting buyers and getting a solid offer. If you’ve been wondering, “How can I sell my car in BC quickly and for a great price?” — this guide is for you.
By following these practical steps, you’ll present your car in the best possible light and boost your chances of a smooth, successful sale. Let’s dive in!
1. Start with a Thorough Cleaning
First impressions matter, and a clean car signals to buyers that you’ve taken good care of it.
Exterior: Wash, wax, and polish the car to restore its shine. Pay attention to details like rims, windows, and headlights.
Interior: Vacuum seats and carpets, wipe down surfaces, and remove any personal belongings. Don’t forget hidden spots like cup holders, under the seats, and door pockets.
Odor Control: If your car has any lingering smells (from pets, food, or smoking), use a neutralizing spray or baking soda to freshen it up.
A sparkling, fresh-smelling car makes a great first impression — and can even justify a higher asking price.
2. Handle Minor Repairs
Buyers are more willing to pay a premium if they don’t have to deal with repairs right away. Address small issues that could turn people off:
Replace burnt-out bulbs and worn wiper blades.
Top off fluids like oil, coolant, and windshield washer fluid.
Fix small dents, chips, or scratches — many auto shops offer affordable touch-ups.
While you don’t need to overhaul your car, taking care of minor fixes shows buyers you’ve maintained it well.
3. Gather All Documentation
Buyers want reassurance that they’re making a good investment. Having the right paperwork ready builds trust and speeds up the selling process.
Be sure to collect:
Vehicle registration and title (proving you own the car).
Maintenance records showing regular service and any major repairs.
Carfax report (or similar) if available, highlighting the vehicle’s accident history.
Warranty details if any coverage remains.
Well-organized paperwork makes buyers feel confident about your car's history and condition — and strengthens your negotiating power.
4. Set a Competitive Price
When you think, "I want to sell my car in BC," pricing it correctly is crucial.
Research online listings for similar cars in your area — check platforms like AutoTrader, Craigslist, and Facebook Marketplace.
Use pricing tools like Canadian Black Book or Kelley Blue Book for a reliable estimate.
Consider your car’s mileage, condition, and added features when setting a price.
Pro tip: List your car slightly above your ideal price to allow room for negotiation. If you want $12,000, try starting at $12,500.
5. Take High-Quality Photos
Good photos grab attention. Use natural lighting and capture different angles, including:
Exterior (front, back, and sides).
Interior (seats, dashboard, trunk).
Close-ups of features like the stereo, tires, and odometer.
Any recent upgrades or special features.
Sharp, clear images can make your car stand out and generate more interest.
Why Choose Vancouver Preowned?
If you want to “Sell My Car BC” without the hassle, Vancouver Preowned is here to help. We offer expert appraisals, handle the paperwork, and connect you with serious buyers — ensuring a smooth, stress-free process.
Our team knows the BC car market inside out, so you can rest assured that you'll get a fair, competitive price for your vehicle.
Ready to sell your car with confidence? Contact Vancouver Preowned today — and let’s get your car sold!
0 notes
Text
Top Benefits of Hiring Professional Concrete Services in Brisbane
When it comes to construction projects, whether it's building a driveway, a patio, or a commercial foundation, concrete is an essential material. While DIY concrete work may seem tempting, hiring professional concrete services in Brisbane offers numerous advantages that far outweigh the potential risks and hassles. Here are the top benefits of working with experienced concrete professionals for your next project.

1. Expertise and Experience
One of the most significant advantages of hiring professional concrete services in Brisbane is the expertise and experience that come with the job. Concrete work involves a variety of techniques, materials, and specialized equipment. Professionals have the skills to handle all these elements, ensuring that your project is completed efficiently and to the highest standard. Whether it's pouring a slab, laying a driveway, or constructing intricate decorative features, experienced concrete contractors know exactly how to approach each task, avoiding mistakes that could lead to costly repairs later.
2. Quality and Durability
Concrete is known for its strength and longevity, but only when it is mixed, poured, and cured correctly. Professional concrete services in Brisbane have access to top-quality materials and tools that ensure the finished product is durable and built to last. Professionals also know how to mix concrete to the correct consistency and ensure it cures properly. This means that your concrete surfaces will withstand the harsh Brisbane climate and any heavy traffic or loads they may face, reducing the likelihood of cracks, damage, or deterioration over time.
3. Time and Cost Efficiency
While it might seem like doing concrete work yourself would save money, it could end up being more costly in the long run. Without the right experience, you may make costly mistakes, which could lead to the need for repairs or even a complete redo of the project. By hiring professional concrete services in Brisbane, you’re not only ensuring the work is done right the first time, but you’re also saving time. Professionals can complete the project much faster than a DIY effort, allowing you to enjoy your newly paved driveway or patio sooner.
4. Proper Equipment
Concrete projects often require specialized equipment, such as mixers, trowels, and concrete pumps, which can be expensive to rent or purchase. Professional concrete contractors come equipped with all the necessary tools and machinery to get the job done efficiently and accurately. By hiring a pro, you avoid the hassle and added cost of renting or buying these expensive tools, while ensuring the project is completed with precision.
5. Custom Designs and Finishes
Concrete is a highly versatile material, and skilled professionals can work with it to create a range of beautiful finishes and designs. Whether you’re looking for polished concrete floors, stamped concrete patterns, or colored concrete, a professional concrete service in Brisbane can help bring your vision to life. With access to the latest techniques and design trends, they can offer creative solutions tailored to your needs and preferences.
6. Compliance with Local Regulations
Brisbane, like many cities, has strict building codes and regulations for construction and renovation projects. Professional concrete services are familiar with these rules and will ensure that your project complies with all necessary requirements. This can save you from costly fines or legal issues down the line, as well as ensure that your project is safe and meets all structural standards.
7. Long-Term Warranty
Many professional concrete services in Brisbane offer warranties on their work. This warranty provides peace of mind knowing that if any issues arise within a specified period, the company will address them at no additional cost. This is a valuable benefit that DIY projects can’t provide, ensuring you have support if something goes wrong after the job is finished.
Conclusion
Hiring professional concrete services in Brisbane is an investment that offers long-term benefits. From ensuring high-quality, durable results to saving time and avoiding costly mistakes, professional contractors bring the experience and expertise needed to complete your project efficiently. Whether you're looking to enhance your home’s curb appeal or complete a commercial construction project, working with professionals ensures the job is done right—on time, within budget, and to the highest standards.
0 notes
Text
Expert Pool Cleaning Services in Fort Myers Beach, Florida – Island Pool Pros
Your Trusted Pool Service Provider in Lee County, Florida
Island Pool Pros is a premier pool cleaning company in Fort Myers Beach, Florida, dedicated to providing exceptional pool maintenance and cleaning services. With over 20 years of industry experience, we take pride in offering top-tier pool care solutions tailored to residential and commercial clients across Lee County. Our service areas include Ft. Myers Beach, Sanibel, Captiva, St. James City, Bokeelia, Matlacha, and surrounding communities.
Why Choose Island Pool Pros?
A clean, well-maintained pool is essential for both aesthetic appeal and health safety. At Island Pool Pros, we offer professional and affordable pool cleaning with a commitment to customer satisfaction. Here’s why homeowners and businesses trust us:
✔ Over 20 Years of Experience – Expertise you can rely on. ✔ Comprehensive Pool Services – From routine maintenance to deep cleaning. ✔ Locally Owned & Operated – Dedicated to the Fort Myers Beach community. ✔ Skilled & Certified Technicians – Trained professionals who know pools inside out. ✔ Eco-Friendly & Safe Cleaning Methods – Keeping your pool water safe for family and friends. ✔ Flexible Service Plans – Weekly, bi-weekly, or customized schedules to fit your needs. ✔ Affordable Pricing – High-quality service at competitive rates.
Our Pool Cleaning & Maintenance Services
1. Routine Pool Cleaning & Maintenance
Keeping a pool in pristine condition requires consistent upkeep. Our routine cleaning services ensure that your pool stays crystal clear and free from debris.
Our routine cleaning includes:
Skimming leaves and debris
Brushing walls and tile lines
Vacuuming pool floors
Cleaning skimmer and pump baskets
Checking and adjusting water chemistry
Inspecting equipment for proper functionality
2. Deep Pool Cleaning
For pools that have accumulated algae, dirt, and debris, we offer specialized deep cleaning to restore their original beauty. This includes acid washing, algae removal, and pressure washing of pool surfaces.
3. Pool Chemical Balancing
Proper pH balance and chemical treatment are crucial for safe and clear water. Our expert technicians test and adjust chlorine, alkalinity, and calcium hardness levels to maintain a perfect balance.
4. Pool Equipment Inspection & Repairs
We ensure that your pool equipment, including pumps, filters, heaters, and automation systems, functions efficiently. If any component is malfunctioning, we provide repairs and replacements as needed.
5. Green Pool Treatment
A green pool is not only unsightly but also a breeding ground for bacteria and mosquitoes. Our team specializes in turning green pools clear by treating algae growth, filtering out contaminants, and balancing water chemistry.
6. Saltwater Pool Maintenance
For homeowners with saltwater pools, we provide specialized care, including salt cell cleaning, pH balance maintenance, and system optimization to keep your pool in perfect condition.
7. Pool Opening & Closing Services
Seasonal maintenance is crucial in Florida’s climate. Our pool opening and closing services help prepare your pool for summer use and winter storage, ensuring longevity and efficiency.
Service Areas – We Cover All of Lee County, Florida
Island Pool Pros proudly serves all major areas in Lee County, including:
Fort Myers Beach
Sanibel Island
Captiva Island
St. James City
Bokeelia
Matlacha
Surrounding areas
No matter where you are in Lee County, our team is ready to provide reliable, efficient, and high-quality pool cleaning services.
The Importance of Professional Pool Cleaning
Many homeowners attempt DIY pool maintenance, but professional pool cleaning offers several advantages:
✔ Health & Safety
Improper chemical balance can cause skin irritations, eye infections, and bacteria growth. Our experts ensure your pool remains safe and sanitized.
✔ Extending Equipment Lifespan
Regular filter and pump maintenance prevents costly repairs and extends the lifespan of your pool equipment.
✔ Saving Time & Effort
Cleaning a pool requires time and effort. Hiring professionals allows you to enjoy your pool without the hassle of routine maintenance.
✔ Energy & Cost Efficiency
Well-maintained pools consume less energy and chemicals, ultimately saving you money.
Customized Pool Service Plans
We understand that every pool is unique, so we offer customized maintenance plans to suit different budgets and requirements. Whether you need weekly cleaning, one-time service, or emergency repairs, we have a plan that fits.
Get a Free Pool Inspection Today!
Looking for professional pool cleaning services in Fort Myers Beach and Lee County, Florida? Island Pool Pros is your go-to expert for all things pool maintenance. Let us help you keep your pool sparkling clean and safe for use all year round.
📞 Call us today to schedule a free consultation! 📍 Serving Fort Myers Beach, Sanibel, Captiva, St. James City, Bokeelia, Matlacha & nearby areas.
Experience the best pool cleaning services in Fort Myers Beach, FL with Island Pool Pros – where crystal-clear pools are our passion!


#pool cleaning Fort Myers Beach#pool maintenance Fort Myers#professional pool cleaning services#pool service Lee County FL#best pool cleaners Fort Myers#weekly pool cleaning service#residential pool cleaning Fort Myers#commercial pool maintenance Florida#swimming pool cleaning services#affordable pool care Fort Myers Beach#expert pool maintenance Sanibel#Captiva Island pool service#green pool cleaning Florida#saltwater pool maintenance#pool chemical balancing#pool equipment repair Fort Myers#algae removal services#pool filter cleaning service#pool skimming and vacuuming#deep pool cleaning Fort Myers Beach
0 notes
Text
Common Hidden Issues in Used Cars: What Every Buyer Should Know
Buying a used car in UAE, is a smart decision, especially when you're looking for a cost-effective option without the steep depreciation of a new vehicle. However, the used car market comes with its own risks especially hidden issues that may not be immediately visible but could lead to costly repairs later. Knowing these common problems can help you avoid potential pitfalls and make a smart purchase.
1. Engine Problems
The engine is the most vital part of any car, and hidden issues here can be expensive to fix. Some sellers may mask these issues temporarily, making them harder to detect during a short test drive.
What to Look For:
Unusual noises like knocking, ticking, or grinding
Excessive smoke from the exhaust (blue, white, or black smoke)
Oil leaks or burnt oil smells
Difficulty starting or rough idling
Pro Tip: Let the engine run for a while and observe how it performs. If possible, have a trusted mechanic inspect it for deeper issues.
2. Transmission Troubles
Transmission repairs can cost a fortune. Problems here can affect how the car shifts gears, leading to unsafe driving conditions.
Warning Signs:
Delayed or rough gear shifting
Slipping gears while driving
Transmission fluid leaks under the car
Strange noises when shifting
Pro Tip: Test drive the car in various conditions. Make sure the gear shifts are smooth and responsive.
3. Odometer Tampering
Reducing the mileage shown on the odometer is a common trick in the used car market. It can make a car seem newer and more valuable than it actually is.
How to Detect:
Check service records for consistent mileage readings.
Look for wear on the steering wheel, pedals, and driver’s seat—excessive wear may not match the odometer reading.
Review previous inspection reports or request a vehicle history report.
4. Frame and Structural Damage
Structural damage from accidents may not always be visible but can affect the safety and performance of the vehicle.
Signs to Watch:
Misaligned doors, trunk, or hood
Uneven gaps between panels
Rust or cracks on the frame
Signs of welding or repainting
Pro Tip: Ask for accident history. Even if the car looks perfect, hidden frame damage could compromise its safety.
5. Electrical System Failures
Modern vehicles rely heavily on electronic systems, including safety features, entertainment systems, and power controls. Electrical issues can be complicated and costly to repair.
Common Problems:
Dashboard warning lights that won’t turn off
Power windows, locks, or mirrors not working
Malfunctioning infotainment systems
Flickering or dimming lights
Pro Tip: Test all electronic features thoroughly during your inspection.
6. Brake and Suspension Issues
The braking system and suspension are crucial for safe driving. Hidden issues here may affect handling, comfort, and safety.
Check For:
Squealing or grinding noises when braking
Car pulling to one side when braking
Excessive bouncing over bumps
Uneven tire wear
Pro Tip: Conduct a test drive over various road conditions to check how the car handles turns and uneven surfaces.
7. Flood Damage
Flood-damaged cars can have long-term problems, including rust, electrical issues, and mold. While some of these cars may look fine initially, hidden damage can emerge later.
Red Flags:
Musty odors in the interior
Water stains under carpets or seats
Corrosion in the engine bay or trunk
Foggy headlights or taillights
Pro Tip: A vehicle history report can help confirm if the car has been exposed to flood damage.
8. Unreported Accidents and Poor Repairs
Not all sellers disclose accident histories. Poorly repaired vehicles might not be immediately obvious but could cause long-term problems.
🔍 Signs of Past Damage:
Mismatched paint shades
Uneven body panels or doors
Loose bumpers
Cracks in the chassis
Pro Tip: Always get a pre-purchase inspection from a trusted professional.
Why Choosing the Right Inspection Partner Matters
Even with thorough personal checks, hidden problems can still go unnoticed. That’s where Moatamad Cars comes in. As a trusted name in the UAE, KSA, and Oman, Moatamad offers:
Certified used cars that pass rigorous inspection processes.
6-month/10,000 km warranty, ensuring peace of mind.
Cars refurbished to meet strict quality standards.
Their team ensures that every vehicle undergoes comprehensive evaluations so buyers get only the best pre-owned vehicles, free from hidden issues.
Final Thoughts
Buying a used car doesn’t have to be risky. By understanding the common hidden issues and partnering with a reliable inspection provider like Moatamad Cars, you can ensure your purchase is safe, reliable, and truly worth the investment.
Buy smart. Choose certified. Trust Moatamad for a worry-free used car experience.
1 note
·
View note
Text
Surface Pro 4 là chiếc laptop 2in1 được Microsoft sản xuất từ tháng 10 năm 2015. Do đó ở thời điểm hiện tại thiết bị này có thể gặp phải một số lỗi phổ biến như hỏng màn hình, pin yếu, lỗi mainboard, hoặc vấn đề về cảm ứng. Bài viết sau Trí Tiến sẽ cung cấp thông tin chi tiết về các lỗi thường gặp, cách khắc phục và địa chỉ sửa chữa Surface Pro 4 uy tín để giúp bạn khôi phục thiết bị của mình một cách nhanh chóng và hiệu quả.
0 notes
Text
How to Patch Drywall Over Textured Walls Without It Looking Obvious
Patching drywall is a necessary skill for homeowners and DIY enthusiasts, but when it comes to textured walls, the challenge increases. A poorly patched drywall spot on a textured wall can stand out, making your repair look obvious. However, with the right techniques, tools, and attention to detail, you can seamlessly patch drywall on textured surfaces without leaving any visible signs.
In this guide, we’ll walk you through the best methods to patch drywall over textured walls while ensuring a flawless finish.
Why Patching Drywall on Textured Walls is Tricky
Textured walls add a unique character to a home, but they also make repairs more complex. Unlike smooth walls where a simple sanding process blends the patch, textured surfaces require additional steps to replicate the original wall’s finish. If the texture doesn’t match, light will cast shadows on the repaired spot, making the patch obvious.
Tools and Materials You Will Need
Before you start, gather the right materials to ensure a professional-looking repair:
Drywall patch or joint compound
Putty knife (4- to 6-inch and 12-inch for smoothing)
Sandpaper (120-150 grit)
Texture spray or texture brush
Paint that matches your existing wall
Primer
Taping knife
Drop cloths and painter’s tape
Step-by-Step Guide to Patching Drywall on Textured Walls
Step 1: Cut and Prepare the Damaged Area
If the damaged area is a hole, first cut out the damaged drywall in a square or rectangular shape. If the damage is minor, clean the edges and remove loose debris.
For larger holes (more than 4 inches in diameter), you may need a drywall patch or a piece of drywall cut to size. Secure the patch using drywall screws or adhesive backing, ensuring it sits flush with the existing wall.
Step 2: Apply Joint Compound Over the Patch
Using a putty knife, apply joint compound (also known as mud) over the patch. Feather the edges out at least 2-3 inches beyond the patch to ensure a smooth transition. Let it dry completely (typically 24 hours).
After drying, lightly sand the area to remove any ridges or high spots. Repeat this process with a second thin layer of joint compound if needed.
Step 3: Matching the Texture
This is the most crucial part to ensure your repair blends seamlessly.
Option 1: Using Texture Spray
Buy a texture spray that matches your wall type (orange peel, knockdown, or popcorn texture).
Shake the can well and test it on a scrap piece of drywall before applying it to your patched area.
Hold the can 12-18 inches away and spray lightly in layers, allowing each coat to dry before adding more.
Use a putty knife to slightly knock down the texture if necessary (for knockdown textures).
Option 2: Using a Texture Brush or Sponge
If your wall has a hand-applied texture, a texture brush or sponge may be a better choice.
Dab joint compound onto the patch, mimicking the existing wall pattern.
Blend the texture by softening the edges with a damp sponge.
Step 4: Prime and Paint the Patched Area
Once the texture is fully dry, apply a coat of primer to prevent the paint from absorbing differently than the rest of the wall. Let the primer dry for at least 2 hours.
Then, paint over the repaired area with the same color as your existing wall. For best results, use a roller to match the surrounding texture and feather the paint outward to blend seamlessly.
Pro Tips for a Perfectly Blended Patch
Use the Right Texture Type: There are various textures like orange peel, knockdown, and slap brush. Identify your wall texture before repairing.
Layer the Joint Compound: Applying multiple thin layers creates a smoother transition compared to a single thick layer.
Blend the Edges Well: Avoid sharp edges where the new and old textures meet by feathering them with a damp sponge.
Match the Paint Accurately: Even if you use the same original paint, the wall color might have faded over time. Consider blending slightly beyond the patched area to even out differences.
Use Test Patches: Before applying texture spray or brushing the compound, test on a scrap piece of drywall to ensure it matches your existing wall.
Common Mistakes to Avoid
Skipping the Primer: Without a primer, the paint may absorb unevenly, making the patch noticeable.
Applying Too Much Texture at Once: Over-spraying or applying too much texture in one go can create a bulky appearance. Build up gradually instead.
Not Sanding Between Layers: If you don’t sand lightly between layers of joint compound, the patch may have rough edges that stand out.
Using the Wrong Paint Finish: If your wall has a matte finish, using semi-gloss paint on the patch will make it obvious. Always match the paint sheen.
Final Thoughts
Patching drywall over textured walls requires patience and the right techniques, but with these steps, you can achieve a seamless repair. Whether you're fixing a small dent or a large hole, ensuring the patch blends naturally into the wall texture is key to an invisible repair.
By following this guide, you can restore your walls to their original look without leaving any telltale signs of damage. Now, grab your tools and confidently tackle your drywall patching project!

1 note
·
View note
Text
How to Replace an Old Faucet Without Damaging Your Sink?
Replacing an old faucet is a great way to upgrade your kitchen or bathroom without a full renovation. However, improper installation can lead to leaks, damage to your sink, or costly repairs. Whether you are a DIY enthusiast or seeking professional help, knowing the right steps can save you time and effort. As experts in Faucet Installation in Milton and the surrounding areas, we at Harb Plumbing have helped countless homeowners successfully upgrade their fixtures.

Understanding When It's Time for a Replacement
Before diving into the Faucet Installation in Milton or replacement process, it is important to recognize the signs that your faucet needs replacing:
Persistent leaks that won't stop despite repairs
Mineral buildup affecting water flow
Visible corrosion or rust
Outdated style that doesn't match your updated decor
Increasing water bills due to inefficient operation
Tools and Materials Needed
Before starting, gather the necessary tools and materials to make the process smooth:
Adjustable wrench
Basin wrench
Plumber’s tape
Bucket and towels
New faucet
Plumber’s putty or silicone caulk
Screwdriver
Pipe wrench
Supply lines (if needed)
Safety gloves
Step-by-Step Replacement Guide
1. Preparation
Before beginning any work, shut off the water supply to your faucet. You'll find the shutoff valves under the sink. Turn them clockwise until they're fully closed.
2. Remove the Old Faucet
This step requires careful attention to avoid damaging your sink:
Disconnect the water supply lines using your adjustable wrench
Remove any caulk or sealant around the old faucet base
Loosen the mounting nuts under the sink using your basin wrench
Carefully lift the old faucet from above
Pro Tip: If the mounting nuts are stubborn due to corrosion, spray them with penetrating oil and wait 15 minutes before trying again.
3. Clean the Mounting Surface
Once the old faucet is removed:
Thoroughly clean the mounting surface
Remove any old putty or sealant
Check for any damage to the sink surface
Ensure the new faucet will cover any existing holes
4. Install the New Faucet
This is where attention to detail matters most:
Read the manufacturer's instructions carefully
Apply plumber's putty or silicone around the base plate
Place the new faucet through the mounting holes
Attach mounting hardware from underneath
Connect water supply lines, using plumber's tape on the threads
Tighten all connections, but avoid over-tightening
5. Testing and Final Adjustments
After installation:
Turn the water supply back on slowly
Check for leaks at all connection points
Run both hot and cold water to ensure proper flow
Test the faucet handle movement
Clean up any excess putty or sealant.
Related Plumbing Services: Water Heater Installation in Mississauga
Upgrading your plumbing system doesn’t stop at faucets. If your home requires a Water Heater Installation in Mississauga, a licensed plumber can ensure efficient setup, preventing water damage and improving energy efficiency. A new water heater enhances home comfort, providing consistent hot water for daily use.
When to Call a Professional
While DIY Faucet Installation in Milton is possible, hiring a professional plumber in Milton ensures proper installation, preventing future plumbing issues. If you notice water pressure problems, persistent leaks, or difficulty accessing plumbing connections, it’s best to seek expert assistance.
At Harb Plumbing, our experienced team specializes in Faucet Installation in Milton and surrounding areas. We also offer comprehensive plumbing services, including Water Heater Installation in Mississauga, ensuring your home's plumbing system operates efficiently.
Conclusion
Replacing a faucet without damaging your sink is achievable with the right preparation and careful execution. Whether you choose to tackle this project yourself or seek professional help, understanding the process helps ensure success. For those in the Milton area needing expert faucet installation or Mississauga residents looking for comprehensive plumbing services, including water heater installation, Harb Plumbing is here to help.
0 notes
Text
Top Signs You Need Help from a Swimming Pool Renovation Company
A swimming pool is supposed to be a place of relaxation, not stress. But over time, cracks appear, tiles fall off, and the water starts looking... well, less inviting. Sometimes, it’s easy to ignore the small issues, but if you wait too long, a minor fix can turn into a major problem. That’s when calling in the Best Swimming Pool Renovation Companies becomes the smartest move.
Not sure if your pool needs professional help? Here are some clear signs it’s time for a renovation.
1. Cracks and Structural Damage
A few tiny cracks might not seem like a big deal, but they can get worse fast. Even small fractures in the pool’s surface can lead to leaks, which means higher water bills and possible damage to the surrounding area. The Best Swimming Pool Renovation Companies know how to repair these cracks before they turn into expensive disasters.
2. Water Level Keeps Dropping
If you constantly need to refill your pool, there’s a good chance you have a leak. Evaporation happens, especially in hot weather, but if you notice the water level going down too fast, it’s time to call in the pros. The Best Swimming Pool Renovation Companies can detect leaks and fix them before they cause serious structural issues.
3. The Pool Surface Feels Rough
Run your hand along the bottom or sides of your pool. Does it feel rough, bumpy, or worn out? This is a sign the plaster or lining is deteriorating. Not only does this make the pool look old, but it can also be uncomfortable for swimmers. A resurfacing job from the Best Swimming Pool Renovation Companies will give your pool a fresh, smooth finish.
4. Outdated or Broken Pool Tiles
Loose, cracked, or missing tiles can make your pool look neglected. More importantly, broken tiles can be a safety hazard. If your pool’s tiles are falling apart or just look outdated, it’s time for a makeover. The Best Swimming Pool Renovation Companies can replace damaged tiles and update the design to give your pool a modern, stylish look.
5. Your Pool Equipment Is Outdated
An old, inefficient filtration or heating system can make pool maintenance a nightmare. If your pool pump is making strange noises, your heater isn’t working properly, or your filter is struggling to keep the water clean, it’s time for an upgrade. The Best Swimming Pool Renovation Companies can install energy-efficient equipment that saves you money in the long run.
6. The Pool Area Looks Dull and Uninviting
Even if the pool itself is in decent shape, an outdated or boring design can make it less enjoyable. Whether it’s dull lighting, an uninspired deck, or an old-fashioned layout, a professional renovation can breathe new life into your backyard. The Best Swimming Pool Renovation Companies specialize in upgrades that transform ordinary pools into luxurious retreats.
7. Stains That Won’t Go Away
No matter how much you scrub, some stains just won’t disappear. Hard water, algae buildup, and chemical imbalances can leave ugly stains on your pool’s surface. If your pool is looking permanently dirty, a professional resurfacing job from the Best Swimming Pool Renovation Companies can restore its original beauty.
0 notes
Text
Step-by-Step Guide to Setting Up and Taking Down a 10x10 Custom Canopy Tent

A custom 10x10 canopy tent is an essential tool for businesses, vendors, and event organizers. However, setting it up and taking it down efficiently can be tricky if you’re unfamiliar with the process.
This step-by-step guide will help you set up and take down your canopy tent quickly, safely, and correctly, ensuring a smooth experience at any event.
Part 1: Setting Up Your 10x10 Custom Canopy Tent
Step 1: Choose the Right Location 📍
Before you begin, pick an ideal location for your canopy tent.
✅ Flat, level ground – Avoid slopes or uneven surfaces. ✅ Clear of obstacles �� Check for trees, overhead wires, or nearby structures. ✅ Weather-friendly – Position to reduce wind exposure.
💡 Pro Tip: If setting up on concrete or asphalt, bring weights to secure your tent.
Step 2: Unpack and Inspect Your Tent 🎒
Before assembling, check all components to ensure nothing is missing or damaged.
✅ Tent Frame – Ensure joints and legs move smoothly. ✅ Canopy Top – Look for rips, stains, or loose stitching. ✅ Accessories – Confirm sidewalls, stakes, and weights are ready.
💡 Pro Tip: If any parts are damaged, repair them before use to avoid setup issues.
Step 3: Expand the Frame 🔄
1️⃣ With a partner, slightly extend the frame by pulling opposite corners apart. 2️⃣ Stop halfway once the frame is partially open. 3️⃣ Make sure the legs are straight and not twisted.
💡 Pro Tip: For one-person setup, expand the frame gradually, moving between corners.
Step 4: Attach the Canopy Top 🎪
1️⃣ Drape the canopy fabric over the top of the frame. 2️⃣ Align the Velcro straps or hooks with the frame. 3️⃣ Secure all corners, making sure the fabric is evenly stretched.
💡 Pro Tip: Pull the fabric tightly to avoid sagging, which can collect rainwater.
Step 5: Fully Open the Frame & Lock It 🛠️
1️⃣ Pull the frame all the way open until it locks into place. 2️⃣ Push up the center peak to fully extend the canopy. 3️⃣ Lock the slider brackets on each leg until they click.
💡 Pro Tip: If you hear a clicking sound, your frame is securely locked.
Step 6: Adjust the Leg Height 📏
1️⃣ Extend each leg one level at a time, starting with opposite sides. 2️⃣ Set the desired height by locking each leg at the preferred level.
💡 Pro Tip: For uneven ground, adjust individual legs to stabilize the tent.
Step 7: Secure the Tent with Weights & Stakes 🏋️♂️
Outdoor conditions can be unpredictable, so securing your tent is crucial.
✅ On Soft Ground: Use stakes and tie-down ropes. ✅ On Hard Surfaces: Use weighted sandbags, water weights, or tent weights.
💡 Pro Tip: Use at least 20 lbs per leg for maximum wind resistance.
Step 8: Add Sidewalls & Accessories (Optional) 🏢
For extra protection, branding, or privacy, attach custom sidewalls or accessories.
✅ Zip sidewalls together for a full enclosure. ✅ Attach banners & signs to enhance branding. ✅ Use lighting or fans for comfort.
💡 Pro Tip: If using sidewalls, leave one side open for easy access and airflow.
Part 2: Taking Down Your 10x10 Custom Canopy Tent
Step 1: Remove Accessories & Sidewalls. 🔧
✅ Detach sidewalls, banners, and lighting first. ✅ Roll them neatly to avoid wrinkles or damage.
💡 Pro Tip: Store accessories in separate bags to keep them organized.
Step 2: Lower the Legs 🔽
1️⃣ Press the release buttons on each leg. 2️⃣ Slowly collapse the legs to their shortest height.
💡 Pro Tip: Lower opposite legs one at a time to avoid straining the frame.
Step 3: Unlock & Collapse the Frame. 🔄
1️⃣ Press the lock release on each corner of the frame. 2️⃣ Slowly push the frame inward to collapse it halfway. 3️⃣ Keep folding until the tent is fully closed.
💡 Pro Tip: Avoid forcing the frame—gently guide it closed to prevent damage.
Step 4: Remove the Canopy Top 🎪
✅ Detach Velcro or clips securing the fabric. ✅ Carefully pull the canopy off the frame. ✅ Fold neatly to avoid wrinkles.
💡 Pro Tip: Let the fabric dry completely before storing to prevent mold.
Step 5: Pack & Store Your Tent 🎒
✅ Store the frame, canopy, and accessories in a rolling carry bag. ✅ Keep in a dry, cool place to prevent wear.
💡 Pro Tip: Clean your tent after every use to extend its lifespan!
Bonus: Quick Troubleshooting Guide 🚨

Final Thoughts
Setting up and taking down a custom canopy tent 10x10 is easy when you follow these steps. Proper handling ensures durability, safety, and efficiency, making your event experience stress-free and professional.
#custom canopy#custom pop up tents#custom printed tents#custom tents with logo#custom tent with logo#custom logo tents#10x10 canopy#10x10 custom canopy#10x10 canopy tent#10x10 pop up canopy#10x10 custom tent#10x10 branded tent#10x10 tent with logo#10x10 custom canopy tent#custom 10x10 canopy tent with company logo#custom 10x10 canopy tent#custom canopy tent 10x10
0 notes