#remove duplicate files
Explore tagged Tumblr posts
Text
0 notes
Text
Why are so many of these voice clips I downloaded so…suggestive. Send help.
#kidk says stuff#can’t find a clean file of ‘I’m your best guy’ much less anything of sooga since he became playable#but BOY do I have a lotta ‘injured’ and ‘fight’ noises that sound like somebody’s gettin nailed with a sword winkwinknudgenudgesaynomore#me: *playing back everything I downloaded* HELLO???? *starts labeling every file ‘questionable’*#me: *plays them all back again to make sure I removed duplicates* haha lol they’re bangin
2 notes
·
View notes
Text
Mod Post
A recent computer issue has messed up the post filing system for this blog, so it’s getting scrapped and everything’s getting reorganized. This doesn’t mean much on the follower side of things, except you might see some post repeats more frequently than usual for a bit.
#mod post#Update: doing that removed almost 2 GB of duplicate files that were created by the computer issue
14 notes
·
View notes
Video
youtube
How to Find and Remove Duplicate Music Files in Windows
2 notes
·
View notes
Text
My GIF Making process: Screen capturing using MPV player, Organizing files, 3 Sharpening settings, Basic Coloring PSD + Actions set

This is a very long post so heads up.
I’ll try to be as thorough and true as much as possible to the way I make my gifs (I already use Photoshop Actions which I’ve long since set up but now for this tutorial I’m reviewing them to show you the exact steps I’ve learned to create my gifs 😃) and present them to you in a semi-coherent way. Also, please bear with me since English is my second language.
First things first. Below are the things and tools we need to do this:
Downloaded 4K or 1080p quality videos (let’s all assume we know where to get these—especially for high definition movies and tv series—so this post doesn’t get removed, okay? 😛)
Adobe Photoshop CC or the CS versions can work as well, but full disclosure I haven’t created gifs using the CS versions since 2020. I’m currently using Adobe Photoshop 2024.
mpv player. Use mpv player to get those frames/screenshots or any other video player that has a screen grabber feature. I’ve used adapter for the longest time but I’ve switched to mpv because the press to screenshot feature while the video is playing has been a game changer not to mention ultimate time saver for me. For adapter you need to play it in another video player (like VLC player), to get the start and end timestamps of the scene you want to gif which takes me ages before I can even open Photoshop.
Anyway! Please stop reading this post for a moment and head over to this amazing tutorial by kylos. She perfectly tells you how to install and use mpv player, both for Mac and Windows users.
One thing I have to share though, I had a tough time when I updated my MacOS to Sonoma since MPV is suddenly either duplicating frames or when I delete the duplicates the player seems to be skipping frames :/ I searched and found a solution here, though it didn’t work for me lol. My workaround for this in the meantime is decreasing the speed down to 0.70 then start screenshotting—it’s not the same pre Sonoma update but it works so I’ll have to accept it rather than have jumpy looking gifs.
Now, after this part of kylos’ tutorial:

you can continue reading the following sections of my gif tutorial below.
I want to share this little tip (sorry, this will only cater to Mac users) that I hope will be helpful for organizing the screenshots that MPV saved to the folder you have selected. Because believe me you don’t want to go through 1k+ of screenshots to select just 42-50 frames for your gif.
The Control + Command + N shortcut
This shortcut allows you to create a new folder from files you have pre-selected. As you can see below I have already created a couple of folders, and inside each folder I have selected screenshots that I want to include in one single gif. It's up to you how you want to divide yours, assuming you intend to create and post a Tumblr gifset rather than just one gif.

Another tip is making use of tags. Most of, if not all the time, I make supercorp gifs so I tag blue for Kara and red (or green) for Lena—just being ridiculously on brand and all that.
Before we finally open Photoshop, there's one more thing I want to say—I know, please bear with me for the third? fourth? time 😅
It's helpful to organize everything into their respective folders so you know the total number of items/frames you have. This way, you can add or delete excess or unnecessary shots before uploading them in Photoshop.
For example below there are 80 screenshots of Kara inside this folder and for a 1:1 (540 x 540 px) Tumblr gif, Photoshop can just work around with 42-50 max number of frames with color adjustments applied before it exceeds the 10 MB file size limit of Tumblr.

Sometimes I skip this step because it can be exhausting (haha) and include everything so I can decide visually which frames to keep later on. You'll understand what I mean later on. But it's important to keep the Tumblr 10 MB file size limit in mind. Fewer frames, or just the right amount of frames, is better.
So, with the screenshot organization out of the way, let's finally head over to Photoshop.
Giffing in Photoshop, yay!
Let’s begin by navigating to File > Scripts > Load Files into Stack…

The Load Layers window will appear. Click the Browse button next.
Find your chosen screenshots folder, press Command + A to select all files from that folder then click Open. Then click OK.
After importing and stacking your files, Photoshop should display the following view:

By the way, I'll be providing the clip I've used in this tutorial so if want to use them to follow along be my guest :)
If you haven't already opened your Timeline panel, navigate to Windows > Timeline.
Now, let's focus on the Timeline panel for the next couple of steps.
Click Create Video Timeline, then you’ll have this:

Now click the menu icon on the top right corner then go to Convert Frames > Make Frames from Clips

Still working on the Timeline panel, click the bottom left icon this time—the icon with the three tiny boxes—to Convert to Frame Animation
Select Make Frames From Layers from the top right corner menu button.
So now you have this:

Go and click the top right menu icon again to Select All Frames
Then click the small dropdown icon to set another value for Frame Delay. Select Other…

The best for me and for most is 0.05 but you can always play around and see what you think works for you.
Click the top right menu icon again to Reverse Frames.
I think Photoshop has long since fixed this issue but usually the first animation frame is empty so I just delete it but now going through all these steps there seems to be none of that but anyways, the delete icon is the last one among the line of feature buttons at the bottom part of the Timeline panel.
Yay, now we can have our first proper GIF preview of a thirsty Lena 😜

Press spacebar to watch your gif play for the very first time! After an hour and half of selecting and cutting off screenshots! 😛 Play it some more. No really, I’m serious. I do this so even as early (lol) as this part in the gif making process, I can see which frames I can/should delete to be within the 10 MB file size limit. You can also do it at the end of course 🙂
Now, let’s go to the next important steps of this tutorial post which I’ve numbered below.
Crop and resize to meet Tumblr's required dimensions. The width value should be either 540px, 268px, or 177px.
Convert the gif to a Smart Object for sharpening.
Apply lighting and basic color adjustments before the heavy coloring. I will be sharing the base adjustments layers I use for my gifs 😃.
1. Crop and Resize
Click on the Crop tool (shortcut: the C key)

I like my GIFs big so I always set this to 1:1 ratio if the scene allows it. Press the Enter key after selecting the area of the frame that you want to keep.
Side note: If you find that after cropping, you want to adjust the image to the left or another direction, simply unselect the Delete Cropped Pixels option. This way, you will still have the whole frame area available to crop again as needed and as you prefer.
Now we need to resize our gif and the shortcut for that is Command + Opt + I. Type in 540 as the width measurement, then the height will automatically change to follow the ratio you’ve set while cropping.
540 x 540 px for 1:1
540 x 405 px for 4:3
540 x 304 px for 16:9
For the Resample value I prefer Bilinear—but you can always select the other options to see what you like best.
Click OK. Then Command + 0 and Command + - to properly view the those 540 pixels.

Now we get to the exciting part :) the sharpen settings!
2. Sharpen
First we need to have all these layers “compressed” intro a single smart object from which we can apply filters to.
Select this little button on the the bottom left corner of the Timeline panel.


Select > All Layers
Then go to Filter > Convert for Smart Filters
Just click OK when a pop-up shows up.
Now you should have this view on the Layers panel:

Now I have 3 sharpen settings to share but I’ll have download links to the Action packs at the end of this long ass tutorial so if you want to skip ahead, feel free to do so.
Sharpen v1
Go to Filter > Sharpen > Smart Sharpen…
Below are my settings. I don’t adjust anything under Shadows/Highlights.
Amount: 500
Radius: 0.4
Click OK then do another Smart Sharpen but this time with the below adjustments.
Amount: 12
Radius: 10.0

As you can see Lena’s beautiful eyes are “popping out” now with these filters applied. Click OK.
Now we need to Convert to Frame Animation. Follow the steps below.
Click on the menu icon at the top right corner of the Timeline panel, then click Convert Frames > Flatten Frames into Clips
Then Convert Frames > Convert to Frame Animation
One more click to Make Frames From Layers
Delete the first frame then Select All then Set Frame Delay to 0.05

and there you have it! Play your GIF and make sure it’s just around 42-50 frames. This is the time to select and delete.
To preview and save your GIF go to File > Export > Save for Web (Legacy)…
Below are my Export settings. Make sure to have the file size around 9.2 MB to 9.4 MB max and not exactly 10 MB.

This time I got away with 55 frames but this is because I haven’t applied lighting and color adjustments yet and not to mention the smart sharpen settings aren't to heavy so let’s take that into consideration.
Sharpen v1 preview:

Sharpen v2
Go back to this part of the tutorial and apply the v2 settings.

Smart Sharpen 1:
Amount: 500
Radius: 0.3
Smart Sharpen 2:
Amount: 20
Radius: 0.5
We’re adding a new type of Filter which is Reduce Noise (Filter > Noise > Reduce Noise...) with the below settings.

Then one last Smart Sharpen:
Amount: 500
Radius: 0.3
Your Layers panel should look like this:

Then do the Convert to Frames Animation section again and see below preview.
Sharpen v2 preview:

Sharpen v3:
Smart Sharpen 1:
Amount: 500
Radius: 0.4
Smart Sharpen 2:
Amount: 12
Radius: 10.0
Reduce Noise:
Strength: 5
Preserve Details: 50%
Reduce Color Noise: 0%
Sharpen Details: 50%
Sharpen v3 preview:

And here they are next to each other with coloring applied:
v1

v2

v3

Congratulations, you've made it to the end of the post 😂
As promised, here is the download link to all the files I used in this tutorial which include:
supercorp 2.05 Crossfire clip
3 PSD files with sharpen settings and basic coloring PSD
Actions set
As always, if you're feeling generous here's my Ko-fi link :) Thank you guys and I hope this tutorial will help you and make you love gif making.
P.S. In the next post I'll be sharing more references I found helpful especially with coloring. I just have to search and gather them all.
-Jill
#tutorial#gif tutorial#photoshop tutorial#gif making#sharpening#sharpening tutorial#photoshop#photoshop resources#psd#psd coloring#gif coloring#supercorp#supercorpedit#lena luthor#supergirl#my tutorial#this has been a long time coming#guys. i'm BEGGING you. use the actions set - it was a pain doing all this manually again ngl LMAO#i've been so used to just playing the actions#so this has been a wild refresher course for me too 😆
494 notes
·
View notes
Text
update: I went from 228 to 174 last night and fun fact this program finds and deletes duplicates so guess who’s deleting 3000 files rn
deleted 30gb of cc
#I was at 169 before duplicate deletion#will update afterwards#I also had cc lots and forgot to remove the zip files from my folder#so that got rid of 15GB
21 notes
·
View notes
Text
About Sims 4 Mod Manager

It came to my attention a few days ago that a popular program used for sorting custom content, Sims 4 Mod Manager, is based on Overwolf software. The issue with this is that ad placements on Overwolf programs give a 20-30% cut to Overwolf directly. As stated on their website. I know it is an Overwolf program because you can find Overwolf files within it:

Personally, I do not mind un-obstructive ads on free programs as long as they are vetted by the developer, but I do not want to give Overwolf any money. So I will be kindly contacting the developer via the contacts on his website and ask he divest and use a different avenue with the ads. Maybe moving to github instead. He is also recently released a curseforge integrated app.
If you are to request the divestment, please please do so with respect as to invite people INTO the conversation and not put them in a defensive position. No one likes to listen when they are being threatened or harassed. 🤷♀️
I know many will be disappointed with this news as it is a great, one of a kind program, so I wanted to offer some alternative methods besides manually sorting custom content:
Sims 4 Mod Assistant: A small app used to find duplicates and mod conflicts. Also supports filtering and moving files to other folders. Available on Mod the Sims and Github.
S4Pavir: It's not that pretty, but it can be used to view, remove, and sort cc. Available on Github.
You can also use sims tray importer to sort through cc. Dress your sims in all the cc you want to remove or place build/buy items on a lot. Save the sim/lot to your library and use Sims 4 tray importer to view the list of cc used, and open its file location to delete. Available on Luniversims (.fr)
Sims 4 Studio can also be used to view, edit, and delete cc. Available here.
Let me know of any other methods you know or notify me if there are any issues with these two programs.
Hopefully there is a positive outcome with reaching out to the creator. Please be respectful and you can use my pinned post as a reference for why curseforge is a problem. 🙏
Edit:
Update on Sims 4 Mod Manager
After going through the older versions of Sims 4 mod manager I have found out that Version 1.0.9 Beta (Windows 10, 11 for me) does not have Curseforge ads. I think this is suitable option to use the mod manager without giving direct ad revenue to Overwolf/Curseforge.


When you go to the Sims 4 Mod Manager site, click other versions and scroll until you find this version. It does not have all the current features, but it works. You can uninstall your current version by searching the app in your start menu (Windows), right click and select 'uninstall', and click 'uninstall' again once you find it in the list that comes up.
(I do not have Mac, so I do not know if the later version 1.1.3 Beta, will also not have ads. If you download it please let me know.) I will update my original S4MM post with this info and also put it in a reblog so hopefully everyone can see this.)
It doesn't have the sort to subfolders option, but my way around that is to sort cc into a "moving folder" and then open your regular file explorer and cut and paste those items to your sub-folder manually. Easy peasy!
546 notes
·
View notes
Text
iii. garden.
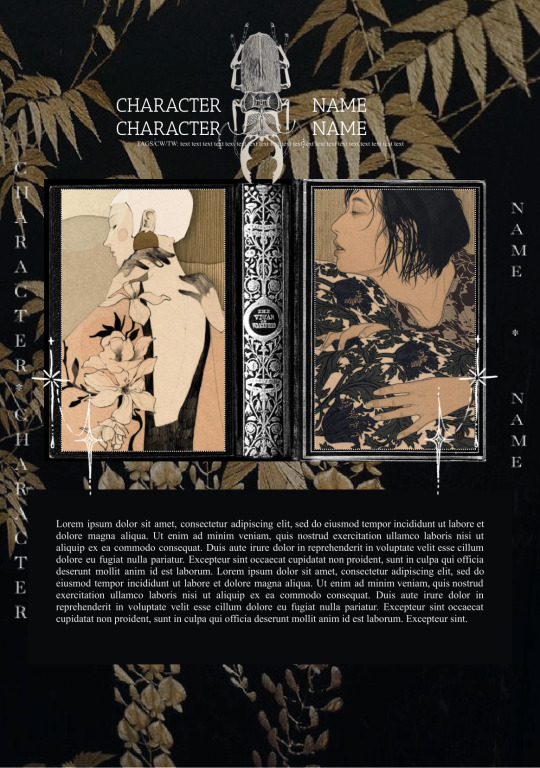

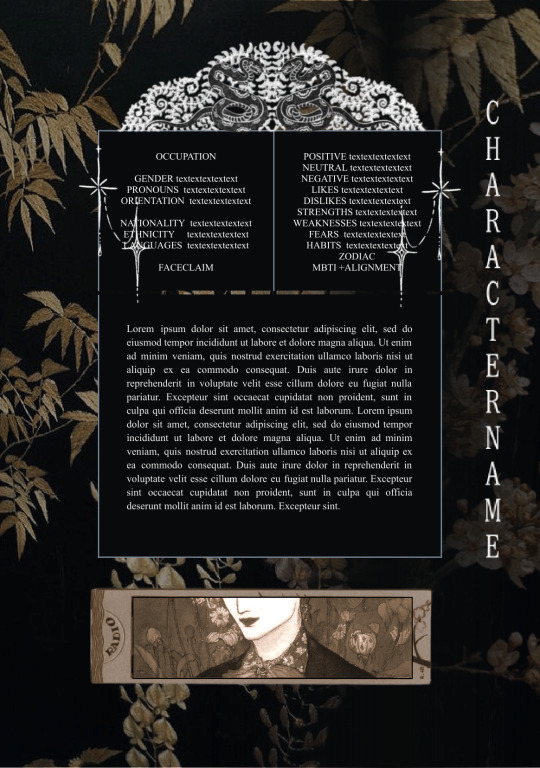
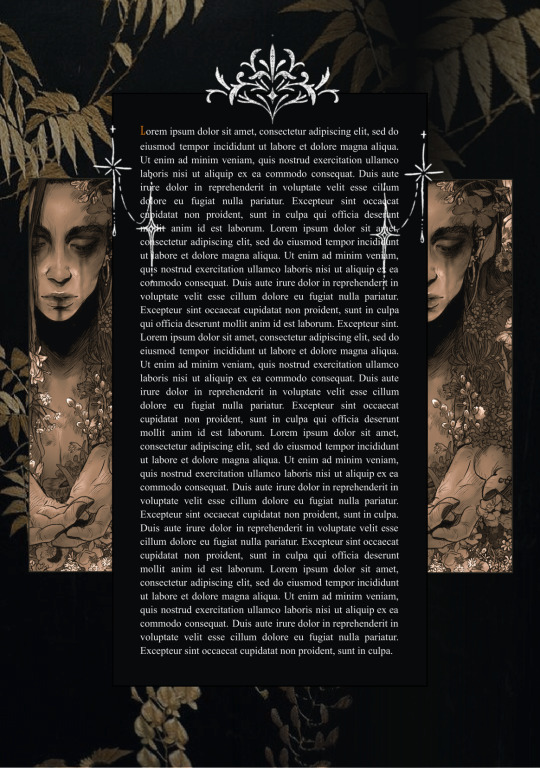
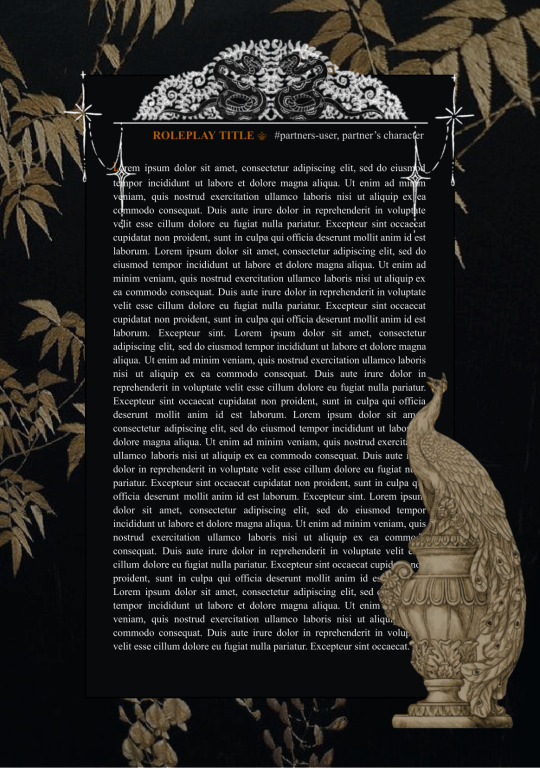
this is a 16-page shipping + roleplay tracker template combined and is fully customizable and easy to duplicate to include more space. don't be fooled by the five images, there are indeed 16 pages
& THANK YOU to lily, my hero
editing and modifications are welcome once you purchase the template.
all elements are created by me. If you take inspiration from this document, please credit me as the source of your inspiration.
there is credit, don't remove it.
please like or reblog this post if you use my template!
how to use
click underlined "garden"
download the template via my ko-fi
follow the instructions left on the note attached
once you receive access to the template, go to file → make a copy
#riot: original#google doc template#google docs#aesthetic template#google doc#google docs template#character template#discord rp#minimalistic#minimalism#elegant#elegance#paid template#multimuse rp#muse template#multimuse#floral#flowers#bugs#tw bugs
1K notes
·
View notes
Text
FF14 Battle Portrait Tutorial
For the past few weeks I was trying to find a way to recreate the battle portrait from FF14 as there was a few characters that I want to see in that style but don't officially have one yet. I think I got it down more or less (see image below) so I thought it's a good time to share what I did.

First of all, I made a few files that would help make life a little easier. They can be grabbed here .
Note: I did use Reshade to do a bit of work at the screenshot stage to help speed up the process but the same effect can be recreated in Photoshop with a vanilla screenshot. There are a lot of tutorials on how to do comic/cartoon effect in photoshop and those would make good bases to work off of.
Step 1: Take the screenshot with the PortraitBase Shader on. I usually take two screenshots. One with "Comic" on and one with it turned off. This is so that I have more to work with if needed.


Step 2: Drag all the screenshots into photoshop and remove the background. In photoshop, arrange the layer so that the screenshot with the Comic lines visible is on top of the one with the effect off.
Step 3: Duplicate the the layer with the "comic" effect and apply Blur->Gaussian blur (radius 0.5)
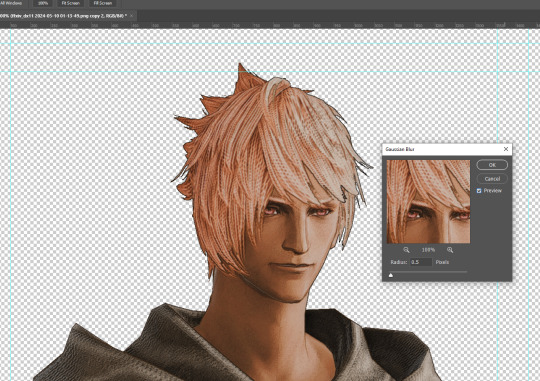
Step 4: Take a look at the hair. In Eric's case, It still doesn't look blur enough to me so I used the blur tool and blurred it a bit more
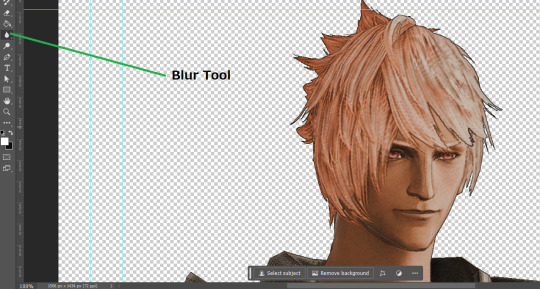
Step 5: Create a new layer above the layer in the previous step and use the brush tool to start outlining the edges. Where to outline is up to you but the idea is to make edges defined so that it looks more like a drawing.

Step 6: Duplicate the outline layer and then hide that layer. Step 7: Merge everything under the outline layer. Step 8: Drag and drop the "Texture.png" into the project and Clip it to your character layer. Set the blending of the texture to "soft light". Step 9: Drag and drop the "stroke Texture.png" into the project and Clip it to your character layer. Adjust the size till you are happy then set the blending to "overlay". Step 10: Adjust the opacity settings of both texture layers until it looks good to you.
Step 11: Click on your character layer and go to image->Adjustments->Hue/Saturation (note: you will see I dragged in the official Hades portrait as a point of reference to work off of). Adjust the saturation till you are happy.
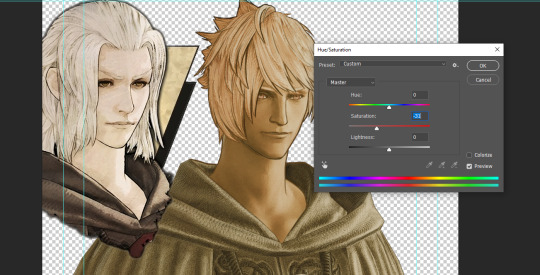
Step 12: Go to image->Adjustments->Color Balance and adjust the color till you are happy. In this example, since Eric is also wearing the Sophist robe, I tried to match that color to Hades' Sophist robe color.
Step 13: Once you are happy, drag the "Template.png" into the project and scale that to the size you want. Make sure it is completely covering the character. If it's not, you can just use paint more of it with the brush tool to extend it till it covers everything.

Step 14: Hide the "template.png" layer and select your character layer. Use the magic wand tool to select the outside of the character.
Step 15: With the selection still selected, click on the "Template.png" layer and press delete on your keyboard. You should now be left with a blank in the shape of your character.

Step 16: Drag the"Template.png" layer to be below your character layer. Then click on your character layer and clip it.
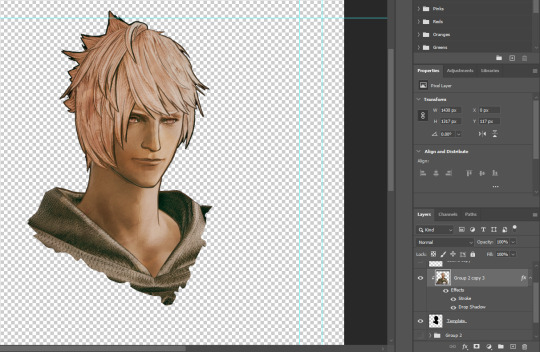
Step 17: Click on the "Template.png" layer and add a 2px stroke and shadow to it.
Step 18: Drag "Back_Deco.png" into the project and place it behind your character. Scale it till you are happy with it.

And that's it! Now you can recreate portraits for any NPCs that you want (in theory). A lot of it is also fine tuning to what you want but this should at least give you a decent base to work off of :)
971 notes
·
View notes
Text
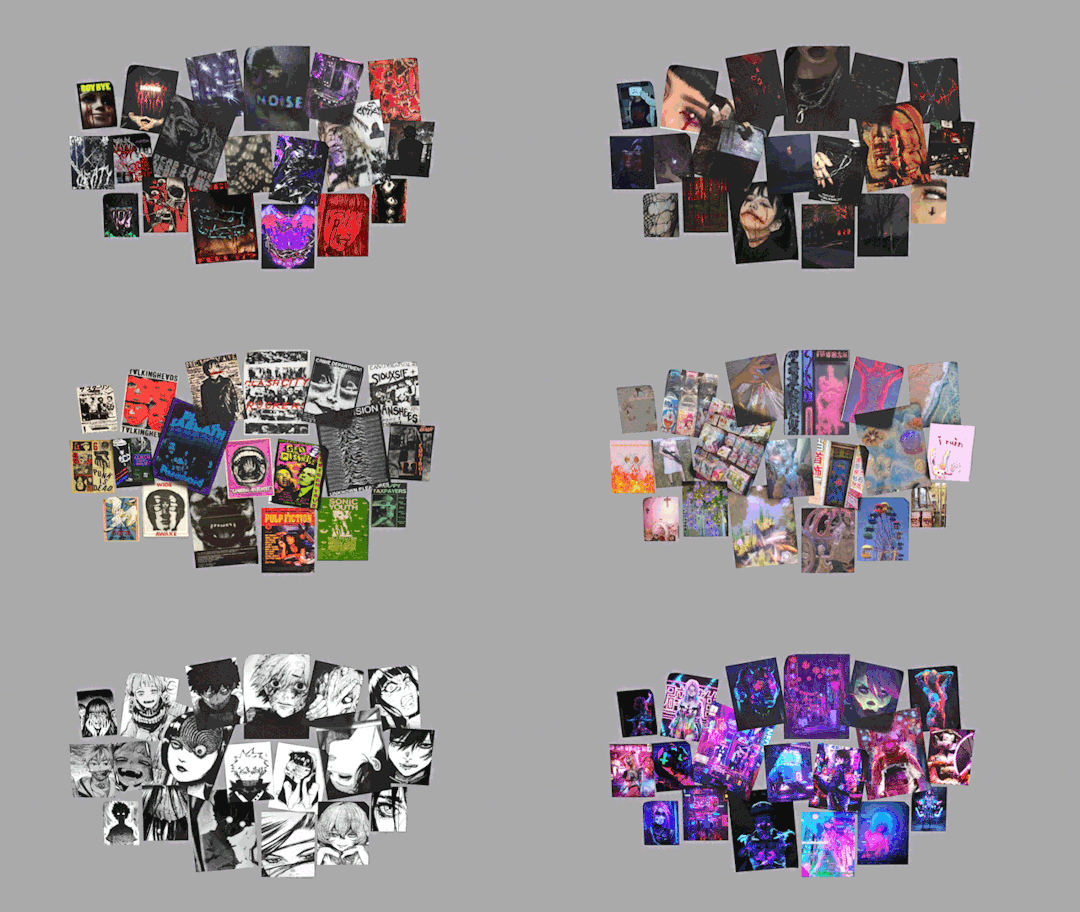
4t3 Conversion of Grouped posters by @cosmiccs4 + Recoloring PSD with tutorial
8 non-recolorable presets
1024 textures
Included PSD for retexturing (tutorial how to use under the cut)
113 poly, all LODs
Shiftable
Price - 5§
BGC
Compressed package
TOU, Ko-Fi

DOWNLOAD | ALT | SIMBLR.CC
Tutorial: How to use my PSD for retexturing
You need:
Photoshop with .dds plugin
My retexture PSD and package file of posters
19 pictures to your liking, preferably vertical
TSRW
Sims3Pack Multi Installer and Compressionizer
Step 1: Open my PSD file, open your images:
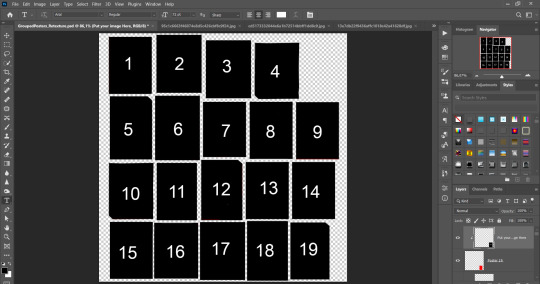
Step 2: Select (Ctrl+A) copy and paste to posters file (Ctrl+C, Ctrl+V) first of your images :
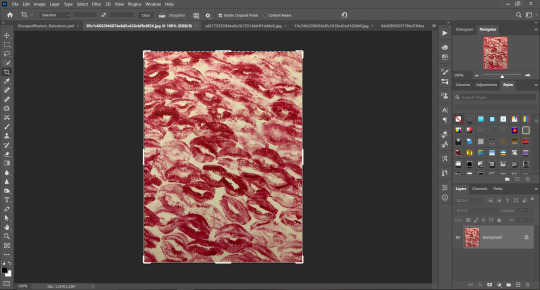
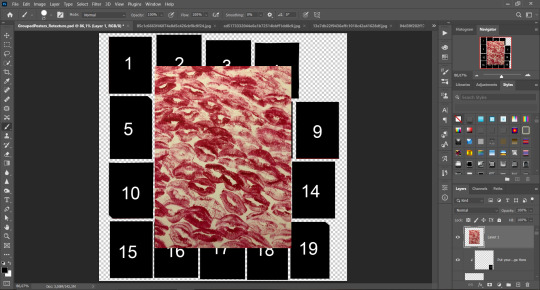
Step 3: Choose where you want to put it, for reference you can use one of the presets:
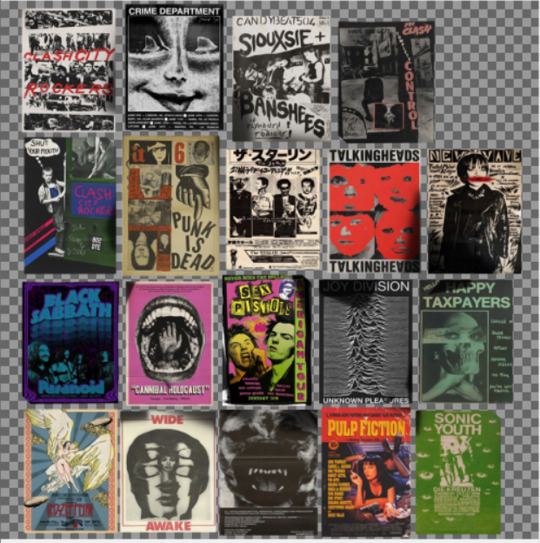
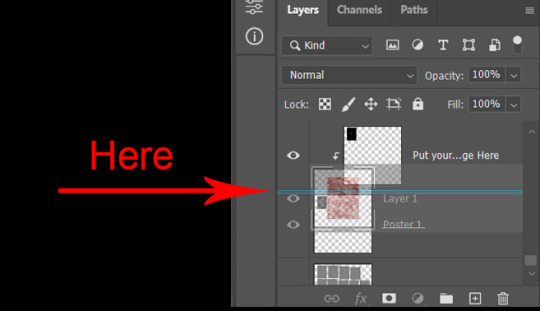
Step 4: After you decided with placement of your image. Move its layer in the Layers tab between "Poster x" and "Put your image here" layers, it will create a clipping mask, which allows the picture to be fit within the poster without cropping. Hide or delete "Put your image here" layer.
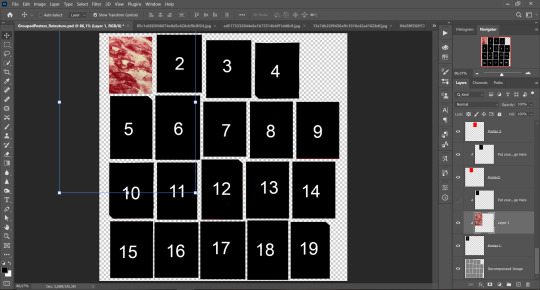
Step 5: Use Transform, Free Transform and Move tools to resize the image by your liking:
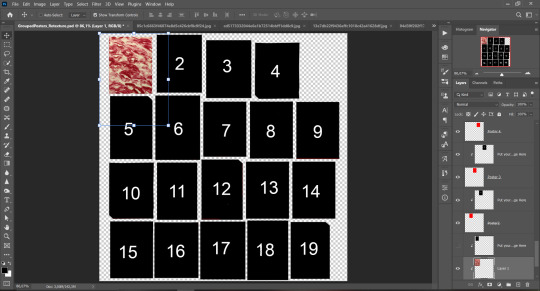
Step 6: Repeat the Step 2-5 with other 18 images:
*vibes are totally random, all images from Pinterest*
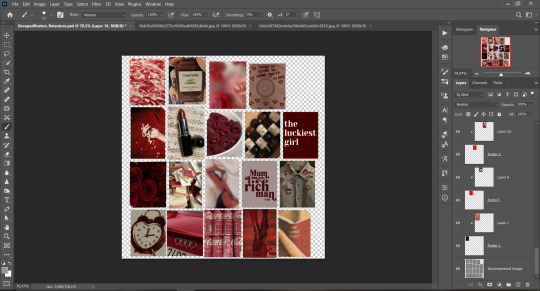
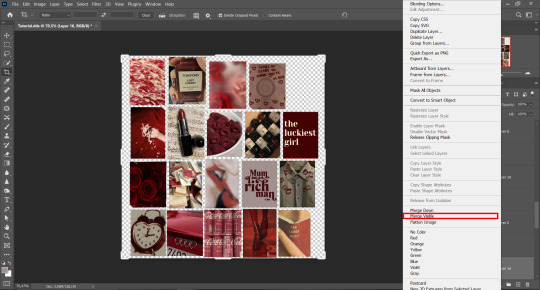
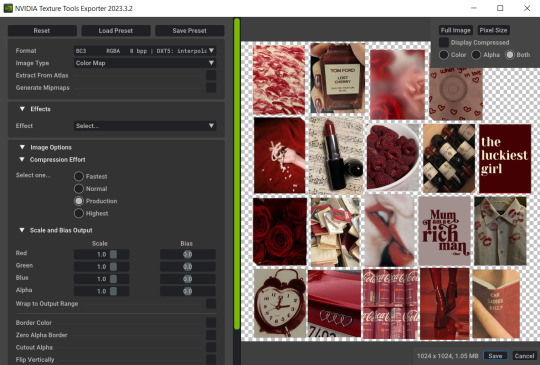
Step 7: After you've done, delete all the "Put your image here" layers, if you didn't it before. Right-click on the Layers tab and press Merge Visible (Shift + Ctrl + E). Now press Save As (Control + Shift + S) and save your image as .DDS with this parameters (2nd picture):
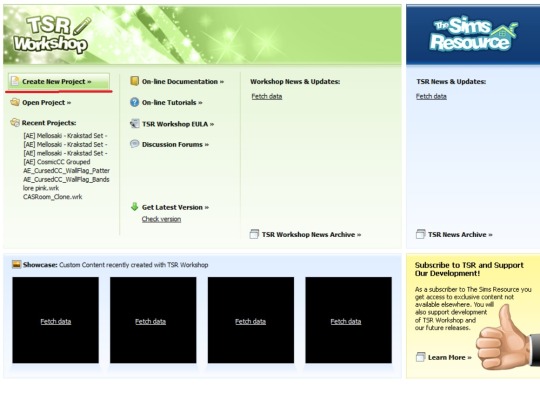
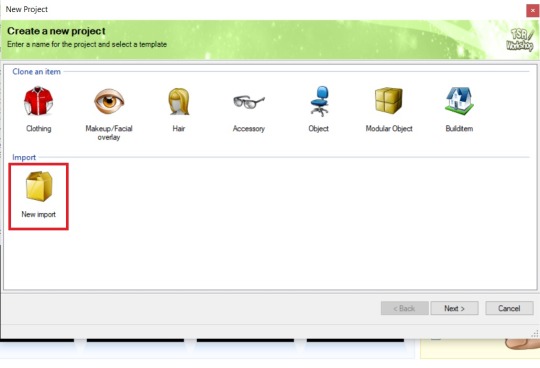
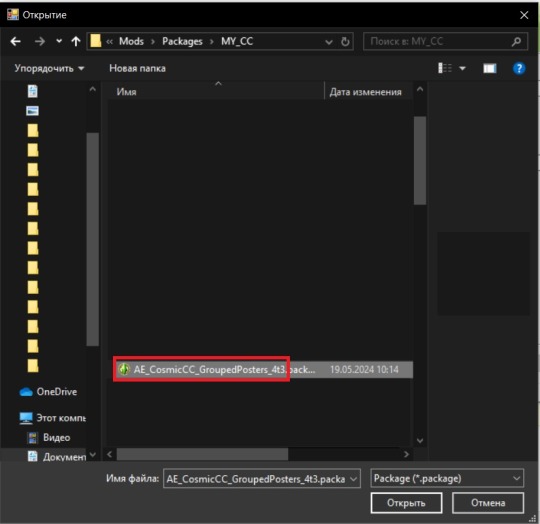
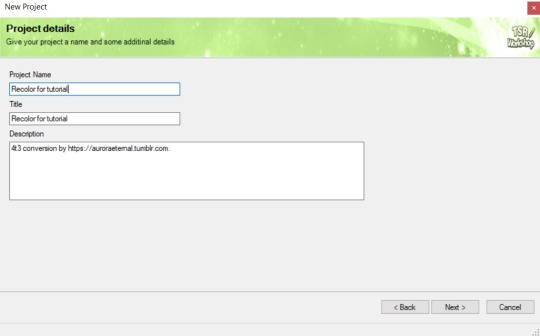
Step 8: Go to TSRW. Press Create New Project > New Import, and select package with my posters. Give for your recolor unique Title and Project name, otherwise it will override original posters:
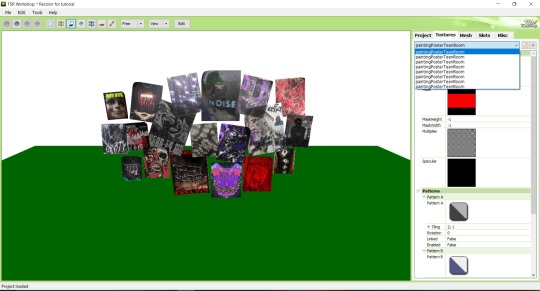
Step 9: In Textures tab go through all the presets except the first one and delete them. Then go to Edit > Project Contents and remove all the textures of removed presets. Its pretty common when someone make retexture of TS3 mesh and leave that unused textures in file, which leads to increasing its size:
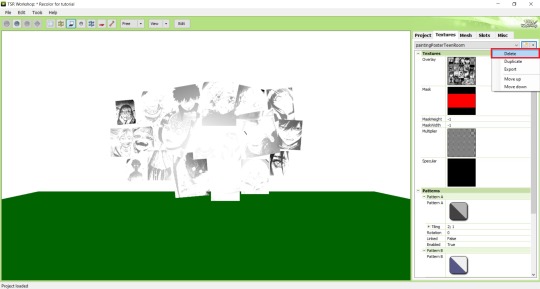
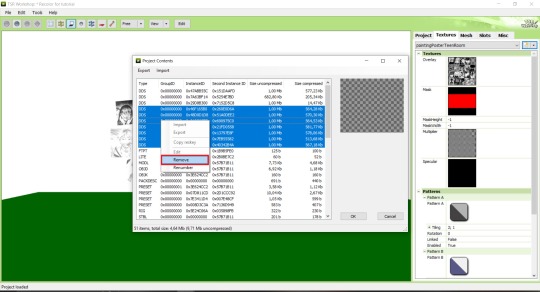
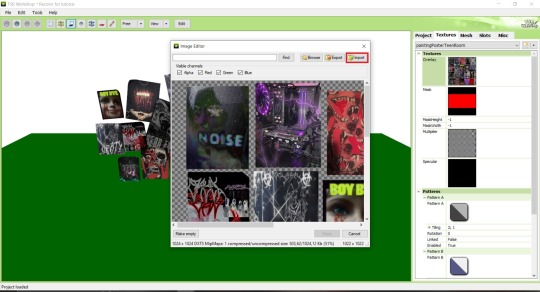
Step 10: Press Edit button next to the Overlay tab. Then press Import button and select your retexture. Press Done and when this pop-up appears, press Yes:
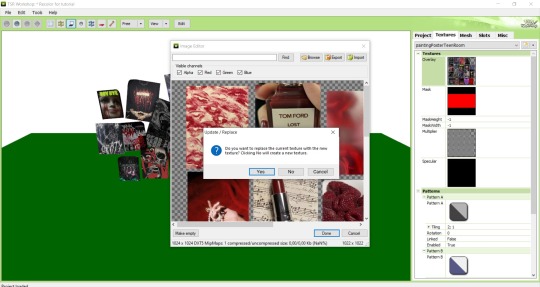
Step 11: If you want to add more presets press Duplicate and reapeat Step 10, but instead, when pop-up about replacing the texture appears, press No.
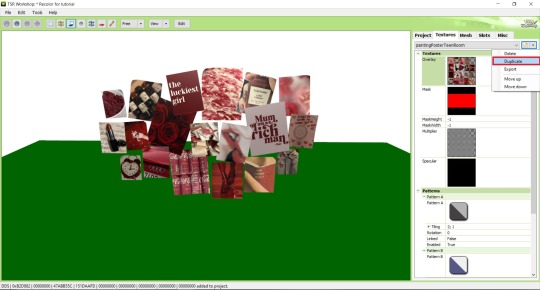
Step 12: After you've done, press File > Export > To Sims3pack or Edit > Project Contents > Export > To .package. If you choose the first method, convert your Sims3pack to Package and in both cases run it through Compressionizer. Test your recolor In-game, make thumbnails (if you want to share it) and have fun!
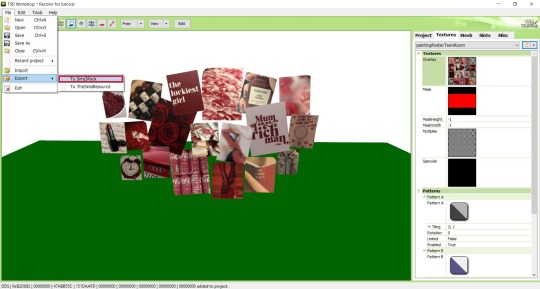
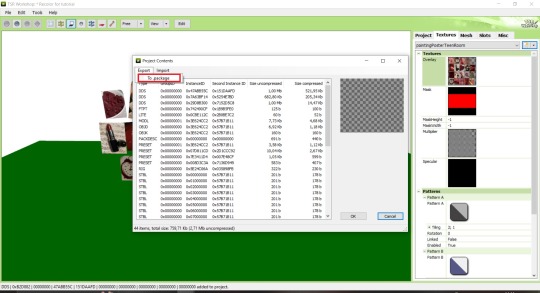
For those who read this tutorial to the end, click HERE to download this recolor.

@pis3update @xto3conversionsfinds @wanderingsimsfinds @kpccfinds @simfluencer-network @sssvitlanz @simblrcc-site
855 notes
·
View notes
Text
Chalk'd UI - Lovestruck Update [26 July 2024]
Before downloading this new update, please remove old versions and clear any caches!
Main Mod Page & Patreon post
Current version: Lovestruck EP + July 25 emergency patch
+ Updated for the Lovestruck EP patch and the follow-up emergency patch. Now requires the latest UI Cheats Extension v1.42.1.
+ Added dark mode for the new Cupid's Corner panel and its phone icon 💘 Also updated the Social Bunny phone icon.
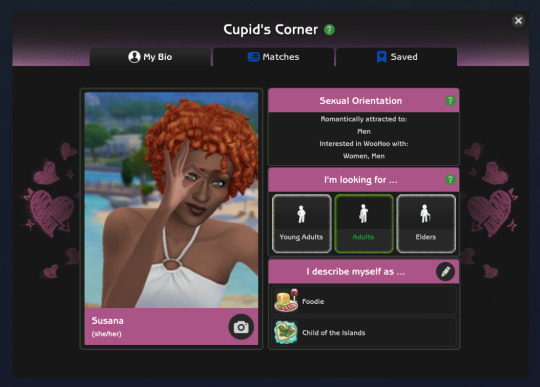
+ Updated CAS & GUI files to fix the loading issue and include the new Romantic Boundaries panel and Copy button. Now entering CAS should no longer stops your game.
+ Updated Game Options file to include the new Safe for Streaming UI in the Music tab.
+ Updated several Live Mode related UIs and fixed the issue of not being able to access the Simology panel and getting an empty Aspiration selection menu.
+ Added more phone icon overrides for other mods. Will be found in its own SFS folder to pick & choose.
Basemental mods (18+)
adeepindigo mods
SimRealist mods
// Mod Compatibility Info
With TMEX's new searchable menu mods, there are now more files that conflict with his mods which I've separated and placed in the Additional Files folder for you to remove and avoid conflicts. If you don't use his mod(s), you can keep the Standalone files and only remove the TMEX_Compatible files to avoid duplicates ^^ If you want to use his mods, remove the conflicting Standalone files. You can find out more in the README text found in the folder.
Thank you for your patience 💞 will be back in a day or two as I work on the Sims 2 UI and release it!
let me know if there are issues in case I missed it ~_~
453 notes
·
View notes
Text


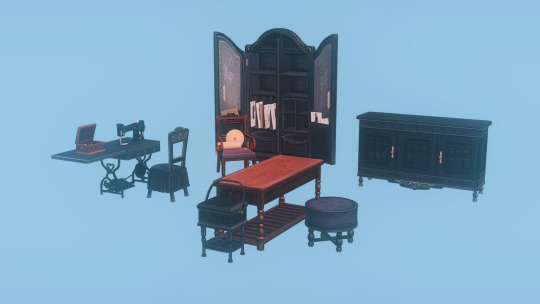
Crashcraft's vintage sets in Cluedo colors
✿ This is for the sims 2 ✿
Here are recolors I made of various Cashcraft sets for use in Éclaire. I recolored only the objects I thought I'd like to use in my game, so not all of the sets are present in full.
Please also note that I wrote cluedo colors, and not woods. No way in hell I was going to handpaint all that to change the wood grain, sorry.
What's included?
✿ 6 objects from the Magnolia Hill Dining set (buffet, china cabinet, curio, hutch, mirror and sideboard);
✿ 6 objects from the Regency set (tea set, dining chair, cabinet, sideboard, china cabinet and armchair);
✿ 30 objects from the Vanity Fair sets (armchair, canopy, cash register (req. OFB), chaise, coffee table, curtain, desk chair, end table, footstool, handbag, hat, 3 lamps, mirror, parlor chair, perfume tray, round table, sewing basket, sewing clutter, cutting board, desk, screen, sewing shelf, worktable, sofa, tall cabinet and vanity);
✿ 7 objects from the Victorian set (chafing dish, chair, painting, sideboards, hutch and table);
✿ 5 objects from the Vintage Charm set (alarm clock, bed, books and 2 lamps).
DOWNLOAD (SFS)
Meshes, swatches and previews included, files compressed and clearly named.
✿ I renamed the meshes to remove any special characters, so check your download folder for duplicates manually if you already have Cashcraft's sets in your game.
Credits: Cashcraft, @cluedosims.
636 notes
·
View notes
Text
Ask Masterpost 2/1/2025
Fourth edition! I changed some formatting things for better readability.
Summary:
Permissibility of creator-leaked/teased soundtracks (Not allowed)
Proposal of demographics poll
Permissibility of Simlish covers (Allowed)
What franchise has the most polls?
Permissibility of remixes of licensed music (Allowed)
Inquiry about duplicate submissions
Permissibility of pinball soundtracks (Not Allowed) and Inquiry about ports of older games
Permissibility of unused tracks in the game files (Allowed)
Permissibility of roblox game tracks (Allowed)
Highest "I like & I know it" song?
Inquiry about revealing the composer before the reveal
Proposal of demographics poll
"Can we submit 'leaked' soundtracks from games if the creator leaked/teased them?"
I'm going to say no, because there's a broad spectrum of scenarios that could happen in between the 'leak' and the official launch of the song that would technically make the 'leak' not indicative of the final product and of course you don't know that until the final product is released :').
----------
@pomrania asked:
Is there any chance we could get a poll on what people mean when they vote for that they like a song, or that it sounds familiar? For me, "I like this song" means "I'd want to listen to it again once it's revealed", and "it sounds familiar" generally means "I'm not sure whether I've heard it before but I might have" also sometimes it's "I know I haven't heard this SPECIFIC song before, but I recognize the motifs in it".
Or if that's not something you'd want to make a poll for, then I'd still be interested in seeing what people say for how they vote on things, like in the comments.
I think this would be super interesting to do for a special event or something like that! I've been curious about demographics and other general statistics for a while now. I'm actually starting to have quite a good rhythm with managing the blog now so I may begin implementing the fun side ideas I've had sometime soon (or at least, I hope so, this semester is looking rough LOL)
----------
Can we submit simlish versions of popular songs, like simlish Katy Perry?
They're remixes for a game so absolutely! I think we already have some in the submissions queue.
----------
Which franchise/game has the most polls?
It's probably destiny (forlorn, distant stare).
----------
@haellen-o asked:
Is licensed music created/remixed for video games allowed?
(examples being the version of rob zombies dragula in the original jet set radio. And ludens by bring my the horizon)
It's an official remix for the game's soundtrack, so absolutely :).
----------
Out of curiosity, how often do you get duplicate requests from different people (or maybe the same person, worried you never got their first response, lol)? I think you've said you have around 7,000 requests, is that after removing duplicates or before?
We honestly have a lot of duplicate requests for popular games, and we've been shaving down the duplicates as we go along and queue new submissions. I think we've cut down AROUND ~1000 duplicates so far (we're not done!) and these are mostly very popular (at least on tumblr) games such as disco elysium, sonic series games, in stars and time, final fantasy, pokemon, tf2, mass effect, hollow knight, legend of zelda, just off the top of my head. The 7000 number was from before removing duplicates.
----------
for older games where the music is ported to different consoles, would the soundtracks be considered separate if the soundfonts impact them enough, or do they have to be very, VERY different? Like if a game was released on pc vs a 32x port.
Also, if a pinball cabinet includes a soundtrack, is that considered a video game soundtrack?
I would honestly just submit your PREFERRED version (if the soundfonts did differ), and I would put BOTH versions into the reveal, since I don't think this is a common enough occurrence to be significantly obnoxious/unfair for whatever reason. As for the pinball question, last masterpost answered overwhelmingly 'no', so I'm going to say no as well :').
----------
Are unused vgms allowed for submission? So in the files but never added to the game itself.
If you can credit the creator of the tracks then yes! (provided they're in the files in the final publicly released version and not from a demo/waiting for a future update to be implemented in a live service game/etc)
----------
are roblox games allowed?
Yes, if you can credit the creator of the tracks and they were made for that roblox game :).
----------
what song had the highest "I like it and I've definitely heard it before" percent?
I think it is still #100, which was Megalovania from Undertale (85.20%) Correction: It's Death By Glamour, #460, at 87% :)
----------
@enderlordisadumbusername asked:
are we allowed to mention song composers before the song has been revealed?
Absolutely!!!!!!!!!!!!!! And please do!!!!!! (This will literally only give away the game if you were already familiar enough to know the composer, so it's actually very perfect)
----------
Would you or have you ever run a poll to gauge how much of a song your followers listen to before voting?
Definitely considering it after learning a lot of people don't listen to the full song or even at least the first minute...
95 notes
·
View notes
Text
MEGATHREAD OF KIM MENTIONS BY ALL SKILLS
While doing my max stats run, I noticed Rhetoric called Kim 'Kim'. I thought this was a little unusual, as I assumed blue skills would address him in a more formal fashion. This led me down a rabbit hole of how they all refer to Kim, so here you go.
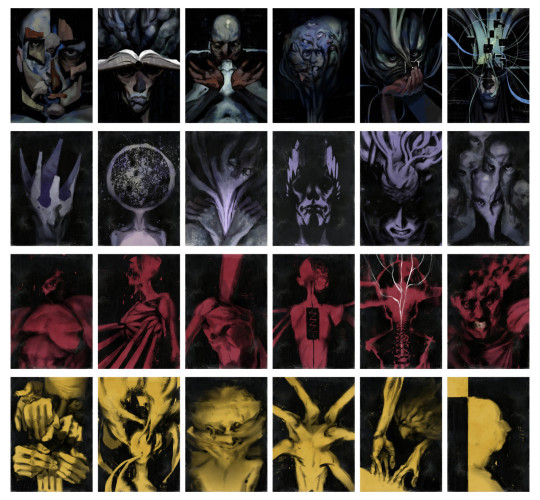
DISCLAIMER: These are all mined from fayde.co.uk (big shoutout, this post would not have been possible without it). I have removed all duplicates and interactions with variants ("Replaced with:"). It is also possible despite my best efforts my dyscalculia may have fked up with the larger figures but I did go over it multiple times, so it's unlikely. OK LET'S GO
BLUE SKILLS
LOGIC
All 3 mentions of 'Kim' are late-game. Otherwise, Logic defaults to 'the lieutenant'. Only 1 mention of 'Kim Kitsuragi' and that's only when talking about the case file number sequence for The Hanged Man.

ENCYCLOPEDIA
The full name usage is related to when you discover his past with pinball - even the one mention of 'Kim' is in reference to how Seolite people love pinball. Otherwise, the most common address is also 'the lieutenant'.

RHETORIC
Seems like the use of 'Kim' is an outlier and like I suspected, the default tends to be 'the lieutenant'. It wasn't a late vs. early game thing either because I got the 'Kim' mention on Day 1 of the game.

DRAMA
Interestingly, no 'Kim' at all. Drama prefers more bombastic and less personal terms, I guess.

CONCEPTUALIZATION
No use of 'Kim' or 'Kitsuragi'. The only direct address was the line "Dammit lieutenant, have you no intellectual curiosity?"
Otherwise, like most of the other blue skills, Conceptualization doesn't mention Kim that much.

VISUAL CALCULUS
Mentions Kim (in all forms) the least, which is not surprising.
Like all other blue skills, 'the lieutenant' is the most common used. They tend to be more on the less personal side.

PURPLE SKILLS
VOLITION
Only 1 direct address of 'lieutenant'. The line mentioning Pinball/Kimball is 'Any plan to call him Pinball or Kimball is immediately wiped from your neocortex, as if with some sort of mind altering device. It is simply not going to happen.'
Still more of a formal address preference.

INLAND EMPIRE
The only time IE uses 'Kim' is "If you can't trust your own eyes, who can you trust? Certainly not Kim. He's so… suspicious." in regards to finding a key card in Evrart's office.
Also prefers 'the lieutenant', like the blue skills.

EMPATHY
Also seems to refer to Kim in a more respectful way. The only mention of 'Kimball' is about footprints in the dust in the back of the Whirling: "This is so good it makes him forget the whole Kimball memory."
Also note the increased frequency in Kim mentions.

AUTHORITY
Of course 'Lieutenant Eyebrow' occurs during the famous showdown. One mention of 'Kim' is earlier game and one is late game. Makes sense Authority would be professional most of the time and use 'the lieutenant'.

ESPRIT DE CORPS
Will not shut up about Kim (101!!). Most mentions advise you not to complete important tasks without him. 1 repeat of 'Lieutenant Kitsuragi' mentions the black bomber jacket you get from hardcore mode. The last one is when Harry climbs the horse statue during the moralist run.
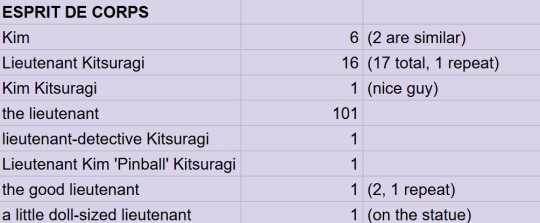
SUGGESTION
Much less quiet in comparison, but still polite.
Purple skills mention Kim a lot more, in general, than blue ones, which makes sense as they concern external affairs and people moreso. Out of all the skills, they refer to Kim the most, actually, as we will see.

RED SKILLS
ENDURANCE
The two instances of 'Lieutenant Kitsuragi' are during the confrontation with Ruby: "The torment Lieutenant Kitsuragi is experiencing is worse than your own."

PAIN THRESHOLD
Doesn't care about anyone but Harry, probably. Only mention is talking to Klaasje about the body hanging behind the Whirling: "A bitter cringe. It hurts. You look to the lieutenant…"

PHYSICAL INSTRUMENT
The most disrespectful. Refers to Kim as a binoclard the most out of all the skills.

ELECTROCHEMISTRY
The only mention of 'binoclard' is when you try to teach Lilienne's twins to say 'fuck'. EC cheers you on. Volition is disappointed, as is Kim ("deeply unimpressed").
"Why does he have to be such a binoclard? It's just a funny word!"

SHIVERS
Doesn't have much to say about the lieutenant. 2 of the 4 are variations of each other during the Moralist quest. Duplicates are due to the Noid vs. Soona version of the quest.

HALF LIGHT
One mention is during the game of Suzerainty, when Kim has the upper hand, which is a funny time for a fight-or-flight response to kick in.
In general, the red skills don't concern themselves much with Kim, since they largely are focused on Harry.

YELLOW SKILLS
HAND/EYE COORDINATION
Second least mentions of Kim in the yellow skills.

PERCEPTION
Both 'Kim' mentions are Sight. Mentions of 'the lieutenant' by category: 2 Smell, 6 Hearing, 2 Sight. (No Taste… sadly).

REACTION SPEED
Gets a little more fancy with it 'the good lieutenant' and also addresses Kim directly the most out of all the skills (2 mentions of 'lieutenant'): "Too late, lieutenant." and "Impressive note-keeping, lieutenant."

SAVOIR FAIRE
The duplicates have to do with a line during the Ultraliberal quest: "The lieutenant speaks as if you're rich -- a common misconception -- especially if you count the tax. No, we've got a long way to go before we can feel financially comfortable. The hustle never stops!"

INTERFACING
Least reference to Kim of all yellow skills, which is surprising considering the Kineema interaction.

COMPOSURE
The chattiest of the yellow skills about Kim, though yellow skills still have the second lowest mentions of the lieutenant.

STATS RUNDOWN
Total Kim mentions by colour
Blue: 82
Purple: 245 (thanks, EDC)
Red: 31
Yellow: 62
Top 3 mentions
EDC: 128
Empathy: 43
Rhetoric: 30
Bottom 3 mentions
Pain Threshold: 1
Interfacing, Shivers, VisCal: 4
H/E Coordination, Endurance, Half Light: 5
Most common address
the lieutenant: 335
Kim: 32
Lieutenant Kitsuragi: 26
So, overwhelmingly, most of the skills seem to default to 'the lieutenant'. Not just the blue ones. Hopefully, that helps someone, although how I have no idea.
BONUS: YOU!
What about Harry, you ask (or not)? I GOT YOU.
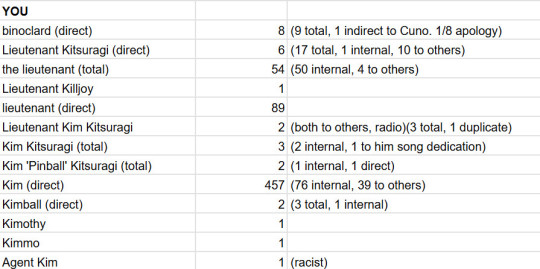
Harry calls Kim a binoclard more than Physical Instrument, though one time he says it as an apology.
Both times he uses Kim's full name and title is during radio comms.
Harry calls him 'Kim' to his face (457) more than 'lieutenant' (89) (spread over early to late game).
To others, Harry refers to Kim as 'Kim' 39 times, compared to 4 uses of 'the lieutenant'.
The only time Agent Kim is used is discussing the Seolite conspiracy.
That's it! One last parting gift: Kim refers to Harry as 'Harry' 15 times. :)
#disco elysium#harrier du bois#harry du bois#kim kitsuragi#meta#disco elysium meta#skills#disco elysium skills
139 notes
·
View notes
Text
Friday, July 21st, 2023
🌟 New
We’ve launched a new badge you can earn for viewing 601 or more posts on Tumblr in a day!
We’ve also launched the new activity view redesign on iOS, the same as what we built on web.
On desktop web, we’re running an experimental new version of the site navigation, which some users are seeing. This is a big change! Please send any constructive feedback you have to Support as “Feedback”. We’re reading through every piece of this feedback.
We’re also experimenting with a new design refresh for the direct messaging conversation window on web. Please send in feedback about that as well if you have any!
Also, we’re experimenting with new additions to the For You feed that aim to help get exposure to blogs that aren’t getting as much attention and engagement as more established blogs.
You can now edit posts with polls in them, and you can remove the poll, but you can’t edit the poll options themselves after the post has been created.
You can now upload WebP images in posts.
🛠 Fixed
Fixed a bug in the post editor that was allowing multiple native videos to be uploaded in the same post, and in reblogs, which could cause errors and the post being lost.
🚧 Ongoing
We’re aware that posts have been marked with a “Mature” community label incorrectly, and the appeals process failed. We’re working to resolve these issues ASAP and ensure it does not happen again. We’re truly sorry about this, it’s not acceptable for us to mess up this process.
There is a bug in the Android app causing it to crash if certain gifts are earned. We have a fix for this coming in the next version of the Android app.
We’re aware of a bug in the activity view in the iOS app which is duplicating the blog name in the activity text. We have a fix coming in the next app version here, too.
🌱 Upcoming
We’re working to add the ability to report ads specifically because they contain flashing images, so we can take action on them faster.
Experiencing an issue? File a Support Request and we’ll get back to you as soon as we can!
Want to share your feedback about something? Check out our Work in Progress blog and start a discussion with the community.
1K notes
·
View notes
Text
K-202 GROUNDY MOD MAJOR UPDATE 2023
Hello everyone :)
As the last expansion is out for around a week now, we have updated from the ground the k-202 Groundy Mod ...
Maxis made some real changes inside its painting terrains since 2022 and an update was a long time due ! That's why we called it a Major Update :)
missing base ones have been added AND updated
the Get Famous terrains have been removed by Maxis so we did
the Cottage Living ones are completed
the only one terrain paint from Wedding World has been added
the Chestnut Ridge ones have been added
Most of them are Maxis match but a few are really different :) Everything has been updated until for Rent Expansion but Tomarang has no terrain paint ...
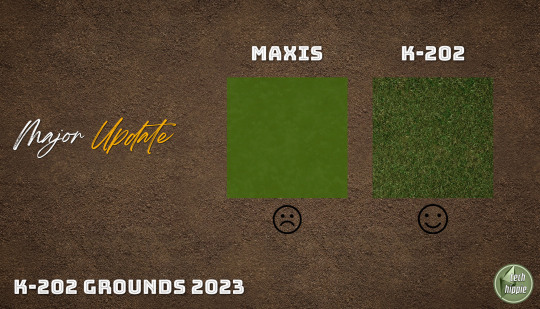
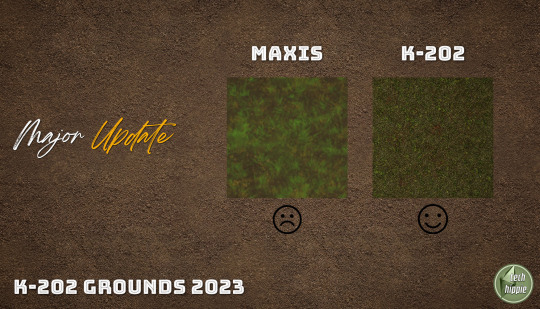
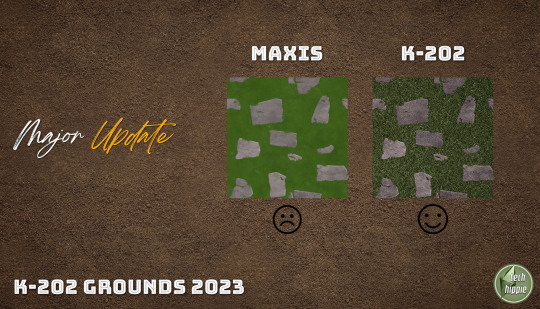
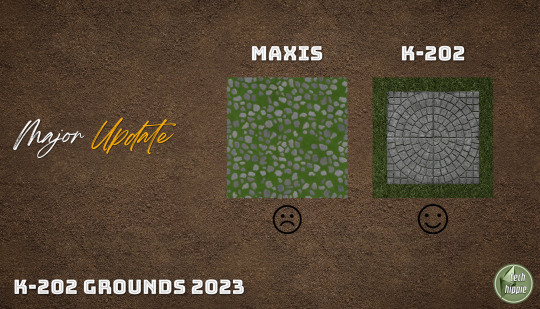
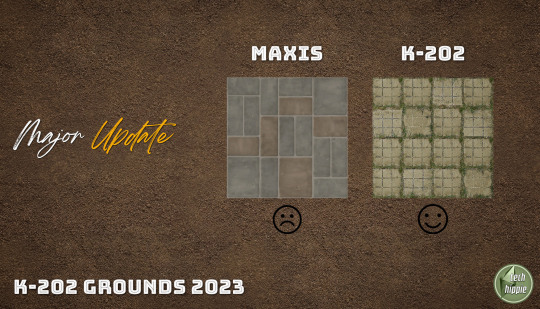
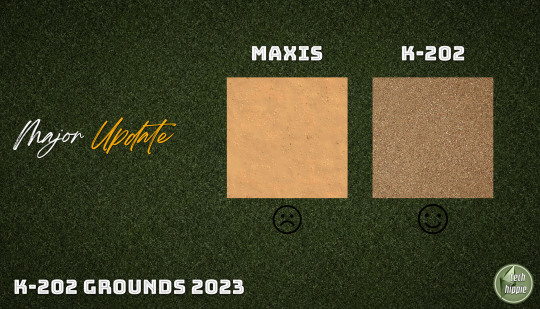
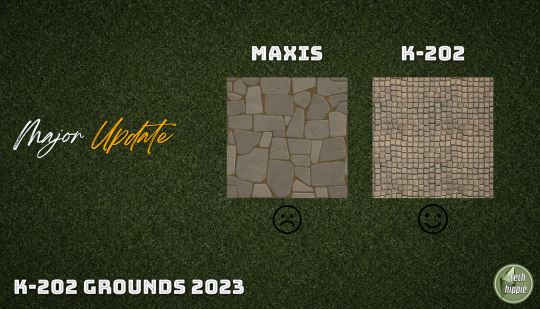
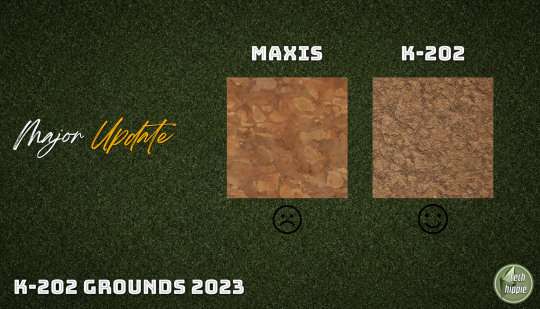
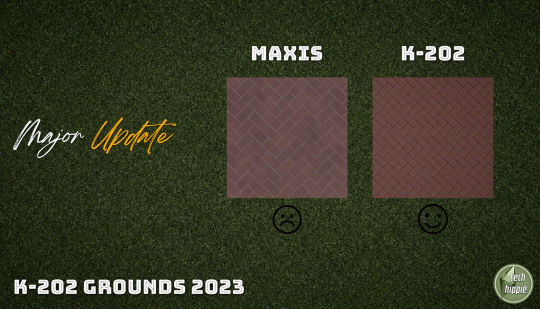
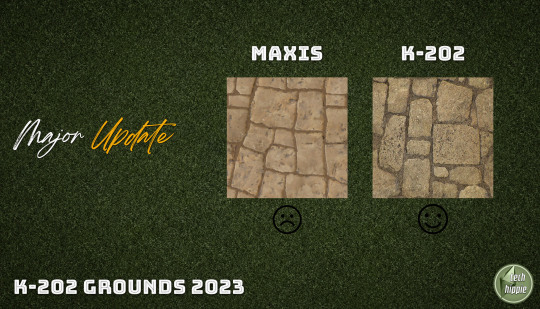
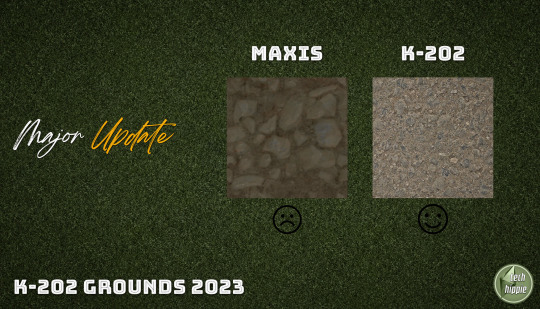
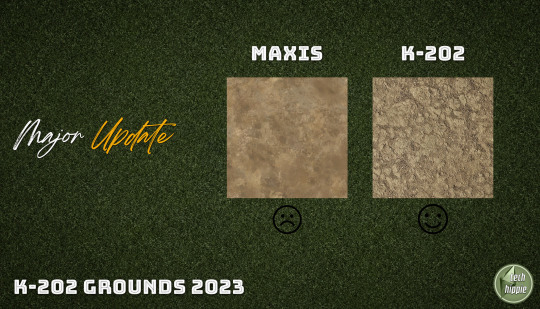
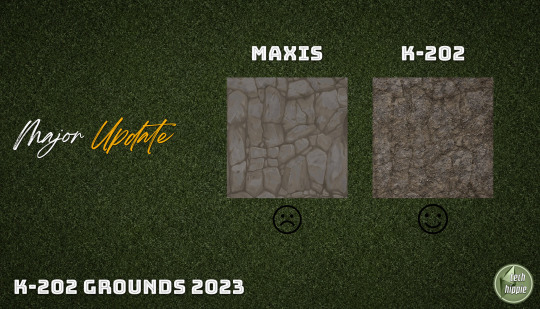
The ones which have terrain paints are : Willow Creek and Oasis Spring ( base game ) - Granite Falls - Windenburg - Evergreen Harbour - Sulani - Chestnut Ridge - Tartosa - Henford-on-Bagley
For those who do not know what is the k-202 Groundy Mod, they are terrain paints, the ones used by Maxis for the terrains you may modify AND all your inside lot terrains :) They are different from the k-505 terrains ( which cover the worlds ) ... And speaking about the k-505 : WE MADE A SILENT UPDATE OF THE K-505 BASEGAME ONLY IN ORDER TO REMOVE THE DUPLICATES AND TO BE FULL OK WITH THIS K-202 UPDATE !
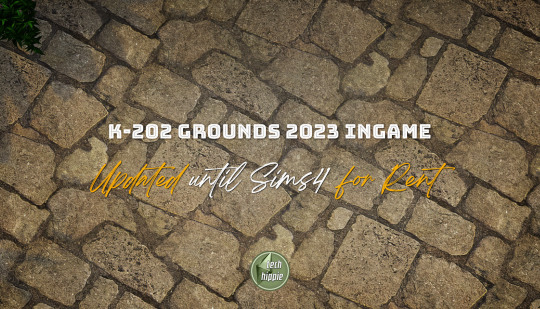
ALL THE K-202 FILES OVERRIDE THE GAME FILES AND WORK VERY FINE IN-GAME …
These updates are our last updates before the new year. But rendez-vous before Xmas for a k-hippie talk & news related to the Sims 4 :)
For everything related to our Sims 3 Worlds, we know we are a bit late but do not worry : THERE WILL BE UPDATES for Lost Cove, Oaksoak Hollow and Eureka Valley :) and a new World incoming : Shetland Harbour !
See you soon ... xoxo
Download k-202 ( updated ---> for Rent )
Download k-505 ( base game silent update )
if you think it good enough: ko-fi // paypal
\o/
#sims 4#sims 4 custom content#sims 4 download#sims 4 wysiwyg#sims 4 build#sims 4 cc#ts4#the sims 4#k mods#k hippie#k-202#k-505#sims 4 world#sims 4 terrain
581 notes
·
View notes