#remove any duplicates
Explore tagged Tumblr posts
Visit Tumblr Blog
Explore Tumblr blogs with no restrictions, modern design and the best experience.
Last Seen Tumblr Blogs


Fun Fact
US Tumblr user growth rate is estimated to slow down to 4.1%.
Text
youtube
#foryou#foryoupage#behind the scenes#viralvideo#short video#fani video#foryouviral video#Log in#Sign up#You said:#I wiill give you the words you wiil me need to me wiil be hahstags in paragraph removed the number rating us wall us removed the dupli#ChatGPT said:#ChatGPT#It seems like you want to generate hashtags from a paragraph and remove duplicates or specific elements like numbers. Could you clarify the#remove any duplicates#and clean it up as needed!#Amsterdam#1M#Israelis#190K#Arabs#161K#Maccabi#300K#Dutch#142K#f1twtselfieday#Ajax#RPSConf24#ThisMorning
0 notes
Text
Trembles like a small dog. The new beta may be for a qol update but but like what if what if there's new stuff in the files guys what if Calvin is there what's the vote should I look through all the sprite sheets and code again the vote is yes we are all voting yes because I am very normal about this game
#rat rambles#oni posting#chances are someone has already beat me to it in the spritesheet department but I know less ppl go digging in the code#I can only hope colin hasnt been removed from the duplicant list because I need to have the comfort of being able to see what he looks like#I mean I can just make something up if he doesn't ever get a duplicant but itd be fun to see what he does look like#as far as Im aware hed be the first duplicant to be directly related to a different duplicant#which I mean it could be revealed at any time that ohhh meep and mae were cousins this whole time or smth but yknow
1 note
·
View note
Text
Changes to Character Tags in Video Blogging RPF: Usernames Incoming!
Hello! In the near future, the Video Blogging RPF wrangling team will change the way we format character tags. We’re happy to announce that all canonical character tags will include content creators’ usernames by default, similar to what has been done for character tags in SMP fandoms for some time.
For example, the following tags will be updated:
Sean McLoughlin will be renamed to Sean McLoughlin | Jacksepticeye
Jeremy Harrington will be renamed to Jeremy | Jerma985
Rachell "Rae" Hofstetter will be renamed to Rachell "Rae" Hofstetter | Valkyrae
Apollo Willems will be renamed to Apollo Willems | DumbDog
These changes are already underway for smaller-use character tags, and we ask for your patience as we roll out changes across all relevant Video Blogging RPF character tags. We hope this change makes it easier for you to find and tag your works. We’ve included more granular details below for anyone curious about the specifics :)
Why are you making this change?
As we’re an RPF subfandom, we adhere to standard policy for RPF tag formatting, which means including a legal name where appropriate. We source legal names from web pages that are publicly accessible at the time of canonization, which creators would have endorsed themselves (such as their social media or interview articles). However, when character tags only contain a legal name, they’re often unrecognizable for both users and wranglers.
If a content creator primarily promotes themselves under a username, many users likely won’t know who the canonical character tag is referring to. Similarly, tag wranglers have struggled with accidentally duplicating character tags: we have trouble finding the canonical tags too!
To improve things for everyone, we’re changing our canonical tags to include usernames alongside legal names where appropriate. This ensures we’re compatible with other RPF fandoms—which we often have overlap with—while keeping tags usable and recognizable.
Will this affect anyone whose character tag is only a username? Will you add legal names to tags that don’t have them already?
We don’t plan to edit any existing canonical character tags that only contain a username. For example, TommyInnit (Video Blogging RPF) will remain canonical, even though the creator has since also made content under the legal name Tom Simons.
In rare cases, a username may be ambiguous within Video Blogging RPF, and we will add another name or more information to a character tag to differentiate it. However, this is generally quite rare. When we conducted our audit of all character tags in Video Blogging RPF, the vast majority of username-only tags did not require additional disambiguation and will not be changed.
In other cases, such as a content creator not wanting to be associated with a username anymore, we will remove the relevant information from the tag and replace it with a more appropriate name. This is similar to how we handle content creators who do not go by old legal names anymore. If a content creator changes their name—legal name or username—and does not want to be associated with their old name, we have and always will update the character tag as appropriate.
What if a legal name on a character tag is incorrect? Will you be fixing those?
During our audit, we also ran into a few cases where a character tag’s legal name is incorrect, outdated, or there are conflicting sources. We will be updating such tags with more up-to-date information as we come across them or will remove names from a tag entirely if there are conflicting sources. For example, as mentioned above, Jeremy Harrington will be renamed to Jeremy | Jerma985 due to conflicting unofficial sources regarding the creator's legal last name.
We want to thank our volunteers for their hard work, both for evaluating the 6000+ character tags in Video Blogging RPF and for preparing to rename all relevant tags as quickly and smoothly as possible. Given the large number of tags that will be changed, these changes will take some time to complete. We ask for your patience as we work to rename all relevant tags. If you have any follow-up questions, or concerns about specific tags, you can always contact AO3 Support.
(From time to time, ao3org posts announcements of recent or upcoming wrangling changes on behalf of the Tag Wrangling Committee.)
1K notes
·
View notes
Text
FF14 Battle Portrait Tutorial
For the past few weeks I was trying to find a way to recreate the battle portrait from FF14 as there was a few characters that I want to see in that style but don't officially have one yet. I think I got it down more or less (see image below) so I thought it's a good time to share what I did.

First of all, I made a few files that would help make life a little easier. They can be grabbed here .
Note: I did use Reshade to do a bit of work at the screenshot stage to help speed up the process but the same effect can be recreated in Photoshop with a vanilla screenshot. There are a lot of tutorials on how to do comic/cartoon effect in photoshop and those would make good bases to work off of.
Step 1: Take the screenshot with the PortraitBase Shader on. I usually take two screenshots. One with "Comic" on and one with it turned off. This is so that I have more to work with if needed.


Step 2: Drag all the screenshots into photoshop and remove the background. In photoshop, arrange the layer so that the screenshot with the Comic lines visible is on top of the one with the effect off.
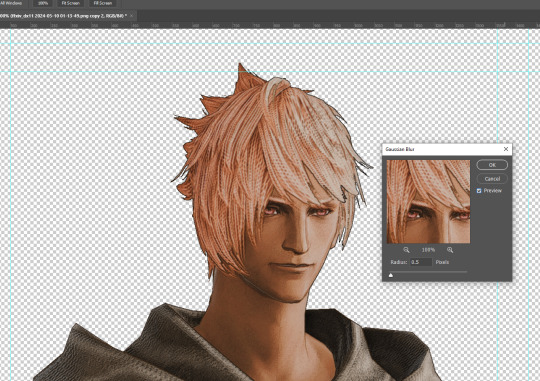
Step 3: Duplicate the the layer with the "comic" effect and apply Blur->Gaussian blur (radius 0.5)
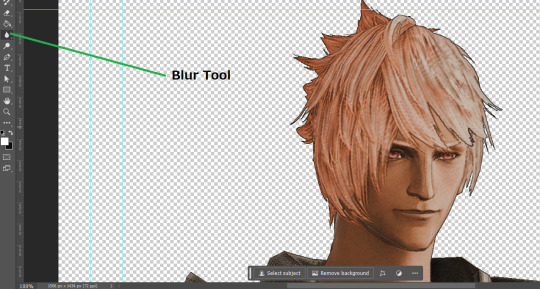
Step 4: Take a look at the hair. In Eric's case, It still doesn't look blur enough to me so I used the blur tool and blurred it a bit more
Step 5: Create a new layer above the layer in the previous step and use the brush tool to start outlining the edges. Where to outline is up to you but the idea is to make edges defined so that it looks more like a drawing.

Step 6: Duplicate the outline layer and then hide that layer. Step 7: Merge everything under the outline layer. Step 8: Drag and drop the "Texture.png" into the project and Clip it to your character layer. Set the blending of the texture to "soft light". Step 9: Drag and drop the "stroke Texture.png" into the project and Clip it to your character layer. Adjust the size till you are happy then set the blending to "overlay". Step 10: Adjust the opacity settings of both texture layers until it looks good to you.
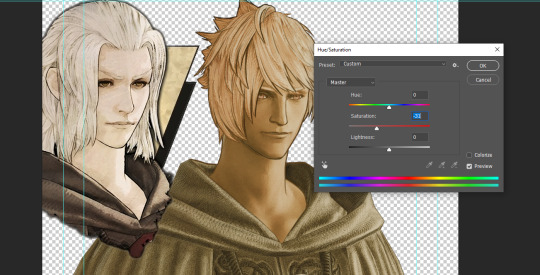
Step 11: Click on your character layer and go to image->Adjustments->Hue/Saturation (note: you will see I dragged in the official Hades portrait as a point of reference to work off of). Adjust the saturation till you are happy.
Step 12: Go to image->Adjustments->Color Balance and adjust the color till you are happy. In this example, since Eric is also wearing the Sophist robe, I tried to match that color to Hades' Sophist robe color.
Step 13: Once you are happy, drag the "Template.png" into the project and scale that to the size you want. Make sure it is completely covering the character. If it's not, you can just use paint more of it with the brush tool to extend it till it covers everything.

Step 14: Hide the "template.png" layer and select your character layer. Use the magic wand tool to select the outside of the character.
Step 15: With the selection still selected, click on the "Template.png" layer and press delete on your keyboard. You should now be left with a blank in the shape of your character.

Step 16: Drag the"Template.png" layer to be below your character layer. Then click on your character layer and clip it.
Step 17: Click on the "Template.png" layer and add a 2px stroke and shadow to it.
Step 18: Drag "Back_Deco.png" into the project and place it behind your character. Scale it till you are happy with it.
And that's it! Now you can recreate portraits for any NPCs that you want (in theory). A lot of it is also fine tuning to what you want but this should at least give you a decent base to work off of :)
2K notes
·
View notes
Text
devtalk #1 11/10 ::
Hey, I've been recently made aware of a... I don't know what to say so I'll just put, "controversial" update of one of the games in this community.
First off, I want to say kudos to @/fantasia-kitt for biting the bullet and putting some actual real dark shit into the game. This is what's been missing from the community.
Personally, I think these devblogs and interactions between community and developer have watered down yandere stories and have promoted an almost unhealthy look towards what a yandere actually is.
It also has caused several people to develop an unhealthy sense of relationships, thinking that you're only loved or capable of showing love if you do extremely toxic things as a "Look what I'll do for you, don't you understand?"
This isn't to say that I think devblogs should be removed, or we should stop dev-community interactions all together. No, this is just me saying, "Hey, guys. These characters are meant to be dark, are meant to be evil, they're morally reprehensible and irredeemable. Remember that."
When you get into dark content, you have to be prepared for dark fucking content, okay?
Onto my second point of this post.
Do I think there should have been clearer warnings in the game before some of this stuff happened? Yes and no. I think FK's warnings are appropriate and clearly stated.
I also think that following a similar format to Boyfriend to Death, where there is a content warning/trigger list for each separate character would help in expectations for these incidents. People get attached to characters, it's a thing that happens. If you asked me several months ago, I would have a different opinion. As it stands, I now have comfort characters of my own.
Do I think anything is wrong with TKATB or FK? No, absolutely not. FK is entitled to create whatever story they want to, however dark they want to. I appreciate that they're bringing this into the community and it's a little inspiring and motivating if I'm being honest.
Anyway, this is just my own personal thoughts and ramblings on this matter. I am but a tiny dev with a tiny following that wanted to make a post about this in general. In the future, I will personally be making a trigger/content warning list for each character before such content is released to avoid this happening. I will also be implementing it into the game itself so it's very in your face about what Duplicity: Revival contains.
You have your own responsibility to listen to and heed warnings that developers list for their games. If ***any*** of that content on those warnings are an issue for you, then don't interact with the game. At all.
I think that's all I had to say about this. I'll add more if I think of anything.
Take care of yourself, bunnies. <3
-Cin
757 notes
·
View notes
Text
My GIF Making process: Screen capturing using MPV player, Organizing files, 3 Sharpening settings, Basic Coloring PSD + Actions set

This is a very long post so heads up.
I’ll try to be as thorough and true as much as possible to the way I make my gifs (I already use Photoshop Actions which I’ve long since set up but now for this tutorial I’m reviewing them to show you the exact steps I’ve learned to create my gifs 😃) and present them to you in a semi-coherent way. Also, please bear with me since English is my second language.
First things first. Below are the things and tools we need to do this:
Downloaded 4K or 1080p quality videos (let’s all assume we know where to get these—especially for high definition movies and tv series—so this post doesn’t get removed, okay? 😛)
Adobe Photoshop CC or the CS versions can work as well, but full disclosure I haven’t created gifs using the CS versions since 2020. I’m currently using Adobe Photoshop 2024.
mpv player. Use mpv player to get those frames/screenshots or any other video player that has a screen grabber feature. I’ve used adapter for the longest time but I’ve switched to mpv because the press to screenshot feature while the video is playing has been a game changer not to mention ultimate time saver for me. For adapter you need to play it in another video player (like VLC player), to get the start and end timestamps of the scene you want to gif which takes me ages before I can even open Photoshop.
Anyway! Please stop reading this post for a moment and head over to this amazing tutorial by kylos. She perfectly tells you how to install and use mpv player, both for Mac and Windows users.
One thing I have to share though, I had a tough time when I updated my MacOS to Sonoma since MPV is suddenly either duplicating frames or when I delete the duplicates the player seems to be skipping frames :/ I searched and found a solution here, though it didn’t work for me lol. My workaround for this in the meantime is decreasing the speed down to 0.70 then start screenshotting—it’s not the same pre Sonoma update but it works so I’ll have to accept it rather than have jumpy looking gifs.
Now, after this part of kylos’ tutorial:

you can continue reading the following sections of my gif tutorial below.
I want to share this little tip (sorry, this will only cater to Mac users) that I hope will be helpful for organizing the screenshots that MPV saved to the folder you have selected. Because believe me you don’t want to go through 1k+ of screenshots to select just 42-50 frames for your gif.
The Control + Command + N shortcut
This shortcut allows you to create a new folder from files you have pre-selected. As you can see below I have already created a couple of folders, and inside each folder I have selected screenshots that I want to include in one single gif. It's up to you how you want to divide yours, assuming you intend to create and post a Tumblr gifset rather than just one gif.

Another tip is making use of tags. Most of, if not all the time, I make supercorp gifs so I tag blue for Kara and red (or green) for Lena—just being ridiculously on brand and all that.
Before we finally open Photoshop, there's one more thing I want to say—I know, please bear with me for the third? fourth? time 😅
It's helpful to organize everything into their respective folders so you know the total number of items/frames you have. This way, you can add or delete excess or unnecessary shots before uploading them in Photoshop.
For example below there are 80 screenshots of Kara inside this folder and for a 1:1 (540 x 540 px) Tumblr gif, Photoshop can just work around with 42-50 max number of frames with color adjustments applied before it exceeds the 10 MB file size limit of Tumblr.

Sometimes I skip this step because it can be exhausting (haha) and include everything so I can decide visually which frames to keep later on. You'll understand what I mean later on. But it's important to keep the Tumblr 10 MB file size limit in mind. Fewer frames, or just the right amount of frames, is better.
So, with the screenshot organization out of the way, let's finally head over to Photoshop.
Giffing in Photoshop, yay!
Let’s begin by navigating to File > Scripts > Load Files into Stack…

The Load Layers window will appear. Click the Browse button next.
Find your chosen screenshots folder, press Command + A to select all files from that folder then click Open. Then click OK.
After importing and stacking your files, Photoshop should display the following view:

By the way, I'll be providing the clip I've used in this tutorial so if want to use them to follow along be my guest :)
If you haven't already opened your Timeline panel, navigate to Windows > Timeline.
Now, let's focus on the Timeline panel for the next couple of steps.
Click Create Video Timeline, then you’ll have this:

Now click the menu icon on the top right corner then go to Convert Frames > Make Frames from Clips

Still working on the Timeline panel, click the bottom left icon this time—the icon with the three tiny boxes—to Convert to Frame Animation
Select Make Frames From Layers from the top right corner menu button.
So now you have this:

Go and click the top right menu icon again to Select All Frames
Then click the small dropdown icon to set another value for Frame Delay. Select Other…

The best for me and for most is 0.05 but you can always play around and see what you think works for you.
Click the top right menu icon again to Reverse Frames.
I think Photoshop has long since fixed this issue but usually the first animation frame is empty so I just delete it but now going through all these steps there seems to be none of that but anyways, the delete icon is the last one among the line of feature buttons at the bottom part of the Timeline panel.
Yay, now we can have our first proper GIF preview of a thirsty Lena 😜

Press spacebar to watch your gif play for the very first time! After an hour and half of selecting and cutting off screenshots! 😛 Play it some more. No really, I’m serious. I do this so even as early (lol) as this part in the gif making process, I can see which frames I can/should delete to be within the 10 MB file size limit. You can also do it at the end of course 🙂
Now, let’s go to the next important steps of this tutorial post which I’ve numbered below.
Crop and resize to meet Tumblr's required dimensions. The width value should be either 540px, 268px, or 177px.
Convert the gif to a Smart Object for sharpening.
Apply lighting and basic color adjustments before the heavy coloring. I will be sharing the base adjustments layers I use for my gifs 😃.
1. Crop and Resize
Click on the Crop tool (shortcut: the C key)

I like my GIFs big so I always set this to 1:1 ratio if the scene allows it. Press the Enter key after selecting the area of the frame that you want to keep.
Side note: If you find that after cropping, you want to adjust the image to the left or another direction, simply unselect the Delete Cropped Pixels option. This way, you will still have the whole frame area available to crop again as needed and as you prefer.
Now we need to resize our gif and the shortcut for that is Command + Opt + I. Type in 540 as the width measurement, then the height will automatically change to follow the ratio you’ve set while cropping.
540 x 540 px for 1:1
540 x 405 px for 4:3
540 x 304 px for 16:9
For the Resample value I prefer Bilinear—but you can always select the other options to see what you like best.
Click OK. Then Command + 0 and Command + - to properly view the those 540 pixels.

Now we get to the exciting part :) the sharpen settings!
2. Sharpen
First we need to have all these layers “compressed” intro a single smart object from which we can apply filters to.
Select this little button on the the bottom left corner of the Timeline panel.


Select > All Layers
Then go to Filter > Convert for Smart Filters
Just click OK when a pop-up shows up.
Now you should have this view on the Layers panel:

Now I have 3 sharpen settings to share but I’ll have download links to the Action packs at the end of this long ass tutorial so if you want to skip ahead, feel free to do so.
Sharpen v1
Go to Filter > Sharpen > Smart Sharpen…
Below are my settings. I don’t adjust anything under Shadows/Highlights.
Amount: 500
Radius: 0.4
Click OK then do another Smart Sharpen but this time with the below adjustments.
Amount: 12
Radius: 10.0

As you can see Lena’s beautiful eyes are “popping out” now with these filters applied. Click OK.
Now we need to Convert to Frame Animation. Follow the steps below.
Click on the menu icon at the top right corner of the Timeline panel, then click Convert Frames > Flatten Frames into Clips
Then Convert Frames > Convert to Frame Animation
One more click to Make Frames From Layers
Delete the first frame then Select All then Set Frame Delay to 0.05

and there you have it! Play your GIF and make sure it’s just around 42-50 frames. This is the time to select and delete.
To preview and save your GIF go to File > Export > Save for Web (Legacy)…
Below are my Export settings. Make sure to have the file size around 9.2 MB to 9.4 MB max and not exactly 10 MB.

This time I got away with 55 frames but this is because I haven’t applied lighting and color adjustments yet and not to mention the smart sharpen settings aren't to heavy so let’s take that into consideration.
Sharpen v1 preview:

Sharpen v2
Go back to this part of the tutorial and apply the v2 settings.
Smart Sharpen 1:
Amount: 500
Radius: 0.3
Smart Sharpen 2:
Amount: 20
Radius: 0.5
We’re adding a new type of Filter which is Reduce Noise (Filter > Noise > Reduce Noise...) with the below settings.

Then one last Smart Sharpen:
Amount: 500
Radius: 0.3
Your Layers panel should look like this:

Then do the Convert to Frames Animation section again and see below preview.
Sharpen v2 preview:

Sharpen v3:
Smart Sharpen 1:
Amount: 500
Radius: 0.4
Smart Sharpen 2:
Amount: 12
Radius: 10.0
Reduce Noise:
Strength: 5
Preserve Details: 50%
Reduce Color Noise: 0%
Sharpen Details: 50%
Sharpen v3 preview:

And here they are next to each other with coloring applied:
v1

v2

v3

Congratulations, you've made it to the end of the post 😂
As promised, here is the download link to all the files I used in this tutorial which include:
supercorp 2.05 Crossfire clip
3 PSD files with sharpen settings and basic coloring PSD
Actions set
As always, if you're feeling generous here's my Ko-fi link :) Thank you guys and I hope this tutorial will help you and make you love gif making.
P.S. In the next post I'll be sharing more references I found helpful especially with coloring. I just have to search and gather them all.
-Jill
#tutorial#gif tutorial#photoshop tutorial#gif making#sharpening#sharpening tutorial#photoshop#photoshop resources#psd#psd coloring#gif coloring#supercorp#supercorpedit#lena luthor#supergirl#my tutorial#this has been a long time coming#guys. i'm BEGGING you. use the actions set - it was a pain doing all this manually again ngl LMAO#i've been so used to just playing the actions#so this has been a wild refresher course for me too 😆
622 notes
·
View notes
Text
About Sims 4 Mod Manager

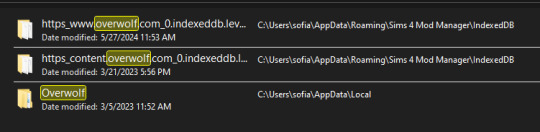
It came to my attention a few days ago that a popular program used for sorting custom content, Sims 4 Mod Manager, is based on Overwolf software. The issue with this is that ad placements on Overwolf programs give a 20-30% cut to Overwolf directly. As stated on their website. I know it is an Overwolf program because you can find Overwolf files within it:
Personally, I do not mind un-obstructive ads on free programs as long as they are vetted by the developer, but I do not want to give Overwolf any money. So I will be kindly contacting the developer via the contacts on his website and ask he divest and use a different avenue with the ads. Maybe moving to github instead. He is also recently released a curseforge integrated app.
If you are to request the divestment, please please do so with respect as to invite people INTO the conversation and not put them in a defensive position. No one likes to listen when they are being threatened or harassed. 🤷♀️
I know many will be disappointed with this news as it is a great, one of a kind program, so I wanted to offer some alternative methods besides manually sorting custom content:
Sims 4 Mod Assistant: A small app used to find duplicates and mod conflicts. Also supports filtering and moving files to other folders. Available on Mod the Sims and Github.
S4Pavir: It's not that pretty, but it can be used to view, remove, and sort cc. Available on Github.
You can also use sims tray importer to sort through cc. Dress your sims in all the cc you want to remove or place build/buy items on a lot. Save the sim/lot to your library and use Sims 4 tray importer to view the list of cc used, and open its file location to delete. Available on Luniversims (.fr)
Sims 4 Studio can also be used to view, edit, and delete cc. Available here.
Let me know of any other methods you know or notify me if there are any issues with these two programs.
Hopefully there is a positive outcome with reaching out to the creator. Please be respectful and you can use my pinned post as a reference for why curseforge is a problem. 🙏
Edit:
Update on Sims 4 Mod Manager
After going through the older versions of Sims 4 mod manager I have found out that Version 1.0.9 Beta (Windows 10, 11 for me) does not have Curseforge ads. I think this is suitable option to use the mod manager without giving direct ad revenue to Overwolf/Curseforge.

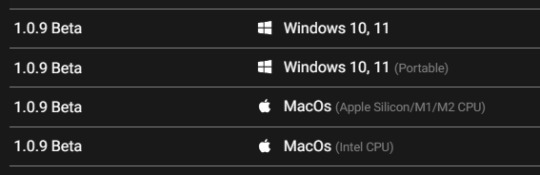
When you go to the Sims 4 Mod Manager site, click other versions and scroll until you find this version. It does not have all the current features, but it works. You can uninstall your current version by searching the app in your start menu (Windows), right click and select 'uninstall', and click 'uninstall' again once you find it in the list that comes up.
(I do not have Mac, so I do not know if the later version 1.1.3 Beta, will also not have ads. If you download it please let me know.) I will update my original S4MM post with this info and also put it in a reblog so hopefully everyone can see this.)
It doesn't have the sort to subfolders option, but my way around that is to sort cc into a "moving folder" and then open your regular file explorer and cut and paste those items to your sub-folder manually. Easy peasy!
551 notes
·
View notes
Text


— introducing 017: IN THE WINGS OF DEATH + [ link ]
a writing-centric google doc template inspired by gothic architecture and tarot cards. its classic design allows your writing to shine, especially since all sections of this template can accommodate any length (especially long amounts) of writing! every purchase comes with single and double column variants for the backstory, writing sample and extras section. this premium template and static previews of both versions can be found in the link above or in the source link.
features:
9 total 8.5" x 14" pages with 7 unique custom backgrounds
all sections made to organically expand to accommodate any amount of writing, including long amounts of prose as you type
connections that can be easily duplicated for more
terms of use:
you may edit to your heart’s desire. Change the colours, replace, add or remove elements and images etc.
you may remix pages with pages from my other templates.
you may not remove the credit from the templates.
you may not copy, sell or redistribute my templates whether wholesale, in part (i.e. taking out certain pages) or remixed (i.e. modified).
you will also receive an additional guide with images on how to use and edit google doc templates! if you have any problems or issues, feel free to leave an ask or join our discord server.
I'm grateful for your tremendous and consistent support over the last year. thank you for all the likes and reblogs! ♡
#google doc template#google docs template#muse template#writing template#writing doc#muse doc#oc doc#roleplay doc#supportcontentcreators#m#m pr#fave
782 notes
·
View notes
Text

^ iterator projection tutorial!! ^
this post follows on from this one made by @prismsoup, intended to cover my slightly more extended process (including post-processing)
step -1 : pre-requisites
this tutorial is designed around clip studio paint for PC because its what i work with. its probable that whatever other program / platform you're using has these features but under different names
i use a rainworld typography font for text. find it here (or do it yourself)
i use scanline textures as a part of this. find them here
step 0 : select a base image

maps, blueprints and diagrams are favourable due to lots of detail without it derailing into noise. get experimental though, my favourite one came out from a picture of a nebula, and another from a friends factorio screenshot
step 1 : binarise & flip
this command can be found under edit > tonal correction (D) > binarization. this forces every pixel in the image to be either black or white. adjust its sensitivity to your liking
step 2 : remove background

add in a black layer below (not just paper layer, as will become important later). wand select the background colour and delete it. if the remaining colour is black, CTRL+I to invert it to white
step 3 : add details

replace any text with rainworld font or simply remove it. add in blueprints or other complex decals (drawingdatabase is a decent source). during importing remember to binarise (after resizing). for "lower layer" elements such as contour lines create outlines for higher layers to retain clarity
step 4 : add multiply layer(s)
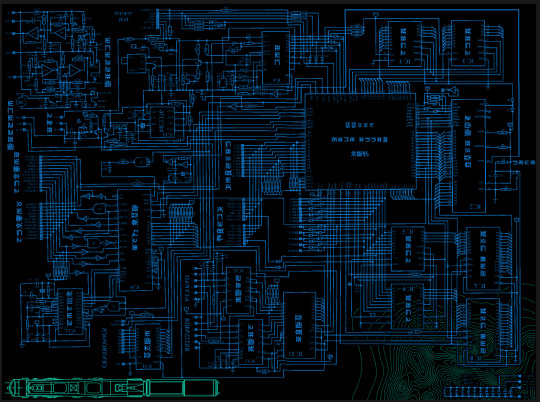
if you want to have multiple colours, put everything in the "higher" layer into a folder and set the top multiply to clipping above it
step 6 : post processing setup

copy all existing layers, create a new folder on top, and paste into that folder. right click the folder and "merge selected layers" set the resultant layer to add(glow). copy+paste and hide duplicate for now. from filters > blur apply a guassian blur with a strength of 130-170 (this creates the base bloom layer). set opacity to ~50%
step 7 : chromatic abberation
unhide not-blurred layer. guassian blur with a strength of 2. duplicate again. select top layer and move 1px up and 1px left (with arrow keys). CTRL+U then change the hue by 30. select bottom layer and move 1px down and 1px right, CTRL+U then change hue by -30.
stronger chromatic abberation can come from stronger gaussian blur and more change in hue
step 8 : scanlines
add the scan lines on top, invert so that they're white and set to add(glow). copy a multiply layer over it and make sure clipping is on. decrease layer opacity to ~10%. if it does not cover the whole image initially, paste more in and merge them together into one layer
tada! you now have one iterator projection. if you want to give it an extra affect, re-import the final PNG and filter > distort > convert to panorama. set distortion to 10 and scale to 101 (note that this drastically blurs the image)
284 notes
·
View notes
Text
Chalk'd UI - Lovestruck Update [26 July 2024]
Before downloading this new update, please remove old versions and clear any caches!
Main Mod Page & Patreon post
Current version: Lovestruck EP + July 25 emergency patch
+ Updated for the Lovestruck EP patch and the follow-up emergency patch. Now requires the latest UI Cheats Extension v1.42.1.
+ Added dark mode for the new Cupid's Corner panel and its phone icon 💘 Also updated the Social Bunny phone icon.
+ Updated CAS & GUI files to fix the loading issue and include the new Romantic Boundaries panel and Copy button. Now entering CAS should no longer stops your game.
+ Updated Game Options file to include the new Safe for Streaming UI in the Music tab.
+ Updated several Live Mode related UIs and fixed the issue of not being able to access the Simology panel and getting an empty Aspiration selection menu.
+ Added more phone icon overrides for other mods. Will be found in its own SFS folder to pick & choose.
Basemental mods (18+)
adeepindigo mods
SimRealist mods
// Mod Compatibility Info
With TMEX's new searchable menu mods, there are now more files that conflict with his mods which I've separated and placed in the Additional Files folder for you to remove and avoid conflicts. If you don't use his mod(s), you can keep the Standalone files and only remove the TMEX_Compatible files to avoid duplicates ^^ If you want to use his mods, remove the conflicting Standalone files. You can find out more in the README text found in the folder.
Thank you for your patience 💞 will be back in a day or two as I work on the Sims 2 UI and release it!
let me know if there are issues in case I missed it ~_~
456 notes
·
View notes
Text
youtube
#foryou#foryoupage#behind the scenes#viralvideo#fani video#short video#foryouviral video#Log in#Sign up#You said:#I wiill give you the words you wiil me need to me wiil be hahstags in paragraph removed the number rating us wall us removed the dupli#ChatGPT said:#ChatGPT#It seems like you want to generate hashtags from a paragraph and remove duplicates or specific elements like numbers. Could you clarify the#remove any duplicates#and clean it up as needed!#Amsterdam#1M#Israelis#190K#Arabs#161K#Maccabi#300K#Dutch#142K#f1twtselfieday#Ajax#RPSConf24#ThisMorning
0 notes
Note
-"you should really, really, REALLY not open submissions like… ever again. at this rate you are already backlogged by FOUR YEARS."
-"that's the plan… :')"
Personally I don't mind that much hearing a bunch of songs from the same game in a row, but this^^^ DOES bother me. I'm not sure there's any good solution (wiping previous submissions and starting fresh feels mean to the people who have been waiting to see theirs, posting dozens of polls a day sounds overwhelming and like too much work for the mods, etc), but it's incredibly discouraging to know I'm probably not ever going to be able to even submit the song I wanted, let alone see it posted.
I'm trying to think of the best possible way to deal with it -- but please rest assured that I'm not going anywhere and I hope everyone will have a chance to submit something as they'd like. I also haven't removed any duplicate submissions yet and I know for certain there are many, so I do expect the number to go down.
edit: from the comments :)

185 notes
·
View notes
Text
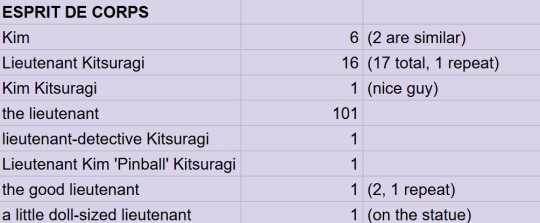
MEGATHREAD OF KIM MENTIONS BY ALL SKILLS
While doing my max stats run, I noticed Rhetoric called Kim 'Kim'. I thought this was a little unusual, as I assumed blue skills would address him in a more formal fashion. This led me down a rabbit hole of how they all refer to Kim, so here you go.
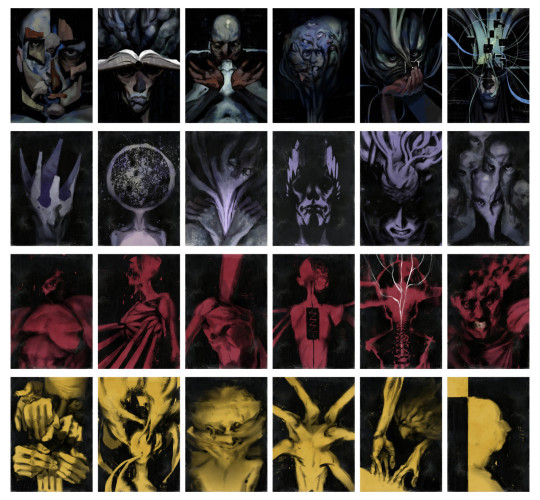
DISCLAIMER: These are all mined from fayde.co.uk (big shoutout, this post would not have been possible without it). I have removed all duplicates and interactions with variants ("Replaced with:"). It is also possible despite my best efforts my dyscalculia may have fked up with the larger figures but I did go over it multiple times, so it's unlikely. OK LET'S GO
BLUE SKILLS
LOGIC
All 3 mentions of 'Kim' are late-game. Otherwise, Logic defaults to 'the lieutenant'. Only 1 mention of 'Kim Kitsuragi' and that's only when talking about the case file number sequence for The Hanged Man.

ENCYCLOPEDIA
The full name usage is related to when you discover his past with pinball - even the one mention of 'Kim' is in reference to how Seolite people love pinball. Otherwise, the most common address is also 'the lieutenant'.

RHETORIC
Seems like the use of 'Kim' is an outlier and like I suspected, the default tends to be 'the lieutenant'. It wasn't a late vs. early game thing either because I got the 'Kim' mention on Day 1 of the game.

DRAMA
Interestingly, no 'Kim' at all. Drama prefers more bombastic and less personal terms, I guess.

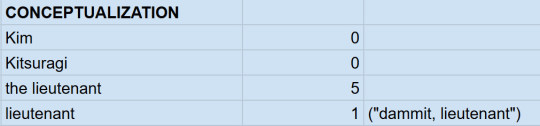
CONCEPTUALIZATION
No use of 'Kim' or 'Kitsuragi'. The only direct address was the line "Dammit lieutenant, have you no intellectual curiosity?"
Otherwise, like most of the other blue skills, Conceptualization doesn't mention Kim that much.
VISUAL CALCULUS
Mentions Kim (in all forms) the least, which is not surprising.
Like all other blue skills, 'the lieutenant' is the most common used. They tend to be more on the less personal side.

PURPLE SKILLS
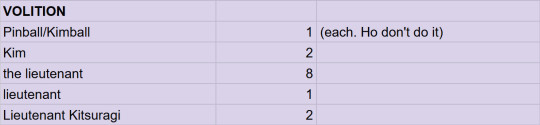
VOLITION
Only 1 direct address of 'lieutenant'. The line mentioning Pinball/Kimball is 'Any plan to call him Pinball or Kimball is immediately wiped from your neocortex, as if with some sort of mind altering device. It is simply not going to happen.'
Still more of a formal address preference.
INLAND EMPIRE
The only time IE uses 'Kim' is "If you can't trust your own eyes, who can you trust? Certainly not Kim. He's so… suspicious." in regards to finding a key card in Evrart's office.
Also prefers 'the lieutenant', like the blue skills.

EMPATHY
Also seems to refer to Kim in a more respectful way. The only mention of 'Kimball' is about footprints in the dust in the back of the Whirling: "This is so good it makes him forget the whole Kimball memory."
Also note the increased frequency in Kim mentions.

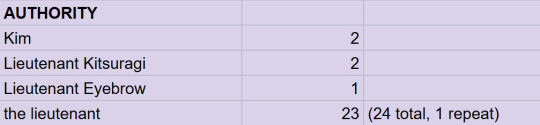
AUTHORITY
Of course 'Lieutenant Eyebrow' occurs during the famous showdown. One mention of 'Kim' is earlier game and one is late game. Makes sense Authority would be professional most of the time and use 'the lieutenant'.
ESPRIT DE CORPS
Will not shut up about Kim (101!!). Most mentions advise you not to complete important tasks without him. 1 repeat of 'Lieutenant Kitsuragi' mentions the black bomber jacket you get from hardcore mode. The last one is when Harry climbs the horse statue during the moralist run.
SUGGESTION
Much less quiet in comparison, but still polite.
Purple skills mention Kim a lot more, in general, than blue ones, which makes sense as they concern external affairs and people moreso. Out of all the skills, they refer to Kim the most, actually, as we will see.

RED SKILLS
ENDURANCE
The two instances of 'Lieutenant Kitsuragi' are during the confrontation with Ruby: "The torment Lieutenant Kitsuragi is experiencing is worse than your own."

PAIN THRESHOLD
Doesn't care about anyone but Harry, probably. Only mention is talking to Klaasje about the body hanging behind the Whirling: "A bitter cringe. It hurts. You look to the lieutenant…"

PHYSICAL INSTRUMENT
The most disrespectful. Refers to Kim as a binoclard the most out of all the skills.

ELECTROCHEMISTRY
The only mention of 'binoclard' is when you try to teach Lilienne's twins to say 'fuck'. EC cheers you on. Volition is disappointed, as is Kim ("deeply unimpressed").
"Why does he have to be such a binoclard? It's just a funny word!"

SHIVERS
Doesn't have much to say about the lieutenant. 2 of the 4 are variations of each other during the Moralist quest. Duplicates are due to the Noid vs. Soona version of the quest.

HALF LIGHT
One mention is during the game of Suzerainty, when Kim has the upper hand, which is a funny time for a fight-or-flight response to kick in.
In general, the red skills don't concern themselves much with Kim, since they largely are focused on Harry.

YELLOW SKILLS
HAND/EYE COORDINATION
Second least mentions of Kim in the yellow skills.

PERCEPTION
Both 'Kim' mentions are Sight. Mentions of 'the lieutenant' by category: 2 Smell, 6 Hearing, 2 Sight. (No Taste… sadly).

REACTION SPEED
Gets a little more fancy with it 'the good lieutenant' and also addresses Kim directly the most out of all the skills (2 mentions of 'lieutenant'): "Too late, lieutenant." and "Impressive note-keeping, lieutenant."

SAVOIR FAIRE
The duplicates have to do with a line during the Ultraliberal quest: "The lieutenant speaks as if you're rich -- a common misconception -- especially if you count the tax. No, we've got a long way to go before we can feel financially comfortable. The hustle never stops!"

INTERFACING
Least reference to Kim of all yellow skills, which is surprising considering the Kineema interaction.

COMPOSURE
The chattiest of the yellow skills about Kim, though yellow skills still have the second lowest mentions of the lieutenant.

STATS RUNDOWN
Total Kim mentions by colour
Blue: 82
Purple: 245 (thanks, EDC)
Red: 31
Yellow: 62
Top 3 mentions
EDC: 128
Empathy: 43
Rhetoric: 30
Bottom 3 mentions
Pain Threshold: 1
Interfacing, Shivers, VisCal: 4
H/E Coordination, Endurance, Half Light: 5
Most common address
the lieutenant: 335
Kim: 32
Lieutenant Kitsuragi: 26
So, overwhelmingly, most of the skills seem to default to 'the lieutenant'. Not just the blue ones. Hopefully, that helps someone, although how I have no idea.
BONUS: YOU!
What about Harry, you ask (or not)? I GOT YOU.
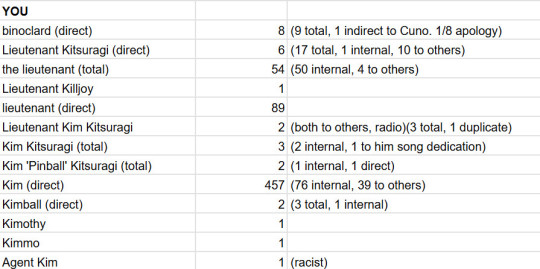
Harry calls Kim a binoclard more than Physical Instrument, though one time he says it as an apology.
Both times he uses Kim's full name and title is during radio comms.
Harry calls him 'Kim' to his face (457) more than 'lieutenant' (89) (spread over early to late game).
To others, Harry refers to Kim as 'Kim' 39 times, compared to 4 uses of 'the lieutenant'.
The only time Agent Kim is used is discussing the Seolite conspiracy.
That's it! One last parting gift: Kim refers to Harry as 'Harry' 15 times. :)
#disco elysium#harrier du bois#harry du bois#kim kitsuragi#meta#disco elysium meta#skills#disco elysium skills
168 notes
·
View notes
Text


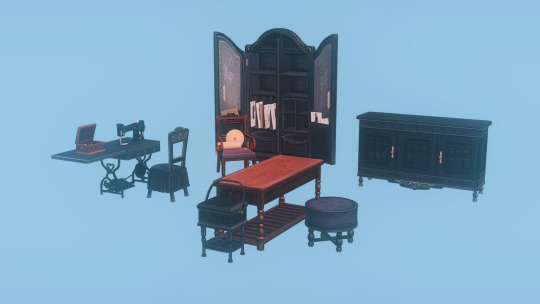
Crashcraft's vintage sets in Cluedo colors
✿ This is for the sims 2 ✿
Here are recolors I made of various Cashcraft sets for use in Éclaire. I recolored only the objects I thought I'd like to use in my game, so not all of the sets are present in full.
Please also note that I wrote cluedo colors, and not woods. No way in hell I was going to handpaint all that to change the wood grain, sorry.
What's included?
✿ 6 objects from the Magnolia Hill Dining set (buffet, china cabinet, curio, hutch, mirror and sideboard);
✿ 6 objects from the Regency set (tea set, dining chair, cabinet, sideboard, china cabinet and armchair);
✿ 30 objects from the Vanity Fair sets (armchair, canopy, cash register (req. OFB), chaise, coffee table, curtain, desk chair, end table, footstool, handbag, hat, 3 lamps, mirror, parlor chair, perfume tray, round table, sewing basket, sewing clutter, cutting board, desk, screen, sewing shelf, worktable, sofa, tall cabinet and vanity);
✿ 7 objects from the Victorian set (chafing dish, chair, painting, sideboards, hutch and table);
✿ 5 objects from the Vintage Charm set (alarm clock, bed, books and 2 lamps).
DOWNLOAD (SFS)
Meshes, swatches and previews included, files compressed and clearly named.
✿ I renamed the meshes to remove any special characters, so check your download folder for duplicates manually if you already have Cashcraft's sets in your game.
Credits: Cashcraft, @cluedosims.
649 notes
·
View notes
Text
CC Creation Tutorial: Smooth Seams in Blender

In this tutorial, I will show you how to make your mesh seams smooth inside Blender (no Milkshape required!) and walk you through the process step by step. We will make a perfectly smooth mesh and transfer the normal data from that mesh to our main mesh using the Data Transfer modifier.
I am using Blender 3.6 in this tutorial (though you should be able to follow along using other versions as well)
You do not need to have much previous knowledge to follow this tutorial, but I assume you know some basics in Blender like how to select, things, navigate around, etc, and know how to import the meshes and put them into Blender.
For this tutorial, I exported the Sims 3 afbodyEP4DressPromBigBow mesh with TSR Workshop. You can use any clothing mesh you like though, and works on any meshes, not just Sims 3 ones.

This is our mesh. You can already tell that it has the dreaded seams on the neck and the rest of the body.

First, we need to make a copy of the mesh (in Object mode, select the mesh and hit Ctrl+D Shift+D to duplicate it, then hit Esc to stop it from moving around).
Rename the mesh (I added Seamless to the mesh name).
Make sure the original mesh is hidden (click the eye symbol) and select the Seamless mesh.
Press the Tab key to go into Edit Mode.

Now we select the parts that we want to have smooth seams. Let's select everything that is skin (you can select a litte piece of the mesh and then press Ctrl+L to select the entire piece)!

Now, press M and in the menu, choose By Distance. (in older versions, this is called Remove Doubles).
This will remove all double vertices at the seams on the selection we made.

It will show you how many vertices it removed. The skin looks nice and smooth!
Let's switch back to our original mesh: Make sure you deactivate the eye on the Seamless mesh and activate the eye again on the main mesh. Then, select the main mesh.

Now, let's add a data modifier to our main mesh. Click the blue wrench icon in the vertical list of the properties panel and then onto Add Modifier, then choose Data Transfer from the list.

As the source, we choose our Seamless mesh.

Also toggle on Face Corner Data and click the Custom Normals button.
Hold on, there is a message saying that we should enable Auto Smooth in Object Data Properties. Let's do that next! (if the message does not appear for you, maybe Auto Smooth is already on).

Click the green inverted triangle button and in the Normals section, toggle on Auto Smooth.

Now we can switch back to the modifier tab by clicking the blue wrench icon again.
But hang on, what happened to our mesh? There are now black spots over the dress and shadows on the legs!

This is due to the Data transfer modifier's Mapping setting. If we change it to Topology, our mesh goes back to normal again. Phew!

Now that the normals look good, we can start the transfer of our new smooth normals from the seamless mesh to our main mesh. To do that, we hit the Generate Data Layers button. This button works destructively, so you cannot undo what it did, just FYI.

Note: On newer versions of Blender, Generate Data Layers may not be enough to transfer the normals and you may need to apply the modifier instead.
You can toggle the modifier's visuals on and off with the little screen icon to see the results after you click Generate Data Layers to see if it stuck. If it did not (and you see the seams of your base mesh when toggling it off), try to apply it instead.

I switched from textured to solid shading because the differences are just more noticeable in this mode. This is how our mesh looks now with the modifier turned off.
Because we clicked the transfer button, the normals have been permanently applied to our mesh. The skin is smooth now, and so is the dress (even though we did not smooth that one, hmm...)

If we toggle the modifier back on, suddenly the dress has seams again! What's going on there? I'm not exactly sure why, but Auto Smooth seems to be doing some smoothing on the dress mesh as well.
I am not sure if this is normal behavior or not, but let's pretend that this did not happen and the modifier in fact did not smooth the dress.
Maybe we just forgot to smooth some areas on the Seamless mesh that we noticed only later on. That's no problem. We simply modify our Seamless mesh again!

So let's swap back to the seamless mesh and select it (remember to click the eye icons so only the Seamless mesh is visible).

Let's select the main dress parts and press M -> merge by distance on them. We cannot smooth the whole dress all at once, because then that would remove some seams that we want (like those for the backfaces and the middle section of the dress where the bow is attached).
If we remove the wrong seams, we ruin our normals and will have black splotches.

Now, let's select the backfaces and areas we left out before and repeat this process: M -> merge by distance.

Look at how perfect our Seamless mesh is looking now! Now, let's transfer those beautiful normals to our main mesh.
Select the main mesh and toggle the eye icons again, to hide our Seamless mesh and reveal our main mesh.

Once again, we will use the Generate Data Layers button in our Data Transfer modifier. If you have previously applied the modifier, just add the modifier again to the main mesh and use the settings shown here.
And that's it, you are done! You have a perfectly smoothed mesh that you can export now.

Final Note: it is best to transfer the normals at the very end of your meshing process because any action that recalculates the normals can reset our custom-made smooth normals again.
Of course, you can simply use the Generate Data Layers button again to re-add them, but it saves you time to only do this step at the end.
I almost forgot to say: You still have to use Mesh Toolkit to fix the seams on the edges of your mesh and do the usual shenanigans.
178 notes
·
View notes
Text
with you (teaser)
spiderverse chronicles. haechan x reader, mark x reader genre fluff, action, mature content content spiderman au, enemies to lovers, friends to lovers, selective mutism, sign language, smut (not in the teaser) more tba teaser wc 1.5k full fic est. 20k
an: since i'm making progress on the story (shocking) i'll share a little teaser. the past few days i've consumed a lot of spiderman content, it's not funny anymore. it was a sign of the times. i'm so excited to write this. happy reading ♡

description: after a catastrophic scientific explosion, chaos is unleashed in new york. a deaf girl must face the city that she once knew now submerged in a mayhem, pairing with a daily bugle intern to try to solve the mystery when one of the many affected with extraordinary abilities seems to have a duplicity between good and evil.

he can sense you're there.
just moments ago he had swept the area, now, he looks intently at the boxes loaded into the helicopter.
“planning on stealing the moon tonight?” he's growing bored. “you guys aren't elusive at all, you should practice a little at that.”
the ambiguity of his own reaction puzzles him. there was no hurry in his movements, nor the usual tension. instead, there was a deliberate pause, and this unbearable boredom.
he's quick to deflect a couple of bullets; it comes out spontaneously now. all his senses are enriched. everything vibrates. everything sings. he's sneaky instead of a fighter. and he's also fond to make jokes at inopportune times.
“isn't this labor exploitation?” he inquires. “i hope you get paid overtime,” he says again when in response, a dozen men point their guns at him. he reacts shooting his hands upwards.
“easy, i'm your friendly neighbor.” a man turns to him. the big fish. “oh, my bad, i mistook you for some lookalike with a bunch of small yellow people.” he also doesn't miss the opportunity to make an emphasis on his size.
wilson kingpin snorts, annoyed. “after months, i'd think you'd stop acting like a kid.”
“i am a kid.” he chuckles, removing the mask.
there was no point in hiding his identity when the old crow knew who he was from the very beginning, though it also made him a prospect for his tasteless jokes.
he takes a look at the containers when the man turns his back at him and shout instructions. “nano-technology prototypes...” his voice comes out in an interrogatory tone, sniffing through the large box.
the man in charge sees him snooping around when he speaks. “are you interested?”
“they wouldn't hurt,” he replies, distracted; something stirs inside him when you move closer.
“take a few, see if you put it to good use.” he sneers and he mimics him, nonchalantly.
he's pretty quick and elusive. skills, he guesses, his best traits; but even though, he might need some; he's been doing alchemy lately, so he grabs two and when the man looks away, grabs a few more. he can put good use to that kind of technology. “any other tasks you need me to do?”
he bristles when the man smiles, agreeing; he's been waiting for the moment. doing silly tasks, dirty work. finally he was getting closer to get what he wants. “yes. why don't you take care of that little reporter mouse?”
fisk goes back to his job as if he's bored, and his lips tighten into a grimace that he already knows, making him take care of you.
“was this what you wanted, to steal technology?” you ask to the wind. the men hardly pay attention to you, but he does.
he must acknowledge that you have guts even though fisk is giving you a window because you don't pose a threat. not because of his size, but because of his influence.
“what's in the boxes?”
“as if i were going to tell you.” he mocks, hiding behind the mask. “why don't you cover tonight's weather instead, family of murderers?” he sees you freeze. “why don't you leave these matters to us and you take care of yours? seems like you're in deep shit,” he says, taking one step closer.
when you realize it, he's in front of you and you have nowhere to run. yet your feet recede to the edge. “mmm? don't test your luck and stay out of it.”
he gives you recognition that you don't look even a little intimidated. “who are you?”
his smile almost reach his eyes, “as if i were going to tell you,” he repeats, morbid.
fisk growls behind you, and something dark spreads on his gut, “get done with it, bug.”
he does what he says. first, he steals it from you in one move. and you're not quick to protest when his hands half-push you and your feet stumble. doing silly tasks, dirty work. one more thing and it will end.
nevertheless, getting rid of you is hard for him.
your hands try to hold on but he pulls away, so you fall into nothing.
like a bullet, he watches you fall, waiting. and when a blue boost barely flashes around you, he moves away from the edge. afterward, you just fall into new york.
#mark x you#haechan x you#mark lee au#haechan au#haechan angst#mark lee angst#mark fluff#haechan fluff#haechan smut#mark smut
150 notes
·
View notes