#recyclable crafting
Explore tagged Tumblr posts
Visit Tumblr Blog
Explore Tumblr blogs with no restrictions, modern design and the best experience.
Last Seen Tumblr Blogs


Fun Fact
130K people were victims of a chain letter scam that affected Tumblr in May 2011.
Text

bottle cap magnet craft! 🫙 (+ bonus project: glue a magnet on anything!)
Have miscellaneous bottle caps laying around? Dig through your recycling and craft these super fun customizable magnets.

Start by collecting a bunch of bottle caps, which for me is always very easy given my ongoing junk drawer situation.
Cut your image to fit snugly inside the bottle cap. I found that a quarter made the perfect template, using a pencil to trace where I’ll cut.
Cut out the photos you’d like to use & glue them to the inside with a big blob of glue. Set aside to dry a bit. You can set them aside to let dry for 24 hours if you have patience, but if you’re like me just watch a movie and come back to it when you’re done.
When that’s dry, coat the entire image inside the bottle cap with a glob of glue (make sure it will dry clear), making sure the sides and everything is covered and sealed. Here, I also added some small pieces of confetti or glitter, using a needle to push them under the wet glue. Pop any bubbles that form. This part takes the longest to dry, I always leave them overnight.
When the glue has cleared up and it’s all dry, use some strong craft glue to attach a small magnet to the back. Wait until that’s dry to put the magnet anywhere. All done!
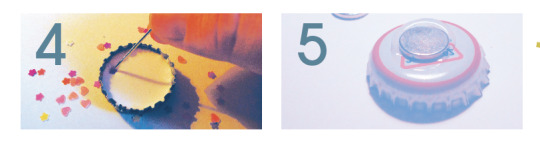
Supplies: - Bottle caps - Scissors - Strong glue - Clear drying craft glue - Small magnets - Printed scaled down images, or - Magazine photos - Confetti or glitter (optional)
bonus craft: glue a magnet on anything!
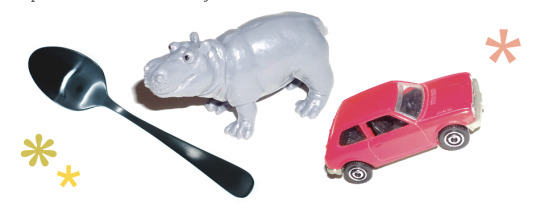
Using a super strong craft glue, attach magnets on anything your heart desires. Toy cars, plastic animals, spoons, game pieces, whatever you want!
Hot tip: It’s much easier to make stuff into magnets if the object has at least one flattish side!

#home stuff and apparel#magnet craft#recyclable crafting#bottle cap crafts#DIY projects#easy crafts#DIY#welcome to craftyland
3 notes
·
View notes
Text
Idea: sew some cute little moths with scrap fabrics and sew them on holes you have on your clothes so you can keep wearing them :)

#diy#sewing#visible mending#textile art#DIY culture#diy punk#sewing ideas#craft ideas#eco fashion#reduce reuse recycle
23K notes
·
View notes
Text
my bag 🌿⛓️🌻⚙️ more details in the image ID and more pics below
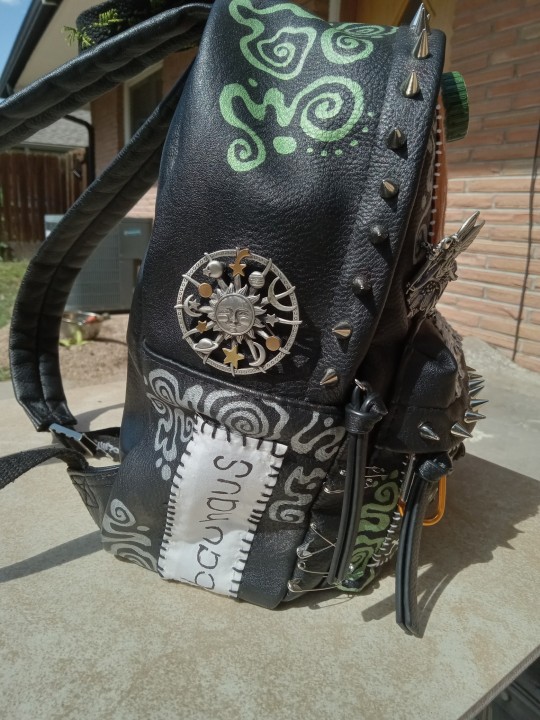
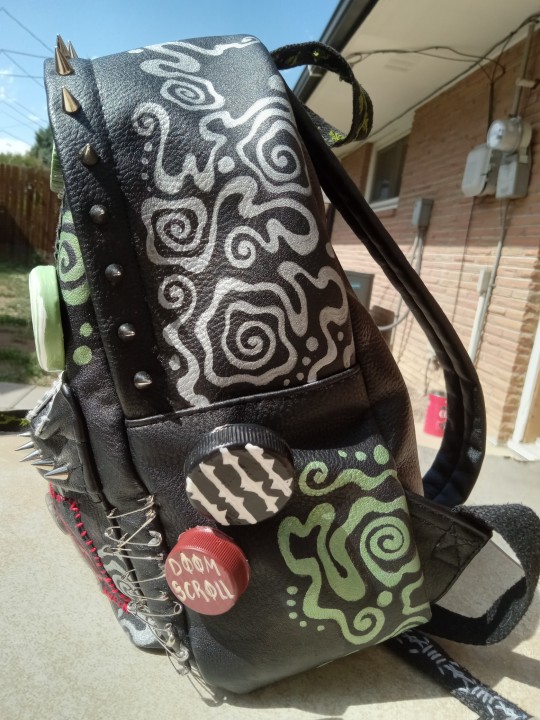

I found a small plain black leather backpack at the thrift store for $6 and made it my own :) I used silver sharpie for the swirls and made the buttons all myself with the exception of the metal ones
[Image ID: a small black leather backpack covered in patches, buttons, safety pins, studs and silver and metalic green spirals in the spaces with no patches. There are four patches on the front, an orange patch with a white trans rights symbol sewn on with white thread, and a circular green patch with a simplistic sun and moon drawin on it in black (a mirrormask patch) sewn on with black thread. And on the front pocket on the bottom, theres a dark green band patch with white lettering that says "she past away" sewn on with white thread and a black patch next to it with a red anarchy symbol sewn on the bag with red thread. There are silver spike studs lining the edges of the bag along the zipper and on the front pocket as well as soda tabs sewn onto the front pocket flap with off-white thread. And on both sides of the pocket there are safety pins decorating the empty space next to it. There are four pins on the side of the bag, a light green and white spiral pin, a light green and white "eat the rich" pin, and a metal fairy pin on the top half, and theres a metal frog with an umbrella pin on the front pocket in-between the two patches. Theres also a small orange carabiner on the pocket zipper.
On the left side of the bag, there is a patch on the bottom where a side pocket would normally be. An off-white band patch that says "bauhaus" in black lettering and it's sewn on with black thread, and there are silver spirals around it filling the space. There are some areas I left blank to make the swirls/spirals look like they're hanging down or growing up the bag like vines. There's a horizontal seam above all this that makes the area look like a pocket, and above this seam there's a metal pin with a sun, moon and stars on it.
The right side of the bag, there's no patch where a pocket should be, I instead filled this space with some spirals and more handmade bottle cap buttons. Two buttons, a larger type o negative band button that's black with white thorny vines, and a smaller red band button that says "doom scroll" on it in off-white lettering. Above the seam on this side I drew a bunch of silver spirals that look like they are growing out from behind the seam.
All thread mentioned in this post is embroidery thread, and some groups of spirals drawn on the bag are metallic green. End ID]
Here's the top of the bag as well as the straps that hang down
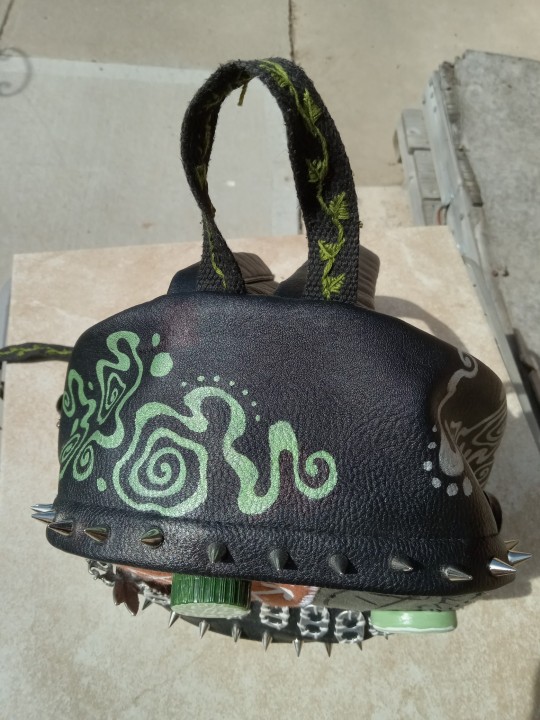
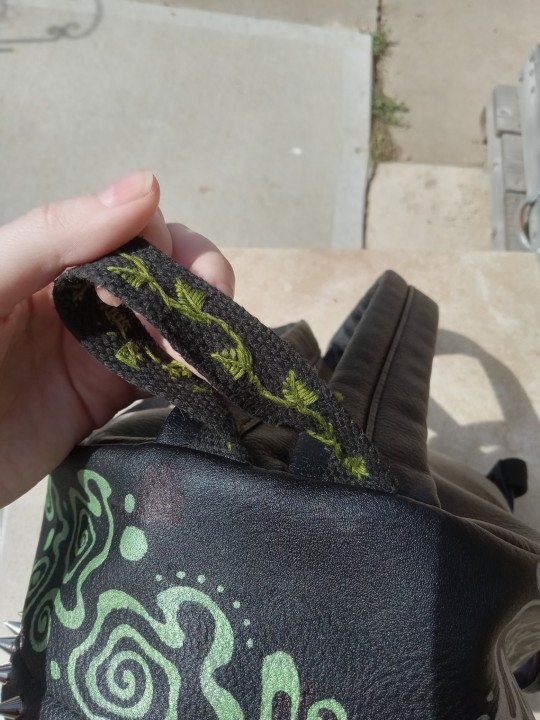
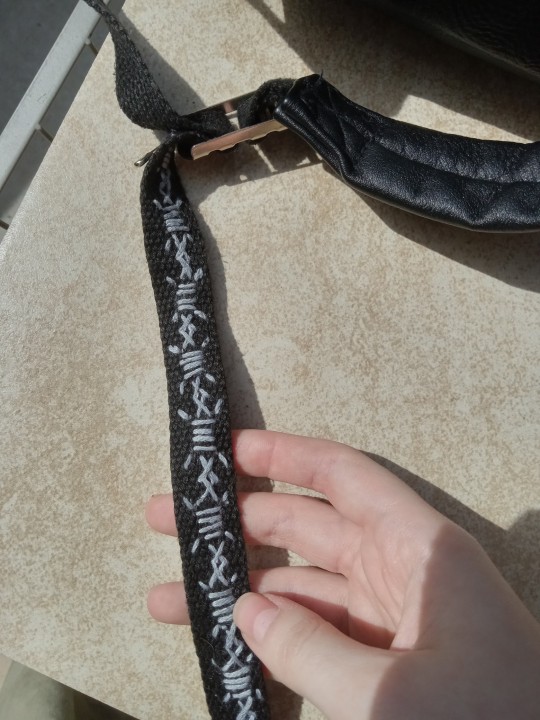
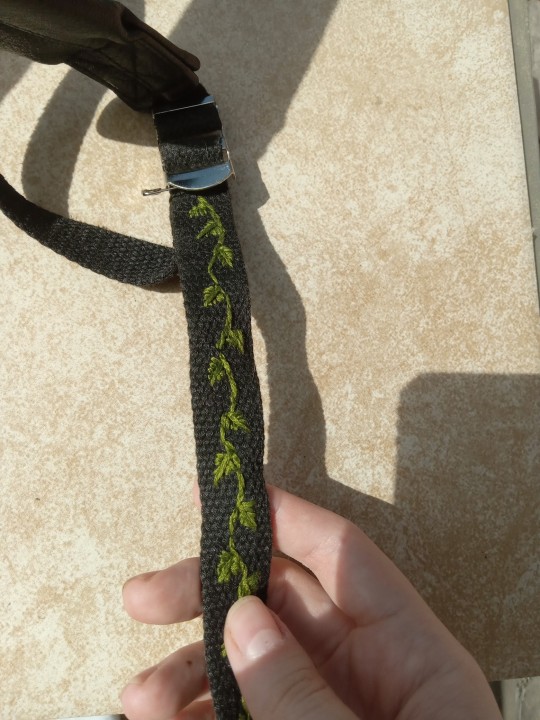
[Image ID: the bag has a rounded arch shape, and across the top of the leather I drew a cluster of green spirals in between the silver spirals I drew on the sides. There are some blank spots to avoid making the bag look busier than it already is. The loop at the top for hanging the bag is embroidered with a green leafy vine pattern. The same pattern is embroidered on the right strap that hangs down from the bottom of the bag, and on the right one, a gray barbed wire pattern is embroidered. I plan on sewing some more soda tabs onto the top of the bag at some point for the sake of adding more shiny things and also fill up some of that space I mentioned because while I don't want the bag to be too busy, I think the blank space i left on the top is a little too much blank space. End ID]
#punk#punk diy#punk fashion#solarpunk#solarpunk diy#solarpunk fashion#ecopunk#hopepunk#hatchet mends things#hatchet makes stuff#upcycled fashion#upcycling#sustainable fashion#sustainability#recycling#sewing#embroidery#crafting#diy#fashion#patches#customization#thrifting#art#goth#slow fashion
844 notes
·
View notes
Text
hickey's knife super interesting for obvious reasons, but also have you guys ever see some of the other knifes that got fashioned / salvaged from the wrecks.... especially the inuit-made ones....

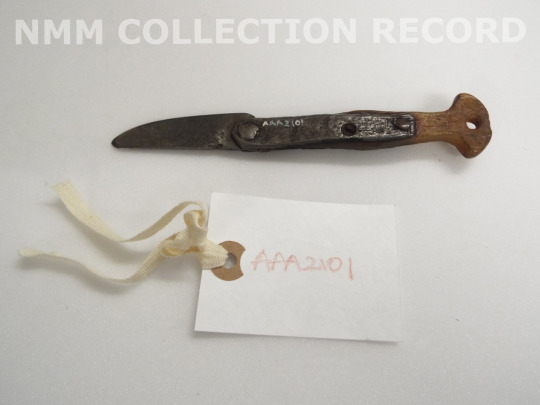

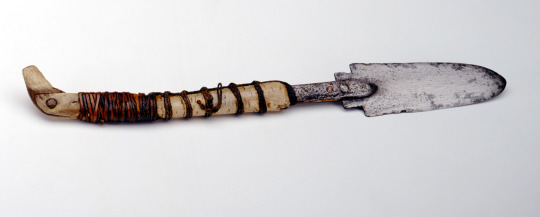
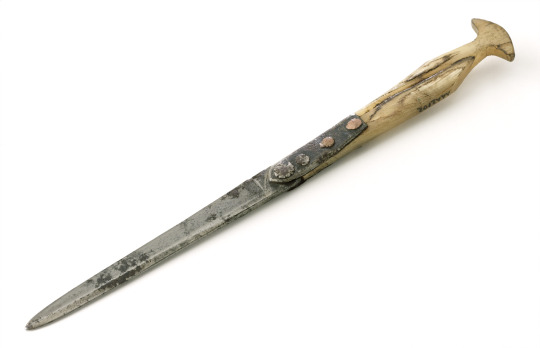
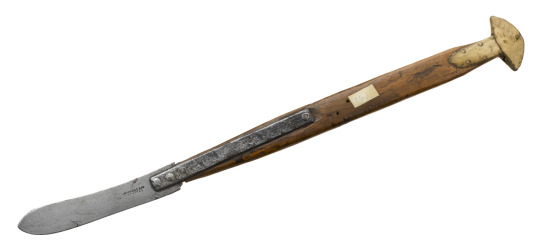


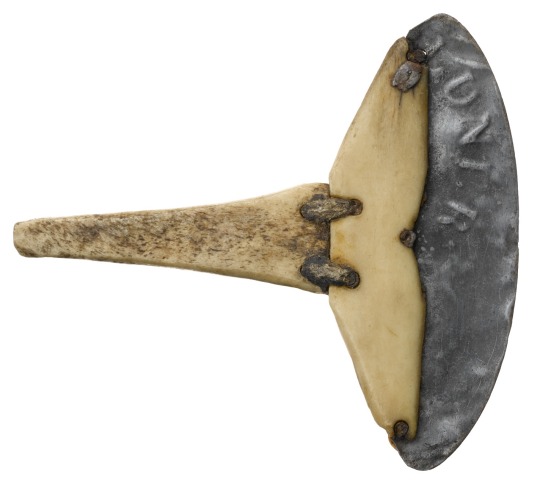
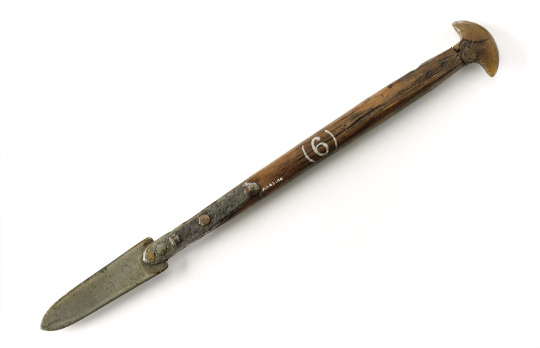


like these are very beautiful to MEEEEE
#especially the ulu knife being made from a recycled goldner tin...... i could cry....#native tool to skin animals/slice food into portions being crafted from the metal that held poisoned sour food that killed the imperialists#i need to double over and take a fucking breather here dude are you KIDDING MEEEE#📜
1K notes
·
View notes
Text

Grocery Bag Tail Tutorial!
Buckle up, this is a long one lol! Also please mind any typo's. We're very dyslexic.
(Note: While I feel this craft can be relatively straight forward and repetitive once you get in the rhythm, still be prepared for this to take a several hours to complete)
Step 1:

thread a long piece of thread on a needle to roughly the length you want your tail to be. (A little bit of extra length is always good. This can be trimmed later.)
Step 2:

Measure out a 5"x5" (127mm x 127mm) square template out of paper, (This will roughly end up being the width the tail is around.) then fold it in half.
Step 3:
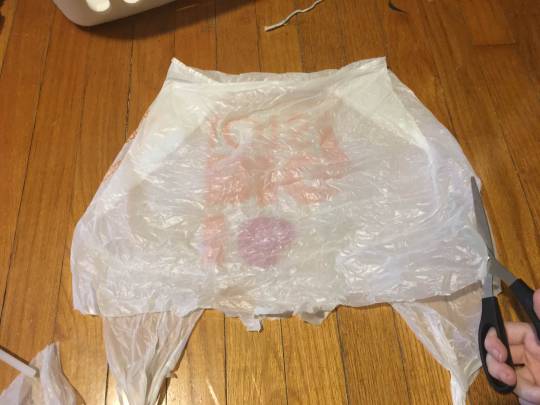
Cut the bag into a rectangle shape, preferably not including the label for a solid color. (Or leave it, that's up to you!) (Also, I like to save the access trims from the bag for other projects)
(Hint: If you paint a light wash of acrylic paint on the bag at this step you can change the color of the tail ;3 )
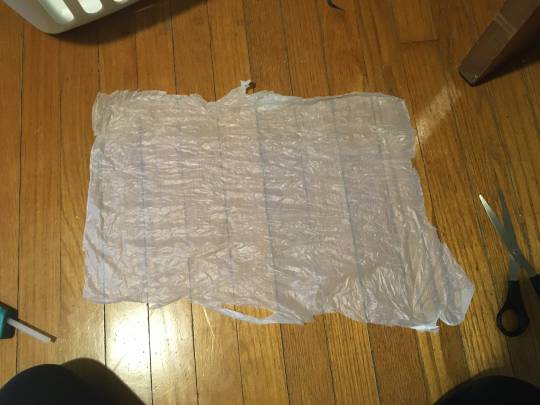
Step 4:


Fold the rectangle once vertically, and once horizontally.
Step 5:

Cut along 3 of the folded sides but NOT the side where they are all attached! (This is so it remains one solid piece) Fold It back out and it should have cleaner edges. (Once again I like to keep the trimmings for use in other projects.)
Step 6:

Fold the rectangle towards you and roughly to the size of the folded paper template (see step 2) Trim three edges; the one closest you you, and the side edges. NOT the top!
Step 7:

Hold the bag in the middle of the non-cut side and cut strips into the CUT sides of the bag. (it should end up looking like the second picture)
Congrats! You're over half way! Keep it up, you got this!
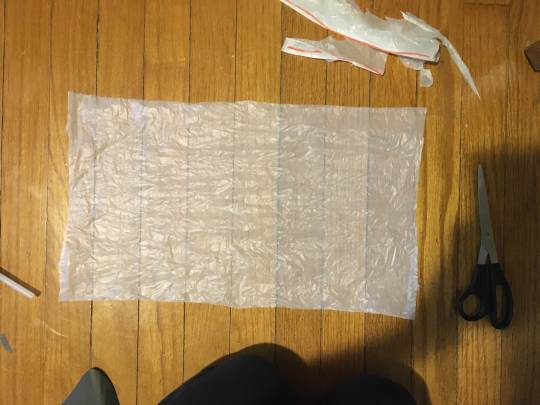
Step 8:

GENTLY pull each piece apart and lay them out. if done correctly up to this point, they should look like the image above. Repeat steps 3-8 until you have a decent amount of these. (You should make around 10-15 of these before moving on to the next step.)
Step 9:

Pile each of the squares on top of each other, then thread them through the center once one way and then back close to the center a second time. Make sure to leave some extra thread. (See the second image.) (Don't string it back through the same hole or it wont hold.)
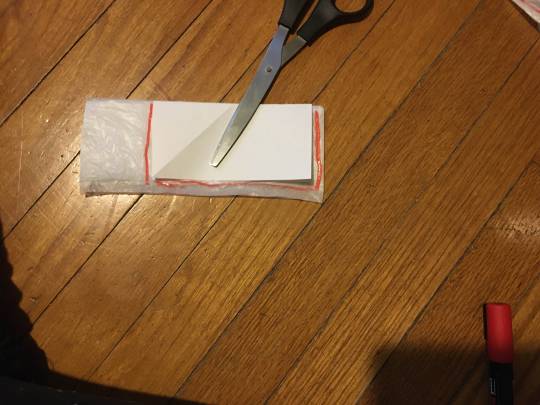
Step 10:
Tie a double knot with the end of the thread and the other part of the thread still attached to the needle.
Step 11:


Trim the access from the side not attached to the needle. (Do NOT cut the thread attached to the needle! (It should look roughly like the second image.)
Step 12:
Tie a piece of string to the thread and double knot it. Trim extra. (this will help bulk it uses so you wont need to make nearly as many squares.)
One more step!
Step 13:


Slide the knot down to the the end where the bags are, then string another square.
Continue this process of alternating tying a knot of string and adding a plastic square until you are satisfied with the length! Simply tie it off at the end when you're done! (trimming at the end for shaping the tail can help too)
-
If anyone makes this and wants to post it, please tag us! we'd love to see! This method can most likely be used with other materials as well so get creative!
Also:
-Let us know if anyone finds a way to improve on how to make these more efficiently.
-If anyone has any questions about the tutorial, please let us know in the comments, and we'll try my best to answer. -Max
#alterhuman#alterhumanity#therian#adult therian#otherkin#furry#otherhearted#therian community#therianthropy#therian crafts#therian tail#recycled art
204 notes
·
View notes
Text
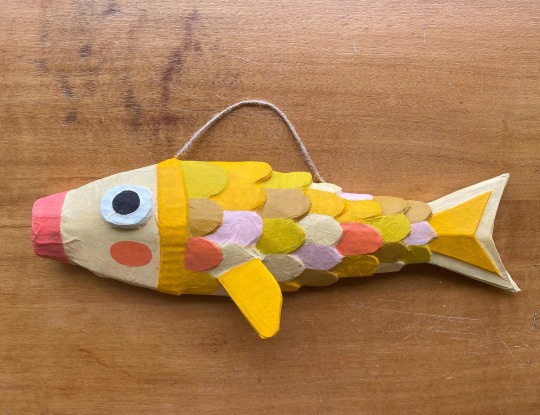
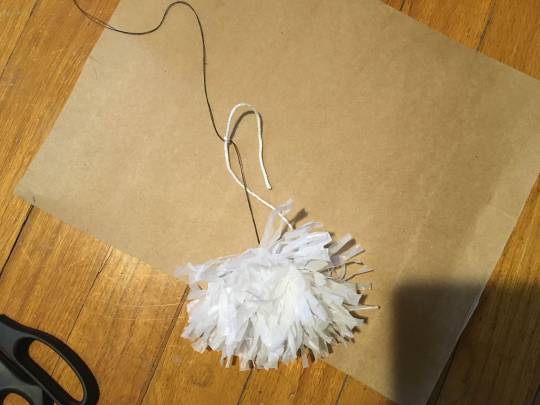
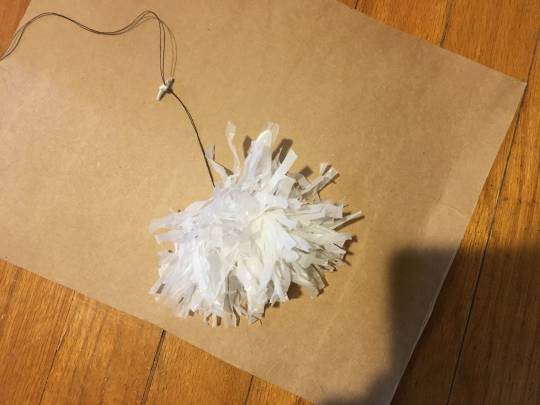
Sweet little koi boi filled to the brim with recycled soft plastics and scraps of cardboard 🙌
I made this trash koi fish to add to my crappy wall of dodgy masks and alters #blessthismess
Created using rubbish, paper mache and acrylics 🐟
#koi#koi fish#wallart#wall art#wall hanging#handmade#paper mache#papier mâché#illustration#art#crafty#crafting#paper craft#acrylics#recycling#trash art#creative#illustrator#painting
482 notes
·
View notes
Text
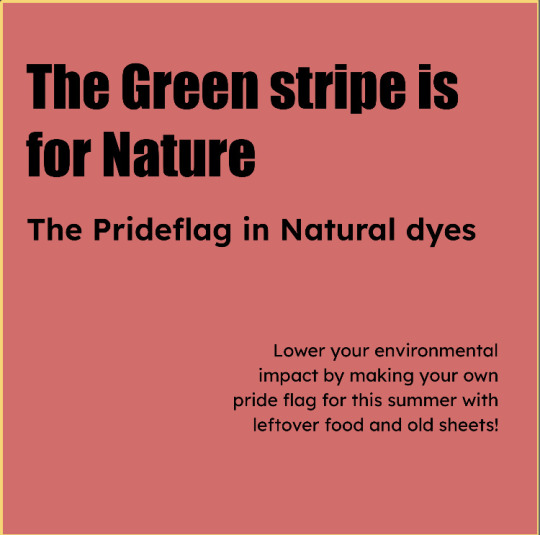
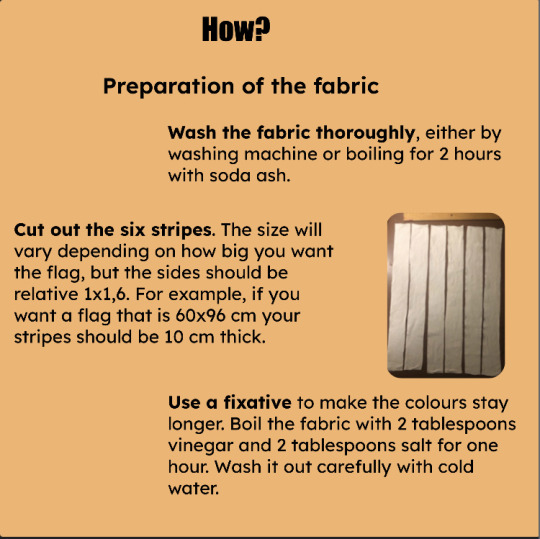


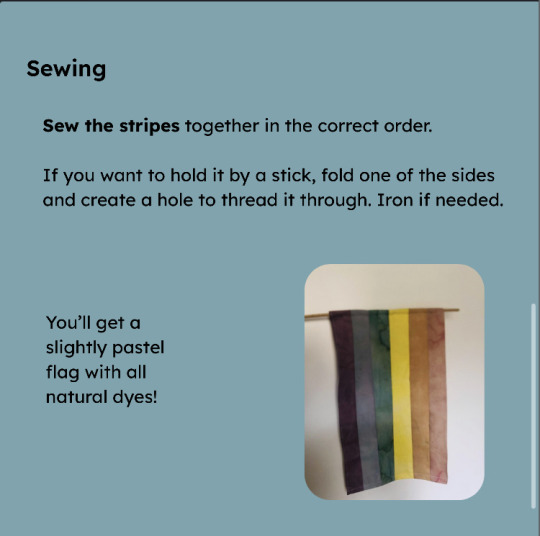
The results will be a unique and slightly rustic flag. In general, I want people to be aware of their impact when it comes to buying textiles, and that there is alternatives when wanting new clothing or similarities.
#environment#ecopunk#reduce reuse recycle#upcycle#recycling#lgbtqia#sustainability#ecofriendly#eco pride#diy#diy craft#cottagecore#pride#punk#environmentalism#natural dyes#dyeing
579 notes
·
View notes
Text

Day 30 Birthday
They deserve everything
So much more than they have
#dcatober24#fnaf sun#dca sun#fnaf dca#dca fandom#my art#sun would build and craft a cake for them every time I believe#And yeah the banner is a recycled version they got from one of Freddys#They can't even celebrate together and eat cake or have a game or...#I think they would find a way but damn
169 notes
·
View notes
Text

Just feel like I need this in my life right now.
178 notes
·
View notes
Text


I love making quilts and blankets, but when I offered one from my stack to a friend, they said that they really only wanted a blue one... so I made this! It started as a spite project but turned into something much better.
The front is made from upholstery samples that I got from a free event aimed at giving away items being sent to landfills. Because of the variety of fabric materials and types, it's a textural wonderland, with each square feeling very different from the ones next to it.
The back is flannel cotton, which is far less interesting.
The moon applique is a completely new technique for me, and one that I'm excited to try again in the future.
I hope my friend likes it. If not, I'll scream! Or at least be really bummed. This thing took a lot of work, and I'm honestly pretty proud of the results.
#quilt#quilting#blanket#sewing#patchwork#upholstery#upholstery fabric#moon#blue#blue blanket#blue quilt#recycled#art#craft#handmade
79 notes
·
View notes
Text
After:


Before:
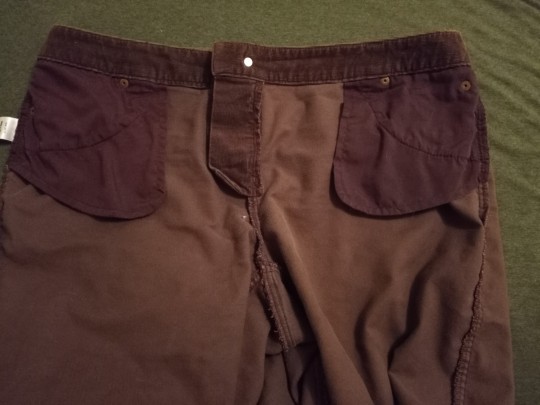
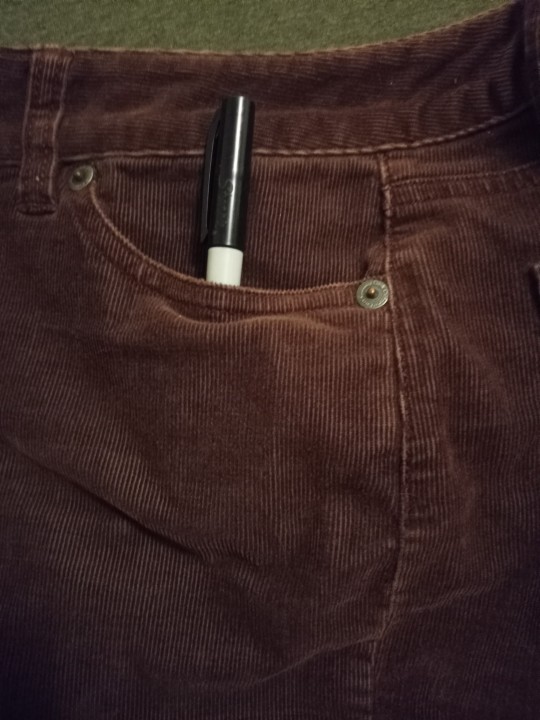
Fuck tiny pockets!! I finally got around to extending the pockets on these corduroy pants I thrifted over a month ago! My handsewing looks like shit but they're functional
351 notes
·
View notes
Text
Patchwork Makeup Bags


Made patchwork makeup bags out of secondhand and recycled materials to ask my BFFs to be my bridesmaids using this tutorial
#diy#upcycle#upcycled#upcycling#crafts#handmade#ecofriendly#reduce reuse recycle#quilts#quilting#quiltblr#quilt#quilters of tumblr#patchwork#sewing#makeup#makeup bag#wastelesscrafts#wasteless crafts#zero waste#zerowaste#cozytumblr#cozycore#cozy aesthetic#cozy vibes#cozy#secondhand#thrifting#thrifstorefinds#secondhand crafts
62 notes
·
View notes
Text
Made more bracelets 🌿🧷🌿


Working on embroidered ones atm
[Image ID: 5 images of hand stitched fabric cuffs with studs and spikes. They are various sizes and all adjustable. The first one is made from the collar of a blue and white flannel shirt and it has messy frayed edges and 0.75 inch long spikes. The 2nd bracelet is made of the sleeve cuff of a light green shirt with cleaner edges and 1 inch long spikes. The third cuff is made of the sleeve cuff of a black and white flannel shirt with 1 inch long spikes and one row of black and white checkerboard pattern ribbon stitched along both sides of the row of spikes. The next two sleeve cuff bracelets have the same design, but one is dark red with smaller 1 centimeter spikes and the last one is dark purple with studs and no spikes. All checkerboard cuffs are my widest ones. On the bracelets with the checkerboard ribbon, I used white thread, but colored in the stitches over the black squares with a sharpie so it doesn't distract from the already busy pattern.
End ID]
#solarpunk#solarpunk fashion#solarpunk aesthetic#punk#punk fashion#solarpunk diy#punk diy#diy#punk jewelry#jewelry making#jewelry#sewing#upcycled fashion#upcycling#sustainability#sustainable fashion#recycling#fashion#goth#ecopunk#hopepunk#hatchet makes stuff#studs#crafting
118 notes
·
View notes
Text


This WAS a wristwatch. Now it's a POCKET watch. 👌
57 notes
·
View notes
Text
#yuletide#yule#pagan#spiritual healing#spirituality#healing#nature#paganism#earth#self care#holidays#gift ideas#recycle#upcycle#crafting#craft#creativity#mother nature#mother earth#family#friendship#art
243 notes
·
View notes
Text


Can tab chains! Making these is so calming
Tabs: found on the street & collected over the course of 15 years
Shoelaces: from old boots
Closings: from thrifted lanyards
Trash crafts best crafts
369 notes
·
View notes