#radley irradiates people
Explore tagged Tumblr posts
Visit Tumblr Blog
Explore Tumblr blogs with no restrictions, modern design and the best experience.
Last Seen Tumblr Blogs


Fun Fact
Mobile Tumblr US users spend an average of 4.04 minutes per session on the app.
Text
Been a while, crocodiles. Let's talk about cad.

or, y'know...

Yep, we're doing a whistle-stop tour of AI in medical diagnosis!
Much like programming, AI can be conceived of, in very simple terms, as...
a way of moving from inputs to a desired output.
See, this very funky little diagram from skillcrush.com.
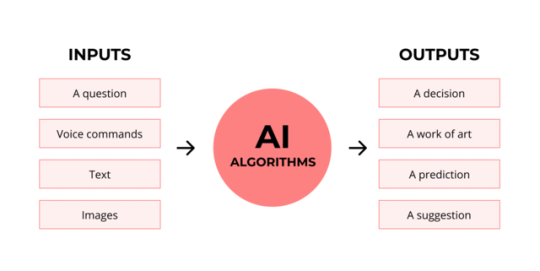
The input is what you put in. The output is what you get out.
This output will vary depending on the type of algorithm and the training that algorithm has undergone – you can put the same input into two different algorithms and get two entirely different sorts of answer.
Generative AI produces ‘new’ content, based on what it has learned from various inputs. We're talking AI Art, and Large Language Models like ChatGPT. This sort of AI is very useful in healthcare settings to, but that's a whole different post!
Analytical AI takes an input, such as a chest radiograph, subjects this input to a series of analyses, and deduces answers to specific questions about this input. For instance: is this chest radiograph normal or abnormal? And if abnormal, what is a likely pathology?
We'll be focusing on Analytical AI in this little lesson!
Other forms of Analytical AI that you might be familiar with are recommendation algorithms, which suggest items for you to buy based on your online activities, and facial recognition. In facial recognition, the input is an image of your face, and the output is the ability to tie that face to your identity. We’re not creating new content – we’re classifying and analysing the input we’ve been fed.
Many of these functions are obviously, um, problematique. But Computer-Aided Diagnosis is, potentially, a way to use this tool for good!
Right?
....Right?
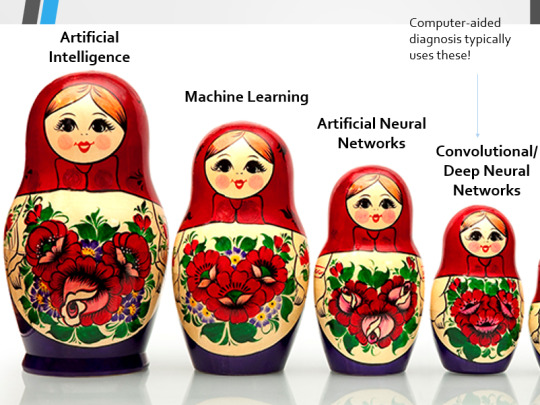
Let's dig a bit deeper! AI is a massive umbrella term that contains many smaller umbrella terms, nested together like Russian dolls. So, we can use this model to envision how these different fields fit inside one another.

AI is the term for anything to do with creating and managing machines that perform tasks which would otherwise require human intelligence. This is what differentiates AI from regular computer programming.
Machine Learning is the development of statistical algorithms which are trained on data ��but which can then extrapolate this training and generalise it to previously unseen data, typically for analytical purposes. The thing I want you to pay attention to here is the date of this reference. It’s very easy to think of AI as being a ‘new’ thing, but it has been around since the Fifties, and has been talked about for much longer. The massive boom in popularity that we’re seeing today is built on the backs of decades upon decades of research.
Artificial Neural Networks are loosely inspired by the structure of the human brain, where inputs are fed through one or more layers of ‘nodes’ which modify the original data until a desired output is achieved. More on this later!
Deep neural networks have two or more layers of nodes, increasing the complexity of what they can derive from an initial input. Convolutional neural networks are often also Deep. To become ‘convolutional’, a neural network must have strong connections between close nodes, influencing how the data is passed back and forth within the algorithm. We’ll dig more into this later, but basically, this makes CNNs very adapt at telling precisely where edges of a pattern are – they're far better at pattern recognition than our feeble fleshy eyes!
This is massively useful in Computer Aided Diagnosis, as it means CNNs can quickly and accurately trace bone cortices in musculoskeletal imaging, note abnormalities in lung markings in chest radiography, and isolate very early neoplastic changes in soft tissue for mammography and MRI.
Before I go on, I will point out that Neural Networks are NOT the only model used in Computer-Aided Diagnosis – but they ARE the most common, so we'll focus on them!

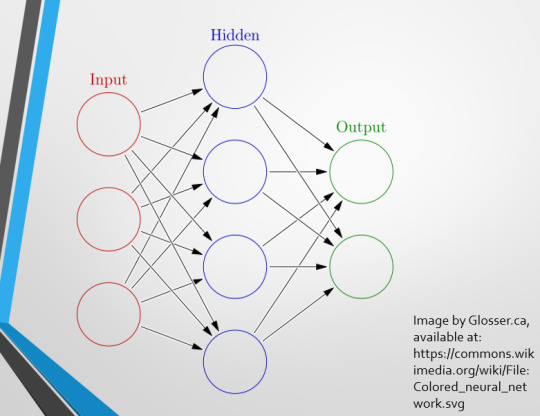
This diagram demonstrates the function of a simple Neural Network. An input is fed into one side. It is passed through a layer of ‘hidden’ modulating nodes, which in turn feed into the output. We describe the internal nodes in this algorithm as ‘hidden’ because we, outside of the algorithm, will only see the ‘input’ and the ‘output’ – which leads us onto a problem we’ll discuss later with regards to the transparency of AI in medicine.
But for now, let’s focus on how this basic model works, with regards to Computer Aided Diagnosis. We'll start with a game of...
Spot The Pathology.
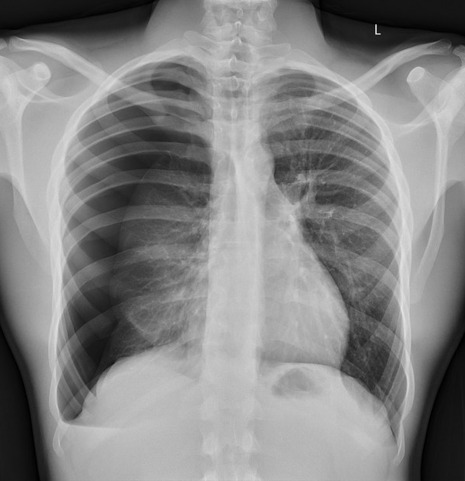
yeah, that's right. There's a WHACKING GREAT RIGHT-SIDED PNEUMOTHORAX (as outlined in red - images courtesy of radiopaedia, but edits mine)
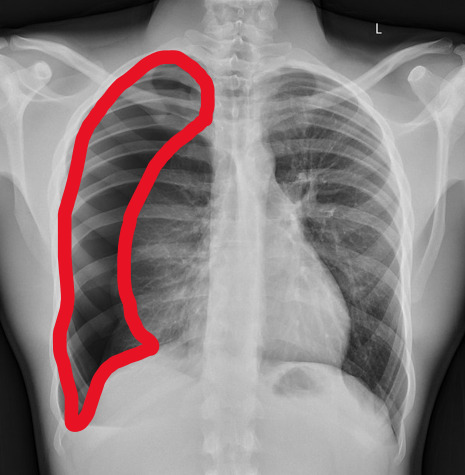
But my question to you is: how do we know that? What process are we going through to reach that conclusion?
Personally, I compared the lungs for symmetry, which led me to note a distinct line where the tissue in the right lung had collapsed on itself. I also noted the absence of normal lung markings beyond this line, where there should be tissue but there is instead air.
In simple terms.... the right lung is whiter in the midline, and black around the edges, with a clear distinction between these parts.

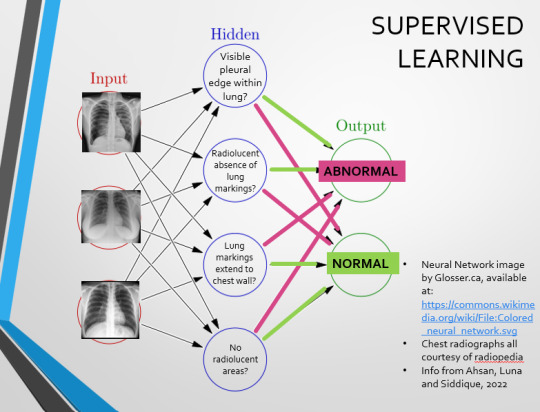
Let’s go back to our Neural Network. We’re at the training phase now.
So, we’re going to feed our algorithm! Homnomnom.
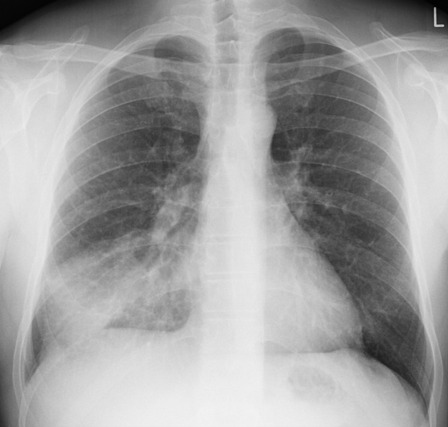
Let’s give it that image of a pneumothorax, alongside two normal chest radiographs (middle picture and bottom). The goal is to get the algorithm to accurately classify the chest radiographs we have inputted as either ‘normal’ or ‘abnormal’ depending on whether or not they demonstrate a pneumothorax.
There are two main ways we can teach this algorithm – supervised and unsupervised classification learning.
In supervised learning, we tell the neural network that the first picture is abnormal, and the second and third pictures are normal. Then we let it work out the difference, under our supervision, allowing us to steer it if it goes wrong.
Of course, if we only have three inputs, that isn’t enough for the algorithm to reach an accurate result.
You might be able to see – one of the normal chests has breasts, and another doesn't. If both ‘normal’ images had breasts, the algorithm could as easily determine that the lack of lung markings is what demonstrates a pneumothorax, as it could decide that actually, a pneumothorax is caused by not having breasts. Which, obviously, is untrue.
or is it?
....sadly I can personally confirm that having breasts does not prevent spontaneous pneumothorax, but that's another story lmao
This brings us to another big problem with AI in medicine –

If you are collecting your dataset from, say, a wealthy hospital in a suburban, majority white neighbourhood in America, then you will have those same demographics represented within that dataset. If we build a blind spot into the neural network, and it will discriminate based on that.
That’s an important thing to remember: the goal here is to create a generalisable tool for diagnosis. The algorithm will only ever be as generalisable as its dataset.
But there are plenty of huge free datasets online which have been specifically developed for training AI. What if we had hundreds of chest images, from a diverse population range, split between those which show pneumothoraxes, and those which don’t?
If we had a much larger dataset, the algorithm would be able to study the labelled ‘abnormal’ and ‘normal’ images, and come to far more accurate conclusions about what separates a pneumothorax from a normal chest in radiography. So, let’s pretend we’re the neural network, and pop in four characteristics that the algorithm might use to differentiate ‘normal’ from ‘abnormal’.
We can distinguish a pneumothorax by the appearance of a pleural edge where lung tissue has pulled away from the chest wall, and the radiolucent absence of peripheral lung markings around this area. So, let’s make those our first two nodes. Our last set of nodes are ‘do the lung markings extend to the chest wall?’ and ‘Are there no radiolucent areas?’
Now, red lines mean the answer is ‘no’ and green means the answer is ‘yes’. If the answer to the first two nodes is yes and the answer to the last two nodes is no, this is indicative of a pneumothorax – and vice versa.
Right. So, who can see the problem with this?
(image courtesy of radiopaedia)
This chest radiograph demonstrates alveolar patterns and air bronchograms within the right lung, indicative of a pneumonia. But if we fed it into our neural network...
The lung markings extend all the way to the chest wall. Therefore, this image might well be classified as ‘normal’ – a false negative.
Now we start to see why Neural Networks become deep and convolutional, and can get incredibly complex. In order to accurately differentiate a ‘normal’ from an ‘abnormal’ chest, you need a lot of nodes, and layers of nodes. This is also where unsupervised learning can come in.
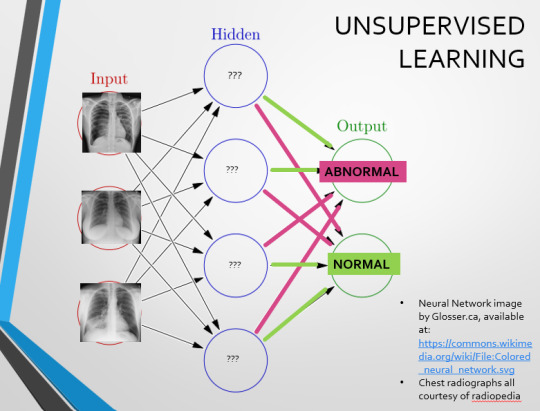
Originally, Supervised Learning was used on Analytical AI, and Unsupervised Learning was used on Generative AI, allowing for more creativity in picture generation, for instance. However, more and more, Unsupervised learning is being incorporated into Analytical areas like Computer-Aided Diagnosis!
Unsupervised Learning involves feeding a neural network a large databank and giving it no information about which of the input images are ‘normal’ or ‘abnormal’. This saves massively on money and time, as no one has to go through and label the images first. It is also surprisingly very effective. The algorithm is told only to sort and classify the images into distinct categories, grouping images together and coming up with its own parameters about what separates one image from another. This sort of learning allows an algorithm to teach itself to find very small deviations from its discovered definition of ‘normal’.
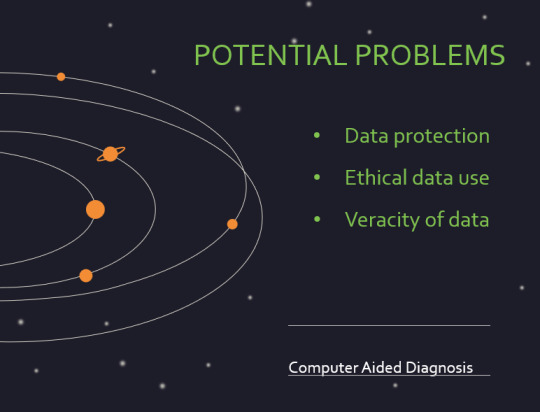
BUT this is not to say that CAD is without its issues.
Let's take a look at some of the ethical and practical considerations involved in implementing this technology within clinical practice!
(Image from Agrawal et al., 2020)
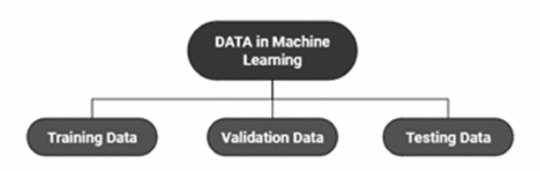
Training Data does what it says on the tin – these are the initial images you feed your algorithm. What is key here is volume, variety - with especial attention paid to minimising bias – and veracity. The training data has to be ‘real’ – you cannot mislabel images or supply non-diagnostic images that obscure pathology, or your algorithm is useless.
Validation data evaluates the algorithm and improves on it. This involves tweaking the nodes within a neural network by altering the ‘weights’, or the intensity of the connection between various nodes. By altering these weights, a neural network can send an image that clearly fits our diagnostic criteria for a pneumothorax directly to the relevant output, whereas images that do not have these features must be put through another layer of nodes to rule out a different pathology.
Finally, testing data is the data that the finished algorithm will be tested on to prove its sensitivity and specificity, before any potential clinical use.
However, if algorithms require this much data to train, this introduces a lot of ethical questions.
Where does this data come from?
Is it ‘grey data’ (data of untraceable origin)? Is this good (protects anonymity) or bad (could have been acquired unethically)?
Could generative AI provide a workaround, in the form of producing synthetic radiographs? Or is it risky to train CAD algorithms on simulated data when the algorithms will then be used on real people?
If we are solely using CAD to make diagnoses, who holds legal responsibility for a misdiagnosis that costs lives? Is it the company that created the algorithm or the hospital employing it?
And finally – is it worth sinking so much time, money, and literal energy into AI – especially given concerns about the environment – when public opinion on AI in healthcare is mixed at best? This is a serious topic – we’re talking diagnoses making the difference between life and death. Do you trust a machine more than you trust a doctor? According to Rojahn et al., 2023, there is a strong public dislike of computer-aided diagnosis.
So, it's fair to ask...
why are we wasting so much time and money on something that our service users don't actually want?
Then we get to the other biggie.
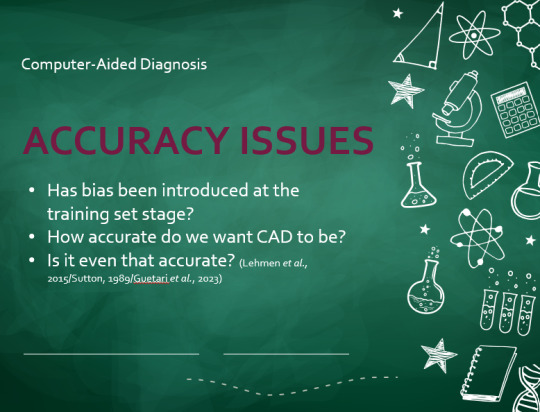
There are also a variety of concerns to do with the sensitivity and specificity of Computer-Aided Diagnosis.
We’ve talked a little already about bias, and how training sets can inadvertently ‘poison’ the algorithm, so to speak, introducing dangerous elements that mimic biases and problems in society.
But do we even want completely accurate computer-aided diagnosis?
The name is computer-aided diagnosis, not computer-led diagnosis. As noted by Rajahn et al, the general public STRONGLY prefer diagnosis to be made by human professionals, and their desires should arguably be taken into account – as well as the fact that CAD algorithms tend to be incredibly expensive and highly specialised. For instance, you cannot put MRI images depicting CNS lesions through a chest reporting algorithm and expect coherent results – whereas a radiologist can be trained to diagnose across two or more specialties.
For this reason, there is an argument that rather than focusing on sensitivity and specificity, we should just focus on producing highly sensitive algorithms that will pick up on any abnormality, and output some false positives, but will produce NO false negatives.
(Sensitivity = a test's ability to identify sick people with a disease)
(Specificity = a test's ability to identify that healthy people do not have this disease)
This means we are working towards developing algorithms that OVERESTIMATE rather than UNDERESTIMATE disease prevalence. This makes CAD a useful tool for triage rather than providing its own diagnoses – if a CAD algorithm weighted towards high sensitivity and low specificity does not pick up on any abnormalities, it’s highly unlikely that there are any.
Finally, we have to question whether CAD is even all that accurate to begin with. 10 years ago, according to Lehmen et al., CAD in mammography demonstrated negligible improvements to accuracy. In 1989, Sutton noted that accuracy was under 60%. Nowadays, however, AI has been proven to exceed the abilities of radiologists when detecting cancers (that’s from Guetari et al., 2023). This suggests that there is a common upwards trajectory, and AI might become a suitable alternative to traditional radiology one day. But, due to the many potential problems with this field, that day is unlikely to be soon...
That's all, folks! Have some references~
#medblr#artificial intelligence#radiography#radiology#diagnosis#medicine#studyblr#radioactiveradley#radley irradiates people#long post
16 notes
·
View notes
Text
It’s SPOOKY SCARY SKELETONS MONTH
So let’s talk about yer bones! Yeah, that’s right, Captian Holt. I said –

An adult has (roughly) 206 bones (I say ‘roughly’! You can have non-pathological anatomical variation, such as lumbarised sacral vertebrae (an extra bone in your back) or accessory sesamoids like the flabella (a little bone at the back of the knee!))
A newborn has (roughly) 300 bones
That's a big difference! Almost 100 bones of difference! Where do they go?
Well, you see - as you get older, every time you come into the hospital we steal more of your bones...
Just kidding.
...Or am I
As an embryo, your skeleton is completely composed of cartilage. This gradually ossifies as you age, until, as an adult, you have a full skeleton, with only the interactive portions of joints being capped with hyaline cartilage.
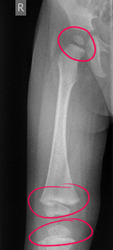
[Paediatric normal whole leg radiograph, showing epiphyseal plates around the head of the femur, the femoral condyles, the proximal tibia, the distal tibia and the lateral malleoli that can mimic fractures. Courtesy of radiopaedia]
See all those weird blobs? Those are bones in the process of fusing together! The transverse lines that could be mistaken for fractures are actually epiphyseal plates – hyaline cartilage bridges between the shaft of a bone and what will become its tip, which don't attenuate x-rays, and thus appear black on our radiographs! This is where bone growth occurs - the cartilage forms a sort of template matrix that then ossifies into bone.
Compare our paediatric radiograph to the AP knee radiographs of an adult with no visible pathology:

[Adult normal AP knee radiographs, showing fully fused bones. Courtesy of radiopaedia]
See how all those ragged pieces have joined up? That’s endochondral ossification, BABY!
This is how we can figure out the age of a paediatric service user from their bones! Certain bones form at different times.
Let’s check out the carpal bones – all those fiddly little bones in your wrist! Anyone who’s binged Hatecrimes MD – sorry, House MD as often as I have will know the classic acronym for remembering the names of these bones. Moving thumb side to pinkie side, we have…
Scared (Scaphoid - red)
Lovers (Lunate - dark blue)
Hate (Hamate - green)
To (Triquetrum - yellow)
Try (Trapezium - orange)
The (Trapezoid - light blue)
Coolest (Capitate - purple)
Positions (Pisiform - pink)
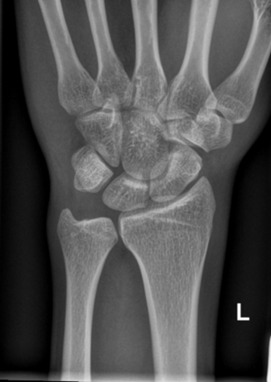
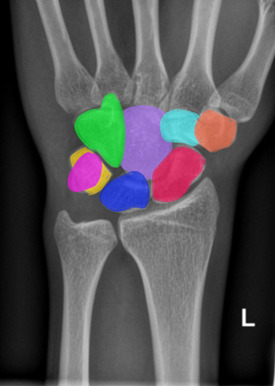
[Normal adult wrist radiograph, shown with and without coloured carpal bones. Courtesy of radiopaedia.]
But did you know that these bones form at different times?
The Capitate ossifies at 1-3 months
The Hamate ossifies at 2-4 months
The Triquetrum ossifies at 2-3 years
The Lunate ossifies at 2-4 years
The Scaphoid, Trapezium and Trapezoid ossify at 4-6 years
And the Pisiform ossifies at 8-12 years
So, I can look at this picture, and tell you that this child is approximately 3 years old, because their Capitate and Hamate have ossified, and their Triquetrum is just visible, starting to ossify below the thumb (circled!)
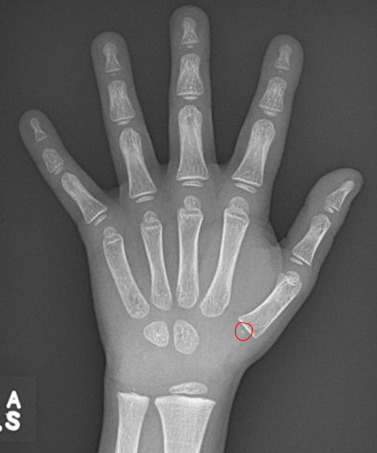
[Normal wrist radiograph of a paediatric patient, triquetral ossification centre circled. Courtesy of Radiopaedia.]
Your bones continue to form and fuse until you reach about 25! Your olecranon (the bump of your elbow) starts to ossify at 6-11 years, and fuses at 13-16 years! We can look at the base of your fifth metatarsal to age afab folks who are approx. 10 and amab folks who are approx. 12, as this bone fuses in the 2-4 years following these ages! The medial end of the clavicle can be used to assess your age from approximately 18-22, and your facial bones continue to ossify into adulthood! How cool is that?
If you’re over 25, fret not – there’s still plenty of funky stuff happening to your bones. But we’ll get into all of that next time, when we take a look at the function of osteoblasts and osteoclasts and explore all the cool little jobs that your bones perform within your body - it's more than you might think! So, tune in next time for more Bone facts...

And thank you for reading!
#medblr#halloween#spooky#skeleton#science side of tumblr#radiography#radiology#medicine#human anatomy#x rays#radley irradiates people#spoopy
33 notes
·
View notes
Text
PATHOLOGY OF THE URINARY SYSTEM (aka: STUFF WHAT GOES WRONG WITH YER PISS BEANS)
(AND YER PISS TUBES)
(and the pretty pictures I take of them)
[a warning: this post contains radiographic images and non-graphic description of serious kidney pathologies, including paediatric cancer]
Let's kick off with an old familiar friend! Yeah, I'm talking -
UROLITHIASIS (the humble kidney stone!)
Wanna know something horrific? The biggest kidney stone on record weighed over a kilogram. It was 17 cm across. Just. Imagine. Trying to piss that out…

Urolithiases are formed anywhere among your urinary tracts. They’re commonly found in the kidneys, giving rise to the more common term, renal calculi, or kidney stones.
Urolithiasis occurs when compounds within your urine crystallise. If your urine becomes too acidic, too base, contains too many of these compounds for them to remain in solution, or simply… sits around too long without flowing, it literally petrifies into a solid lump!
Some unlucky souls are just… predisposed to developing them. If you have had a kidney stone in the past, you are far more likely to get another one in the future. There also seems to be a genetic link – so if someone in your immediate family gets kidney stones, you have a higher risk.
Kidney stones typically hang out in the pelvis of your kidney and don’t cause an issue. Until you try to piss them out. Remember our kidney diagram (drawn on a conveniently shaped bean)?
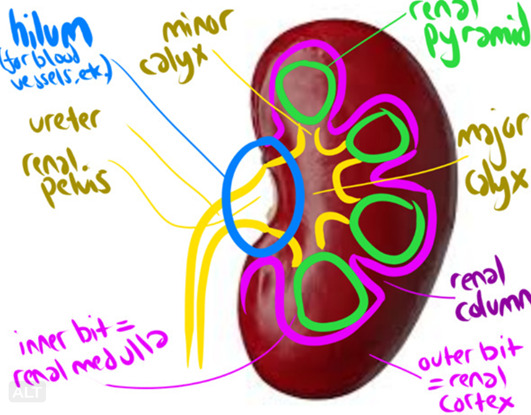
You might notice that the ureters are significantly smaller than the renal pelvis. In other words…

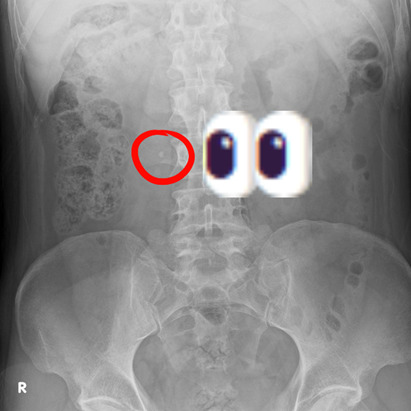
Most renal calculi are made of CALCIUM (oxalate, usually). This is very, very good (for us. Less so for you) because calcium attenuates x-rays – meaning, it glows all pretty and shiny when we take a radiograph!
Here’s a kidney stone on an Abdominal X-Ray!
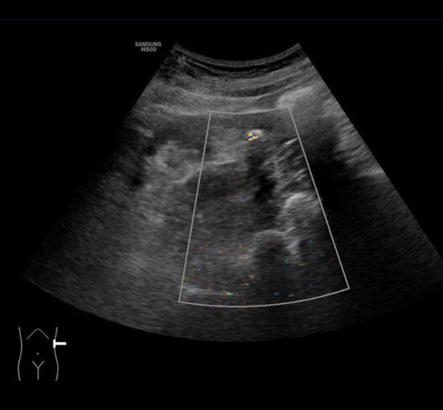
And a twinkly artefact caused by a kidney stone on Ultrasound!
But the best way to assess urolithiases, is, of course, with CT!

For realsies. We don’t need to inject contrast intravenously, because the kidney stones are (typically) shiny – which cuts down on time and worry, as it means you’re at no risk for having an adverse reaction! So a CT KUB (checking Kidneys, Ureters and Bladder for stones) is basically just a quick tumble in the washing machine (CT scanner), with a lovely clear picture as a result!

Look at these babies!! So sharp!!! So clear!!!!!! So shiny!!!!!!!!!!!! That’s a beautiful matching pair of renal calculi right there – and to make things better, they’re (currently) non-obstructive, so this patient isn’t in suffering The Agonies!
Speaking of The Agonies…
Most kidney stones are passable, albeit with extreme pain.
However, some ain’t going anywhere. Especially staghorn calculi, which, um. One, stags have antlers. Two…

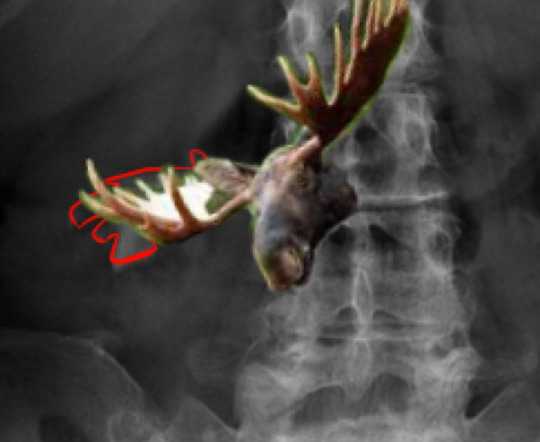
more like a fuckin' MOOSE ANTLER amirite????
But yeah, those buggers aren’t coming out. That’s almost definitely going to require surgery!
Smaller calculi can still cause problems when they become obstructive – i.e., they block the passage of your peepee. They can lead to:
HYDRONEPHROSIS (dilation of the renal pelvis due to retained urine, seen here in the Left kidney [right side of image])
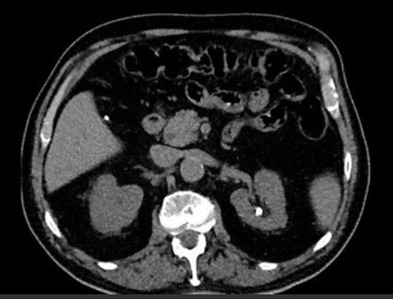
HYDROURETER (dilation of the ureter)
So, what do we do with bothersome calculi? How about some...
EXTRACORPOREAL SHOCKWAVE LITHOTRIPSY (ECSWL, because we love a sexy little acronym here in medworld).
We blast the stone apart with shockwaves, from outside your body! Ultrasound turned up to 11! Unfortunately, it only works on certain densities of stone, and on small stones.
LASER LITHOTRIPSY
(same thing but…. ZIP ZAP LASERZZZZZ]
SURGERY – PERCUTANEOUS NEPHROLITHOTOMY (PCNL).
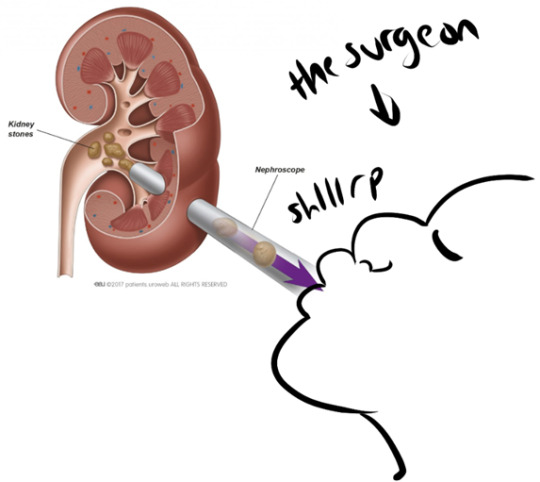
(I totally haven’t added to this diagram in any way. This is how it works. Trust me.)
LOADS of other stuff can go wrong with The Ol’ Piss Beans
We have:
RENAL CELL CARCINOMA
The most common form of kidney cancer.
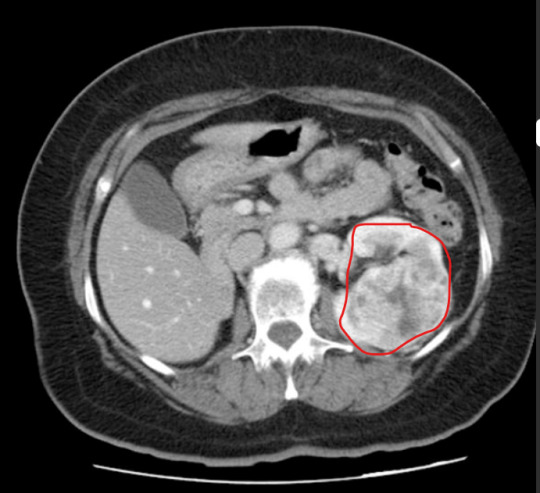
For suspected malignancies, we do a CT Urogram that assesses the whole urinary tract. This takes significantly longer than a KUB, but is well worth the results. This is a three-phase scan. We do...
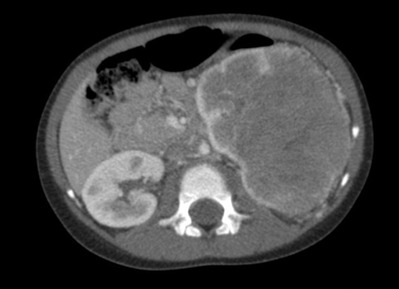
A regular KUB non-contrast scan to check for calculi and to get our baseline Hounsfield Units ('grayness' and densities) for the kidneys. Then we inject contrast in a 'split bolus' - one load immediately, and another roughly 8 minutes in, scanning roughly a minute after the second injection is given. We scan 80 secs after the first contrast bolus is administrered, for the 'nephographic' phase, which enhances the renal cortex & medulla, and makes neoplastic changes and renal masses obvious (see image above). Then we wait 10-ish minutes and scan for the 'excretory' phase, after the contrast has worked its way through your kidneys, to detect 'filling defects' (anything that stops contrast opacification of the ureters) and pathologies related to the urinary collection system.
NEPHROBLASTOMA
This is one of the more common cancers found in kids. Although paediatric cancer is never exactly a happy topic, this cancer is now curable in roughly 90% of cases, thanks to the early removal of kidneys and the possibility of transplants.
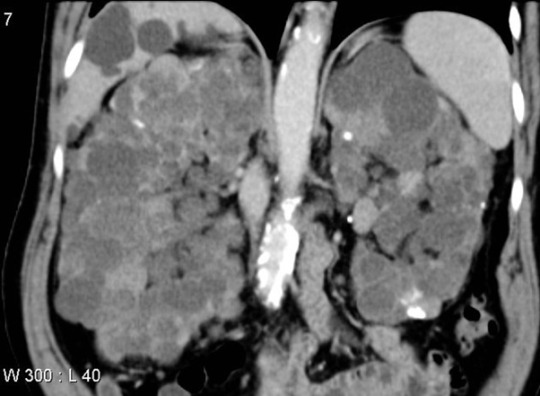
Autosomal Dominant (and Recessive) Polycystic Kidney Disease
An inherited renal disease that can cause you to go into End Stage Renal Failure due to the healthy tissue in your kidneys becoming completely overtaken by cysts. As a result, your kidneys can grow more and more, until they practically fill your whole abdomen. 45% of patients will be in ESRF and need dialysis by the age of 60. Thankfully, transplants are an option.
Other commonly encounutered renal pathologies include trauma, which I talked about in my first kidney ramble (linked here!), infections, and more.
I hope you enjoyed this whistle-stop tour of Stuff That Can Go Wrong With The Kidney, And How We Look At Them Gnarly Beans!
....And, um, I spent way too long making this and now need to pee. This is your reminder to go empty that bladder if you need to! Stop those stones!
16 notes
·
View notes
Note
What would you consider the hardest imaging modality to work with? Any tips on how to get my eyes adjusted to the different images/radiographs they’re producing? I’m a student struggling with the different modalities and machines and the radiographs are just starting to look like blurry black and white and gray swirls in my eyes. 😵💫
Oh goshhhh, best of luck to you!
I'm going to give an annoyingly honest answer to 'which is the hardest imaging modality to work with'. It depends a lot on what you're looking at, and how you're looking at it!
In general, I would say that MRI is the easiest for discerning anatomy. Those are our crisp, clear, pretty images, which differentiate the soft tissues of the body beautifully. Especially when seen in the coronal plane (aka: the view you typically find in anatomy diagrams), it's suuuuper easy to discern different organs.
The only problem is.... it's kinda hard to express that on tumblr, when you can only post one image! MRI and CT produce 2D 'slices' of a 3D image in every plane, meaning that you're supposed to scroll through them to get the whole concept of the anatomy, rather than visualising a single image.

Here is a static normal abdomen MRI image, taken of a pregnant person, courtesy of radiopaedia. But I would enocurage folks to follow the link and scroll through the whole series!
The hardest modality to interpret (and, I would argue, use) in most cases would, in my opinion, be Ultrasound. Ultrasound is a cheap, fast and accessible imaging modality, which is incredibly useful as it can take 'dynamic images' (i.e., video, basically) without incurring a massive radiation dose. The pay-off is.... it's all fuzzy grey blobs.

Guess what this is! Go on, guess! Dingdingding, it's prostate cancer
You can get an awful lot of information out of those grey blobs, but you need a skilled Sonographer with a lot of wrist strength to be performing the exam and interpretating the images. My limp-wristed ass could never.
Ultrasound can be incredibly clear though! Some structures within the body are very difficult to image using MRI or CT, as they are in constant motion - your heart is the classic! We can compile 3D images of these structures by using ECG Gating - we trigger the CT scanner to only take 'pictures' (with radiation) when the heart is in diastole. This results in a gorgeous clear 3D image of the heart! But depending on the stage of diagnosis/suspected pathology, it can honestly be... just a lot quicker, cheaper and easier to whip out the ol' Ultrasound and do some good ol' echocardiography.
Check out this beautiful transthoracic view of the heart, taken using Ultrasound, showing clear differentiation between the four chambers!

Courtesy of Radiopaedia
But what this image can't show you is how this structure is moving, which is the key benefit of Ultrasound. The cardiologist taking this echocardiagram would be watching the motions of the muscle and assessing the function of the valves, not just looking at the static anatomy. Ultrasound might not be the best at creating detailed anatomical images, but it performs very well as a dynamic device, allowing the sonographer to watch various mechanisms at work within the body or, say, find a Deep Vein Thrombus by activating the Doppler and locating the point where the blood has clotted in someone's leg.
As for advice.... my best advice is to develop a three-dimensional model of human anatomy in your head, which you can spin around and rotate as you please to orientate yourself along the different planes used in imaging. Then you can just visualise where you are within your model as you scroll through the images, and figure out the blobby greyness using your knowledge of anatomy!
That sounds WAY easier said than done - and may take serious effort, depending on how good your individual brain is at thinking spatially and reconstructing images in 3D. I'd recommend accessing a resource like Anatomy TV, which lets you basically put human anatomy in the Horse Plinko Machine and twist it about and play with it and prod it from every angle. There are some free versions as well, but I'm afraid I can't vouch for their quality!
Again, best of luck, and keep practicing! It gets easier (and less confusing) I promise you! I am always here if you wanna yell.
8 notes
·
View notes
Note
Hello! Any tips on how to identify anatomy/structures/organs on a radiograph? I’m a radtech student and I am taking a radiographic anatomy course and I find it quite difficult to identify what organs are in a radiograph, say for example, radiograph of the abdomen. I have quite a hard time figuring out which part, for example the large intestine, would be the cecum or sigmoid colon. Or if its the whole abdomen radiograph, where are the surrounding organs seem to be located, like kidneys, ureters, stomach, etc. My eyes just can’t seem to focus on each part. If you’ve got any tips, please lmk. Thank you!
That is a truly fabulous question! So, I assume you're talking about bog standard plain film Abdo radiographs (AXR).
I'll do a quick run-down first for those who aren't in the know! We typically take one view of your abdomen: Antero-Posterior Supine (i.e., we shoot x-rays through your front and out your back, while you are lying on your back upon the image receptor).
Techniques vary from trust to trust, but generally...
We ensure your mid-sagittal plane is perpendicular to the image receptor (that you're lying straight, no rotation, shoulders/hips equidistant to the table).
We centre midline between the iliac crests (although I often wind up going an eensy bit lower... This varies on a patient's unique anatomy!)
We collimate to include the xiphoid process superiorly (meaning you hit the diaphragms), the pubic symphsis inferiorly (meaning you get the whole urinary bladder), and the lateral abdominal walls laterally - you may not be able to expand out to skin margins, depending on the size of the patient.
The breathing instructions are:
for an average patient - breathe all the way in. breathe all the way out and hold the exhale (so the diaphragms rise and we can visualise the bowel loops clearly!)
for a very tall patient/patient with a Marfanoid habitus - breathe all the way in and hold the inhale (so the organs are smushed down by the diaphragms and we can fit all yer guts onto one image, meaning we irradiate you far less!)
Typically, we take an AXR to check for (very) Gross Abdominal Pathology - like intestinal obstruction due to volvulus, or toxic megacolon. You can see the organs of the abdomen far more clearly on a CT scan, so anything remotely complex will go there, either immediately or straight after an AXR. We can also see most renal calculi (kidney stones) on AXR, as they tend to be radiopaque, along with many swallowed foreign objects within the digestive system - so those are some more typical radiation justifications!
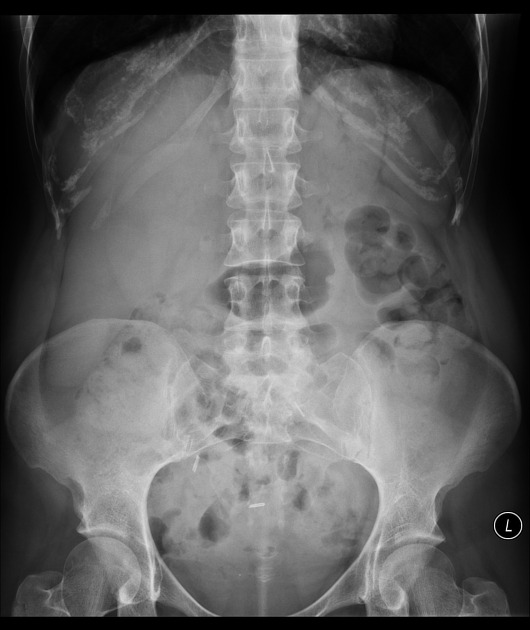
It's way easier to discern particular organs on an AXR when there is pathology extant. For instance, this is an example of intestinal obstruction. As you can see, the small bowel loops are SUPER OBVIOUSLY dilated.
[case courtesy of radiopaedia]
So, all this is to say.... AXR are more for confirming diagnoses and assessing the level of various pathology, than providing a detailed organ study. However, you can still find your main organ landmarks through some simple tricks!
For instance, I can tell that the small bowel is dilated, rather than the large bowel (colon), because the colon has haustra: bands of muscle that wrap most of the way around its circumferance. The small bowel has plicae circulares - complete circular folds that wrap all of the way around its circumference. As the transverse lines crossing the dilated bowel loops go all the way across, that is a strong suggestion that they are small bowel loops - even if they're dilated to the point where they look like the colon, from the blockage!
But lets look at some non-pathologic anatomy. There are several anatomical landmarks that are just visible on an AXR. Working superior-to-inferior, we have...
Right and left hemidiaphragms
Liver & spleen
Right and left kidneys
Small intestine
Large intestine (ascending / transverse / descending / sigmoid)
Psoas muscles (if these are visible, you have adequate density on your radiograph!)
Urinary bladder
Once you find one of these, you can usually orientate yourself and, roughly, locate the others! I find it easiest to work from the top down. If you've included your full Area of Interest, you should have the R & L hemidiaphragms at the top of the image. Beneath that will be the liver. The right kidney is typically relatively easy to find: it sits lower than the left kidney as it is squashed down by the liver, and its shape, as you can see on the unannotated image below, is relatively easy to discern. The left kidney is harder, but still has a traceable outline, typically. The psoas muscles are sometimes tricky to spot, but you can see them on the (anatomical) right side of the image below if you squint and know what you're looking for. The urinary bladder is either super obvious or... you kinda got to guess, but if you hit the symph (which this radiographer didn't, quite) you know you've definitely got it all on!
AXR is one of the largest radiographs we take. As a result, it's easy to chop off the top or bottom of the image! You'll often see radiographers doing 'cross kidneys' or 'coned bladder' shots on top of a full AXR, just to hit all the anatomy!

[image courtesy of radiopaedia - obligatory note that I too am a humble student, and may be a little off on my anatomical estimations!]
It's important to note that very are MANY 'normal' anatomical variations that cause no pathology. For instance, the person in the above radiograph has a 'Reidel lobe' - a low-hanging liver! Check out the red outline I've drawn around their actual liver - I've included another red line showing where a more 'typical' right lobe of the liver would end.
Colons are also finnicky things with a lot of variation - we've all seen the classic 'ascending/transverse/descending colon' in textbooks, but that's not always the case in actuality. They can be soooo wiggly, and can migrate to surprising places - especially in little old ladies!
As a result (bringing it alllll the way back to your specific question) the caecum is often difficult to locate precisely. It will be SOMEWHERE on the anatomical lower right side of the image, as the sigmoid colon will curve around SOMEWHERE on the anatomical lower left. The sigmoid can be easier to find on an AXR when it's got some faecal matter in situ - it helps you visualise the curve!
Here's my estimate (drawn on the previous normal AXR) for the colon + caecum - I think this person has an exaggerated splenic flexure!

I hope all my rambling was somewhat helpful. My main advice is to learn the 'correct' positions of the anatomy off by heart from textbooks, then use that to muddle your way through all the different examples you can find on radiopaedia and on the internet in general! Print out a load and doodle on them with pens! Squint at AXRs until you start seeing organs everywhere! Start critiquing every AXR you see - how's their collimation, density, and contrast? How many organs can you see? The only way to improve is through practice, and it sounds like you're well on your way!
Best of luck with your studies!
1 note
·
View note
Text
This had me both amused and horrified. The body is so weird 🤣
PATHOLOGY OF THE URINARY SYSTEM (aka: STUFF WHAT GOES WRONG WITH YER PISS BEANS)
(AND YER PISS TUBES)
(and the pretty pictures I take of them)
[a warning: this post contains radiographic images and non-graphic description of serious kidney pathologies, including paediatric cancer]
Let's kick off with an old familiar friend! Yeah, I'm talking -
UROLITHIASIS (the humble kidney stone!)
Wanna know something horrific? The biggest kidney stone on record weighed over a kilogram. It was 17 cm across. Just. Imagine. Trying to piss that out…
Urolithiases are formed anywhere among your urinary tracts. They’re commonly found in the kidneys, giving rise to the more common term, renal calculi, or kidney stones.
Urolithiasis occurs when compounds within your urine crystallise. If your urine becomes too acidic, too base, contains too many of these compounds for them to remain in solution, or simply… sits around too long without flowing, it literally petrifies into a solid lump!
Some unlucky souls are just… predisposed to developing them. If you have had a kidney stone in the past, you are far more likely to get another one in the future. There also seems to be a genetic link – so if someone in your immediate family gets kidney stones, you have a higher risk.
Kidney stones typically hang out in the pelvis of your kidney and don’t cause an issue. Until you try to piss them out. Remember our kidney diagram (drawn on a conveniently shaped bean)?
You might notice that the ureters are significantly smaller than the renal pelvis. In other words…
Most renal calculi are made of CALCIUM (oxalate, usually). This is very, very good (for us. Less so for you) because calcium attenuates x-rays – meaning, it glows all pretty and shiny when we take a radiograph!
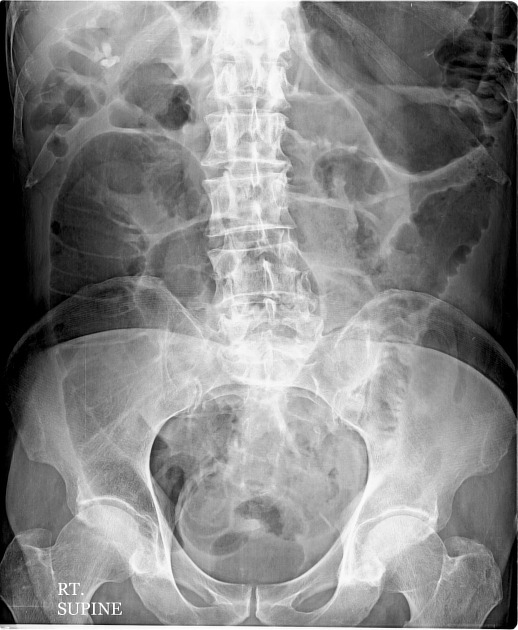
Here’s a kidney stone on an Abdominal X-Ray!
And a twinkly artefact caused by a kidney stone on Ultrasound!
But the best way to assess urolithiases, is, of course, with CT!
For realsies. We don’t need to inject contrast intravenously, because the kidney stones are (typically) shiny – which cuts down on time and worry, as it means you’re at no risk for having an adverse reaction! So a CT KUB (checking Kidneys, Ureters and Bladder for stones) is basically just a quick tumble in the washing machine (CT scanner), with a lovely clear picture as a result!
Look at these babies!! So sharp!!! So clear!!!!!! So shiny!!!!!!!!!!!! That’s a beautiful matching pair of renal calculi right there – and to make things better, they’re (currently) non-obstructive, so this patient isn’t in suffering The Agonies!
Speaking of The Agonies…
Most kidney stones are passable, albeit with extreme pain.
However, some ain’t going anywhere. Especially staghorn calculi, which, um. One, stags have antlers. Two…
more like a fuckin' MOOSE ANTLER amirite????
But yeah, those buggers aren’t coming out. That’s almost definitely going to require surgery!
Smaller calculi can still cause problems when they become obstructive – i.e., they block the passage of your peepee. They can lead to:
HYDRONEPHROSIS (dilation of the renal pelvis due to retained urine, seen here in the Left kidney [right side of image])
HYDROURETER (dilation of the ureter)
So, what do we do with bothersome calculi? How about some...
EXTRACORPOREAL SHOCKWAVE LITHOTRIPSY (ECSWL, because we love a sexy little acronym here in medworld).
We blast the stone apart with shockwaves, from outside your body! Ultrasound turned up to 11! Unfortunately, it only works on certain densities of stone, and on small stones.
LASER LITHOTRIPSY
(same thing but…. ZIP ZAP LASERZZZZZ]
SURGERY – PERCUTANEOUS NEPHROLITHOTOMY (PCNL).
(I totally haven’t added to this diagram in any way. This is how it works. Trust me.)
LOADS of other stuff can go wrong with The Ol’ Piss Beans
We have:
RENAL CELL CARCINOMA
The most common form of kidney cancer.
For suspected malignancies, we do a CT Urogram that assesses the whole urinary tract. This takes significantly longer than a KUB, but is well worth the results. This is a three-phase scan. We do...
A regular KUB non-contrast scan to check for calculi and to get our baseline Hounsfield Units ('grayness' and densities) for the kidneys. Then we inject contrast in a 'split bolus' - one load immediately, and another roughly 8 minutes in, scanning roughly a minute after the second injection is given. We scan 80 secs after the first contrast bolus is administrered, for the 'nephographic' phase, which enhances the renal cortex & medulla, and makes neoplastic changes and renal masses obvious (see image above). Then we wait 10-ish minutes and scan for the 'excretory' phase, after the contrast has worked its way through your kidneys, to detect 'filling defects' (anything that stops contrast opacification of the ureters) and pathologies related to the urinary collection system.
NEPHROBLASTOMA
This is one of the more common cancers found in kids. Although paediatric cancer is never exactly a happy topic, this cancer is now curable in roughly 90% of cases, thanks to the early removal of kidneys and the possibility of transplants.
Autosomal Dominant (and Recessive) Polycystic Kidney Disease
An inherited renal disease that can cause you to go into End Stage Renal Failure due to the healthy tissue in your kidneys becoming completely overtaken by cysts. As a result, your kidneys can grow more and more, until they practically fill your whole abdomen. 45% of patients will be in ESRF and need dialysis by the age of 60. Thankfully, transplants are an option.
Other commonly encounutered renal pathologies include trauma, which I talked about in my first kidney ramble (linked here!), infections, and more.
I hope you enjoyed this whistle-stop tour of Stuff That Can Go Wrong With The Kidney, And How We Look At Them Gnarly Beans!
....And, um, I spent way too long making this and now need to pee. This is your reminder to go empty that bladder if you need to! Stop those stones!
16 notes
·
View notes