#python input and output
Text
does anyone know how to download a nnd video AND have its comments/danmaku hardcoded into the video
#i used yt-dlp to download the video and it put the comments in a .json file#then i tried using danmaku2ass but it keeps outputting a blank .ass file#i think it cant read the json#and danmaku2ass's input example has an xml not a json. how do i get an xml of the comments?????#danmaku2ass recommends you-get to download comments but i have zero python knowledge and cant figure out how to use it#in short: HELP
6 notes
·
View notes
Text
Man this day sucked balls
#i had to get up at 5:45am#that was the first worst sign#it was well until i went home for my zoom lesson#since i was like the main coordinator for one big event which had multiple small events#my boss called me and was like hey where is the portable ultrasound for the event#and she found it but the charger was missing#so i asked people responsible for the smaller events who used that ultrasound if they know anything and they were like nope#and one even managed to throw shade on me bc it has been like 2 weeks since the event#after my zoom lesson i cried abt that stupid charger#but i was like hold up i have 20 minutes only to cry bc i have my next lesson in person and i have to go#and then i went and i managed to forget abt that stupid lost charger#and i was like yay i will learn python#and then i did learn the basics and then it started to get complicated and i was lost and then our task was like#hell#and then i tried to make something at least of my task. to like define functions and stuff#and it wasnt possible#and then our teacher kind of wrote the script for the 1st part of the assignment#and i was like okay#and i tried it and the int thing didnt work it was like no you cant put it there where your teacher put it#and i was like fuck then#i just learned how to write a if else and now i have to make two different triangle area scripts baded on input and so that it would work#for non existing triangles#and like what does it mean a triangle with 4 3 and 9 as edge lengths#what do you want from me? an error output? triangle does not exist? what?#either way im fucked#i have to wake up just as early tomorrow#and i have to do a lecture for schoolkids on saturday and my ppt is not finished#and its not like ill have time tomorrow bc i work from 7am to 9pm bc im maybe a masochist#which means even less sleep#i think i have so much going on i want to just. scream.
0 notes
Text
python save/load gzipped json serialized data
import gzip import json def write_json(fname, data): with gzip.open(fname, 'wt', encoding='utf-8') as f: json.dump(data, f) def read_json(fname): with gzip.open(fname, 'rt', encoding='utf-8') as f: data = json.load(f) return data
0 notes
Text

These are 50 triangles "learning" themselves to mimic this image of a hot dog.
If you clicked "Read more", then I assume you'd be interested to hear more about this. I'll try my best, sorry if it ends up a bit rambly. Here is how I did that.
Points in multiple dimensions and function optimization
This section roughly describes some stuff you need to know before all the other stuff.
Multiple dimensions - Wikipedia roughly defines dimensionality as "The minimum number of coordinates needed to specify any point within it", meaning that for a 2-dimensional space, you need 2 numbers to specify the coordinates (x and y), but in a 3-dimensional space you need 3 numbers (x, y, and z). There are an infinite amount of dimensions (yes, even one million dimensional space exists)
Function optimization - Optimization functions try and optimize the inputs of a function to get a given output (usually the minimum, maximum, or some specific value).
How to train your triangles
Representing triangles as points - First, we need to convert our triangles to points. Here are the values that I use. (every value is normalized between 0 and 1)
• 4 values for color (r, g, b, a)
• 6 values for the position of each point on the triangle (x, y pair multiplied by 3 vertices)
Each triangle needs 10 values, so for 10 triangles we'd need 100 values, so any image containing 10 triangles can be represented as a point in 100-dimensional space
Preparing for the optimization function - Now that we can create images using points in space, we need to tell the optimization function what to optimize. In this case - minimize the difference between 2 images (the source and the triangles). I'll be using RMSE
Training - We finally have all the things to start training. Optimization functions are a very interesting and hard field of CS (its most prominent use is in neural networks), so instead of writing my own, I'll use something from people who actually know what they're doing. I'm writing all of this code in Python, using ZOOpt. The function that ZOOpt is trying to optimize goes like so:
• Generate an image from triangles using the input
• Compare that image to the image we're trying to get
• Return the difference
That's it! We restrict how long it takes by setting a limit on how many times can the optimizer call the function and run.
Thanks for reading. Sorry if it's a bit bad, writing isn't my forte. This was inspired by this.
You can find my (bad) code here:
https://gist.github.com/NikiTricky2/6f6e8c7c28bd5393c1c605879e2de5ff
Here is one more image for you getting so far

123 notes
·
View notes
Text
Took me four hours but I was able to convert and format a Mandarin epub to include pinyin notation above the text:
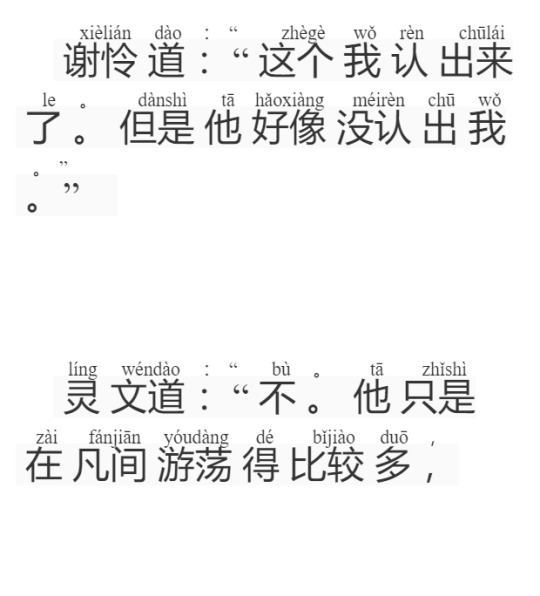
Technical details below for anyone interested
I was trying to do this on my personal laptop, which is, unfortunately, Windows. I found two GitHub projects that looked promising: pinyin2epub and epub-with-pinyin and spent most of my time trying to get python to work. I wasn't able to get the second project to work, but I was eventually able to get some output with the pinyin2epub project.
The output was super messy though, with each word appearing on a different line. The script output the new ePub where all the tags that encapsulated every word and pinyin were on a new line, as well as having a ton of extra spacing.
I downloaded Calibre and edited the epub. With the help of regex search and replace I was able to adjust the formatting to what is shown in the picture above.
All in all, I'm fairly happy with it although it does fail to load correctly in any mobile ePub reader I've tried so far ( I have an Android). I think it's the <ruby> tags are either unsupported or cause a processing error entirely depending on the app.
Once I have motivation again I'd love to try to combine the original text epub with a translated epub. My idea here is that there would be a line of the original text above followed by a line of the translate text so on and so forth. I'd probably need to script something for this, maybe it could look for paragraph tags and alternate from two input files. I'd have to think about it a bit more though.
Unfortunately my Mandarin isn't yet strong enough to read the novels I'm interested in entirely in the original language, but I'd love to be able to quickly reference the original text to see what word or character they used, or how a phrase is composed
Feel free to ask if you want to try to do this and need any clarification. The crappy screenshot and lack of links because I'm on my phone and lazy.
107 notes
·
View notes
Note
Hi! I’m a student currently learning computer science in college and would love it if you had any advice for a cool personal project to do? Thanks!
Personal Project Ideas

Hiya!! 💕
It's so cool that you're a computer science student, and with that, you have plenty of options for personal projects that can help with learning more from what they teach you at college. I don't have any experience being a university student however 😅
Someone asked me a very similar question before because I shared my projects list and they asked how I come up with project ideas - maybe this can inspire you too, here's the link to the post [LINK]
However, I'll be happy to share some ideas with you right now. Just a heads up: you can alter the projects to your own specific interests or goals in mind. Though it's a personal project meaning not an assignment from school, you can always personalise it to yourself as well! Also, I don't know the level you are, e.g. beginner or you're pretty confident in programming, if the project sounds hard, try to simplify it down - no need to go overboard!!

But here is the list I came up with (some are from my own list):
Personal Finance Tracker
A web app that tracks personal finances by integrating with bank APIs. You can use Python with Flask for the backend and React for the frontend. I think this would be great for learning how to work with APIs and how to build web applications 🏦
Online Food Ordering System
A web app that allows users to order food from a restaurant's menu. You can use PHP with Laravel for the backend and Vue.js for the frontend. This helps you learn how to work with databases (a key skill I believe) and how to build interactive user interfaces 🙌🏾
Movie Recommendation System
I see a lot of developers make this on Twitter and YouTube. It's a machine-learning project that recommends movies to users based on their past viewing habits. You can use Python with Pandas, Scikit-learn, and TensorFlow for the machine learning algorithms. Obviously, this helps you learn about how to build machine-learning models, and how to use libraries for data manipulation and analysis 📊
Image Recognition App
This is more geared towards app development if you're interested! It's an Android app that uses image recognition to identify objects in a photo. You can use Java or Kotlin for the Android development and TensorFlow for machine learning algorithms. Learning how to work with image recognition and how to build mobile applications - which is super cool 👀
Social Media Platform
(I really want to attempt this one soon) A web app that allows users to post, share, and interact with each other's content. Come up with a cool name for it! You can use Ruby on Rails for the backend and React for the frontend. This project would be great for learning how to build full-stack web applications (a plus cause that's a trend that companies are looking for in developers) and how to work with user authentication and authorization (another plus)! 🎭
Text-Based Adventure Game
If you're interested in game developments, you could make a simple game where users make choices and navigate through a story by typing text commands. You can use Python for the game logic and a library like Pygame for the graphics. This project would be great for learning how to build games and how to work with input/output. 🎮
Weather App
Pretty simple project - I did this for my apprenticeship and coding night classes! It's a web app that displays weather information for a user's location. You can use Node.js with Express for the backend and React for the frontend. Working with APIs again, how to handle asynchronous programming, and how to build responsive user interfaces! 🌈
Online Quiz Game
A web app that allows users to take quizzes and compete with other players. You could personalise it to a module you're studying right now - making a whole quiz application for it will definitely help you study! You can use PHP with Laravel for the backend and Vue.js for the frontend. You get to work with databases, build real-time applications, and maybe work with user authentication. 🧮
Chatbot
(My favourite, I'm currently planning for this one!) A chatbot that can answer user questions and provide information. You can use Python with Flask for the backend and a natural language processing library like NLTK for the chatbot logic. If you want to mauke it more beginner friendly, you could use HTML, CSS and JavaScript and have hard-coded answers set, maybe use a bunch of APIs for the answers etc! This project would be great because you get to learn how to build chatbots, and how to work with natural language processing - if you go that far! 🤖
Another place I get inspiration for more web frontend dev projects is on Behance and Pinterest - on Pinterest search for like "Web design" or "[Specific project] web design e.g. shopping web design" and I get inspiration from a bunch of pins I put together! Maybe try that out!
I hope this helps and good luck with your project!
#my asks#resources#programming#coding#studying#codeblr#progblr#studyblr#comp sci#computer science#projects ideas#coding projects#coding study#cs studyblr#cs academia
173 notes
·
View notes
Text
The split() function in python
The split() method in Python is used to split a string into a list of strings. It takes an optional separator argument, which is the delimiter that is used to split the string. If the separator is not specified, the string is split at any whitespace characters.
The syntax of the split() method is as follows:
Python
string_name.split(separator)
where:
string_name is the string object that is calling the split() method.
separator is the string that is being used as the separator.
For example, the following code splits the string my_string at the first occurrence of the " character:
Python
my_string = "This is a string with a \"quote\" in it."
parts = my_string.split("\"")
print(parts)
This code will print the following output:
['This is a string with a ', 'quote', ' in it.']
Here are some additional examples of how to use the split() method:
Python
my_string = "This is a string with multiple separators: -_--_-"
parts = my_string.split("--")
print(parts)
This code will print the following output:
['This is a string with multiple separators: ', '_', '_-']
Python
my_string = "This is a string without a separator."
parts = my_string.split("@")
print(parts)
This code will print the following output:
['This is a string without a separator.']
The split() method is a very versatile tool that can be used to split strings into lists of strings in a variety of ways. It is commonly used for tasks such as parsing text files, extracting data from strings, and validating user input.
#programmer#studyblr#learning to code#python#kumar's python study notes#codetober#progblr#coding#codeblr#programming
38 notes
·
View notes
Text
Relay operated power button

What you need:
a 5V relay module
Raspberry Pi
a bunch of cables
Explanation:
A power button on a computer case lets electricity flow between two power pins upon it being pressed, which is when the motherboard detects the button is pressed and reacts accordingly.

A relay is a specific kind of switch which lets electricity flow conditionally upon the flow of electricity in another circuit. The voltages involved both in motherboard power pins and on Raspberry Pi are generally low to not damage both, but we're taking extra precautions to electrically separate them both.
"5V relay module" here means that 5V is the voltage that is required for the relay module to work, while the controlling voltage can be lower. It being relay module it means it also has a flyback diode we'd otherwise have to provide ourselves.

Raspberry Pi's GPIO pins are programmable and can be controlled through Python code, and operate on 3.3V. Raspberry Pi also provides 5V output, but this one is not controllable.
By
connecting a power button to rPi GPIO pins
connecting the 5V voltage output pin from rPi to the relay module's Vcc input pin
connecting the ground pin from rPi to the relay module's groud pin
connecting programmable GPIO pins as the relay module's input pin
connecting the relay module's outputs (the normally open one and the ground) to the motherboard power pins
running some code on rPi
We can extend the power button functionality so Raspberry Pi can turn on and off our computer, while also still keeping the power button working.
Which is what I use to remotely turn on my computer on, by SSHing to rPi and running a script to turn the PC on while I'm away from home.
Why not Wake-On-LAN?
Wake-On-LAN has restrictions which makes it not as reliable as it could be, for example:
The ability to wake from a hybrid shutdown state (S4) (aka Fast Startup) or a soft powered-off state (S5) is unsupported in Windows 8 and above
The code and explanation for it in Part 2, when I get to writing it.
17 notes
·
View notes
Text
100 Days of Python: Day 1
I have decided to take on the 100 Days of Python challenge by Dr. Angela Yu. I know I will need accountability to stick with it, so I will be posting daily updates on how things went. Each day there are some Python lessons, sometimes practice exercises, and a final project for the day.
Today's project is called Band Name Generator. The guidelines are to take the name of the city where the user grew up and the name of their pet and combine them into a possible band name. Here is the code that I ended up with:
print('Welcome to the Band Name Generator')
city = str(input('What\'s the name of the city you grew up in?\n'))
pet_name = str(input('What\'s your pet\'s name?\n'))
print(f'Your band name could be {city} {pet_name}')
I have a bit of previous knowledge in Python, so I elected to use an f-string rather than string concatenation as Yu demonstrates in her solution to complete this project. Also, it wasn't strictly necessary or required to ensure the input type was a string, but I elected to do so as it accounts for more input possibilities. (Who am I to judge if you named your cat '6'?)
The output looks like this:
Welcome to the Band Name Generator
What's the name of the city you grew up in?
ABC City
What's your pet's name?
Fluffy
Your band name could be ABC City Fluffy
4 notes
·
View notes
Text
the print() function
in python, you print lines of text to the console using the print() function!
the most common way the print() function is introduced is through this specific line of code:
#input
print("Hello world!")
#output
Hello world!
if you were to run this code, "Hello world!" would appear in your console. this is because the hello world string is placed inside of the parenthesis!
you can do the same thing with variables! for example:
#input
x = 10
print(x)
#output
10
strings, variables, and numbers can also be strung together (no pun intended) inside of the parenthesis in order to print out multiple pieces of information. there are multiple ways to do this, but the most common ways i've seen are the following:
#method 1:
x = 10
print("The value of x is", x)
#method 2:
x = 10
print("The value of x is " + str(x))
#output
The value of x is 10
there are a few differences between these two:
in method 1, we do not have to convert/type cast the variable into a string and it automatically placed the space between the "The value of x is" string and x. if you wanted to stop this code from printing this space in between all the inputs, you would have to place , sep='' after the x.
in method 2, we have to manually add spaces and convert x into a string. if we were to run that code without placing str() around the x, we would get a TypeError (it would print out "can only concatenate str (not "int") to str").
personally, i prefer method 2, as it gives me more control over the output and lets me do spaces in between some thing and no spaces in between others. it's completely up to you on which method you use!
sometimes you want to make a single print statement span multiple lines. this is possible with the use of \n. \n is the newline character, and it basically tells your code to stop printing on the line it's on and jump to the next line down. so, in practice:
#input
print("1\n2\n3\n4\n5")
#output
1
2
3
4
5
this allows you to use a single print statement when printing out blocks of code!
hopefully this has helped you understand the basics of the print() function in greater depth, or introduce you to the function if this is your first time seeing it! as always, if you have any questions or requests, feel free to send me an ask!
happy coding!!
- bea :]
4 notes
·
View notes
Note
Hi,
I really admire your work. I have been doing photo manips with Photoshop for some time and would like to get into AI based work. But where to begin? Can you suggest a starting point? Also, is there any AI software out there that will allow me to create different facial expressions from a single image as a source? Thanks very much.
It's hard to know what to recommend so I'll do 2 things - 1. leave this Beginner's Guide Link here, and 2. summarize how I ended up here:
I started with DreamStudio which is more or less the official Stable Diffusion service. It's still a great place get familiar with the various settings, but the nsfw filter will be very frustrating if you're producing curvy content, and they don't have the best photorealism models. It also offers access to their API which means you can use it from within Photoshop, though you'd have to pay for it. (I used to just spam accounts to get endless free access, I did let them know that this was a loophole people were exploiting, afaik they never fixed it).
After that I tried out various Colabs - the original demo is worth playing with if you're comfortable tinkering with code a little, as it explains how it works. I used to recommend this virtual notebook to run Stable Diffusion, Unfortunately Google has disallowed using colabs for webUI implementations for free. But you can still pay to use it, or try a different paid cloud service as per the links on that page. Due to the popularity of AI artgen all the free ML services are clamping down on such use.
Finally I treated myself to buying a 2nd hand gaming laptop with 8gb of VRAM, and installed the automatic1111 webui version of Stable Diffusion using this installer, way easier than trying to install Python and CUDA and all the other things needed to make it work.
So that's the short version of how I ended up here, without going into detail about model merging, what settings to use and other important stuff. Maybe I better walk it back a little - Stable Diffusion is the core program that generates AI art, it runs the backend of almost all the apps and sites available. There's different interfaces for getting inputs and outputs to the core program, the webUIs let you control Stable Diffusion via your browser, and the most popular one is stable-diffusion-webui which is maintained by automatic1111 on github. Other programs such as Easy Diffusion use their own app to control the SD backend.
Part of the reason for the auto1111 webui's popularity is the wide range of extensions it supports, such as a plugin for controlling it from within editors such as Photoshop, GIMP, Krita and even PhotoPea iirc.
Aside from Stable Diffusion, Midjourney is still the best AI artgen system even though the interface is discord based, unfortunately it filters inputs and outputs strictly so it's of limited use to people creating erotic art. I haven't tried Bing, and I don't use Photoshop so I haven't tested their Generative Fill tools, my understanding is that it's their in-house implementation of Stable Diffusion, idk how limited it is for erotic content but I assume it's an excellent tool otherwise.
Because I mess around with computers a lot I've sort of worked it out as I go and don't know which how-to guides to recommend but there's a lot of good youtube guides out there and that first link isn't too bad. Stable Diffusion has vast untapped potential for photo manip artists especially with inpainting models, but that's a whole other thing. Only reason I haven't gotten into that is I'm no longer comfortable editing and sharing people's pics without permission, but 20yo me probably wouldn't have left the house if I had this to play around with back in the day.
As for varied facial expressions from a single source, I think that's something that can be done but I don't know how to do it myself.
Hope some of this makes some sense. It's my way of saying IDK where to start, it really depends on what hardware you have available and how comfortable you are with stuff like command lines and code, but wherever you're starting from - there's options that will work for you.
16 notes
·
View notes
Text
Matrix Breakout: 2 Morpheus
Hello everyone, it's been a while. :)

Haven't been posting much recently as I haven't really done anything noteworthy- I've just been working on methodologies for different types of penetration tests, nothing interesting enough to write about!
However, I have my methodologies largely covered now and so I'll have the time to do things again. There are a few things I want to look into, particularly binary exploit development and OS level security vulnerabilities, but as a bit of a breather I decided to root Morpheus from VulnHub.
It is rated as medium to hard, however I don't feel there's any real difficulty to it at all.
Initial Foothold
Run the standard nmap scans and 3 open ports will be discovered:
Port 22: SSH
Port 80: HTTP
Port 31337: Elite
I began with the web server listening at port 80.

The landing page is the only page offered- directory enumeration isn't possible as requests to pages just time out. However, there is the hint to "Follow the White Rabbit", along with an image of a rabbit on the page. Inspecting the image of the rabbit led to a hint in the image name- p0rt_31337.png. Would never have rooted this machine if I'd known how unrealistic and CTF-like it was. *sigh*
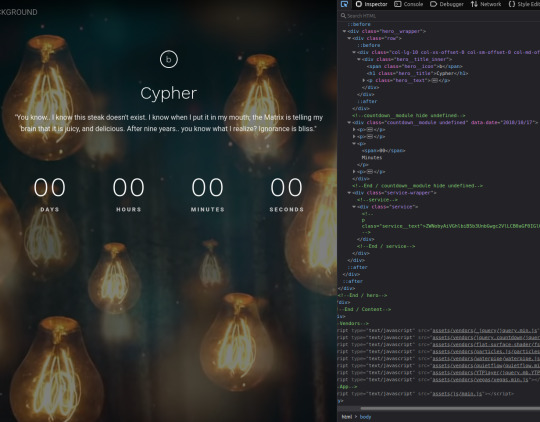
The above is the landing page of the web server listening at port 31337, along with the page's source code. There's a commented out paragraph with a base64 encoded string inside.
The string as it is cannot be decoded, however the part beyond the plus sign can be- it decodes to 'Cypher.matrix'.

This is a file on the web server at port 31337 and visiting it triggers a download. Open the file in a text editor and see this voodoo:
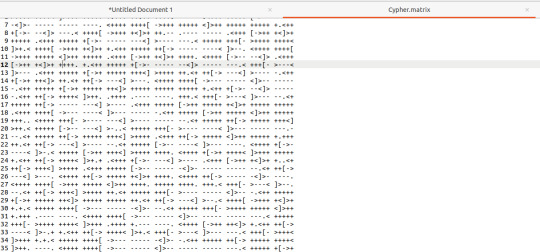
Upon seeing the ciphertext, I was immediately reminded of JSFuck. However, it seemed to include additional characters. It took me a little while of looking around before I came across this cipher identifier.

I'd never heard of Brainfuck, but I was confident this was going to be the in-use encryption cipher due to the similarity in name to JSFuck. So, I brainfucked the cipher and voila, plaintext. :P
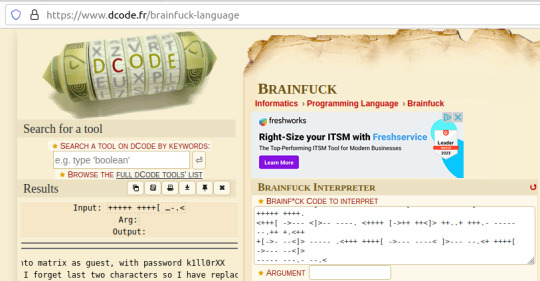
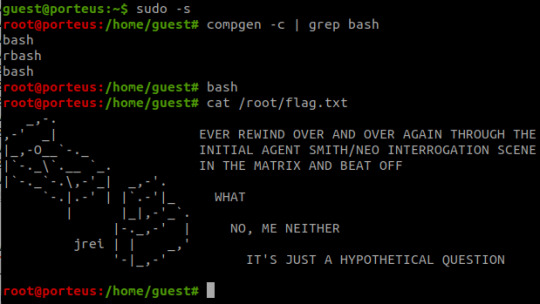
Here, we are given a username and a majority of the password for accessing SSH apart from the last two character that were 'forgotten'.
I used this as an excuse to use some Python- it's been a while and it was a simple script to create. I used the itertools and string modules.
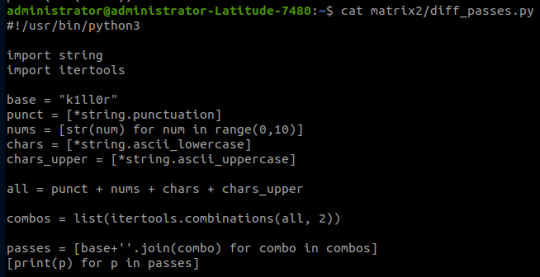
The script generates a password file with the base password 'k1ll0r' along with every possible 2-character combination appended. I simply piped the output into a text file and then ran hydra.
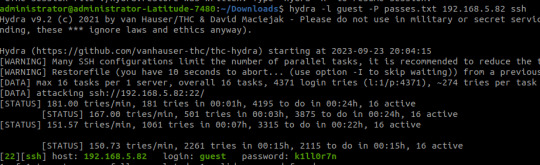
The password is eventually revealed to be 'k1ll0r7n'. Surely enough this grants access to SSH; we are put into an rbash shell with no other shells immediately available. It didn't take me long to discover how to bypass this- I searched 'rbash escape' and came across this helpful cheatsheet from PSJoshi. Surely enough, the first suggested command worked:

The t flag is used to force tty allocation, needed for programs that require user input. The "bash --noprofile" argument will cause bash to be run; it will be in the exec channel rather than the shell channel, thus the need to force tty allocation.
Privilege Escalation
With access to Bash commands now, it is revealed that we have sudo access to everything, making privilege escalation trivial- the same rbash shell is created, but this time bash is directly available.
Thoughts
I did enjoy working on Morpheus- the CTF element of it was fun, and I've never came across rbash before so that was new.
However, it certainly did not live up to the given rating of medium to hard. I'm honestly not sure why it was given such a high rating as the decoding and decryption elements are trivial to overcome if you have a foundational knowledge of hacking and there is alot of information on bypassing rbash.
It also wasn't realistic in any way, really, and the skills required are not going to be quite as relevant in real-world penetration testing (except from the decoding element!)
#brainfuck#decryption#decoding#base64#CTF#vulnhub#cybersecurity#hacking#rbash#matrix#morpheus#cypher
9 notes
·
View notes
Text
python generate questions for a given context
# for a given context, generate a question using an ai model # https://pythonprogrammingsnippets.tumblr.com import torch device = torch.device("cpu") from transformers import AutoTokenizer, AutoModelForSeq2SeqLM tokenizer = AutoTokenizer.from_pretrained("voidful/context-only-question-generator") model = AutoModelForSeq2SeqLM.from_pretrained("voidful/context-only-question-generator").to(device) def get_questions_for_context(context, model, tokenizer, num_count=5): inputs = tokenizer(context, return_tensors="pt") with torch.no_grad(): outputs = model.generate(**inputs, num_beams=num_count, num_return_sequences=num_count) return [tokenizer.decode(output, skip_special_tokens=True) for output in outputs] def get_question_for_context(context, model, tokenizer): return get_questions_for_context(context, model, tokenizer)[0] # send array of sentences, and the function will return an array of questions def context_sentences_to_questions(context, model, tokenizer): questions = [] for sentence in context.split("."): if len(sentence) < 1: continue # skip blanks question = get_question_for_context(sentence, model, tokenizer) questions.append(question) return questions
example 1 (split a string by "." and process):
context = "The capital of France is Paris." context += "The capital of Germany is Berlin." context += "The capital of Spain is Madrid." context += "He is a dog named Robert." if len(context.split(".")) > 2: questions = [] for sentence in context.split("."): if len(sentence) < 1: continue # skip blanks question = get_question_for_context(sentence, model, tokenizer) questions.append(question) print(questions) else: question = get_question_for_context(context, model, tokenizer) print(question)
output:
['What is the capital of France?', 'What is the capital of Germany?', 'What is the capital of Spain?', 'Who is Robert?']
example 2 (generate multiple questions for a given context):
print("\r\n\r\n") context = "She walked to the store to buy a jug of milk." print("Context:\r\n", context) print("") questions = get_questions_for_context(context, model, tokenizer, num_count=15) # pretty print all the questions print("Generated Questions:") for question in questions: print(question) print("\r\n\r\n")
output:
Generated Questions: Where did she go to buy milk? What did she walk to the store to buy? Why did she walk to the store to buy milk? Why did she go to the store? Why did she go to the grocery store? What did she go to the store to buy? Where did the woman go to buy milk? Why did she go to the store to buy milk? What did she buy at the grocery store? Why did she walk to the store? What kind of milk did she buy at the store? Where did she walk to buy milk? What kind of milk did she buy? Where did she go to get milk? What did she buy at the store?
and if we wanted to answer those questions (ez pz):
# now generate an answer for a given question from transformers import AutoTokenizer, AutoModelForQuestionAnswering tokenizer = AutoTokenizer.from_pretrained("deepset/tinyroberta-squad2") model = AutoModelForQuestionAnswering.from_pretrained("deepset/tinyroberta-squad2") def get_answer_for_question(question, context, model, tokenizer): inputs = tokenizer(question, context, return_tensors="pt") with torch.no_grad(): outputs = model(**inputs) answer_start_index = outputs.start_logits.argmax() answer_end_index = outputs.end_logits.argmax() predict_answer_tokens = inputs.input_ids[0, answer_start_index : answer_end_index + 1] tokenizer.decode(predict_answer_tokens, skip_special_tokens=True) target_start_index = torch.tensor([14]) target_end_index = torch.tensor([15]) outputs = model(**inputs, start_positions=target_start_index, end_positions=target_end_index) loss = outputs.loss answer = tokenizer.decode(predict_answer_tokens, skip_special_tokens=True) return answer print("Context:\r\n", context, "\r\n") for question in questions: # right pad the question to 60 characters question_text = question.ljust(50) answer = get_answer_for_question(question, context, model, tokenizer) print("Question: ", question_text, "Answer: ", answer)
#python#ai#ml#generate questions#questions#question answer#qa#text generation#text#generation#generate text#ai generation#llm#large language models#large language model#artificial intelligence#context#AutoModelForSeq2SeqLM#tokenizer#tokens#question answer model#model#models#voidful/context-only-question-generator#data processing#datascience#data science#science#compsci#language
16 notes
·
View notes
Note
I learned all the languages for different classes I had and it's not like I'm super good at using them. I wouldn't say I'm a good programmer lol
Also I forgot a lot of things about all of the languages so if I wanted to actually use any of them I would have spend like an hour at least googling the syntax to remind myself how to do it.
Asembler is basically a low level programming language. You use it to communicate directly with the processor. Usually a microprocessor. You have to write exactly what data to put where in the memory using read and write commands.
Here is example of fragment of my code for a class:
LDI R16, LOW(RAMEND)
OUT SPL, R16
LDI R16, HIGH(RAMEND)
OUT SPH, R1
LDI R16, 0b11111111
OUT DDRD, R16
LDI R16, $0D
OUT OCR1AH, R16
(TOP) | 3507 0DB3
LDI R16, $B3 OUT OCR1AL, R16
LDI R16, $09
OUT OCR1BH, R16
It's pretty fun because when you're writing it and you look away for a second by the time you look back at the code you have no idea what's on the screen anymore lol
Ps. Don't get tricked I'm actually pretty stupid and I failed so many classes it's ridiculous and I'm barely holding on in university
-speck
i will repeat myself and say again that looks really scary. maybe it isnt for me lmao but wait im guessing the R is for the registers? (i may be very very wrong here its just a guess) and RAMEND is for write and end of RAM? idk lol
and yeah that does happen when u do a bunch of stuff like i had my exam for data structures recently and unexpectedly we had to write actual c code for the problems instead of just the algorithms or pseudo codes and while i knew the algos pretty well, i think i botched it bcoz i hadnt practiced any c in such a while! i was writing damn print and input commands (like in python) instead of the printf and scanf. halfway through writing the exam i realised and i had to redo those questions and that lowered my time left to do the 2 markers :/ but ig thats on me i shoulda practiced at least the bsic input output syntaxes beforehand
and oh please dont be too hard on yourself its very easy to fall off the coding train but its also kinda simple to get back up! this semester i will be trying to hop back on with my ml coding train again! i even got an actual physical book and everything on it (i have now realised that covid era esque habit of just reading everything on a laptop has downsides to it) im sure you can do whatever language youre focusing on rn very well too!! i wish you luck man❤️
#tumblr is weird it didnt show me the ask for the longest time on mobile i only saw it when i got on the laptop :(#barely holding on in uni why does that sound like me#ima show this to my roommate when i meet her in like 2 days and shes going to laugh at me for seeming like i know so much#and shes going to love you doing so much stuff omg (i hope ur okay with that if not tell me please)#altho the trend rn in this sphere is more towards web developement would you say? (she is also doing that)#or is it just a thing where im from? lemme know please!#ask.speck
2 notes
·
View notes
Text
I have zero coding skills, but I was able to coax ChatGPT to write a JavaScript tool for blogging
My goal was simple but it eluded me for ten years.
I do a lot of linkblogging on mitchw.blog. I prefer to have links formatted like this:
How Many Steps Do You Really Need? That’s the Wrong Question. Walking is important, but challenging yourself to go faster and higher can improve your health even more. nytimes.com
It’s esthetically pleasing, and the reader can see which website they’re being directed to. It’s the way Dave Winer formats it on the links page of his Scripting News blog, which is where I got the idea. I like it.
However, formatting links that way is just fussy enough that it’s inconvenient, particularly when I’m reading and blogging from the iPad and iPhone. I looked for automated tools that would work with my existing blogging software to create those links. Currently, I’m blogging on Micro.blog; previously I used WordPress. But I couldn’t find anything that worked quite the way I wanted.
Then I thought: Why not let ChatGPT try? I’d heard ChatGPT made an excellent coding assistant. Why not see if ChatGPT could do the whole thing?
So I did. You can read a transcript of my conversation with ChatGPT here, complete with code snippets, or read on here and I’ll walk you through it.
Getting started
I started by asking ChatGPT4:
I’m looking for a tool that would automatically convert URLs for posting to the web, to strip off everything but the domain and then link to the URL from the domain. The output should be in Markdown format. For example:
https://www.nytimes.com/2024/03/08/world/middleeast/gaza-aid-by-sea.html would become nytimes.com
https://news.yahoo.com/trump-set-finalize-rnc-takeover-051211725.html would become news.yahoo.com
https://en.wikipedia.org/wiki/Yorgos_Lanthimos would become en.wikipedia.org
You can see an example of that style of linking on this page: http://scripting.com/?tab=links
ChatGPT replied with a Python script that would do the job. I would have to edit the script manually to change the URLs.
A good start, but not what I was looking for.
I thought about using Drafts, a utility for the Mac, iPad and iPhone designed to be the place “where text starts.” You type some text into Drafts and then send the text to email, messages, Slack, your task manager, WordPress, whatever. It’s extremely customizable; users can write automations, known as Actions, to manipulate text or send notes to other apps.
I told ChatGPT:
Write me a plugin for the Drafts app that does the same thing using a URL in a draft. Here is the Drafts app https://getdrafts.com
ChatGPT wrote a Drafts action, along with instructions how I could install it. I ran the plugin and got an error. So I sent the error message to ChatGPT, which explained the problem to me and rewrote the code.
And it worked. The whole process took just a few minutes.
But then I ran into a glitch. Here’s how I explained it to ChatGPT:
Please modify the JavaScript so that if the URL starts with www, the www is not included in the output. For example, if the input is this:
Immigrants are less likely to commit crimes than U.S.-born Americans https://www.kpbs.org/news/national/2024/03/08/immigrants-are-less-likely-to-commit-crimes-than-u-s-born-americans-studies-find
The output is currently this:
Immigrants are less likely to commit crimes than U.S.-born Americans www.kpbs.org
Instead, it should be this:
Immigrants are less likely to commit crimes than U.S.-born Americans kpbs.org
ChatGPT revised the code to check for the presence of www in the URL, and remove that string if present. I updated the Drafts Action yet again, and it worked.
How about link previews?
Next, I asked ChatGPT to write an action that would generate a link preview in a post, in the style of Facebook, Mastodon, Threads, etc. I got that idea from the recent kottke.org redesign.
ChatGPT told me it could do that partially, but couldn’t fetch the title of the web page automatically because Drafts can’t access the Internet.
I replied:
You are incorrect. Drafts can extract the title. See this action for example code. directory.getdrafts.com/a/13y You’ll want to use open graph to get the information for the preview. Try again please.
ChatGPT corrected itself and generated an action for me. I got error messages and passed them on to ChatGPT, which corrected the action. We went back and forth until we generated an action that worked successfully. However, the output was ugly and I lost interest. Maybe I’ll come back to it another day.
Back to plan A
I returned to the original problem and asked ChatGPT for a slight modification.
Me: Let’s go back to the “Convert URLs to markdown” Drafts action. Ready to do a little more work on that one?
ChatGPT: Of course! Let’s continue working on the “Convert URLs to Markdown” Drafts action. What adjustments or additions would you like to make?
Me: I’d like to modify that script so there are brackets surrounding the domain link, with the brackets inside the link.
I provided an example, which included an escape character, \, in front of the square brackets, because I thought that was necessary to render the text properly.
ChatGPT responded with the correct code—which did not include the escape character, because it’s unnecessary.
You can read my conversation with ChatGPT in its entirety here.
I’m pleased by this, and I have a couple of ideas for other Drafts actions ChatGPT can create for me to automate blog and social media formatting.
3 notes
·
View notes
Last Seen Blogs

2af-afterdark
Playground for Adults

newerasports
New Era Sports

sermavica
Sin título

resedabae
DBH imagines (requests closed)

selfcaremaxtr-blog
selfcare