#puff sleeve blouse tutorial
Explore tagged Tumblr posts
Text
Puff Sleeve Blouse Pattern: Learn How to Make a Gianni-Inspired Blouse from Scratch
In this post, you will learn how to self draft gianni-inspired puff sleeve blouse. Are you looking for a fun and easy sewing project that will add some flair to your wardrobe? Do you want to learn how to draft and sew your own puff sleeve blouse with a tie front and a peplum bottom? If so, you are in the right place! In this post, I will show you how to make a puff sleeve blouse from scratch,…

View On WordPress
#beginner#drafting#easy#GANNI#pattern#puff sleeve blouse#puff sleeve blouse design#puff sleeve blouse pattern#puff sleeve blouse tutorial#Puff Sleeves
2 notes
·
View notes
Link
Check out this listing I just added to my Poshmark closet: Miss Red Aspen Lashes.
0 notes
Text
Learn How to Create a Gianni-Inspired Puff Sleeve Blouse from Scratch free pattern
1 note
·
View note
Text
OKAY I promised I'd do this so here we go:
How I Made my Vanessa Cosplay 101
What I used:
1 green zipper
Velcro
2 yds dark green fabric
3 yds medium green fabric (like that generic green you know what I'm talking about probably)
1 1/2 in. wide dark green ribbon
3/8 in. wide gold ribbon
1 pkg. large rhinestones
~1/2 yd. off-white felt
A crap ton of thread
Gold foam glitter paper
A hot glue gun
A petticoat
A plain green knee length sleeveless dress
Elbow length green gloves
A plain black headband
Plain black ribbon
Stuffing
Basically everything on this list can be obtained on Amazon and at your local craft/fabric store.
Confession: I cheated. I bought a green dress on Amazon to use as a base for the cosplay. But it's fine.
The first thing I did was draft a bunch of patterns, using newspaper. I used a blouse of mine as the base of the bodice pattern, and drafted a collar (essentially I cut a long rectangle out and curved the top and bottom.). For the puffed sleeves, I used the puff sleeve pattern from kirileecosplay (check her out on YouTube- she's got a great puff sleeve tutorial and a free pattern, as well as a bunch of super cool sewing tutorials and cosplays!). I then drafted a diamond pattern.
For the bodice, I highly recommend making a mockup to practice the puff sleeve attachment and make sure everything is going to fit right. Use an old sheet or pillow for this.
For the skirt, i cut a bunch of diamonds out of the dark green fabric (approximately 40) and sewed two together on three sides, then flipped the diamond inside out and stitched it closed. When i had done all the diamonds (about 10 total per side) I took the green dress I had purchased off Amazon and sewed the diamonds on that, making sure to leave a space about 2 1/2 inches wide about 5/6 of the way down the dress to stitch the dark green ribbon onto, all the way around.
Most of the bodice was pretty simple- I had one piece for the front and two pieces for the back, made out of the green fabric. I added the zipper to the back (any zipper you buy will probably have an attaching tutorial with it) and the sleeves to the sleeve holes things. Then I took two lengths of dark green ribbon, long enough to go around the base of the puff sleeve, and two lengths of gold ribbon, the same length. I sewed the gold ribbon onto the green ribbon and then sewed the ends of the green ribbon together to form one round. I hand stitched these sleeve caps onto the bottom of the puffed sleeves. The last step on the bodice was to hot glue a large gold rhinestone at the base of the neckline.
For the accessories, I started with the crown. I simply cut a small gold crown out of the foam paper and hot glued the ends together. Then I cut a slut on two opposite sides of the crown to put the headband through. The belt was also pretty simple. I cut a length of green ribbon long enough to go around my waist, hemmed the end, and added Velcro to secure it. Then I hot glued three gold rhinestones, about 2 inches apart, along the center of it. The choker was enough black ribbon to go around my throat, and a gold rhinestone hot glued in the middle. I tied it to secure it.
The final cosplay was a petticoat, the dress, the bodice, the belt, the choker, the crown, and plain black flats.
I hope this was helpful! Good luck to anyone who attempts this!
5 notes
·
View notes
Note
Hi there. I've loved the goth lolita since high-school and I've just ordered my 1st custom ordered dress from Etsy Dollbe. It should take 2-3 months for completion and shipping. In the meantime, I'm tempted to try my own hand using one of these old A line dresses of mine as a base for a pattern. (Please see pic)
I have basic sewing skills of alterations and simple projects like totes or cosplay/Halloween costumes. Dart work is not my forte yet. Anything lolita that I purchase in the future will have to be custom made for my taller curvy shape (size 12-16).
Are draft alterations of an old A line waste of time or is it worth while? Do you have any suggestion?

I've said it before on the smock dress with puff sleeve post, but I'll say it again: your ability to add detail to a simple garment is going to make or break your ability to sell a nontraditional garment as lolita. You can add a bigger skirt or change the straps, and if it's not detailed enough or not given the right elements to make it work, it won't look lolita.
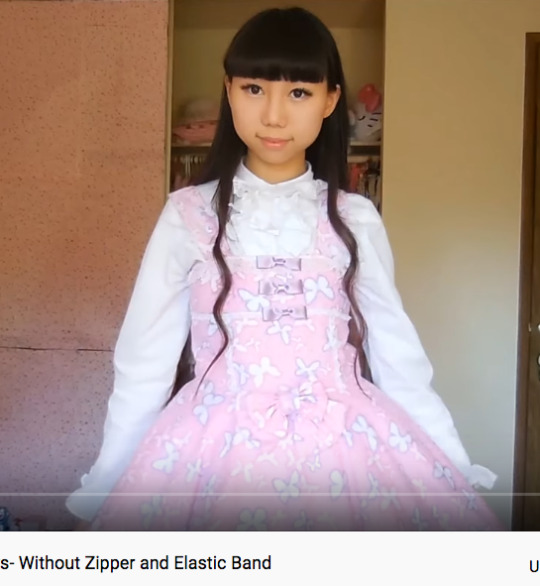
This is actually the phenomenon by which Yumi King's lolita dress tutorial, which is barely constructed by a normal standard of craftsmanship, still reads as lolita more than a lot of bad replicas out there. That's not to say that making a garment lolita is as easy as gluing some lace on it and calling it lolita, but you should be planning on adding lace.
With the pictures that you've given my main concern is the shape of the bodice. That pleated skirt is not uncommon, even if it's low volume, but the bodice has a more closed neckline and smaller sleeve holes than you'd expect out of a lolita JSK. Remember that it's expected for you to wear a blouse under the bodice, and you need to figure out how you're going to come to terms with that restraint.
However, while the re-construction necessary to get these pieces to be proper, by-the-book lolita would be kind of intense, and possibly more work than just building a dress from scratch, there is nothing stopping you from reworking the dresses to be heavily lolita-inspired. You can practice how to build upon a foundation, and learn the ways to reach EGL's intense adornment standard without feeling cluttered or tacky. Doing this will also help you build connections that will help you when you do sew your own lolita. It'll teach you how to build your own bows. It'll teach you where to source good lace. Building yourself a garment that's heavily lolita-inspired can also help you feel like you have something more lolita in your wardrobe. It might not pass the CoF check, but if you're doing lolita for personal enjoyment and not online approval, that might not matter.

For reference, here's a heavily lolita-inspired piece with a similar box pleat waistline. There is a good choice of accessory (I own this piece so if you want detail shots, let me know) such as pearls, which builds upon the undersea theme. This dress does have fewer detail additions than a normal lolita dress (it doesn't have hem lace, for starters), but that's a decision of how to balance the piece.
Learning how to make something over-the-top in a restrained way is something you learn best from doing. You get experience from trying things. If you're not able to start doing full lolita yet, you can still gain the experience of incorporating those details into a piece.
If you're absolutely determined to make these pieces actual lolita, I'd probably turn them into skirts with bustle backs (example), because the bodices will be difficult to modify, and the skirts don't really have the normally expected lolita fullness. At that point, however, I'd have to be doing it because I love the fabric, and not because it would save time or effort.
Also, check the notes to this post, because if any of my followers have suggestions for good places to get lolita for a curvy/tall dress that goes up to size 14+, they'll probably leave them in the replies. (please do, if you know)
19 notes
·
View notes
Text
Persimmods’ Sims 4 CAS CC Directory Part 1
Next Part
Skin Details
More Moles
Makeup
Mime Makeup + Mime Lookbook
Hiders
BG Labial Folds CAS Hiders
Tutorials
Batch Imports+Exports Hair Override Tutorial
Toddler Clothes
Tillisims’ Flower Appliqué Dress Flowers Decal Accessory + Tilliesims’ Flower Appliqué Dress in the Historian and Scientist
Tilliesims’ Puff Sleeve Blouse & Bloomers in the Historian and Scientist
Casteru’s Basketball Shorts in the Historian and Scientist
Casteru’s Bowtie Pullover + Ankle Slacks in the Historian and Scientist
Casteru’s Layered Hoodie Decal Accessory + Casteru’s Layered Hoodie in the Historian and Scientist
Casteru’s Puffy Dress in the Historian and Scientist
Casteru’s Festive Dress in the Historian and Scientist
Tilliesims’ Teddy Jumper in the Historian and Scientist
Tilliesims’ Bib Collar Dress in the Historian and Scientist
Teen-Elder Accessories
Vintage Simlish Designs Decal Accessory
Ridgeport’s Monet Duster Accessory in the Historian and Scientist
Teen-Elder Clothing Collections
Grimcookies’ Sporty Collection in the Historian and Scientist
Teen-Elder Tops Clothes
Casteru’s Cropped Hoodie the Historian and Scientist
Renorasims’ Priyah Top in the Historian and Scientist
Cubersims’ Square Neck Bodysuit in the Historian and Scientist
Okruee’s Mirabel Hoodie + Okruee’s Mirabel Hoodie Decal Accessory in the Historian and Scientist
Cubersims’ Silk Spaghetti Strap Crop Top in the Historian and Scientist
Ridgeport’s Cassia Top in the Scientist Addon
Ridgeport’s Canyon Top in the Scientist Addon
Ridgeport’s Bronte Top in the Historian and Scientist
Okruee’s Questionable Tees in the Historian and Scientist
Ridgeport’s Flounce Tee in the Historian and Scientist
Cubersims’s Polo Crop Top in the Historian and Scientist
MLys’ Mona Sweater in the Historian and Scientist
Petr Shirts + UCI E-Student Lookbook
Teen-Elder Bottoms Clothes
Casteru’s Simple Shorts the Historian and Scientist
Okruee’s Bombay Flared Pants in the Historian and Scientist
Ridgeport’s Darcy Wrap Skort in the Scientist Addon
Casteru’s Knit Ribbed Skirt in the Historian and Scientist
Ridgeport’s Missed Opportunity #45 Skirt W/ Flowers in the Historian and Scientist
Barbieaiden’s Coco Skirt in the Historian and Scientist
Teen-Elder Full Body Clothes
Renorasims’ McCartney Dress in the Historian and Scientist
Ridgeport’s Wallflower Dress in the Scientist Addon
Ridgeport’s Stevie Wrap Dress + Ridgeport’s Stevie Wrap Dress Accessory Overlay in the Scientist Addon
Ridgeport’s Phia Suit + Ridgeport’s Phia Suit Accessory Overlay in the Scientist Addon
Ridgeport’s Clementine Jumpsuit in the Scientist Addon
Ridgeport’s Daze Dress in the Historian and Scientist
Ridgeport’s Bronte Dress in the Historian and Scientist
Joliebean’s Paruparo Jumpsuit in the Historian and Scientist
Oakiyo’s Kira Overalls + Accessory Sweater in the Historian and Scientist
Casteru’s Leg Slit Dress in the Historian and Scientist
Casteru’s Bodycon Ruched Dress in the Historian and Scientist
Casteru’s Square Neck Dress in the Historian and Scientist
Nuagelle’s Lenora Dresses in the Historian and Scientist
Sforzinda’s Joanie Dress in the Historian and Scientist
Sforzinda’s Lucky Palm Dress in the Historian and Scientist
Simandy’s Lullaby & Evanesce Dresses in the Historian and Scientist
Demondare-Sims’ Polo Dress in the Historian and Scientist
Sforzinda’s Turtleneck Dress in the Historian and Scientist
Sforzinda’s Flora Dress in the Historian and Scientist
Sforzinda’s Elsie Dress V2 in the Historian and Scientist
Leeleesims1 Off-shoulder Sweater Dress In the Historian and Scientist
Teen-Elder Shoes
Arethabee’s Hazel Boots in the Historian and Scientist
Sondescent’s High Hope Boots in the Historian and Scientist
Mysterious Dane’s Adidas Gazelle in the Historian and Scientist
Taiga Sims’ Love Platforms in the Historian and Scientist
Sondescent’s No-Combat Boots in the Historian and Scientist
9 notes
·
View notes
Text


finally complete enough for now. (I finally stitched some ribbon ties onto the sailor collar today so that it can actually be. worn.)
dress: marine bear ribbon jsk by metamorphose temps de fille in mint blouse: puff sleeve knit shirt from forever21 with alterations to sleeves and handmade sailor collar shoes: kelly & katie wesleyn flats in powder blue wig: rayiis 16″ in cold brown (amazon) hat: freebie from the lacemarket seller they got from taobao bag: bear backpack I’ve had for a very long time, tush tag says “mango” bracelet: handmade from plastic chain links petticoat: two layer dailywear by Night Whisper Lolita
the pic in the wheelchair is without the petticoat, obvs. and I still didn’t bother to look up an actual tutorial for tying bows. (also I know I look dour, I hate taking photos.)
#photo#crafts#sewing#a look through the lolibrary#did not even bother pretending to consider doing my makeup.#also I still don't have actual bloomers I've just got some bike shorts I had for some other reason#I don't really like how unevenly this petticoat sits - plus it's meant to be adjustable length but it doesn't stay at the shorter length#I'd like a different one.
2 notes
·
View notes
Photo

Sparrow Refashion ,Sewing , Thrift flip and refashion Blog o przeróbkach i szyciu ubrań diy: Puff Sleeve Cottagecore Blouse Step by step sewing tutorial no pattern needed
#embroideryideas Puff Sleeve Cottagecore Blouse Step by step sewing tutorial no pattern needed ! Hello
0 notes
Text
Michiru School Uniform Cosplay Tutorial Part 2: The Blouse and Wig
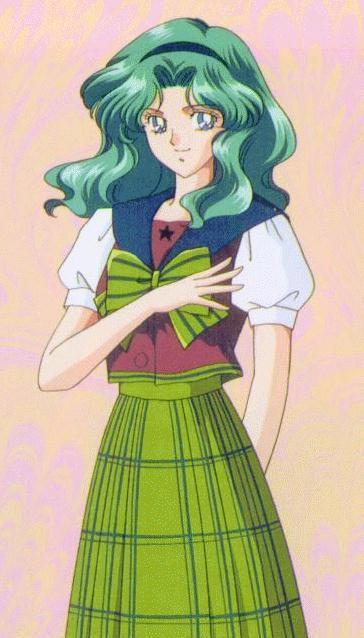
Welcome back everyone! In part 1, I showed you how I put together the skirt and bow for Michiru’s school uniform. Click below to see how I completed the look with the blouse and wig!
So as you can see from the new cover photo, I decided to go with the short sleeve look at the last minute! Since the con is in September in AZ, short sleeves are definitely preferable. I personally like this look better as well.
The pattern instructions say to sew only the darts and shoulders of the shirt, then add the collar and facing before sewing up the sides. In my case, the green blouse stripe was added in after one side seam was finished. This method actually worked out pretty well as far as being able to move the blouse around in the machine. A couple of notes, though: the neck hole on this pattern is very very narrow. I actually cut out almost an inch wide strip in addition to the seam allowance, but this might not be necessary for everyone. The pattern also directs you to sew the collar and facing on at the same time. I did them one at a time to ensure everything was fitting properly. Getting in and out of this blouse is...a challenge to say the least, haha. It is capable of going on and off over your head without a zipper or a button down front, but I would definitely recommend wiping off your makeup before taking it off.
Here is the neck facing pinned on over the collar, which is already sewn in:
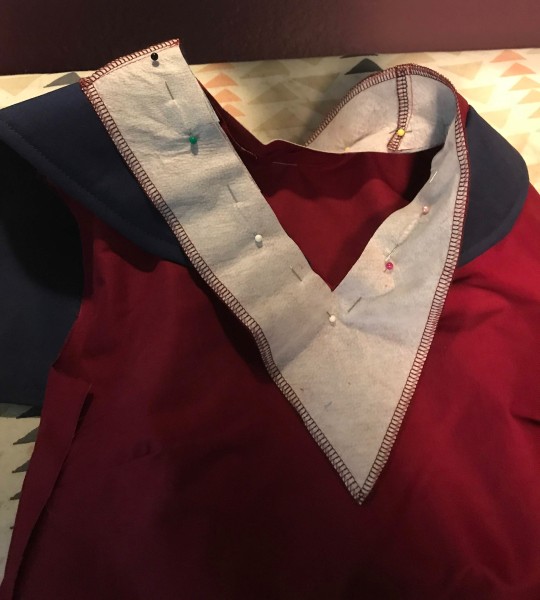
You can see I added top stitching to the collar edges as well.
Once the neck facing is sewn on, turn it in and press the new edges. I also tacked the facing down at strategic points on the shirt, mostly under the collar, to keep it from popping up.
For the inset front piece with the star, I digitized a star to be embroidered on. You could easily paint this though.
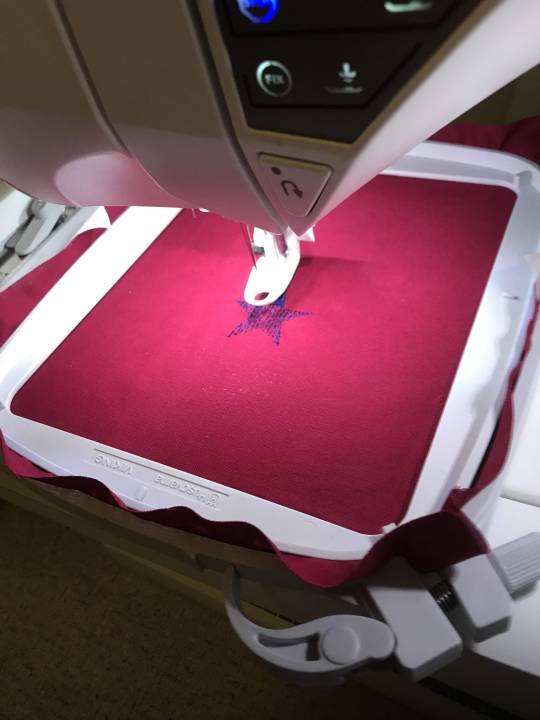
I embroidered the star before cutting out the pattern piece around it. Sew the top edges of the inset together and flip them right-side out to press.
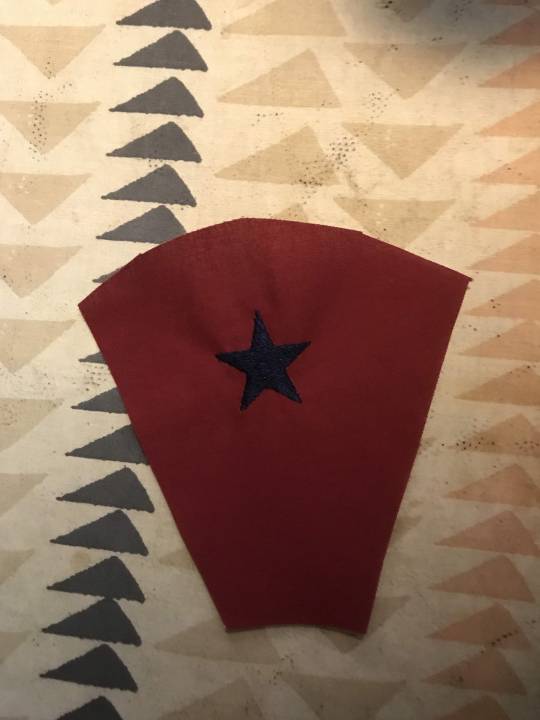
Finish the edges before pinning this piece onto the blouse to be sewn. I also checked the positioning on this piece while wearing the blouse, and moved it around until I was pleased with where it sat.
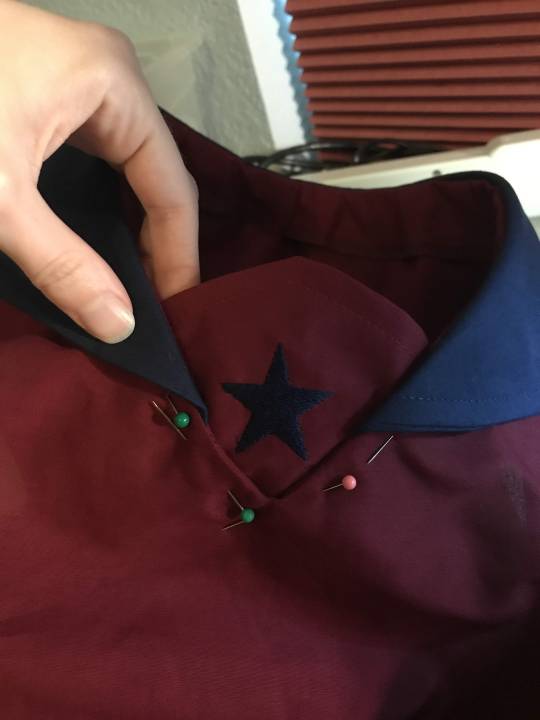
Before adding the green stripe along the bottom, sew up one side of the blouse. Also take into account how much space the green stripe takes up at the bottom; this same amount of red fabric should be cut away as it is being replaced. This is why I have the green stripe pinned so high on the blouse in the image below:

Definitely make sure at this point that the two blue stripes match up on the other side before you commit to sewing it in! However, if you are pleased with the placement, press the seam where the green and red pieces meet, and finish up the other side.

For the sleeves, I used the short puff sleeve and cuff pieces that came with the same pattern. I like to put my gathers in first, and then even them out until they meet the length of the cuff before attaching the two and sewing up the side sleeve seams.

Add the sleeves to the shirt, and it’s time to finish up with some details!

I hand-sewed the bow to the front of the shirt, and decided to make my own cover buttons so that they would match the shirt fabric. Cover button kits are readily available at most craft stores, and they are super fun and easy to make!

Sew those on, and the blouse is done! :)

The wig I have for Michiru is an Arda Wig’s “Claudia” in Mako Green. Here is what it looks like out of the bag. I had only worn it once before, as is.
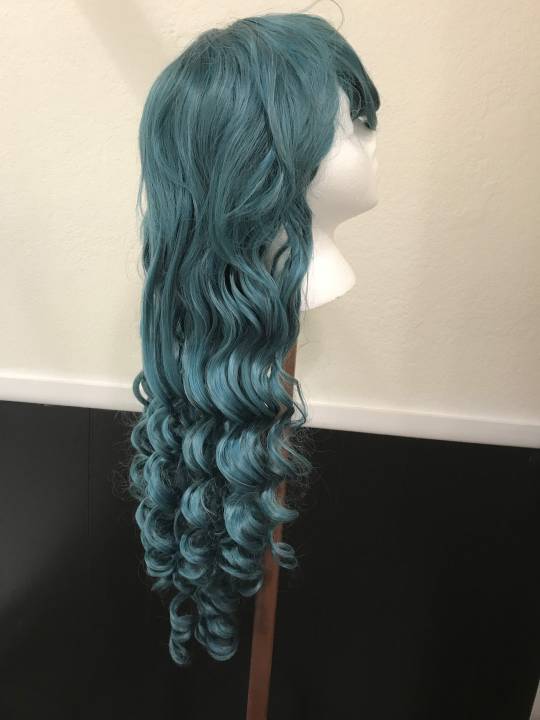
While the ringlets are beautiful, they don’t go as high up as I would like. The wig is also a touch long for Neptune in my opinion. I steamed and brushed the curls out, trimmed off about five inches, and recurled them in about 3 inch wide segments.
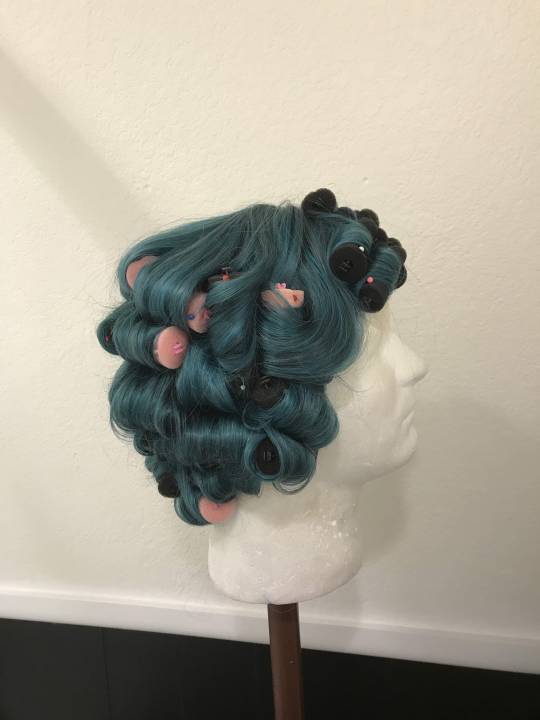
I also heavily curled the bangs, using about 9 rollers on them alone. I’m not sure I would curl them as heavily next time, as I had mixed results with the bangs.
After steaming the wig again and hitting it with the hair drier, this is what the curls looked like when they had cooled and been released:
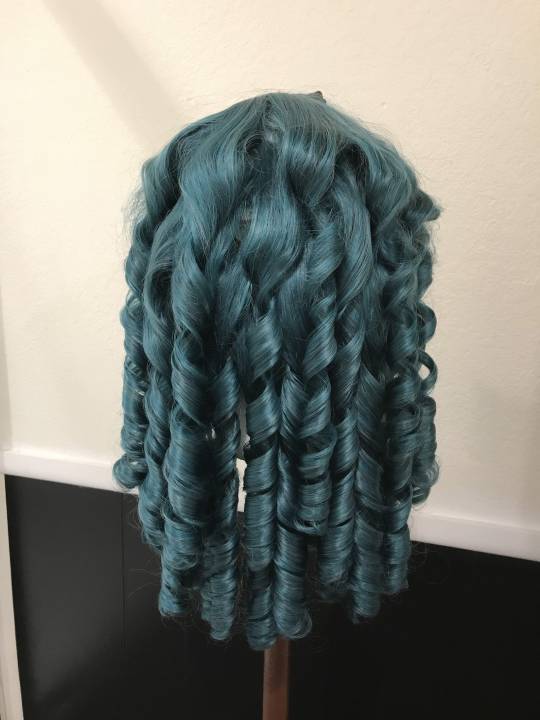
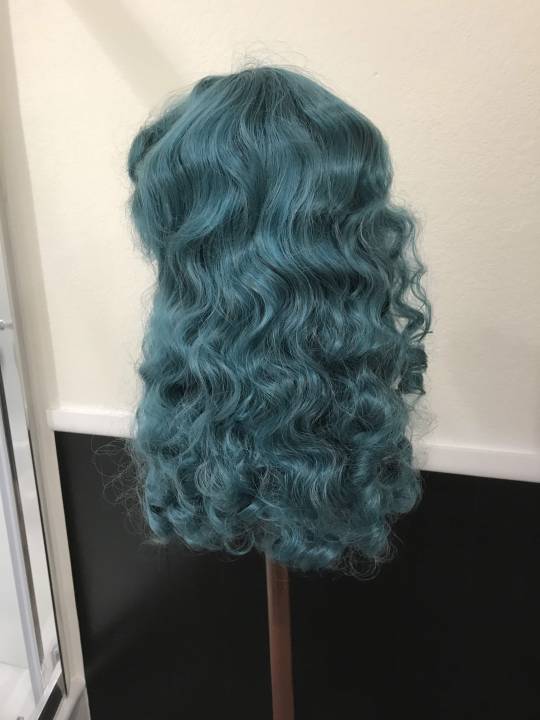
To get the curls to go from Shirley Temple to ocean waves, I brushed through them with a wide paddle brush and reshaped them with my fingers (this helps eliminate any frizz that might occur as well).
For the bangs, I back-combed them for some volume and shaped them with the hair dryer and my hands. They came out more asymmetrical than I would have liked, but seeing as it was the night before the con, they would have to do.
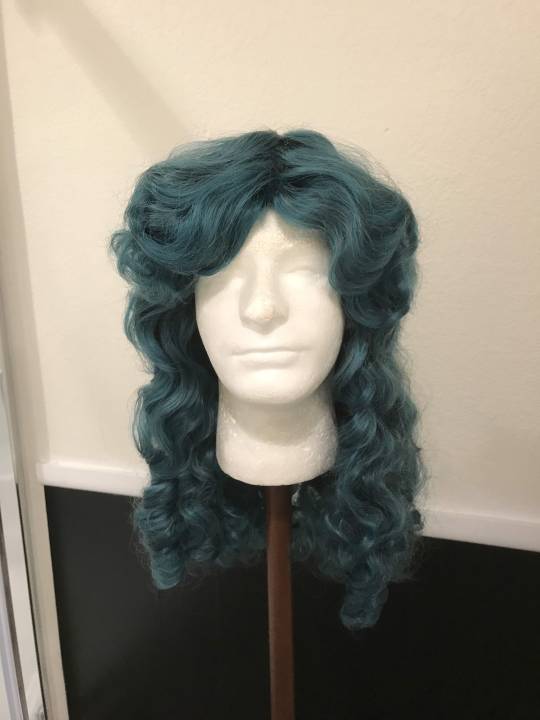
Add a few final Michiru touches: a navy hairband, her transformation wand, some cute frilly socks, her violin (if you have one!) and be the magical girl that you are!!! :D


I know I felt truly magical being Michiru for a day. Thank you so much for reading, I hope this tutorial helps you in your own cosplay pursuits! Neptune Planet Power, Make-up! ;)
#cosplay#cosplayer#cosplaytutorial#cosplayhelp#cosplaytips#sailormoon#sailorscout#sailorneptune#sailorneptunecosplay#michiru#michirucosplay#magicalgirl#ardawigs#cosplaylife#cosplayersofinstagram#womenofcosplay#saboten#sabotencon#sabotencon2018
7 notes
·
View notes
Text
5 Pretty Woman’s Shirt & Blouses For This Spring
Finding the proper dress to wear can be difficult for any woman. There are so many different types and designs of blouses available that you can wear one for nearly every occasion.
From diverse patterns and colors to materials and forms, finding a shirt that fits your own style and body type is very simple. In this tutorial, we'll go through all of the different sorts of blouses to help you pick which one is best for you!

1. Chiffon Long Sleeve Blouse
A silk chiffon blouse with a deep V-neckline and sheer blouson bow-tie sleeves that lead to split single-button cuffs for a delicate finish is a demure top for dressing up.
It's a lightweight, basic chiffon long-sleeve blouse that's easy to style with a clean-cut design. It's ideal for wearing to work or on a regular basis. It is suited for everybody due to its casual and relaxed fit.
It's simple to pair with pants, leggings, skirts, shorts, and so on.
2. The Striped Blouse
Even in a more feminine shape, the striped shirt will always have a feminine-masculine side to it, which is what makes it so appealing.
3. Lace Blouse
A lace blouse is the essence of femininity; it exudes elegance and class. Lace is an attractive fabric that looks best when styled simply. Avoid using flashy embellishments like sequins or other patchwork patterns. When it comes to accessorizing, lace calls are more approachable.
Lace has the advantage of looking excellent on any lady; it emphasizes a woman's femininity and lends a softness to any outfit.
4. The Collared Blouse
A blouse with a bow neck collar will give a touch of refinement to your ensemble. This beautiful blouse has contemporary puff sleeves and can be worn with any formal or informal summer outfit.
5. The Shirt With Floral Print
This shirt top with a floral design for women, with a spring motif and bloomy floral accents, is enough to welcome the return of sunny days. This gorgeous blouse is ideal for rocking your summer appearance and will be a terrific addition to your wardrobe.
We hope that the information provided above on women's shirt tops and blouses was useful.
0 notes
Photo

✨ Unlock Your Sewing Magic: Milkmaid Top Pattern Hacks! ✨
Hey there! Today, I'm absolutely thrilled to share an incredible sewing adventure with you all. We're diving headfirst into the captivating world of milkmaid tops and exploring the art of pattern hacking. Get ready to unleash your creativity and bring forth an array of breathtaking styles, perfect for those who adore the whimsical cottagecore aesthetic.
In my latest video, I'll be your guide on this enchanting journey. Together, we'll learn how to transform my free PDF printable pattern into a multitude of charming tops, blouses, and even dreamy dresses, all with a touch of cottagecore elegance.
But that's not all—I have a delightful surprise for you! As an added bonus, I've included a free printable pattern for puff sleeves. These ethereal sleeves will add a touch of romance and whimsy to your creations, making them truly one-of-a-kind.
No need to worry if you're new to pattern hacking—I've got you covered. This tutorial is designed to be beginner-friendly, providing detailed step-by-step instructions that will help you bring your sewing vision to life with ease and confidence.
So, head over to my YouTube channel and watch the full video tutorial. Immerse yourself in the magic of pattern hacking as I guide you through each step, revealing the secrets to creating unique and captivating garments. Don't forget to show your support by hitting the like button, subscribing to my channel, and sharing the video with your sewing friends.
Grab your favorite fabric, download the milkmaid top pattern, and let the magic begin!
Happy sewing!
youtube
#milkmaid top#pattern hacks#pattern hacking#cottagecore fashion#sewing community#diy fashion#puff sleeve#puff sleeve pattern#sewwithlove#sewing magic#tumblrsew#free sewing patterns#sewing patterns#milkmaid top pattern#pdf pattern
20 notes
·
View notes
Link
Check out this listing I just added to my Poshmark closet: Miss Red Aspen Lashes.
0 notes
Photo

The other day I needed a sewing “win” and had the idea to hack the #antheablouse so it has a scooped neckline (also cut the front on the fold to eliminate the button placket). I also added 2” of extra width at the front and back so I could gather it at the neckline, making it a fuller blouse (you wouldn’t need to do this, but I like how this looks). I attached a neckline ruffle with narrow bias tape as well as adding a faux necktie (although as this neckline is quite big I wish I had made the ties more functional so I could cinch it in more). I cut the sleeves straight at the hem and narrowly hemmed it (turning up 1/8” pressing, then again 1/8”). I sewed two rows of elastic shirring about 1” from the sleeve hem to create the cuff and ruffle. But the shirring didn’t give a tight enough cuff so I gently pulled the elastic a bit tighter. I then knotted the threads and sewed a French seam. For the puffed sleeves I decided to sew basting stitches higher up the sleeve so instead of having the gathers all around the armscye, they are more concentrated at the shoulder. I also pressed the sleeve seam towards the sleeve (unlike the instructions tell you to press away from the sleeve) so it gives a puffier puff! It’s fun and I love how it turned out! Anyway, I know this isn’t exactly a tutorial but I haven’t had the time or energy to write one up yet. But I might if there’s interest. Enjoy these unedited photos in my messy studio! ❤️ https://www.instagram.com/p/CRWwQLdsbLq/?utm_medium=tumblr
0 notes
Text
A Century of Glamour Ghouls: 1960s
Marianne Danielle in The Brides of Dracula (1960)

The Movie
Sometime in the late 19th century, somewhere east of France, those damned dapper, aristocratic vampires are at it again. Two years after Horror of Dracula (1958) was a smash hit for Hammer Film Productions, The Brides of Dracula (1960) was produced. Dracula didn’t rise from the grave for this one, but Van Helsing continues on his quest to wipe out his blood-sucking kin.
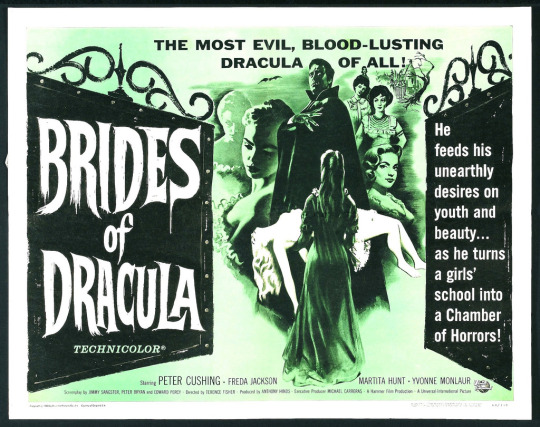
The film begins when Marianne Danielle (Yvonne Monlaur), a deportment teacher from Paris, encounters coach trouble en route to a new job. Stranded at the village inn, Marianne meets the Baroness Meinster who invites her to stay the night at her chateau. Marianne soon discovers that the Baroness has been keeping a secret; the Baroness’ “ill” son is locked up in his own wing of the chateau. Misunderstanding the nature of the Baron’s affliction Marianne executes a plan to set him free. The Baron then murders his own mother before escaping into the night. Marianne, distraught at being left behind, flees through the woods where she is found in passed out in shock and exhaustion by Dr. Van Helsing, who is investigating rumors around the Meinster family. A rash of strange murders break out in the village and Van Helsing closes in on the Baron. Unbeknownst to Van Helsing, Marianne has agreed to marry the Baron, still not aware that he is a vampire.
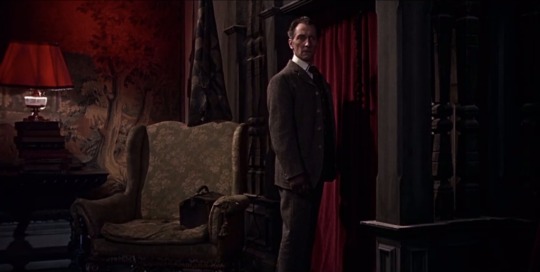
When Hammer began producing their own set of adaptations of the classic movie monsters, they established a colorful gothic universe that stretched well beyond the initial characters, scenarios, and stories. Brides sets the tone for all of the Hammer vampire films that followed. They’re stylish period pieces, though which period can be a little muddy giving the films an added fantastical quality. They have a pronounced gothic flair.
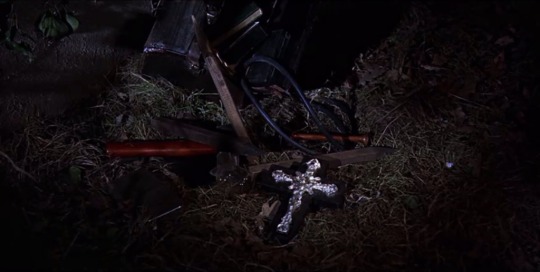
While no Hammer film is absent of camp, their first decade of horror was a bit more reserved in style and content. Hammer bucked censors from the start with The Quatermass Xperiment (1955) when they not only didn’t fret an X rating, but changed the title of the film to publicize that X. It wouldn’t be until the end of the 1960s that Hammer would push for the pulpy provocative content, nudity, and lesbianism closely associated with the later Hammer vampire films, but the seeds for that progression (or regression depending on how you look at it) are already visible in Brides.

The Look
A hallmark of Hammer horror is glossy glam taking precedent over historical accuracy in costuming and makeup design. Marianne is no exception.

The Clothes
The film is roughly set at the end of the 19th century and Marianne’s costuming doesn’t reflect that exactly but it’s quite consistent throughout the film.
Marianne is always in long dresses, with long tapered sleeves and puffy shoulders. Most of her collars make a high v. Marianne is often costumed in deep colors (warm grey with red detailing, forest green, crimson, etc.) and velvety fabrics.

This contrasts her from the Meinsters, who are typically costumed in cool grayish and purple shades and often in fussier fabrics like silk and embellished lace.

(In addition, when people encounter the Baron for the first time either to get vamped or put in his thrall, they’re usually wearing a cool purple shade.)

She also has the best winter coat I’ve ever seen in my life and if anyone knows where I can get this exact coat HMU.

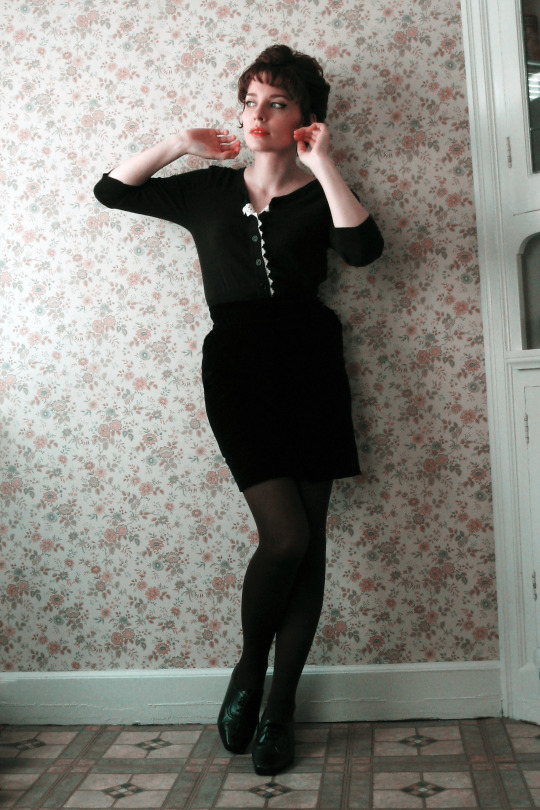
For the daytime look, I wanted to translate the Marianne costuming philosophy into something more contemporary. I didn’t succeed very well with colors, but hey. I chose a knit button-up top with lace detailing and a little puff at the sleeves and a velvet mini skirt. To add some deep colors to the look, I wore purple tights (though the camera didn’t pick up the hue well).
For the full cosplay, I stuck with a velvet skirt (ideally it’d be ankle-length, but I don’t have many ankle-length skirts). This time I paired it with a cream-colored high-necked blouse under a black fitted blazer that I tucked into the skirt, trying to mimic the style of dress Marianne wears in the film. On top of that, I added a plaid capelet with brown and white detailing and white scarf.
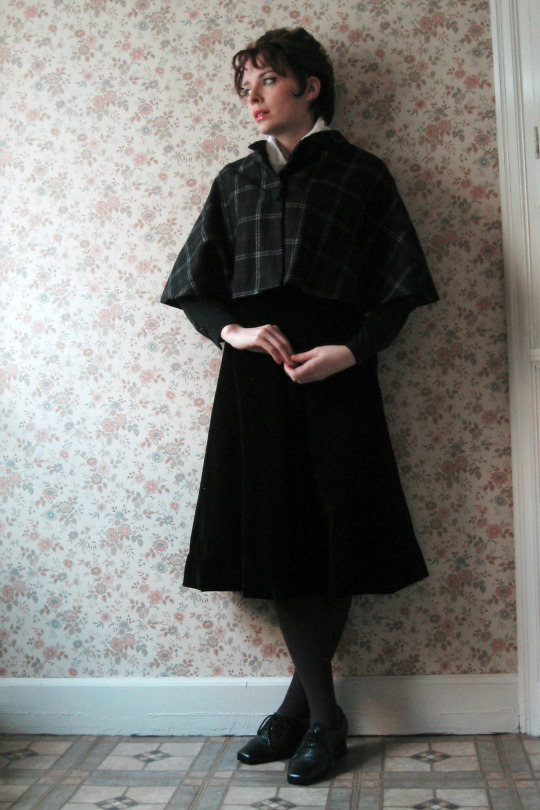
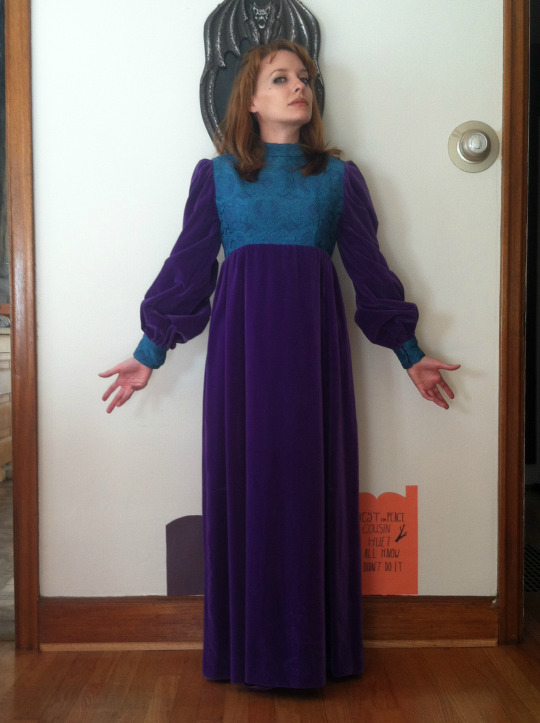
Recreating Marianne’s look simply from my own closet was easier said than done. If you’d like to be a generic woman from Hammer horror, era-appropriate dresses are usually easy to find in vintage stores and could be paired with the makeup below. Case in point, me on Halloween 3 years ago:
The Makeup
Marianne’s makeup is definitely a look that could pass for modern, so I’ll only do a single face for both levels of cosplay. It’s a high-contrast look but with warm, romantic colors. A great look for autumn to be honest.

Start with an even base with a natural or semi-matte finish. Cover your lids with a neutral shade either in your skin tone or one shade lighter.
Take a neutral or warm purple shade into the crease and outer edge of your lid and blend up. Follow that up with a lighter shade on the lid and just below the brow to create contrast; I chose a pale yellow.

The liner is pretty intense so if you need extra guidance on wings, I talked covered my method in the 1950s. (1.) Start with a thin line of eyeliner right at the lashline. (2.) With your eyes open, looking straight into the mirror, draw out an upward swinging triangle on the outside of your eye and fill it in. (3.) Take a thin angled brush with black or dark brown shadow, smooth the liner and connect the wing with your lower lashline with what is left on the brush. (4.) Finish the eyes up with a few coats of black mascara and, if you like, go into the upper waterline with black liner.

Contouring wasn’t big in 1960, but sculpting with blush certainly was. Take a warm blush and go over the tops of your cheekbones and below them all the way to your ear.
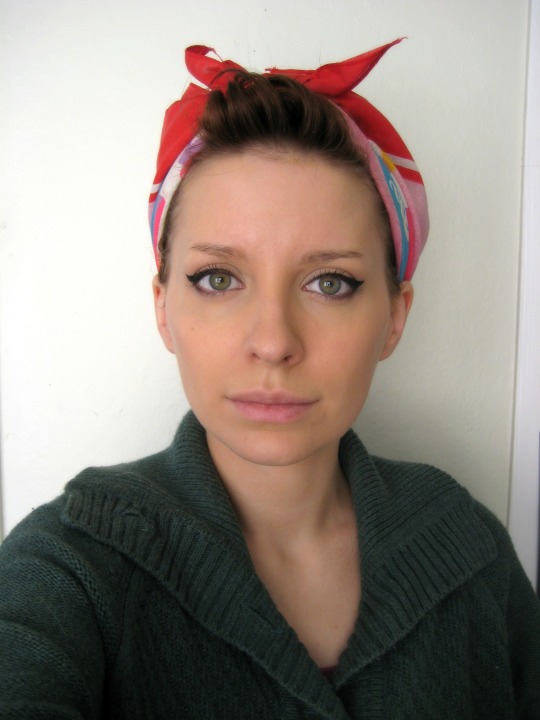
Marianne’s eyebrows are strong but relatively straight. I took a warm brown pencil to draw out the whole shape then softened it with light brown powder and a clean spoolie.
Go back into your eyeliner and, with a small pointed brush place a beauty mark on top of your left cheekbone but below your eye.

Marianne’s lips are full and overlined a little to soften the lipline. Go in with a coral pink liner and round out the shape of your upper lip, particularly making sure the cupid’s bow is obscured. On the bottom lip, draw inward a little at the edges to focus the fullness on the middle of your lip. Then fill in your lips with a glossy coral pink lipstick or lipgloss if you feel that it’s too much with the eyes and cheeks.

If you wanted to glam it up further, long wispy false lashes would be perfect.

If you have the hair to properly recreate Marianne’s style, this Loepsie tutorial will serve you well.
The 1910s | The 1920s | The 1930s | The 1940s | The 1950s | The 1970s | The 1980s | The 1990s | The 2000s
#A Century of Glamour Ghouls#horror#horror movies#horror film#hammer films#hammer horror#the brides of dracula#brides of dracula#yvonne monlaur#British film#movie#film#classic film#glamour#glam#vintage#vintage inspired#true vintage#1960s#1960s fashion#1960s movies#makeup#makeup tutorial#fashion#halloween#halloween costumes#closet cosplay#instructional#costume#cosplay
270 notes
·
View notes
Text
Master List: Garments you can make from commercial patterns with little modification
I’ll update this as I remember to.
I’ve talked about it before, but it’s a good idea, when making your first lolita dress, to find an existing dress by a major lolita brand, and copy as much of that detailing as you can. How to apply lolita detailing is a skill that you have to learn, and learning by copying is a well-established practice. The first time you draw a human, you use a model. This doesn’t mean you’re not an artist. The first time you make a lasagna, you use a recipe. This doesn’t mean you’re not a cook. If you use a reference garment the first time you make a lolita dress, it doesn’t mean you’re not a designer.
So here’s my current favorite patterns, and then I’ll go into some garments you can make with these patterns by just copying the trim and fabric choices (and occasional small adjustments like changing out a ribbon bow for a fabric one, etc, omitting waist ties, etc)
The main patterns that I find that are particularly useful for lolita, in no particular order:
Dresses:

Cosplay by McCall’s Manikin M2035: Narrow-strap JSK with back shirring and tiered skirt, overskirt with optional boning (worn to give bustle effect in the back); blouse with flat collar, front tucks, and back lacing. Also instructions for a scarf in case you don’t know how to sew a rectangle.

<Edit: I had Simplicity 8671 in here for dresses, but couldn’t find good examples of that cut in actual lolita, so that was about 2 hours of work for nothing (I’m on hour 7 of writing this post as of the time of this edit). However, since I reference the blouse down below, here’s the image Simplicity 8761 is a high-waist dress with either a sailor collar or a V-cut princess seam front, and a high back. Pattern also includes a simple sheer blouse>

Simplicity 8444: The infamous Simplicity 8444. Two princess-seamed JSK patterns with full back shirring. One has front opening for front bustle, and shirred center front underbust. Two blouse cuts with standing collar and lace back. Bustled underskirt has ruffles only on front half, and attaches with fabric ties. I’ve tried to use this pattern before and if you’re having trouble with it, it’s the pattern, not you. Was released with the now out-of-print accessory pattern. The accessory pattern is utter garbage in all views. This pattern is slightly controversial and if you love drama, you should check out the story behind it. This pattern was “designed” by the same woman who did 8671, and if you’re wondering how her knowledge of lolita got significantly better all of a sudden, it’s because these designs are stolen. Major pattern houses often steal designs from major designers, and that’s legal, but it’s emotionally much worse when they’re stealing from indie designers.
This is getting long, and I haven’t even gotten to dresses that match these patterns, so here’s a jump to save your dash:
<jump!>

New Look 6390, view C: Sleeveless dress with front and back princess seams, no shirring, back zipper, band at waist. Flared skirt. This pattern can turn any lolita skirt tutorial into a JSK.

McCall’s Costumes M6187: Gathered skirt with attached apron, puff sleeves and sleeve ruffles, attached waist ties. This pattern comes in children’s sizes, so if you want to make lolita for kids, this is your pattern. Also works for adults. Pieces need to be omitted but no extreme modifications.
EDIT: Simplicity 8127. I forgot Simplicity 8127.

A-line dress with an underbust seam and optional slip and waist ties. This one’s out of print but still available 3rd party.
Skirts: There are fewer entries in the skirts category because there’s approximately forty-six thousand, eight hundred and seventy six lolita skirt tutorials out there.

McCall’s M7439, view C: Gathered skirt with shaped waistband and ruffle. Back zip, no shirring. I have made this and fit a petticoat under it pretty darn decently well. If you don’t like the waistband, you can take the one from View F and use that.

Cosplay by McCall’s Nightfell Herbalist M2110, view B: Gathered skirt has back zip and built-in petticoat. For the subtypes of lolita where long skirts are accepted/expected, or for shortening.

McCall’s M7184: Flared skirt has high, princess-seamed waist and cross straps. Back zip. Another one if you’re making it for kids, also matches many high-waist skirts and underbust JSKs
Coats:

McCall’s M6800: Flared coat has options for detachable fur collar or hood. High neck option. Front button, and it’s got pockets, folks.
Blouses:

Already mentioned: M2035 (Manikin), Simplicity 8671, Simplicity 8444. M2035: buttons in the front, has tucks, a flat collar, gathered elastic sleeve cuffs and back lacing. 8671: designed for sheer fabrics, has elastic sleeves cuffe, a gathered neckline, and back zip. 8444: Short puffed sleeve and long bell sleeve variations, stand collar. Really crappy instructions provided in the pattern None of these will get you the perfect lolita blouse, but they’ll all get you a usable one, provided good fabric and trim choices.

McCall’s M7071: Front darts, bib-inset, puffed sleeves in bands, stand collar, and back zip. There’s tons of lolita blouses styled like this, but not constructed like this. Putting in a back closure makes assembling the inset and collar MUCH simpler, so good blouse for beginners.

New Look 6599: Back lacing, puff sleeves, neckline options, trim placement lines. This pattern’s out of print but still available third-party. You either need to do a mod that I’ve already done a tutorial for, or combine view A’s neckline with view D’s sleeves to get a blouse for wearing with skirts.

Vogue V9331: Loose-fitting front-button shirts with rounded collar and hime sleeve options. This is the kind of thing that works out a lot better under a JSK than with a skirt, but the collar and sleeves are both acceptable.
Blouses are tricky, because there’s many patterns that work with small modifications (tutorial for changing collars here), or patterns that work in very specific contexts. I know I’ve done a post before about how the starter handmade lolta should buy their first premade blouse instead of buying a dress as the first thing, but tumblr’s search function is being annoying and won’t let me, you know, search. But that’s 6 blouse options that will all work in at least one lolita-specific area.
So, now that you can get your hands on one or more of these patterns, here’s some items that you can more or less copy the styling of when you make a garment out of them.
I have written about half of that and I’ve been working on this post for over seven hours, so it’s going to be its own post. That’s the exact opposite of what I wanted to do (contextualize modern patterns into lolita styling), but my draft box has a tendency to eat posts and I don’t want all of this work to vanish (especially because all of those images are collages I had to freaking compile myself). But this post was also supposed to take about an hour and here we still freaking are writing this post, and I really wanted to get stuff done today. So I’ll get this done tomorrow. ...
Meanwhile, elsewhere on this blog:

The second half of the JSK resizing post is approaching one year of me not having finished it.
I’m so bad at this blogging thing.
#master list#lolita fashion#sew lolita#handmade lolita#resource#this is LONG and it took FOREVER#and is taking forever#20dollarlolita quality posts
453 notes
·
View notes
Photo

I had an anon question as well as an earlier question on wordpress that I will answer here together as they are kind of related.
1. I saw an early 19th century painting which showed women in a blouse and sari. I always thought blouse was introduced by Jnanadanandini Devi?
I think some sort of blouse (and possibly a kind of petticoat given ghaghra cholis and related outfits) was always around. Even Ajanta paintings have a few examples. This early 19th century painting is an example of it too:

But I think the formal kind of blouse, often influenced by prevailing Victorian fashion, and the petticoat worn with a sari did come in with both styles in Western India as well as in Bengal in the 1870s. A few books of the time and later refer to shops selling “jackets” which term seems distinct from the choli.
The early 20th century Dhurandhar painting right on top shows differing blouse styles, from the indigenous choli to the modified choli with puff sleeves as well as more elaborate versions which are obviously Victorian in origin suggesting a variety of styles after the 1870s. In summary I think the sari blouse was around but not essential. Especially in the hotter areas of India where a sari sufficed. From the 1870s onwards, however, it became an essential part of attire for educated women and then all women.
2. Several months back I had a query regarding Jnandanandini Devi’s introduction of the Brahmika (Brahmo woman) drape from Sari Sisters. The query was on the difference between the Brahmika drape and Classical Bengal drape and whether the only difference was in the pleats on the shoulders.
At the time I assumed that there wasn’t much difference between earlier sari drapes in Bengal and the Brahmika saree. But the question stayed in my mind and I had some time this weekend to poke around a bit. Not much came up. Though everyone agrees that the Brahmika drape was novel and inspired by the Parsi/Gujarati drape that Jnanadanandini saw in then Bombay, the exact nature of the earlier drape is not clear. Instead there is more emphasis on the introduction of accessories like the blouse, petticoat, hair net etc, which assisted in making the saree a dress for a bhadra (respectable) woman. Nevertheless there was some change since there are many remarks both on the untidiness of draping as well as the immodesty of previous drapes.
The only clear reference I got was in Rochona Majumdar’s book (Marriage and Modernity) where she mentions that the traditional style is the pallu (end of the sari) wrapped around the waist or hanging in front rather than the pleats of the Brahmika saree. As it happens there aren’t too many pre 1870 pics that I could find except these.

Rabindranatha Tagore’s mother on the left (presumably an older style, though it isn’t clear to me if the pallu is tucked around the waist and also on the shoulder). On the right a milkmaid of the 1840s, this drape has some resemblance to the Brahmika style but has no pleats and is simply wound around.

The Parsi/Gujarati style is seen above which is the seedha (straight) pallu style with the sari being secured on the right shoulder.

The Brahmika/Bengal styles are above. The style arranges the saree border in a way that mimics the seedha pallu (more evident in the left pic of girls in 1904*) but the pallu is eventually thrown over and secured at the left shoulder. So it does appear that the sari sisters were right in that process of pleating and arranging the sari in the upper part was probably different for the Brahmika saree (though some of the modern Bengal saree drape tutorials have a bit of a pleat arrangement in the bottom part too. Further the loose end can be thrown over the right shoulder).
As always feel free to comment/inbox and do let me know if Bengal has more draping styles or if there are differences I missed.
*1904, courtesy Geraldine Forbes.
108 notes
·
View notes