#photoshop without download
Explore tagged Tumblr posts
Visit Tumblr Blog
Explore Tumblr blogs with no restrictions, modern design and the best experience.
Last Seen Tumblr Blogs


Fun Fact
The Tumblr app for Google Glass was released on May 16, 2013.
Text

' new woman | lisa ft rosalia psd. you can buy it here.
#32#dark indie#weheartit#aesthetic#have a nice day#couple#indie#psd#psd coloring#psd commissions#rp psd#psd kpop#blackpink psd#psd color#psd icon#psd download#psd icons#psd resources#psd files#coloring psd#rosalia#rosalia psd#psd malamente#malamente#photoshop psd#icons without psd#icons sem psd#deviantart#psd deviantart
344 notes
·
View notes
Text
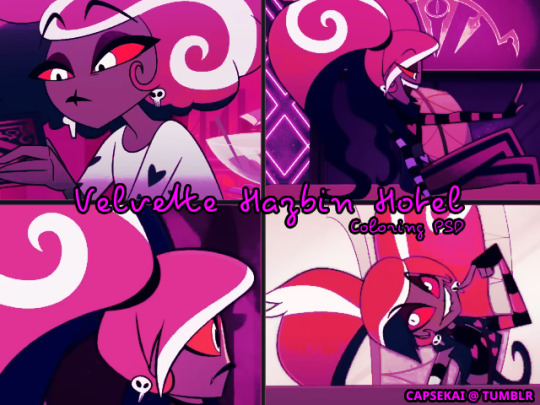
VELVETTE - HAZBIN HOTEL COLORING PSD
We've been learning to do ADJUSTMENT LAYERS! (yes , thats right I grew up with photoshop 5.0 when we didn't have these.)
This is a FOREVER FREE and not in our ko-fi :)
Credit & Reblog where possible, not because we're gatekeeping you - but because it's sharing is caring!
Clearly we don't OWN the Goblin Queen images, but we are capping parts of the show again to prep for more icons!
To those waiting on requets: We gotchu, it just takes a while beyond our normal stuff to organize them - and Dusk (the one writing this) has CPTSD, and has been sort of running themselves ragged XD
YOUR FILEGARDEN LINK TO THE PSD!
If you'd like to support us financially you can choose to support either Dusk or Earth via these links:
EARTH - https://ko-fi.com/earthnicity
DUSK - https://ko-fi.com/duskfallcrew/

#rp resources#psd#coloring psd#carrd resources#rentry resources#icon#rp icons#capsekai#capsekai resources#rp psd#psd coloring#character psd#icon psd#psds#icons without psd#icons sem psd#psd download#free psd#photopea psd#coloring#art aesthetic#hazbin hotel velvette#hazbin velvette#velvet trolls#velvette x reader#velvette fanart#color themed#roleplay resources#free rp resources#adobe photoshop
22 notes
·
View notes
Text

PSD COLORING #SATANLY97
❪ * uso personal y comercial.
/ personal and commercial use
BUY THE PSD HERE
PSD SATANLY99 - Payhip
if you need help feel free to tell me on twitter , @_brujadelnorte
#edits#edit#icons#edit requests#template psd#coloring psd#psd download#free psd#psd#psd coloring#icons without psd#editing resources#rp resources#coloring#coloringpsd#photoshop#dailyicons#reqs open#request#layout requests#kofi commission#ko fi support#buy me a kofi#commission#gif commissions
7 notes
·
View notes
Text
prosecco and painting tonight. i want to finish two illustrations tonight... will it be epic win or epic fail? keep me in your thoughts please 💌
#one of them is for my mom's bday which i need to print but its so stressful. printing illustrations should not be this complicated#also i still need to find a reliable rgb -> cmyk converter without having to download fucking photoshop....#pogaduchy
10 notes
·
View notes
Text
.
#are y'all using photoshop to make your icons oooor is there an easier way#for example theres a free icon pack i want to use but it says i gotta download it but like where do i edit it once i download it ahahaha#or is there a simple way to make your own icons without having to pay for any fancy editing software#pls help#but then again do i even want to use icons ya they look great but the effort man#i don't got it
2 notes
·
View notes
Text
Hey everyone it seems there a malicious individual trying to hack the sims cc community again and fill it with malware you need to stay vigilant as a creator and a downloader so
i have some tips for both to stay safe while downloading:
1- sims cc file extension is always .Package never download anything that is .exe
2- do not auto unpack zip files and rar files into your mods folder directly, open each zip or rar individually check the file extensions and drag them to your mods folder one by one
3- the only mods that have a .ts4script extension are ones that affect gameplay or how the game works, understand that if you are downloading cas or bb items you shouldn't have a .ts4script file
4- if you are downloading gameplay mods that do have .ts4script make sure that A) the creator hasn't announced on their pages that its infected B) you are downloading from a link provided by the creator of the mods themselves not something off of google or a link you got sent and make sure dates of upload match dated of announcements
5- if the mod or cc creator has retired and hasn't posted for a while LOOK AT THE DATES OF THE UPLOAD if it has been "updated recently" after the creator has left the community its most likely re-uploaded by a hacker and infected
6- download mod gaurd by Twisted mexi and keep it updated and keep your windows defender or malware detector Program up to date and always running do not disable it
7- make sure everything you download comes from a direct link from the cc creator, in this day and age do not trust link shortners, adfly, linkverse, etc get the universal bypass extension and ublock extension to stay safe but genuinely NEVER CLICK ON THOSE no matter how much the creator reassures you its safe it. is. NOT.
8- this is more of a general saftey precaution but, create a system restore point weekly before you run the game with new mods that way if anything happens you could have a chance to restore your windows to an earlier date before you downloaded anything.
9- BACK UP YOUR SHIT im serious right now either weekly or monthly put your files somewhere safe like a usb a storage card a hard drive even an online cloud if you dont have any of the previous.
10- files you should back up are your media from games and media everything else, any mods, games saves, work files, passwords, saved bookmarks, any documents txt files word files pdfs, links you saved, brushes or actions for Photoshop if you have any, any digital bills or certificates if you have any, and keep a physical list of all programs you have installed and where you installed them from
11- turn on any 2 factor authentication and security measures for any account you have
12- google and firefox have the option to check your paswords and emails against any data leaks USE THIS FEATURE and change any leaked passwords
13- regularly check your logged in sessions to make sure all the logged in devices or computers are yours and log out any that aren't and any old devices or unused sessions do this for every website and app you have an account on if available
14- change your passwords often. I know this is a hassle i know its hard to come up with new passwords but changing your passwords every few months will help you against anything mention previously that wasn't detected.
15- and as a cc creator check your cc and the accounts you host cc on and its uplaod and update dates make sure nothing has been changed without your permission :(
16- generally try not to get swept up in the "i must get it" fever you do not need to "shop" for mods weekly or monthly you do not need to download everything by that one creator you do not need to download new cc everytime you want to make a sim, im guilty of this so i know how hard it is to resist but take a breath and think "do i want this or do i need it" before downloading.
These are prevention methods i cant claim they are 100% will prevent any hacking but its better to be safe than sorry and these do keep you safe so
Brought to you by someone who has had their laptop ruined and data leaked from downloading cc once upon a time
878 notes
·
View notes
Text
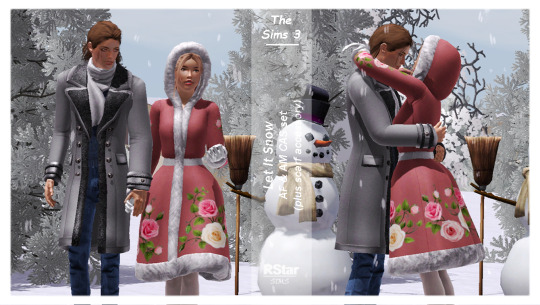
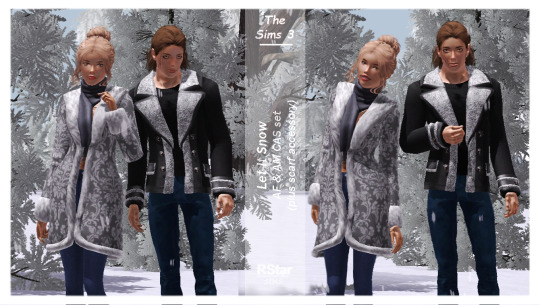


TS3 - Let It Snow (F&M CAS set)
General details-CAS:
Original meshes by me;
Age: young/adult females & males;
Base Game compatible;
All LODs & Morphs;
Disabled for random;
1k & 2k textures;
Normal maps included;
Custom thumbnails for both Launcher and CAS;
sims3pack & package files;
Compressed;
Meshed with Blender, adapted to TS3 with Milkshape, Photoshop, Corel painter, TSRW.
► Hooded Coat -AF
Poly: 5.0k
Outfits section;
2 presets, 3 recolorable channels (first preset with the flowers stencil, the 2nd one without);
Valid for maternity;
Categories: Everyday; Formal; Outerwear.
► Open Coat - AF
Poly: 5.0k;
Tops section;
2 presets, 3 recolorable channels (first preset has a top underneath the coat, the 2nd one doesn't have anything so you can add accessory bras or tops. Or leave it as it is 😁 );
Valid for maternity;
Categories: Everyday, Formal, Outerwear;
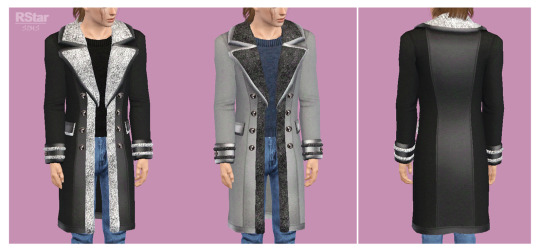
► Long Coat - AM
Poly: 6.2k;
Tops section;
2 presets, 4 recolorable channels;
Categories: Everyday, Formal, Outerwear;
► Short Coat - AM
Poly: 5.7k;
Tops section;
2 presets, 4 recolorable channels;
Categories: Everyday, Formal, Outerwear;
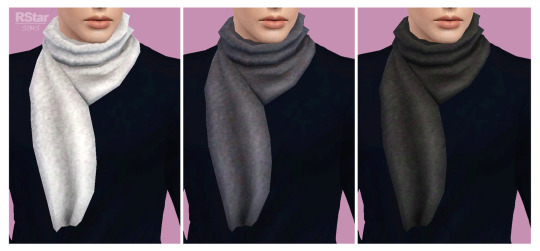
► Scarf - AF& AM
Poly: 0.7k;
Accessories/Necklaces section;
3 presets, 1 recolorable channel;
Categories: All;
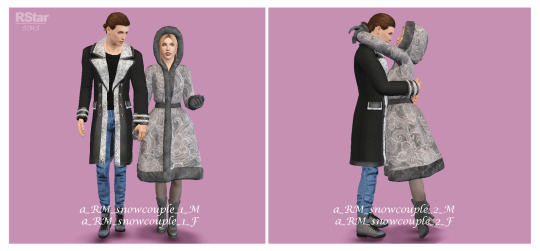
► (Micro)Pose Pack - Snow Couple
A tiny pack containing 4 poses;
Might need further placement while holding down Alt as the poses don't snap together properly;
Requires Pose Player;
Pose Player list compatible.
———————————————
Creator Notes:
1.There's shininess present on the scarves and the female open coat in CAS. They all look fine in game though.
2. For the female coat with the hood I recommend using close-to-scalp hairstyles. Some short hairs work too; but big, fluffy hairs will clip through. The hood might get a bit screwy with more ample head movements. Also the back of the coat might sometimes clip through the legs when sims are crouching.
3. Scarves:
there are 2 separate files (one for each gender), as they're shaped differently in the chest area.
both scarves work with all the open coats.
———————————————
Download on PATREON (Early Access; public on February 21st, 2025)
Hope you enjoy them!
Thank you & Happy Simming!
———————————————
You can also support me on Ko-fi.
———————————————
Thank you to my supporters on Patreon & Ko-fi!
———————————————
TOU 🔊 Do not re-upload my creations. Do not claim as your own. Do not put them anywhere up for download and don’t add adfly to my links.
#ts3#ts3 download#ts3cc#sims 3 custom content#ts3 cc#ts3 clothing#ts3 female clothing#ts3 female outfit#ts3 male clothing#ts3 male top#ts3 female top#ts3 accessory#ts3 accessories#clothing#accessories#ts3 poses#ts3 simblr#sims 3 clothing#sims 3 female clothing#sims 3 male clothing
530 notes
·
View notes
Text


instagram story template by seulvgi
important info: › used font: roboto › you will get one psd (1.8 MB) with a lot of folders that tell you where to put everything. › to use this template you need basic knowledge of photoshop (how to make a clipping mask and change text). contents: › four options for the number of stories one, two, four or six stories. › two options for location. › four options for music. › two options for tags. › a verification option, close friends and reels. notes: › please 𝙙𝙤 𝙣𝙤𝙩 claim as yours. › this is a paid template so please 𝙙𝙤 𝙣𝙤𝙩 share the link without informing me. › please 𝙙𝙤 𝙣𝙤𝙩 mix some elements of this template with other templates.
that's it! enjoy tatlımlar! download ($3)
#Psd Template#template psd#premium psd#Photoshop Template#lookbook psd#paid psd#paid template#supportpaidcontent#ig story#instagram story#instagram story template#the sims 4#simstories#the sims#sims 4#sims 4 screenshots#ts4 simblr#ts4#the sims4#simblr#mycc
1K notes
·
View notes
Text
Chiho Saito’s 1999 Revolutionary Girl Utena Original Illustration Collection
IT’S HERE. IT’S DONE. IT’S FINISHED. NOW…IT’S YOURS. Happy Holidays, my friends.
Vanna here! I have posted some already about this project, and the responses I got, public and otherwise, have been absolutely incredible. Y’all have been reblogging and hyping this before it even finished…I haven’t felt so encouraged about an Utena project since the musicals! (Yes, streams soon, I promise.) You can read the other post to get more details, and catch my post here with more details about the process if you’re interested. The long and short of it?
This is the first artbook I ever scanned. I did it in 2001. In Photoshop, using multiple scans per page that took hours to process. But it was 2001. A half megabyte file that was 1250px wide was considered extremely hardcore and impressive. That’s just always been the business I’m in when it comes to Utena art, you know?
It’s now the latest artbook I’ve scanned, and so much of the process, and effort involved, is unchanged. What has changed, is the result. Welcome to your new desktop background. Your new phone background. Your new poster print.

What I’ve done here is attempt to create definitive digitized images of Chiho Saito’s work as offered by this book--I have removed the print moiré of the original scans, and used my literal decades of experience to try and tease out as much information from them as possible. Without being physically in front of the original artwork (which is a thing I’ve had the great fortune to get to do) this is The Most Chiho Saito you are ever going to get. I’ve tried my best to make sure there is a way to get it that works for everyone:
Do you just wanna scope 'em out? Look at some disaster gays? Grab your favorite one or two? This is the path for you! Check out the ‘compressed’ (not very) 10k ‘web friendly’ (not really) copy at the Bibliothèque, the media archiving wing of the Something Eternal forums at Empty Movement*. All the following links are also available from here. Do you want these copies? All of them? Don't just grab them individually, friend. This batch is 375MB and can be downloaded as a zip of the individual files here on our Google Drive.
Do you like digital archiving? Are you looking for a copy that preserves the archival quality of the effort but sits nice and comfy in a single file? This is for you. A minimally compressed 10k, 513MB version worked into a PDF is now up, shiny and chrome, on the Internet Archive. Do you like the idea of the minimal compression, but want the individual files in a zip? Yep I did that too, here's the drive link.
Are you looking to print these in a larger size? This is probably the only reason on Earth you’d ever want them, and yet a bunch of you are going to go straight for these. Here are the zero-compression JPG full size copies, most of them are 15k across, like simply a ridiculous size. Pick your fave and download it from our Google Drive!
I am genuinely really proud of this work.** I was able to tease out so much new detail from these…her incredible layering techniques, the faintest brush of her highlights, and the full range of her delicate hand at whites and blacks… details commonly lost in digitization. I sincerely hope you find something here that you’re looking for, as an artist looking for inspiration, as a weeb looking for a desktop, as an archiver excited to see incredible 90s manga artwork saved forever in the digital realm. I feel like I have already said so much about them, and could keep going, but you know what? This work speaks for itself. Enjoy, use, explore, and definitely tell us what you think!
We love y’all. ~ Vanna & Yasha
* AHEM ASTERISK AHEM
You might be wondering what any of that is. Something Eternal? Biblewhatawhat??? EmptyMovement.com? You might even have done a double take at the word ‘forum.’ And you should!!!
I have a confession. This artbook was my ‘side project’ as I worked on this, *the main project.* For a couple years I’ve been banging around with a new domain, and originally I had other plans for it, but Elon Musk ruined my Twitter and Discord is well along on its way to enshittification, and well….we joke on the Discord a lot about ‘reject modernity, embrace forums’ and you know what? We’re right. So Yasha and I are putting our money where our mouths are once again, and doing something insane. We are launching, in 2023, a website forum. Obviously, this is not the official ‘launch’ per se, but I cannot announce the artbook without directing you to the forum, since it sits on the attached very cool gallery system. Oops! Told on myself. Another post more focused on the forum will be forthcoming, but if you are just that motivated to get in right away, you absolutely can! (This will help stagger new arrivals anyway, which is good for us!) If you would rather wait for the ‘official’ launch, by all means that’s coming, including a lengthy screed about how and why we’re doing this. In either case, remember: this is a couple weebs trying to make internet magic happen, we are not website developers by trade. Give us grace as we iron things out and grow into this cool new website thingie…hopefully along with some of you! :D
If you do join up, naturally, there is a thread about this project!
** If you like this kind of content, consider helping us pay for it! We do have a Patreon! If you’re wanting to use these in some public-facing distributive way, all we ask is for credit back to Empty Movement (ohtori.nu or emptymovement.com, either will work.)
I would like to say ‘don’t just slap these files on RedBubble to get easy money’ but I know that saying this won’t effectively prevent it. Y’all that do that suck, but you’re not worth letting it rain on the rest of this parade. :)
#revolutionary girl utena#utena#rgu#sku#empty movement#chiho saito#90s manga#digital archives#manga aesthetic#shoujo kakumei utena#utena art
2K notes
·
View notes
Text
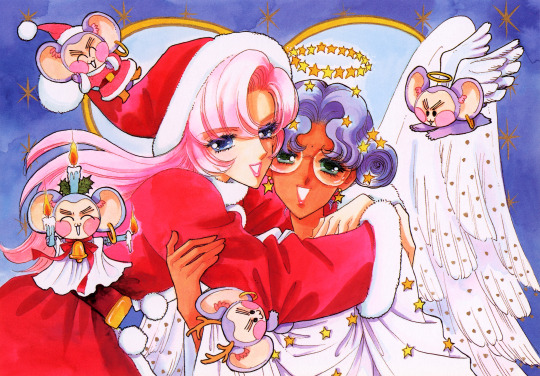
4t3 Conversion of Grouped posters by @cosmiccs4 + Recoloring PSD with tutorial
8 non-recolorable presets
1024 textures
Included PSD for retexturing (tutorial how to use under the cut)
113 poly, all LODs
Shiftable
Price - 5§
BGC
Compressed package
TOU, Ko-Fi
DOWNLOAD | ALT | SIMBLR.CC
Tutorial: How to use my PSD for retexturing
You need:
Photoshop with .dds plugin
My retexture PSD and package file of posters
19 pictures to your liking, preferably vertical
TSRW
Sims3Pack Multi Installer and Compressionizer
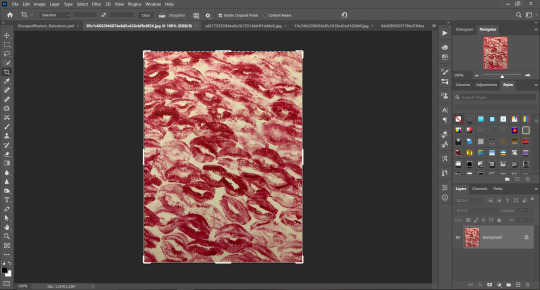
Step 1: Open my PSD file, open your images:
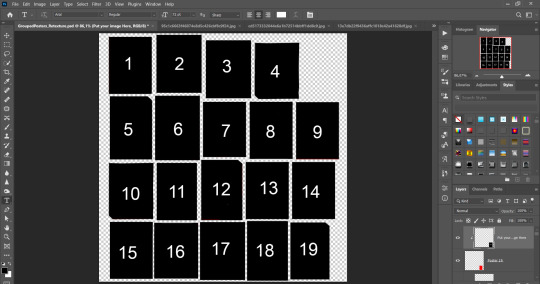
Step 2: Select (Ctrl+A) copy and paste to posters file (Ctrl+C, Ctrl+V) first of your images :
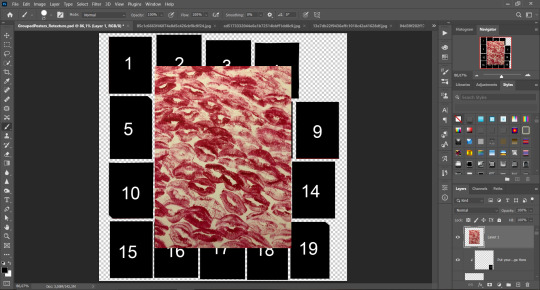
Step 3: Choose where you want to put it, for reference you can use one of the presets:
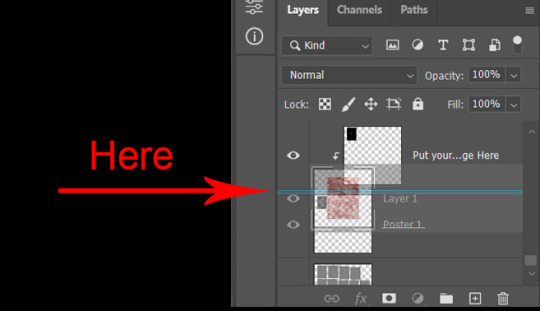
Step 4: After you decided with placement of your image. Move its layer in the Layers tab between "Poster x" and "Put your image here" layers, it will create a clipping mask, which allows the picture to be fit within the poster without cropping. Hide or delete "Put your image here" layer.
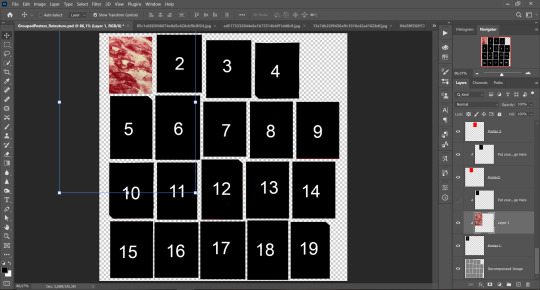
Step 5: Use Transform, Free Transform and Move tools to resize the image by your liking:

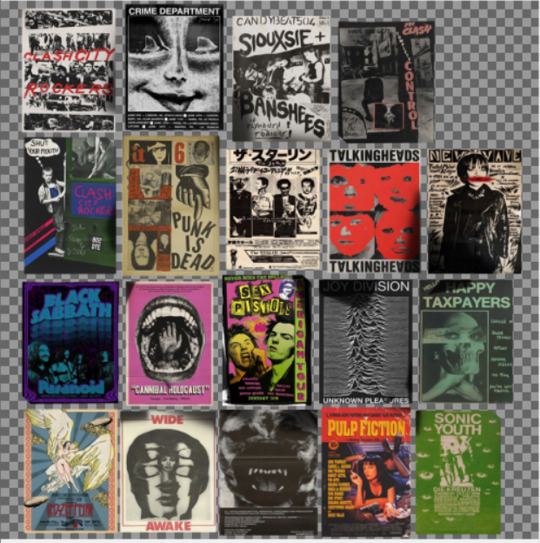
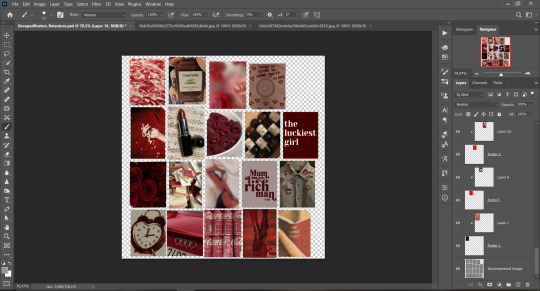
Step 6: Repeat the Step 2-5 with other 18 images:
*vibes are totally random, all images from Pinterest*
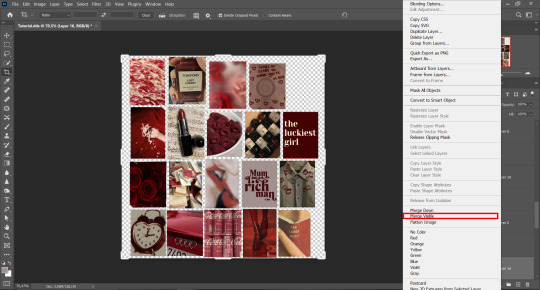
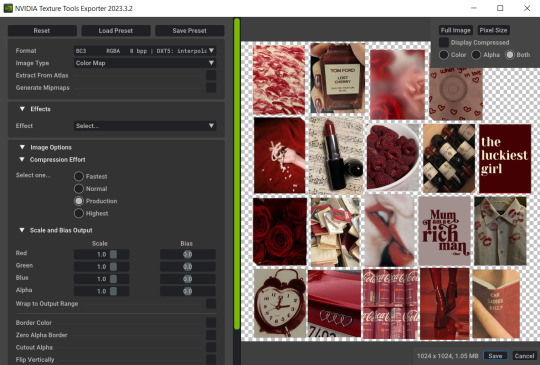
Step 7: After you've done, delete all the "Put your image here" layers, if you didn't it before. Right-click on the Layers tab and press Merge Visible (Shift + Ctrl + E). Now press Save As (Control + Shift + S) and save your image as .DDS with this parameters (2nd picture):
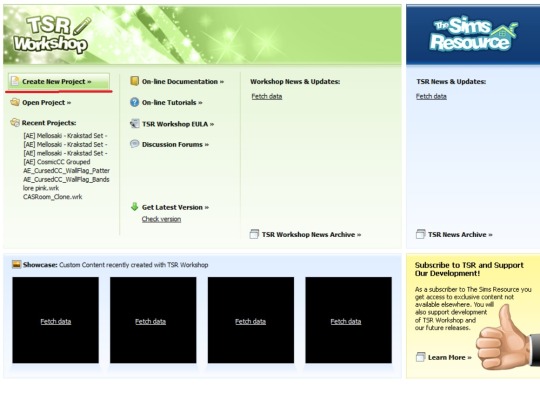
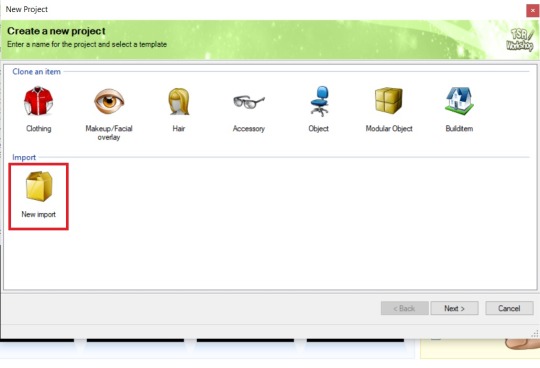
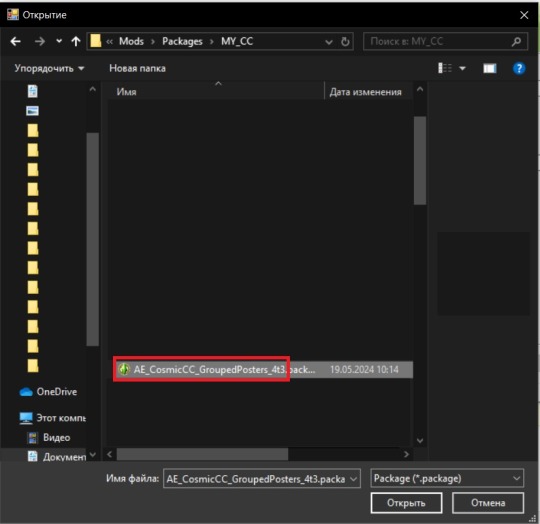
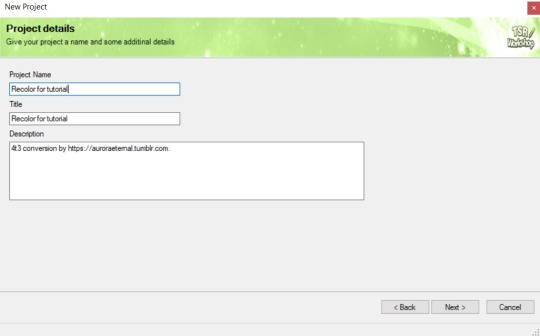
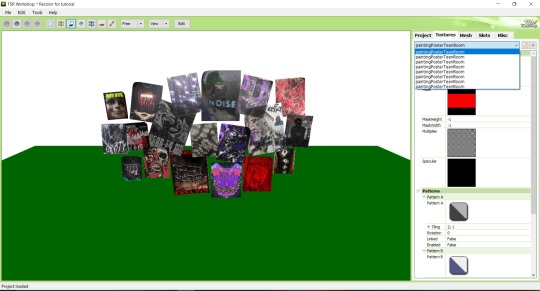
Step 8: Go to TSRW. Press Create New Project > New Import, and select package with my posters. Give for your recolor unique Title and Project name, otherwise it will override original posters:
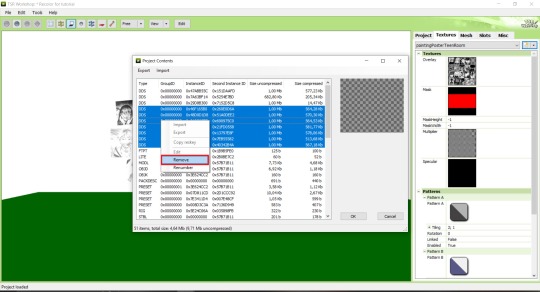
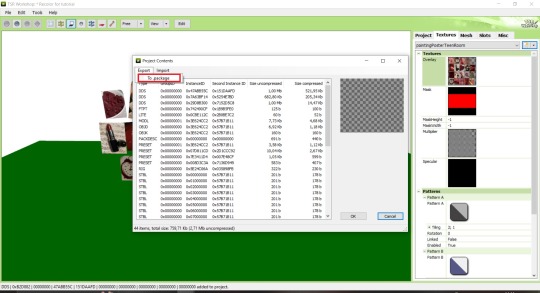
Step 9: In Textures tab go through all the presets except the first one and delete them. Then go to Edit > Project Contents and remove all the textures of removed presets. Its pretty common when someone make retexture of TS3 mesh and leave that unused textures in file, which leads to increasing its size:
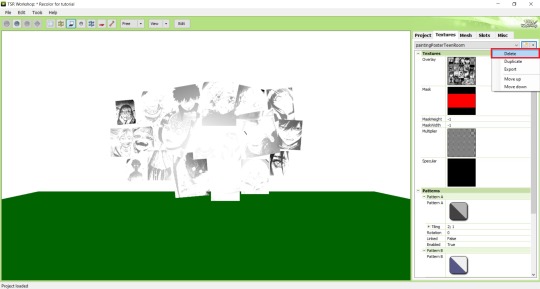
Step 10: Press Edit button next to the Overlay tab. Then press Import button and select your retexture. Press Done and when this pop-up appears, press Yes:
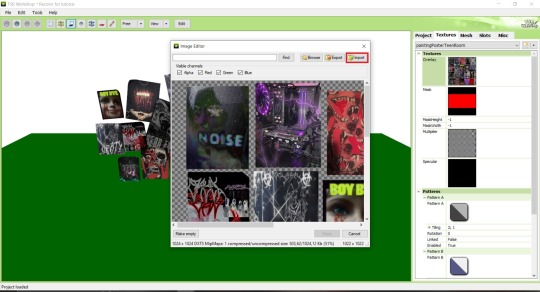
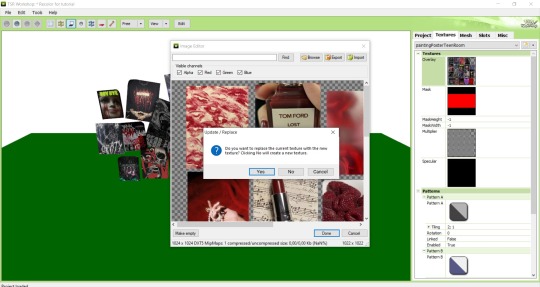
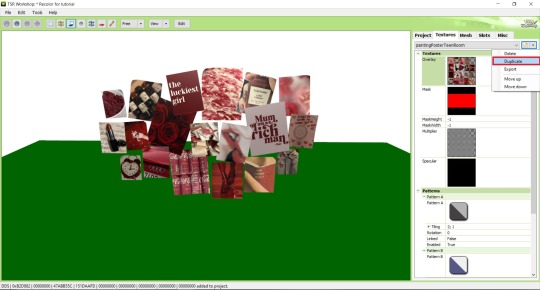
Step 11: If you want to add more presets press Duplicate and reapeat Step 10, but instead, when pop-up about replacing the texture appears, press No.
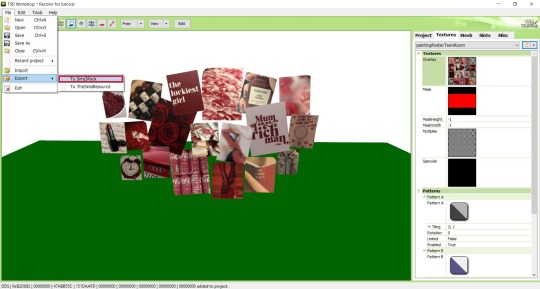
Step 12: After you've done, press File > Export > To Sims3pack or Edit > Project Contents > Export > To .package. If you choose the first method, convert your Sims3pack to Package and in both cases run it through Compressionizer. Test your recolor In-game, make thumbnails (if you want to share it) and have fun!
For those who read this tutorial to the end, click HERE to download this recolor.

@pis3update @xto3conversionsfinds @wanderingsimsfinds @kpccfinds @simfluencer-network @sssvitlanz @simblrcc-site
869 notes
·
View notes
Text

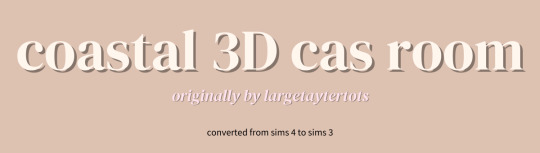
🌊Coastal Cas Room by largetaytertots [4t3]


♡ You can only have ONE cas room replacement at a time
♡ This only replaces the CAS room and nothing else
♡ Will conflict with any cc that replaces the cas room
♡ I am not the original creator, I just converted the cc
♡ I reduced the polycount a bit, ion know if that info helps
♡ The rug has a black 'border' just because when I make it transparent, it kinda messes up.... so beware
♡ Ensure to always read my TOU
♡ Credit has been given to the relevant users/softwares

🌊Coastal Cas Room
🍰Patreon (alt) (FREE)
Feel free to tag me if you use these in your game, I'd love to see it! And if there is any problems don't hesitate to contact me <3

♡ @largetaytertots literally obsessed with everything she does <3
♡ @lalasimmer for the tutorial, couldn't have done it without you lol!
♡ Blender 2.76, Photoshop 2021

Wanna buy me a coffee ☕ or even a slice of cake 🍰, feel free to donate via my ko-fi.
My Ko-Fi Page 🎀
Or sub to my Patreon!
💌 Thank you to everyone who is reblogging and supporting my content! Y'all are greatly appreciated!

♡ PERSONAL USE ONLY: My original cc & overrides are free for personal use in you Sims 3 game. DO NOT redistribute or claim as your own.
♡ CREDIT OF USAGE: If you share my cc in any way, please credit me.
♡ NO PAYWALLS: DO NOT put my cc behind any paywalls or adlinks such as linkvertise.
♡ REDISTRIBUTION POLICY: DO NOT reupload my cc on other sites. Please share my original download links to respect work put into my cc and spread the word.
♡ MODIFICATIONS: If you edit or recolour my cc, and want to share it, please give full credit where it's due.
#cozykhuwa cc#sims 3#sims 3 simblr#the sims 3#ts3#ts3 cas#ts3 simblr#sims 3 cc#sims 3 cas background replacement#sims 3 cas rooms#sims 3 3d cas rooms#sims 4 to sims 3#ts4 to ts3#creator: largetaytertots#dl: overrides
186 notes
·
View notes
Text

COLORING + SHARPENING TUTORIAL
someone asked for a coloring tutorial and my sharpening settings, so here it is! there are also a few tips to achieve more HQ gifs. :)
tutorial under the cut!
FOR HIGH-QUALITY GIFS
FILE SIZES
it doesn’t matter what your sharpening settings are if the file you’re using to gif is too low quality, so i tend to look for the best that i can get when downloading stuff.
usually, movies (+2h) look better if they’re 5GB or more, while an episode (40 min/1h) can look good with even 1GB. the minimum definition i try to find is 1080p, but i gif with 2160p (4k) when available. unfortunately, not every computer can handle 4k, but don’t worry, you can gif with 1080p files just fine if they are big enough. contrary to popular belief, size does matter! which means sometimes a bigger 1080p file is better than a smaller 2160p one, for example.
SCREENCAPPING METHOD
this can too influence the quality of your gifs. as a gifmaker, i’ve tried it all: video frames to layers, directly opening video clips, loading files into stack, and i’ve finally settled down with opening screencaps as an image sequence. with bigger files, it doesn’t matter much what technique you use, but i’ve noticed with smaller files you can do wonders if you screencap (either by loading files into stack or opening as an image sequence) instead of using video clips. for example, this gif’s original video file was only 4GB (so smaller than i’ve usually go for), if you can believe it!

here’s a tutorial for setting up and screencapping with MPV, the media player i use to screencap. again, you can keep using video clips for bigger files, but you’ll find this useful when dealing with dire causes. i don't file loads into stack, though, like the video does. i open as an image sequence (open > screencap folder > select any image > click the image sequence button). just select OK for the speed. this will open your screencaps as a video clip (blue bar) in timeline mode (i'm a timeline gifmaker, i don't know about you). you will need this action pack to convert the clip into frames if you're a frames gifmaker. i suggest you convert them into frames even if you're a timeline gifmaker, just convert them into a timeline again at the end. that way you can delete the screencaps right away, otherwise you will delete the screencaps and get a static image as a "gif".

ATTENTION if you’re a Mac Sonoma user, MPV won’t be an option for you unless you downgrade your system. that is, if you have an Intel chip. if you have M1 Max chip (or even a better one), here’s a fix for MPV you can try while keeping that MacOS, because nowadays MPV is skipping frames in its latest build. or you can use MPlayer instead for less hassle. here are two tutorials for setting and using MPlayer. Windows users are fine, you can use MPV without trouble.
FOR EVEN MORE QUALITY
ADD NOISE
here’s a tutorial for adding noise as a way to achieve more HQ gifs if your original material is too low quality.
REDUCE NOISE WITH CAMERA RAW
instead of adding noise, you can reduce it, especially if your gif is very noisy as it is.
the path is filter > camera raw > detail > nose reduction. i do this before sharpening, but only my video file isn't great to begin with. because it’s a smart filter, you can reduce or increase its opacity by clicking the bars next to its name in the layers panel.
TOPAZ AI
i use Topaz Photo AI to increase the quality of my screencaps when i need to. it’s paid software, but there are… ways to find it for free, usually on t0rrent websites. if someone’s interested, i can make a tutorial solely about it in the future.
SHARPENING SETTINGS
here are my sharpening settings (filter > sharpen > smart sharpen). i sharpen things twice: 500% 0.4px + 10% 10px. here's an action for it, for more convenience. here's a tutorial on how to use Photoshop actions. for animated stuff, i use this action pack.

COLORING
here’s the gif i'm gonna use as a base. it’s already sharpened like the way i always do it.

LIGHTNING THE SHOTS
half of the secret of a good coloring is good lightning. i always useCurves (layers > new adjustment layer > curves) and Brightness & Contrast (layers > new adjustment layer > brightness & contrast). the settings depend on the scene you’re giffing, but i always try make my gifs bright and with high contrast to make the colors pop.
CURVES
besides lighting your scene, the Curves adjustment layer has four automatic options that will color-correct it for you. it’s not always perfect and it doesn’t mean you won’t need to do further coloring, but it’s a great start. it’s a lifesaver for most ridiculously yellow scenes. look at the difference! this gif uses the 3rd automatic option (the screenshot below isn't mine btw so that's why the fourth option is the chosen one), from top to bottom. what automatic option you need to choose depends on the gif.


sometimes i like to tweak my Curves layer. not everybody does that, it’s not that necessary and if you’re not careful, it can screw your gif up. to modify your layer by hand, you will need to click and drag points of that straight line in the position you desire. this is the concept behind it:

basically, the lower part of the line handles the shadows, while the upper part handles the highlights of the image. if you pull a highlight point up, the image’s highlights will be brighter. if you pull it down, it will make them darker. same thing for the shadow points. you should play with it to get a grasp of it, that’s what i did when i first started giffing.
BRIGHTNESS & CONTRAST
then i added a bit of brightness and contrast.

CHANNEL MIXER
the scene looked a bit too yellow, so i used the Channel Mixer (layer > new adjustment layer > channel mixer) adjustment layer. here’s a tutorial of how it works. not every scene needs the Channel Mixer layer though, i mostly use it to remove heavy overall tints. in this particular case, the Curves layer got rid of most of the yellow, but i wanted the gif to be just a bit more blue so the Channel Mixer tweaks are very minimal.

SELECTIVE COLOR
now, this adjustment layer i always use: Selective Color (layer > new adjustment layer > selective color). this is THE adjustment layer to me, alongside the Curves one. this is how it works:

ie, you can separately edit a color this way, giving it tints. for this gif, i wanted to make the colors more vibrant. to achieve that, i edited the selected colors this way:

for the reds, i added even more red in them by moving the first slider to the right, making the color more vibrant. for his hat to have a more warm tint, i added yellow to the reds (third slider, moving it to the right). finally, to make the reds stronger, i moved the last slider to the right (more black).
for the yellows, i made them brighter by adding white to them, thus making the tile wall and Paddington more bright as well.
for the cyans and the blues, i just added the maximum (+100) of black that i could.
i wanted for Paddington's nose to be brighter, so i added more white to the whites.
lastly, i added depth to the blacks by increasing their own blackness.
you should always play with the Selective Colors sliders for a bit, before deciding what you want or need. with time, you will automatically know what to change to correct the color grading. it all takes practice!
HUE/SATURATION
i don’t know if you noticed, but there are some green spots on the blue wall behind Paddington. to correct that, i added a Hue/Saturation adjustment layer (layer > new adjustment layer > hue/saturation) and made the saturation of the greens 0%, making that unwanted green disappear from the background.

while the green spots on the wall are specific for this gif, i use hue/saturation a lot to tweak, well, hue and saturation. sometimes someone’s skin is too yellow, i made it redder by tweaking the reds and the yellows, or vice-versa. the hue bar follows the rainbow bar, so the maximum settings (+100 and -100) give the selected color to change its hue to something more red or pink (the rainbow extremities). changing hue can give pretty whacky results, like turning someone’s skin tone to green, so you will need to play with it to get the hang of it. you can also tweak the opacity of your hue/saturation layer to further improve your gif’s coloring. i didn’t do it in this case, the opacity is still 100%. the reds and the blues had their saturation increased to make them pop just a bit more, without affecting the other colors.
COLOR BALANCE
the highlights of the gif still had a green tint to it due to the automatic correction of the Curves layer, so i used Color Balance. this is how it works: instead of giving specific colors some tints, you can give them to the shadows, highlights, and mid-tones. if your shadows are too blue, you counterbalance them with the opposite color, yellow. same thing with the cyan-red and magenta-green pairings. in my case, i added a bit of magenta.


B&W GRADIENT MAP
now, if this gif was a dish, it’s time for the salt and pepper. i always add a Gradient Map (layer > new adjustment layer > gradient map) (black to white gradient) with the Soft Light blending mode, thus giving my shadows more depth without messing with the mid-tones and highlights. it also doesn’t “deep fry” (you know those memes?) the gif too much by adding even more contrast. usually, the opacity of the layer is between 30% to 70%, it all depends on the gif. it always does wonders, though!

COLOR FILTER
finally, i like to add Color Filters (layer > new adjustment layer > color filter) to my gifs. it’s very handy when giving different scenes for the same minimalistic set because it makes them kind of match despite having completely different colors. in this gif’s case, i added a “deep blue” filter, opacity 50% density 25. you can change the density and the opacity of the layer for further editing, again, it all depends on the gif.

VIBRANCE
if i feel like it, i add a vibrance layer (layer > new adjustment layer > vibrance) to make the colors pop. this can ruin your coloring sometimes, especially when regarding skin color, so be careful. i didn't do it in this gif because i felt i didn't need it.
TA-DA! 🥳
AN OTHER EXAMPLE
the color grading of the original scene it’s pretty good as it is, to be honest. let’s see a worse scenario, a VERY yellow one:


no channel mixer this time because the automatic curves option dealt with the yellowness, but you can see it made the gif too green. i needed to correct that with the following adjustment layers:
curves (automatic option) (gif 2) >> same curves layer (tweaks) (gif 3) >> brightness & contrast (gif 4) >> hue/saturation (tweaked cyan+blue+green) >> selective color >> color balance (gif 5) >> b&w gradient map >> (sepia) filter >> vibrance (gif 6)
i added a hue/saturation layer to remove the blues & greens before my selective color layer because i thought that was more urgent than tweaking the tint of all colors. color balance (gif 4) was the real hero here, though, by removing the green tint. the selective color layer was meant to make the red pop more than anything else, because the rest looked pretty good, especially her skin tone (despite the green tint). you can notice that tweaking the curves layer (small gif 3) also helped A LOT with the green problem.
tl;dr 😵💫😵💫😵💫
here's a list of my go-to's while coloring and lightning gifs. it's not a rule, just a guide. there are gifs in which i don't use all these adjustment layers, or use them in a different order. it all depends!
1. curves (automatic option + tweaks) 2. brightness & contrast 3. channel mixer 4. selective color 5. hue/saturation 6. color balance 7. b&w gradient map 8. color filter 9. vibrance
i'll suggest that you study each adjustment layer listed for more info, either with other Tumblr tutorials or YouTube ones. the YouTube ones focus on images, but you can translate what they teach to gif making very easily. you can ask me to further explain any adjustment layer, too! i was brief to keep this short (which i kinda failed lol).
feel free to ask me for clarification or something else about gifmaking wise, i always like to help. ❤️
#*#*tutorials#gifmaker tag#resources#resource: tutorials#ps help#uservivaldi#tuserjen#userrin#userelio#useralien#userzaynab#userchibi#userbuckleys#usertj#userbess#tuserlucie#useraljoscha#userdavid#usershreyu#usernolan#userhallie#userisaiah#tusergio#tusergeo#userjesslynn
714 notes
·
View notes
Text


4to3 - Goth Galore Kit - Net Sleeved Top
No wonder no one else had done anything else from this DLC, there are so many different presets, and I guess I'm the only one crazy enough to go painting by hand the net mask and alpha 💀 (and not happy with that, I just found out that I could've just bake it with thornowl technique in blender 2.79 and it would get just fine without the need to fix it on photoshop, oh well)
For TF-AF
Polycount: 3.6k
Fully recolorable, with 3 presets with different masks (this is why the file is kinda big)
Morphed and all LODs
Everyday, Formal, Career, Not valid for random.
Download: SimFileShare | Mediafire | Simblr.cc
#sims 3#ts3#simblr#the sims 3#s3cc#sims 3 download#4to3 clothing#4to3#4t3conv#4t3#4to3 conversion#sims 3 clothing
504 notes
·
View notes
Text


Gshade preset "Pumpkin spice"
This preset will help to create an autumnal atmosphere in your game with a pumpkin latte flavor ☕️
All screenshots were taken with this preset and without any additional editing (except for additional sharpening in Photoshop).
If you use this preset, don't forget to tag me ❤️
Download: Patreon (free)
235 notes
·
View notes
Text

* ⠀ in the air tonight ⠀ / ⠀ template psd
this is a psd file for character introduction. to use this template you need to have a basic knowledge of photoshop. the file is separated into sections to make editing easier. you can find it via payhip for free, but i will appreciate likes & reblogs. please don't take parts of this template without giving credits.
fonts: old english text, rockwell.
download here: link.
150 notes
·
View notes
Text
Amazon’s recent decision to stop allowing people to download copies of their Kindle e-books to a computer has vindicated some of my longstanding beliefs about digital media. Specifically, that it doesn’t exist and you don’t own it unless you can copy and access it without being connected to the internet. The recent move by the megacorp and its shiny-headed billionaire CEO Jeff Bezos is another large brick in the digital wall that tech companies have been building for years to separate consumers from the things they buy—or from their perspective, obtain “licenses” to. Starting Wednesday, Kindle users will no longer be able to download purchased books to a computer, where they can more easily be freed of DRM restrictions and copied to e-reader devices via USB. You can still send ebooks to other devices over WiFi for now, but the message the company is sending is one tech companies have been telegraphing for years: You don’t “own” anything digital, even if you paid us for it. The Kindle terms of service now say this, explicitly. “Kindle Content is licensed, not sold, to you,” meaning you don’t “buy a book,” you obtain a “digital content license.”
[...]
Amazon is far from alone in this long-running trend towards eliminating digital ownership. For many people, digital distribution and streaming services have already practically ended the concept of owning and controlling your own media files. Spotify is now almost synonymous with music for some younger generations, having strip-mined the music industry from both ends by demonetizing more than 60% of the artists on its platform and pushing algorithmic slop while simultaneously raising subscription fees. Of course, surrendering this control means being at the complete mercy of Amazon and other platforms to determine what we can watch, read, and listen to—and we’ve already seen that these services frequently remove content for all sorts of reasons. Last October, one year after the Israeli military began its campaign of genocide in Gaza, Netflix removed “Palestinian Stories,” a collection of 19 films featuring Palestinian filmmakers and characters, saying it declined to renew its distribution license. Amazon also once famously deleted copies of 1984 off of people’s Kindles. Fearing piracy, many software companies have moved from the days of “Don’t Copy That Floppy” to the cloud-based software-as-a-service model, which requires an internet connection and charges users monthly subscription fees to use apps like Photoshop. No matter how you look at it, digital platforms have put us on a path to losing control of any media that we can’t physically touch. How did we get here?
28 February 2025
134 notes
·
View notes