#photoshop mockup
Explore tagged Tumblr posts
Text


First Fanart | Second Fanart | Third Fanart
For Artists: I will make 3 Frame Mockups For one of your Artworks for Free, Send me an Email at [ [email protected] ]
#frame#anime#anime fanart#fanart frame mockup#frame mockup#okarun#dandadan art#dandadan#dandadan fanart#momo ayase#ken takakura#turbo granny#anime art#photoshop mockup#mockup
30 notes
·
View notes
Text

A High-Resolution Top-View Stationery Mockup for Stunning Brand Design Presentations
Download here.
Follow WE AND THE COLOR on: Facebook I Twitter I Pinterest I YouTube I Instagram I Reddit I ChatGPT
#design#graphic design#branding#mockup#adobe photoshop#photoshop mockup#stationery#templates#adobe stock
2 notes
·
View notes
Text
How to create T-Shirt Mockup in Photoshop
Photoshop basics tutorial video shows how to create T-Shirt Mockup for logo design and graphic design. After creating a 2D graphic design, the quick way to visualize the graphic design is to composite with existing image. In this tutorial, we will use am image and graphic logo image file to merge 2 images together with bending mode. Therefore, we can get the realistic looking for T-shirt design…

View On WordPress
0 notes
Link
Free psd mockup download
0 notes
Text


My concept designs for Formula 1 themed playing cards, based on drivers and their 2024 teams ❤️
#i worked so long on this...def a labour of love but it was fun and im happy w how it turned out!#i used illustrator for all the graphics and photoshop for the image editing and final mockups#graphic design#graphic art#visual design#art#f1 edit#formula one#formula 1#f1#formula one edit#charles leclerc#max verstappen#lewis hamilton#valtteri bottas#oscar piastri#j.exe#j.design
175 notes
·
View notes
Text
𓈒༷♪˚.✧ How to make a mockup like this for smaus, ocs, etc. (step-by-step tutorial ☆ no Photoshop, easy, free) (requested by @lovebittenbyevans) ✿
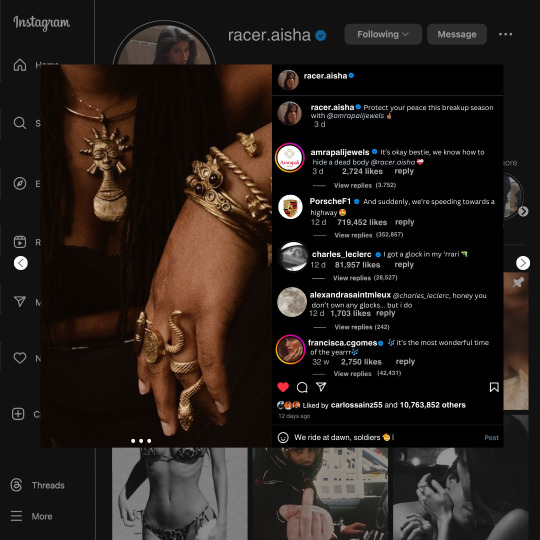
guys this took me two hours to make and you could probably get this done in like, 30 minutes :) I hope this is coherent <3 Please look back this image for comparisons, if my explanation is not well explained, etc.
first of all, if you dont already have one, make a free canva acount. once you're signed in, hit the purple "create design" button on the sidebar. A pop-up will appear with different design template options. For this design, we want the dimentions to be 1080 x 1080, so you can either make a custom size or choose the instagram post (square) template by either searching or scrolling through the list.

2. Now you have a blank page. Zoom in with the slider at the bottom of the page if you need to (Mine is currently zoomed in 41%). Click on the page and change the color to an off black (hex code #111111).
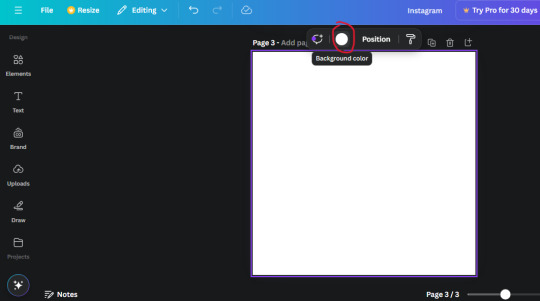
3. Now that the color is changed, click the "elements" tab and search "line". Click the shape and it will add it to the page automatically. These line are particularly hard to navigate and hard to get it at the right angle and length so this part might take a little longer than the rest.
4. stretch it from top to button and turn in a 90 angle so its straight on the left side of the page. Change the color of this as well to a grey tone (hex code #2F2F2F).
5. Now we'll add the Instagram logo. Click the "text" tab then click the purple "add text box" button. Write "Instagram" in the box and change the font to "apricots". This is the closest font I could find that resembled the logo font but if you find a better one, feel free to use that instead. Make the font size 19.3 (you can do this manually or do it in the text options). Change the color to grey color (hex code #707070). Add it to the upper left corner of the page like this:
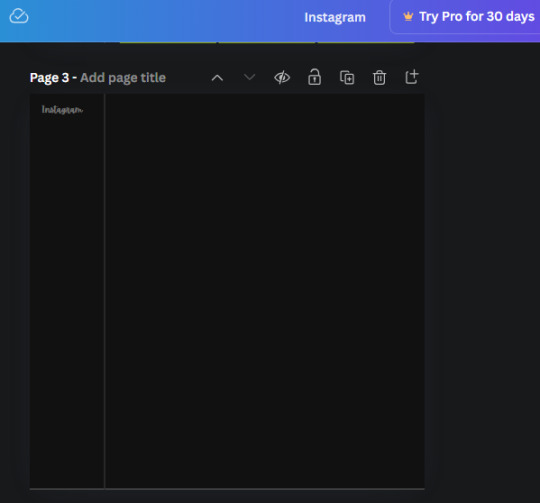
6. now we're adding icons and a menu inside the border we just made. Click the "elements" tab again and search for "instagram home icon" and add the element by sketchify to the page. Click the home icon, an options icon with pop-up above the page. Look for the "Position" button and click it. Scroll to find the advanced options and you can manually type in the width and height at 26.6 and 28.7.
Move it inside the border, under the logo (photo below). Change the color again (the hex code is #707070).
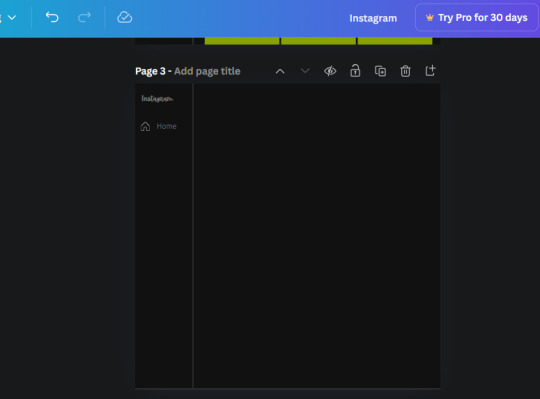
7. Open the text tab and add a text box. Change the font to Canva Sans and write "Home" in the box. Change the font size to 18.1 and align with with the house icon. It will look something like this,
8. Go into the elements tab again and search "instagram search icon". Scroll until you find the one by sketchify and add it to the page.
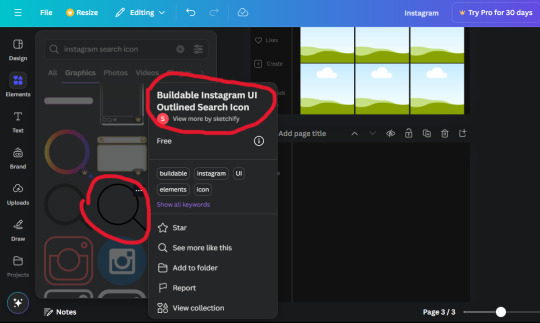
9. Shrink it so the W and H is at 36.6 and 31.3. Move it below the home icon until a purple "67" pop ups and aligns under it. Change it to the same color as the Home text and icon (#707070). Go ahead and Duplicate the the "Home" text box and clicking it and a pop-up will show up then edit the text so it says "Search" and align with the searcch icon we just added.
10. You know the drill. We are continuing to search up more icons in the "elements" tab. Search "instagram compass icon" and choose the one by sketchify (are u seeing the pattern?). Add it to the page and change the width and heigth to 33.1. align it under the search icon just like how we did before and change it to the say colors as the other icons.
11. Do the same as before and write "Explore" in a text box and align it with the icon. We're doing the same thing for all of these.
We'll be using the same search prompt for all of these icons so just change the type of icon you're looking for like we've done before hand. Next look for the Instagram reel icon and add the outlined one by sketchify and change the W and H to 31.2 x 30.9. Change the color to the ones we've used before, align it underneath the icons above and add your text ("Reels").
12. The next icon is an outlined, "sent" one. W and H is 31.1 x 27. The text will say "Send". Then an heart outline by sketchify; W and H is 34.2 x 29.1 and the text is "Likes". Next is the "create" outline icon by sketchify, W and H is 36.8.
(p.s if you are struggling to align the icons and text correctly, shoot me a message and I'll send you the X and Y positions ;D)
If you followed it through, it should look like this,
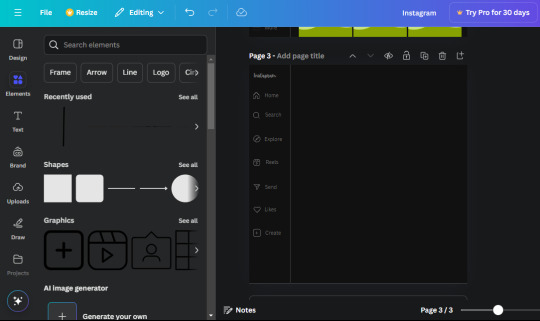
13. Now onto step 13, we'll be adding the Threads logo. You don't have to add this but to make it look more like the actual website, I will be adding it. Open the "text" tab and add a text box. Write an "@" symbol in the box and change the font to Nanum Sqaure and the size to 24.9. Add in the bottom corner below all the icons we just added to our page. We need another text box now (Color is still #707070), write "Threads" and align it to the "@" symbol.
14. We're adding another icon now. Search "Instagram menu icon" and find a wireframe menu icon by sketchify. the W and H are 42.5 x 24.6. Add a text box that says "More". It will look like this:
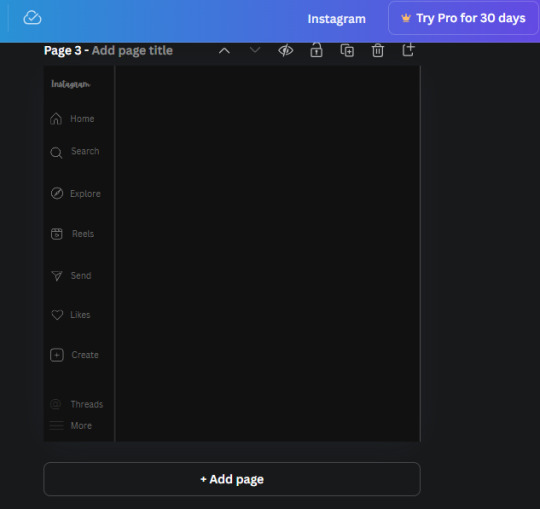
We are a quarter way done now :D
15. Search in the elements tab "circle frame" and look for the one with a little border around it.
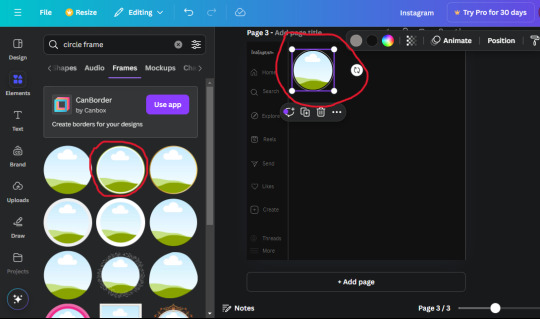
At first, the circle will be green and inside the circle will be white. Change the white to color of the background of the page (hex code #111111) then change the green to a grey color (#8D8986).
16. Add a new text box, change the font to Canva Sans and the size to 22.8 and the color is white. I just wrote "user.name" in the box. the W and H will be 153.3 x 35.7.
Enter the "elements" tab and search for a blue checkmark and find the icon by Victor Aguiar. The W and H is 28.1 by 28.
17. Search in the search box for a rectangular shape and add it to the page. Place it next to your username and checkmark icon and make the W and H to 149.6 x 38. Add another and place it next to the other rectangle shape. the W x H is 111.4 x 36.7.
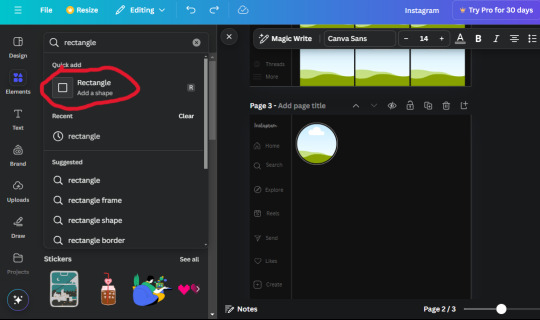
Change the color of both boxes to #2F2F2F. Add a text box and write "following" then change the W and H to 82.6 x 21.8 and fit it inside the first box. Add a second text box and write "message" in it then change the W and H to 77.8 x 21.8. Change both text colors to #7A7A7A

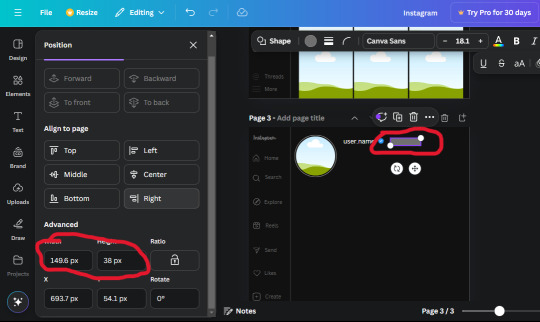
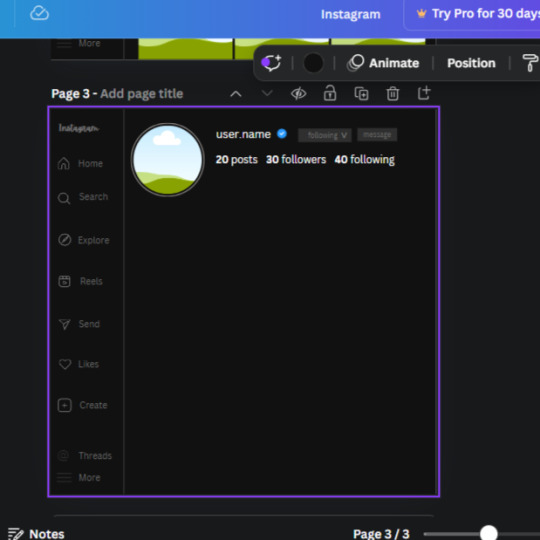
18. Add another text box. Write "<" and turn it upside down and place it beside the "following" text inside the rectangle. Adjust the size as you need to. I also like the round the corners to around 8 so its not so pointy and square.
19. Add 3 new text boxes. Write the amount of posts, the amount of accounts you're following and the amount of followers your have. Write "20 posts", "30 following" "40 followers". Bold the numbers and change the text W and H to 116.4 x 32.7. These are just place holders that I use.
20. Open the "elements" tab again and search "frame". Choose the first one.
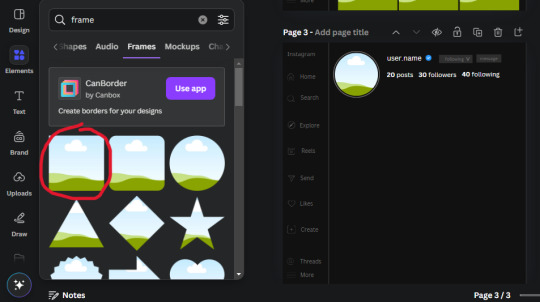
We want the height and width to be 268 x 252.4. Place it at the bottom of the page but we want some space between the frame and the page.
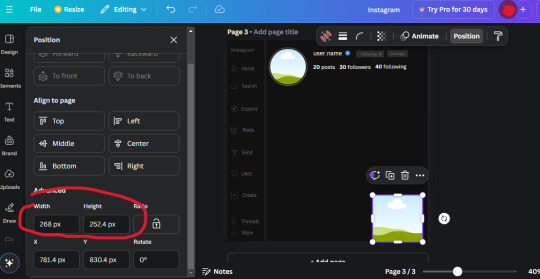
Now we'll duplicate the frame we just placed (the icon between the comment and trash can on the pop up above the frame). Place it next to the previous frame but we want to leave a bit of space between them like this:
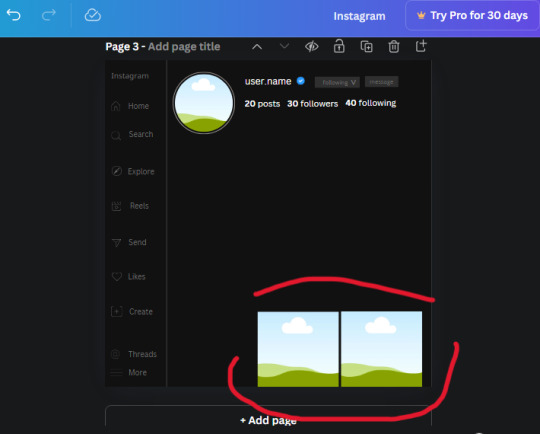
If its a little wonky, don't worry. You can always adjust it so it looks right.
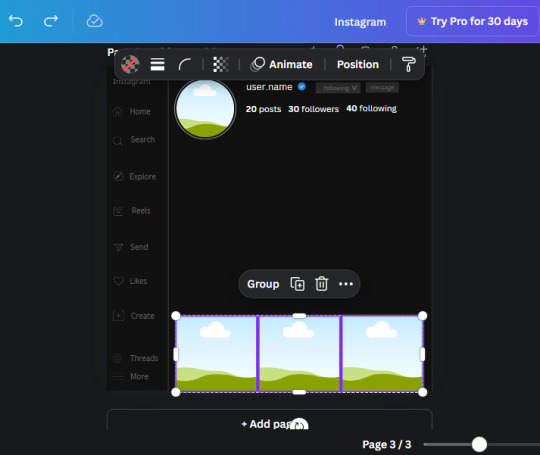
Duplicate the frame again and place it next the second frame you just placed, same distance between. Make sure they're even. Now we have a row.
Select all three frames and duplicate them. Move them above our original frames but leave a little space between them.
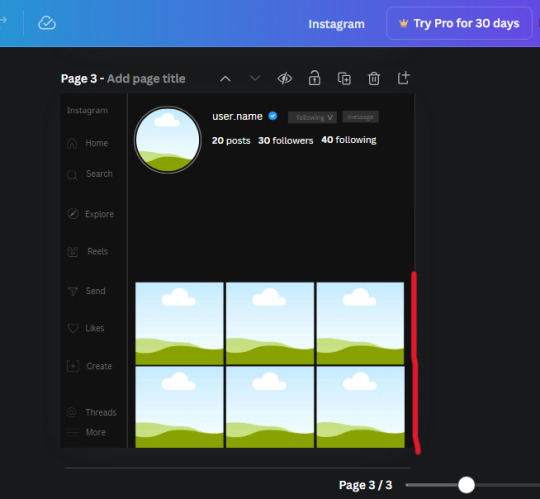
Again, if they're uneven, adjust them as you need to.
21. Select the line again from the elements tab. Stretch starting from the top frame to the last frame and make the color grey (#2F2F2F).
Because the line is stupid hard to navigate, use something like a text box to mark where you want it to end like this:


Delete the text box and the line with be where we want it.
22. On to the highlight reels. Seach for "add button" and find the one by Barudak Lier.
Change the heigh and width to 81.1 and move it above the border.
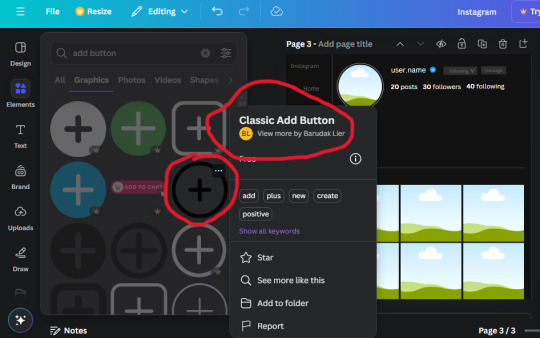
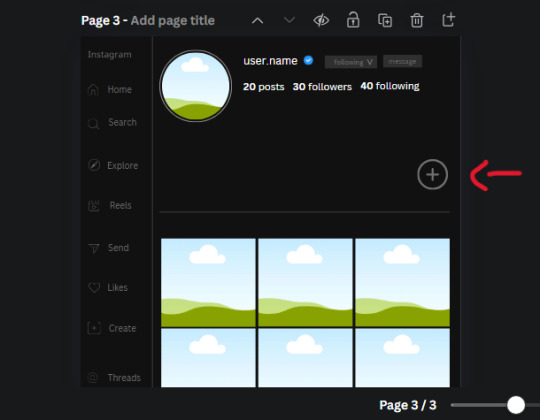
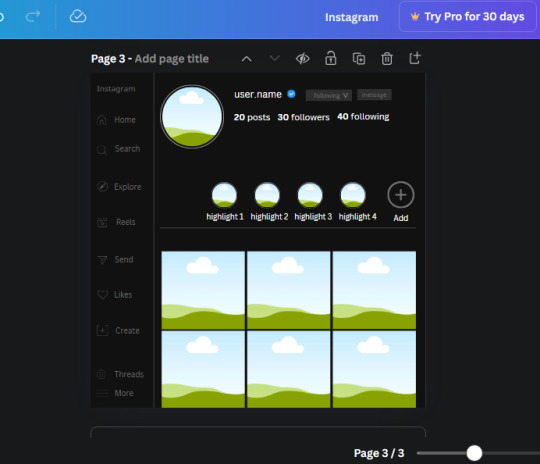
Search for circle frames now and add this one to the page (The same one we used for the pfp), change the width and height to 85.4 and move it next to the add button. Since this is a generic, blank template, I add about 4 of these highlight frames but you can do however many you want. You can change the border color to a gradient or leave it grey.
Add a text box now. The font will be Canva Sans, the size will be 18.1 and the color will be white. Change the text to "Add" and place it under our add button. Make more of these text boxes to place under the circle frames. Depending on which frame its under, write "Highlight 1", "Highlight 2", etc. etc. or you can give them different names and such.
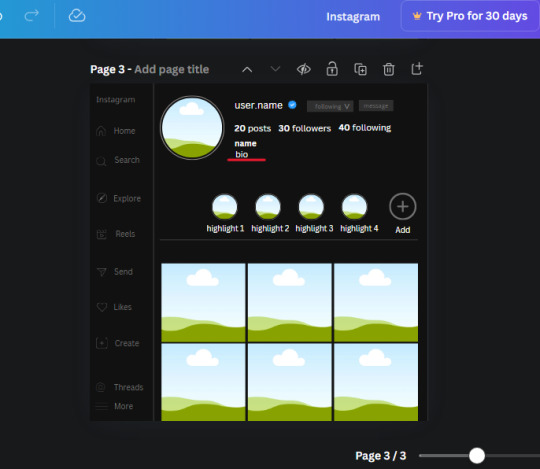
23. Add another text box, write "name" and bold it, change the size to 19.1 and the W and H to 69.2 x 28.8. The font will be Canva Sans and the color will be white. It will go under the amount of posts, followings and followers.
Add another box. The font is Canva Sans, font size to 20.1, the W and H is 40.8 x 31.3 and the color is white as well. This is our "bio". Place it under "name".
Yay!🎉🎉🎉 You're halfway done!
24. Search for a shape in the elements. Look for the rectangle again and add it. Change the width and height to 460 x 760.4 and the color to an off black/grey color (#191919), placing it like this:
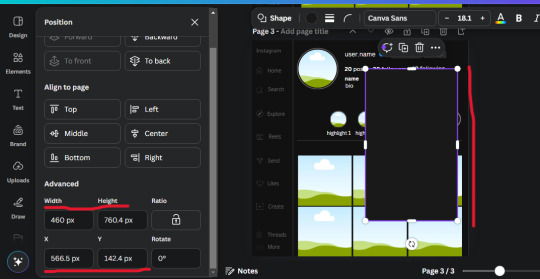
Get the same kind of square frame we used before to make the profile grid and make it the same size as the rectangle we just added. Place right up against the rectangle like it's its other half. Add another line like before and span across the upper half of the black rectangle as a border then add a circle frame inside the border.
Add a text box, "user.name" and align it with the frame. The text is white and the W and H is 111.5 x 25.9
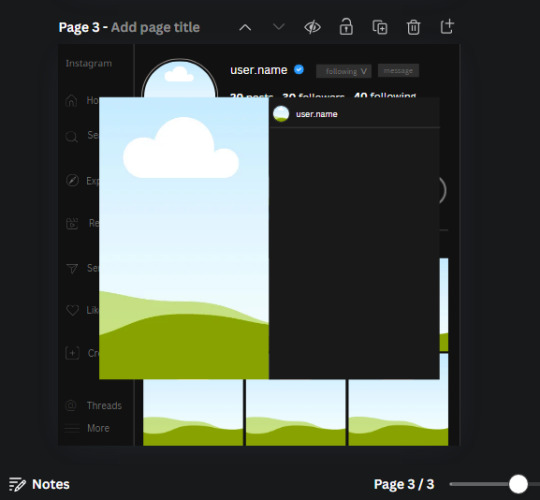
25. Add more circle frame along the inside of the rectangle to resemble the comment section. Make sure the W and H of the frames are 46.1.
Add more text boxes that align with the frames you just made and write "username" again and bold them. Add even more text boxes that align with the usernames and write "comment". These are place holders for when you decide to use this template.
Add another rectangle on the lower part of the rectangle and make the color black. and search for "instagram heart icon", "instagram comment icon" and "instagram send icon". Make sure the lines are thick. Find the heart icon by sketchify, and the the comment and send icon are by Mirazz Creations. Make the lines white and make sure the W and H are the following:
Heart icon: 38.7 x 32.9
Comment icon: 35.2 x 35. 8
Send icon: 35 x 32
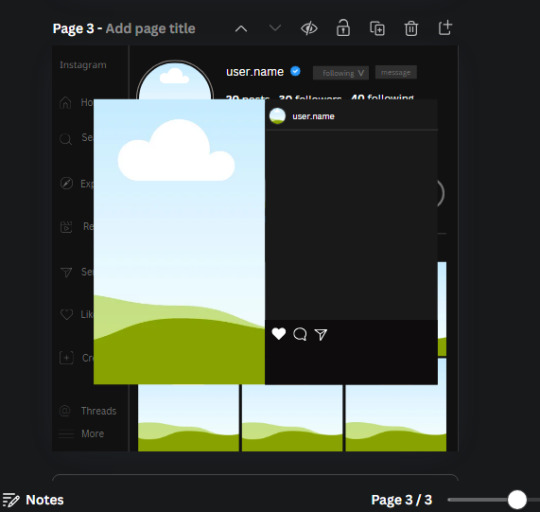
Next, look for "instagram bookmark icon" and find the one by Adricreative. Change the color to white and the W and H to 29.7 x 40.2. Move it to the other end of the rectangle.
26. Now add three circles frames and change the W and H to 37.2. Move them below the heart icon and have them overlap each other some. Then, add a text box and write "liked by username and 1000 others". Change the font size to 13.6 and change the font to Canva sans. the color will be white. Align this with the three overlapped frames.
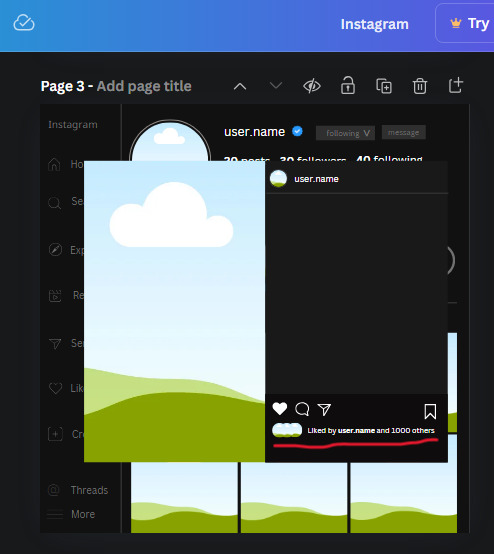
27. Look in the elements tab for an emoji icon and choose the one by Soni Soukell from Noun Project. The W and H will be 32.8 and the color is white.
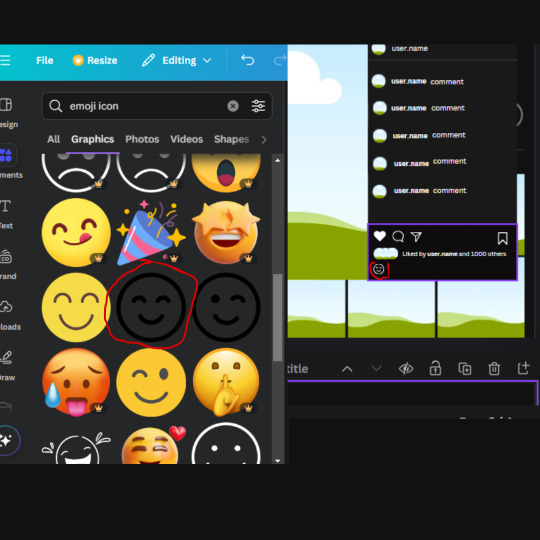
Now add a another text box and write "Write a comment". The color will be white, the font size will be 14.2 and align with the emoji icon you just placed.
Search for "next arrow button" by Pixeden and make the W and H 42.8 then add it to both sides of the post.
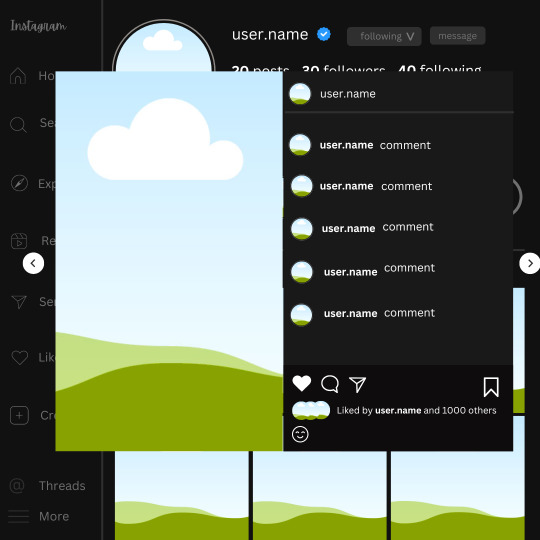
And you're all done with your template! All that is left to do is fill it but before doing that, duplicate the page so you always have an extra blank mockup if you want to use it again.
To fill the frames, upload an image (or use a Canva stock photo), drag and hover it over the frame and it will fill the frame.
Hope this was helpful and you you successfully made one :D <3
#requests#text#smau#template#mockup#moodboard#instagram#instagram moodboard#instagram mockup#graphic design#canva#psd#free tutorial#tutorial#instagram au#social media au#free psd#photoshop#resources#fanfiction resources#graphic design resources#graphic design tutorial#psd tutorial#photoshop tutorial#au#au ideas#mockups#digital design#digital design tutorial
68 notes
·
View notes
Text

ID CARD MOCKUP PSD.
editable ID card mockup, only available on my deviantart.
(BUY FOR $3 HERE.)
20 notes
·
View notes
Text
40 minute drive to work bad because all i am doing is plotting scene by scene a like 300k fanfic about lucanis's year in solitary as if i have the time on inclination to do that
#earlier i started a photoshop mockup of what he'd look like cleanshaven because i just can't picture it and i'm obsessed with the idea th#at this IS his caveman look#i had to quit halfway through because he was scaring me and it was time to go to work.#personal#liz plays dragon age#ossuary fic
13 notes
·
View notes
Text


yourself poster4
#polish graphic design#graphic designer#graphic art#graphic design#computer design#poster design#design#poster art#poster#plakat#mockup#baugasm#gradient#adobe photoshop#abstracart#abstract#typography poster#typografia#typography#love yourself#yourself#focus on yourself#grafika#grafika komputerowa#projektowanie graficzne#polska#poland#motion#illustrator#illustration
8 notes
·
View notes
Text

#I've been trying to photoshop Pickford into various situations for a mate's secret santa#now I've fallen down a hole of content#actually quite distressing being a Geordie but here we are#this was iconic#jordan pickford#football#anyways the lads in a snowglobe now and I've got a mockup 19 crimes label to print off#oh and a kpop style trading card holder to make for his card#happy xmas dani
6 notes
·
View notes
Text


fanart 1 | fanart 2
Dandadan fanart frame mockups 🎃🎃
#frame#frame mockup#anime#anime fanart#fanart frame mockup#okarun#ken takakura#anime art#photoshop mockup#momo ayase#dandadan aira#dandadan fanart#dandadan#mokarun#psd mockup#mockup#shiratori aira
25 notes
·
View notes
Text

A Look at Pixelbuddha’s Subway Train Poster Mockup
Download here.
Subscribe to the podcast on Spotify, Apple Podcasts, or Amazon Music.
Follow WE AND THE COLOR on Facebook I Twitter I Pinterest I YouTube I Instagram I Reddit I ChatGPT I Podcast
#design#graphic design#photoshop#adobe#poster#posters#poster design#poster mockups#graphics#download#adobe stock
8 notes
·
View notes
Text
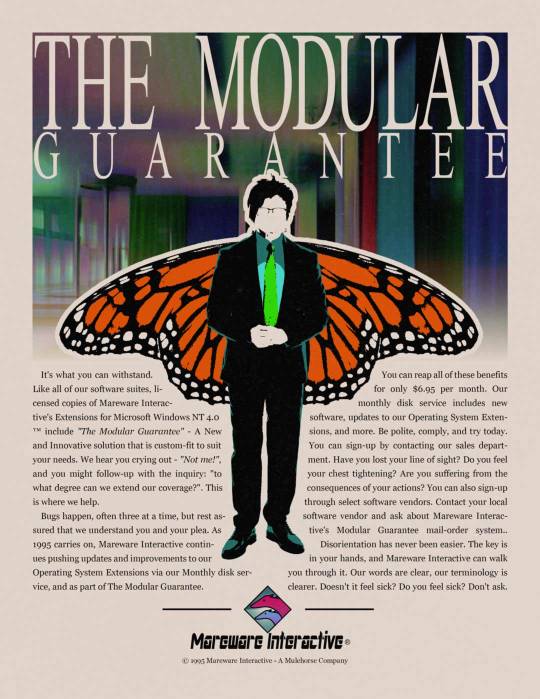
The Modular Guarantee
(transcription)
It's what you can withstand. Like all of our software suites, licensed copies of Mareware Interactive's Extensions for Microsoft Windows NT 4.0™ include "The Modular Guarantee" - A New and Innovative solution that is custom-fit to suit your needs. We hear you crying out - "Not me!", and you might follow-up with the inquiry: "to what degree can we extend our coverage?". This is where we help. Bugs happen, often three at a time, but rest assured that we understand you and your plea. As 1995 carries on, Mareware Interactive continues pushing updates and improvements to our Operating System Extensions via our Monthly disk service, and as part of The Modular Guarantee.
You can reap all of these benefits for only $6.95 per month. Our monthly disk service includes new software, updates to our Operating System Extensions, and more. Be polite, comply, and try today. You can sign-up by contacting our sales department. Have you lost your line of site? Do you feel your chest tightening? Are you suffering from the consequences of your actions? You can also sign-up through select software vendors. Contact your local software vendor today and ask about Mareware Interactive's Modular Guarantee mail-order system. Disorientation has never been easier. The key is in your hands, and Mareware Interactive can walk you through it. Our words are clear, our terminology is clearer. Doesn't it feel sick? Do you feel sick? Don't ask.
#microsoft sam#arg#mareware interactive#malwareministry#themalwareministry#1995#retro computing#retro advertising#mulehorse#art#photoshop#photomanip#mockup#fake ads#alternate reality game
4 notes
·
View notes
Text
A vast collection of unique and very easy-to-use Photoshop Effects.
Available now at ⚡mockupcloud.com
#mockup#branding#psd#template#showcase#mockupcloud#brand#stationery#inspiration#download#filter#effect#photoshop#graphics#graphic#assets#typography#background#retro#overlay#texture
9 notes
·
View notes
Text

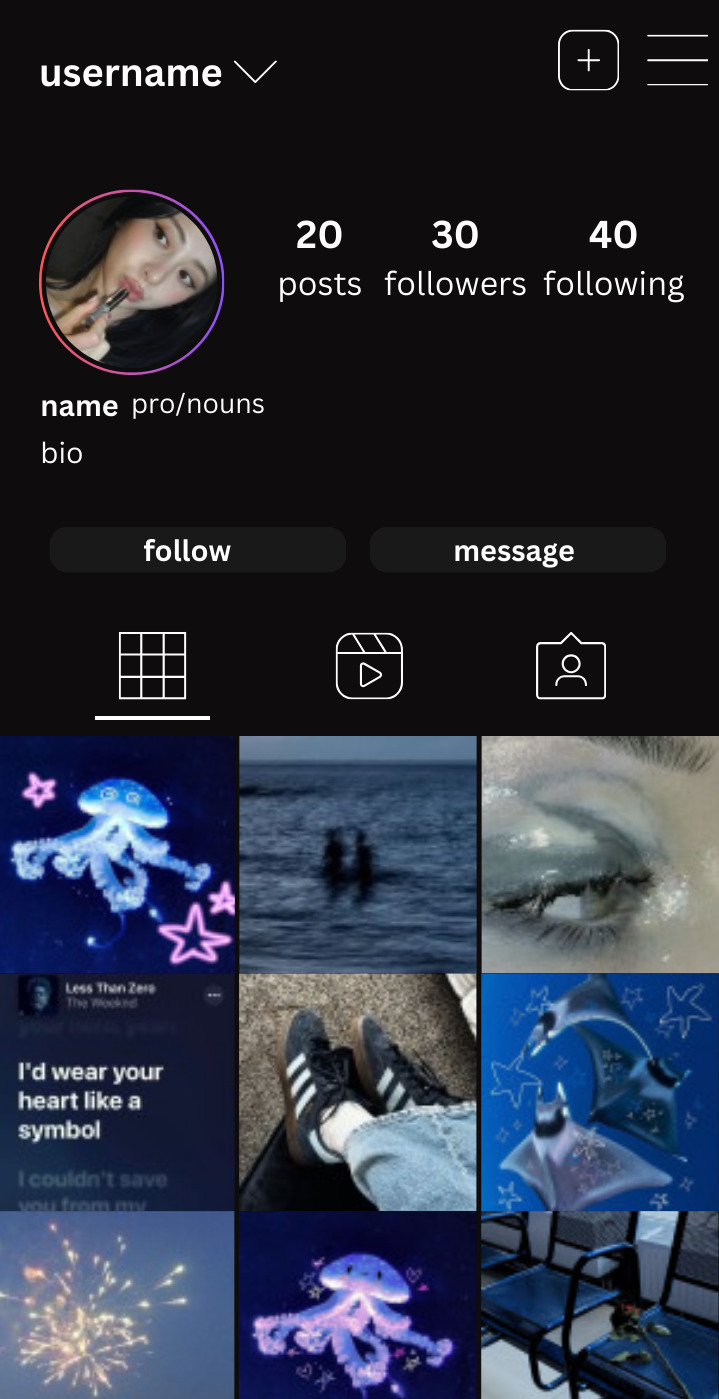

the average graphic designer should be fearing me rn
New instagram (mobile) mockups, profile and story in light AND dark mode because im not a huge fan of the photonote app. Lemme know if you want a tutorial (no photoshop needed)
desktop tutorial caller ID screen snapchat post
#im literally a superhero for fanfic writers girl#smau#instagram mockups#mockups#instagram moodboard#aestheti#social media au#fanfiction#photoshop#photoshop psd#psd#fanfiction resources#online tutorial#tutorial
6 notes
·
View notes
