#paintbrush manufacturer
Explore tagged Tumblr posts
Visit Tumblr Blog
Explore Tumblr blogs with no restrictions, modern design and the best experience.
Last Seen Tumblr Blogs


Fun Fact
The total number of visits Tumblr.com received during January 2021 is 327 million.
Text

Luxury Synthetic Hair 11pcs Makeup Brush
0 notes
Text

matching sillies!!!! i’m currently getting stickers of these & am gonna order keychains of these soon also me thinks :]
#my manufacturer is on break rn so it’ll be awhile but!!! i think they’re cute!!!#they’re not gonna be the magnetic ones tho cuz tbh i think they look a bit silly…#and plus what if u only want one yknow#ii paintbrush#ii lightbulb#inanimate insanity#my art#store stuff
33 notes
·
View notes
Text
Kabawat Brushes: Achieve the Perfect Finish for Every Painting Project
Introduction
Painting is more than just a process; it’s an art that transforms any space, bringing walls to life and making homes feel unique and inviting. Kabawat Brush Company understands this deeply, which is why they focus on providing premium quality paint brushes and rollers that allow every painter—whether a DIY enthusiast or a professional—to achieve that perfect, polished finish.

The Kabawat Advantage: Quality That Lasts
Kabawat Brushes are crafted with durability and ease of application in mind, ensuring every stroke provides a smooth and even finish. These brushes simplify the painting process, making it faster and more enjoyable while delivering professional results. Kabawat Brushes are perfect for both DIY home makeovers and professional projects, helping you achieve flawless coverage and impeccable detail every time.
Transform Any Wall into a Masterpiece with Kabawat Brushes
Kabawat brushes are crafted to bring ease, efficiency, and a flawless touch to every stroke. Whether you’re painting vibrant exteriors or cozy interiors, the brushes from Kabawat are designed to help you achieve a professional look without the hassle. Here’s what makes Kabawat brushes stand out:
Durability: Made from high-quality materials, Kabawat brushes are built to last. Their longevity ensures that you can rely on them for multiple projects, making them a great investment for professionals and hobbyists alike.
Smooth Application: Kabawat’s brushes glide over surfaces effortlessly, creating even, consistent layers of paint that contribute to a professional finish.
Superior Quality Finish: With Kabawat brushes, your finished project will look polished and seamless, showcasing a quality you can see and feel.
Why Choose Kabawat Brushes?
Kabawat Brush Company has built a strong reputation in the market for offering painting tools that combine quality with functionality. Their products are trusted by customers across Mumbai and India, thanks to the company’s commitment to excellence and customer satisfaction. Kabawat brushes and rollers are the perfect tools for anyone aiming for a high-quality finish on their painting projects.
Contact Kabawat Brush Company
Ready to start your next painting project with tools you can trust? Kabawat Brush Company is here to help bring your ideas to life.
Phone: 82096 17061 | 98218 25663
Email: [email protected]
Website: Kabawat Brush Company on IndiaMART
Instagram: @kabawatbrush
Transform your space with Kabawat’s top-quality painting tools, and let your walls reflect the true artistry of a perfect finish.
Get in Touch with Kabawat Brush Company Ready to start your next project? Contact Kabawat Brush Company for top-quality painting supplies that professionals and enthusiasts alike trust. For a painting experience marked by quality and satisfaction, choose Kabawat Brushes. Let’s bring your vision to life!
For more information or to request a consultation, visit their website: Kabawat Brushes Company
To stay updated with the latest posts, follow us on social media:
📸 Instagram
📘 Facebook
📌 Pinterest
🧵 Thread
🥁 Tumblr
▶️ YouTube
Contact:Kabawat Brush Company +91- 82096 17061 / +91- 98218 25663 https://www.indiamart.com/kabawatbrushcompany/
Digital Partner:
TVM INFOSOLUTIONS PVT LTD
Contact: TVM Info Solutions Pvt. Ltd.
+91-9004590039
Follow us on Social Media
🌐 Website
📸 Instagram
📘 Facebook
🔗 Linkedin
▶️ Youtube
#Kabawat#Kabawat Brush Company#brushes#paintbrushes#interior painting#exterior painting#painting#Wholesaler#Brush Manufacturer
0 notes
Note
i love lightbrush, but i feel like a good amount of the fan content for it is very heavily biased towards paintbrush. most of the talking points i see people make about the ship are about how in love paintbrush is with lightbulb, how much she means to them, how badly they want her and yearn for her, how she’s their muse and they’re so sad that it took them so long to appreciate her, yada yada it’s Always about paintbrush’s perspective. how paintbrush feels. but lightbulb’s perspective? her feelings? are Seldom taken into account beyond “silly gf”. like 90% of the time she’s only there to cheer them up.
call me crazy but at times, it genuinely feels like some fanon lightbrush depictions don’t treat lightbulb like her own character. she’s just a Concept. something for paintbrush to feel sad over. an easy way to manufacture paintbrush angst. ii17 made this a million times worse btw like at first it was cool to see all the angst fanart and stuff but idk i feel like it lost its impact after a while. atp it kinda just feels like the “dead wife” trope but instead it’s “paintbrush’s dead girlfriend” 😭 like im sorry maybe this is a bit of an overreaction on my end bc i Do still genuinely like seeing fanart of that scene! but ig what i’m trying to say is i’m just a little tired of seeing it All The Time. like it’s the only thing about lightbulb people ever seem to consider (in fanon lightbrush that is) aside from her just being silly. she’s either Silly or Dead
speaking of ii17, i think the canon scene is cool and i don’t hate it by any means but tbh i wishhhhhhh it had been the other way around so bad. i wish paintbrush had died instead of lightbulb bc i feel like it would’ve been so much more interesting to see how she would’ve reacted to that 😔 but also lightbulb is my favorite character so maybe that’s just my bias talking
umm tl;dr lightbrush is cool and rad and awesome but i think there’s just a little too much paintbrush favoritism in the fan content. let me see more lightbulb-focused lightbrush PLEASE im so so tired of her always being depicted as paintbrush’s perfect sunshine therapist girlfriend and nothing else when she’s canonically so much more than that pleaseeeeee
.
27 notes
·
View notes
Note
when engaging in traditional art, does it matter to you what pencils|brushes|paint|paper|etc to use from what manufacturer? are you the "100 euros per single luxury pencil" person, inbetween, or the "the cheapest pen from the corner shop, and the back of the envelope, is fine" person ? did you art school have requirements for what materials the students use? thank you.
Depends on what you want to do with your art, but if you want to do more than chill and have fun (make it a field of study, go to art school,...) you gotta land on the middle, man. Had already mentioned it before but

^ I've drawn with these shitty clicky pencils for decades. For years I have, and tbf still do, draw on the most average printing paper I find with these shitty clicky things and lineart with that quadricolor pen.
If you want to do more, if you want to branch out, new material comes into the picture evidently, you have to adapt the paper you draw or paint in to the medium. While you, strictly speaking, can paint watercolor on printer paper, it's gonna suck the whole time.
I don't got "100 euros luxury pencil" money man. For paint and paintbrushes, though, I would recommend not going for the absolute absolute cheapest and save some money to at least get student-grade paints. Unless you're working every day with them and selling your works, you don't really need professional-grade paints imo. My first watercolor set which I've had a great run with (I need to get back to ittttt tbh) was a Winsor and Newton Cotman box like that one

It's like. 15-20€ depending on the place you get it at.
most of my acrylic paints are also W&N, the "Galeria" type which is their student-grade. They're 3-5€ a tube, which yeah is pretty steep if you're just getting started, that's why you build up a palette bit by bit. That and the professional grade is 10€ a tube.

I've also used Liquitex for the primary colors that are gonna run empty very quickly as well as black and white

Student-grade as opposed to artist/professional-grade might be a bit more streaky, less pigmented, etc but like. I don't use it enough to care. I can't tell you about oil paints because I've never used them myself.
My art school had no requirements for material, but my art school is different from yours, or the one you covet. You might be asked for specific materials. I wasn't.
17 notes
·
View notes
Text

Steve Silver stands inside his 5,000-square-foot loft in the Williamsburg neighborhood of Brooklyn, New York. Silver, a painter, moved into the loft in 1979.
A Look Inside New York’s Historic Artist Lofts
The Last of Their Kind.
They used to be printing shops, garment factories and flophouses. Now they’re some of the coolest artist spaces you’ll ever see.
These unique, expansive lofts, rarely seen by the public, are all over New York City.
For decades, they’ve been occupied by painters, sculptors and other artists who moved in when manufacturers started leaving the city in the second half of the 20th century.
“When people think of New York City as a cultural epicenter, these are the artists that they’re envisioning,” said Joshua Charow, a photographer and filmmaker who has spent the past few years documenting the artists and their studios for his book “Loft Law: The Last of New York City’s Original Artist Lofts.”

Artist Claire Ferguson moved into her loft in the city’s Tribeca neighborhood in 1981. At the time, the building in Lower Manhattan had a mix of artists and industrial tenants. “The floor below me was a paintbrush factory,” she told photographer and filmmaker Joshua Charow. “The floor above me put lines on paper before they had offset printing, and they had these huge machines. They had a guillotine that cut through the reams of paper every morning. At 6 a.m., they would turn it on, and it was this noise, aargh!”

JG Thirlwell’s loft in Brooklyn’s Dumbo neighborhood doubles as his home recording studio. “Loft living is not for everyone,” he told Charow. “You’re responsible for everything in here, and not everyone wants a life like that.”

A cat rests inside the Tribeca loft of Ken and Flo Jacobs, experimental filmmakers who moved into the space in 1965. At the time, the monthly rent for the 2,000-square-foot loft was just $70.
For the first half of the 20th century, New York City was a major manufacturing center. Factories were all over, producing everything from ice cream to torpedoes.
But when companies started finding it profitable to move their operations to other parts of the country and the world, many buildings were abandoned. By the 1960s and ‘70s, industrial neighborhoods, including those we now know as SoHo and Tribeca in Lower Manhattan, were largely deserted.
Landlords were desperate to find tenants. A big problem, however, was that the buildings were not zoned for residential use. Many of them didn’t have kitchens or showers, or even electricity or heat.
“The only people that would rent the space were artists,” Charow said. “And that’s because (the buildings) had tall ceilings, so they could make big work. They had big windows to let in lots of light. The spaces were completely raw, in many circumstances.”

Anne Mason sits in front of one of her late husband’s paintings in the loft they lived in together in the Little Italy neighborhood of Lower Manhattan. Frank Mason died in 2009, but his wife preserved his studio and his paintings.

Plants thrive in the natural light of the Midtown loft Bob Petrucci and Ray Bailey call home. It’s on the 16th floor of a building previously used as a necktie factory.
Artists would move into the empty factories and warehouses and make them more livable spaces. It was technically illegal, of course, but everyone was benefiting and the once-abandoned neighborhoods started to thrive again.
By the end of the ’70s, however, loft living had become quite fashionable and some landlords were looking to cash in, pushing out the artists for a wealthier clientele.
The artists pushed back, and in 1982 state lawmakers enacted Article 7-C of the New York Multiple Dwelling Law, which is commonly known as the 1982 Loft Law. This legislation gave protection and rent stabilization to people who had been living in these spaces. It also required landlords to bring the units up to residential code.
When the law was enacted, Charow says in his book, there were tens of thousands of artists living in lofts across the city. Now just a few hundred remain.

Noah Jemison moved to his Williamsburg loft in 1980. He remembers his neighborhood not having as much traffic as it does now. “You could walk down the streets and see nobody,” he told Charow. “It was a place where you could hear yourself think. It was perfect for artists.”

A scan of a 1913 blueprint shows one of the Manhattan buildings Charow photographed. New York City was a major manufacturing center for the first half of the 20th century.

Painter Betsy Kaufman walks inside her Tribeca loft. She uses the front half as her studio. It still has its original wooden floors.

Legislation enacted in 1982 allowed loft residents in New York to establish legal residence and have their living spaces brought up to code. It also stabilized their rent and protected them from eviction.
Charow wanted to document these artists — and their extraordinary lofts — before their numbers dwindled even more. He found a map of the remaining protected buildings and went door to door to see whether their tenants would be willing to share their story with him.
He was often rejected at first. But over time, more doors started to open up as people he met would introduce him to others.
Over the past three years, Charow has photographed 75 artists — 30 of whom are in his book.
“My life has been greatly enriched by meeting some of these artists and learning about their lives and their stories,” Charow said. “It’s had a big impact on just my life, and I can’t imagine how much of an impact this group of people has had on the city as a whole.”

Art created by Carolyn Oberst and Jeff Way adorn the walls of the loft they share in Tribeca. They live on the top two floors of a building they started renting in 1975. “I won’t tell you what it cost, but it was very cheap. We’ll just leave it at that,” Way told Charow. “But that was an incentive to fix it up. It was sweat equity, they called it.”
Ellen Christine makes new hats and restores old ones. She’s one of the last milliners in New York City. “In the 1930s, you could walk down any street, and there would be at least 30 milliners,” she said. “It was just (that) everybody wore hats, you see… So they needed new ones all the time.”

Curtis Mitchell remembers when he first walked into his loft in the Dumbo neighborhood of Brooklyn. The building used to be an ice cream factory. “It looked just like a dream,” he said. “To me, it still is a dream. It’s a fantastic place. Cold as hell in the winter and hot as hell in the summer, but I don’t care.”
One of Charow’s favorite spaces was the Bowery loft of Carmen Cicero, who is now 97 years old but moves with the energy of someone much younger, Charow said. Cicero lives in the loft with his wife, the art historian Mary Abell. Filling the space are hundreds of Cicero’s paintings, some bigger than he is.
“When you dream of what a painter in their loft in New York would be like, it’s Carmen,” Charow said. “And he’s filled with incredible stories. He has such phenomenal stories of his time as an artist here.”
Cicero’s work can be found in the permanent collections of the Whitney Museum of American Art, the Museum of Modern Art and the Smithsonian American Art Museum.
He told Charow the story of how he got his big break: “I had a lot of friends who thought I was a really remarkable painter. One day, they said, ‘Carmen, you’re going to a gallery.’ And they had two guys grab my feet, and two guys grab my arms — they threw me in the car and said, ‘We’re going.’ We went to four or five galleries, and almost every one of them wanted my work — I was lucky.”

Carmen Cicero lives in the Bowery, which has one of the highest concentration of Loft Law-protected buildings in the city. The painter moved to New York in 1971, after his home studio in New Jersey went up in flames
Charow says it has been a thrill to meet these artists and listen to their stories.
“The spaces are beautiful and interesting and historic in their own ways. But without the artists, these spaces lose the significance and the interest to me,” he said. “The artists are the ones who are giving the spaces meaning. Their decades of life and working there is what makes these spaces sort of a sacred thing.”
Through June 29, Charow’s photos are being exhibited at Westwood Gallery NYC, alongside the art of many of the people he photographed.
“I’m really excited that people get to see the paintings and sculptures and and see where they’re made,” he said.

Filmmakers Ken and Flo Jacobs have lived in their top-floor Tribeca loft for more than 50 years. “Once, we staged a live shadow play with a stretched curtain in the loft. Our audience consisted of just two people: Yoko Ono and John Lennon,” Ken told Charow.

Sculptor Marsha Pels lives in what used to be a glass factory in Brooklyn’s Greenpoint neighborhood.
Even though the book is already published, Charow’s project will continue. After he began sharing his photos and videos, more artists started reaching out to him so that they could tell their story.
He now has a list of artists to photograph over the next few months.
“This isn’t just a thing of New York’s past. This is the present,” Charow said. “You can walk down the street and look at a window and you might see (an artist), and they’re still working and they’re still making their paintings and sculptures.
“I think it’s a beautiful part of our city, that this exists. It took a lot of resilience and ingenuity to stay in these spaces.”

Kimiko Fujimura, a painter, moved from Tokyo to New York City more than 50 years ago. She has lived in this Chinatown loft since 1979. It was the top floor of a former bow-and-ribbon factory.

The Lower Manhattan skyline is seen from a loft in Brooklyn.
Joshua Charow’s book, “Loft Law: The Last of New York City’s Original Artist Lofts,” is published by Damiani Books. The exhibition at Westwood Gallery NYCis taking place through July 13.
Photographs by Joshua Charow. Story by Kyle Almond. Published June 16, 2024
#Joshua Charow#A Look Inside New York’s Historic Artist Lofts#Joshua Charow “Loft Law: The Last of New York City’s Original Artist Lofts”#loft#real estate#art#artist#art work#art world#art news#art studio#long post#long reads
17 notes
·
View notes
Text
All gems for my II Gem Au (i hope i didn't miss a character
If you have any questions about this Au, the askbox is open!
•MePhone4- Aqua Diamond
•MePhone4s- Red Diamond
•MePhone3GS- Grey Diamond
•Albite- Toilet (One of the gems that directly serves Aqua Diamond, gives news often)
•Lavander Jade- MePad (Another servant of Aqua Diamond, makes reports and often replaces Aqua in occasions where he cannot be present)
▪︎▪︎▪︎PS, All the Diamonds of this era refuse to have and or own Pearls▪︎▪︎▪︎
•Yellow Apatite- Lightbulb (Guard gem/fighter, always accompanying Pieteresite)
•Pieteresite- Paintbrush (Mural artist, pretty high-quality gem)
•Peridot- Test Tube (Technician)
•Rubellite- Fan (Keeps an eye on homeworld log dates)
•Golden Spinel- Cheesy (Entertainer, built to be your "best friend")
•Silver- Nickel (Observes gem production, makes sure they have good resources to come out properly, can fight if needed)
•Fine Silver- Silver Spoon (ONLY observes and does analysis on gem creation, works along Silver/Nickel, makes sure they look polished)
•Lavander Sapphire- Candle (Future Vissiooonnn)
•Red Thulite- Balloon (deemed useless, a soldier gem)
•Bronzite- Suitcase (manages materials that are carried within injectors to other planets for gem production and colony starters, often around Silver/Nickel)
•Bi-Colour Tourmaline- Baseball (Can heal, manages grouping and escorting newly made gems)
•Pink Kunzite- Bow (Communicator, works with signals that connect to other colonies)
•Vivianite- Tissues (Simple gem, doesn't do much, usually observes other gem activities)
•Yellow Kunzite- Dough (Random guard, quite lazy)
•Actinolite- Pickle (Messenger boy, delivers important info)
•Bloodstone- Taco (Former messenger girl that worked with Actinolite, now turned rebel)
•Howlite- Marshmellow (Calm gem, works around the human zoo sometimes, rare gem)
•Red Beryl- Apple (Gem warrior, often accompanying Howlite)
•Citrine- OJ (Public speaker, always talking with White Zircon)
•White Zircon- Paper (Lawyer Gem)
•Hypersthene- Microphone (Usually a gem that replaces other gems, a substitute you could say)
•Pink Chalcedony- Soap (Homeworld's official cleaner, friends with Hyperstene)
•White Selenite- Salt (works with Grey Selenite, works around the reef where pearls are made)
•Grey Selenite- Pepper (helps White Selenite with working around the reef)
•Black Druzy Quartz- Bomb (quartz that specializes in explosive manufacturing)
•Fused red spinel- Cherries (entertainer)
•Conjoined Psilomelane (black & white)- Yin-Yang (observes activities along with Vivianite, talks with fused red spinel often)
•Yellow Jasper- Trophy (Quartz soldier)
•Periwinkle Tanzanite- Cabby (Has information and reports on all gems, their activity and general state)
•Kunzite 2.0 (later they gave themselves the identity of Prehnite)- Bot (Does what Kunzite was supposed to do, before they found out they weren't really her, they were just a robotic body with Kunzite's gem shards added in, so they developed their own identity later and now they work along with Periwinkle Tanzanite)
•Bubbled/Corrupted Smoky Quartz- Box (former quartz soldier)
•Zebra Jasper- Knife (Quartz soldier)
•Green Sapphire- Clover (Brings good predictions with her future vision)
•Kaolinite- Tea Kettle (Brings good morale and compassion to fighter and soldier gems)
•Cinnabar- Lifering (Specializes in gem care and fighting)
•Benitoite- Blueberry (the diamonds don't know what to do with him so he just kinda, sticks around)
Idk about Goo and Floory tho.
11 notes
·
View notes
Text


Transformed this blog into my Gem Au blog
I wouldn't call it an ask blog, this is where i can keep all my stuff. But the ask box is open regardless!
All the gems:
•MePhone4- Aqua Diamond
•MePhone4s- Red Diamond
•MePhone3GS- Grey Diamond
•Albite- Toilet (One of the gems that directly serves Aqua Diamond, gives news often)
•Lavander Jade- MePad (Another servant of Aqua Diamond, makes reports and often replaces Aqua in occasions where he cannot be present)
▪︎▪︎▪︎PS, All the Diamonds of this era refuse to have and or own Pearls▪︎▪︎▪︎
•Yellow Apatite- Lightbulb (Guard gem/fighter, always accompanying Pieteresite)
•Pieteresite- Paintbrush (Mural artist, pretty high-quality gem)
•Peridot- Test Tube (Technician)
•Rubellite- Fan (Keeps an eye on homeworld log dates)
•Golden Spinel- Cheesy (Entertainer, built to be your "best friend")
•Silver- Nickel (Observes gem production, makes sure they have good resources to come out properly, can fight if needed)
•Fine Silver- Silver Spoon (ONLY observes and does analysis on gem creation, works along Silver/Nickel, makes sure they look polished)
•Lavander Sapphire- Candle (Future Vissiooonnn)
•Red Thulite- Balloon (deemed useless, a soldier gem)
•Bronzite- Suitcase (manages materials that are carried within injectors to other planets for gem production and colony starters, often around Silver/Nickel)
•Bi-Colour Tourmaline- Baseball (Can heal, manages grouping and escorting newly made gems)
•Pink Kunzite- Bow (Communicator, works with signals that connect to other colonies)
•Vivianite- Tissues (Simple gem, doesn't do much, usually observes other gem activities)
•Yellow Kunzite- Dough (Random guard, quite lazy)
•Actinolite- Pickle (Messenger boy, delivers important info)
•Bloodstone- Taco (Former messenger girl that worked with Actinolite, now turned rebel)
•Howlite- Marshmellow (Calm gem, works around the human zoo sometimes, rare gem)
•Red Beryl- Apple (Gem warrior, often accompanying Howlite)
•Citrine- OJ (Public speaker, always talking with White Zircon)
•White Zircon- Paper (Lawyer Gem)
•Hypersthene- Microphone (Usually a gem that replaces other gems, a substitute you could say)
•Pink Chalcedony- Soap (Homeworld's official cleaner, friends with Hyperstene)
•White Selenite- Salt (works with Grey Selenite, works around the reef where pearls are made)
•Grey Selenite- Pepper (helps White Selenite with working around the reef)
•Black Druzy Quartz- Bomb (quartz that specializes in explosive manufacturing)
•Fused red spinel- Cherries (entertainer)
•Conjoined Psilomelane (black & white)- Yin-Yang (observes activities along with Vivianite, talks with conjoined red spinel often)
•Yellow Jasper- Trophy (Quartz soldier)
•Periwinkle Tanzanite- Cabby (Has information and reports on all gems, their activity and general state)
•Kunzite 2.0 (later they gave themselves the identity of Prehnite)- Bot (Does what Kunzite was supposed to do, before they found out they weren't really her, they were just a robotic body with Kunzite's gem shards added in, so they developed their own identity later and now they work along with Periwinkle Tanzanite)
•Bubbled/Corrupted Smoky Quartz- Box (former quartz soldier)
•Zebra Jasper- Knife (Quartz soldier)
•Green Sapphire- Clover (Brings good predictions with her future vision)
•Kaolinite- Tea Kettle (Brings good morale and compassion to fighter and soldier gems)
•Cinnabar- Lifering (Specializes in gem care and fighting)
•Benitoite- Blueberry (the diamonds don't know what to do with him so he just kinda, sticks around)
Idk about Goo and Floory yet tho.
5 notes
·
View notes
Text
Winter and Claus
Chapter 9
first, previous, next
After wishing Claus goodnight, Winter began his long trek through the walls back to his home. When he arrived back, the borrower peeked his head through the curtain separating his and his brother's rooms. Ryan was fast asleep in his cloth corner. Winter didn't really get why his older brother always opted for the pile of scrap fabric over their sponge beds, but he supposed it was understandable. At their size, the sponge beds were more scrappy and scratchy, and they were far too small for it to actually be plush against their bodies. But still, borrowers weren't akin to waiting supplies. Winter had manufactured a way to carve out portions of the sponge to fit his sleeping habits and positions.
Winter shrugged it off and went to the water room. The dripping wire that funneled dew out of the drains for filtering was a great idea. Winter had come up with it after seeing one of the humans books about the mechanism. This way they didn't have to venture out into the sink to get water every week. Winter stepped over the small pile of threads he assumed Ryan had brought back from their parents house. The borrower grabbed his micro tip paintbrush and dipped it into the massive bottle of toothpaste he and Ryan had managed to sneak out of the human toiletry bag one time. He brushed his teeth with the coarse fibers of the brush then rinsed with some already boiled water.
He shuffled into his night clothes and went to his room, nestling himself in bed. For one reason, he found himself missing the comforting warmth of Claus's hand, his neck, the way the human's pulse thrummed so melodically, like a lullaby. Winter shot up, sitting in his bed trying to process what it was he was thinking. Sure, Claus wasn't as scary as he had first thought, but was winter really fantasizing about sleeping on Claus instead of his safe...spongy bed? What was wrong with him? Claus was supposed to be scary, winter was small, a borrower, Claus had proven different ways in which he posed a threat to the borrower. So why did winter crave to feel the humans touch? Why did he want to be embraced like they had earlier? What the hell was wrong with him!?
The borrower sighed, shaking his head to rid himself of these thoughts. Not now, it was too soon. He didn't even know claus. So what if he had the humans schedule fully memorized, including holidays. So what if winter knew the different breathing patterns that Claus had depending on how deep his sleep was? That was irrelevant. Just normal borrower stuff. It didn't mean that winter....*liked* claus or anything. He was just overthinking again. After all, what borrower wouldn't like being surrounded by a gentle safe warmth? It was instinct, in his nature. He was just doing what he was supposed to. With these thoughts out of the way, winter laid back down to sleep, though not without tossing and turning a few times.
The next morning winter was awoken by an annoying amount of poking to the face by none other than his older brother.
"Ngh....RYAN!!" Winter swatted at the other borrower's hand as he groggily sat up and glared drowsily.
Ryan laughed, a deep, warming sound that echoed through the creaky hollowed out part in the wall where they lived. "Common lil whinny~ its time to get up. The red currant ain't gonna pick themselves!" Ryan grabbed Winter's hand and dragged the stubborn borrower out of bed.
Winter groaned and complied, rubbing the tiredness from his eyes as his brother dragged him out "didn't we harvest some before you left last week?" Winter yawned as Ryan finally let go of his hand.
"Well yeah, but I gave that stock to mom and dad, remember?" Ryan said chipperly. The mention of their parents made winter's face sour.
"Ugh. Fine we can go, but at least let me gear up man. I swear don't you know the first thing about borrowing? The early worm gets caught remember" winter grumbled as he pulled his shirt over his head. The walls were drafty today, which meant they'd need to prepare for cold weather and wind.
Once winter had finally gotten dressed and eared up, his overly energetic brother wasted no time in pulling winter through the walls and vents until they reached the small garden. The mistress of the house often busied herself and the little girl here during her husband and stepson's 'little spats' as she so underwhelmingly called them. Nevertheless, the garden is a welcome and appreciated resource for the borrowers residing in the area. Fresh fruit and vegetables were hard to come by for most borrowers so of course, winter's neighbor's often used the garden themselves.
By borrower courtesy, winter and the other borrowers in the area also helped grow the garden, doing menial tasks that took groups such as pulling weeds and planting extra seeds that weren't fully buried. Winter had realized quickly that if the humans thought they were good at gardening, they would plant more, which meant more supplies and resources for the borrowers in the area.
As they reached the current bush, which was Ryan's obvious favorite, the borrowers set out their fruit bag. It was an old jewelry bag that was the size of winter himself, but the mesh pattern was breathable and the perfect size for holding berries.
Ryan scrambled up the bush as winter set out the bag and prepared to catch the falling berries. One by one, Ryan used his blade to chop the berries off the stem. Each one was the size of winter's head. current was a spherical red berry mainly used to make jams. It was the easiest berry for borrowers to use because the skin was very thin and the seeds were easy to spot.
Winter hummed contentedly as they filled up the bag half way. Ryan clambered down the tall plant and hopped down to winter. The two made quiet conversation as they lugged the bag of berries back home.
"so...uh...how was the trip?" Winter asked awkwardly.
Ryan raised an eyebrow "surprised you asked at all, seeing as how they treated you." The other borrower pushed his lips in thought as he walked backwards "i guess it was alright, the usual. Mom's doing well. Apparently the humans started fostering yet another kid. I kinda forgot how loud that place was honestly, glad im back here anyways."
Winter nodded as he led both of them into the drainage pipe, hopping down and gently lowering the bag through the grates "did...did anyone ask about me?" Winter asked, a look of faint hope sparking in his eyes.
Ryan sighed, knowing the question would come up "I mean, you know how it is, i don't want you to hurt your feelings but if I'm telling you honestly, they're so caught up in their own little world that they don't care man. Although~" Ryan smirked as if remembering something.
Winter perked up momentarily "although...what?" He said as they both stepped into the hollow interior of the wall, their footfalls echoing quietly as they walked.
"Well, Pat asked how you are, you know how she is" Ryan smiled coyly, as if his words held deeper meaning.
Winter sighed and deadpanned "common Ryan, she can't still have those feelings, you and I both know how it ended last time" he looked down blush ringing his cheeks "plus even if she did, it wouldn't work anyway. Not with me living two days' journey out. Just leave it as is, "Winter said in a more stern tone as the two borrowers finally reached the interior wall, pulling away the old soda can in place to hide their entrance.
Ryan just shrugged "whatever you say bro" he said as he let go of the bag. Winter stepped into the other room and removed his gear as Ryan started the pot. Winter checked the mini wristwatch hanging next to Ryan's bed. The borrower silently cheered, because Claus would be getting home soon.
"Ah-" Winter caught himself, looking at his brother through the curtain door, he chewed on his knuckle's anxiously. He would have to inevitably tell Ryan about claus, it would be for the both of their safety, and if he didn't aren't Ryan about the human then that could end terribly for the both of them later.
#winter#Claus#winter and Claus#oc winter#oc Claus#gt#giant tiny#giant tiny angst#gt fluff#gt writing#writing#fluff writing
6 notes
·
View notes
Text
Starter for @copaceticjillybean from Marion!
Marion was painting- it was in her meager section of the city. A part that seemed to be a bit more haphazard. Under no one in particular's rule and she had a few souls- enough souls to earn a bit of power of her and have a s small apartment building under her care as well as a shop front. A front for people who wanted a teensy bit of joy in hell. She enjoyed the arts, and sometimes would renew her status as a lawyer if they needed one. Though there wasn't much in the way of court it was more for contract writing. The one part of being a lawyer she could tolerate down here.
However today was not a day she planned on playing contract negotiator and intended to paint. So she was. She was painting hell in a very, very odd color swapped scheme of blues and greens with pops of the odd red. It was a painting just for fun and she mostly just used the place as a studio, so she enjoyed the quiet solace of being alone.
Just when she thought of how much she enjoyed being in the quiet of the shop front section of the building she heard the little bell on the door. She set down her paintbrush, walked over to the counter and placed her doll like arms on the counter.
"How can I help you?" The tone and inclination of what she said was quite pleasant, but also quite manufactured.
15 notes
·
View notes
Text

Triangle handle detailing paint artist brush
0 notes
Text
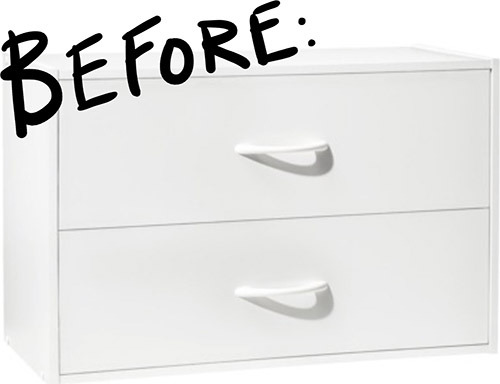
DIY Cabinet Makeovers
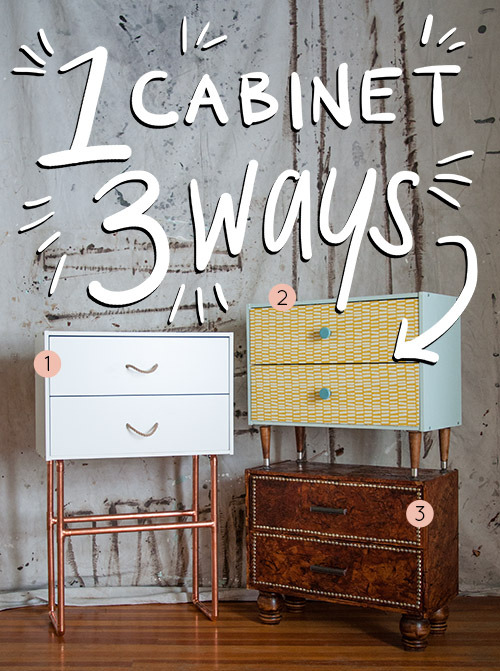
Project by Max Tielman:
Keeping up with the latest trends in design can often be overwhelming, especially when you’re pinching pennies, your budget too tight for the occasional furniture splurge. Working on a budget, however, doesn’t mean you have to forgo style — especially if you’re feeling crafty. To prove our point, we teamed up with our pals over at Target and completely revamped one of their most simple, flat-packed cabinet designs (retail price: $34.99) in three different popular styles. The best part? Each of these projects are easy enough to be accomplished in less than a day and without breaking the bank. Check out all three styles, plus directions for crafting each look after the jump! —Max

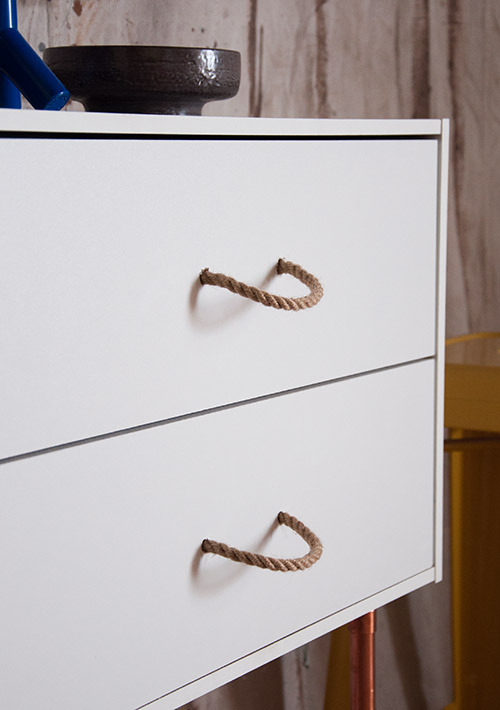
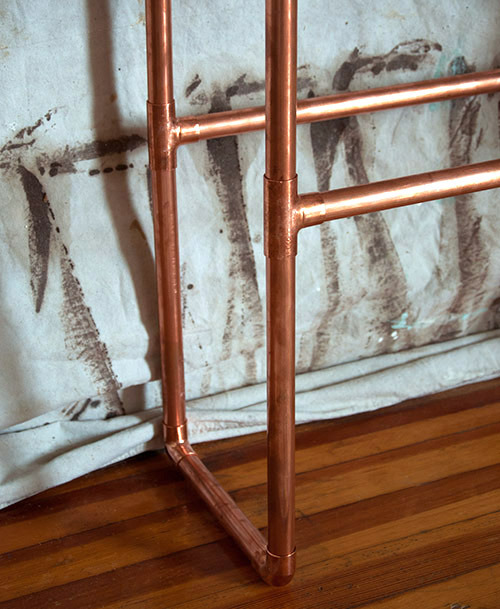

INDUSTRIAL CHIC
Materials
1 Room Essentials 2-Drawer Organizer (White finish)
About 13 feet of copper piping, 3/4 inch diameter (more or less based on desired height)
8 copper 90-degree elbows (3/4 inch diameter)
4 copper T-joints (3/4 inch diameter)
2 2-hole conduit straps (3/4 inch)
8 #10 3/4 inch wood screws (for attaching conduit straps)
Roughly two feet of rope
Power drill with bit to match rope thickness
Painter’s tape
Miter saw with blade made for cutting metal
Phillips screwdriver
1) Assemble cabinet according to manufacturer’s directions. Do not attach drawer pulls.
2) Cut copper piping using miter saw into the following lengths (you may want to adjust these based on the height you need):
8 inches (4 pieces)
21 inches (8 pieces)
19.5 inches (2 pieces)
3) Insert 2 21-inch pipe pieces into the top and bottom of each copper “T” joint.
4) Attach a copper elbow at the end of each 21-inch piece. Connect other side of elbows together with 8-inch pipe pieces. This should leave you with two separate long loop-shaped pieces of piping. These are your table legs.
5) Attach each 19.5 inch piece to the leftover center hold on each “T” joint in order to create a central brace that holds the table legs together (see photograph for reference).
6) Put cabinet on its side (face up) and attach legs to cabinet bottom with metal conduit straps.
7) Cover the screw holes on the drawer fronts with painter’s tape. Drill through each hole using a bit that corresponds with the thickness of your rope. Remove painter’s tape.
8) Cut rope into two evenly-sized pieces. Feed each rope piece into the drilled holes. Adjust size as desired. Affix rope pulls by tying a tight knot on each end on the drawer interior.
9) SAFETY NOTE: Because the cabinets are fairly light weight, you will need to use the wall-mounting attachment that is provided with the cabinet hardware. This prevents the cabinet from tipping over if rattled or opened too quickly. If you’d rather not see this bit of hardware, simply affix it to your cabinet on its underside. Done!


RETRO REVIVAL
Materials
1 Room Essentials 2-Drawer Organizer (White finish)
1 Room Essentials Chesapeake Sketch Window Panel in Yellow
Threshold Jessina Knobs in Aqua
Devine Color Paint in Horizon
4 Waddell Straight Top Plates
4 Waddell 5 1/2 inch Round Tapered Legs
Mod Podge (or similar craft glue, in glossy finish)
Shellac-based primer
Sand Paper
Wood Stain
2 Foam paintbrushes
1 regular paintbrush
X-Acto Knife (or similar craft knife)
Phillips screwdriver
1) Wash and dry curtain panel according to provided washing directions. Iron out any wrinkles with a warm iron.
2) Sand the outward facing surfaces of the cabinet frame (4 sides total).
3) Apply shellac-based primer to outward facing surfaces of cabinet frame and allow to dry. Follow with 2 coats of Devine Color Horizon Paint. Allow to dry.
4) Apply 2 coats of wood stain to tapered legs according to stain manufacturer’s directions. Allow to dry.
5) Sand the front-facing side of the drawer fronts.
6) Lay drawer fronts face-up, parallel to each other.
7) Apply a generous layer of Mod Podge to both drawer fronts.
8) Lay curtain panel fabric face-up on top of drawer fronts. Wipe firmly across drawer surfaces to remove any air bubbles and to secure fabric to drawer fronts.
9) Gently apply layers of Mod Podge on top of the portions of fabric that are covering the drawer fronts. Allow to dry thoroughly.
10) Cut excess fabric away from drawer fronts, leaving about an inch around the edges of the drawer fronts.
11) Flip drawer fronts upside down and gently cut away all remaining excess fabric with your X-Acto blade. In order to protect your floors or work surface, use the disassembled box that the cabinet came in as a cutting surface.
12) Attach Threshold knobs to the center of the cabinet, using the two pre-drilled knob holes as a guide. If you have a power drill handy, it’s helpful to drill a pilot hole before you screw the knobs in. Because the cabinet panels are thinner than most wood, use the knob screws provided with the cabinet rather than those provided with the Threshold knobs.
13) Assemble cabinet according to manufacturer’s directions.
14) Place cabinet on its side and drill four top plates into the corners of cabinet underside. Screw in tapered legs. Presto! All done!


VINTAGE GLAM
Materials
1 Room Essentials 2-Drawer Organizer (Espresso finish)
Pack of paper lunch bags
Kiwi Shoe Polish in Brown
4 4-inch Bun-Foot Table Legs
Threshold Vista Square Drawer Pulls in Oil-Rubbed Bronze
Dritz Nailhead Trim in Antique Gold
Mod Podge (or similar craft glue)
Sand paper
Wood Stain
Foam paintbrush
Phillips screwdriver
1) Stain table legs according to stain manufacturer’s directions. Allow to dry.
2) Assemble cabinet frame according to manufacturer’s directions. Leave drawers unassembled at this time.
3) Sand all portions of cabinet that will be visible, including drawer fronts.
3) Decoupage your “faux leather” finish onto all outwardly visible parts of cabinet frame and drawer fronts. To create a distressed leather look, tear brown paper bags into non-uniform pieces, making sure there are no creases or straight lines. Crumple paper in your hands, uncrumple paper, apply a generous amount of Mod Podge to cabinet surface and place paper piece onto primed surface. Secure with a thin layer of Mod Podge. Repeat until entire cabinet frame and drawer fronts are covered.
4) Apply two layers of brown shoe polish to decoupaged surface. Create a uniform look by applying in small, circular strokes. Allow to dry.
5) Apply nailhead trim to the border of each drawer front, following the trim manufacturer’s directions.
6) Attach drawer pulls to drawer fronts using the pre-drilled holes. Because the cabinet material is thinner than most wood panels, use the knob screws that are provided with the cabinet, not the screws provided with the drawer pulls.
7) Assemble cabinet drawers and attach to cabinet frame following manufacturer’s directions.
8) Place cabinet on its side (front up) and screw in top plates at corners. Attach table legs. Done!
2 notes
·
View notes
Text
CS major here. Taking a course on ethical CS practices. Have to say that software being seen as copyrightable is fucking stupid to me. It's a product. A tool. Patentable, sure. Copyrightable? I don't think so. The imagination and design process going into software is much more similar to that that goes into designing a manufacturing process, not that that goes into producing a character or writing a novel.
Anyway, this is a bit tangential to the above post. The thing is that I do believe in intellectual property to some degree or other; I think producers of intellectual property should be rewarded for that production. So I don't agree that all software should be open-source. You wouldn't use a paintbrush without paying for it, after all.
However, I do agree that software should be transparent. Making it impossible or nigh-impossible to see inside of the box that does the shiny yay funtimes for you is wrong, regardless of if it's for copy protection or not.
Having said that, I also acknowledge that this would make using the tool without providing recompense to the developer much easier -- you could just remove the code that requires an access key, for instance.
Still, I'm more on the side of 'the program should be reviewable by outsiders to check for malicious activity,' and that might not necessitate making the base code 100% visible to everyone. I think there's some middle ground that we can pursue that protects intellectual property (the same ownership type that allows digital artists to make a living or authors to sell books, just fyi. You don't want to get rid of this, trust me) while also forcing software to be more transparent and easily reviewed for malicious conduct.
PS: Feel free to debate. My mind isn't fully decided on this issue tbh, and I'd love to hear more perspectives. Just miss me with the standard Tumblr aggressiveness, please. I don't respond well to aggression.
all software should be open source wtf. u expect me to run this on my own computer without knowing what its doing???
car manufacturers dont weld the hoods shut to keep ppl from copying their engines. books arent written with a military-grade cipher to avoid plagiarism. and we dont let food have "secret formulas" anymore bc too often one of the "secret ingredients" was fucking lead
when ur distributing a product to the public u forfeit the right to hide whats inside it, u dont get to hand out a black box and expect ppl to just trust u when u totally swear it doesnt have a microphone inside
29K notes
·
View notes
Text
Paint Roller Brush
Introduction
In the dynamic world of painting and decorating, the tools you choose can significantly impact the quality and efficiency of your work. Among these tools, paint roller brushes stand out for their ability to provide smooth, even coats over large surfaces, making them indispensable for both professionals and DIY enthusiasts. Kabawat Brush Company, a distinguished manufacturer based in Bhiwandi, Maharashtra, has been at the forefront of producing high-quality paint roller brushes that cater to a diverse range of painting needs.Make in India Tradekabawat.tradeindia.com+3Tradeindia+3MYTAT+3

About Kabawat Brush Company
Established in 2011, Kabawat Brush Company has carved a niche in the Indian market as a reliable manufacturer and supplier of painting tools. With a commitment to quality and innovation, the company offers a broad spectrum of products, including roller brushes, wall paint brushes, and various specialized brushes designed to meet the evolving demands of the painting industry. Their dedication to excellence is evident in their ISO 9001:2008 certification, underscoring their adherence to international quality standards. kabawat.tradeindia.com
The Significance of Paint Roller Brushes
Paint roller brushes have revolutionized the painting process by enabling quick and uniform application of paint over expansive areas. Unlike traditional paintbrushes, rollers can cover more surface area with less effort, reducing the time and labor involved in painting projects. This efficiency makes them particularly valuable for large-scale projects such as painting walls, ceilings, and floors.
Kabawat's Range of Paint Roller Brushes
Kabawat Brush Company offers an extensive selection of paint roller brushes, each tailored to specific applications:
Industrial Paint Rollers: Designed for heavy-duty use, these rollers are ideal for industrial environments where durability and performance are paramount. Tradeindia
Mini Paint Rollers: Perfect for detailed work and hard-to-reach areas, mini rollers provide precision without compromising on the quality of the finish. Tradeindia
Foam Paint Rollers: These rollers are suitable for smooth surfaces and deliver a fine finish, making them ideal for interior walls and ceilings. Tradeindia
Designer Paint Rollers: For those looking to add texture or patterns to their walls, designer rollers offer an easy way to achieve decorative effects.
Wall Painting Rollers: Specifically crafted for wall applications, these rollers ensure even coverage and a professional finish. Tradeindia
Quality and Manufacturing Excellence
At Kabawat Brush Company, quality is not just a buzzword but a foundational principle. The company employs stringent quality control measures throughout the manufacturing process to ensure that each product meets high standards of performance and durability. By sourcing premium raw materials and utilizing advanced manufacturing techniques, Kabawat ensures that their paint roller brushes deliver consistent results, enhancing the painting experience for users.
Commitment to Customer Satisfaction
Understanding that customer satisfaction is pivotal to success, Kabawat Brush Company places a strong emphasis on meeting and exceeding customer expectations. Their team of dedicated professionals works closely with clients to understand their specific needs, offering tailored solutions and expert advice. This customer-centric approach has fostered long-term relationships and a loyal customer base.
Contact Information
For those interested in exploring Kabawat Brush Company's range of paint roller brushes or seeking expert guidance on selecting the right tools for their projects, the company can be reached at:
Address: B No. 1st Floor, Nirmal Compound, Opp. Bhola Mandi, Purna, Bhiwandi, Maharashtra, 421302, Indiakabawat.tradeindia.com+2Tradeindia+2Tradeindia+2
Phone: +91-9821825663
Email: [email protected]MYTAT
Kabawat Brush Company's unwavering dedication to quality, innovation, and customer satisfaction positions them as a trusted partner for all painting tool needs. Whether you're a professional painter or a DIY enthusiast, their comprehensive range of paint roller brushes is designed to help you achieve impeccable results with efficiency and ease.

For more information or to request a consultation, visit their website: https://www.indiamart.com/kabawatbrushcompany/
To stay updated with the latest posts, follow us on social media:
📸 Instagram - https://www.instagram.com/kabawatbrush/
📘 Facebook - https://www.facebook.com/kabawatbrushcompany/
📌 Pinterest - https://in.pinterest.com/kabawatb/
🧵 Thread - https://www.threads.net/@kabawatbrush
🥁 Tumblr - https://www.tumblr.com/kabawatbrush
▶️ YouTube - https://www.youtube.com/@KabawatBrushCompany
Contact: Kabawat Brush Company +91- 82096 17061 / +91- 98218 25663 https://www.indiamart.com/kabawatbrushcompany/
Digital Partner:
TVM INFOSOLUTIONS PVT LTD
Contact: TVM Info Solutions Pvt. Ltd.
+91-9004590039
Follow us on Social Media
🌐 Website
📸 Instagram
📘 Facebook
🔗 Linkedin▶️ Youtube
0 notes
Text
How to Prepare Your Walls for a Flawless Paint Job

A fresh coat of paint can completely transform a room, but if you don’t prepare your walls properly, even the best paint job can look sloppy. Proper wall preparation ensures smooth application, better paint adhesion, and a long-lasting finish. Here’s a step-by-step guide on how to get your walls ready for a flawless paint job.
Step 1: Gather Your Supplies
Before starting, make sure you have all the necessary tools and materials, including:
Drop cloths or plastic sheeting
Painter’s tape
Spackling paste or joint compound
Putty knife
Sandpaper (120- to 220-grit)
Mild detergent or trisodium phosphate (TSP)
Sponge or cleaning cloth
Primer
Paintbrushes and rollers
Having everything on hand will make the process smoother and more efficient.
Step 2: Clear the Room and Protect Surfaces
To avoid paint splatters on furniture and flooring, remove as much as possible from the room. If you can’t move heavy furniture, cover it with drop cloths or plastic sheets. Also, cover the floors with drop cloths to catch any drips or spills.
Use painter’s tape to protect baseboards, trim, door frames, and window sills. Press the tape down firmly to prevent paint from bleeding underneath.
Step 3: Clean the Walls
Paint adheres best to a clean surface, so it’s essential to remove dust, dirt, and grease.
For lightly soiled walls: Use a damp cloth or sponge to wipe them down.
For greasy or heavily stained walls: Use a mild detergent or a TSP solution to cut through the grime.
For bathroom or kitchen walls: Consider using a mold-resistant cleaner if there are any signs of mildew.
Allow the walls to dry completely before moving to the next step.
Step 4: Repair Imperfections
Examine your walls for cracks, holes, or dents. These imperfections can become more noticeable after painting, so it’s best to fix them beforehand.
Use spackling paste or joint compound to fill in small holes and cracks.
For larger holes, use a patch kit and follow the manufacturer’s instructions.
Once the filler dries, sand the area smoothly with fine-grit sandpaper (120- to 220-grit) to ensure an even surface.
Run your hand over the repaired area to check for smoothness. If you feel any bumps, sand them down further.
Step 5: Sand the Walls
Even if your walls seem smooth, lightly sanding them helps remove minor imperfections and ensures better paint adhesion.
Use a fine-grit sandpaper or sanding block to gently smooth the surface.
For glossy walls, sand them a bit more to create a slightly rough texture that will help the new paint stick better.
Wipe away the dust with a damp cloth or use a vacuum with a brush attachment.
Step 6: Apply a Primer
Primer is essential for a professional-quality paint job. It provides a smooth base, helps the paint adhere, and improves coverage, especially if you’re changing from a dark to a light color.
Use a high-quality primer suitable for your wall type (e.g., drywall, previously painted walls, or stain-blocking primer for high-moisture areas).
Apply the primer evenly with a roller or brush.
Let it dry completely before applying the paint.
If the old paint is dark or there are stains, consider applying a second coat of primer for full coverage.
Step 7: Final Inspection
Before painting, do a final check:
Ensure there are no dust particles or debris on the walls.
Check for any missed cracks or dents and fix them if needed.
Make sure the primer is fully dry and even.
Once everything looks good, you're ready to start painting!
Conclusion
Taking the time to properly prepare your walls will make a huge difference in the final result of your paint job. Cleaning, repairing, sanding, and priming may seem like extra steps, but they ensure a smooth, long-lasting, and professional-looking finish. By following this guide, you’ll set yourself up for a flawless paint job that enhances the beauty of your space.
Now, grab your brushes and rollers—it’s time to bring new life to your walls!
0 notes