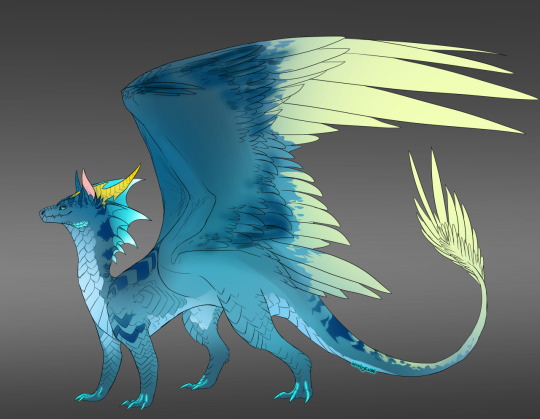
#omg that took a while
Explore tagged Tumblr posts
Visit Tumblr Blog
Explore Tumblr blogs with no restrictions, modern design and the best experience.
Last Seen Tumblr Blogs


Fun Fact
Tumblr has been providing a Korean-language service since 2013.
Text
First of thanks for the tags @messingwithmoony and @uhhlifeig !!
Second: I HAVE LIKE 170+ MOOTS OMG??? TY?? (yes i counted)
Time to find out how many people I can tag lol
@siriusblackdevotee @vulcajes @starving-marauder-lover @ari-hearts @lex-dr4ws @nourinzz @sparklingwatermelo @hotteststar @luckygreeenblogsss @swagrunawaywinner @madmadder @distinguishedvoidkid @thepocketeater @keytar-official @izzythedemigod @sanemero57tempmain @spookyblazecoffee @nontheanon @imonthenoflylist @cemetriiez @emperordipsh-t (i can't tell if tumblr was just acting up or if i really forgot to follow you back till now but if it's the latter, hii! dunno how that happened lol) @stars-and-leather (i apparently forgot to follow you back too; but hi!!) @ashstillalive (again, forgot to follow you back, so hii now!!) (i'm wondering if maybe tumblr messed with the notifications one day bc me missing 3 people relatively close chronologically is weird) @therewasnofloorbtw @sweeterelease @green774 @justazebra @reggiescat @hyperfixationsgobrrrrrrrrrrrrrrr (it's a good thing tumblr suggests your name lol bc that is a lot of Rs) @axolotl-detector @aieoggen @marysgffr @secretly-a-goose @madame-marauder @metalmouth0004 @lusxnei6 @whydousernamesevenexist @eggedagain @littlegayduck @salubriousbean @nanochittle (HI NAPS hehe) @onyxxberry @this-machine-runs-on-coffee @thatacefrog @ethan-torchios-bitch @communist-usa-real2 @yuuricino @mybedroomceilingsbored
Rb and tag your mutuals. No reason, just to let them know you appreciate them.
Moots <3
@imasillygooose @mat-of-superwholock @furious-poetry-review @why-am-i-a-moth @breadbut3d @doctahpants @raspberrydee @disasterhals @priincessboy @spacecurlsandbowties @reyah-song @drop-of-infinity @chilly-shark @tangerinejuice @lilgayboy475 @codex-arcene @bananaterracotta-pie @icarianstars @alltoowellsscarf @jodie-whittakers-suspenders @blogurlnotfound
Holy shit there's a lot of you <3 love you guys. Not to get sappy on main but y'all make this hellsite (affectionate) a really great place to be, and I've found a great sense of community with you all. Much love <3 -Cas
881 notes
·
View notes
Text


found this cool show, don't know if yall know of it
original screenshots below vvv


<3 <3 <3 <3


no filters + better quality
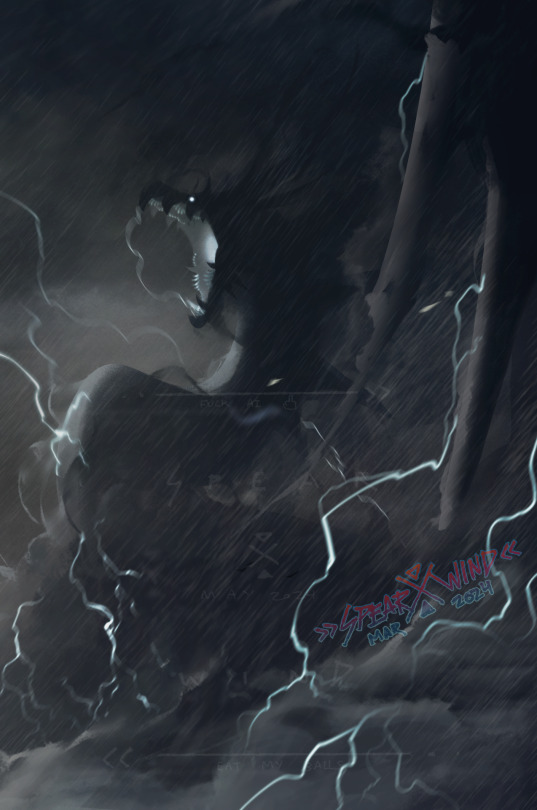
#hoodedjelly art#inanimate insanity#inanimate insanity 2#inanimate insanity 3#ii paint brush#ii fan#ii oj#ii orange juice#ii paper#payjay#ii nickel#ii balloon#nickloon#ii knife#ii gijinka#osc#object show#might do this again but omg this took a while
1K notes
·
View notes
Text

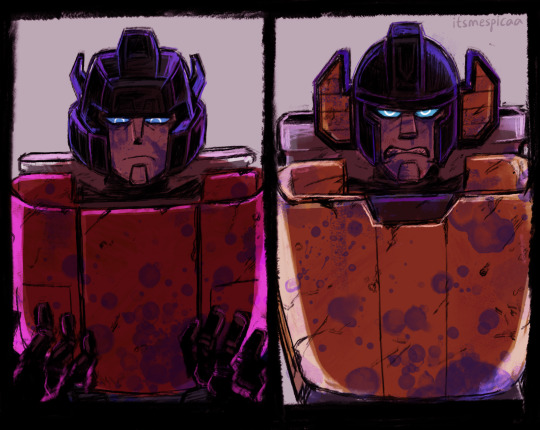
"Do you…also kinda miss those days in the mines, bro? Sure, it sucked to the pit and back but…things were so much simpler too, yknow?"
"…Shut up."
#transformers#transformers one#maccadam#sideswipe#sunstreaker#spica draws#war changes you :( they can never go back to how they used to be.....#ITS FINALLY DONEEEEEEEE OMG#IM SO HAPPY WITH THIS BUT MAN IT TOOK A WHILE 😭😭😭😭😭 i couldnt decide what expression they would make and how to render and fdhsjkf yea#based on my fic thAT I HAVENT FINISHED RAAAAAAARGHHHFHJKDSF- anyone wanna be my beta reader lol im being fr rn#cw blood#???? i guess?
446 notes
·
View notes
Text


This shits easy
#my art#sonic the hedgehog#cream the rabbit#blaze the cat#sonic fanart#sth#FINALLY know how to draw these characters omg it took a while#super un stable
454 notes
·
View notes
Text

✨ Simple Gif Colouring for Beginners ✨
I wrote up my basic gif colouring process for a friend recently, but a couple of people here mentioned they'd also find it helpful! so, as requested, this is a beginner-friendly walkthrough of the way I colour my gifs :) it's aimed at brand new gif makers with no prior experience with photoshop or photo editing.
when I first started gif making I found colouring and photoshop in general suuuper daunting, so I've tried to simplify everything here as much as possible. hopefully this will be relatively easy to follow and not too intimidating!
a couple of things to begin with:
I'm only talking about colouring here - this is not a full gif making tutorial. I've linked to some of my favourites of those here!
I personally like to make bright, 'clean' looking gifs with vibrant but natural colours, so that is the style of colouring this tutorial is geared towards. most of gif colouring is subjective and about personal taste - the only thing that I'd say is possible to get wrong is skin tones, which I talk about a lot in this guide.
as I mostly gif Thai dramas, most of the advice is geared towards colouring for East Asian/South East Asian skin tones - but the techniques should be fairly universally applicable (and here are some tutorials that talk about gif colouring for other skin tones).
I'm not an expert! I'm not claiming this is the best or the only way to colour gifs - it's just how I do it.
this post is very image-heavy. if the images aren't loading (or the gifs are running slowly or cutting/looping weirdly), then try viewing the post in its own tab (rather than on the your dash or someone's blog) and refreshing the page.
okay, full walkthrough beneath the cut!
contents:
1. intro a. natural gif colouring goals b. very very basic colour theory 2. super simple colouring (the essentials) a. curves b. selective colour (and skin tone correction) c. hue/saturation d. saving and reusing colouring e. another simple colouring example 3. other adjustment layers a. brightness/contrast b. levels c. vibrance d. colour balance e. channel mixer 4. troubleshooting a. curves b. saturation 5. fin!
1. intro
the colouring part of gif making can be super overwhelming, especially if (like me when I first started!) you're completely new to photoshop and/or have no experience with colour theory or photo/video editing.
if you're opening photoshop and making gifs for the first time, I highly recommend getting used to making a few basic, uncoloured gifs to begin with. just to practice, rather than post anywhere (though you can always come back and colour them later if you want) - but it'll make the rest of the process much easier if you're already beginning to get used to working in timeline mode of photoshop. give yourself a bit of time to practice and get a feel for things like how many frames you tend to like in a gif, where you like to crop them for the best loop, what kind of aspect ratio you like etc* - so that you're not trying to navigate all of that for the first time on top of everything else!
* frames: for me between 60-90 frames is ideal, but 40-120 frames is the absolute min-max I'd personally use in a normal gifset loops: for the smoothest loops, try to avoid cutting someone off mid-movement or mid-word if possible. aspect ratio: for full-size (540px) gifs, I tend to go for either 8:5 (slightly 'skinnier' gifs), 7:5, or 5:4 (particularly big, thick gifs lmao)
✨ natural gif colouring goals
part of what can be so daunting about starting gif making is not knowing where to start or what you want to achieve. this is definitely something that gets easier with practice - the more gifs you make, the more you'll get a feel for what kind of look you like and the more instinctively you'll know how to get there. it also helps to see if any gif makers you like have made "before and after colouring" posts - these can help with getting a sense of the kinds of changes made through gif colouring. here's one I made!
in general, I like to make my gifs bright and 'clean' looking, with vibrant but natural colours. these are the things I'm usually hoping to achieve with colouring:
brighten dark scenes
remove muddy, yellowish lighting or filters
saturate colours
correct any skin lightening filters or overexposure
make lighting and colours as consistent as possible between gifs within a single gifset, especially gifsets featuring gifs from multiple scenes/episodes/videos
this guide is focusing on natural colouring, but of course there are many cool ways to make stylised/unnaturally coloured gifs. imo you'll need to master these basics first, but if you want to learn how to do things like change the background colour of gifs or use gradients or other cool effects, then @usergif's resource directory has loads of super helpful tutorials!
✨ very very basic colour theory
[disclaimer! I don't know shit about fuck. I do not study light or art. this is just an explanation that makes sense to me exclusively for the purposes of gif making.]
the primary colours for light/digital screens are red, blue, and green. having all three colours in equal measures neutralises them (represented by the white section in the middle of the diagram).

so to neutralise a colour within a gif, you need to add more of the colour(s) that are lacking.
in practice this usually means: the scene you want to gif is very yellow! yellow is made of red and green light, so to neutralise it you need to add more blue into your gif.
it can also mean the reverse: if you desaturate the yellow tones in a gif, it will look much more blue.
looking at the colour balance sliders on photoshop can make it easier to visualise:

so making a gif more red also means making it less cyan.
removing green from a gif means adding magenta.
taking yellow out of a gif will make it more blue.
tl;dr:
neutralise yellows by adding blue (and vice versa)
neutralise reds by adding cyan (and vice versa)
neutralise green by adding magenta (and vice versa)
2. super simple colouring (the essentials)
starting with a nice sharpened gif in photoshop in timeline mode. (these are the sharpening settings I use!)
some scenes are much harder to colour than others - it helps to start out practising with scenes that are bright/well-lit and that don't have harsh unnaturally coloured lights/filters on. scenes with a lot of brown/orange also tend to be harder.
I usually save a base copy of my gif before I start colouring just in case I end up hating it, or find out later that it doesn't quite fit right into a set and need to redo it etc.
so here is my base gif!

it's an okay gif, but it has a bit of a yellow tint to it that I want to reduce.
colouring is easiest to do in adjustment layers, which can be found under layer -> new adjustment layer - or for me they are here:

there are lots of different types of adjustment layers that do lots of different things - but for me the absolute essentials for colouring are curves, selective colour, and hue/saturation.
I also use brightness/contrast, levels, exposure, vibrance, colour balance, and channel mixer sometimes, depending on the gif - but I use curves, selective colour, and hue/saturation on every single gif.

✨ curves layer
the first thing I always do is a curves layer. when you first open one it will look like this:

first I usually click the ‘auto’ button, just to see what happens. sometimes it makes a big difference (it usually brightens the gif a lot) - but on this gif it didn’t do much.
if it had made the gif look nicer then I would have kept it and added a second curves layer on top to do the rest of these steps.
the next step is selecting the white and black points with the little eyedropper tools.
the bottom eyedropper lets you pick a white point for the gif. click somewhere super light on the gif to see what happens - for this gif, I clicked on the lampshade on the left. if it looks weird, I just undo it and try somewhere else - it usually takes a few goes to find something that looks good.
here's what that did to the gif:

then I pick the top eyedropper and use it to pick a black point by clicking somewhere really dark, again playing around until I find a black point that looks good.
here's what the gif looks like after picking the white and black points:

this can take some experimenting, but you can make super easy drastic changes to your gif just with this. in this case, the curves layer took out a lot of that yellowy tint.
and this is what the curves graph looks like now:

you can click and drag those lines to make further changes if you want - I usually leave them alone though. the colours of the lines indicate which colours have been changed in the gif - for example, you can see from that steep blue line on the graph that blue has been added to neutralise those yellows.
next I usually do another curves layer and just press the ‘auto’ button again to see what happens. usually it brightens the gif a bit more, which I like.
‼️if nothing is working: usually with a bit of fucking about a curves layer works well - but sometimes you can’t find a good white and black point anywhere, and instead your gif turns wacky colours and nothing looks good. this happens more often with very heavily colour tinted scenes :( the troubleshooting section at the end goes over some options, including starting with a levels layer instead.
✨ selective colour (and skin tone correction)
skin tones are made up of a mixture of yellow and red.
removing yellow (or adding blue or red) to a gif will make the skin-tones too red - and removing red (or adding cyan or yellow) to a gif will make the skin-tones too yellow.
adding blue to this gif with the curves layer took out the yellowy tint, which I wanted - but it also took the yellows out of Kim's skin tone, which I don’t want. so I need to put yellow back into the skin tones specifically - without putting it back into the rest of the gif.
selective colour layers let you select an individual colour and adjust the levels of other colours within that colour. you can change how yellow the green shades are, or how much cyan is in the blues, for example.
I need to add yellow back into the red tones to correct the skin tones on this gif. this is the case for most gifs in my experience - the vast majority of the time, unless a scene is very heavily tinted in another colour, a curves layer will add blue/remove yellow.
in the 'colors' dropdown, select the 'reds' section and drag the 'yellow' slider higher - this will add more yellow into just the red shades within the gif.

the amount of yellow you need to add back into the reds depends on how much yellow was taken out of the gif initially - I just play around with the slider until it looks right. if you're not sure, it helps to have some neutrally-coloured (not white-washed!) reference photos of the people in your gif to compare to.
here's the result. Kim's skin is a lot less pink toned and much more natural looking:

✨ hue/saturation
this adjustment layer lets you adjust the hue and saturation of the gif as a whole, and also of each colour individually.

I don't use the hue or lightness sliders unless I'm trying to do something more complicated with the colouring.
clicking the dropdown menu that says 'master' lets you edit the saturation of each colour individually. this is useful if your gif is still super tinted in one colour.
I thought the yellows on this gif were still slightly too bright, so I switched to the yellow channel and desaturated them slightly. (remember if you do this then you need to go back to selective colour and add more yellow into the red skin tones to balance out the desaturation!)
then I increased the 'master' saturation of all the colours to +5:
I usually find the right amount of saturation is somewhere between +5 and +12, but it depends on the gif.
‼️if the gif feels undersaturated, but the saturation slider isn't helping/is making the colours worse, try a vibrance layer instead.
done!

✨ saving and reusing colouring
you can copy and paste adjustment layers between gifs to make your colouring even across each of your gifs for one scene - so if you're making a set of multiple gifs of the same scene, or you think you might want to gif the same scene again in the future, you can save it as a psd so you can reuse the colouring again later.
each gif's colouring will then still need tweaking - different cameras/angles/shots of the same scene can still start out with slightly different colouring.
I recommend uploading the gifs as a draft post on tumblr so you can see what they all look like next to each other and catch any inconsistencies.
✨ another one! (speedrun!)

HI KEN!
the white point for the curves layer was in the window behind them.
the curves layer removes the muddy yellow tint, but again it makes their skin tones (especially Ken's) very red toned, which is adjusted by the selective colour layer.
3. other adjustment layers
imo many many gifs can be coloured really nicely with just those three adjustment layers, but some need different adjustments.
✨ brightness/contrast

pretty self explanatory!
I personally usually avoid using the 'brightness' slider because I rarely like the effect - I only tend to use the 'contrast' one.
the 'auto' button is sometimes useful though, especially if you’re struggling with the curves layer.
✨ levels

levels alters the white and black points of the gif, like curves - but unlike curves it doesn't also alter other colours.
use the sliders beneath the graph to alter how dark/light the gif is. you can slide the black slider further to the right to make the blacks darker, and the white slider to the left to make the whites lighter.
levels is a good place to start if your curves layer isn't working.
(I'm going to hit the image limit for this post lol so here are some screenshots of a table I made to demonstrate this rather than actual gifs. sorry!)


on both sides, I dragged the sliders up to where the big jumps are on the graph - this is usually a good place to start!
✨ vibrance
vibrance... makes the colours more vibrant. it's more subtle than saturation.
it's really helpful for gifs that feel grey. sometimes adjusting saturation just makes the greys kind of weirdly tinted, but a vibrance layer can fix that.

vibrance is much more subtle!
✨ colour balance

colour balance affects the overall balance of colours within a gif.
it's good for scenes with heavy tints.
I tend to stick to the 'midtones' dropdown, but you can also alter the colour balance within the shadows and highlights if you want.


✨ channel mixer
I avoided channel mixer for such a long time because it scared me. but it's great for scenes that are very heavily tinted in one colour.
basically, it works with the levels of red, green, and blue within a gif. you select an output colour and then play around with the levels of the colour you selected within each other colour.
kind of the reverse of selective colour?

so in the 'blue' channel, the levels of blue are at 100%, and the levels of red and green are at 0% - but you can impact how much blue is in the reds and greens and blues.
this tutorial explains it well - but imo the best way to get to grips with channel mixer is just to play around with it a bit (sorry)
(when I made this guide for my friend, I also made a slightly more complicated gif colouring walk-through that included using channel mixer. there isn't space to include it within this post, but if anyone is interested I could always upload it as an 'intermediate' gif colouring tutorial - lmk!)
4. troubleshooting
‼️curves
usually with a bit of fucking about a curves layer works well - but sometimes you can’t find a good white and black point anywhere, and instead your gif turns wacky colours and nothing looks good. this happens more often with very heavily colour tinted scenes :(
for example, with this base gif:

using many of the brightest points as a white point turn it wacky colours, like this:

yikes :(
some options for these cases:
try brightening the gif first with the 'auto' button on the curves layer or with a levels layer. having a brighter gif to start with can give you better options for picking a white point.
try finding an alternate, whiter/brighter white point. look for places the light reflects - on this gif, using the light on Porsche's cheekbone works well as the white point. it also helps to find places that would be white if the scene wasn't tinted - the lightest part of a white shirt is often a good place to start, for example.
skip the curves layer, and instead use a levels layer to alter your white/black points, and colour balance or channel mixer to balance the colours.
‼️over/undersaturation
if your gif (especially the skintones) is looking a little washed out or lifeless, it might be undersaturated. boost that saturation - or if that's not working, try a vibrance layer.
oversaturation is often easiest to spot in the mouths and ears of any people in a gif. if the mouths are looking unnaturally, vibrantly red, then you've gone too far with the saturation.
5. fin!
and done! I hope this was coherent helpful to somebody.
if there's anything that I've missed or that doesn't make sense pls feel free to shoot me an ask or a message and I'll do my best to help! I've also collated a bunch of additional reading/resources below.
happy gifmaking 🥰
✨ some links!
photoshop basics by @selenapastel
gifmaking for beginners by @hayaosmiyazaki
gifmaking guide for beginners by @saw-x
dreamy's gif tutorial by @scoupsy-remade (includes instructions on how to blur out burned-on subtitles or annoying video graphics)
beginner's guide to channel mixer by @aubrey-plaza
how to fix orange-washed characters by aubrey-plaza
colour correcting and fixing dark scenes by @kylos
does resampling matter? by usergif
how to put multiple gifs on one canvas by @fictionalheroine
watermarking using actions by @wonwooridul
resource directory by @usergif
#i got a couple of asks about this so i figured i'd type it up as a post#it's been sitting in my drafts for a while now though i'm so sorry omg.#i had to replace my laptop and it took me a while to get round to downloading photoshop on the new one#but i hope this is helpful!!#gif making#tutorial#photoshop tutorial#colouring tutorial#coloring tutorial#gif colouring#gif coloring#photoshop resources#gif tutorial#gif resources#userbunn#uservik#darcey.txt#darcey.gif#usergif
853 notes
·
View notes
Text
Tumblr: You seem to like Bruce Wayne, aka Batman.
Me: Yeah, I do.
Tumblr: Then can I recommend you these posts tagged "Anti Bruce Wayne"?
Me: Why do you hate me so much?
#my ramblings#bruce wayne#batman#dc comics#wtf tumblr? exposing me to that?#also someone using the scene where Bruce took Jason to where he died as if Bruce would ever do thqt#why would he never do that? simple because it's simply fucking disgusting and awful and unforgivable and wtf#like comics writers stop writing characters like asshole all the time omg#but also gotta love the “see Bruce is awful for doing that” while ignoring how Jason tried to kill Mia in Green Arrow#like buddy if you can comprehend that sometimes characters are badly written I think you can understand how the return to Ethiopia is bs#also Jason trying to kill Mia was written by the same who wrote utrh so like...#me looking at comics: you are so awful I hate you wtf
166 notes
·
View notes
Text

Birdman doodles
#my art#omg he’s so fun to draw?? i had a really good time drawing him!!#i’ve always loved drawing wings but he makes it even better#it took me a while to figure out his hair tho but i love it 😂#he’s a cutie#bnha#mha#takami keigo#hawks#boku no hero academia#my hero academia#bnha fanart#mha fanart
606 notes
·
View notes
Note
Happy 10th birthday to Cercerion!
OUGHHH UR RIGHT CERCIE IS 10 YEARS OLD NOW !!!!!!

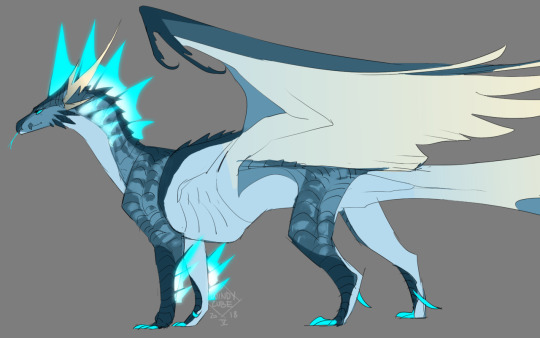
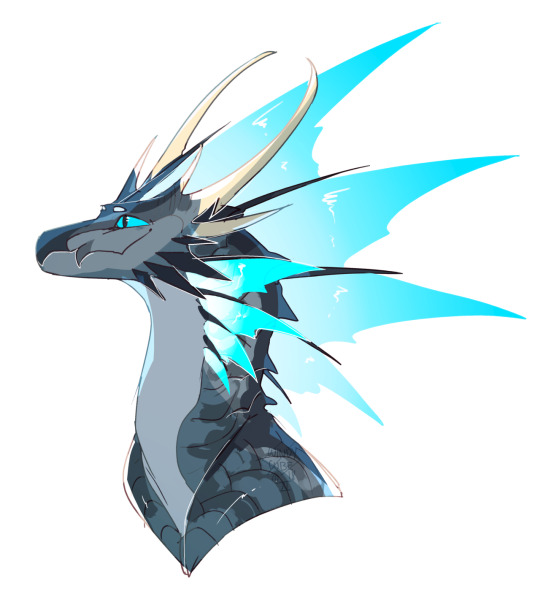
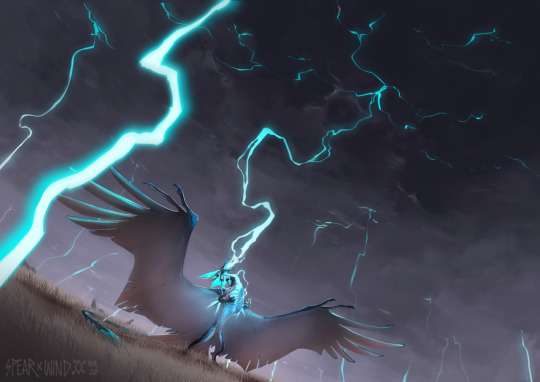

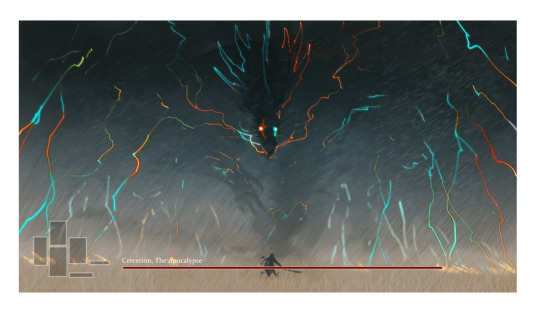
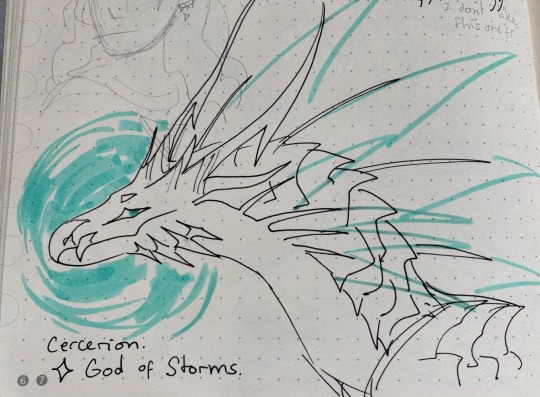
HAPPY BIRTHDAY BABY BOY BELOVEDEST DID NOTHING WRONG EVER IN HIS WHOLE LIFE !!!!!!!!!!!!!!!!!!!!!!!!!!!!!!!!!
#ALSO IM RLY HAPPY HIS OLD DESIGN IS NOW MUCH OLDER THAN HIS FIRST DESIGN WOAH!!!!!!#since i drew the old one SO MUCH back in 2014 i remembered it as being so super prevalent. that when i changed his head shape a couple year#it took a while to get used to the not boxy head but god it was so much more fun to draw the beak. and now its the standard#and it makes me rly happy fr fr. i actually thought i changed his design like only 2 years ago but it was SIX YEARS WHAT!! HOW TIME FLIES..#ask#cercerion#SORRY I JJST WANTED TO REPOST ALL OF THESE#omg dude this also means u and i have known each other for 10 years thats CRAZY#this photoset is so funny its like he went from being :D to being >:U over the years but i assure you now hes more chill than before#HIS COLORS HAVE NOT CHANGED FOR EIGHT YEARS ALSO WHATTTTT i just chose the perfect hues forever#sobbing and crying i love this guy so much#i dont show him online a lot or at least i didnt as muhc until recently but hes always in my brain#cercerion may as well be a part of my soul at this point#HAPPYU TENTH BIRTHDAY CERCIE I LOVE YOU SOOOO MUCH!!!!!!!!!!!!!!!!! BLOWING KISSES INTO A HURRICANE FOR U#windyart#sure ill put it in my tag. this is literally my art
204 notes
·
View notes
Text

Darling, I Want to Destroy You
#bill cipher#stanford pines#gravity falls#billford#fuck I made this XD#don't draw often but omg this took a while!
93 notes
·
View notes
Note
can you draw aisho and yotsuyu from part 8 theyre actually my favorite divas but i never see any fanart for them and you make amazing fanart

explodes them one billion times 💥💥💥
#omg sorry that took so long im reading part 8 rn but i just started and i wanted to wait until i was fully introduced to these guys 😭😭#ALSO AISHO DIDNT DESERVE ANY OF THAT SHIT 😭😭 ALL HE DID WAS GET CHEATED ON TURN TO STONE AND HIT BY A BUS WTF😭😭😭😭😭#also when anyone compliments my art i do a little giggle while kicking my legs and twirling my hair 💥💥💥💥💥💥💥#aisho dainenjiyama#yotsuyu yagiyama#jojolion#jjba#jojos bizarre adventure#my art
58 notes
·
View notes
Text


Care that I'm mad, care that I'm sad, it's so bad, it's funny, care if I cry, care if I die, you only care about money. Sellin' my soul to a psycho, they say I'm so lucky, better act like you're lucky, honey.
ANGEL OF MY DREAMS JADE, 2024
#jade thirlwall#dailywomen#usermusic#userpcultures#brunettesource#userwocs#tuserlisa#namjoonlisa#tuserandrea#chewieblog#usercherry#userladiesblr#userloren#userewa#usernarco#stephlays#pocedit#femalegifsource#littlemixedit#little mix#jade angel of my dreams#tw flashing#it took me a while to get it but i did!#i think this is my fav debut of them 3 omg#byrochi#*long post
276 notes
·
View notes
Text
“I thought I was supposed to be the old person in this relationship,” Toji’s voice rings out in the previously quiet atmosphere, makes your head whip up in surprise. your concentration is broken from your prior engagement, hands slowing as you can’t help the smile that grows on your face at his teasing.
“Crocheting is for any and all ages,” you snark back at him, taking in how he watches the way your hands still move rhythmically—yarn over, pull through two loops, yarn over, pull through the last two, chain four, repeat. “You weren’t talking shit when I made you that sweater for your birthday.”
“Yeah I did, cause it itched like all hell.” He teases, makes you stick your tongue out at him playfully. he wore that sweater everywhere, to the point you damn near had to rip it off of him to put it in the wash. (the only times he didn’t wear it was when he knew he’d get it dirty while doing his…business ventures, which you didn’t mind. you’d rather he go a day without wearing it than googling how to wash blood out of a crocheted sweater that took you weeks to make.)
by the time you snap back to reality, Toji has already crossed the room, standing in front of where you sit cross legged in the comfy recliner he brought just for when you crocheted. it takes you aback by how quickly he moved, so silently, face suddenly warm as you look up at him from under your lashes. his eyes are dark, shadowed by his fringe, his hands in his pockets, his head cocked to the side. he looks devious.
“What are you cooking up in that pretty little head of yours?” you ask him, finally pausing your hands as you rest them in your lap. but Toji doesn’t let you, no. instead, he holds them back up in front of your face as he sinks to his knees in front of you, his smile wide and evil, pulling your legs from under you as he settles them on his shoulders.
“Don’t worry ‘bout it,” he croons to you, kissing the inner part of your knee, eyes still glued to your burning face. “Just keep doing your little old lady hobby while I busy myself.” without warning, he pulls your sleep shorts to the side, grinning when he’s met with the bare beauty that is your pussy. you shudder at the air that breezes past you, try to focus on chaining when he squeezes at your thighs with warm, veiny hands.
“But I can’t focus on counting my stitches when your face is between my legs.” you pout to him, hoping it’ll sway him to eat you out and then let you continue your project. but he doesn’t put his mouth on you until you start again, rewards you with a single wet, smacking kiss where you need it most.
“Guess you’re gonna have to learn how to multitask, sweetheart.” Toji grins before he licks a long stripe from taint to clit, your hands hiccuping in their movements. you can feel his smile more than see it, and come to the realization that he’s an evil, evil man. (you have to recount your stitches more than once, and even after you’re fucked out from euphoria and bliss, you still think you’re missing a few.)
#this is. so self indulgent sorry ALSJDKDJD#can u tell I thot about this while I was crocheting today#I made another sweater for somebody and it only took two days but I have to make another one again omg#but the whole time I was like. wow. I miss my man aksjdkdj#he’d make fun of me for my old lady habits even tho he’s ten years my senior :(#I make fun of him for being an old fart and he puts me in my place :((#ALSO THIRTY PLUS IS NOT OLD 😳 🤚🏼 I just wanna brat to him so I can get Corrected™️#I’m rambling now my b 😔#I’m so eepy okay gn 🏃🏽♂️#—new treat in the streets! 🍫#toji treats! 🍬
270 notes
·
View notes
Text
Headcanon that, as Timmy gets older, he kind of starts to hate his last name. He already has some bad connotations with his full name after the Wishology situation (Timmy having a fear-response to his own name lives in my head rent free), but the older he gets, the more he dislikes it.
It's the last name of his parents, who neglect him and don't try to learn the first thing about him. It's the name that teachers snap at him when he's failed yet again. It's another reminder that the family he has with his fairies isn't really his and he can't keep them. He doesn't have a single good connection to his last name.
Anyway, all of this to say that I'm thinking about the way Jimmy says Timmy's last name in Part 3 of the crossover. Not with disappointment or disdain, but fondness. Like it's just Timmy's name. He uses his last name, "Turner," and it doesn't mean "terrible student" or "useless kid," it means "friend." Like Jimmy looks at him and just sees a person instead of everything that everyone's ever told Timmy is wrong with him.
#fairly oddparents#timmy turner#nicktoons unite#jimmy neutron#jimmytimmy#timmyjimmy#jerkinators#am I thinking a little too hard about this? perhaps#I'm just kind of a little bit obsessed with timmy going to other dimensions and being WANTED there#like he has that whole episode about feeling unwanted and then s6 has the fairy-lympics episode—#—where the pixies and anti fairies were both clamoring for his approval#so many fairies showed up for his birthday!!#so many fairies LOVE timmy like THEY HAVE A STATUE OF HIM OMG#and in retroville timmy has five friends who think he's amazing!!#sure Jimmy took a while to warm up to him#but they're BUDDIES#they're a great team!!#in jimmy's dimension timmy is VALUED and WANTED#follow me for more normal thoughts in the dead of night
355 notes
·
View notes
Text
My haitani father Shio headcanon is just a bit too funny cuz of how well it works that it sounds like a waste of perfect canon idea and crossover for both of wakui's works.
Aside from the obvious physical features very very obvious, identical eyes, nose, blonde eyebrows, rindou's face form, ran's hair color palette and (arguably) bonten hair style, blah blah i mean just look a the pictures below, you can also bring up any fact from either manga and add it to the hc and it fits in just SO WELL, i'll give the first example, The Haitanis are very obviously rich spoiled kids like have you seen their apartment? They have a fucking dj set, only rich kids with neglective powerful parents will have no problem paying for that, just saying, and even though i love him let's be real Shio is the type to be that parent, i mean cmon he's rich like crazy rich (filthy yakuza money yum yum) he tots would give his children WAY more than enough allowance so they can leave him alone, also the way they act, i've always the Haitanis were the type of kids that think they own the school cuz their dad is rich .
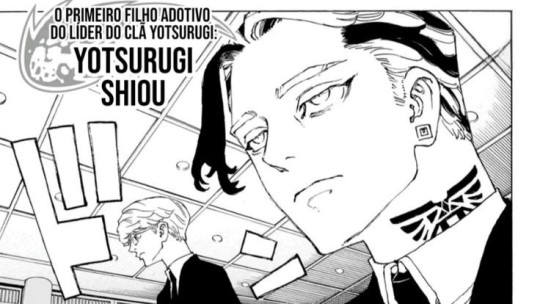
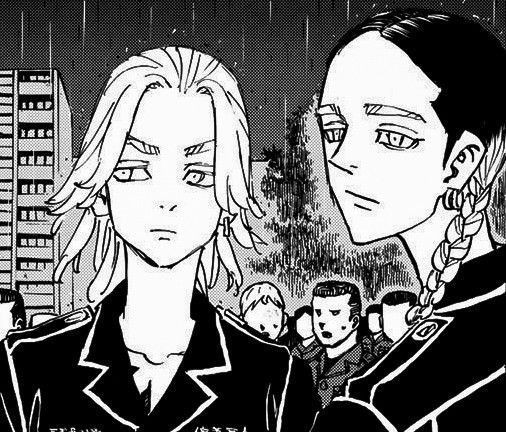
Nvm if this never becomes canon or both universes don't collide, it's just so entertaining to keep connecting the dots that were likely never there, like how Rindou is a heavy drinker cuz his father drank alot with the rest of the Yotsurugis and he tried to imitate him from a young age that it became an unhealthy habit or if you want to add more drama he only drinks cuz he looks up to his father but Shio favors Ran cuz he can posssibly succeed him (canon power complex) so Rindou resorted to drinking cuz it's the only thing like his dad that he can do. Heck yeah i made it angsty!!!
You can also add great context to his fear of Yakuza, picture this, when he was a kid he got up in the middle of night after hearing a loud noise to search for his parents and witnessed Shio (canon Yakuza) pew pew-ing some poeple and surrounded with scary men, that probably scarred him for life that he was so terrified when Kakucho got them interfering with some, OH OH something just came to mind, if he's the son of a yakuza yeah he didn't wanna clash with other yakuza families cuz it can end in a blood shed and risk his and his family's lives.
And i'm gonna add this one not very small detail and i swear i'll shut up (for now), i know it's just a stupid headcanon that is very far from becoming reality and i don't have to take it this deep but hear me out, why their last name is Haitani and not Yotsurugi like their dad, Shio is powerful and have many enemies right ? So he simply decided to protect his children and their identity by giving them another last name likely their mother's (yk like minato with naruto style plan ?) So Haitani is actually their mom's family name. I rest my case. Thank you for coming to my useless ted talk.
#i officially announce i have gone crazy#this is like my new hyperfixation until i find a better headcanon that is more likely to be canon#actually you should all thank me#i just made up a way for the haitanis to be useful for once in their lives#kinda#i mean we already established they bring absolutely nothing to the table#we don't have to go through that again#let's put it in a simple equation#tokrev plot - haitanis = no big difference#but Shio on the other hand is the main antagonist so far sooooo#in my logic by relation they are sort of useful in some way (through nepotism)#i saved the narrative you're welcome#also an addition no one asked for or thought about ran is their dad's favourite but loves his mom more#while Rindou is mama's boy (yk how moms prefer the youngest) but looks up to his dad#speaking of their mom i think she's like from another powerful family#and based on shio doing anything to gain more power that's probably why he married their mom in the first place#OMG ARRANGED MARRIAGE WITH SHIO IS INVADING MY HEAD AFTER I THOUGHT ABOUT IT FOR A SPLIT SECOND#WRITERS IF YOU'RE SEEING THIS PLLLLSSSSSS#oh and apparently Shio is also in Roppongi so that's that.#i really took calling him daddy shio to a whole other level lol#tokyo revengers#ran haitani#rindou haitani#negai no astro#astro royale#haitani brothers#shio yotsurugi#i'm gonna call my new masterpiece of a shitty hc#the wakui multiverse of madness
137 notes
·
View notes
Text
traumatized dickweeds turn to torturing each other so they can distract from the fact that they both need therapy
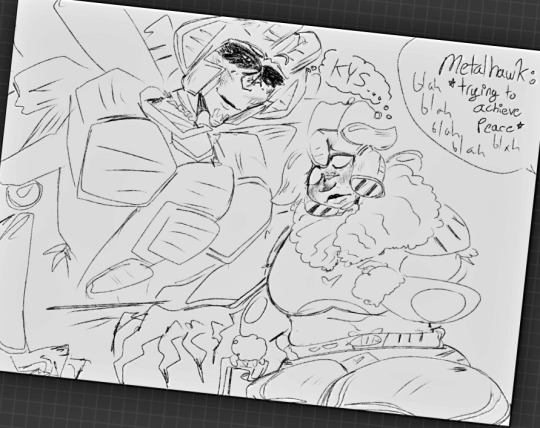
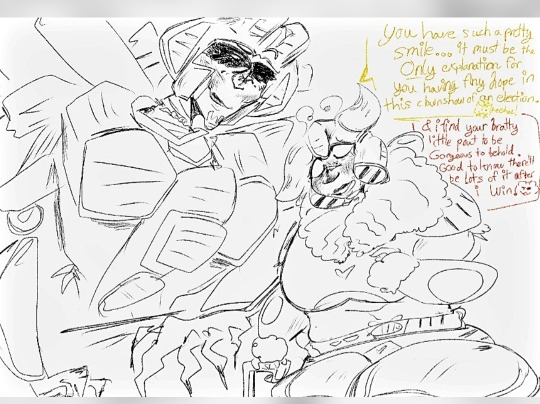
#starscream is terrified that he feels kind of getting for thinking de@ththre#@ts at metalhawk#and bumblebee is terrified that he doesnt feel any guilt at all#and only one other bot knows it so the accomplice must be destroyed any gaslighting distactable means possible#' YOU need THERAPY' ' NO yOU NEED THERAPY. ' ' I DONT NEED THERAPY. I JUST FILMED AN AD FOR MENTAL HEALTH AWARENESS'#' fat fuck probably took up 29 cameras to film just you'#' THE TITAN. DIDNT. CHOOSE. YOU'#and then they both say keep yourself safe bcs theyre just so kind#me drawing starscream like an scp : now THIS is secy to me !!!#bee is an scp too they were Made for each other otter#starscream who everyone sees as an scp: everyone screams cries runs away tells to get help#bee: literally just a guy who happens to be a bitch. what happened to having fun and whimsy in this world anymore :\#bee who everyone sees as their lil friend nothing more : uoughhh so cute the smol protecc him omg!!#starscream: he kicked me while i was down & told me he hoped that made me infertile#' hes a fucking little bitch is what he is. im gonna get him pregnant now.' real life starscream quote Real i was maccadam.#maccadam#starscream#bumblebee#tf idw#idw scumbag bee enjoyer#metalhawk#whatever he has like no content anyways ill include him ig#transformers#starbee#the way i made shipart then almost forgot to tag the ship#GUILTY* KIND OF GUILTY* bruh
85 notes
·
View notes
Text

He no longer envied the doctor, no longer stole moments that were not his to take. The dream world had changed, molding into bustling cities long ago full of parks, restaurants, and cafés for him to wander with her by his side, to create memories that were for just the two of them to share. The smiles came naturally, his eyes focused only on her as she chatted and showed him things he did not know in his own world. He listened to her stories, hearing unfamiliar names of the people in her life, but he was engrossed nonetheless, holding onto her every word like a lifeline. When she mentioned the doctor, she paused, seemingly conflicted. “Go on,” he urged her gently, being rewarded instantly with her kind smile. He didn’t remember the anecdotes she shared of the doctor. He had become too drunk on her voice, too enamored by her pure existence to even think lucidly anymore. Oh, how he wished he could stay intoxicated, to always keep this feeling of euphoria within himself. — calling your name, Dawnbreaker/Reader. 1.5k words. Masterlist. AO3
#love and deepspace#love and deepspace zayne#love and deepspace x reader#love and deepspace dawnbreaker#zayne x reader#dawnbreaker x reader#zayne angst#love and deepspace fanfiction#lnds fanfics#x ; edits#˚₊· ͟͟͞͞➳❥ lads photoshoot funsies ࣪₊♡۶ৎ#this took wayyy too long omg#i saw a chinese player made something similar with caleb so i wanted to try with dawnbreaker because i love him and he deserves to be happy#i was gonna do dragon!sylus and caleb too but idk this took a while ;~;#granted i was waiting for my other laptop to finish updating........
47 notes
·
View notes