#new 35mm slr
Explore tagged Tumblr posts
Visit Tumblr Blog
Explore Tumblr blogs with no restrictions, modern design and the best experience.
Last Seen Tumblr Blogs


Fun Fact
Tumblr was created by web developers David Karp and Marco Arment.
Text
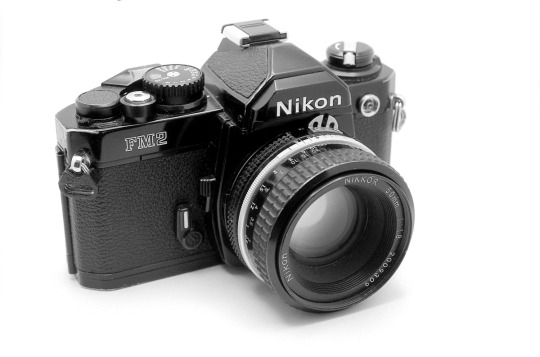
Why Buy A New Film Camera When I Can Buy Used Ones From eBay?!
by Johnny Martyr Film photographer in 2000: “Why would I buy a new Nikon FM10 for $150, a new Nikon FM2 for $700 or a new Nikon FM3a for $800 from a camera store when I can buy a used Nikon FM from eBay for $50?” Film photographer in 2010: “Why would I buy a new Nikon FM10 for $300 from a camera store when I can buy a used Nikon FM for $75, a used Nikon FM2 for $200, or a used Nikon FM3a from…
View On WordPress
#brick and mortar camera store#camera store#death of film photography#death of new 35mm slr#death of the camera store#new 35mm camera#new 35mm film camera#new 35mm slr#new film slr#new vs used#nikon 35mm slr#Nikon FM#Nikon FM10#Nikon FM2#Nikon FM3a#nikon slr
0 notes
Text
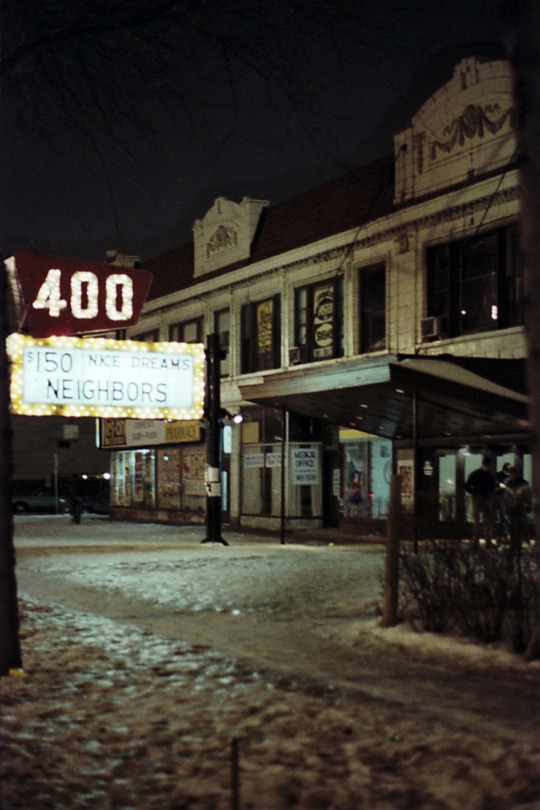
The 400 Theatre, Chicago, 1982
#400 theatre#movie theaters#theatres#chicago theatres#rogers park#chicago history#marquee#film photography#original photography#35mm photography#night photography#vintage photos#photographers on tumblr#ricoh xr-7#kodak#kodacolor 2#kodacolor ii#kodak safety film 5075#first roll of film through my new slr#loved that camera deeply#mediocre photo#but i was just learning#neighbors with john belushi and dan akroyd#nice dreams with cheech and chong#for only a dollar fifty you could see two shitty movies
111 notes
·
View notes
Text
#photography#film photography#35mm film#black and white#my photos#my new slr and the difference in quality already is wild#this is a Nikon and the lens is actually decent#it’s not that the Minolta i have is a bad camera but that lens I have on it lol
1 note
·
View note
Video
Coney Island by Ellen Munro
#35mm#35mm film#Analogue#SLR#film SLR#Pentax Program A#Pentax#film#New York#NYC#USA#New York City#Coney Island#Brooklyn#seaside#beach#promenade#parade#pier#Tower#flickr
1 note
·
View note
Text
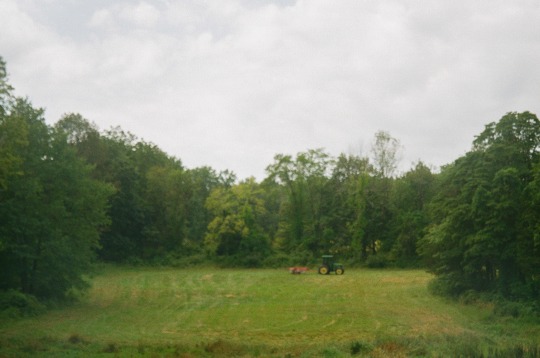
missing ag fairs and when the sun would come out sometimes
#jpG#I know these r out of focus sshhh I need to upgrade to an slr sooo bad#minolta family zoom#35mm#fujifilm#farm#rural#horses#tractor#New Jersey
1 note
·
View note
Text
I autismed a little too close to the sun and now I got a bunch of new additions to my film camera collection. A Nikon FG (paid fair market price BOOOOO BOOOO I love it though omg, my first SLR), a Minolta Hi-matic AF2 (paid below market price plus C'MON it's the camera from the wailing like hello?), a Minolta freedom zoom 140ex panorama (it was from the same seller as the other Minolta and was so cheap like c'mon ! Hear me out!!! Plus zoom point and shoots are so silly and cuuute! And the panoramic mode!! How novel!!!), 8 rolls of expired film, and 2 (??) Diana F+s (guys it was a DIRT CHEAP lot with hella accessories!! My first medium format cameras!!! Flashes, lenses, flash gels, 35mm camera back, books, bags, film, and stuff that I don't even know what it is!!! For so cheap HELLO??) my boyfriend is getting me a Fujifilm XM-5 for my birthday (hooray hooray!! dip my toe into digital!! hooray!!) so I was gonna not buy any cameras after I got the FG but the deals were too crazy. I'm gonna have so many test rolls to shoot 😭😭 (YAY YIPPEE I LOVE BRACKETING I LOVE READING MANUALS I'M NOT BEING SARCASTIC I LOVE IT)
#im so happy 😭😭#i got really lucky on some of these prices imo#bunny has been listening intently to me infodump#dor.chat#film photography#lomography#analog
3 notes
·
View notes
Note
hello! i love your photos, i just added a bunch of your posts to my queue <3 i love your shots of the nature in org. you dont have to answer but i wanted to ask please what camera did you use for “cat on film” ? ive been thinking about getting a 35mm camera but i don’t know which one would give me that soft warm fuzzy look your photos of your cat had :’) thank you
hi, thank you!
the camera i took those on is a chinon gaf memo 35ee,..
...but i wouldn't recommend getting one, to be honest, especially if you're new to film photography. it's a rangefinder focus, which means instead of just turning a wheel around the lens until the image is sharp, you have to line up two tiny versions of what you see in the center of the viewfinder and then take the picture. like this:
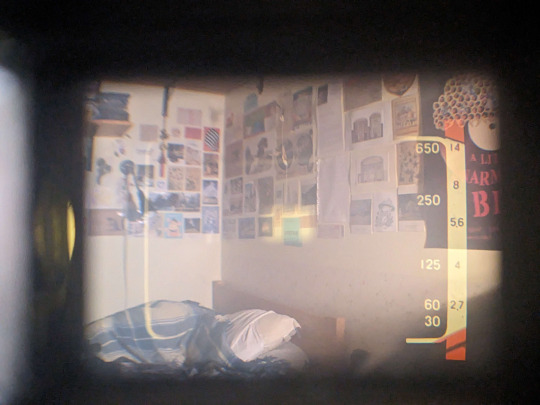
you see the tiny yellow rectangle in the middle of the frame? in order to focus the camera, you need to line up the two images within that tiny amount of space. there's a whole bunch of other reasons i don't love this camera, and a few things i like, but i won't go into it. i don't really use this camera anymore.
the good thing is that the "soft warm fuzzy feeling" you want to replicate really has almost nothing to do with this camera. it's more related to the film you use, the settings you use on your camera, and, of course, the lighting in the area where you're taking the photo.
here's another photo i took that has a similar warm, fuzzy vibe, despite the fact that it was taken on a different camera and with different film.

i'm not a film photography expert by any means, but i would say when you're trying to get this type of vibe, the actual lighting in the place where you're taking the photo is the most important.
you also probably want to use a camera that doesn't have fixed focus. Some cameras, especially the really easy to use instant film or disposable film ones, don't require you to focus; you just press the button and move on. that's fixed focus. part of what gives you the warm fuzzy feeling about the photo above is that not every part of the image is sharp.
a lot of the pictures in that cat post are also slightly over- or under-exposed, but none of them use flash, so you probably want a camera that doesn't automatically set off a flash if it detects the lighting is too low.
in terms of getting your first film camera, that can be tricky because there's basically no new ones out there for sale- unless you want to get a tacky plastic disposable or shill out 1000s for a Leica. you're most likely going to have to buy secondhand from a camera store or just some guy online. facebook marketplace is really good for this in my experience.
some buying tips:
-decide if you want a point-and-shoot (you just look through the viewfinder and press the shutter button, done) or a SLR that lets you manually adjust the shutter speed, iso, etc. both are great and i have one of each for different situations.
-in my experience, don't bother paying more than 40$ CAD for a 2ndhand point-and-shoot or $100 for a full film camera unless it's something ridiculously amazing or unless you're buying secondhand from a camera store.
-look up the specs of your camera before buying it and pay attention to the degree to which the camera is automatic. film cameras use a light meter to measure what the shutter speed should be in different situations to capture the right amount of light, but the way they use the light meter differs. if a camera is fully automatic, that means that it measures the light in the room and then automatically adjusts the shutter speed to be correct.
this sounds great, but it also usually means you can't manually change the shutter speed. this can be a problem because, again, you're buying a secondhand camera that's probably at least two decades old. there's a high chance the electric components that automatically measure the light will be corroded or broken or will soon break down, and when they do repairs may be very expensive or even impossible, since you just can't find some repair parts anymore.
the more manual your film camera is, the better it can stand the test of time, because even if the camera's light meter fully breaks down and can't be repaired, you can buy a handheld light meter to tell you the right shutter speed and then manually change the shutter speed on your camera. this isn't to say to avoid all automatic features- all my cameras are to some degree automatic and i like it a lot- but its something to be aware of.
-look up your camera on lomography.com, which has a ton of film photos that you can sort by film and by camera. (i also have my own lomography account, where my photos are sorted by film and by camera.)
-when buying a camera that has a battery slot, open it up and check for any rust or corrosion inside. don't buy it if there's any green or brown on the parts the battery connects to.
i have three other cameras that i have and like a lot:
nikon EM (SLR) - 80 bucks on FB marketplace
yashica fx-3 super 2000 (SLR) - belonged to a relative
samsung ff-222 (point + shoot) - 30 bucks on FB marketplace
i also like the canon T series a lot, my friend has a canon t70.
and the films i tend to use are:
fujifilm superia (my fave; relatively cheap color film. the cat photos are on this.)
kodak ultramax (slightly more expensive. not that different results wise, maybe a little more pastel.)
portra - expensive but pretty
ektar - expensive but pretty
ilford hp5 b&w - cheap. good for testing a new film cam so you can see results without splurging too much.
you can look them up on lomography to see the differences between them.
hope this helps!
5 notes
·
View notes
Photo

National Camera Day
Dust off an old digital camera, buy a disposable camera, or just fire up your smartphone and snap some pictures of your day to keep those memories forever.
The origin of National Camera Day is unknown, but it is used as a reminder for us to remember the existence of the camera and its many benefits. After all, how many other mediums can capture people and places so beautifully? How many other mediums can evoke smiles of memories past, or reminders of events that have shaped our lives?
The camera, in all of its many forms, is to be celebrated. This humble device has become a major part of our lives, and so, on National Camera Day, snap some photos during your lunch hour, on your commute to work, or whenever a moment of inspiration strikes.
Of course, the way you take pictures probably won’t be the way that people did it before the advent of digital photography and smart devices. Readers of a younger generation will be reaching for their smartphones to take photos of the world around them. And even if you are somebody who was well-versed in the wonderful world of 35mm film and zoom lenses, you might still find yourself reaching for your mobile device instead of that vintage camera from yesteryear.
Still, no matter what type of device you use to take photos, do something this National Camera Day. We all need to express ourselves creatively, so let your juices flow when you’re out and about or pottering around in your home, and take some magical pics.
History of Cameras and Photography
Cameras and photography have developed substantially over the years, from its early roots with the French inventor Joseph Niépce right up to modern day digital photography.
Joseph Niépce was a French inventor and is most noted as one of the inventors of photography and as a pioneer in the field. He developed the heliograph; a technique used to produce the world’s first known photograph in 1825, the view from the window at Le Gras the families estate.
In 1839, Louis Jacques Daguerre took the first fixed image that didn’t fade. He is recognized for his invention of the daguerreotype process of photography. He became known as one of the fathers of photography. His method required 30 minutes of exposure. He named the process – the Daguerreotype. Tintypes were developed in 1856 by Hamilton Smith and decades later, George Eastman invented flexible and unbreakable film that could be rolled. This was the birth of the first Kodak that was offered for sale in 1888.
In 1925 the Leica I went on sale, and its immediate popularity spawned a number of competitors. Kodak was one such competitor, and they released the Retina I in 1934. Though 35 mm cameras were still out of reach for most people things would soon change with the introduction of the inexpensive Argus A in 1936. The Japanese camera industry began with the birth of Canon in 1936 with its 35 mm rangefinder. Japanese cameras would soon become incredibly popular in the West after the Korean War as veterans and soldiers stationed in Japan brought them back to the United States.
While conventional cameras were becoming more refined and sophisticated, an entirely new type of camera appeared on the market in 1948. While TSLR and SLR were still the rage this new camera would change the way people would capture memories. This was the Polaroid, the world’s first instant-picture camera where no film development was needed. Known as a Land Camera after its inventor, Edwin Land, this camera was able to produce finished positive prints from the exposed negatives in under a minute. This new camera took the market by storm as people no longer had to sit still for long periods of time in order for their photographer to snap a picture.
The first digital camera that was commercially sold was in December of 1989 in Japan, the DS-X by Fuji. In 1991, Kodak brought to market the Kodak DCS-100, the beginning of a long line of professional Kodak DCS SLR cameras that were based in part on film bodies. It used a 1.3 megapixel sensor and was priced at $13,000.
The first commercially available digital camera, in the United States, was the 1990 the Dycam Model 1. It was originally a commercial failure because it was black and white, low in resolution, and cost nearly $1,000 but this changed and soon became loved by photographers.
With the standardisation of JPEG and MPEG in 1988, image and video files could be compressed for storage onto a SD or CF card. With the introduction of the Nikon D1 in 1999 at 2.47 megapixels, this was the first digital SLR that was entirely by a major manufacturer. The D1 cost just under $6,000 and was inexpensive for professional photographers and high-end consumers. This camera also used Nikon F-mount lenses, which meant photographers could utilise many of the lenses they already owned.
By 2010, nearly all mobile phones featured built-in camera with a resolution of 1-2 megapixels digital video camera. Many cameras also featured built-in GPS.
How To celebrate National Camera Day
You don’t need to know the history of the camera to celebrate National Camera Day, but while we have given you a snapshot of the people and events that have paved the way for the cameras we use today, you could make a special effort to learn more, be that at your local library or by looking up facts online.
The most obvious thing to do today is to take some pictures of your own. Use your smartphone if that is your camera of choice, but if you do have access to a digital camera or something that still uses film, brush the dust off it, and take it out for a walk. Who knows what you might see when you’re out and about, be it a comical moment that you can later share with your friends, or a piece of rare beauty that you can capture in a photograph to be looked on forever.
Take photos of your family and friends too, and along with any other pictures you take, share them on social media if they were digitally taken. And why not gift a photo to another? If you have taken something that will have special resonance for another, print it off and put it in a photo frame.
Today could be the day to push yourself out of your comfort zone. So, you might put down your phone and use an actual camera for your photos, and you could take shots of something that you have never attempted before. It could be a sunrise or sunset, birds in flight, or a scenic view at great height, as just a few examples. Just be careful if you attempt that last one!
Source
#Canyonlands National Park#Mesa Verde National Park#Wilkerson Pass#Utah#Nevada#Colorado#Old Colorado City#Colorado Springs#cityscape#USA#landscape#countryside#Hall Winery#reflection#Louis M. Martini Winery#California#summer 2022#original photography#National Camera Day#29 June#taking photos#NationalCameraDay
4 notes
·
View notes
Text
Contax/Yashica System
The Contax/Yashica system was a collaborative line of 35mm single-lens reflex (SLR) cameras and lenses, developed by Yashica Japan in partnership with Carl Zeiss. The joint venture commenced in 1974 with the Contax RTS introduced at Photokina. It would span over three decades merging Zeiss optical expertise with Yashicas strength in electronics and manufacturing.
Two years prior, Zeiss had ceased production of the Contarex line, leaving its optics division without a dedicated camera system.
Both Contax and Yashica cameras of the era share the same bayonet lens mount and often same internals. In addition to Carl Zeiss, Yashica developed its own range of optics under the DSB and Yashica ML brands.

Photokina 74: Contax RTS launch materials showcasing the real time system and new bayonet mount.

Seventeen Carl Zeiss lenses were introduced at the time, covering focal lengths from 15mm to 1000mm. At least some of them had previously been produced for the Rollei quick bayonet mount.
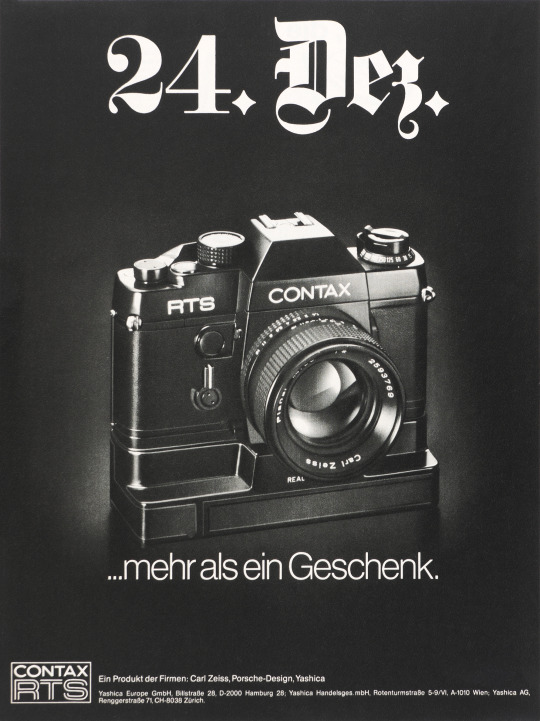

Left: Undated German print advertisement for the Contax RTS. Likely around Christmas. Right: Undated German print advertisement. Sci-fi style, merging industrial design, optics, and electronics to present the camera as an extension of human perception.
0 notes
Text
Olympus O-Product Camera
In high school, my good friend Greg Copeland introduced me to the Olympus camera system in the early 1970s. He was the first person I knew who bought into the Olympus OM system with the OM-1, which I believe was in 1973. At that time, Olympus was very innovative, making the most miniature SLR camera system, which included a complete line of small, compact lenses with very nice optics. I can still remember Greg telling me how much he enjoyed how nice the camera was made. He would take the camera with him all the time. At the time, I was using either the Topcon Super D or, possibly, I had moved on to shooting with a Nikon Nikkormat.
I started working in the photo industry in late 1973 when I was hired as a seasonal employee in the camera department at my local K-Mart. That position didn't last long, but it led me to work at the local camera store chain about a year later. I was hired to work in the warehouse and handle all the camera and lens repairs.
When I started working at the local camera store, the Olympus OM system had a decent hold on the market. However, it was still lagging behind the big kids in the marketplace. Olympus was continually pushing the envelope with many new and exciting products like the terrific XA camera line, which, to this day, is one of my favorite cameras. Olympus introduced new additions to its system yearly, which always had customers in the store talking about its products.
I tell you this because I have seen many odd and unusual cameras introduced by camera companies over the years, and many of them came out in the 1980s to the mid-1990s. The Minolta Prod 20, the Yashica Samurai, and Canon had the Epoca series of cameras. There's a great blog on some of these cameras on the Kosmo Foto Blog.
One of the cameras that greatly impacted me when it was introduced in 1988 was the Olympus O-Product camera. It was a limited edition, and only 20,000 cameras were made. The Olympus O-Product camera had a very unusual, art deco look of a circle in a square and was made of brushed aluminum. At the time, the cost was prohibitive for me to purchase, but I remember thinking that someday, I'd really like to have one in my collection. Its unique design always intrigued me.
The Company:
The history of Olympus cameras is a story of innovation, precision engineering, and a relentless pursuit of compact, high-quality imaging tools. Founded 1919 in Japan as Takachiho Seisakusho, the company initially specialized in microscopes and thermometers. In 1949, it was renamed Olympus Optical Co., Ltd., and it soon began making a name for itself in photography.
Olympus entered the camera market in 1936 with the launch of the Semi-Olympus I. This bellows camera used the German-made Zuiko lens, setting the stage for a signature brand name synonymous with Olympus Optics. However, it was not until the post-war period that Olympus truly revolutionized the photography industry.
One of the most pivotal moments came in 1959 with the release of the Olympus Pen. Designed by the legendary Yoshihisa Maitani, the Pen was a half-frame 35mm camera, meaning it could shoot twice as many exposures per roll of film. It was compact and affordable and helped democratize photography for a wider audience. The Pen series enjoyed massive popularity and marked Olympus as a leader in miniaturization without sacrificing quality.
The next major innovation came in 1972 with the OM system. Again spearheaded by Maitani, the Olympus OM-1 was a compact, lightweight SLR (single-lens reflex) camera that offered full functionality in a significantly smaller body than its contemporaries. This system appealed to professionals and enthusiasts alike, reshaping expectations for what an SLR could be.
In the digital age, Olympus continued to push boundaries. In 1996, they released their first digital camera, the Camedia C-800L. However, the Four Thirds system, introduced in collaboration with Kodak in 2003, made a lasting mark. This was followed by the Micro Four Thirds system in 2008, which eliminated the mirror box of traditional DSLRs, allowing for even more compact and lightweight cameras. The Olympus PEN E-P1, released in 2009, revived the classic Pen design in a digital form and was among the first mirrorless cameras to gain traction in the market.
In 2020, Olympus exited the camera business, selling its imaging division to Japan Industrial Partners, which rebranded the line as OM SYSTEM. Despite the transition, Olympus's legacy lives on through continued innovation and the enduring influence of its designs on modern photography.
The Camera.
I've always thought of the Olympus O-Product camera as more of an art piece rather than a functioning camera, but it is fully functional. In its simplest form, the Olympus O-Product is a "point-and-shoot" camera. There are no settings on the camera that the photographer needs or can really set, which makes it incredibly simple and straightforward to use.
The camera is relatively small, measuring 4" wide by 3.5" tall and 2" deep. These measurements are for the camera alone and not with the flash attached. If I add the detachable flash, the camera is 5.75" wide by 4" tall. The camera weighs just under 1 lbs. at 15.2 oz. with the flash attached. My camera is number 11289 out of 20,000. The camera also features a unique circular viewfinder and a distinctive shutter button, adding to its charm and functionality.
The Olympus O-Product camera is powered by 2-AAA batteries that fit into the camera's bottom. The 2-AAA batteries also power the detachable flash. The camera is very simple and basic. Once the batteries are in the camera, you can load film, which is autoloading. There is no need to set the film's ISO because the camera has DX coding for the film loaded. Once you put the leader on the take-up spool and close the back of the camera, the camera automatically winds the film to frame number one.
To turn on the camera, a lever you pull down on the front opens the front door, exposing the 35mm f3.5 Olympus lens. To turn the camera off, close the front door. There are no shutter speeds to set as the camera has a programmed electronic shutter. The camera is also autofocusing. In the center of the viewfinder, you'll see a white circle when you depress the shutter button halfway on the front of the camera. In that case, a light will light up next to the "AF" in the upper right-hand corner, letting you know the camera has focused on the subject, and you can press the button to take the photo. Once you take the picture, the camera automatically advances to the next frame. Once you've taken all the photos on the roll of film, the camera will automatically rewind the film into the film cassette.
The flash for the camera is detachable, so if you don't need it, you can take it off. To take the flash off, you need to unscrew the mounting screw, and the flash will come off the camera. You still need to unplug the cord from the flash to the camera, which pulls out, so it's very simple. To attach the flash, you screw it onto the camera and plug in the cord. If the camera needs the flash, a red ready light on top of it lights up when the flash is ready and will fire if it determines it needs the extra light to make a proper exposure.
There are two buttons on the camera's top next to the flash attachment that allows the photographer to make adjustments when shooting. One of the buttons is a self-timer. If you want to get into the photo, press the self-timer, giving you 10 seconds to get into it. The other button is a rewind button. Suppose, for some reason, you want to change to a different type of film. In that case, you can depress the rewind button. The camera will automatically rewind the film back, leaving a little bit of the leader exposed so you can re-load it when you want to finish that roll of film.
My Results.
I put batteries in the camera and flash, loaded it with a roll of Ilford Plus 50 black and white film, walked through the house, and strolled around the block taking photos. The camera determined if the flash was needed, which was pretty fun. It was too simple for my taste as sometimes I like to use fill flash, but this camera didn't allow me to do so. I could trick the meter by putting my finger over the meter area, but for this blog post, I wanted to be free and let the camera do all the work.
Here are a few of the photos taken on my walk.
Conclusion.
Using such a simple but beautifully made camera was a lot of fun. The camera produces very sharp images and is extremely easy to use. When I was working at the camera store, we used the term PHD cameras, which always meant "push here dear," meaning the camera was very simple for either men or women. Put the camera to your eye, point it at your subject and "push here dear".
As I mentioned earlier, the Olympus O-Product camera is more of a work of art or statement camera that looks terrific in the collection. It's not really made to be used on a daily basis, but using it every once in a while is good. I wouldn't want the camera to get more scuffed than it already is, but taking the camera out was fun, as was running film through it.
Thank you for taking a few minutes from your day to read about this art piece that can also be used as a camera.
Until next week, please be safe.
#35mm#35mm camera#35mm film#35mm film camera#35mm cassette#Vintage 35mm camera#Rare 35mm camera#35mm Olympus Camera#Olympus camera#Olympus O Camera#Olympus O-Product#Camera#Camera that use 35mm film#japan#Japan#japanese camera#made in japan#camera from Japan#cameras from japan#Rare camera#Limited Edition camera#point and shoot#point & shoot#point and shoot camera#Olympus Point & Shoot#Art Deco#art deco era#art deco 35mm camera#art deco camera#ilford
0 notes
Text
The Art of Film Photography: Embracing the Timeless Medium
Film photography is a nostalgic and artistic medium that captures images with a unique character and depth. Unlike digital photography, film offers a tangible and organic quality, producing rich tones, natural grain, and a distinctive aesthetic. Whether you are a professional photographer or an enthusiast exploring the world of analog photography, mastering the techniques of film photography can open new creative possibilities.
The Basics of Film Photography
Before diving into advanced techniques, it's essential to grasp the fundamental elements of film photography:
Choosing the Right Film: Film comes in different formats and types, including 35mm, medium format, and large format. Color negative, black-and-white, and slide film each offer distinct visual characteristics.
Understanding Exposure: Unlike digital cameras, film has a fixed ISO sensitivity. Mastering the exposure triangle (aperture, shutter speed, and ISO) is crucial for achieving well-balanced images.
Manual Focus and Composition: Many film cameras rely on manual focus, encouraging photographers to slow down and carefully compose their shots using techniques such as the rule of thirds and leading lines.
Types of Film Photography
Film photography encompasses a variety of styles, each requiring unique skills and approaches. Some popular types include:
Black and White Photography: Offers timeless, high-contrast images with a focus on light, texture, and emotion.
Portrait Film Photography: Captures people with soft tones, natural skin textures, and a classic aesthetic.
Street Film Photography: Documents urban life with an authentic and raw quality, often using high-speed film for low-light situations.
Landscape Film Photography: Showcases nature’s beauty with rich colors and dynamic range, often shot on medium or large format film.
Experimental Film Photography: Includes double exposures, light leaks, and film soup techniques to create unique artistic effects.
Tips for Capturing Stunning Film Photos
Choose the Right Film Stock: Different films offer different characteristics—Kodak Portra for warm skin tones, Ilford HP5 for high-contrast black and white, and Fujifilm Velvia for vibrant landscapes.
Meter for Shadows: Unlike digital, film retains details better in highlights. Metering for shadows ensures balanced exposure.
Use a Tripod for Long Exposures: Film photography often requires slower shutter speeds, making a tripod essential for stability.
Develop and Scan Your Film: Learning to develop film at home or choosing a quality lab can impact the final look of your images.
Embrace Imperfections: Light leaks, grain, and slight color shifts add character to film photography, making each shot unique.
Practice Patience: Unlike digital, you can’t see results instantly. Take your time to compose and shoot with intention.
Experiment with Film Cameras: Rangefinders, SLRs, and medium format cameras each offer different shooting experiences and results.
Keep a Photography Journal: Since you can’t review shots immediately, noting settings and conditions helps improve your skills over time.
Conclusion
Film photography is a rewarding and immersive experience that encourages photographers to slow down and appreciate the artistry behind each shot. By mastering exposure, film selection, and composition, you can create visually striking images that stand out in the digital age. Whether capturing black-and-white portraits, vibrant landscapes, or street scenes, film photography offers a timeless charm that continues to inspire generations of photographers.
0 notes
Note
How do you create that vintage look?
And wich camera would you recommend for vintage looking photos??
hii I use 35mm film cameras to take most of my photos! (my personal favorite 35mm cameras after 10 years of using 35mm film are: the Canonet QL17, and Canon Demi)
here's some tips for starting out if you're new to 35mm film & analog photography :D
•decide what kind of 35mm film- Black and White, or Color? Color film is a lot of fun and (in my opinion) easier to take satisfying photos with.
•try 400iso film first (common options are 200, 400, and 800 speed).
• Cameras: if you're looking for an affordably-priced, easy-to-use camera,, I recommend researching point-n-shoot 35mm cameras with optional flash.
(example: Olympus Shoot & Go R )
Simple point-and-shoot film cameras are great because they are like disposable film cameras, but you can use them over and over again! They'll take vintage-looking photos and an affordable camera option to see if you'd want to continue with 35mm film.
some other common camera types/categories are: SLR (most common- have a little triangular viewfinder block on top), and rangefinders (much quieter and compact)
There are many local businesses worldwide that develop film & sell film cameras. Film-developing stores can scan the developed film ("negatives"), email you those photos to have digitally, and also print them out! I go to Photo Plus in San Francisco to develop my color film, There are online shops you can mail in your film to (see in links below).
I hope this is useful! Film photography (and digital photography) was the first art medium i learned and have enjoyed long-term.
recommended sites for learning, buying supplies, and more:
lomography.com
reformedfilmlab.com
#35mm color film#film photography#photography#art#filmisnotdead#black and white photography#35mm camera#35mm photography#35mm#ask#35mm film
1 note
·
View note
Text
0 notes
Text
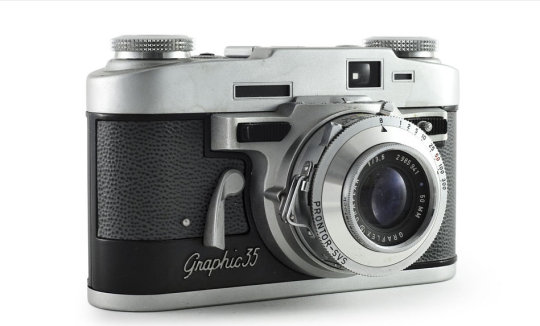
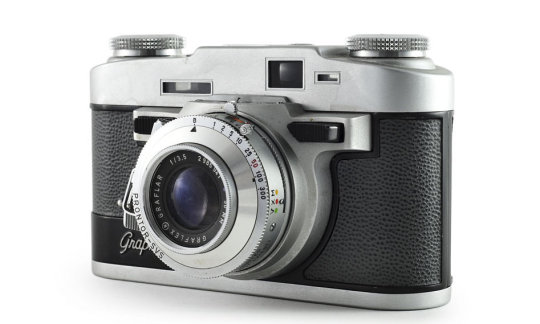
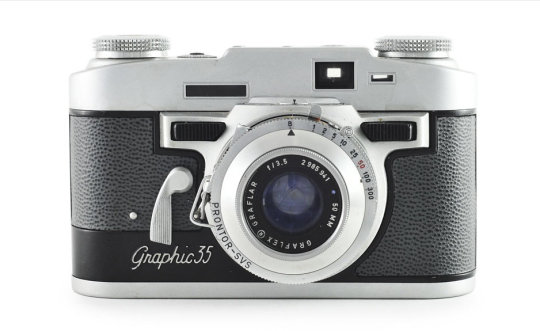
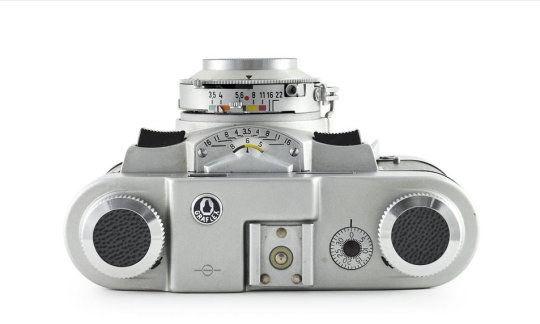
The Graflex Graphic 35 is a 35mm rangefinder.
The Graflex Graphic 35 is a 35mm rangefinder introduced in 1955 by Graflex as a replacement for the Graflex Ciro 35, the camera on which it was also heavily based. The Graphic 35 was designed in the US and earlier examples were made in Rochester although production shifted to Japan with Kowa later on. The lens and shutter were sourced from West Germany. The Graflex in 1959, 35mm film cameras began to take a larger portion of the market in the mid-1950s, and you are seeking a way to distinguish your cameras from the rest. The transistor radio only recently hit the market, and such electronic advances are not yet appearing in camera design. Especially with older camera companies who hired primarily mechanical engineers. Except for a few outliers such as the Miranda the interchangeable lens SLR is not yet a standard. Most manufacturers concentrated on fixed lens rangefinders during the 1950s. Canon and Nikon have only just unveiled their, yet successful, lines of SLR 35mm film cameras in 1959. In addition to this excellent balance of usability and capability, the Graphic 35 was one of the best values in photography at the time of its release. Costing just $77 for the version equipped with the 50mm F/3.5 lens and $98 for the faster F/2.8 lens, it was one of the most affordable full-featured 35mm film rangefinder-focusing cameras in production at that time.
The result of the camera’s combination of respectable performance, eye-catching new features and reasonable price was as we’d expect; it was popular. In just three years of production, the Graphic 35 sold approximately 68,000 units. I still used my Graphic 35 in 2024; that’s 70 years after someone in Rochester tightened the final screw and packed it in a box to be shipped to a camera shop. Cameras have come a long way in those 70 years, and yet the Graphic 35 remains a lot of great things, things that we still value in a camera today. It’s compact. It’s dense. It’s beautiful. It’s well-made and works like magic. Its knobs and dials and switches and levers actuate with precision, emitting the whirrs and clicks and the wicks that mechanical-thing-likers live for. In an earlier article, I called the Zeiss Contina a “clockwork camera” (a term that other bloggers and YouTubers have adopted despite a conspicuous absence of royalty checks). The Graphic 35 is similarly clock-like. I bought this Graphic 35 at the estate sale of Kirk Kekatos (founding member and former president of the Chicago Photographic Collectors Society) along with other cameras like the LaBelle Pal, Univex Model AF-4, Ansco Memo, Vest Pocket Kodak, and Bell & Howell Electric Eye 127. I had actually been looking for this camera’s successor—the Graphic 35 Jet—but couldn’t pass up a great deal on the Graphic 35 when I found one at the estate sale. And at the end of the someone came up to me with the Graphic 35 jet the person that bided for in the sale his cheque did not cleaner.

0 notes
Link
Check out this listing I just added to my Poshmark closet: Minolta DYNAX MAXXUM 800si 35mm SLR Film Camera with Minolta AF Zoom 28-80mm.
0 notes
Text
I wrote this because in addition to being the friend with the pickup truck, I am also the friend with the good camera. I have friends who have much better cameras than I do, some of whom sat me down and explained this to me.
I learned photography in a really weird way. I started with a little 110 camera that my parents gave me, then moved up to taking family photos on our 35mm point-and-shoot cameras, then I took a photo composition and film development class, then started using the yearbook film SLRs (the first time I became the 'friend with the good camera' was on an international school trip where everybody just decided to give me their film on the fifth day since I was the one with the good camera who was taking photos of everyone and everything - it was a yearbook camera I'd borrowed for the trip), taught photography at a yearbook camp, then was a news photographer for a few years, then I took a digital photography class, THEN my friend with the good camera explained how cameras work to me in a marathon six hour session in front of a coffee shop where we both had our cameras out and were pointing them at different stuff around us so he could point out the way that the settings changes changed the images.
I had a very good eye for photos, but I had very little technical knowledge until I'd already been shooting for years. And now that I'm the friend with the good camera, I find that people tend to be in the same boat that I was in - they know what looks good, they know how to frame a photo, but they don't know how to make their camera interact with the light the way that they want it to.
So whenever it comes up I tell them to bring their camera and we sit down for a marathon session of pointing our cameras at stuff and I show them what the settings do, and this post is the short version of that talk without the examples in your hands.
I am certainly not the most technically competent photographer in the world, but I know enough to do the head math of "I don't care if this is noisy so I'll bump the ISO and reduce the exposure time to get the picture I want" without having to pull out a textbook or fiddle fuck around with my settings too much. It's a good place to be in! It lets me be a lot more intentional with my photos than I was before.
So you know absolutely positively nothing about photography
Cellphone cameras are fucking great. I love them. I love the ability to take photos whenever and wherever at basically zero cost.
Point-and-shoot cameras have always been awesome and accessible devices.
This is not a post shit-talking "basic" cameras. This is a post for people who have only ever used basic cameras who want to know at least slightly more about photography.
Because, the thing is, a remarkable amount of photography is math. And if you don't know it's math, it looks like a mystery. And you may be standing there snapping a photo with your phone that looks pretty good, but your friend with a DSLR looked at the sky, twisted a dial, and took three steps to the left and they took a photo of the same subject that looks like it belongs on a magazine cover.
How did they do that?
Probably math.
If you've come into possession of a DSLR camera and are disappointed that the photos you're taking aren't looking like the photos you thought came from DSLRs, I'm here to tell you about the math you may not know about.
What is a photograph?
At its most basic, a photograph is the result of light on a sensor. Let's consider a pinhole camera for a moment. A pinhole camera is a lightproof box with a piece of photographic paper on one side and a tiny hole in the other.
When you create a photo with a pinhole camera, you're using pretty much all of the math you would in a big fancy camera, just in a cruder form they are:
The sensitivity of the paper, film, or camera sensor to light (this is your "ISO" if you're using a digital camera or film). Light sensitivity can be easily changed on a digital camera, but on chemical-treated paper or film the sensitivity is predetermined and cannot be changed. If you want to change the ISO on an analog camera, you need to change the medium that's being exposed.
An opening to let light in - your F-stop, or aperture. The F-stop of a photo is how wide open the lens is to let light onto your film or sensor. In a pinhole camera, you have something that is theoretically a very very large F-stop because you have a very, very tiny opening to let light through (F-stops run in reverse - the bigger the number, the smaller the opening).
Exposure - your exposure is the amount of time you leave your sensor open to the light. The majority of photos you see in the world have exposure times that are measured in tiny fractions of a second, sometimes in thousandths of a second. If you're using photo paper in your pinhole camera, you may have an exposure time of minutes rather than tiny portions of a second, but your photo exposure will still depend on how long you want to leave your "lens" open.
Focal length - your focal length is a description of the relationship of the distance between the light source and the light sensor. You can manipulate this in a pinhole camera by making the camera longer or shorter. A larger focal length means a narrower field of view - it zooms in on the subject.
A pinhole camera is the simplest camera that lets you, the photographer, control all of the elements of a photo. This is, functionally, fully manual photography.
So what's the difference between all that and a cellphone camera?
Point-and-shoot cameras like those on cellphones give the user more limited control over these settings. For instance, think of a disposable camera. On a disposable camera, the photographer has control over one setting - the ISO of the film, which they can select at purchase. They can't control how wide the lens opens or how long it stays open, and the only way they can compensate for lighting that is a poor match to the ISO is flash.
Cellphone cameras are very much like a standard point-and-shoot. By default, users point their cameras, then shoot a photo. Many cellphones have a "pro" mode that will allow the user to emulate different ISOs or f-stops, but the sensors in cellphone cameras aren't as good as the ones in camera-cameras, and the lenses are very limited as well. Some cellphone cameras and point-and-shoot digital cameras WILL allow users to set longer exposures, and many cellphone cameras have multiple lenses which does allow for some lens effects, but they don't give a huge amount of control to the user.
Okay so let's say I've got my new shiny camera, what do I need to know?
For best results, you want your ISO to match the light you're shooting in. Low ISO is for bright light, high ISO is for low light. If you wanted to take snapshots of your family outdoors at disneyland in the summer, you'd buy 100 ISO film. When I used to shoot football games at night in oddly lit stadiums, I'd use 1600 ISO film. If you have a DSLR camera, there's a setting somewhere in there that tells you how to set the ISO. If you are shooting in relatively low light and the photos are turning out darker than you'd like *but* things are moving too quickly to use a longer exposure, you can bump up your ISO for brighter, sharper images but they will be more noisy and grainy than ones shot at a lower ISO. If you want clean, smooth, crisp images, your goal should be to shoot with the lowest ISO possible.
The Aperture of your camera lens determines your F-Stop. This acts like the pupils of your eyes. When it's really really bright out, your pupils shrink down to let in less light. When it's darker out, your pupils get bigger to let in more light. If you are shooting in low light, you want a low F-Stop, which means that your camera's lens is open really wide. If you are shooting in a bright environment, you want a higher F-Stop, which will mean the opening is very small. Since your F-stop interacts with the focal length of your lens, you will find that zooming in with the lens often makes images darker. To shoot clear images from far away, you need to be very conscious of your F-stop, your ISO, and ambient lighting conditions.
Exposure describes the length of time you set the camera to leave the aperture open. In many DSLRs this can span from 1/3200th of a second to infinitely long (the "bulb" setting means "aperture is open until you close it.") If you want sharp images of frozen motion, you want the fastest speed that you can get. Sports photography and photography of things like insects or milk crowns often use extremely short exposures to get sharp images. If you want blurry images you want slower speeds. If you want to take a photo in a low-light environment and capture motion within that environment - for instance, taking photos of cars on a freeway at night - you want slower speeds (if you want to do this in a brighter environment, like taking photos of a stream in the daytime, you want slower speeds and a specific kind of lens filter called a neutral density filter). When exposures are set to be longer than about 1/60th of a second, images with motion start to look blurry.
Focal Length determines the field of view of your subject. If you have a lens with variable focal lengths, this is called a zoom lens. A longer focal length zooms you in and a shorter focal length zooms you out. Lenses with fixed focal lengths are called prime lenses, and can't zoom in or out.
Depth of Field - your depth of field is a combination of the interaction of your focal length, your distance from your subject, and your F-stop. The depth of field describes the relative amount of space in a photograph that is in focus. A long depth of field means that much of the image plane is in focus. A short depth of field means that a narrow portion of the image plane is in focus. A low F-stop produces a narrow depth of field. A long focal length produces a narrow depth of field.
You can think of your camera as a tool that measures time and space. Your ISO and Exposures are measurements of time (how quickly the sensor senses the light, how long the sensor is exposed to the light), the F-Stop and the focal length are measurements of space (how wide the aperture of the camera is, how far the lens is from the sensor).
The pre-set modes on your camera, the ones on the dial that show a person running, flower, or a cloud, or a lady with a hat - these are generic settings that combine an ISO, exposure time, and f-stop that are likely to work well for outdoor action shots, landscape photography, cloudy light, and portraits. When you're using those pre-set modes, you control the focal length and not much else.
When you understand that the running person/action mode means low-ish ISO combined with high shutter speeds, you can start just setting your own ISO and shutter speed when you're shooting sports. When you know that portrait mode sets you up for low-ish f-stops, relatively quick shutter speeds, and mid-range ISOs, you can just start setting those things on your own so you can have more control.
"What about light metering?"
Since your camera is a machine that records light, light metering is pretty important. The light meter of your camera will tell you if your settings are "correct" for the amount of that the light sensor senses. In most modern cameras there is a light metering display on the bottom edge of the viewfinder that goes from negative to positive; if the meter shows that you are in the negative it means that your photo will be under-exposed (too little light will get to the sensor and the image will appear dark), if the meter shows that you are in the positive it means that your photo will be over-exposed (too much light will get to the sensor and the image will appear too bright - "blown out"). The way to correct for under or over exposure is to change the length of the exposure, making it longer for underexposed images and shorter for overexposed images.
What the light meter is doing is thinking about all of your settings and the lighting for you. It looks at the ISO, focal length, f-stop, light hitting the sensor, and planned exposure time and tells you what that combination of settings is likely to produce - something too bright, or something too dark.
When you are more experienced with photography, you get good at juggling these things on the fly and messing around with them more, which is how you can do the magic of looking at the sky, twisting a dial, taking three steps to the left, and knocking it out of the park with a picture.
It only looks like magic because you're doing a ton of math under the hood that is extremely non-obvious to people who are new to photography.
Anyway, here is a good guide to depth of field and what goes into it.
Here is a basic photography textbook that explains the principles that I've gone over here in a lot more detail with a lot better explanations. It's a film photography textbook, but one of the cool things about photography is that a lot of stuff from the analog era is still relevant in the digital area, and the basics haven't changed.
However all of that is about the *technical* aspects of photography. Photography isn't just a record of exposure time and focal length, so here's a basic photo composition textbook that talks about the artistic principles of photography.
2K notes
·
View notes