#nail polish mockup
Explore tagged Tumblr posts
Note
Apurar o saltar procesos es receta para el desastre. Hace poco me hice una falda de lino con una sobrefalda de tul y el (buen) tiempo que me tomó hilvanar me ahorró disgustos y desajustes al pasar a la máquina :) Por otro lado, estoy a dos aguas con los patrones comerciales y los patrones hechos por mí :')
What about an amphibian that got stressed doing a sewing project because they rushed it and now the pants don’t fit to the top and omg what am I gonna do also the pants look weird and not like the picture on the website
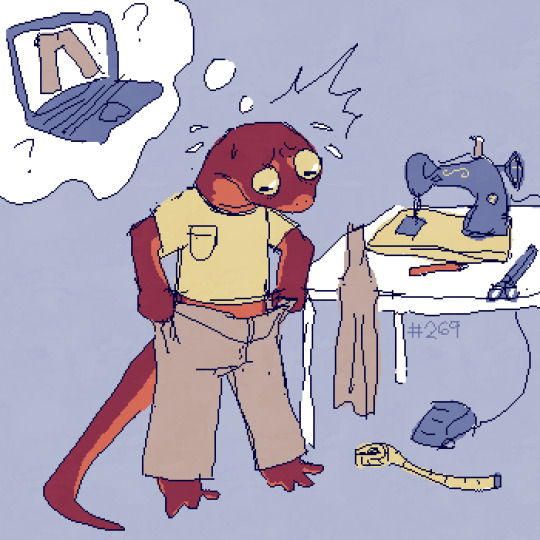
day 1350
#I draft all my own patterns so I really need to make sure I haven't majorly screwed them up first#it's not like I can look at a size chart and just hope for the best! I drew these shapes myself I gotta make sure they're me-shaped!!#I did still end up having to redo the sleeves on that jacket I made this winter though#somehow the sleeve heads got all shifted around and I still don't know how it happened#(also in case anyone's reading this in the future and they've changed their url - it's currently 'i-eat-nail-polish')#I used to hate mockups and basting and all those things#sewing#but I've been sewing for 12 years now and I enjoy doing things slowly and having them turn out nice
483 notes
·
View notes
Text
With a total of 1,176 votes tallied, the preferred plushie poll winner with 28.8% of votes is…

What a close one! Jonathan came in with 27.7%, the mysterious Mr. Morse with 24.9% and, delicious irony of ironies, London Dracula with 18.9%. Rest in pieces. Now, what does all this mean going forward?
First, just to reconfirm: I will absolutely be looking into the costs for having more than one plushie character produced at a time. For all that Mina has the top spot if it comes down to a solo run, Nobody Wants to Separate the Gothic Horror Soulmates, even as wee little plushies. It hurts my heart to think of. Mina and Jonathan deserve to sit side by side on everyone’s pillow. Just as Quinn Morse deserves to haunt the pillow next to theirs while casually throttling and carving London Dracula into pieces. For enrichment.
But beyond that, some other key things:
How is this getting done?
Sadly, I was not a cool enough kid for Makeship to greenlight a collaboration with me. Tragique. But while I was sitting around waiting for them to get back to me, I had time to browse around for other options. During that sniffing around I dug up a couple of promising manufacturers—one of which has some really neat options for not only plush toys, but all sorts of bric-a-brac like stationery, shirts, bags, cups, et cetera—and I plan to reach out to them for quotes to start with. Nothing really gets to move forward until I can nail down prices and the amount of X plushies to be made.
I am more than a little hesitant to tell anyone MAKE ME 1000+ PLUSHIES, PLEASE, THE TUMBLR POLL SAID THEY’RE GOOD FOR IT. These aren’t as simple as print/make-on-demand products, so I need to be careful estimating the amount of folks ready and willing to drop money on the little guys. But I will keep everyone updated on the numbers regardless!
Sooo is this a crowdfunding thing or an investment or what?
Don’t know yet. I am still between jobs at the moment—reminder to check out my Ko-Fi if you want to drop me a buck or commission some art!—but if this is something I can safely drop some of my own money in with the guarantee that it will let me do better than break even, I’ll do what I can out of pocket. However, if the cost of making something of good quality turns out too steep, I’ll start looking into stuff like Kickstarter and Backerkit and so on. I want to be sure I’m not gutting anybody’s wallet to pull this off and I want to be double-sure that what we’re paying for isn’t some flimsy throwaway junk. We are all here on the same Dracula book club starving artist site, so It Has to Be Worth It and not a money-sink for anyone.
Got it. Any other info to spare?
For the plushies specifically, this is when I’ll start:
Polishing up the current four designs into cleaner illustrations with different angles to provide for mockup samples with whoever I pick to manufacture with. If I get stuck on something—(which is likely)—I may throw up another poll to bug everyone about palettes and fashion choices. I have a few more designs I haven’t dropped yet for Epilogue Harkers, a non-Bloofer Lucy, and keychains that I’d love to share too!
Eyeballing materials. I’m already picturing a very close-cut cloth for the build and clothes, but I need to decide on filling too. Stiff overstuffing to hold a pose versus softer/lighter plush for floppy cuddleability.
Poking at other character roughs, ala the Suitor Squad, the Weird Sisters, Van Helsing, Renfield, and Baby Quincey. And if all of those go well…
…maybe some designs for other favorites in the public domain playground. (Looks meaningfully at Clarimonde, Carmilla, Victor Frankenstein and the Creature, the King in Yellow, too many others.) ((But that’s all far-future stuff at the moment.))
Cool! But you also mentioned something about other merch?
I did.
Because goddamn do I want some Dracula-themed stationery. Journals! Memo pads! Pens! Every day we don’t have these things with the Harkers’ mark upon them is a victory for the forces of Count Dracula’s document-destroying evil. Likewise for shirts, totes, mugs, keychains, face masks and other things that could use some novel-flavored goodies. Hell, I’ll probably even get on with making stuff for The Vampyres to link on my website too. Because I am. Maybe behind on that. By several months.
Anyway.
I’ve got to start working on some designs for those too while the plushie process is progressing. Pray that my carpals don’t get tunneled.
Nice! Sounds like your plate is pretty full. So that’s it, right?
:)
Arcane?
:3c
Arcane. I need you to tell me this is all you’re working on.
>:}
Arcane.
Please stand by.
I have a little treat brewing for the Dracula Dailiers and @re-dracula folks in honor of a very special day for our good friend Jonathan Harker.
#I am scheming#my art#my writing#dracula#jonathan harker#mina murray#mina harker#quinn morse#the vampyres#c.r. kane
161 notes
·
View notes
Photo


Another design of nail polish logo art and product. DM me for prices on logos and designs.
#nail polish#product art#product design#graphic design#photoshop#mockup#nail polish mockup#freelance
0 notes
Text
so what goes into making a proxy?
more than you'd expect, honestly. first off: time. a lot of it. all of my work is done freehand, and you can't light trace through cardstock. I make a digital design mockup, then I use pencils to sketch that onto a gesso coated trash card, then I paint. acrylics, nail polish, and spray paints are what I work with. until specifically Christmas I only had one single round brush. I do my lining with pens, specifically a gel pen or a paint pen. it's messy, unoptimized work.


hi my name is Jake. if you dont know me I like drawing and magic the gathering, and I'm currently out of a job. when you're poor and you play mtg, you do something called proxying cards. basically just printing out a card you want but can't use.
I decided that was boring. I started making my own, with my funny little fella named Steve on it. calling it the stevecret lair (crossover events are called secret lairs.) I've made two cards now, a Rhystic Study ($60+) and a hippo token ($1>) for my girlfriend. but the time has come where the people at my local game store (lgs) has started asking me to make cards. figured I'd document the process.


#jakeposting#magic#magic the gathering#mtg#magic the card game#proxy#edh#commander#mtg commander#mtg community#mtg edh#mtg proxy#art#art process
9 notes
·
View notes
Text
BJD Dyeing: Soulkids + DiM Hybrid
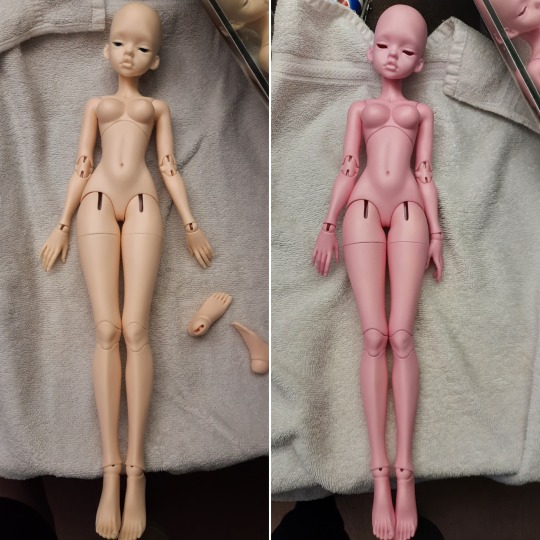
In early August- I, queen of Nervousness, suddenly really wanted to try doll dyeing. Something I've researched billions of times because I have several projects that require it- but setting a day to actually do it was daunting because there was no promise that I wouldn't suddenly chicken out (and then feel bad for weeks.) So, I seized that moment of worry-free clarity! 🤪
Pre-Setup?:
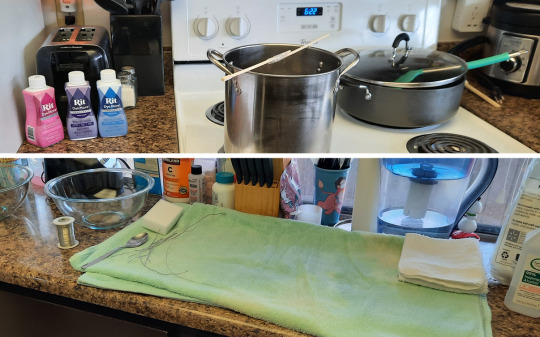
First, I did a "mockup" setup in the kitchen to get a feel for the flow and what supplies I needed at the ready, and then after dinner, armed with my notes and two trusty assistants, I jumped into it. I figured since it was just a hue-shift it would be relatively safe as a first attempt (though a full body doll is still a bit ambitious lol... I think dyeing just a few parts would be even less stressful, like fantasy parts/wings or something.)
Dye subject:
I am dying my Doll in Mind Laia HCE hybrid. She's on a Soulkids New body (from 2021), and both are in normal resin. I believe the head is from 2018 or 2019. For anyone wondering- the default match of these two is excellent! 95+% match with the head being paler, only slightly noticeable in photos. In my opinion, a faceup would be enough to close that gap.
So this doll is shelling a fantasy character of mine; Naelia, an elf mage that has a bubblegum-pink skintone. (Artwork for reference)
Dye Supplies:
- A dedicated "not-for-cooking" stainless steel pot. I got mine at Walmart for 6$ (I have also seen ceramic recommended; avoid non-stick coatings, aluminum, or anything damaged.)
- A long dowel (or in my case, two chopsticks taped together...) to rest across the lip of the pot. This is to hang pieces off of.
- A metal spoon (for measuring dye and some stirring. A longer spoon is welcome but I didn't need it much!)
- The Rit Dyemore colors of choice. I had purple and blue on hand in case the pink hue wasn't right on the peachy resin. I didn't end up needing them at all.
- 1 glass bowl of cool water (I have seen ice water used but I opted for regular cold tap) This is to cool the pieces and pulls off excess dye.
- 1 glass bowl of warmer soapy water. I just used my on-hand palmolive dish soap. This is for- or was for- if I needed to magic eraser excess dye off any of the pieces... I didn't end up using this bowl at all for this project. I was dying a pretty light color though, so I will still set it up every time- better to not use it then not have it in an emergency.
- Cotton balls, magic eraser, & rubbing alcohol- again, on hand to remove access dye, spots, etc.
- Emergency acetone, if I needed to strip a piece completely. I did not have acetone free nail polish remover but I would say based on what I've read, I'd recommend that far more- its safer on pieces and does the job just as well. But in a pinch (or if all else fails) if you rinse your piece REALLY WELL with soapy water very promptly after acetone wiping it should be alright. (I do occasionally use this for removing stubborn faceups and I haven't had any issues, but it pays to be cautious.)
- A clean designated dye towel to lay rinsed parts on (I find this less messy than paper towels, and cushier) I also had some clean washrags handy for drying parts if they needed acetone cleaning so minimize cross-contamination on the towel.
Preparing the doll & dyebath:
First order of business was to unstring her and carefully lay out the left and right sides. (Souldoll kindly marks almost every piece as R or L so I didn't have to worry as much)

I filled my bathroom sink with warm/hot soapy water (palmolive dish detergent again) and laid a washrag in the bottom of my sink to cushion parts from clinking about in the water. I gently washed every piece with a magic eraser, and tried to be as even and thorough as possible to remove any surface dirt, oils, and even out any possible nicks she may have acquired while being my sewing model. Since souldoll does have sanding lines on one side that are pretty noticeable to the touch, I went over them lightly for the hell of it. I accepted that dye may gather here. I laid her out to dry on a towel and went to eat dinner.
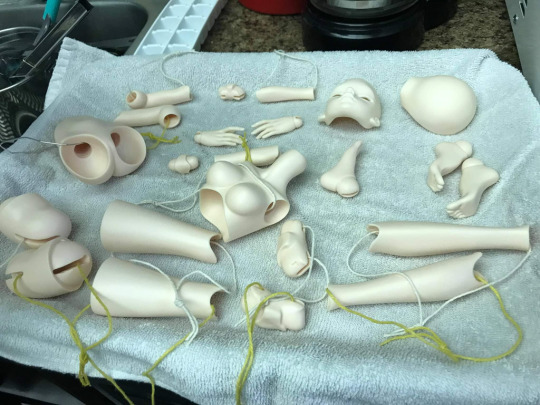
After that I strung her left side in white string and her right side in yellow. I tried to pick string that was a lighter color just in case of any color bleeding, and I chose a woven string instead of yarn just in case of any possible melting. (I haven't seen cases of this or anything, its just me.) I ended up threading wire through a few of the pieces (feet, torso) to try out preferences (I don't think I like wire in this case, it kinda dug into her hip joint at one spot.)
At the recommendation of a few tutorials, I initially filled the pot with 3 quarts of warm/hot water. I was measuring the length of the string and pieces in the pot as I went, and ended up adding about 4 more cups of water. This did not have any negative effects that I could see. I don't know if this matters, but I brought the clear water to an almost boil first- that setting is about a 6 on my stove. Then I added 1 tablespoon of Rit Dyemore Super Pink, and turned up the heat to 7 (medium-high) to keep an active steamy boil. I added one drop of dish soap to the top- it's reportedly to disperse surface tension and break up any dye that may be floating, but this dye is liquid so it shouldn't have as much of a risk of that as powder dye would.
This next part is important- I had help! My two assistants (my roomie @dolliesanddelights/Caiterprince and my partner Naf/@dyemelikeasunset) were present. Cait was helping me document everything, taking videos, and checking the color-match of dyed pieces in photos as we went. My boo had a stopwatch app open and also ended up helping me hold pieces when I was busy. This probably is the biggest recommendation I can offer to anyone dyeing dolls, for the first time or not. Taking photos of the progress while I was in a mad dash between dipping parts would have significantly slowed me down and disrupted my process, and having someone help me time and hold pieces while I ran other pieces along the assembly line was SOOO helpful. So if you're intimidated to do it all yourself, you'd be right and you shouldn't have to! If you have a friend or relative that you trust then I recommend recruiting them. If you do not, then don't be obligated to make yourself take photos, and maybe do a pretend run-through of it yourself so you know what you need and how much time it takes to rinse or photograph a part, etc. It might be over the top, but being prepared helps my anxiety immensely, haha. (Also! Even though I had everything set up, I reminded myself that if it went awful at any point, I could always just stop!) So that being said, the assembly line went like this: Dip the parts with a timer going, to help figure out how long everything would need. I would bob the parts up and down to check the color change every 10 seconds. After the desired color was reached, I would pull them over to my cool clean water and dunk them, then lay them on the towel and check the color and for any discrepancies. If it was good, I would grab the next pair of pieces and my boo would reset the timer. I opted to do all my parts in pairs of the same type- ie both the left and right shins, feet, elbow peanuts, etc. So I decided I would test the flat feet first, on wire. I ended up dipping them again later as they were a touch lighter than the rest of the other pieces!)

This photo doesn't even do it justice- it was already lovely!!!! 😍😍 I had only read one report about dyeing Souldoll resin and that it didn't take dye great, so I was extra vigilant. But it looked good, so onward we went- a 30 minute rush!!! I worked my way up from the feet, doing shins, knees, thighs, etc. I ended up dipping all the body pieces for 45 seconds- even the torso pieces!
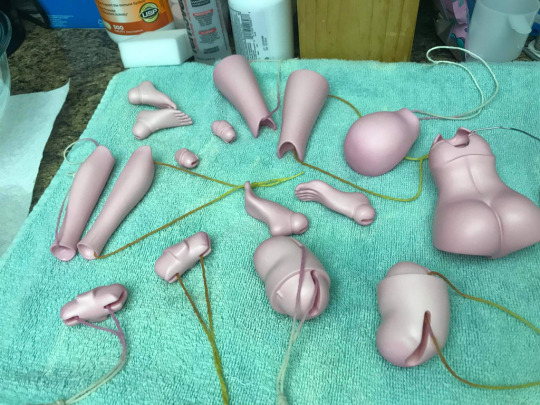
The DiM head took dye significantly faster- around 25 seconds. Since it was a faceplate, I threaded string through the eyewells- it did not have any ill effects!!! I decided to leave her faceplate a half-shade lighter so when I blush her, she'll have a natural highlight in her cheeks... no idea if this is "correct", I just really didn't want to risk it being too dark. Another important highlight: Someone had recommend using nylon socks or a fishnet to dip parts, especially small pieces. I grabbed one of these at walmart to give it a go.

I LOVED this thing. if it was bigger, I would've used it for everything. I used it on all the peanuts, hands, heeled feet, and my boo even fit both the forearms in it with no consequence. I was very attentive about any mesh imprinting on the resin, but nothing like that happened- even if the parts didn't move around much, they all dyed evenly. This thing could probably hold everything for tinies, and most pieces for YOSD except maybe the torso/head. I preferred this way more then trying to string them- the little pieces made me nervous because this pot is deep so this was a blessing.
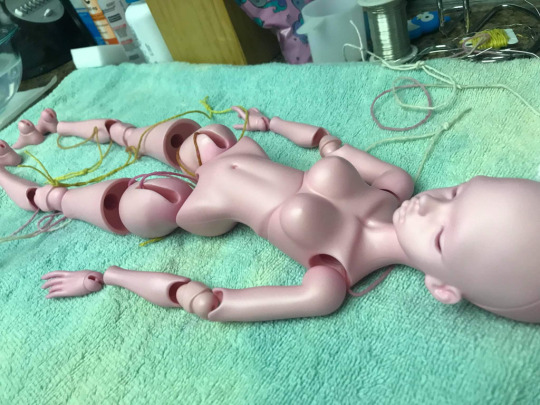
Finally done! (The lighting in my kitchen is affecting the final color a lot, so read on)- The outcome was: her elbow peanuts, flat feet, and face are a touch lighter, but not enough for me to care about. The tops of her hip peanuts have a darker hue from the friction in her hip socket, so that's fine- and absolutely no dye collected on any of her seamlines. Well ok then! 😵
Some things I learned: - Between wire, string, dowels, fishnet, and free-handing- I liked string, it gave me a lot of control. Wire was ok, but I noticed afterwards that it had dug into the thinner resin around her hip socket, so I probably will use it less- wire works well for small bits so they don't get thrashed around in the boiling water, but IMHO the fishnet was awesome and way faster.
- The water WILL evaporate!! 😂 Even though I filled it even more than needed, I started to notice pieces that were formerly submerged started to peek out when hanging on the dowel. This is when my boo and I started to just hold the strings above the pot- but the steam WILL get to you after a while. (Don't be me. Bad bee.) Hook the string onto a piece of wire, hold it with forceps or tongs- whatever you can find. - Keeping up a quick pace is important. The water is evaporating, the dye to water ratio will change over time. This might get complicated if a part gets splotchy or has residue- but I think it's better to run through and dye everything in one pass, then go through and clean/strip the parts that didn't turn out and redye those. (Unless you have an assistant! but I can't speak from experience yet. Guess I have to dye more dolls and find out! 👀) Anyway, without further ado-
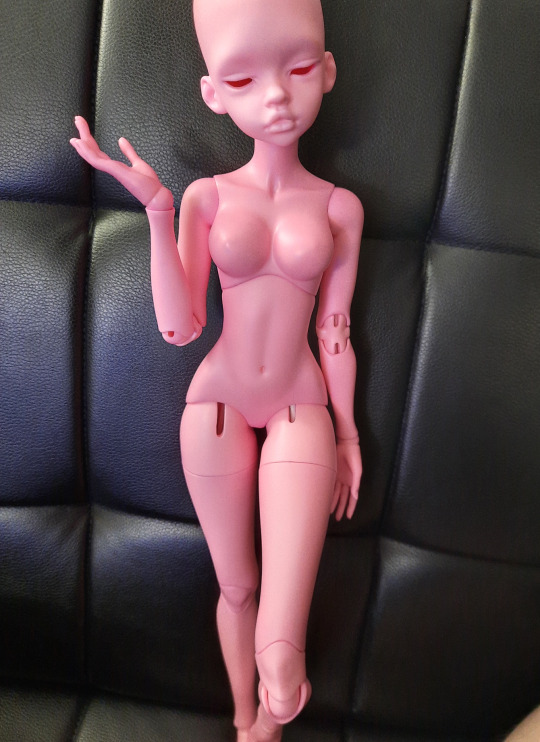
(Since tumblr is limiting posts to 10 photos, expect more photosets in the future...)
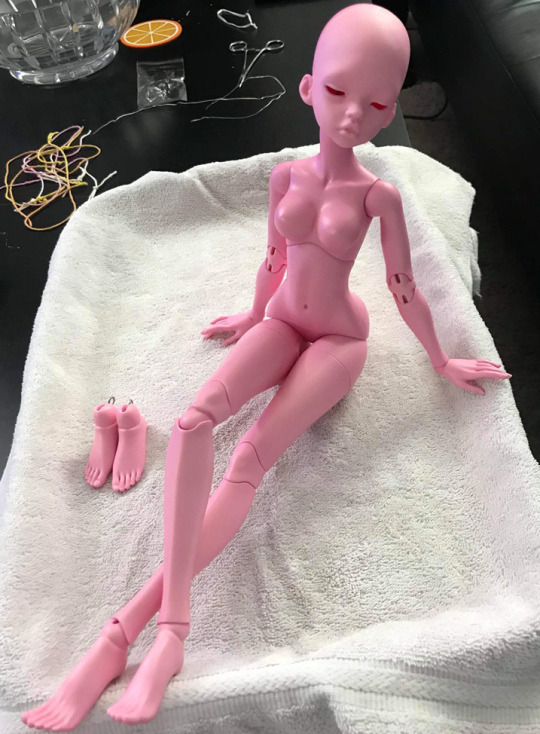
I can't believe how lucky this first attempt was lmfao. I keep having moments of "but is she TOO pink?" but then immediately marveling in how lovely she is in all lighting conditions. I need to get apoxie for her elf ears and start on her faceup, and I'm still hunting eyes and a wig to modify for her, but she's sitting on my craft desk in all her pink radiance.
I was ALMOST tempted to jump into another dye but didn't want to soil my good fortune so quickly, LOL! That being said, I have several other dye projects planned- one girl that needs to be blue, a dip dye, a deep dark elf purple, and a few dark brown hues, so I will do my best to document those too. I find this kind of resource very precious so I'm happy I can finally contribute. 😭 If anyone has any questions I didn't think to address here, feel free to ask. (I will also be cross-posting this to DoA and instagram when I am able to.) Otherwise, thank you for following along, and I hope this was helpful.
#bjds#ball jointed dolls#abjds#souldoll#doll in mind#naelia#doll in mind laia#god writing blog posts is so tiring what happened to my endurance#also tumblr's new post features are... uh... messy#sorry for errors
73 notes
·
View notes
Photo

untitled, 2019 solo presentation, Art Basel Statements, Dawid Radziszewski Gallery booth 60 x 60 x 520 cm acrylic paint, aluminum, aluminum foil, anty-slide mat, balsa wood, batteries, cardboard, ceiling board, cellulose wool, chia seeds, coriander seeds, cork, cork-rubber board, corrugated cardboard, crepe paper, cyanoacrylate adhesive, digital print, doormat, elastic clinker glitter, gold leaf, HDF board, honeycomb cardboard insert, hot glue, LED, matches, MDF board, mineral wool, mosquito net, nail polish, neodymium magnets, oakum, OSB board, painting tape, paper, pepper, pigment, pins, plywood, polyurethane foam, polyurethane sponge, pressed polyurethane, resol foam, sealing glue, spray adhesive, styrodur, styrofoam, technical felt, threads, toilet paper, toothpicks, Vicol, wood wool, wood varnish, wrapping paper The project by Katarzyna Przezwańska consists of a pillar lying on the ground depicting a scale model of the layers of earth 260 meters under the Art Basel fair hall, dating back to around 30 million years ago. At the top of the column, a mockup of the Statements section is placed along with all the artworks shown at the galleries' booths. The work is a reflection of the artist's interest in natural history combined with the realities of the art world in which both artists and gallerists like ants work together building their own microworld. In the project for Art Basel, Przezwańska, on the one hand, talks about the fact that the art world was built on a strong foundation of the past and, on the other hand, about the short history of our time in comparison with the geological time.
2 notes
·
View notes
Text
Building An App Is Similar To Bringing Business Into Being, App Developer Brisbane

Snappy Apps, the leading Brisbane app developer. A budding plan needs a better path to victory. Every app is unique and different, yet each app requires marketing and business plan from scratch to trigger success, working closely to understand each aspect. Almost everyone commits mistakes, movement is life. Many try to outsmart! • Many first develop the App if things don’t work out, they sell • Often they follow the wrong technology set. • The targeted market doesn’t want what they’re selling or have created • At times, market targeting fails • When they don’t comprehend the technology, they tend to outsource overseas • Often they don’t grasp that this app is indeed a business • They assume only building great technology, people will appreciate it and use it. • They kick starts marketing even much before making or developing the App. Snappy Apps, topmost gold coast app developer • Identifying Marketing Strategy • Identifying Business Strategy • Creating early marketing mockups and material • Gathering information from marketing research and contacting the target market directly • Revising app strategy • Attempt to endorse and selling the aap. • Revising app approach • Forming a promotional landing website page, making an attractive webpage, filled with necessary details • Most crucial, search engine optimisation, creating blogs enriched with keywords so that it comes top on searches • With all focus, one should start working on App • Updating progress records to potential customers through video demonstrations, blog entries of latest features, social media platforms and many more. • Endorsing a slight “Beta” program to prospective customers, which will give you an idea of how well people are reacting to your product • Once again revising the app and working on locking in features • Nailing down features and proceeding towards app design polishing • Promoting the upcoming launch to all who has paid attention to the previous steps • App launch • General Advertising strategies App developer Brisbane, Snappy Apps can help individuals in every step. Creating an app is not an easy job, a lot of work needs to be accomplished. They can guide you in each step, to make it successful. Start today, get a free consultation.
youtube
1 note
·
View note
Photo

Merurulince Rede Arls from Atelier Meruru: The Apprentice of Arland
Costume made and worn by me. Photo taken at Anime Central 2018.
I admired the Atelier series from afar for a long time. I played Atelier Iris: Eternal Mana, the first game with a NA release, ages ago but then didn't play another one for years. New games kept coming, and the series quickly seemed too big to get into. In 2017, a search for different things to cosplay led me to play another one. Though I love the character designs in the series in general, I chose Atelier Meruru because it had several characters that appealed to me. I ended up deciding to cosplay Meruru, but I would have been happy to cosplay just about any of the girls. I had a really fun time playing the game, and it was a fun costume to make as well!
The biggest challenge was the bodice. I had to iterate through several mockups to get the shape just right. It still came out fitting a little wonky, but I'm happy with how it looks. It was my first time incorporating bra cups into a garment, and I was happy with the result. The yellow fabric, used here and throughout the costume, is cotton broadcloth, and the white is polyester/cotton twill. The pink fabric used for the cape, bow, and crown are polyester poplin, and the stripe on the bottom of the skirt is polyester/cotton bias tape.
Additionally, I used two custom fabrics from Spoonflower. One was the satin lining of the cape, which is a gradient of purple, peach, and seafoam. Unfortunately, a lot of those colors kind of got drowned out in the final product because the pink from the outside of the cape shows through. Still, it looks much cooler than if I had used a solid color for that lining.
The other custom fabric is the floral pattern on the cuffs and collar. I designed it myself based on a small sample given in a piece of concept art. The closure of the collar is the bow itself, which attaches to each end of the collar with a concealed button.
I painted the boots and buttons with champagne gold spray paint. I made the trim and other gold details from faux leather vinyl. I was extremely fortunate to find vinyl and spray paint that matched, since this gold color is so important to the design.
For the crown, I drew on my experience making Lillie's hat a few months earlier. As with the top of that hat, the pink part of the crown was made up of leaf-shaped segments that I made from fabric backed with fusible stabilizer. To prevent the crown from getting damaged, I cut a piece of foam to fill the interior. This foam piece also holds in place a metal wire which extends out of the top of the crown to hold the topmost heart. That heart and the heart-pattern trim around the outside of the crown are cut from vinyl and glued on. The stones set on the hearts are small rhinestones that I painted using a light coat of nail polish. I built a strap into the bottom of the crown that I use to pin it to the wig. Lastly, the heart hanging by a chain from the side of the crown (barely visible against my hair) is a phone charm that I painted.
I made the three flowers attached to the cape from craft foam. I bent the petals inwards and preserved that curve by coating them in mod podge before painting. Each one has a safety pin glued to the back, which ended up being more visible than I had hoped, but it's only really a problem up close.
The pleated skirt and bloomers were straightforward since they were similar to things that I had made before. I do think that it's probably the nicest pleated skirt that I've made.
The wig is a Luthien from Arda in Serah Pink. I styled the wig myself, though I cannot take credit for the braids. I bought the two extensions already braided and attached both ends of the them to the main wig.
In between wearing this the first time at Anime NebrasKon 2017 and the second time at Anime Central 2018, I made a staff to go with it! I based it on the Student's Staff, which is Meruru's initial equip in the game as well as what she is depicted with in her concept art. The shaft is a piece of PVC pipe, the head is made from EVA foam, and the bottom is a repurposed silicone bottle stopper. I used a lot of the skills that I had learned from making my guitar for Chuchu to make the staff. While it didn't turn out quite as clean-looking as the guitar, it was lightweight and held up well.
I'm glad that I didn't let being a novice to the series stop me from cosplaying Atelier. I loved the game, and I love this costume!
27 notes
·
View notes
Photo

Blog 13
This week we had to determine pattern and some potential mock ups for jerseys and other equipment. I like the jersey edit I completed I just need to remember to take AT&T off. I think it looks pretty natural on that billboard which I am happy about. I thought it would look more realistic to photoshop an actual player’s jersey, instead of just mocking up a jersey.
The pattern I created is an astrology pattern to play off of the stars name. I enjoy the pattern as a black background with gold shapes or white background with gold shapes. I enjoy the idea of putting the pattern on the inside top of the bill on the hat because it makes sense to look up at the pattern like looking up at the stars.
I wish I had more time to dedicate to this project, but I am looking forward to polishing up a few final touches. I think the beer handles for the stadium would be cool to design but that seems like more of a football vibe. I don’t know what other mockup I am going to create, but I think I’ll do some research. I want to nail down a tertiary logo by today because my primary logo is a word mark. My stars folder on my desktop is stressing me out.
0 notes
Photo

Playing around with Mock up idea’s since I the sumbissions will all be online
My cover design isn’t finalised yet so this will not be used as my final.
Tatiana said that my mockup needs to illustrate the kind of book cloth I want to use ect so this one will no be used. I also think that the hand’s blue nail polish is ugly and I draws the focus from the book cover
0 notes
Photo

Download Download Nail Polish Bottle Mockup PSDHere > > https://ift.tt/3ku2RCf
0 notes
Photo

Download Download Nail Polish Bottle Mockup PSD Hese > > https://ift.tt/3xP6pCL
0 notes
Video
youtube
How to design a Nail Polish Mockup | Photoshop Mockup Tutorial
0 notes
Note
I shan't be taking advice from anyone who eats nail polish
What about an amphibian that got stressed doing a sewing project because they rushed it and now the pants don’t fit to the top and omg what am I gonna do also the pants look weird and not like the picture on the website

day 1350
#I draft all my own patterns so I really need to make sure I haven't majorly screwed them up first#it's not like I can look at a size chart and just hope for the best! I drew these shapes myself I gotta make sure they're me-shaped!!#I did still end up having to redo the sleeves on that jacket I made this winter though#somehow the sleeve heads got all shifted around and I still don't know how it happened#(also in case anyone's reading this in the future and they've changed their url - it's currently 'i-eat-nail-polish')#sewing#I used to hate mockups and basting and all those things#but I've been sewing for 12 years now and I enjoy doing things slowly and having them turn out nice
483 notes
·
View notes
Photo

untitled, 2019 solo presentation, Art Basel Statements, Dawid Radziszewski Gallery booth 60 x 60 x 520 cm acrylic paint, aluminum, aluminum foil, anty-slide mat, balsa wood, batteries, cardboard, ceiling board, cellulose wool, chia seeds, coriander seeds, cork, cork-rubber board, corrugated cardboard, crepe paper, cyanoacrylate adhesive, digital print, doormat, elastic clinker glitter, gold leaf, HDF board, honeycomb cardboard insert, hot glue, LED, matches, MDF board, mineral wool, mosquito net, nail polish, neodymium magnets, oakum, OSB board, painting tape, paper, pepper, pigment, pins, plywood, polyurethane foam, polyurethane sponge, pressed polyurethane, resol foam, sealing glue, spray adhesive, styrodur, styrofoam, technical felt, threads, toilet paper, toothpicks, Vicol, wood wool, wood varnish, wrapping paper The project by Katarzyna Przezwańska consists of a pillar lying on the ground depicting a scale model of the layers of earth 260 meters under the Art Basel fair hall, dating back to around 30 million years ago. At the top of the column, a mockup of the Statements section is placed along with all the artworks shown at the galleries' booths. The work is a reflection of the artist's interest in natural history combined with the realities of the art world in which both artists and gallerists like ants work together building their own microworld. In the project for Art Basel, Przezwańska, on the one hand, talks about the fact that the art world was built on a strong foundation of the past and, on the other hand, about the short history of our time in comparison with the geological time.
0 notes
Photo


Click Here To Download This Free Stunning Nail Polish Mockup
1 note
·
View note