#melon bunny
Explore tagged Tumblr posts
Text

wrapping Amanda for the silk study 💜
#my art#wip#my candy love new gen#mclng#corazon de melon#amour sucre new gen#mcl new gen#mcl#mclng amanda#amanda de lavienne#bunny girl#in pink silk#i need to find some cuter inspo for the necklace :(#not my fav in game for sure but she’s pretty
346 notes
·
View notes
Text

Melon soda 🍈
- Kofi -
#trying a different coloring style! nothing too crazy but a little different haha ; w; 💖#just a random character to fit the theme lol 🥹#melon soda#bunny#bunny girl#soda float#diner#retro anime#retro anime aesthetic#90s anime#art#artists on tumblr#anime#food#90s anime aesthetic#cute art#cute anime
401 notes
·
View notes
Text

beastars sketch page pt 2 :U
#digital art#drawing#sketch#character art#chibi#anime#beastars#beastars fanart#manga#beast complex#legoshi#haru#tao#kibi#ibuki#shishigumi#gohin#melon#melon beastars#ako#deshico#louis#anteater#panther#panda#lion#wolf#bunny#furry#fanart
100 notes
·
View notes
Text

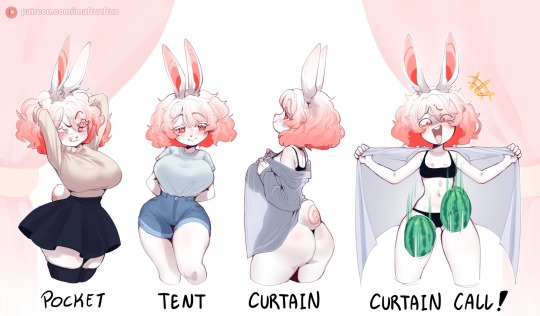
Crutain Call challenge 👀 with a twist 🍉
1K notes
·
View notes
Text

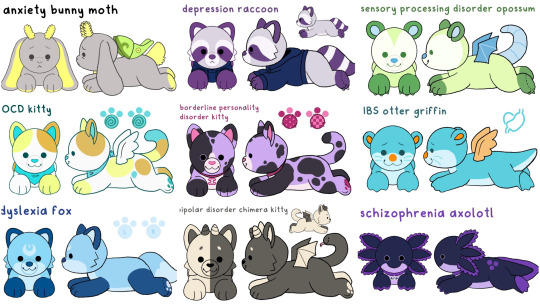
all nine of the stretch goal designs for this campaign - I am not sure how many goals we will be able to reach but there will come a point where I won't be able to do any more goals unless I get fulfillment help, so we'll see if it gets to that point and if I can get help! below the cut are the names, info, and artist statements for each plushie! I may end up changing the names as I am still not sure about ash, sandy, kelly, and luca, but let me know if you like them!
Tristan The Depression Raccoon: Tristan’s plushie will come with a removable hoodie accessory! He loves cozy video games like animal crossing and stardew valley. There are not many widely used symbols for depression that I could find, so I chose Tristan's colors based on how my depression makes me feel, bruised and cold.
Ash the Anxiety Bunny Moth: Ash’s plushie will have fluffy moth antennae and removable magnetic wings similar to Bug’s plush! They love to visit the home depot lights section when their friends are with them! I chose gray and yellow for the main body colors because my anxiety personally deals with uncertainty and things out of my control. The green comes from one of the anxiety flags created by Beyond MOGAI. To add moth features was a suggestion I got that I thought fit very well!!
Sandy the Obsessive Compulsive Disorder Kitty: Sandy is an artist and loves to draw and paint landscapes! Her wings will be attached via magnet, similar to Bug’s wings. The colors of her design are based on the OCD flag created by lucellion, with spirals in her paws to represent repetitive thought processes.
Melon the Sensory Processing Disorder Opossum: Melon is a silly opossum who has bat wings! Melon’s wings will be attached via magnet, similar to Bug’s wings. Melon’s colors are inspired by the SPD pride flag created by Beyond MOGAI.
Jazz the Borderline Personality Disorder Kitty: Jazz is a tortoiseshell kitty that loves to read!! Jazz’s plush will come with a pvc charm of the hand of Eris symbol for you to put on xer collar if you choose! The colors are loosely based on the BPD flag created with community input by ptsdsafe on tumblr.
Kelly the Schizospec Axolotl: kelly is an axolotl who is studying chemistry and loves science! kelly’s design is inspired by the Schizospec flag, created with community input and organized by schizosupport on tumblr. They will have a collar tag once again made of PVC featuring the associated double sided arrow symbol.
Em the Bipolar Disorder Chimera: Em is a chimera kitty who has dragon wings and a snake tail! One side of the snake tail is smiling, the other frowning. This takes inspiration from the :): symbol often associated with Bipolar disorder.
Cy the Irritable Bowel Syndrome Otter: Cy is a happy little otter griffin! They love to sculpt and craft and sew! Cy’s color pallet is based on the assortment of medications I take for my own IBS symptoms.
Luca the Dyslexia Fox: Luca is a dancer and loves to perform! Their design and colors are loosely based on the infinity heart+ moon and star symbol that is often found on dyslexia flags. they will have L and R embroidered on their paws, which was a suggestion I was given.
#tristan the depression racoon#audhd creatures#ash the anxiety moth bunny#sandy the ocd kitty#melon the spd opossum bat#Jazz the BPD kitty#kelly the schizospec axolotl#em the bipolar disorder chimera#cy the IBS otter griffin#luca the dyslexia fox#part of my concern with naming is that when it comes to a collection in order to make fulfillment easier on myself I like to choose names#that mostly have different letters to start. because. I will read the first letter of a name and then go off of that which has led to#many people getting sprinkles instead of scarlet or beau instead of beans ToT#so we have ash - bug - critter - cy (the one repeat) - dash - em - jazz - kelly - luca - melon - tristan#cy i think is different enough from critter because it is only two letters so if I confuse cy for critter. that's. well. i hope i won't
196 notes
·
View notes
Text


2024-07-11
53 notes
·
View notes
Text

happy new year 🍈
#beastars#beastars melon#melon beastars#melon#beastars fanart#artists on tumblr#art#technically my last drawing of 2024 and first drawing of 2025#of course it was melon…#I finished the last episode a week ago…. I miss him…….#peep the bunny dango
42 notes
·
View notes
Text

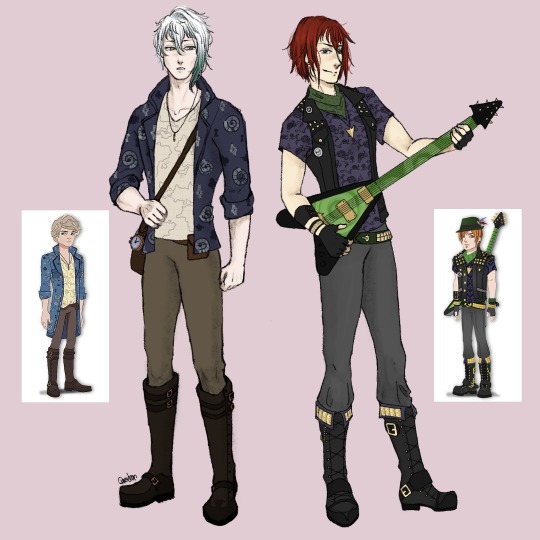
lysander and castiel as alistair wonderland and sparrow hood from ever after high!
i was re-watching the show while being completely engrossed in the game, so the idea came through my mind, hehe…
#my candy love#amor doce#amour sucre#mcl lysander#mcl castiel#lysandre#corazon de melon#castiel#eah#eah fanart#ever after high#ever after royal#ever after rebel#sparrow hood#alistair wonderland#bunny blanc#beemoov
212 notes
·
View notes
Text
Looks like someone's very proud of her bouncing baby belly! ❤️ That's quite the active bunch she's got there... think she could use some helpful belly rubs? 🥰
Just another little comm! Enjoy~!
#super preggo#preggo kink#pregblr#pregfur#furry art#fursona#furry oc#furry fandom#sexy belly#hyperpregnancy#mellie melons#mellie melons art#preggophilia#hyperpreg#bunny girl#big tiddy committee#big tiddy gf#big tiddy goth gf#rabbit furry#rabbit fursona#goth girl#goth furry
100 notes
·
View notes
Text

support group for my ocs who keep finding themselves stuck in timeloop adjacent horror stories
#my ocs#my art#Bunny is the only TRUE horror timelooper here#Melon's is more like she keeps getting isekai'd into new worlds against her will but she meets a lot of the same people across universes#Danny man made that timeloop on purpose but also her genre is more light unlike Bunny and Melon who are in sort of never ending hellscapes#Anita isnt in a timeloop but she is trapped in a void in time where she keeps getting repeating flashes of other time periods and places#so it winds up feeling a little like a timeloop#interesting how three out of four of these characters are magical girls#melon
162 notes
·
View notes
Text

melon soda bunny art print
#my posts#stim#sensory#stimmy#stimblr#stim gifs#art prints#fake food#fake drinks#melon soda#cream soda#fake animals#bunny#green#white#red#examining
22 notes
·
View notes
Text
Tit drop 😏
#big beautiful breasts#big beautiful melons#beautiful model#big tiddy committee#big breasted women#beautiful body#big breasted girl#big tiddy gf#big tittays#snow bunny szn#juicy melons#big juicy titts#juicy tiddies#big titis#big tiddy community#big natural breasts#huge titts#beautiful tiddies#bouncing titts
13 notes
·
View notes
Text
#41 — 07/31/2022 9:28 AM

And here’s domestic Baffy fuel for y’all
Present day thoughts:
See, I like that they can have these moments where they just banter. It adds some background on what they get up to beyond their competitive rivalry/antagonism in their classic shorts.
Also Bugs can actually be quite open about casual things when conversing with Daffy. "How would you liked to be remembered?" and he gives a genuine response. He's willing to be sincere with Daffy, and this is a consistent aspect to his character whether or not it's Daffy. He's sometimes very blunt and childishly naive, other times he's deceptive and feigning innocence.
Even though in some portrayals he can be deliberately obtuse that it feels like he has some vendetta against Daffy, this other casually open and frank side of him is not gatekept from Daffy. So you can see why Daffy sometimes lets himself be vulnerable around Bugs. Sometimes Bugs can be a simple sweetheart, which makes it all the more devious when he uses that disposition while tricking his adversaries.
#both like to take advantage of the other though. so not gonna play it off like daffy is some poor begotten victim of bugs' wrath#melon ramble🍉#looney tunes#bugs bunny#daffy duck#looney tunes lore#baffy void#looney tunes comics#this is from issue 13 btw
53 notes
·
View notes
Text

Break down of my melon soda float prop for my Sailor Jupiter Bunny Suit build. You could easily tweak this for any other drink prop and the majority of materials were sourced from Daiso, including the tray it velcros to so it's fairly low budget.

Materials:
-Desired cup/glass for drink (I would advise sticking with plastic versions for weight and safety reasons) -Plastic ice cubes -Masking or Washi tape -Clear seed beads or Caviar beads in multiple sizes -Clear craft glue -Super glue -UV Resin & alcohol dye OR Stain Glass window paint (Gallery Glass would be my rec) - Some sort of thin, clear plastic sheeting I used part of a salad container -*Muddle spoons or straw or similar decor (polymer clay sprinkles, glitter, any sort of inclusion) -*Foam clay & an ice cream mold or scoop if you want to make a float -*Acrylic paint -*Velcro or Magnets if you would like to stick to a prop tray that you can also remove for photos
*= optional materials
‼️ SAFETY ADVISORY ‼️
If you choose to use UV resin for this you must have proper PPE. That means gloves, respirator with appropriate filters, mixing cups, well filtered workspace, and knowing how to properly dispose of scrap. Do not pour it down drains, please cure all runoff or extra fully before disposing of in household waste. Resin that is still in it's liquid state must be disposed of in chemical waste, this includes paper towels or anything else used to "clean up". You can take a moment to read more here or do your own googling for proper precautions before getting started.

The first thing I did was make my ice cream scoop since it needed to cure for a few days. I found this great little scoop mold I shaped the foam clay too and froze for a bit. Once it was firm enough to remove I set it by a window to dry. Then worked on making a clear plastic base that would fit inside my glass and act as the "top" of my "liquid".


When the base was done and fit snugly to my glass I primed my dry ice cream scoop in glue. This was partly to keep a barrier over the blue foam so the color didn't leach, and partly to give the acrylic paint something to bite into without being absorbed by the foam. Then it was painted a nice shade of vanilla and glued to the plastic base with craft glue. I poked two holes on the underside to also add a pair of short metal flat head wire supports to make sure it didn't peel off. The supports themselves were set with super glue, a bit overkill I know.

Between my paint layers drying I was also puzzle piecing in ice cubes in the glass to see what combination looked the most appealing. However, it also needed to accommodate that clear plastic base so there was constant test fittings. The trick here with fit is you want the cubes to fit snug vertically but not touching the sides of the cup too. You need that wiggle room for the UV resin/window paint. If it rattles around on the sides a bit that would be ideal.

When I found a composition that worked I carefully super glued each cube only where it touched the other cubes. Sometimes superglue oxidizes a little funny on clear surfaces and it can leave a sort of foggy buildup. In those instances you can wipe it away with an alcohol swab to keep things looking clear. As with the step before I keep checking the fit to the glass to make sure I have proper clearance to keep the base level.


When my cubes were one weird unit the fun began! I mixed some different sized clear seed beads (you can also use caviar beads) in some clear pva glue. You want a more dry mixture so it helps to let it set up a bit and get sort of gummy. The idea is replicating how bubbles accumulate in carbonated drinks, so keeping it at points where you would imagine they would get trapped under cubes helps. Of course so does referencing an actual drink lol. I just piled on and semi sculpted the beads in chunks and waited for them to cure.


Of course this same bubble detail was added to the clear base under the ice cream scoop as well. This time just around the perimeter of the scoop. At this point I realized I was forgetting something, the cherry! It is actually an earring I lose the pair to lol. I also cut out a small slot in the plastic base to fit a straw through. On the right you can see how everything looks at this last and final test fit before the "soda" portion was added. The washi tape was used to keep the inner lip clean of UV resin later, but also to mark where my base should be resting.

Putting the cubes and top layer to the side I got to mixing my UV resin. As a point of reference I used just under 1 jumbo tube of the Daiso clear resin which is around 20g or .70oz of product. I mixed some liquid pigment to the shade of green I wanted and got to pouring. Keeping the tape on I poured all of my resin in and kept turning my glass for even coverage. Once that was good to go I sat outside for about 5 minutes slowly turning the glass in direct sun until the resin set enough to stop moving. At this point the washi tape was peeled off. Then I left in on my porch to finish curing in the sun until the following day. The cup will get warm to hot depending on the volume of UV resin so please be mindful. If you were to use window paint I would build up the color over a few days in thin coats and like a silicone brush. When the cup was fully cured I fit my cubes back in and the clear base, and added the straw to the little divot to make sure it all fit well. It did so I went ahead and removed the straw and added some super glue to the top most cube that laid flush against that little sheet of plastic and pressed the ice cream scoop on the base firmly into place. Once it was in I slipped the straw through the divot on the side and mixed a little more green resin that was poured around the ice cream scoop to seal it all in. Then it was once again left on my porch for a full day. If you were doing this in window paint a thick layer on top and texture it to look more like a drink. Though do to it's want to self level there may be some mild resistance until it starts to set up. When my prop was fully cured I added some velcro to the base so it would stick to my drink tray and be peeled off for photos not pictured lmao. Badda bing badda boom it was done!


Lightweight, fun to make, and fairly low budget this is a prop you could make with things from most dollar stores not just Daiso. Personally I think the dollar tree two part acrylic champagne flutes would be perfect for this.
#my cosplay#Cosplay WIP#cosplay prop#prop drink#fake food#melon soda#melon soda float#Bunny Suit#I have been trying to get the explanation for this together since last July/August so lmao here we are
27 notes
·
View notes
Text

LEMON MELON COOKIE feat. Charlie Hopscotch
#UTAU#my art#charlie hopscotch#cute#lemon melon cookie#artwork#illustration#official art#vocal synth#UTAU art#UTAU fanart#bunny#rabbit#kawaii#kawaii art
10 notes
·
View notes