#me w no consistent psd: love that for me
Explore tagged Tumblr posts
Photo


𝐰𝐢𝐩 𝐢𝐧𝐭𝐫𝐨𝐝𝐮𝐜𝐭𝐢𝐨𝐧. // world end club.
𝗴𝗲𝗻𝗿𝗲. YA sci-fi / urban fantasy. 𝘀𝘁𝗮𝘁𝘂𝘀. world building / concept building. 𝗽𝗼𝘃. third person, present tense, multiple narrators. 𝘀𝗲𝘁𝘁𝗶𝗻𝗴. haedo, first prefecture of the united global republic.
𝘀𝘆𝗻𝗼𝗽𝘀𝗶𝘀.
In 2103, six years after Doyeon Kang’s sister, Rena, goes missing from their home in Haedo—he finds her standing in his living room with abilities she definitely didn't have before and a backpack of stolen company secrets that could spark a revolution. To make things even more complicated, she tells him two truths and a promise.
One: Hestia Corporations has an agenda that involves world domination and creating artificial Demilunes.
Two: the Atlas Project, hailed as the best program for disadvantaged youths in the country, was nothing but a cover-up so illegal experiments could run without suspicion.
And the promise? Bring the whole place down to its knees, no matter the cost.
𝘁𝗮𝗴 𝗹𝗶𝘀𝘁. (lmk if you wanna be added / removed !)
@melwrotethat @candiedwriter
#wip intro#writeblr#wip introduction#writeblrs#.mine#wip: world end club#me w no consistent psd: love that for me
91 notes
·
View notes
Text
Art Commissions (January 2023 update)
Hello there! I'm open to commissions again and will gladly do illustrations, fan art, character design, portraits etc.
[email protected] for any inquiries
(Detailed price list and general guidelines under the cut. )
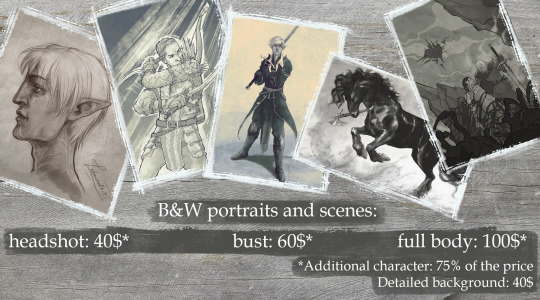
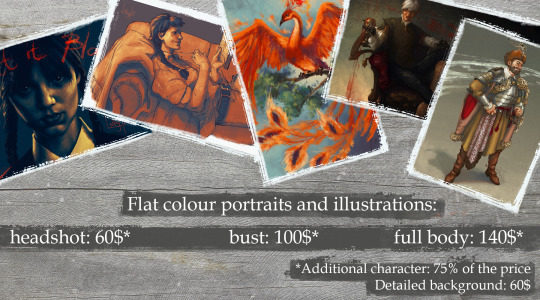
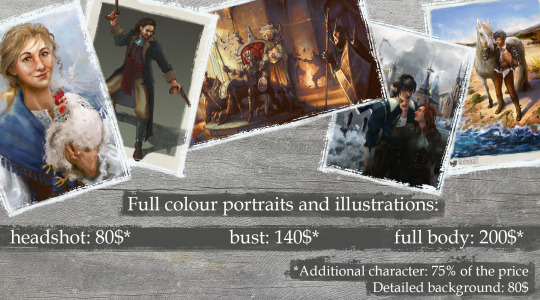

Basic Guidelines:
Long-time Patreon supporters (over 3 months) have a 10% discount (TIers 1-3) or 15% (tiers 4 & 5) from the base price.
Will draw: human/fantasy/sci-fi characters, animals and environments, realistic or stylised. Subtle NSFW content or moderate gore is up for discussion.
Won’t draw: excessive gore or heavily sexual content. I retain the right to refuse cooperation without explanation if the theme just doesn’t work for me.
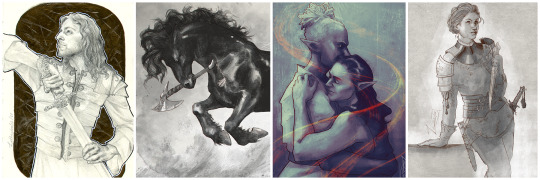
Painterly portraits: If you’d like to order a highly detailed portrait like that (the examples are at the end of this long post), let me know! The price for such a piece will be between 300-500$ depending on the complexity (as it’s really time and energy consuming), but the result will be worth it!
I am asking tons of questions and provide consistent communication and updates while working on a commission, so be sure to stay in touch with me throughout the work process and prepare all the needed references and notes beforehand. Keep them brief, as I won’t be able to read pages of text just to find the needed references for the visuals.
PayPal is now available in Ukraine, so I can accept payments through it, as well as Patreon pledges.
I will post the resulting artwork on my social media with a thanks to my client if not asked otherwise.
After confirming all the details of the starting sketch you should proceed with the full payment. After that you’ll receive your commission in high-res within a week. Don’t hesitate to ask for a print-ready TIFF, PSD original file or cropped images for posting online, if you need them!
Additional notes:
Drastic changes to the ongoing work are only allowed while I work on the rough sketch. After moving on to clean line art and colouring if you happen to change your mind about certain aspects of the commission, you can request changes for an additional fee.
! I do not permit using my artwork for commercial purposes, to train AI datasets or selling them as NFTs!
! If it’s an original illustrative work, then as a client you may also use the image for promotion of your writing material on the internet and on printed promotional materials.
The artist is the creator and copyright holder according to the Intellectual property laws of respective countries.
More examples of B&W, flat colour, full colour and painterly portrait works:
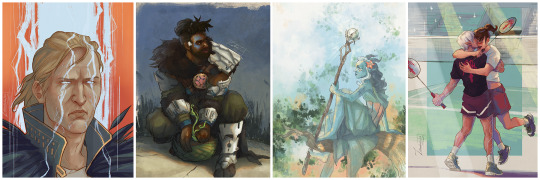
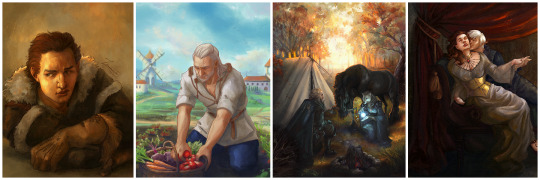

Will be extremely grateful if you could reblog this post!
Thank you for your attention! Stay safe!
Much love, Дякую за увагу
Lethendralis
P.S.: if you'd like to see my daily updates, join my Patreon server or follow me on Twitter! (Lots of war updates and political discussions there, fighting disinfo about Ukraine as much as I can amidst the shitposting).
68 notes
·
View notes
Photo
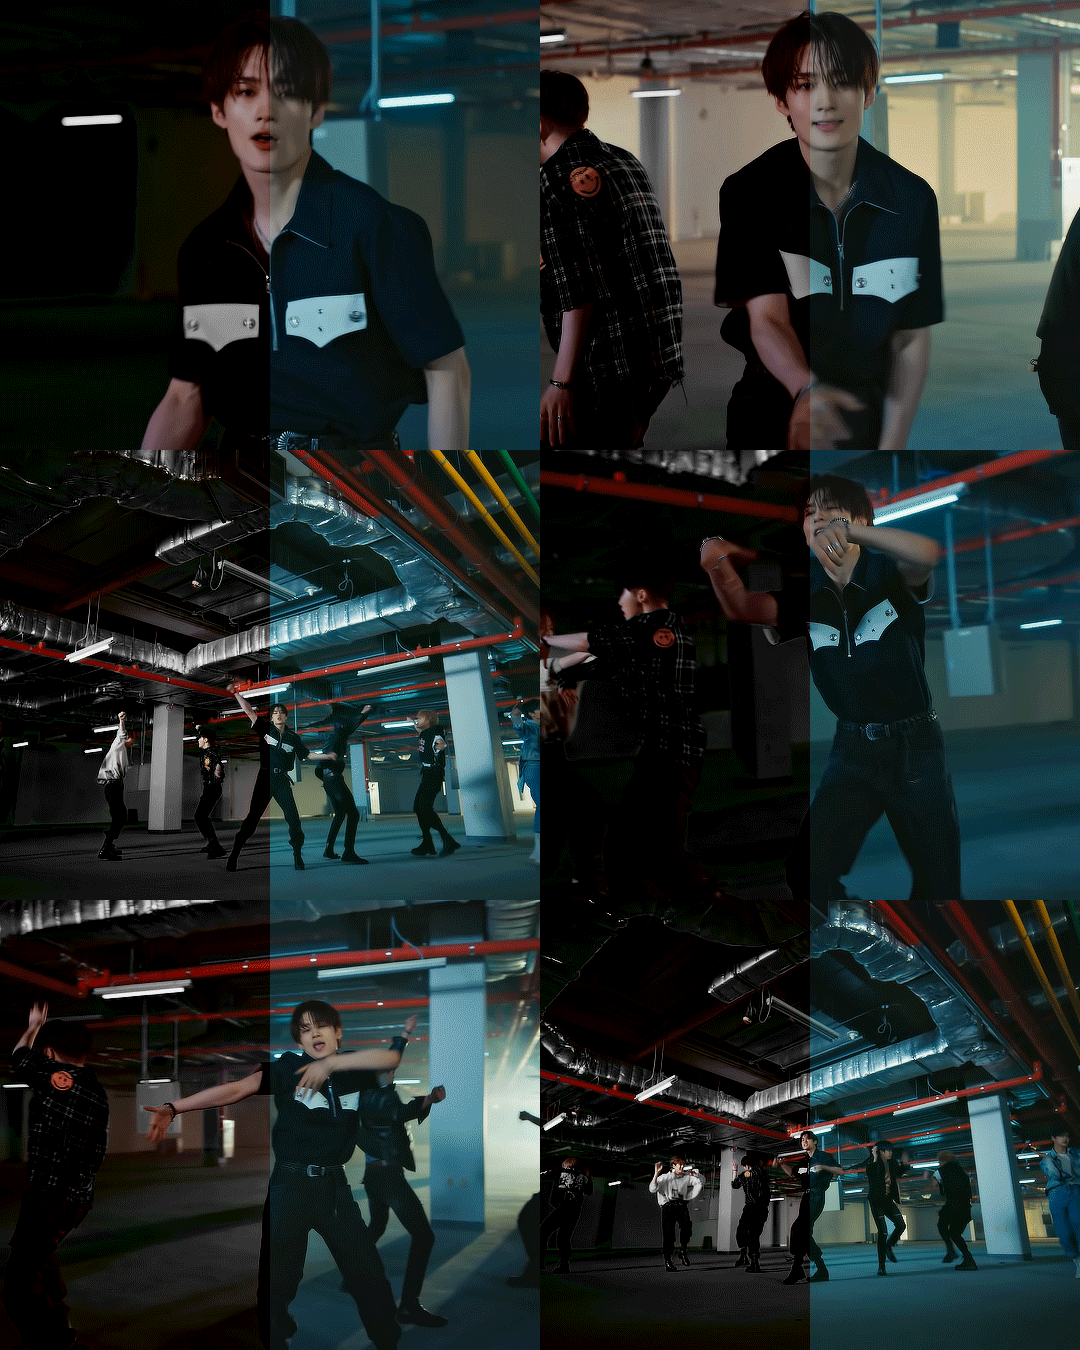
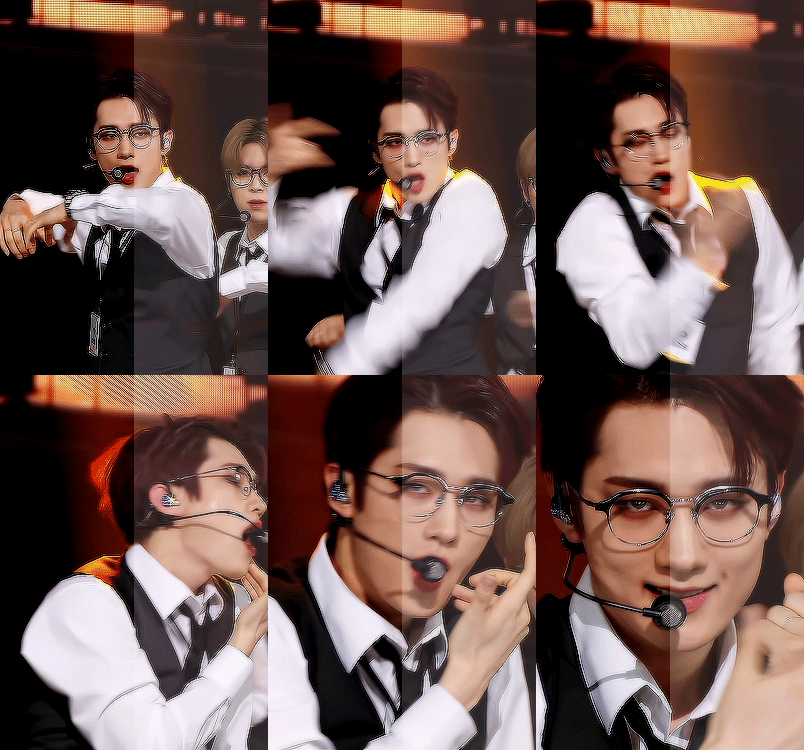
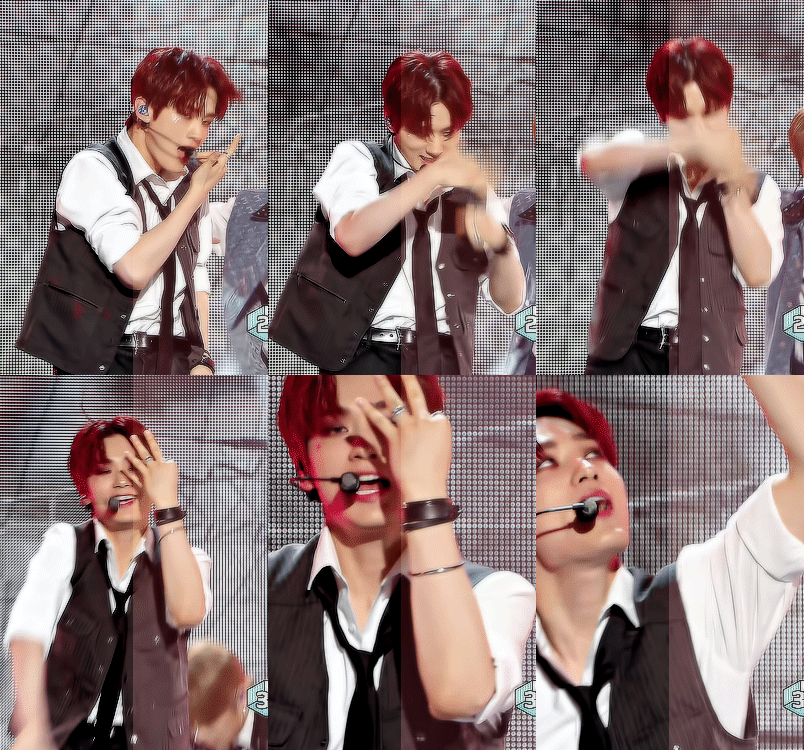
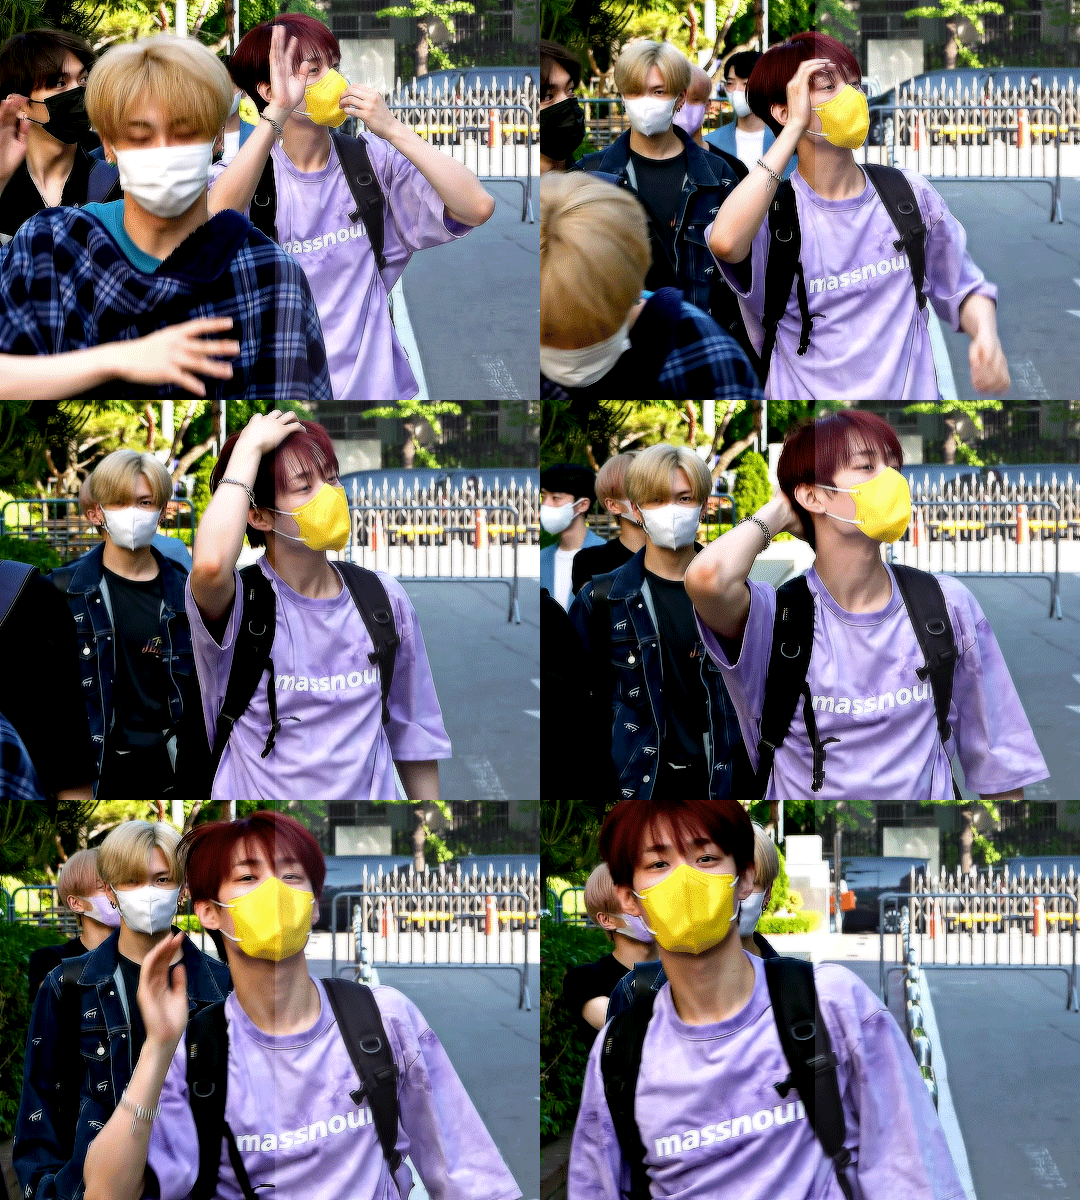
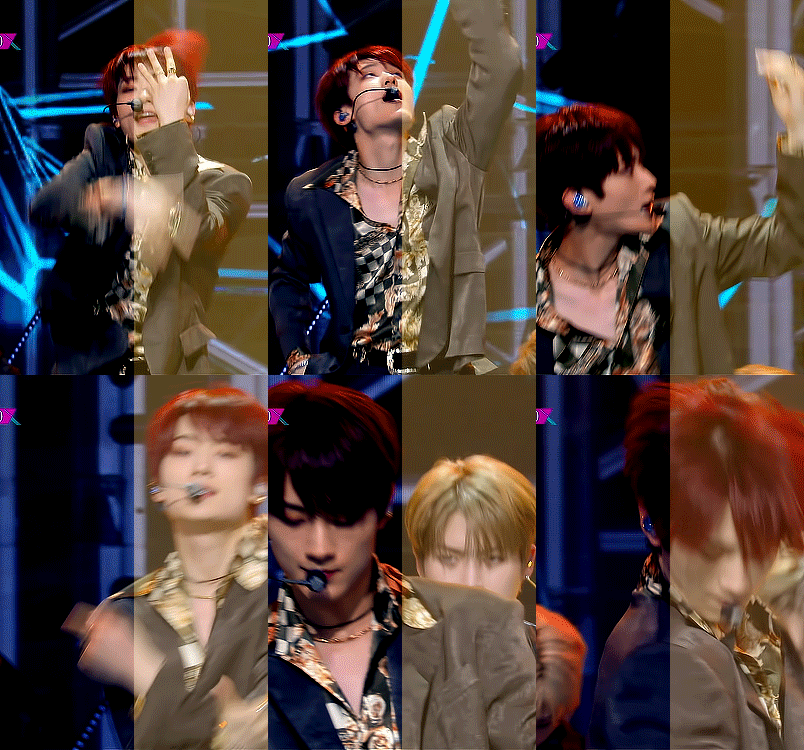
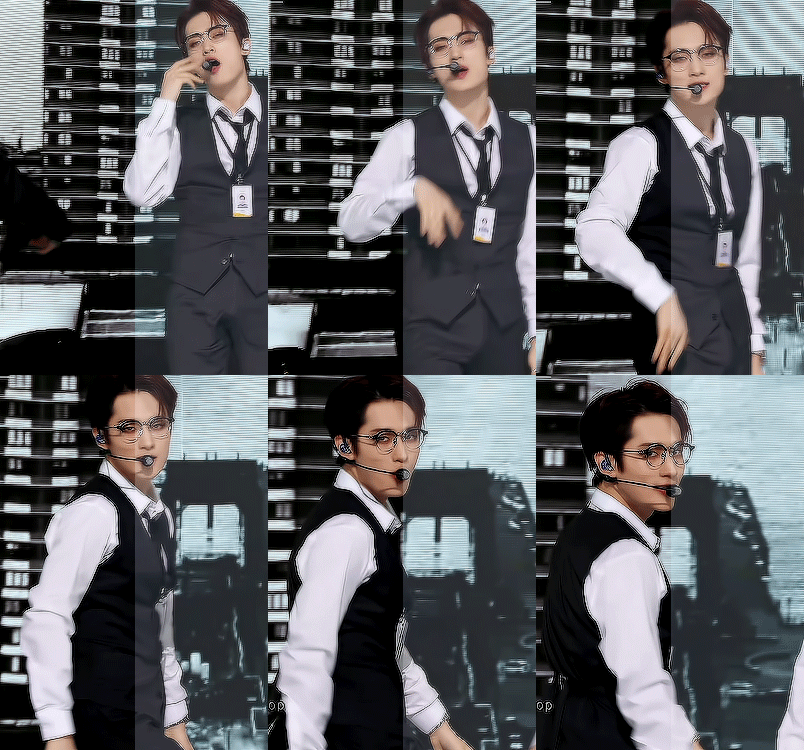
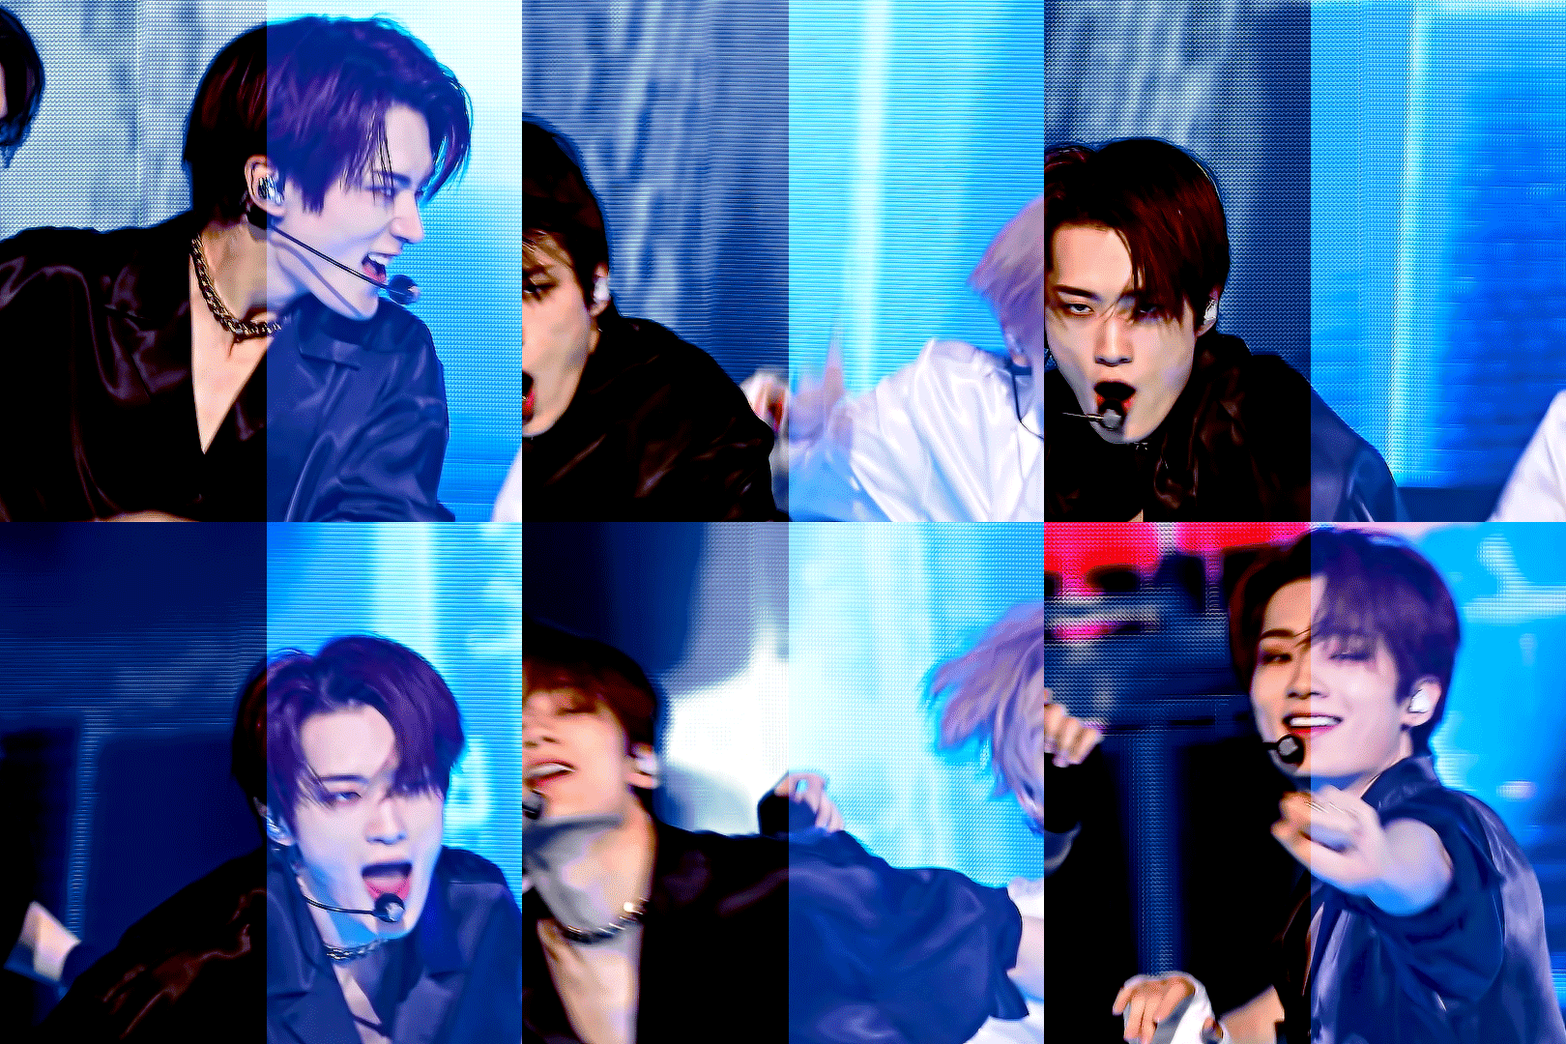
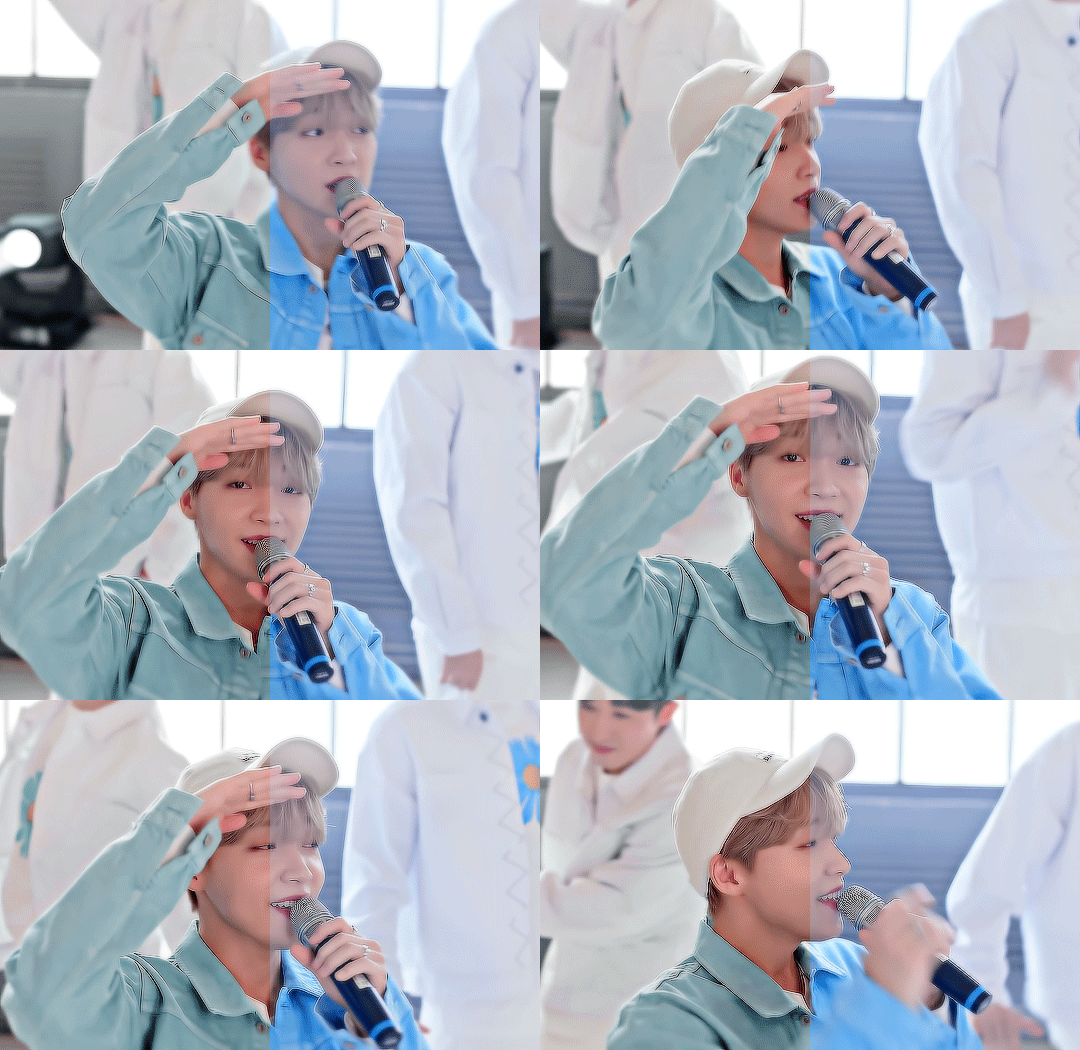
content creator tag game! before vs after coloring ! (or in my case after vs before)
tagged by @innielove @gyeheoni @a-drawingpanda @junjunies thanks for the tags guys^^ enjoyed looking at all of urs!! tagging: @parabataisarah @kimyongs and anyone else who wants to do it! turns out i did have some psds saved! idk if i have a consistent coloring style tbqh i just do whatever i feel is best for that specific video/gifset. sometimes its bare minimum coloring changes like the first few but sometimes i do manipulate quite a bit. i dont think any of the psds i found were of huge coloring changes for me but i think there r def some in here that i spent a good amt of time trying to get right. and sometimes the slightest coloring changes often take the longest to get to for me? idk why feel like i struggled w/glasses yongseung coloring a little even tho it doesnt look like muchhh i think its usually because i have specific shades of reds and blues i like and sometimes getting to that shade takes layers upon layers. anyways idk idt im too great at coloring but its always one of my favorite parts about giffing i love the way colors can change its really cool and the manipualtion part itself is fun. sometimes i have an image in my head but i end up coloring it completely differently which is also super fun like i never know how a gif will turn out until the end which prob leads to my inconsistency in coloring but idk i dont necessarily mind that its always fun to explore +bonus sewoon bc this is literally all yongseung im sorry(?) (had fun with the gifset this gif was from bc its a coloring style i dont really do myself but i wanted to try smth diff. was p okay w how it turned out in the end too :’] )
14 notes
·
View notes
Text
gif cut-out tutorial
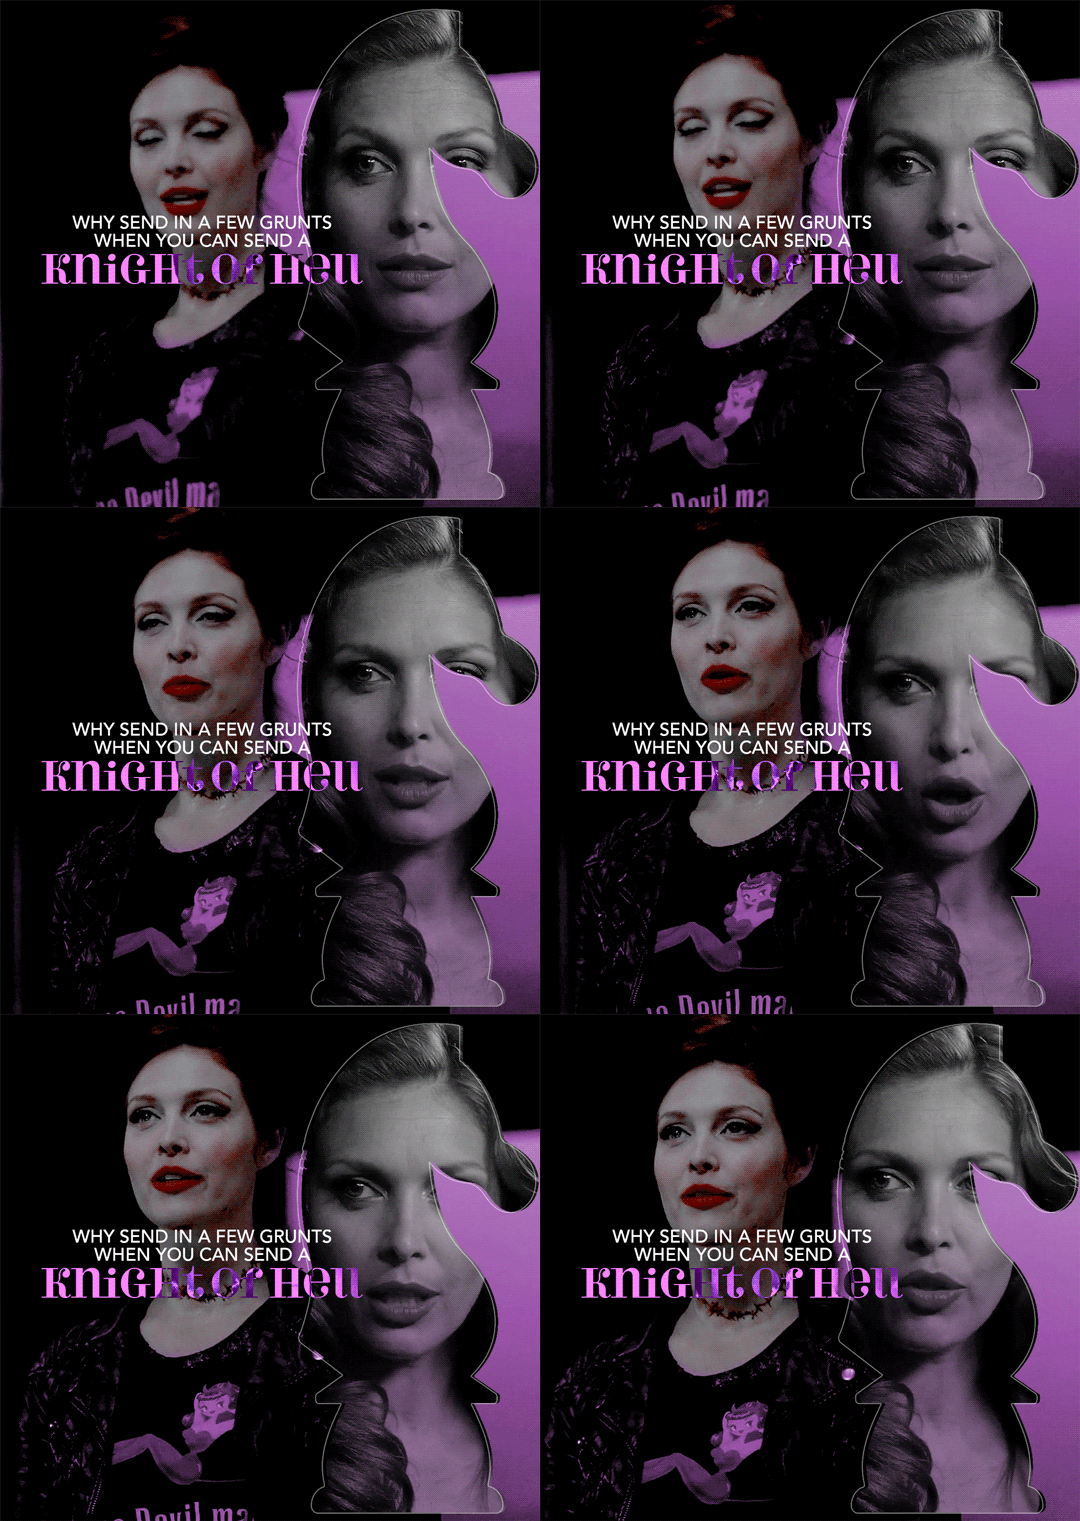
ok ok so @subtledean requested a tutorial on how to do stuff like this post with the gif cutouts and the text effects. hopefully this helps aria ;w; i’m not the best at explaining things but i included some screencaps for clarity. i’ve tried to compress all the sample gifs and screenshots down to under 3mb to avoid tunglr compression on mobile so if they look a little different from the actual gifset, that’s probably why!
what you’ll need:
photoshop, i’m using PS 2021 but any version of photoshop will work out
a basic knowledge of gif-making (i’m assuming you already know how to make a gif and color it).
step 0: storyboard
this isn’t strictly necessary but i HIGHLY HIGHLY recommend it. you don’t have to do any photoshopping this first step, but it’s really important to check out your footage and the shots you have gathered to see what works, especially if you’re trying to combine three or more gifs onto the same canvas. like literally take a piece of paper and draw out where you want the character’s faces to be, where you want the cutouts to be in relation to their faces, and think about whether or not there’s enough empty space to the right or left of characters heads for a cutout to be placed. is there too much movement that would be distracting or messy in an already busy gif?
things like that really help, and it also makes you double check on your footage quality and feasibility. if you end up making a gif where you want one character’s face to be on the left side of the gif but it turns out there’s not enough empty space on the right side of their face to place a cutout and you then have to hunt for new footage or start all over, it’s kind of a trainwreck and you just waste another hour of your time as you deepen your procrastination hellhole. that’s not a real story—
step 1: make the base gif
i’m assuming you know how to color it already. and aria i KNOW you know how to color already so :) size it accordingly to your desired dimensions.
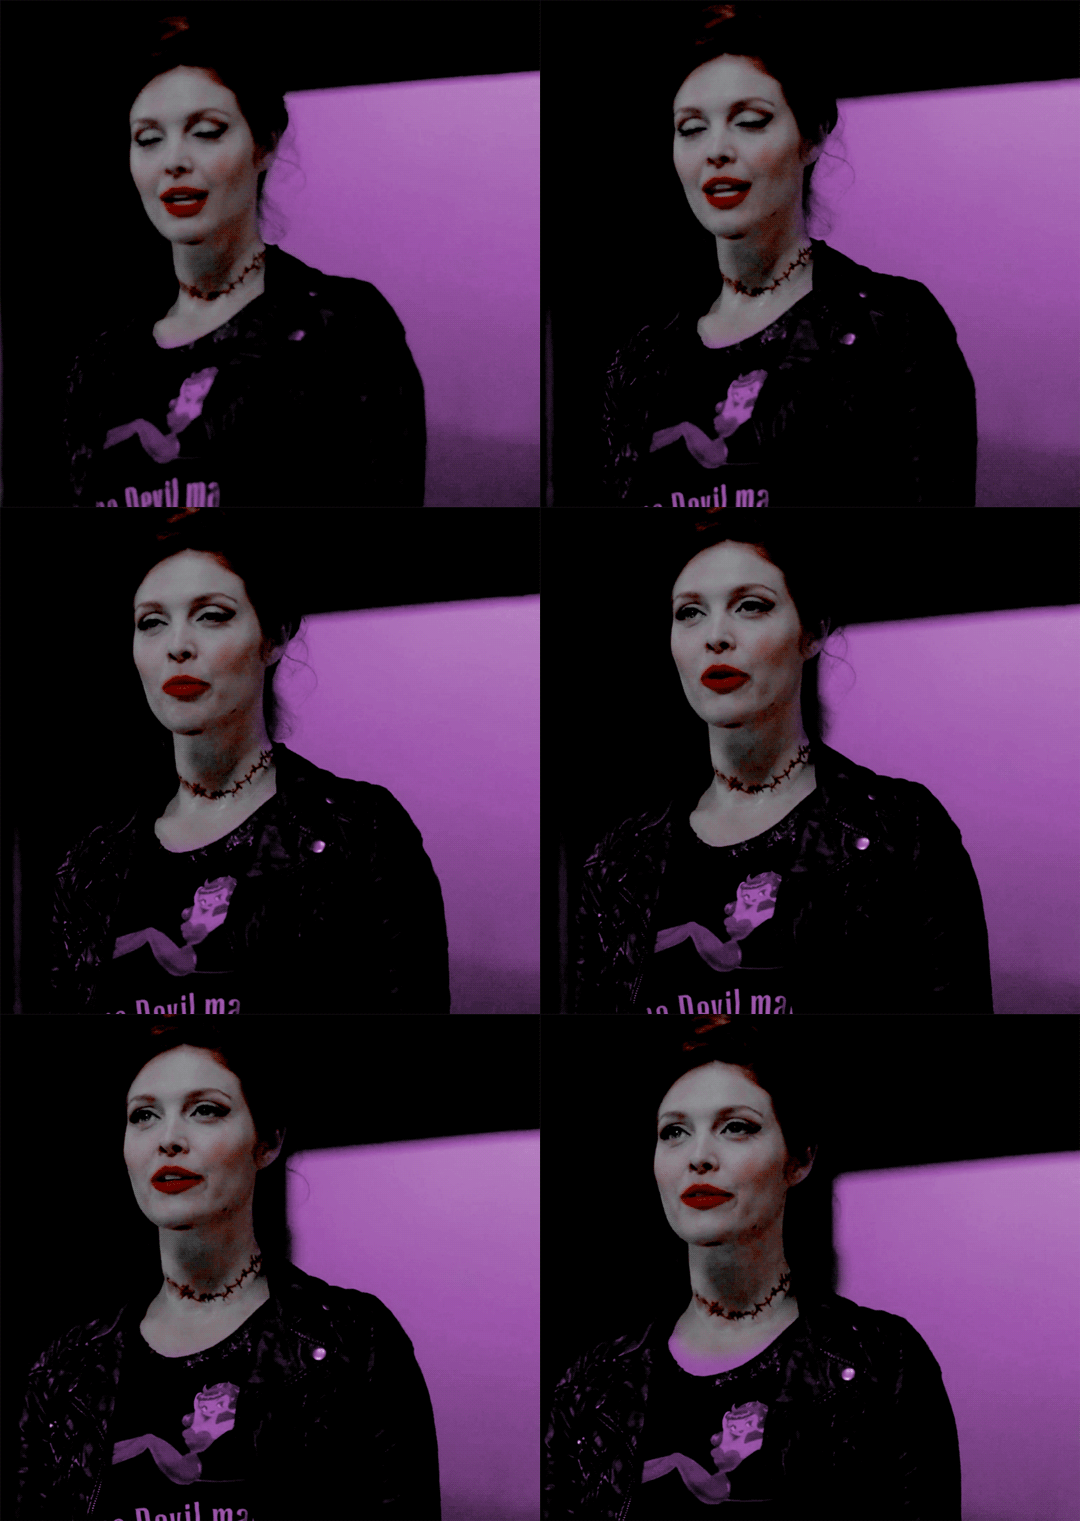
as you can see, i left enough space on the right side of abaddon for the knight cutout to be placed.
save this as a .psd file. you don’t actually have to sharpen and do everything that comes at the end of making a gif right away, but make sure your layers are clearly labeled. do NOT convert to video timeline/smart object just yet.
step 2: make the cutout gif
this is critical: make absolutely certain your cutout gif has the same number of frames as your base gif. otherwise it could get really messy! abaddon has 20 frames, so the cutout will also have 20 frames. again, do not convert the cutout gif to a video timeline/smart object. just keep it as a frame animation. here’s my cutout gif. it’s just a simple b&w gif but i added a touch of purple for color consistency sake whatnot.
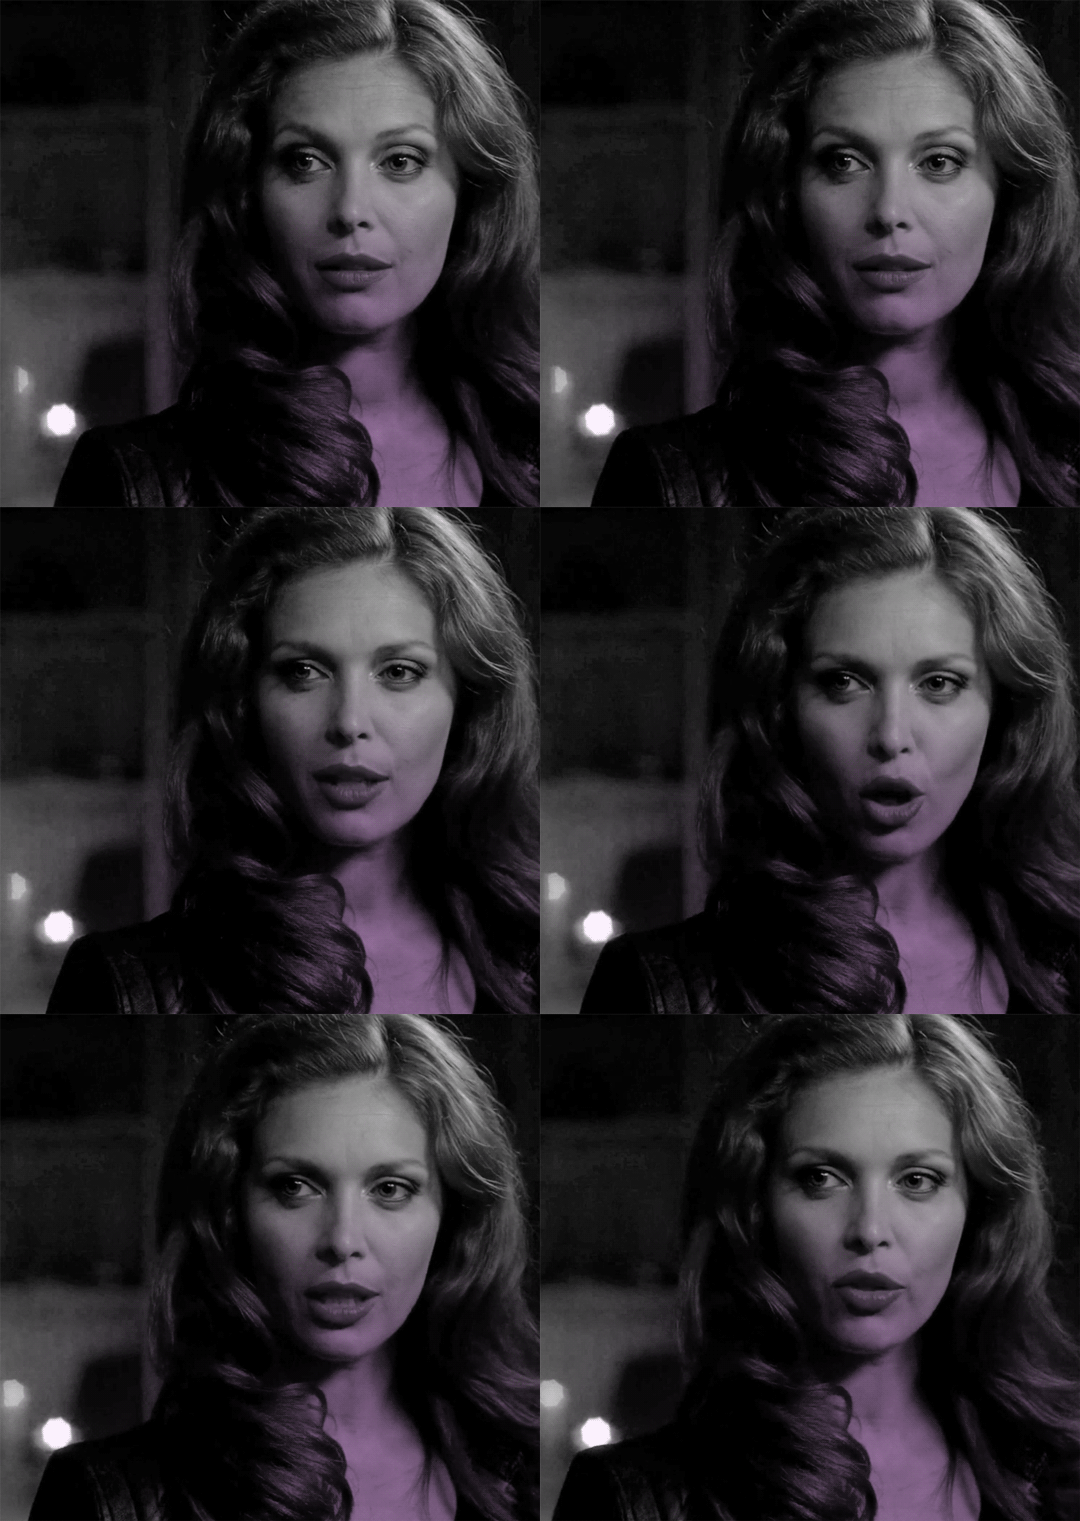
now for this particular gif i’ve actually cropped abaddon to be roughly exactly where i would want her face to be in relation to the first gif, but that is unnecessary. helpful, but unnecessary. you do NOT need the cutout gif to be cropped exactly perfect in order to make this work.
step 3: combining the two gifs
there are many different ways to combine two gifs onto the same canvas. some people like to do it via video timeline. i prefer to do it by frames and convert everything to a video timeline only at the end (it’s just a personal preference). here’s a tutorial if you prefer working with timelines, but i’m gonna go over how to do it by frames.
first group everything in your base gif into one folder. then group everything in your cutout gif into one folder as well. you can name them however you want to keep track of things.
then, select all of the frames in your cutout gif. in this case, all 20 of b&w abaddon get selected. make sure its not just frames 4-20 or whatever, but all the frames you made. you can click frame one and then shift-click your last frame to double check.
click the timeline tab group options bar and then go to options > copy frames
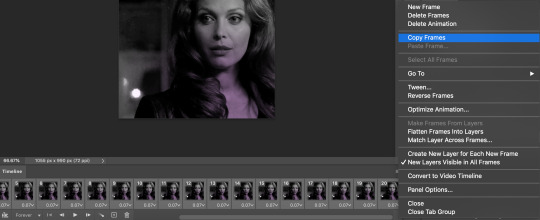
now go to your base gif canvas. select ALL the frames of your base gif as well (it’s critical that all of them are selected).
now do options > paste frames.
a popup should appear and you’re going to select the “paste over selection” option. do not link layers.
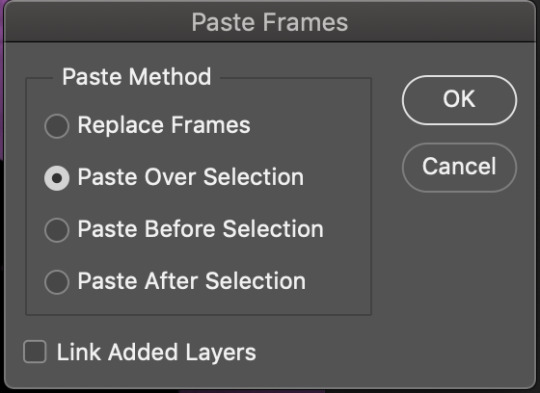
your cutout gif should now be completely or partially obscuring your base gif. however, now you should see two groups on your sidebar of layers. one for the base, one group for the cutout. if you labelled them with names you can tell which one is which.
step 4: creating the cutout
in order to create the cutout, we use my favorite thing in the whole world of photoshop. layer masks.
to make a layer mask, you simply select a layer or group you want to mask and then click this little icon on the row of icons at the bottom of your layers panel.
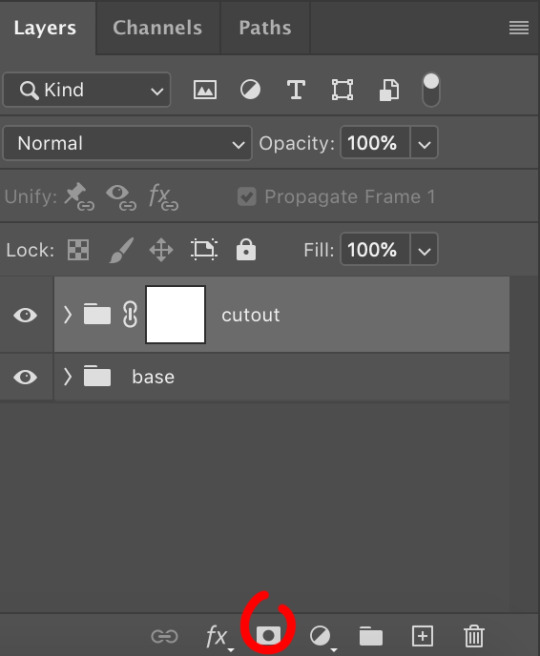
white on a layer mask means whatever group or layer is getting masked is completely visible. black on a layer mask means that the group or layer is invisible. if there is 50% gray on a layer mask, then its 50% visible. so on and so forth.
i love these so much i abuse them on the daily. i’ve made a few gifs where i’ve masked every frame one by one because i wanted to get some cool effects. admitting that kind of embarrasses me but oh well.
anyway this is simple though. just find a picture or an outline of a knight. i used these boyes:
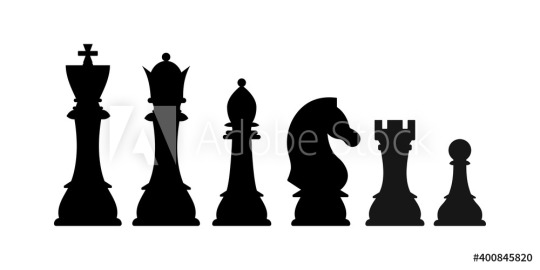
obviously i cropped out the knight of the bunch, got rid of the watermark, and then i placed it on the canvas where i wanted it to go.
select the interior of the knight with the magic wand tool. should be pretty simple since it’s all black.
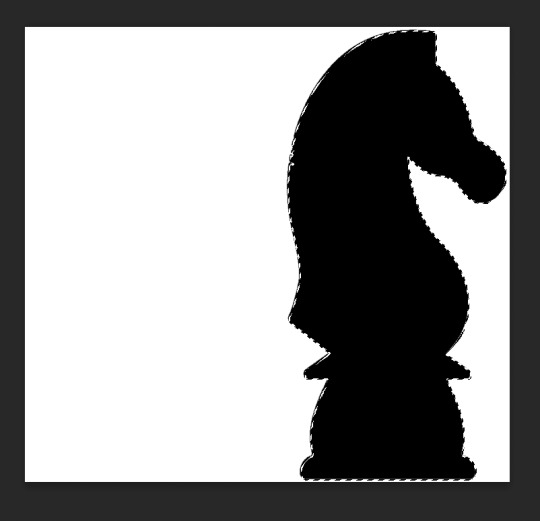
now click over to your layer mask. make sure you have selected the mask and not the group. you can tell you have selected the mask when a little white rectangle pops up on it.
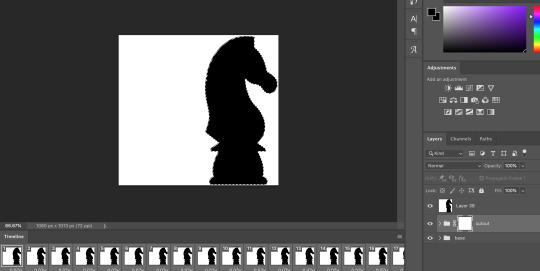
when you know you have the mask selected, click command+i or control+i to invert. if for some reason you do not have this keyboard shortcut, just take a brush tool and color over the area in complete black. as long as the magic wand tool is still selecting just the interior of the knight, it should be fine.
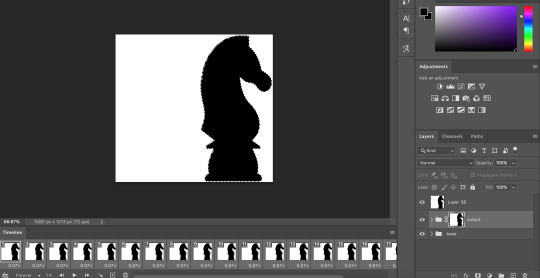
now once again, black means a layer will NOT be showing, white means a layer will be showing. so right now after i disable the visibility of the top layer we used as a reference for the silhouette, it looks like:
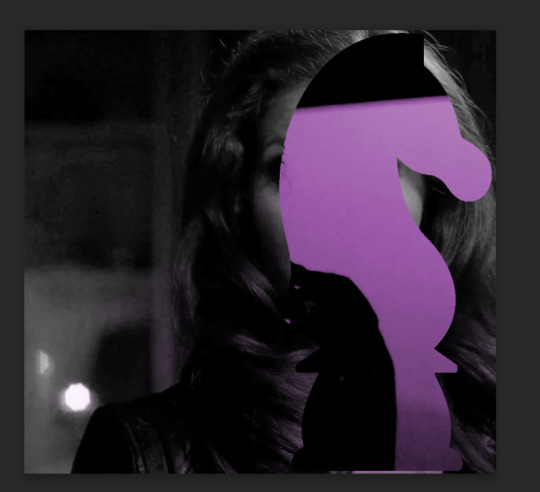
do not fear the clownery. layer masks are great because they are always non-destructive. meaning that even if you somehow mess up and your canvas is showing something completely gross, you can always go back and edit your layer mask and your original gif would be unharmed as long as you did not touch any layers in the group, only the mask. simply invert the mask (again, make sure your mask is selected and then command+i or image > adjustments > invert) to get:
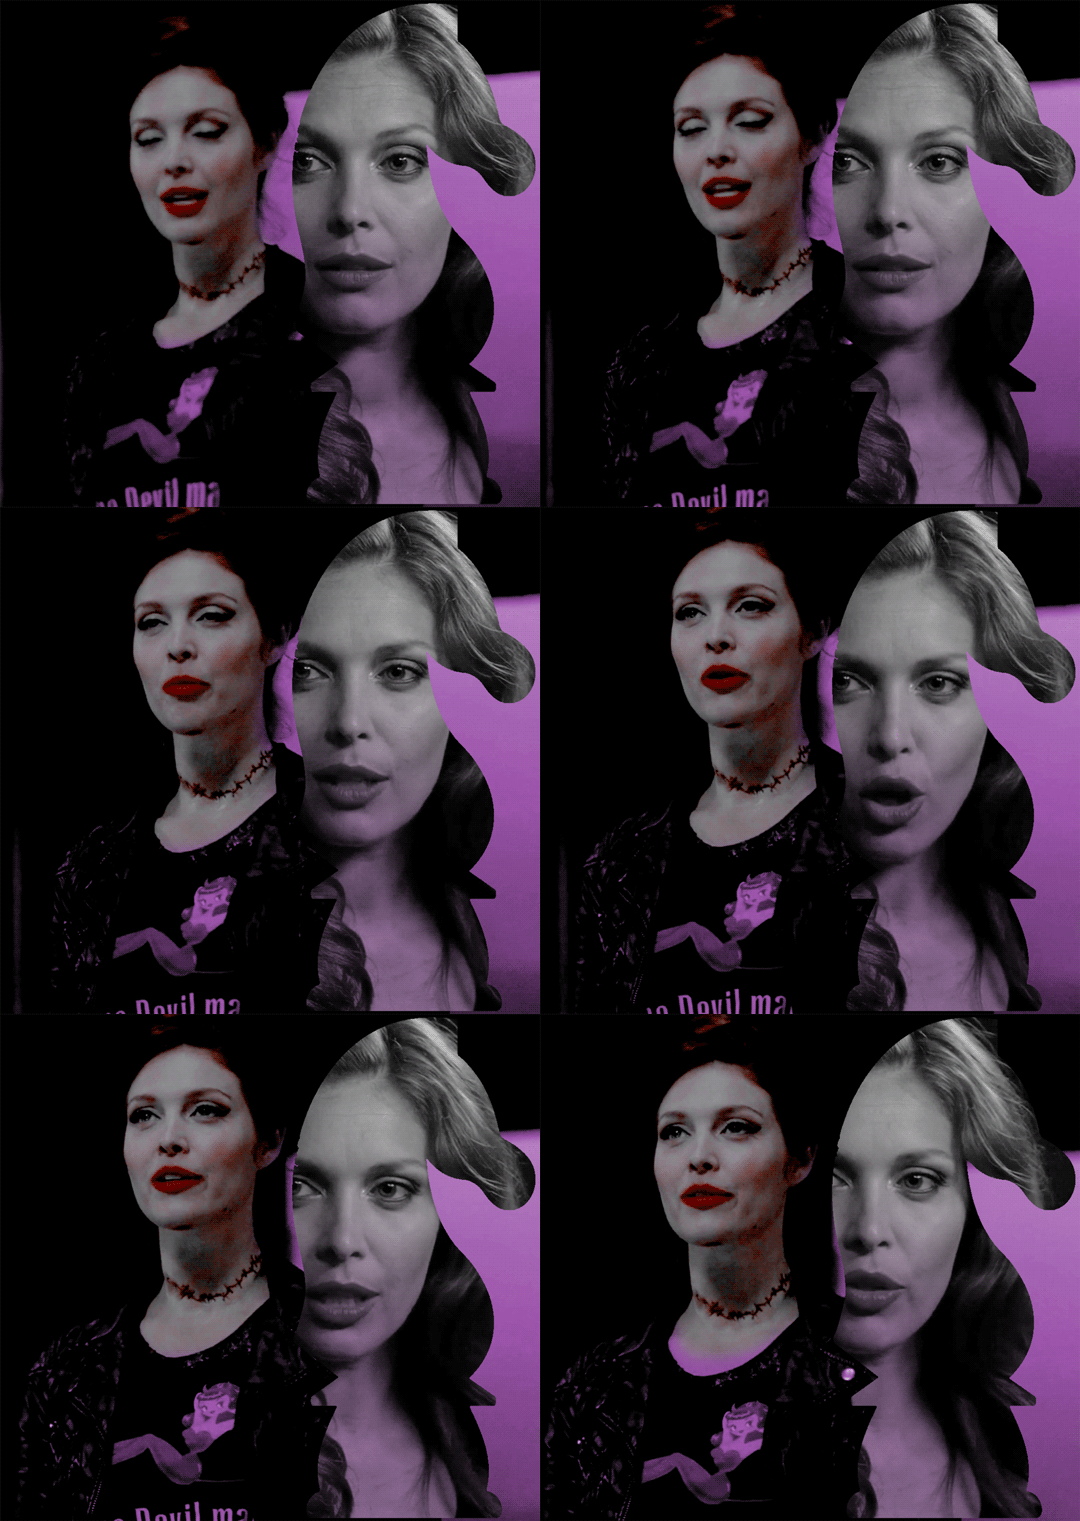
for a layer mask that looks like:
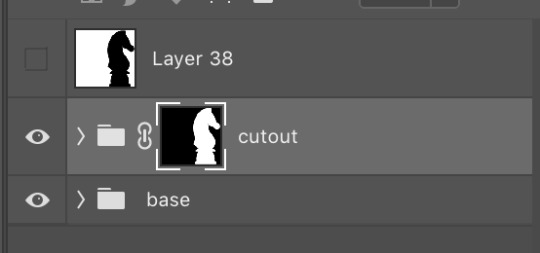
you could have also just made a black layer mask to begin with and then inverted the knight outline to be white. many different ways to do the same thing.
another tip: if you select your outline and then click layer mask upon a group or layer with no mask at the current moment, it will automatically make a layer mask with your selection as white and the unselected pixels as black. this is normally how i do my cutouts, because it’s a time-saver even if it like. saves a few seconds max. but i typed out the above for explanation and clarity, so hopefully i didn’t just make anyone more confused.
anyway.
now say you don’t like where the cutout abaddon is positioned. layer masks can also be linked or unlinked, depending on the little link icon you see between the group and the layer mask in the image above. if the icon is visible, the layer mask and the group are linked. if you cannot see the link icon, they are unlinked.
linked layer masks will move in conjunction with the group if any type of transform is done upon them. if the group moves, the layer mask also moves. but if a layer mask is unlinked, you can move the mask and the group independently of one another. for instance, i can change where the cutout is located on the overall canvas of the gif by simply moving ONLY the layer mask (and thereby changing where the blacks and whites of the layer mask occlude the cutout gif contents). but i can also transform the cutout gif layers without changing where the overall outline is located relative to the canvas itself. basically, i can transform the interior contents of the cutout independently. so here (make sure all of your frames are selected):

group unlinked. i’m also making sure that now i am selecting the GROUP (ie. the frames of the layers you are actually going to move) and not the layer mask. you can tell because the little white rectangle around the layer mask can no longer be seen.
now i can transform/adjust the contents of the cutout solely “within” the cutout, and i don’t have to worry about changing where the cutout is located in relation to the overall gif. when transforming, make sure all the frames of your gif are selected. like select the whole group and not just an individual layer, basically.
i’ve seen a lot of how to combine and cut out gifs tutorials on this website, and here is a really good one that i know sully also used <3 big shoutout to all the photoshop queens being inspired by each other!! however i haven’t seen anything that mentioned the linked vs. unlinked layer masks, which i really feel like deserves a shoutout. you don’t have to crop your gifs out perfectly every time, you can always adjust them later. for demonstration, i’ve positioned abaddon in a few different positions with an unlinked layer mask.
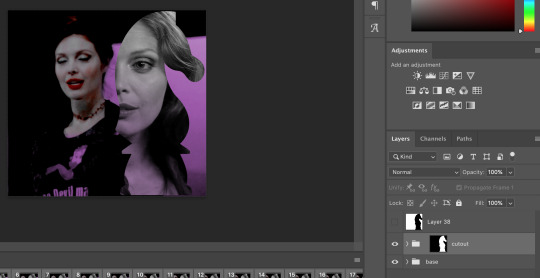
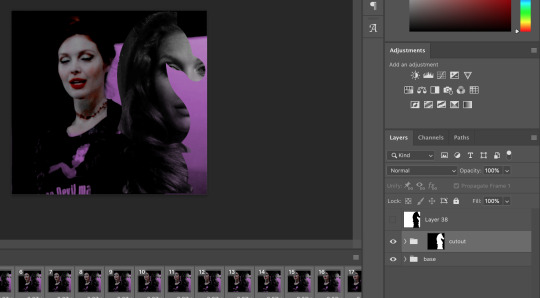
step 5: creating the outline
so in order to emphasize the shape of the cutout (the knight), i simply delete the white space surrounding the picture of the knight in the original silhouette that i used. magic wand tool + delete. you can also make a new layer, then paint bucket tool it. many ways to do the same thing.
now with only the knight on a transparent background, i double click the layer to pull up the effects. select outer glow. i used these settings:
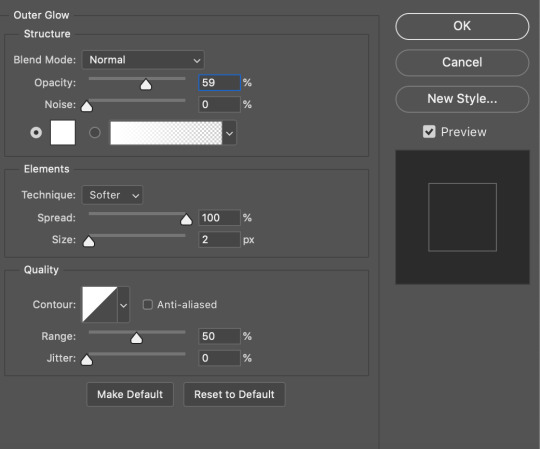
when you are doing this, make sure you are on frame one of the frame animation and the “propagate frame one setting” is selected, otherwise you might end up only applying the effect to one out of your many frames, which blows.
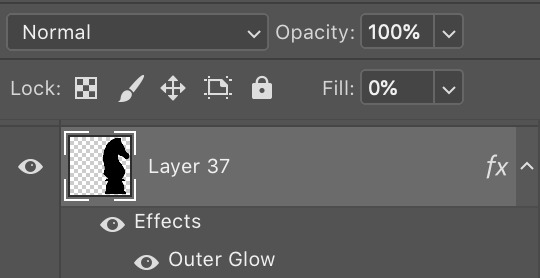
then i go change the fill setting to 0%, BUT i leave opacity at 100%. fill is basically like opacity, but it doesn’t affect layer effects (whereas opacity does). so you basically get only the outline but not the black. you can also set the blending mode of the layer to screen and get the same effect, etc, etc. feel free to adjust however you see fit, in addition to the outer glow settings.
i move this layer over a couple pixels to give it the little offset effect, but you don’t have to.
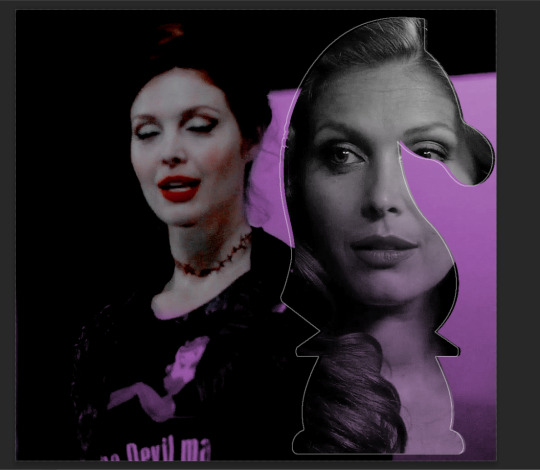
step 6: adding the text
okay the two fonts i used are avenir and perla. i think a LOT of gifmakers use them because they’re really pretty.
i make TWO different text layers, one with avenir in a smaller size and one with perla in a bigger size. this is because for the perla one, i’m going to be changing the blending mode whereas i don’t want to be changing the blending mode for the smaller text. i position the text where i want it to be and make sure the perla font is in the color i like:
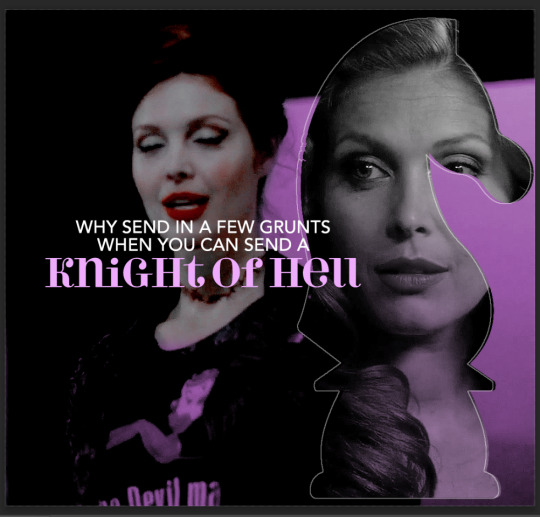
then i change the blending mode of the fancy text (perla) to difference. ONLY that layer, and again make sure to check “propagate frame 1″ and make changes on the first frame to apply the change to all of your frames.

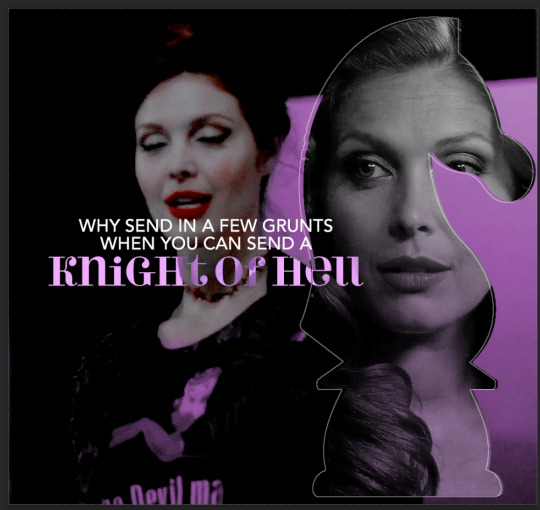
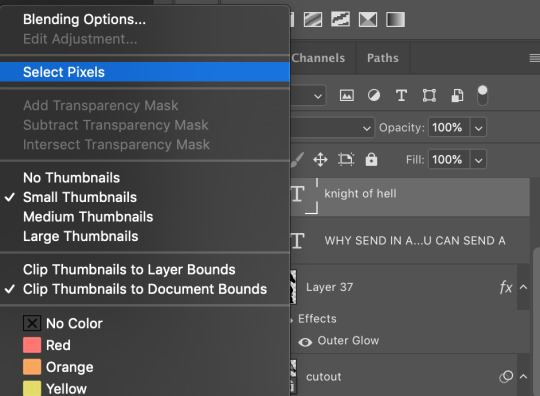
but i still don’t think it produces enough of a difference. so i right click on the text layer for knights of hell, and then go to: select pixels.
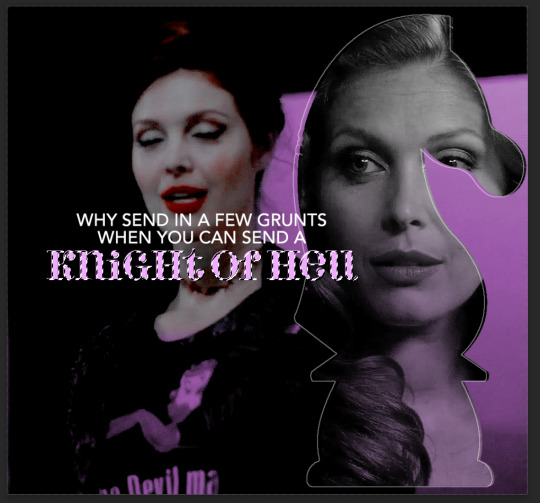
then i click the curves adjustment layer. this will automatically make a curves layer with a layer mask that occludes everything BUT the area you selected. beautiful. i drag the curves around until i get enough of a difference that i like. normally i make the lights lighter and the darks darker. yeehaw.

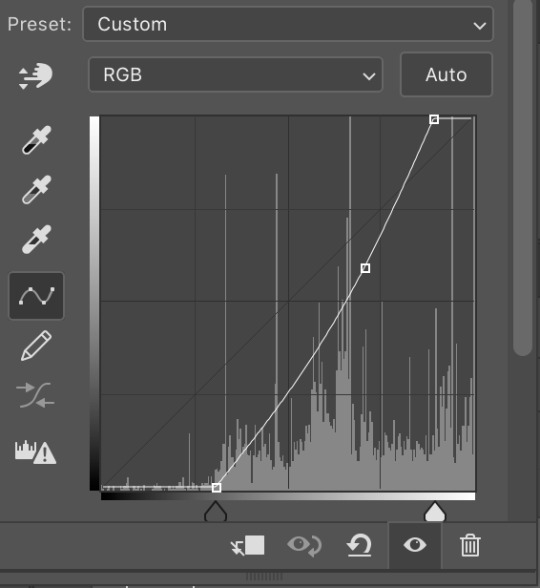
again there are sooooo many different ways to achieve the same effect on photoshop. this is just want comes easiest to me, and it’s totally okay if you find a different way that works better for you at producing the contrast you want or the colors you want.
step 7: export and cry
NOW you can convert everything to a video timeline, put your video frame layers to smart objects, and then apply your finishing sharpening filters. export, cry, and hope tumblr compression doesn’t screw you over.
hopefully this was helpful! pls like... idk support my edits if you found this helpful or reblog this post. feel free to dm me about how u do some of the text effects as well bc i’m always trying to learn new things and i am by no means an expert on like. any of this.
aria please go write your fucking thesis before i delete this entire tutorial challenge. :D
#subtledean#THIS IS FOR YOU#I FEEL LIKE THIS TUTORIAL HAS MORE WORDS THAN UR THESIS ATM SO!!!#tutorials#mine#idk what to tag this but PLS pls pls feel free to talk to me abt ph*toshop#or ask for help or point me towards other tutorials <3#shoutout to sully too its in there somewhere#resources#100n#ps
190 notes
·
View notes
Photo

Hey guys! I got an ask wondering how I make my gifs and some people have asked me how I color my gifs, so here you go!
We’re going to be making this:

You’ll need:
VLC Media Player
Photoshop with working Import Video Frames to Layers function and timeline. I use Photoshop 2020, but any older versions with these functions will work!
A high-quality video (preferably 1080p)
Tutorial under the cut!
PART ONE: MAKING YOUR GIFS
You’re going to want to open up your video in VLC Media Player and open it to around a few seconds before your scene appears. If you’re giffing from a small YouTube video you can ignore this step, but for movies and TV, you’ll want to use VLC to extract the tiny part of it you want.
Pause it before your scene and click View >> Advanced Controls.
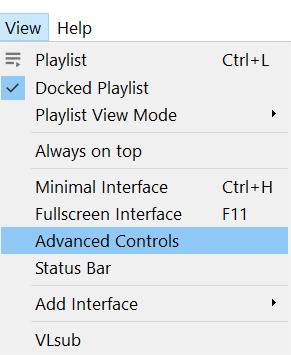
Above the play button, you should see a bunch of new controls. Focus on the red button I circled below:

Click this button and press play. VLC records are a little bit off, so this is why you want to be a few seconds before your scene actually starts so you catch it all! When your scene has played, press the button again. You’ve now recorded your scene and you can record as many scenes as you like for a full gifset.
You can find your recorded videos in the Videos folder. It’ll be named something like vlc-record-a bunch of letters and numbers.
Now that you have your scenes, it’s time to open Photoshop! When Photoshop has loaded, go to File >> Import >> Video Frames to Layers, which is a bit down to the bottom. It’ll prompt you to select a video; click on the video you just recorded, and a screen like this will pop up:
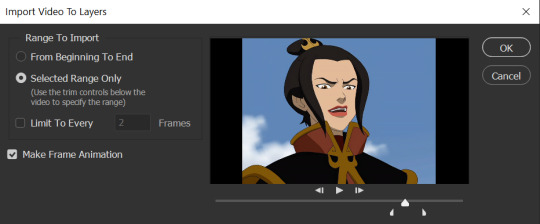
Use the white sliders to select the parameters of your scene. I would recommend going a little bit more on both sides so you catch your whole scene.
TIP: Make sure you do NOT select the button that says “Limit to Every 2 Frames,” because that will make your gifs look choppy and ugly. Love yourself!
Once your frames have loaded, you might not see them on Photoshop the way mine looks. If that’s the case, make sure you go to Window >> Timeline so you can see the frames!
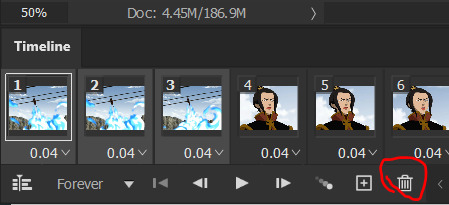
Delete the extra frames in your gif that you don’t need by selecting the frames you want to delete and pressing the trash can button, circled below:
Now that you’ve done that, it’s time to crop. For this particular gif, I’m going for a full-width one, so the width I chose is 540px and I chose a height of 290px. Click on the crop tool and make sure your crop settings are at W x H x Resolution, or you won’t be able to input specific dimensions the way I’ve done here:

Position the crop tool where you want your gif to be:
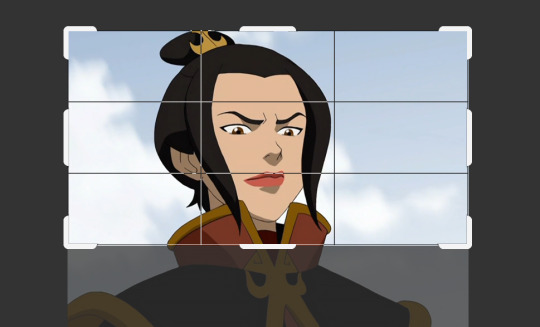
And now that your gif is all cropped and sized, it’s time to sharpen! I have a pretty specific sharpening process that I’ll outline in detail here, but I have an action for this purpose so as to save time. I’m just making this part of the tutorial so you know what you’re meant to do in Photoshop.
First, go ahead and click the three little bars at the right edge of the Timeline/Frames tab and hit Convert to Video Timeline.
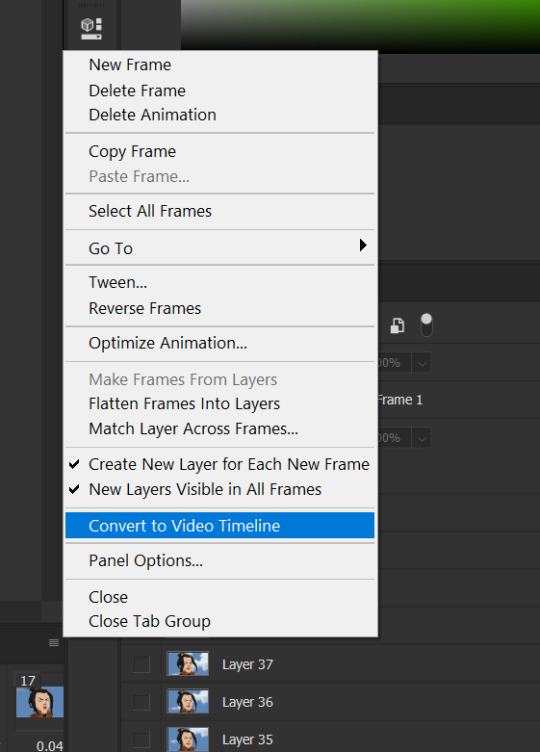
Now, your timeline should look like this:

Go to Select >> All Layers, and right-click on one of the layers in the Layers tab once they’ve all been selected. Select Convert to Smart Object. This allows us to sharpen the entire gif at once as opposed to by frame! Your timeline should now look like this, with all the little purple parts condensed into one:

It’s time to sharpen! Go to Filter >> Sharpen >> Smart Sharpen. I do two passes with the Sharpening tool; here are my settings for both:

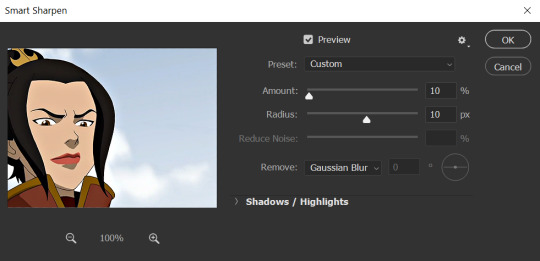
It’s not too apparent in the pictures, but it does make a difference. Don’t worry about your gifs looking too sharp; I use this action on every single one of my gifs and it always works like a charm.
Now that our gifs are nice and sharp, it’s time to take them back to frames. This is because of a glitch in Photoshop that makes gifs saved in Smart Object form much faster than they would be in frames. Click on the small bars on the right of the timeline again and select Convert Frames >> Flatten Frames into Clips.
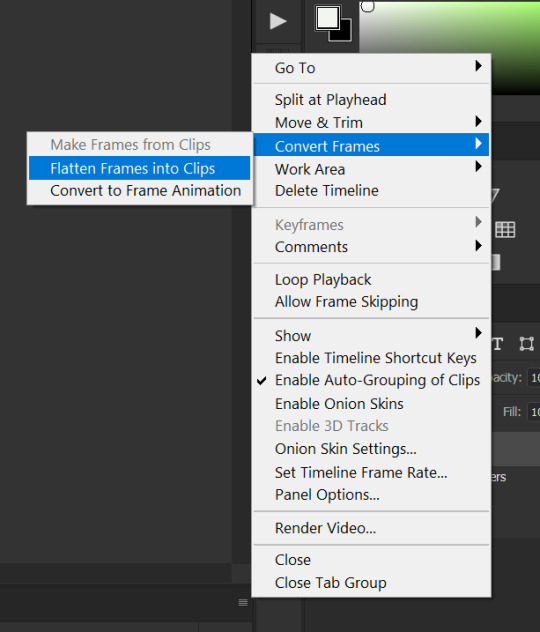
Your gif should have all those little clips that we had before we converted it into a Smart Object.
Then, go to Convert Frames >> Convert to Frame Animation.

Your gif should be back in frames again, but it’s all one frame. Don’t worry; we’re going to fix that by clicking Make Frames from Layers from the menu with the three little bars again.

Now all your frames should be back! We’re going to set the speed of the gif now. Hit those three little bars again and click Select All Frames. Now click on the little triangle under any frame and click Other, and a little popup will appear. I always set my gifs to a speed of 0.05.
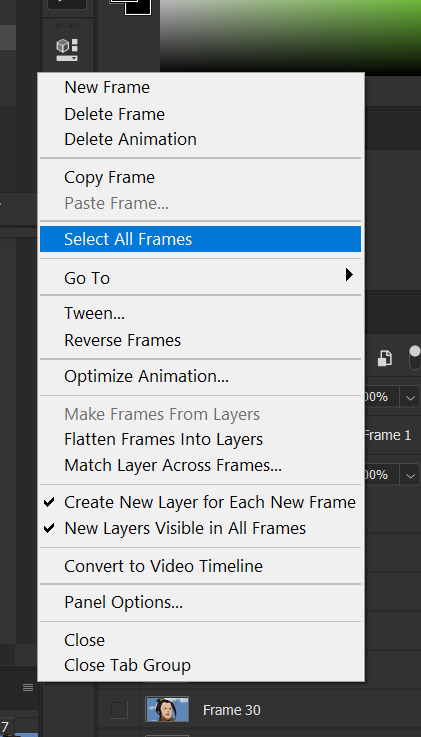

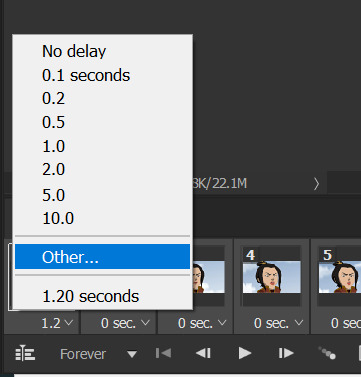

At this point, I save my gifs as a .PSD file. You can delete these PSDS after you’ve posted your gifset (I usually do to save space!), but it helps to have them so you can edit your gifs later if you want. Hit Ctrl+S, and now the screen to save it should pop up. Make sure you save it as a PSD file and not something else.

Now you have a gif that you can color! Which brings us to…
PART TWO: COLORING, ADDING SUBTITLES, AND SAVING YOUR GIFS
I do run a pale blog so this is going to be a pale coloring tutorial. You can check some popular resource blogs to see if they have any tutorials for colorful gifs!
I start out by making a group with the little folder below the layers tab; I title it “coloring.” (Not pictured: I added a layer mask and painted one black dot over it so I could reference the original!)

I always start out with a Curves layer; here are my settings:
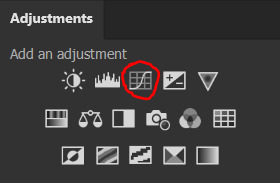
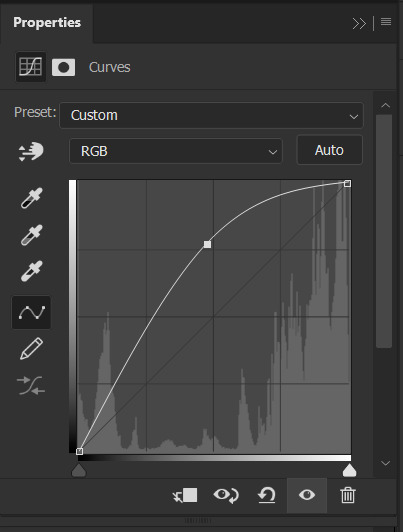
The gif at this point:
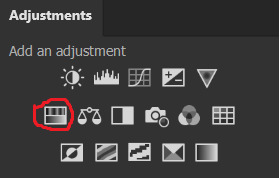
Next, I decrease saturation using the Hue/Saturation adjustment:

After this, I add a black and white Gradient Map layer and set it to blend mode Exclusion at 10% Opacity.


Then, (not pictured), I add a Selective Color layer and reduce blacks in Whites and Neutrals while increasing them in Blacks.
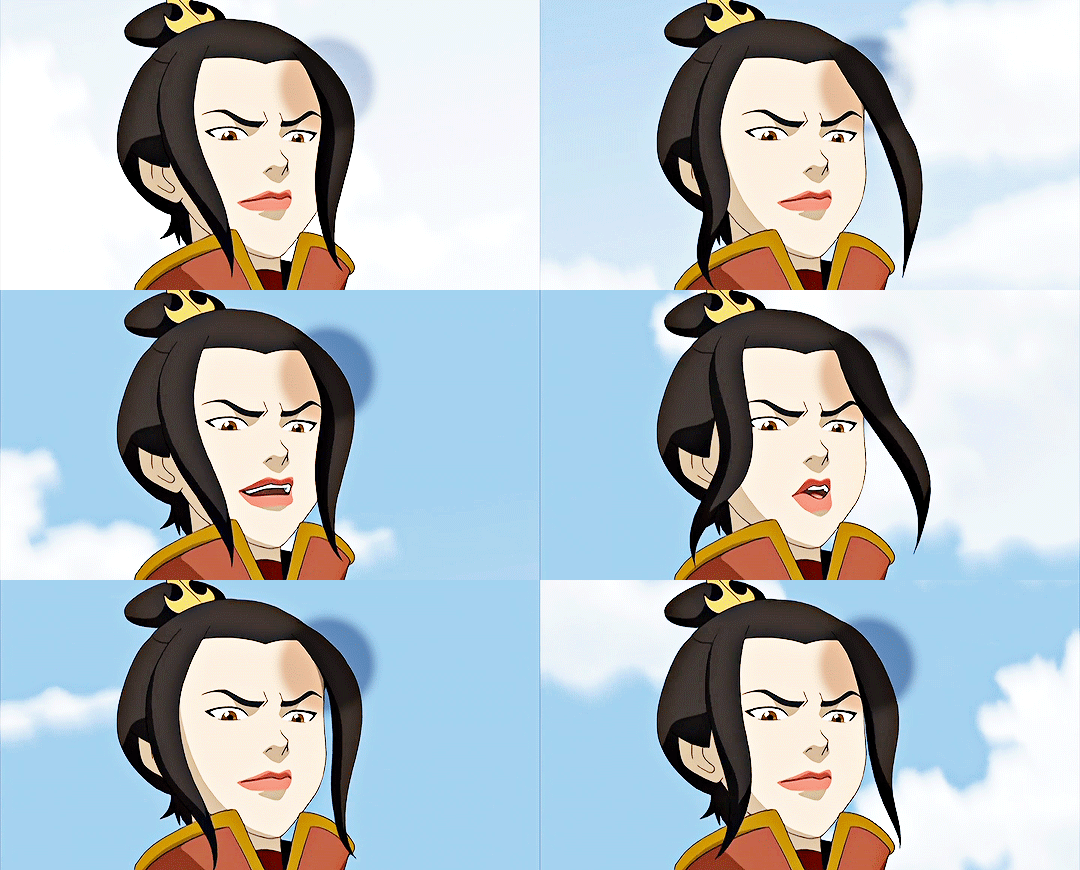
To make the background pale, I added a Hue/Sat layer, applying 100% Lightness to the Cyan and Blue channels and adding color to Azula’s skin by saturating the Yellows.

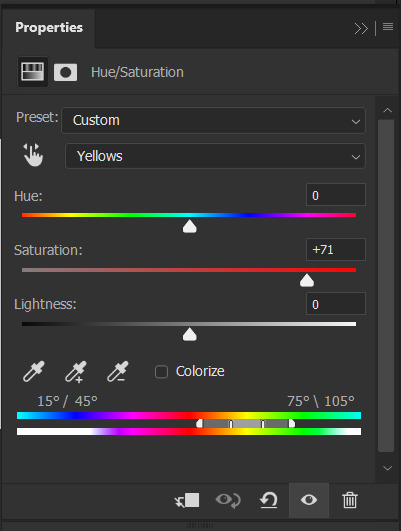
Here’s the gif after those adjustments:

Now I’m going to restore color to Azula’s skin following my own tutorial, so I’m not going to go into those details here. However, here’s the gif after all this. It’s not totally the same as Azula’s skin, but going any pinker makes the gif look awkward and oversaturated, which isn’t a good look:

After some minor adjustments and removal of the layer mask:

Now for subtitles!
Use the Text tool and make a rectangle at the bottom of your gif where subtitles go. I use Arial Rounded MT Bold, with Regular style, at 3.36pt and Sharp anti-aliasing.


Create a rectangle at the bottom of the gif where subtitles go and type in your text; then right-click on the text layer and select Blending Options and check Stroke, and these are my settings:

Now your subtitles are all ready! I’d recommend duplicating one frame of the gif and then duplicating the text layer onto a new canvas and saving it as a PSD so your settings and placement are always consistent across your gifsets!
Time to save your gif. Here are my settings, circled ones important:
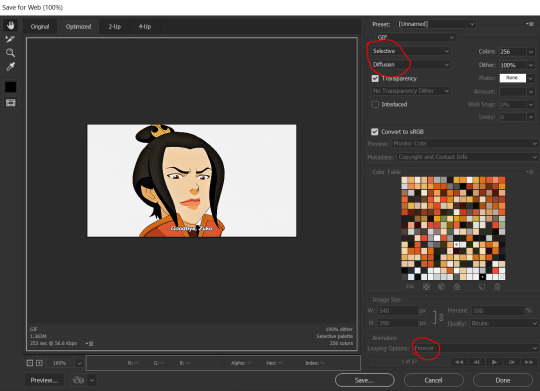
I’ve seen gifmakers use Adaptive+Pattern but I personally think that looks grainier and the pattern is really obvious; in my opinion Selective+Diffusion looks smoother, but it’s all up to you! Experiment with what you think looks best.
Make sure your gifs are set to loop Forever or they’ll only loop a limited amount.
Here’s your finished gif!

I hope this tutorial was helpful! Please reblog this if you learned something, and I hope you have a wonderful day. Happy gifmaking ❤
#allresources#chaoticresources#yeahps#biresources#resourcemarket#useradeela#usermaira#userdanisaur#userchelsea#tuserivy#*mine#resources#tutorial
411 notes
·
View notes
Note
Hi! I hope I'm not bothering you, but I love your mood board edits and was wondering if you could explain how you go about making/colouring them? I see lots of places to find gifs but turning them into a set is so hard. Thank you in advance!
hi! first of all thank you so much and second of all it’s not a bother at all! i am happy to give some of my own tips even if my explanation probably isn’t super helpful. i won’t give like a ps tutorial but below the cut (since i included example gifs, it’s VERY long) is my process for my latest jily aesthetic:
i keep track of all my ideas/sets in a spreadsheet (which i won’t show bc there’s a lot of info i’d have to blur/black out) but i always have a list of what scenes i need to gif/what gifs i’m editing and where i’m getting them from. i also include a couple extra ideas in case the gifs i have planned end up being too hard to color or don’t fit in the set. i’ve found it’s best/easiest to start w the list bc there is literally nothing worse than spending hours on a set and then not being able to complete it.
as for actually finding the material, i have a pretty healthy number of scene packs saved in my giffing folder, esp. for things i know i will gif frequently. most of the time i will peruse youtube, vimeo, and instagram for any aesthetic scenes. i also have a lot of gif packs saved specifically for the purpose of making mbs (usually i mix my own gifs w gif packs), if you msg me i’m happy to direct you to some gif packs i use regularly or you can check my #resources tag. a couple tips for finding material:
always opt for download when possible, i used to screen record and the difference when i switched to downloading was astronomical. (it’s easy to lose quality and esp if you’re on mac, quicktime duplicates frames so either you have to manually delete those extras or you get sort of choppy gifs when you load them into ps.)
always use 1080p or better, 720p will work in a pinch for 268px or 177px gifs since you can make up some of that resolution loss with sharpening, but don’t go any lower than that, just love yourself.
for pale sets, look for the right colors. i tend to look for scenes w high color contrast especially if it features poc so it’s easier to color without whitewashing, ie if the subject is a person then i look for light colored or blue/green/violet/white backgrounds. it’ll make your life wayyyyy easier. this also means if you’re making a set try to find scenes with already similar lighting bc you won’t have to work so hard to make it look cohesive.
here’s a quick rundown of what i do before coloring:
import all frames and save all the files in a folder together!!
play around with frame delay so all the gifs are moving at about the same speed, usually keep it between 0.03-0.05s
crop and resize gifs (i use 268x145 most of the time)
convert to timeline
when it comes to coloring it can be really hit or miss, i’ve recently gotten back into my groove but i was having sooo much trouble earlier this year. in general, don’t stress yourself out!! sometimes it’s easier to just find a new scene/gif (hence my list of extras!) than to try too hard to fit a gif into your set. i color all my gifs by scratch (ie no psds) but i tend to follow the same pattern, i’ll explain using these gifs/psd as an example since then i can also explain how to fix white-washing:
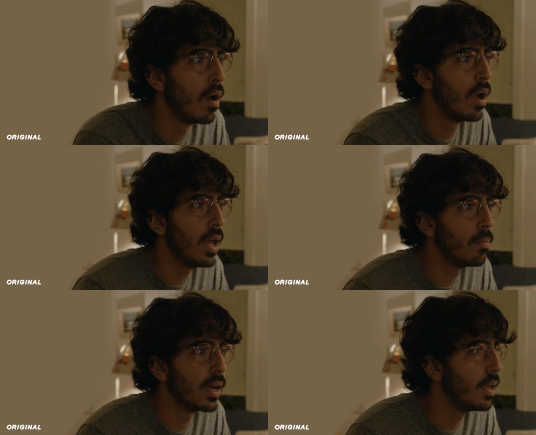
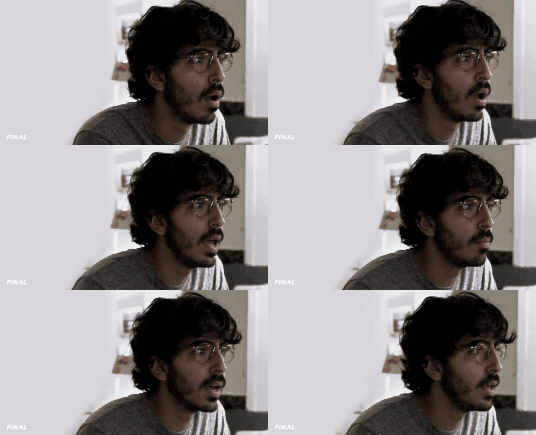
first off when you’re coloring gifs with poc always always always make a layer mask so you can compare the edited and unedited skin tones directly! i use the marquee tool to make a selection in the middle of the character’s face, select the folder of my adjustment layers, and hit ‘add vector mask’ (the third button from the left on the layers panel, it’s a white rectangle with a circle in it).
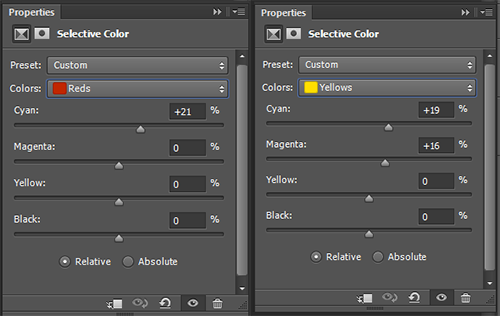
i almost always begin by using hue/saturation layers to highlight and delete certain colors. here i highlighted red and raised the lightness on yellow by a lot since it’s a very yellow scene. then i use a combination of brightness/contrast, levels, and curves layers to brighten the scene. here’s what i have now:
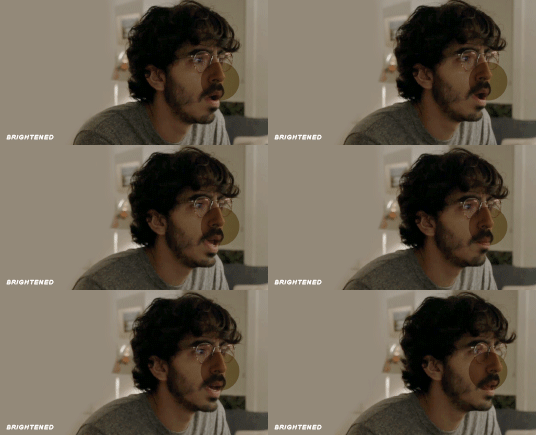
i add a gradient map set to black/white, change the blending to exclusion, and lower the opacity to between 5-10% (depending on the scene) to lighten the contrast further:

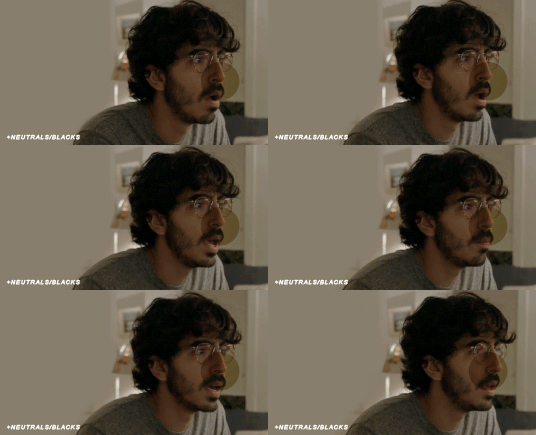
then i add back a little depth with selective color in neutrals and blacks:
now i have two main goals: 1. add contrast between the background and the subject, and 2. brighten the scene into a pale gif. to do this, i use color balance to tweak the color of the background, taking out the yellows. this step works best if there’s at least some shade difference between your subject and background, otherwise isolating the two will be impossible. here’s what i have after adding color balance:

i use hue/saturation to selectively highlight the background color. in this case i chose to adjust magenta and used the color picker (the first eyedropper on the left) to identify the exact shade i wanted to lighten. now i have a fairly neutral background and a colorful subject, which gives a sort of pale effect:
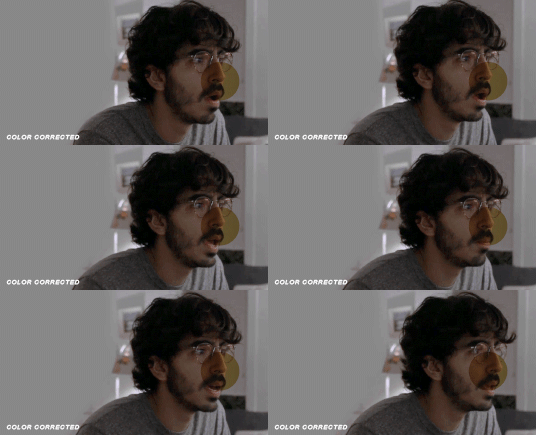
and now i use a curves layer and a selective color (white) layer to brighten further:
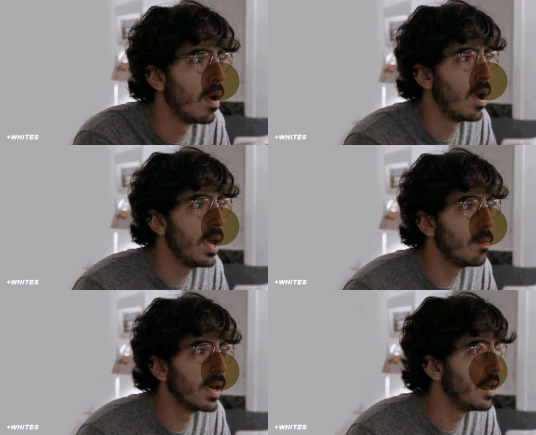

before i go further, i start fixing white-washing. keep in mind that some variance is normal since you are naturally changing the lighting of the scene; this gif shows it rlly clearly bc of how yellow and dim the lighting is, so some lightening is to be expected. however, both because the vector mask shows a lot of whitening and because i’ve giffed dev patel before and have a general idea of what he looks like in this type of lighting, i know what needs to be fixed, so i go back in under the psd/adjustment layers with a combination of selective color (red and neutral) and hue/saturation layers to darken his skin again:

now that some more contrast has been added in, i can go back to working on the psd and use curves and selective color to play around with the background again:

i use another hue/saturation layer and a black/white gradient to tone down oversaturation:


usually i leave those layers on top, so if i want to make any adjustments (like lightening the background more), i go in under those two. in this case i tweaked the whites and reduced the contrast a little to get this:
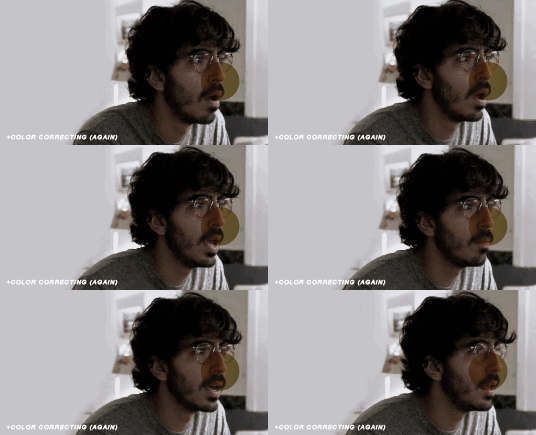

again, you can see his skin tone has changed from the original, but variation is to be expected given how much brighter the room is, the fact that i took out a lot of yellow lighting, and the brightening effect of the computer screen in front of him. some other things to keep in mind when coloring:
when you add layers to correct white-washing, you’re likely to end up with overly red/orange skin tones (red-washing). this can be fixed by upping cyans in the reds, desaturating/darkening the reds, or adding b/w or desaturation later on.
when in doubt, it’s better to be darker than lighter (the issue with white-washing is that it promotes colorism, and there is nothing inherently wrong with a darker skin tone) but really. just put in the effort to color poc correctly.
when changing the lighting a lot it helps to look at pictures of the subject in natural/bright lighting, since you get a better idea of what their normal skin tone is.
don’t try to squeeze all your selective color layers into one. you’ll get less grainy gifs if you separate them out and work one by one.
TURN OFF NIGHT SHIFT/NIGHT MODE! yes i KNOW it’s bad for your eyes (especially if you’re like me and gif at night, when the lighting outside isn’t changing every 20 seconds) but your gifs will look VERY different under f.lux or night mode compared to daytime screens. especially if you’re giffing at different times of day, blue light filters can really change the way your coloring appears. best to keep it consistent.
my sharpening settings vary depending on what i’m giffing but in general i do two layers of smart sharpen (500% with radius between 0.2-0.4, 10% with radius at 10px) and then gaussian blur at 2.5px and adjust the opacity so it’s somewhere between 15-20%. i try to strike a balance between smoothing out the graininess from selective color, and sharpening details like clothes and hair. here’s what i ended up with for the gif above:

then i rinse and repeat for the rest of the gifs in the set! i tend to start with the gifs that i know will be hardest to color, which is usually the darker ones (coloring is limited by how much i can brighten the scene) and those that include poc (again, limited by how much i can brighten and adjust the scene’s lighting without white-washing). then i check set cohesion as i go, using those first few gifs as benchmarks. once i have all 8 (or 9 or 10) gifs, i play around with composition and try to balance and vary the subject, colors, and composition of gifs next to each other. i go back and make a couple of adjustments here and there according to what i observe and what i think might improve the overall appearance.
and that’s pretty much it! i hope this was helpful, if you have other questions feel free to message me and i’d be happy to help/troubleshoot. happy giffing!
#Anonymous#*#resources#answered#sorry this was sO long but i hope it helped on the coloring end#tbh i exceeded my own expectations with the dev gif lol#yeahps#completeresources#chaoticresources#tutorial#coloring tutorial
54 notes
·
View notes
Text
CONTENT CREATOR YEAR IN REVIEW
was thinking for 84 hours where should i post it but as its my creator blog i m doing it here <3 i was tagged by @taemaknae @suhdays @ynki @honsool @jjeongukie @taeyungie @dearbangtansonyeondan @lifegoesmon @everythingoes @flipthatjacketjiminie @yoongi-bts @jiminslight @hopekidoki @cowboyjinbop @yoonqiful @jcngkooks @pjmsdior @hobeah @balenciaguks @jinvant @hobibestboy @vjimin @yoongikook AND THANK U SO MUCH FOR INCLUDING ME T_T ik maybe its not a big deal but its a big deal to me and im touched :(((((((((((( also gimme some time to check all ur posts 👉👈 also im in a mood to say that ive collected many pokemons here djfksfhsakjddld ok nvm
also sorry for a long post ik tmblr fvcks things up sometimes when there is keep reading so dont fight me plz <3
❀ first creation and most recent creation of 2020
ok this is the fist one (still very pleased with colouring here T_T the stage lighting was,,,,,,,,,,,,,,,,,,,,, well yeah as always lmao) and this is the most recent (TBH DKJSKDSDK I WISH MY MOST RECENT POST COULD BE A DIFFERENT ONE THE ONE I WANNA MAKE FOR A MONTH NOW THE ONE ID PUT A LOT MORE EFFORTS IN SO IM A LIL FRUSTRATED i literally just missed giffing but couldnt watch anything new so took an old vid i wanted to gif once I DIDNT EVEN USE MYCOLOURING PSD IT LITERALLY HAS ONLY COUPLE OF LAYERS uhhhhhhhhhhhhhhhhhhhhh :( but whatever,,, it just kinda doesnt show the difference -_-)
❀ a creation u r really proud of
well 👁👄👁 there r quite few,,, and the main reason is colouring most of these r comps and i a b s o l u t e l y sucked at comps and esp at making the colouring consistent there lol so lets begin lol 1 (u have no idea how muchi love this set) 2 (i fucking mastered it i wanted to remake it for two years and i finally did!! 60 fps smooth good moments iconic performance iconic hair colour his attitude bruh and ofc the fact that i could do sth with colouring,,,,,, and chose such an unusual colour scheme that i doubted jckdckfdk and it still worked out 🥺) 3 (lol i had this idea written down since 2018 as well and this year i could finally collect all moments i needed and oh boi yeah,,, AND COLOURING I COULD ALMOST yeah almost do sth decent with it there r still couple moments id changed but im pleased) 4 (im so happy whenevr i see this CUZ IT ALL WORKED OUT it was such an impulsive comp i literally only saw couple moments for past few years as well where i could see three of them in one frame and suddenly I WAS LIKE I FUCKING MUST POST THOSE MOMENTS SOMEHOW and im so proud of colouring it looks so well T_T) 5 (the colouring ofc im still :o that i could get rid of that shitty shit dkksjkj AND THE MOMENTS ITSELF?????? AND BLACK SWAN???????? EVERY PERFORMANCE???? HAIR?????? OUTFIT???????? EVRERYHTIGNM???????? HIS FUCKING STARE? FACE??? DONT MAKE ME CONTINUE AAAAAAAAAAA also if im not wrong this set in particular made me start my before/after posts 🥺) 6 (i jujst love everything about it e v e r yt h i n g also i could made ppl believe that jin fr has purple hair here when in reality its brown djhfdhskdf one of blending modes or adjustment layers worked this way lol) 7 (i wont even comment this tried a great tutorial with great beautiful resuls for the first time ever and it worked out so well and i like it so much and the whole yoongi here,,,,,,,,,,,,,,,,,,,,,,,, also love me some borders that add cinematic feels to some gifs or just make them pretty in a dif way just like i did with prev post i mentioned imo lol) OK LAST ONE 8 (I USED A VIDEO OF STARS AND ADDED IT TO THE GIF FOR THE FIRST TIME EVER I FUCKED WITHMASKING FOR 3 HOURS GRRRRRRRR THIS IS SO HUGE FOR ME!!!!! i cant even explain whew IVE NEVER DID ANYTHING LIKE THIS BEFORE SO I WAS REALLY PROUD TOO even tho i fucked masking up on some layers lmao but lets not pay too much attention to it 👀)
❀ a creation that took u forever
ohhhhhhhh i think this one cuz the moments were long i couldnt decide what do i want to include + it ts file so u kno,,, the speed,,, of processing,, + somehow decided to put them all together + fucked with colouring + had to get rid of the logo and as we know japan likes a lot of big braight text around haha and draw hair in moments where logo made it look blurry + had to adjust the order and all that stuff but getting rid of logo was the longest part
❀ a creation from 2020 that received the most notes
whew this iconic one im still amazed tbh they looked soso incredible and im glad how everything turned out here <3 (could change some colouring on bg tho so it could look better and more hq :c)
❀ a creation u think deserved more notes
lol this one cuz i was so hyped to make it cuz their concert in saudi arabia is one of my fav things in the world and i waited for so long to have mood and energy to go throught it to find jk moments and i couldnt choose some for this comp for so long and just,,,,,, overall,,,, the way he looks here............................................................... its a special comp to me haha ill def gif more of it i have shit ton of clips left and also there r other members and i just want to sit and enjoy yhe whole thing to so may find more stuff to gif here lol
❀ a new fandom u joined an a creation u made for it
i didnt join anything heurheru
❀ a creation u made that breaks ur heart
OKAY LISTEN DSJAKDJHFDKJ THIS ONE IF U KNOW U KNOW AND IM SURE IT BREAKS ALMOST EVERY HEART tbh whenever i see soft smiles or soft interactions or anything like this im just :’( <3 even my serotonin boost tag does it to me cuz its too precious T_T
❀ a ‘simple’ creation that u really love
this one cuz everything about it ah and this one 🥺🥺🥺🥺🥺🥺🥺🥺🥺
❀ a creation that was inspired by someone else
ummmmmmmmmmmmmmmm idk maybe this one ? cuz i never did anything like this before and maybe i saw someones beautiful headers and decided to try one too ? i could do a lot better there is not enough depth but oh well,,, lol
❀ a favourite creatin created by someone else
oh its gonna be hard :) dear every conten creator i hope u dont mind if i wont go though the whole 2020 gif tag but choose form the most recent ones i loved? u know how much i appreciate ur content cuz i never stop screaming about it in tags but truly there r more content makers and i want u to know that i really love ur content :(
@syubb welllllllllllll i wont even comment this is iconique.....
@jinv T_T val i miss u but there should be bday comps with that BIG ASS IMAGE THAT HAS ITS PARTS ON EVERY SINGLE GIF I CANT EVEN EXPLAIN that icant even find dfjksfskj
@jung-koook i literally couldnt choose ehdskjdjksd but i decided this one cuz its sososososososososososososososososososososo well made every single detail here is chefs kiss
@kkulmoon i truly really cant get enough of ur colouring lately T_T
@minhope !!!!!!LITERALLY EVERY PANTONE COMP OR ESPECIALLY 7 YEARS WITH BTS PANTONE ONE IM AAAAAAAAAAAAA and lmao i think this is one of the most reposted things ive ever seen on internet T_T
@jjoon hng amy u know how i feel about ur content T_T decided this one cuz f l a w l e s s
@hopekidoki stuff like this makes my jaw lie in the floor dsjkdj
@flipthatjacketjiminie idk whats up but it makes me scream like a madman every time i see it.........
@lifegoesmon i cant even explain why i chose this one but everything here is so incredible !!!!!!!!1
@hobeah one of those good fucking bye ones.....
@taeyungie this made me feel so many things and a whole ass a w e so cool T_T
@jiminfilter i will never shut up about bts core jungkook one should also be here
@seoksjin THE COLOURS I SCREAM OH MY GOD O HMY OGD I JUST WENT TO CHECK OUT AND SAW THIS AND IMMEDIATELY DJKSJD DECIDED THIS IS CRAZY THE PASTELS THE PINNKS AAAAAAAAAAAAAAAAAAA EVERYHTGIN but also those birthday posts ahhh T_T
@jinvant i wanna YELL but also u know how much i love ur quality and blacks T_T and gfxs too!!!!!!!!!!!!!!
@yoongi-bts i love everything here with my whole heart!!!
@everythingoes SHOUWLD I EVEN EXPLAIN WHY
@hobibestboy THIS IS SO COOL AAAAAAAAAAAAAAA THE COLOUR SCHEME
@joenns I WONT EVEN EXPLAIN IM SO HURT HES SO THIS IS SO T____________________T
@jjeongukie idk i cant get enough of skin tone!!!!!!!!!!!!
@chaylani i really love the colouring and love these posts with highlights T_T
@eklipxe COLOURING AND EVERYTHIGN
@oncupid cant get enough of every colouring ive seen <3
@jiminslight THIS WHOLE GIF RIGHT HERE
@6dis-ease COZY AND PRECIOUS T_T
@ofkimtaehyung I LITERALLY HAVE NO WORDS ITS SO PRETTY
@taee it was really hard to choose too T_T decided to go with this cuz,, u kno
@yoonqiful CUZ THESE COLOURS DRIVE ME INSANE
OK THIS IS GETTING TOO LONG KDSFJSAKDL I WOULD ADD A LOT MORE CUZ THERE IS A LOT MORE TO ADD BUT IVE BEEN DOING THIS FOR THREE HOURS I BETTER CHILL
❀ some of your favourite content creators from this year
ok i may forgot someone + in no order in particular + literally every creator that i follow/whose content i reblog @taeguks @tearuntold @cyphertaehyungie @love4hobi @kimnamtaejin @taejoon @jimiyoong @namkook @taeyungie @jinvant @jinv @6dis-ease @jiminrolls @daechwitas @syubb @syuga @jjeongukie @cowboyjinbop @hope-film @minhope @hopekidoki @joonie @namgination @jung-koook @faerieth @kooksv @lifegoesyoon @yoonqiful @j-sope @chaylani @jiminfilter @jjoon @everythingoes @varietae @seoksjin @dearbangtansonyeondan @ofkimtaehyung @yoongi-bts @gaypeople @seokjinyoongis @agustdfeatrm @joenns @houseofarmanto @namjoon (will miss forever) @thebtsgenre @honsool @vjimin @seokjinite @jiminswn @taee @hobeah @lifegoesmon @taemaknae @gukgi @kkulmoon @flipthatjacketjiminie @jintae @jcngkooks @ynki @yoongikook @yoongiandthebiaswreckers @jiminslight @gwkie @oncupid @eternalbulletproof and many more <3
OK SO i wanna say a special thanks to every content creator ever and also i wanna say that im really glad to be a part of this community all of u r so cool and creative and make such beautiful things and many of u made me feel EMOTIONS with ur sets or not only sets ill be forever grateful that i discovered bts and for everything they do to me without even knowing ALSO THANK U FOR STILL BEING HERE ON TUMBRLDSDFKJ yeah this year was less active there were few issues many ppl went on twt but thank u for still being here also happy new year <3333333 i think i sounded deeper and more emotional when i was commenting ppls gifs :| but its almost 2 am so i hope u will understand dkfjkfsjk im happy there is this corner on the internet that feels cozy and so welcoming <3 i love u i wish u a better year ahead <3 ok for checking notifications purpose ill tag my blog lol @eternal-bangtan
64 notes
·
View notes
Note
I need some kind of a photoshop lesson for this aesthetic of yours
okay i’m gonna do a tutorial real time for a picspam type aesthetic that will look like this ⇣ a photo i will put here once i make it.
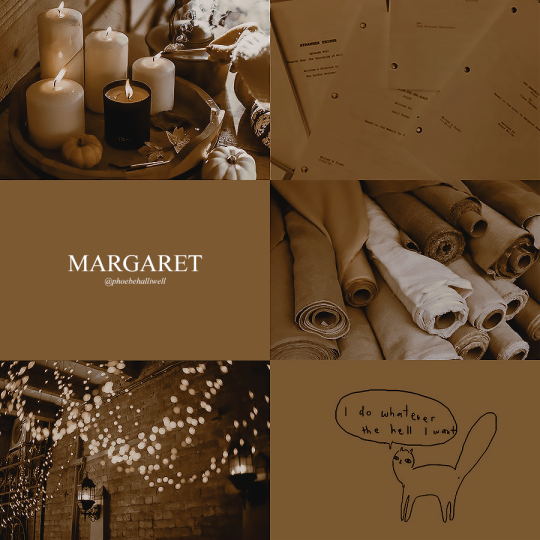
step one. open ps : )

welcome : )
okay so dimensions r a thing tumblr compresses photos like hella so i do all my still img aesthetics 900x900 is you’re trying to do this for say insta i would actually recommend jumping up to 1080x1080. pixels, obviously. idk if i have to clarify that.
so click ctrl+n or create new i’ll be doing 900x900
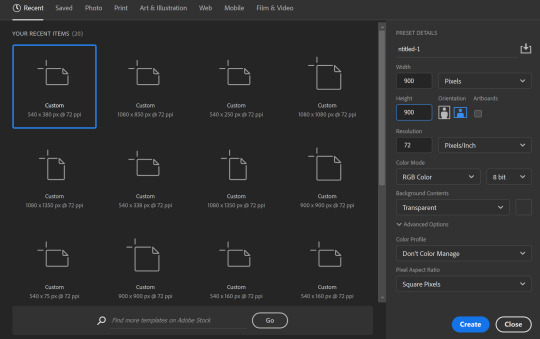
these r the rest of my settings i personally do not think they matter my resolution stays at 72 the only thing i’ve detected this affecting is font size. (side note notice how this pic looks all fuzzy? that’s bc it’s a ss with a boatload of pixels. and if there’s one thing tumblr hates. it’s pixels. and then it’s users. but who’s counting? tumblr is. i recommend keeping ur still images 900x900♥)
step two is collecting ur images i personally use pinterest for these bc quite frankly it’s really nice & easy to find these types of photos esp if you’re looking for a canon character bc if you type in [character name] aesthetic you’ll get stuff if you don’t quite frankly even just type in aesthetic you can scroll until you find an image you like click on that and go through like images underneath it and keep burning thru. like u probably know how to work pinterest. but i am being thorough and covering my bases. searching [color] aesthetic is also nice or even searching a character that isn’t the character you’re doing this for but who’s kind of similar that also works. i recommend esp for charmed bc their pinterest gets bogged down with screencaps and then like. charms like jewelry searching “charmed aesthetic” or “phoebe halliwell aesthetic” really just doesn’t cut it so what i’d recommend is instead of going through pins, go through boards.
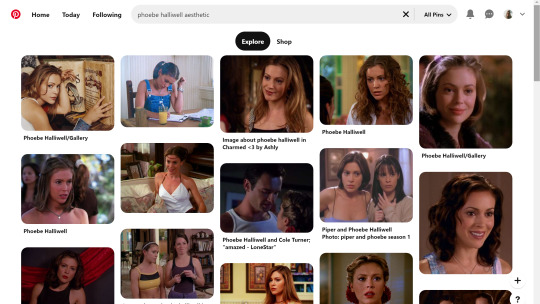

bc like. big difference. other pro tips if you see a board you like, go to the person’s profile and check out their other boards bc odds are you’ll find more you like. another protip if you’re specifically doing ocs typing in oc aesthetic will get you a lot even going to the boards on that as well. yields.
so. you’ve gathered ur images. u need five. open em. i’m making an aesthetic 4 myself which you’ve probably already guessed from the fact i’m putting the finished piece at the top, but it’s not ready yet so it’s still a surprise for me.
cropping. if ur doing a 900x900, use these setting exactly. 1080x1080 use 1080/2 x 1080/3. i’m not doing the math 4 u ♥

most important part? Delete Cropped Pixels. otherwise ur not really doing anything. crop all five images.

but them in ur document. document? psd? ur thing ♥ place them places. u do not have to commit now. leave one middle one blank. it does not matter which one. i personally like to alternate my text pieces if i’m doing a long post like what i did on my ncwotng set. some people keep them all on the same side. this lowkey bugs me i feel like it throws off the Balance but i imagine some people like The Consistency. i don’t. but w/e. it’s up to u as this is gonna be ur set. also like. as you’ve cropped these to x/2,x/3 settings they should fit nice like puzzle pieces : )

the next step i personally like doing is creating by text box with The Color™ do this bc simply duplicating one of ur images, shoving it in the empty slot, and converting into a sharp object. edit contents.


now. obvi i selected these images w a color scheme in mid. i recommend u do the same. even if it’s just vague. they don’t all have 2 fit. this is my example of my sheridan piece b4 or after. tweaking is possible. layers w masks r ur friend. i can talk about them more if need be.
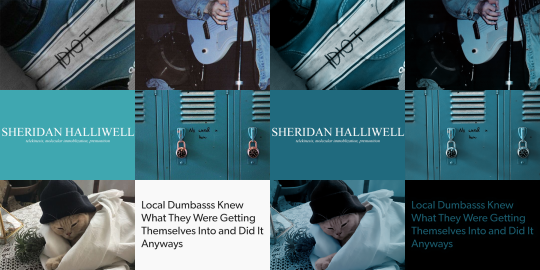
But. back 2 the smart object. brush tool. paint it.
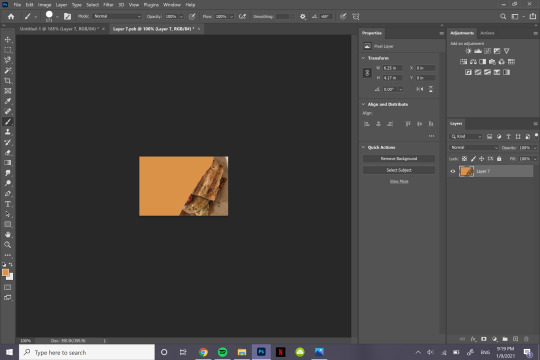
♥
the text i used was times new roman all caps 40pt font 0 spacing for the title and times new roman 14pt font 0 spacing italics for the subheading. here’s my dency b4 and after for comparison

next step is after you have your text in alright, shove everything into groups. mode on “normal”
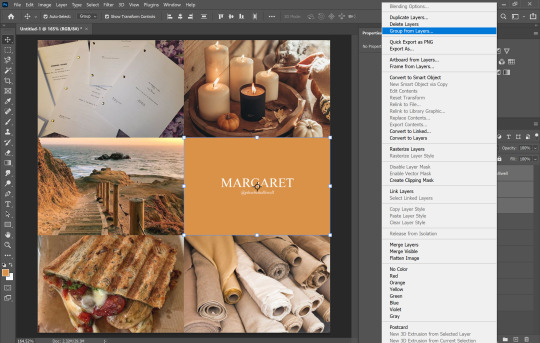


then you can start editing. the groups let you edit things like lighting and color without touching any of the layers below it 👍
i’m not gonna do a Major coloring tutorial, for lighting i’ll usually tinker with exposure, levels, sometimes brightness/contrast. for colors, color balance + hue/saturation. i rarely touch anything else.
i��ll bring u along 4 the coloring of this one bc i’m gonna add a layer mask.
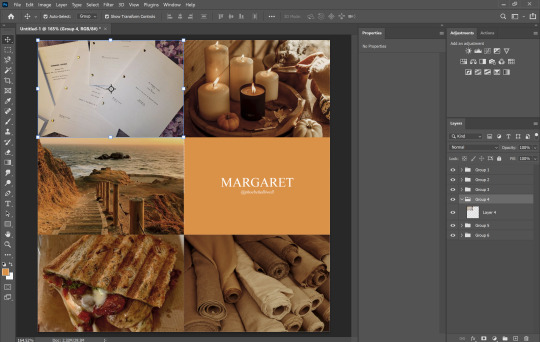
so the first thing i’m going to do bc the paper itself is already close to the vibe is i’m going to color it normal and just ignore the background

something like that. then i’m going to add a layer mask (square button w the plus sign)

and then i’m going to eye dropper a color off from somewhere else
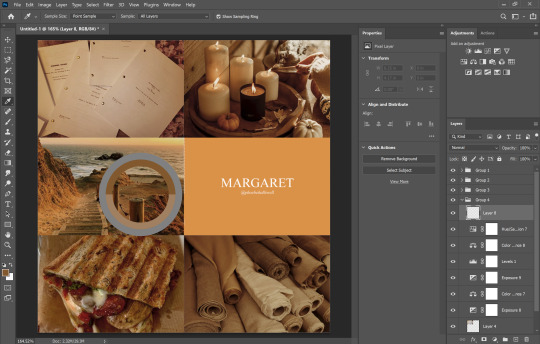
now i was talking about the “normal” blend mode stops ur color settings from bleeding over onto other images? does not apply to painting on layers but you’re already masking this bad boy, so it doesn’t matter. just don’t say i didn’t warn u
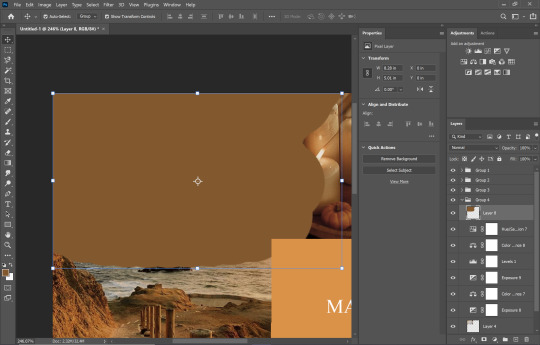
i’d recommend using a really ridiculous blend mode to clean up ur thing at first, i’m using darken which isn’t that wild but like whatevs.
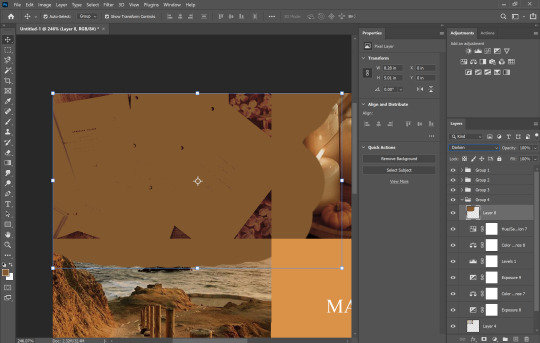
add a layer mask using this button.

select and mask
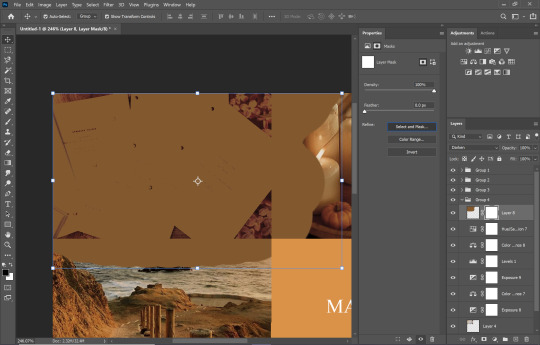
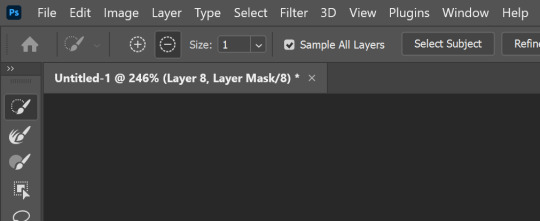
use this thing to clean up ur mask
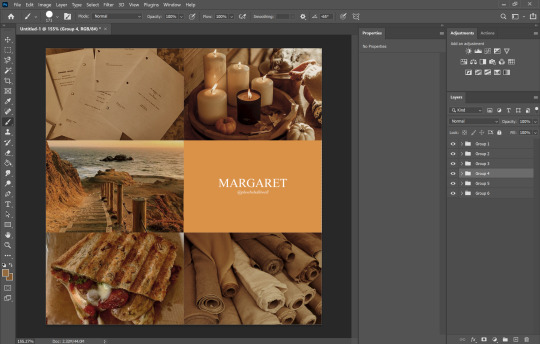
okay so i did a lot since we last spoke

but if i impart any lesson to u. it’s: fuck around. find out. that’s literally how i’ve basically done everything. nothing’s ever really gone horribly wrong. click things. see what happens.
okay so now that you’ve kinda gotten everything figured out. change ur text box color again. i’m introducing u to ye ol trick that is not the paint brush. but. hue/saturation on colorize more yeah babyyyyy
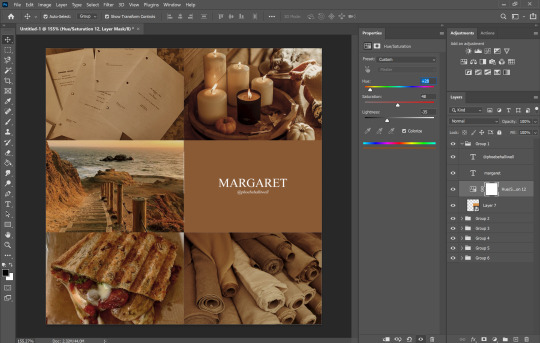
ahaha yes. love this bad boy.
Now. Trick To Make Everything Super Cohesive™. put things above All of your groups.

yeah boy.
reorganize ur thing bc u don’t like how it looks.
fuck around w a lot of stuff.
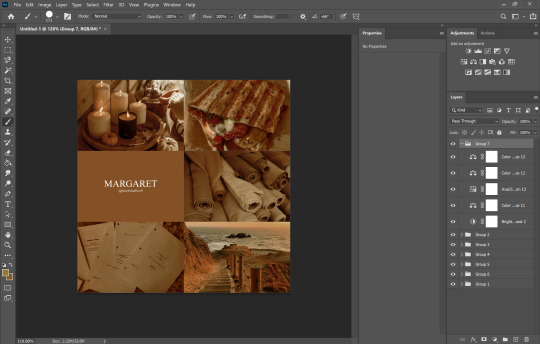
it’s still cluttered.
fuck it. grab a new image.
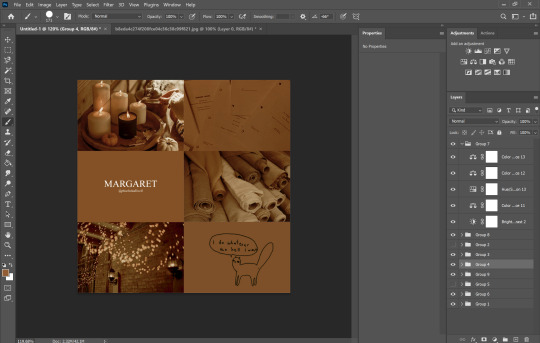
something like that. never let the fear of striking out keep u from playing the game : )
fuck around a bit more.

vibes♥
save ur image bc u literally Have Not Done That Yet

& then remember the other thing u forgot to do
eyedropper what ur text box looks like move the whole thing to the tippity top and recolor

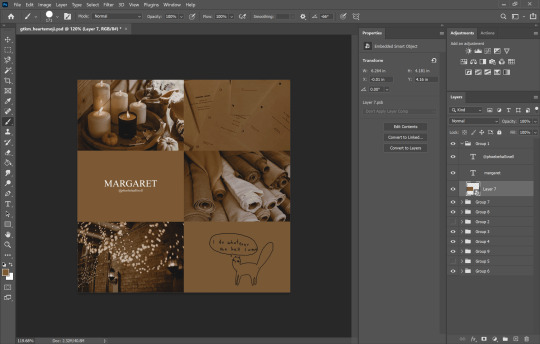
this is just bc u’ve fuck around a lot w a lot f different settings. this ensures that the text stays the same color u set it as.
okay final step.
turn The Whole Thing into a smart object, smart sharpen
leave out the text box tho. the sharpened text can look weird. it’s ur choice, but with these settings,, cronch.
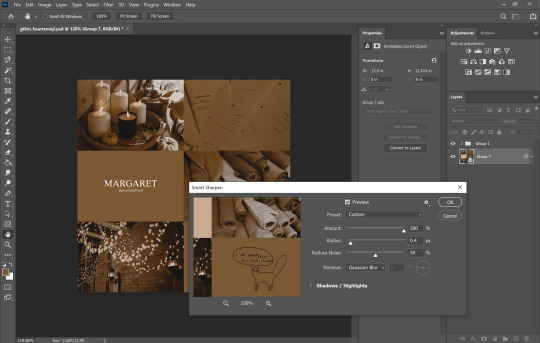
and wallah. ctrl+shift+s save as png and bada bing bada boom baby. aesthetic

#like i cannot stress how much of this simply is. fuck around. find out.#like just have fun click on things#go ape#like there's no right or wrong way to do this#anyways i used to make these for harry potter on canva ♥ remember ur roots#tutorials#ps tutorial#aesthetic tutorial#ogwork
39 notes
·
View notes
Photo


Original → Edited | Gif Making Process
i was tagged by really amazing & talented gif makers who i idolize: @aborddelimpala @adorkabledean @arthusa @fierydeans
thank you so much for this b/c it really made me think about my coloring & how dark the lighting is for spn 😅
confession time! i actually wish i could make pale/pastel gifs, but no matter what tutorial i follow or what psd i download, it never works for me 😭 so i have to settle for what you see above. it’s embarrassing that i have no consistent style & i wish i had some signature look, so peeps would recognize my gifs as mine 🙈 oh well, the only thing i can say is that my gifs tend to turn out on the brighter side.
first thing i do after deleting frames/layers i don’t need is cropping my gif & b/c of the increased size limit, i’ve been making 540x360 gifs. i have a few psds i use regularly, but i start with brightening my gifs by playing around with the curves, brightness, & level layers. then i use the selective layer to change the red/skin coloring, make the blues/cyans brighter, use the white to make it match the colors on the face, & black layer to add “contrast” so it’s not too washed out. i also use the color balance & sometimes the channel mixer layer to play around with the overall colors. then the hue/saturation layer to play around with the reds, blues, & cyans again. and my final layers is a b/w gradient layer, exposure layer (to darken the gifs a little), & vibrant layer cuz my gifs tend to be washed out. i think i use too many layers...pls don’t judge 😂 the sharpening action i use is from [x]. but i set the opacity to 50% instead of 69% so it’s not too “blurry,” but i feel like that “softens” it enough for my taste.
finally, you can see in the last gif, that i have an extremely difficult time making gifs of dark scenes & i’d love some advice 🙏 i’m always so ashamed of posting gifs from dark scenes, & my gifs are just ugh! but i try 😪
sorry for this mega boring post! but, i’d love to tag some gif makers who i also idolize & admire & i hope you’ll find the time to share your process, as well: @hallowedbecastiel @inacatastrophicmind @some-people-call-it-tragic @cath-avery @angvlicmish if anyone else does this...pls tag me! i’d love to learn from you!
#this was really cool to do#thank you to all my friends who tagged me!#it really made me think#tag game#tag games#*edits
43 notes
·
View notes
Text
How I color poc in gifs
About a week a go, I got a request for a tutorial on how I color poc in gifs without whitewashing them. I finally got around to making it, and decided to show 2 different examples since not every scene is the same. Feel free to message me to ask about other types of scenes.
So, in this tutorial, you will see these examples:


PSA: this tutorial will be image heavy, and will probably contain lots of spelling/grammar mistakes since English isn’t my first language. You can always message me for more help in case it’s not 100% clear.
PSA #2: This tutorial is divided in 3 parts: the Tahani part, the Grace part and a general tips part at the end. You can use the search function to find any part you’re interested in.
Tutorial under the cut!
I want to start with saying that I definitely made mistakes myself when coloring poc and I learned a lot over time. I think the most important thing is that when coloring poc you should look at 2 things:
1. the original coloring: if a scene is really bright and the lighting is right in the character’s face, you won’t be able to bring back all of the color. If you do try, you might end up with really orange/red/yellow skintones.
2. A picture of the actor/actress in normal lighting: when you are working with yellow or blue scenes and aren’t sure what your coloring should work towards, just google the actor/actress to know what their skincolor should look like.
Okay that said, let’s start this tutorial!
A) Tahani from the Good Place
We are starting off with this gif (cropped and sharpened)

It’s a fairly light scene, so we’ll have to make sure to bring back color as we go on.
So to start off, I add a basic coloring that consist of 5 layers:

I add a curves layer to brighten up the whole gif and the levels to bring back some contrast/color. The black arrow will give your gif more color while darkening the shadows, which will help when trying not too whitewash your gif.
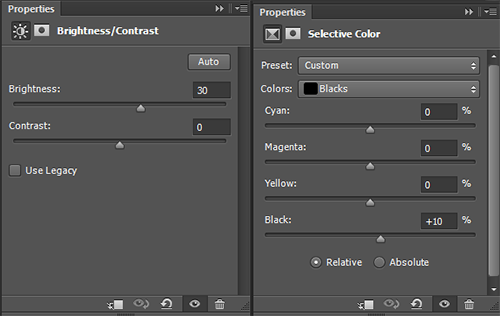
Be careful with brightness since it’ll take away some color from your gif.
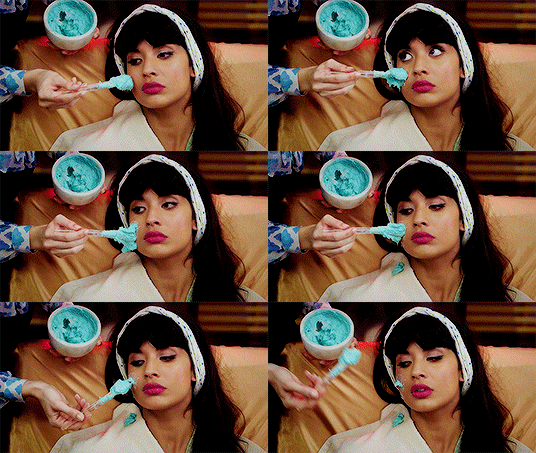
Which gives us this gif:

Which is honestly pretty good? The coloring so far didn’t take away too much of the colors in the gif already, but I think it could be a bit more red (not too much), so I put this layer UNDER the base:

It doesn’t make that much of a difference, but I like it:
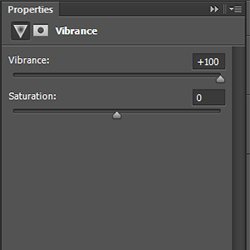
You could leave it here, but I’m gonna add some other layers but that is optional!
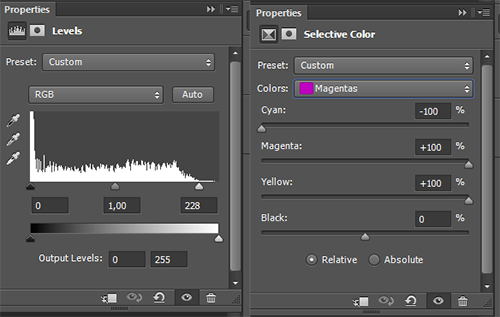
So first I added light levels, which brightens up the lightest parts of your gifs, without taking away the color (I love this layer so much!!!!). Then I added a selective color layer and changed the magentas (this is very much a preference layer, I like the lips to be more redpink and not pinkpink).
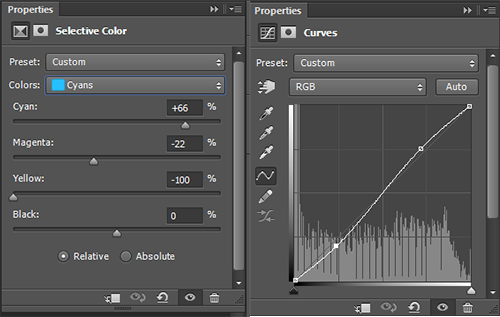
In the same selective color layer I changed the cyans to make them more vibrant. I also added more contrast with the curves layer.
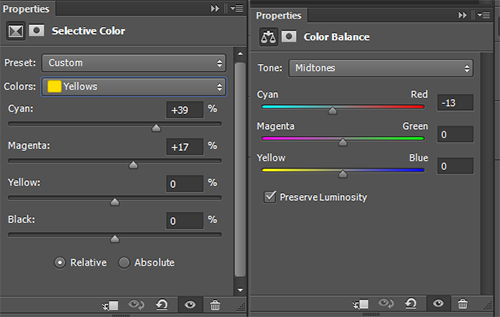
Then I changed the yellows to make then less ‘yellow’ (like in unnaturally yellow for a skintone) by upping the cyans and the magentas. This resulted in me thinking the gif was a bit too red, so I added a new color balance layer.
With all these layers, I ended up with this:

Now, I‘m happy with this, but I am going to give another tip when it comes to bright gifs: the white selective color.
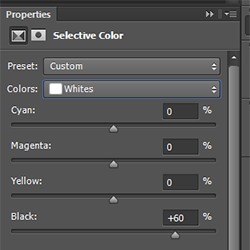
This does not make a big difference, so you cannot use it to fix the whitewashing in a gif. It will add some color back into the whitest parts of the gif. I almost never touch the cyan/magenta/yellow parts of this SC, because it can turn bad very easily :p. With this layer, you get this:

Which I think is a good end result. While the brightest parts of her face are too light, you cannot bring back enough color (in a coloring with high contrast) without making it yellow/orange. When there’s a lot of light on the face, try looking at the neck to see if you’ve whitewashed a gif or if it’s simply the lighting.
B) Grace in Black Lightning
So I chose this scene because it is very orange, so we’ll have to make it less vibrant without whitewashing Grace.
We start with this gif:
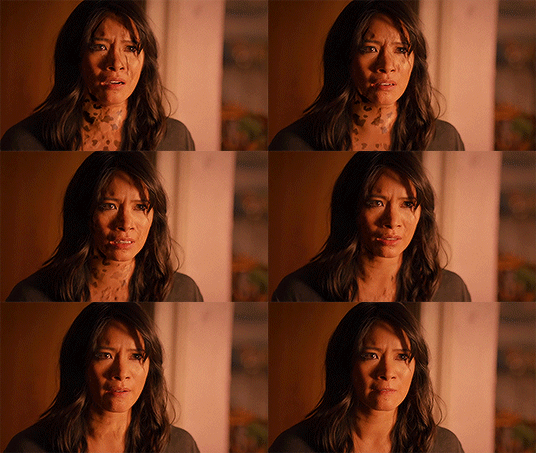
For this, I quickly googled Chantal Thuy (who plays Grace) and looked for a picture that wasn’t too heavily edited. I went with this one:

You can see she isn’t very dark (especially compared to the gif we have), but definitely has some color in her skin that we should maintain in the gif. It’s always better to go too dark than too light. With that in mind, I did these steps:
Again, I started with almost the exact same base as the gif of Tahani. I did not add a vibrance layer yet. I did add a color balance layer UNDER the base to make the gif less red:

This is what we end up with without adding vibrance:
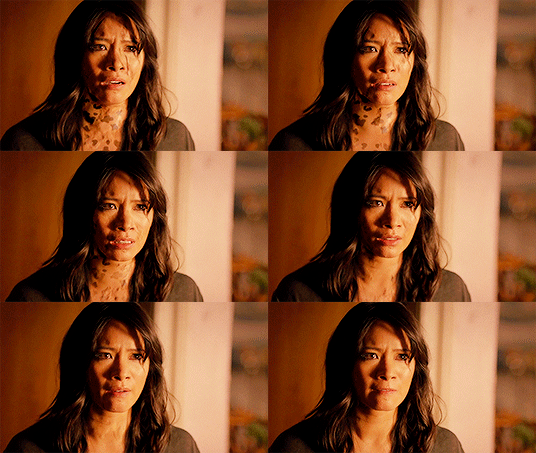
The gif is way too yellow for me, so I added another color balance layer:

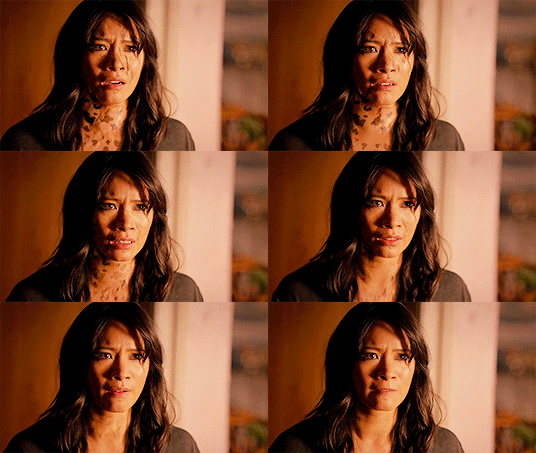
This looks way better imo. So now I add vibrance (only 50% this time)

This makes the gif slightly too yellow again, so I add another color balance layer:

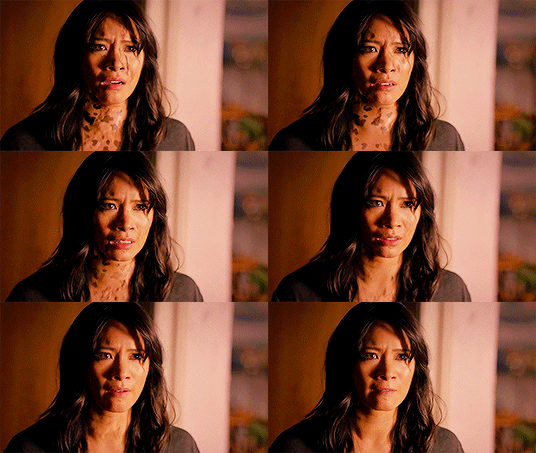
Now I could’ve just not added a vibrance layer... but... I love my vibrance layers
I think this gif looks pretty good? It might still be a bit too vibrant when it comes to her skintone, but I like it. I did add some other layers to tweak the gif a bit, but these are optional:
I did this to make the skin a little less yellow/orange, it’s not a huge difference though.

I added a levels layer to give the gif a bit more contrast
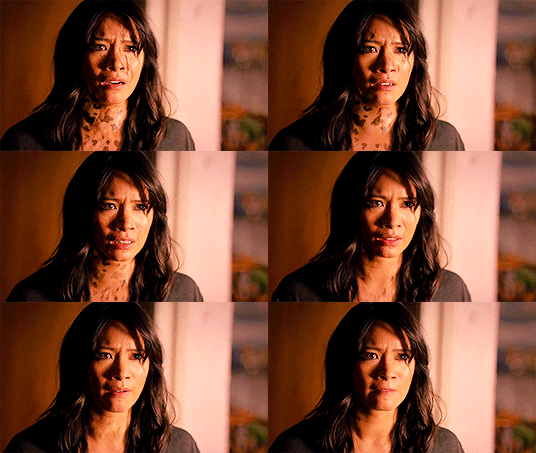
I would prefer this as my end result, because I like very colorful gifs, but if it is still too orang-y for you, you can add another color balance layer;

And then this would be the end result. The gif isn’t orange anymore, but Grace also doesn’t look white.
C) General tips
1. If you are coloring a gif, and you notice it is looking too white and don’t know what to do, check these layers first:
Levels: the middle arrow of the levels will heavily take away the color in your gif while brightening it up, so don’t use it or use it sparsely. The black arrow will add more color in the shadows of you gifs while darkening it a bit.
Red/Yellow selective color. With this layer you can massively change the undertones of the colors in your gif, but be careful! I usually use the yellow SC, and in that one I change the cyans, magentas and yellows. The cyans will change how vibrant the color looks, the magentas will make the gif more/less yellow (I usually go for less yellow by upping hte magentas), same with the yellows. I recommend to only use the yellow arrow when you cannot decrease the yellows enough with magentas.
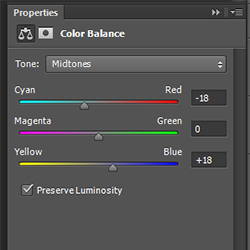
Color balance: you can add a lot of color with this layer. Try to move around the layer in your psd, because different places will give different results. I usually add color with the yellow/red arrows, but the magenta can sometimes help (when your scene is too green and the red arrow makes it looks bad, you can add a little bit of magenta instead). If you are working with a red/yellow scene, you should use the blue/cyan arrows (as I did in the Grace example).
Vibrance: you can always add another vibrance layer on top of your psd to give the colors a boost. I wouldn’t recommend doing another 100% one though, since it will probably make your gif grainy and the skincolor way too vibrant. I don’t rec using the saturation part of the vibrance layer, since it’ll make the gif yellow rather than colorful.
2. If you aren’t sure, ask a friend! I do this all the time, because sometimes, after looking at your gif for half an hour, you have no clue what the hell you’re doing anymore and you need another pair of eyes.
3. Coloring takes practice. You are free to use the (unedited) gifs I posted in this tutorial to practice on.
4. While coloring your gif, put your adjustment layers in a group (select all and click on CTRL+G) and disable the group a few times while coloring so you can check if you’re not lightening the skin too much.
5. You don’t need to do all your adjustments in 1 layer, sometimes it’s better to add two levels layers instead of doing everything in 1, same with color balance and curves/brightness (especially the latter!). Curves and brightness can take away a lot of color when they are (one of) the first layers you use, so it’s better to generally brighten up the gif in the first layer, and add on more after your vibrance layers and color balance layers. (Sometimes I even put my vibrance layer under my psd, this mostly in very bright scenes)
6. The first adjustment layers of your psd do the most adjusting. Keep that in mind when adding color balance and vibrance layers. Adding a vibrance layer under everything else will make the gif a lot more vibrant in a different way than it would putting the vibrance layer above everything. If your gif is very light and you can’t seem to bring back coloring, I suggest putting your vibrance layer under all your other layers, it might help.
You won’t be able to bring back color in every gif. The important thing is that you don’t take it away by brightening too much (or with the wrong layers), taking away the yellow/reds or adding a b&w gradient / layer.
#itsphotoshop#completeresources#yeahps#gif tutorial#tutorial#my tutorial#sorry this is so late anon#i drafted this and then somehow forgot?#anyway I hope this is helpful
474 notes
·
View notes
Note
✨ + /tagged/* 🌹 💓
zee! my adorable little sis! i miss you and i hope you’re well 💓
in no particular order they are: Luda - what don’t i love about this set!? the quality is amazing, you’re forever the negative space queen and i absolutely adore the psds you use and how you colour your gifs! you have that great balance of pastel and muted that i always and forever will struggle to achieve and you just come along and knock it out of the park again and again. your sets are consistently beautiful and this is definitely one of my absolute favourite to show the amazing muted colouring that i always associate with you 💖
2019 fav releases - the quality!! this is so smooth and i love the scenes you chose and how well they all flow together and the psd is just the cherry on top of this beautiful set (as well flawless taste)
Irene - negative! space! queen! the colour palette!? the scenes!? the clean execution of the negative space!? irene!?! honestly perfection.
Fav music videos - no joke this set is genuinely one of the striving forces behind my constant trial and error for negative space sets and it’s the set i frequently revist for inspiration for both composition and also colour palette. the fact you managed to make every scene work and flow well whilst also maintaining their original colours AND you didn’t make any colours clash? that’s pro stuff that i strive to achieve and it always amazes and satisfies me how clean the gifs look.
f(x) - one of my fav groups made by one of my fav content creators 💖 forever in love with how you coloured the gifs (hOW?!) and i’m always weak for b&w gifs added into the mix and you do it so well 💖
thank you so much zee! i love your stuff so much so trying to pick five was so tough! 💖
1 note
·
View note
Text
Art Commissions (July 2021 update)
I am consistently open for commissions and will gladly do illustrations, fan art, character design, portraits etc.
[email protected] for any inquiries
(Detailed price list and general guidelines under the cut. )


Basic Guidelines:
Long-time Patreon supporters (over 3 months) have a 10% discount (TIers 1-3) or 15% (tiers 4 & 5) from the base price.
Will draw: human/fantasy/sci-fi characters, animals and environments, realistic or stylised. Subtle NSFW content or moderate gore is up for discussion.
Won't draw: excessive gore or heavily sexual content. I retain the right to refuse cooperation without explanation, if the theme just doesn't work for me.
Painterly portraits: If you’d like to order a highly detailed portrait like that (the examples are at the end of this long post), let me know! The price for such a piece will be between 300-400$ depending on the complexity (as it’s really time and energy consuming), but the result will be worth it!
I am asking tons of questions and provide consistent communication and updates while working on a commission, so be sure to stay in touch with me throughout the work process and prepare all the needed references and notes beforehand. Keep them brief, as I won't be able to read pages of text just to find the needed references for the visuals.
PayPal is now available in Ukraine, so I can accept payments through it, as well as Patreon pledges.
I will post the resulting artwork on my social media with a reference to my client if not asked otherwise.
After confirming all the details of the starting sketch you should proceed with the full payment. After that you'll receive your commission in high-res within a week. Don't hesitate to ask for a print-ready TIFF, PSD original file or cropped images for posting online, if you need them!
Additional notes:
Drastic changes to the ongoing work are only allowed while I work on the rough sketch. After moving on to clean line art and colouring, if you happen to change your mind about certain aspects of the commission, you can request changes for an additional fee.
! I do not permit using my artwork for commercial purposes or selling them as NFTs!
! If it's an original illustrative work, then as a client you may also use the image for promotion of your writing material on the internet and on printed promotional materials.
The artist is the creator and copyright holder according to the Intellectual property laws of respective countries.
More examples of B&W, flat colour, full colour and painterly portrait works:


Will be extremely thankful if you could reblog and share around this post!
Thank you for your attention! Stay safe!
Much love,
Lethendralis
85 notes
·
View notes
Text
sharkapologlst replied to your post
i feel u. theres literally no consistency to my icons. im okay with it, but if i wasnt.......... god help me i'd be in hell trying to make them all the same akijdhwu
i feel like i’m using similar colouring styles with newer icons, leaning towards more reds rather than my old style of leaning towards blues & lowering the saturation but most of the time i do it scene by scene & sometimes i get a lil wild w it just bc. like i love the cohesive look of the same psd colouring for all icons but even when i download free psds to figure out what they’ve done i still end up being one big ???
2 notes
·
View notes
Photo

LIYAH’S BLOG TUTORIALS 01. how to make moodboards
@potthr requested: maybe moodboards
— DIFFICULTY OF TUTORIAL: ★☆☆☆☆
examples of what you will hopefully achieve by the end of this tutorial can be found here.
hey everyone, so i’ve been wanting to do something for all of you since so long, and so i decided to start something that might be able to benefit all of you — blog tutorials! this series will include everything that will help you and your blog, and i’ll make them on demand, so please do request a tutorial on something if you like!
i’ll be keeping an updated request list for these tutorials, so before you do send me an ask, please check this list to see whether what you want to request isn’t already taken!
WHAT YOU WILL NEED:
photoshop
a pinterest user
the tutorial begins under the cut! i hope this helps any of you, and i apologise in advance if nothing makes sense ♥
QUICK BEGINNING!: a moodboard is a type of creation which consists of nine photos, three rows with three pictures in each one.
— this is what the finished product will look like.
STEP ONE: the first thing you need to do before anything else is to find nine photos that will suit your character, since the moodboard that i’m going to be making is about luna lovegood, i’ll need nine pictures of anything that reminds me of luna lovegood. a great place to start for good pictures is pinterest and weheartit! i have more experience with the former, so we’re going to be using pinterest as an example.
QUICK TIP!: it’s a good idea to make a pinterest, you can create boards about specific things and save pictures to it, in order to keep everything organised. you can find my pinterest here! feel free to use any pictures from my boards and give my user a follow!

in the search box, type in luna lovegood, and the above should come up! below the search bar should be a few options to filter different types of things to do with luna lovegood. select the boards option, so you see boards about luna made by different people!

once you’ve done this, there should be a wide range of boards that appear to do with luna. now, all you need to do is look through different ones and save pictures!

QUICK TIP!: a good way to save pictures is to look for similar colours. try and find pictures which have a white background, cause it gives off an organised effect! since i’m making a moodboard about luna, i’d associate her with a pastel colour scheme, so try to find pictures with hints of light pink, blue, green etc.
i chose at least nine pictures and saved them all to one board on my pinterest. the link for it is here, if you want to check it out!
STEP TWO: once you’ve saved all your pictures to one board, you can now right click on each one and save them to your computer.
↪ if you have more than nine pictures saved to your board, choose the best nine ones and save those!
STEP THREE: next, you’ll open photoshop. i use photoshop cc, though any version should work for this!
STEP FOUR: after you’ve opened photoshop, go to FILE > NEW.
the settings of your box may look different, though that isn’t anything to worry about! make sure that the unit is in PIXELS! the amount of times i’ve actually gone ahead in centimetres is worrying! this is how your box should look like before you press OK.

after this, a 250x250 canvas should appear on the screen. the next thing you need to do is upload your pictures!
STEP FIVE: go to FILE > OPEN and open all the nine saved pictures on photoshop. after you’ve done this, the next step is to crop them!
STEP SIX: it’s important that your moodboard pictures are all the same size. select the CROP tool from the sidebar.

after you’ve selected the crop tool, there should be a panel so you can adjust the size of how much you will crop your picture. make sure that you have ticked W x H x RESOLUTION.

your panel should look like this before you proceed:

now, you just need to crop your pictures!
STEP SEVEN: crop your pictures using the dimensions stated above, until all of them are 250x250. after this, you select the MOVE tool on your left sidebar once more, and drag all your cropped pictures onto the empty canvas you had created earlier. this is how my first picture looks at the moment.

there should be up to nine pictures on the original canvas that you had first created at the beginning of the process!
STEP EIGHT: your picture (i’m just using my first one as an example) looks like this right now.

however, using a PSD, you can make it look like this:

the difference with/without a psd is huge! using this, you can make each picture look more prettier and aesthetic!
HANDY RESOURCE!: i’ve decided to share out the psd which i use for most of my moodboards (and this one too!) you can download it here!
once you’ve downloaded this psd, open it up on photoshop and drag it into this canvas (where you’ve dragged all the cropped pictures and such).
STEP NINE: and you’re done! you’ve now applied the psd to your pictures, in order to download each one separately, just enable/disable layer visibility accordingly!
FINISHED PRODUCT!: once i downloaded all the pictures to my computer and organised them on tumblr, this is what the finished product looks like:

i am extremely sorry if none of this made sense, and now that i look back on this tutorial, it really does look like a load of rubbish! if you feel like you didn’t learn anything through this tutorial, please come shout at me through PM on ways that i can improve next time, i really don’t mind!
i hope this helped, and i’d love it if you could leave your feedback in the replies or something, so i know whether you liked it or not! hope you have a lovely week and keep being amazing ♥
#mine#tutorials*#completeresources#yeahps#itsphotoshop#hope this helps people!#also i am extremely sorry again and again if this didn't make at all sense#i am rubbish :(#100#500
717 notes
·
View notes
Text
The One With The Tiny Shirt
Summary: Washing baby while singing your heart out to one of your favorite songs without knowing Dean is watching you. Who knew things can get pretty hot on Baby’s dash?
Author: sleepywinchester [prev. deanwinchester-af]
Pairings: Dean x Reader
Words: 900+
Warnings: Implied Smut.
A/N: My entry for @sis-tafics & @eyes-of-a-disney-princess Birthday’s Challenge! This was such a fun one to write & I hope y’all like it! Happy Birthdays! <333 PSD; This is not beta’d.
Prompt: The One With The Tiny Shirt
THANKS FOR READING, ENJOY ♥

Washing cars wasn’t a task you did often but when you did, it had to be done while listening to some music classics. There was no cases on the radar, leaving you and the boys to stay in the Bunker. It’s been a week and you were starting to feel caged up and bored. Dean always found the way to kill the time though, either was going to a bar or not leaving his bed at all. You loved spending time with him but there was nothing better to do when you weren’t doing him. Dean wasn’t fond of your love for Bon Jovi but it was just because he didn’t understand your love for the iconic band.
You had a love and hate relationship with arguments about how Led Zeppelin was a thousand ways better than Bon Jovi. It was fun and Dean always had some good points about his favorite band. Led Zeppelin was great but Bon Jovi was and would forever be your favorite. The reason that created so much love for the band was because it was your first concert ever. Your mother being a completely Bon Jovi fan, took you to a concert and it was like you were in a whole new world. So much freedom and carefree in one place blew your mind away.
With ‘You Give Love A Bad Name’ playing on the background, the water splashed over Baby. A lot of the water splashed towards you, soaking the tiny and white shirt you decided to wear. You shivered briefly with the cold water and kept washing the vehicle.
“Woahhh, you’re a loaded gun,” you sang and moved your hips to the song.
Forgetting where you were, you began to dance and play the air guitar around baby. Imaging you were in a movie, you pressed your back against Baby as you slowly squatted down to the floor while dancing and then went up with the same left to right hip movement. As the song kept going, you danced and cleaned the car like nobody was watching you.
“Shake it!” Dean whisteled, startling you.
In a jump, you turned around, catching up your breath from the dancing. You put your wet hair behind your ear and looked at your boyfriend. Dean stared at you with joy in his eyes and a big playful grin. He’s sitting on one of the bikes a couple steps away from you.
“How long you’ve been-”
“A while,” Dean cut you off, his wide grin showing how amused he is.
You sighed heavily as the apple of your cheeks slowly turning red.
“Go on,” you threw the sponge on the bucket and began to walk towards him, “laugh it off.”
“Laugh?” Dean cocked an eyebrow, “You looked sexy as hell.”
Your eyebrows went wide, “Don’t mocking me.”
“I’m serious,” he pushed you closer, grabbing you by your hips, “I could take you on top of Baby’s dash right now.”
Dean’s gruff voice and overall handsomeness turned you on instantly.
“Then what are you waiting for, Winchester?” you taunted him.
He smashed his lips on yours, kissing you with desire and lust. Dean lifted you in a second, he carried you towards Baby and placed you on top of the Impala’s dash. You giggled watching him take his red flannel and black t-shirt off. He leaned in towards you, both lips meeting once again and moving in sync with each other. You could still taste the whiskey he drank before coming in here.
Your lips parted, greeting Dean’s tongue in to play with yours while his hands traveled through your wet body. Dean’s lips all over your body sent fireworks through your entire body. Between the kissing and the touching, he took your shorts off first and then unbuckled and lowered his jeans. Being with Dean was something you’d never get tired off. The man was fun, adventurous and always open to spice things up in the bedroom. You and Dean had made love in Baby, that to be honest it was one of your favorite places to have sex.
“That was fun,” Dean said putting on his flannel, “I love that shirt.”
You glanced down to your chest, the tiny shirt got smaller because of the water.
“Of course you do,” you flashed a grin and turned to look at the halfway washed car. Turning back to meet Dean’s eyes and said, “Are you helping me to finish?”
Dean nodded once, grabbed a sponge and began to wash his beloved car. You had to admit, after the work was done, a masterpiece was revealed. Baby looked amazing and ready to ride and break necks.
“Wanna go out for a drink?” Dean asked while walking through the halls of the Bunker. “Maybe burgers & an unfair game of pool?”
You cocked an eyebrow at him, “Unfair?”
“Mhm, I always win,” he bragged.
“I always smoke you on poker,” you replied.
Dean chuckled under his breath, enjoying your competitive side, “Okay.”
“Good,” you kissed his cheek before strolling into the room for some clean clothes.
You began to look for something quick to wear, which always consisted in plaid and jeans. That’s what happens with you live with the Winchesters for a long time, you end up copying their style without even realizing it.
“Meet you at the shower for round two?” you flirted with your voice and eyes.
“I’m right behind you,” Dean winked.
You gave him a nod and walked towards the bathroom.
“I always let you win at poker,” Dean whispered as he followed you.
Let me know what you think?
Dean’s Tag List ( C L O S E D )
@sis-tafics @torn-and-frayed @blacktithe7 @ruined-by-destiel @kazchester-fanfiction @winchestersnco @xtina2191 @awesome-as-i-wanna-be @lipstickandwhiskey @mrswhozeewhatsis @padackles2010 @adriellej @chickenmcsade @nokillzforu @ruprecht0420 @growningupgeek @faith-in-dean @deansbaekaz2y5 @bennyyh @thing-you-do-with-that-thing @therewillbeblood @angelwingsandsupernaturalthings @spn-fan-girl-173 @supernatural-jackles @juliadijk @loveitsallineed @winchestersmolder @feelmyroarrrr @supernaturalyobessed @latinenglishfandomblog @waywardlullabies @fandommaniacx @sassy-losechester @moonstart86 @sinceriouslyamellpadalecki @lakama15 @missmotherhen @capsofwinchesters @alphadareme @callmesweetheartifyoumeanit @jensen-jarpad @danijimenezv @buckysmetallicstump @thegirlwhoisintoomanyfandoms @mskitty416 @starswirlblitz @sam-w @doro7winchester @falling-for-fandoms @silver-and-green
#elsie writes#dean x reader#dean x reader fluff#dean x reader implied smut#dean fic#dean fics#dean ff#dean fanfiction#dean fluff#baby#spn fics#spn fanfiction#supernatural
263 notes
·
View notes
Text

Art Commissions Open
(January 2021 update, changes in terms as well as additional examples of my works added)
*****************************


I am consistently open for commissions and will gladly do illustrations, fan art, character design, etc.
[email protected] for any inquiries
Additional examples of works in B&W, flat colour and full colour styles accordingly:

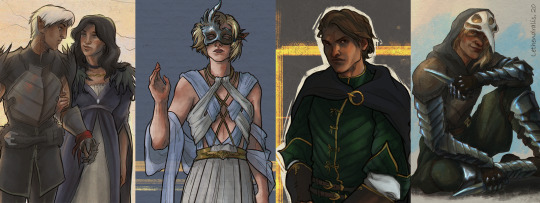
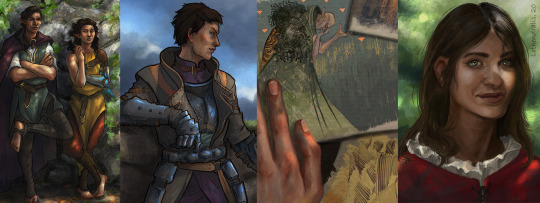
!Important!
Will draw: human/fantasy/sci-fi characters, animals and environments, realistic or stylised. Romantic scenes and subtle NSFW content is up for discussion.
Won't draw: excessive gore or heavily sexual content. I retain the right to refuse cooperation without explanation, if the theme just doesn't work for me.
I am asking tons of questions and provide consistent communication and updates while working on a commission, so be sure to stay in touch with me throughout the work process and prepare all the needed references and notes beforehand.
Due to PayPal unavailability in my country, I can only accept payment through a one-time pledge on Patreon.
I will post the resulting artwork on my social media with credit to my client if not asked otherwise.
After confirming all the details of the starting sketch you should proceed with the full payment. After that you'll receive your commission in high-res in the next few days. Don't hesitate to ask for a print-ready TIFF, PSD original file or cropped images for posting online, if you need them!
Drastic changes to the ongoing work are only allowed while I work on the rough sketch. After moving on to clean line art and colouring, if you happen to change your mind about certain aspects of the commission, you can request changes for an additional fee.
Extremely thankful for likes and reblogs on this post!
Consider supporting me on Patreon, where for as little as 1$ a month you get access to hundreds of art pieces in my gallery, and for 5$ or 10$ pledge you can request a one character sketch of your choosing!
Thank you for your attention! Stay safe!
Much love,
Lethendralis
154 notes
·
View notes