#matharoo
Explore tagged Tumblr posts
Text
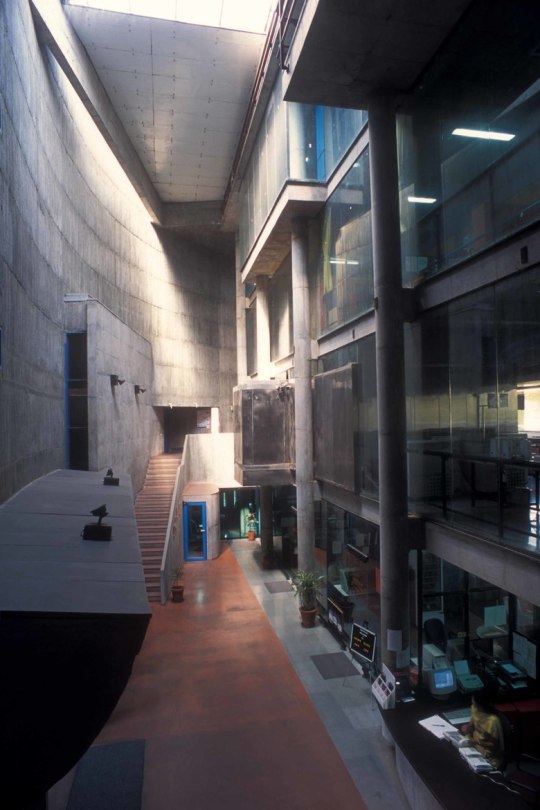
Prathama Blood Centre, Ahmedabad. Matharoo Associates.
#brutalist#brutalism#architecture#interior#interiors#design#ahmedabad#india#matharoo#gurjit singh matharoo#2000
475 notes
·
View notes
Text
Enhance your maths skills with Matharoo's expertly crafted maths word problems worksheets. Perfect for students and educators, our comprehensive collection of maths word problem worksheets is designed to build problem-solving abilities and boost confidence. Explore Matharoo for top-quality resources that make learning maths fun and effective
0 notes
Text

Matharoo Associates
Plain Ties, 2018
Photo: Edmund Sumner, Dinesh Mehta & Matharoo Associates
#matharoo associates#interior#interior design#brutalism#home design#contemporary home#modern home#living room design#interior architecture
83 notes
·
View notes
Text



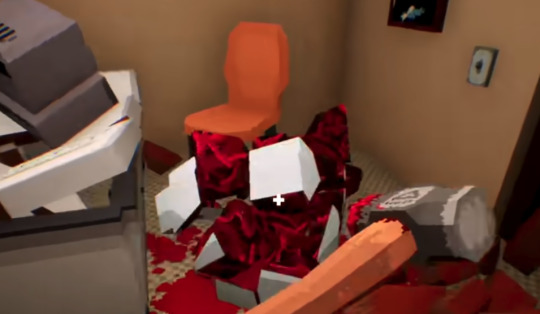

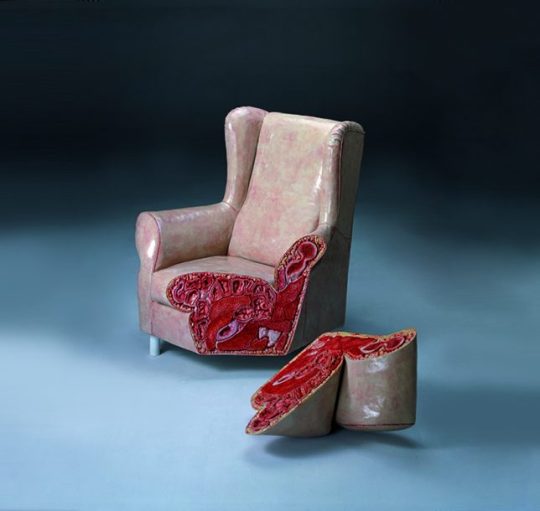

"if we were to dissect a house as we might a human cadaver, we would find ourselves able to isolate and describe its various appendages and their functions in a decidedly anatomical fashion."
ultrakill by arsi "hakita" patala // mystery flesh pit national park // anatomy by kitty horrorshow // perfect vermin by talia bob mair and angad matharoo // i want to play god by cao hui // house of leaves by mark z. danielewski
3K notes
·
View notes
Text

150 Steps up to the Sea House
Matharoo Associates
320 notes
·
View notes
Text
12.07.2023 - Recycling programming
Fangst will be our first commercial release, meaning we're charging money for it and putting it up on stores and all that stuff. But it's not our first game. Since starting a student business at Folkehøgskole (Translating to… county college?) back in 2016 we've worked on: -3 free browser games under Vertebrae -3 edutainment games on commission from Aluminiummuseet in Holmestrand -6 gamejam games each at Global Game Jam Hamar And we've spent 3-4 years working on Liquid State, a previous commercial title that had to be put on hold due to lack of funding.
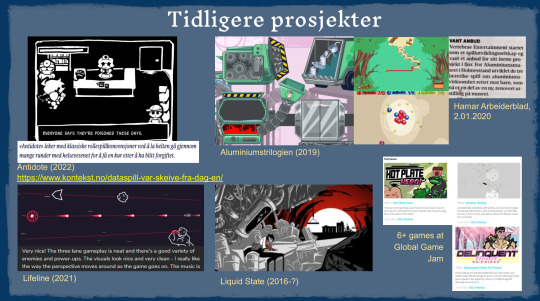
(screenshot from a presentation we sent to a funding org)
All in all that adds up to 18 and a half games. Roughly speaking. The smallest gamejam games have been opportunities to try new things and experiment with features we haven't touched before, the browser games demanded optimization to make performance good enough to run in browser, the edutainment games tested our ability to work under pressure with hard deadlines, and Liquid State gave us a clearer idea of what works and doesn't work when working on a big long term project. They have also given us a backlog of previous works to pull from when developing new games. Not just in terms of lessons learned and getting used to workflows, but also straight up pulling bits of reusable code here and there.
I'm Åge by the way. This blogpost is mainly written from my point of view as a programmer and is going to be focused on programming. But I asked Hauk and he let me know the following:
Liquid State in particular had a big impact on Fangst's animations. Liquid State used traditional animation for the main character and puppet based animation for enemies, which gave him experience with both forms of animation and a clearer idea of how to make effective individual frames with good poses and how to polish the puppets.

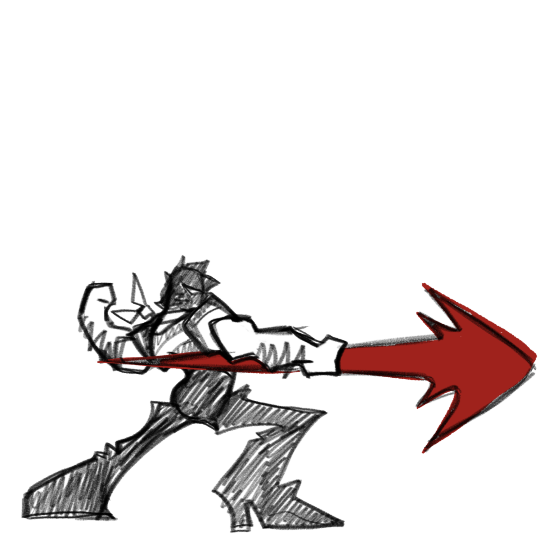
Left: Liquid State. Right: Fangst wip sketch.
As for programming, here are some examples of reused/informed code.
Stepping Stone is a 2D platformer that required somewhat competent collision and input code. It was meant to be a frustrating experience to play through, but the frustration was supposed to be built on the repetitiveness of the gameplay not on things outside of the player's control like clipping through walls or not jumping when you wanted to. I spent much of the game's development tweaking the player controls and collision code, and this got ported into Fangst as the beginning of the main character's movement code before adding some of Liquid State's player physics.

Throughout 2021 I spent some time on an unreleased project with a top down camera titled No Future Towers. I made a twitter thread about my process here. I wanted the buildings to have depth to them so I made a fake 3D effect with 2D parallax but it was kind of a pain to work with. Then I read a blogpost by Matharoo about GameMaker's built in 3D camera features. I ended up using this for the 3D effect in that project, and then reused that effect in Fangst to quickly set up depth without having to program in layer parallax manually.
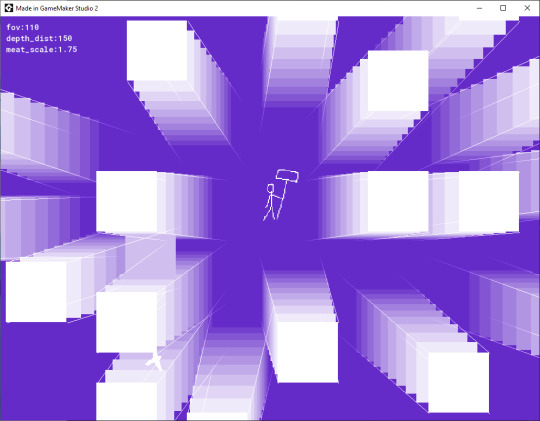

No Future Towers also had an ocean theme with a soundscape of seagulls and crashing waves and creaking wood. I threw this soundscape together with royalty free sound loops, and then ported the sounds into Fangst for some placeholder atmosphere to test the vibes before getting a sound designer on board.
Liquid State had a pretty dramatic impact on Fangst. One of the reasons we're confident in having combat in a game that has a lot of moving parts already is because we've been able to port a lot. Liquid State was a combat focused beatemup, which required things like hitboxes that can remember who they're allowed to target and who they've already collided with, spawning hitboxes at specific positions in specific frames of an animation, changing the hurtbox of the player on the fly, enemies getting stunned while in knockback, and basic enemy AI. This carries over pretty directly to Fangst, so the lucky few who got to try early demos of Liquid State back in 2017-2019 may recognize some of the overall feel.
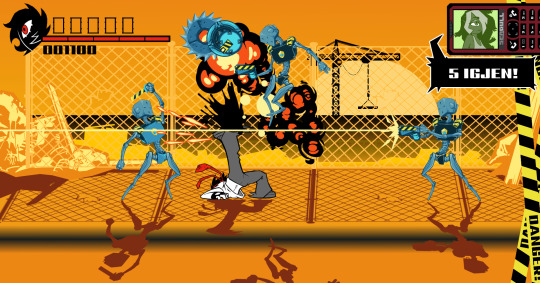
Liquid State's camera also makes a return. Most of the pain points in the previous camera blogpost were lessons I learned during Liquid State and I managed to reuse some of the equations for following the player/moving ahead of the player.
Fangst is made with GameMaker Studio 2, now formally known as just GameMaker. I previously worked with GameMaker Studio 1.4 (oh how I miss you, old sprite editor) but when GMS2 came out I knew I had to transition over to the new version eventually despite my stubbornness. GMS2 is a pretty substantial rework of the engine with a lot of changes under the hood and a different workflow, which means a lot of frustration and wasted time in the transition period. We ended up doing the switch to GMS2 when we started working on educational games for Aluminiummuseet, figuring that we'd need to overhaul our workflow anyway. Getting this pain point out of the way early made it a lot easier to continue using GMS2 for later games, and let me build up a backlog of useful GMS2 scripts for major changes like window resizing, the layer system, etc.

The Aluminiummuseet games ran on Android devices and the browser games ran on, well, the web browser. These platforms are much weaker than the average PC and have various quirks of their own, requiring a lot of consideration of how to make sure the game runs as optimally as possible and avoiding platform-specific bugs. This is evident in the games themselves, the latest games run better than the oldest games. I had to look into things like ordering sprites so they're packed on the same texture page, avoiding transparency on backgrounds when viable, and using the debugger to find out where the game loses the most performance. This has informed how I program things going forward.
And finally, Antidote had a big impact on how text is structured in-game. Antidote is a very text-heavy game with a lot of dialogue boxes, and we originally planned on having a Norwegian language option in addition to the existing English language text. This meant that the game's text had to be saved in a way that made it easy to access, because having text hard-coded in and spread out across many different objects would make it a pain to keep track of and would waste everyone's time when it was time to edit/translate it and it would also risk weird edge-cases where it pulls the wrong language's text. So I programmed it in a way where all textboxes pull dialogue from this one big script that holds all the dialogue in one place. This type of text system serves as the base for text in Fangst as well.


These were some examples of wholesome program cannibalization, and I can't wait to see what we end up cannibalizing from Fangst in the future.
We plan on coming back to the office and resuming work next week. Thanks for reading!
Love, Åge
8 notes
·
View notes
Note
Thanks beyond thanks for the reply - you'll definitely get credit (or at least a big tip if i can ever finish this project and get it out there), because you're among those I've learned from, and coming from a position of zero education and no modern programming knowledge, I can assure you: it's been difficult to piece together an education in game design with an improvised curriculum, so every little bit helps. While most people who get into this come from a programming background end up needing assistance with the art and music ends, I'm coming at it from the opposite side of the spectrum: I've been composing, recording, and engineering music since the magnetic tape era and doing digital design/animation for just as long, so it's just the coding I have to really apply myself to and make myself learn. I won't lie: it's been frustrating, trying to figure it all out by reading manuals and various youtube videos, reddit threads, and yoyo forums because while I'm able to learn the functionality of the code easily enough and there are a lot of helpful resources out there in that respect, context is everything and it can be maddening, trying to figure out how to apply what I've learned in useful or practical ways. For example, I've figured out enough to know that data structure grids can probably help me overcome my current problem with collisions (like you, I began building my 2.5d environment from that exact Matharoo video and even managed to write a pretty decent place-meeting-3d script from the ground up... until, like you, I hit my current impasse of being unable to figure out how to handle multiple collisions at once... but, unlike you, every alteration i make to my code only creates more problems), but while I understand how ds grids work, I can't figure out the proper context in which to apply them as a solution to my collision problem. So, I'm giving up and resorting to reverse engineering - when it comes to a lot of things, I can usually figure stuff out if i can just see it working under the hood, so i hope that's true for ds_grid collision implementation. I'm telling you this because I downloaded your suite of 3d scripts and intend to try and figure out how to implement them, working backward. I honestly don't mean to steal all your work, as you've been more than generous in helping people like me by sharing it in the first place, but it's hard to resist using it as a basis for my education because the physics of your project and your design process and ideas (like self-skinning objects) are so similar to mine. I can assure you, though: I won't be simply copying and pasting your functions, because I have no idea how to use them or from where to run them... it'll be trial and error (already, in trying to structure a Shaun Spaulding-style collision code (might as well start with what i know and see what works!) using your version of place_meeting_3d, I immediately encountered a "variable not defined" error in the instance-place-3d script it calls... maybe because I'm substituting noone for null, which is a variable gm doesn't appear to recognize, or maybe not... this is gonna be fun). At any rate... thank you. Sooner or later, I'll get past the physics and into the familiar territory of writing, drawing, and composing... but without your scripts, who knows how long that would take me! Shoulda gone to college... oh well.
You're welcome, anytime! Gamedev is such a multidisciplinary thing that it's a LOT to try to do all at once, whether you're coming from a programmer position and aren't good at art, or an artist who doesn't know programming yet. College helps with foundational stuff, but what you're doing (researching and learning yourself and putting it into action) is a pretty powerful method and will carry you a long way
You're right, null is a macro I created to stand for noone. Hard to break my day job coding habits haha. It sounds like you're somewhat familiar with the debugger, but I highly, highly recommend learning it more (especially breakpoints and such) for figuring out stuff like "variable not defined". The GameMaker debugger can be a little misleading at times, but it's so much easier than all the guesswork. It's improving a lot in the latest updates too!
It's been a while since I've looked at my 3D collision stuff in depth (it kind of scares me now lol), but yeah, learning how the ds_list stuff works should help. It's basically just (if I remember correctly) grabbing a list of things the object is colliding with, and then checking whether or not they match up on the z axis. I don't want to necessarily say "collide" because it's not using the built-in GM functions for z-axis collisions, but it's checking the z position, height, and seeing if either intersect.
So basically: get a list of collisions on the normal x, y coordinates as a ds_list, then loop through the list and check for intersection on the z axis. If so, there's a 3D collision!
Gamedev is no joke, but you've got the right approach and you're making great strides, keep it up!
3 notes
·
View notes
Text
A Celebration of Sportsmanship and Community at the 6th EVA Inter-Alumni Golf Tournament

Chandigarh, April 2025 — What began as a gathering of former schoolmates has now grown into one of the region’s most anticipated alumni sporting events. The 6th EVA Inter-Alumni Golf Tournament, held at the scenic Chandigarh Golf Club, brought together players, professionals, and partners from across North India, reflecting a blend of competitive spirit and enduring camaraderie.
Tournament Highlights This year’s tournament featured 18 alumni associations competing across multiple categories. Raghav Bhandari stood out with a gross score of 71, securing the title of Best Player of the Tournament. Close behind was Jaskeerat Dullet with a score of 73 (BB6), earning the Runner-Up position.
In the Best Nett category, Rao Birender Singh took the top spot with 39 points, followed closely by Ravibir Singh—also with 39 points but edged out on countback.
Women Take the Lead Women golfers showcased their talent and determination. Rabbiya Gill claimed the Best Nett award with 39 points. Mani Chander secured second place, and standout moments included Ashi Jain’s Longest Drive and Hanima Grewal’s precision in Nearest to the Pin.
Team Spirit and Technical Excellence The team events reflected a fine balance of strategy and synergy.
Best Team (Nett): Arvind Bajaj, Maj R.S. Virk, and Mantegveer Singh (OYA)
Runner-Up Team: Raghav Bhandari, Dilsher Grewal, Sahil Sahgal (SJOBA)
Second Runner-Up: Saurabh Mangat, Rabbiya Gill, and Varun Rao (EVA)
Individual achievements also added to the excitement:
Longest Drive: Angad Matharoo (315 yards)
Nearest to the Pin: Ankit Ahuja (8 feet 8 inches)
A Moment of Appreciation and Presence The tournament was more than just a leaderboard of scores—it was about recognizing those who contribute to the spirit of collaboration. Mr. Kunal Bansal, Director and CFO of GMI Infra, presented tokens of appreciation to key participants. His presence symbolized the alignment of leadership with purpose, showcasing how values like community, excellence, and growth extend beyond the boardroom and onto the fairway.
A Gathering of Esteemed Guests The event was attended by dignitaries including Justice Anupinder Singh Grewal, Justice Amit Rawal, Golf Club President Ravi Bir Singh, and former Advocate General of Punjab, Gurminder Singh. Their presence underscored the social and cultural significance of the tournament.
Leadership That Builds Beyond Structures Under the guidance of Kunal Bansal, GMI Infra continues to invest in the social fabric of the region while driving forward infrastructure development in Mohali and beyond. From urban planning to community engagement, their approach is rooted in values of trust, inclusivity, and long-term vision—values reflected in gatherings like this one.
Presented with the support of GMI Infra
To explore GMI Infra’s ongoing initiatives across Northern India, visit gmiinfra.com
For inquiries: 📞 +91 82976 70000 📧 [email protected] 📍 SCO 2A, First Floor, Madhya Marg, Sector 7-C, Chandigarh – 160019
0 notes
Text
Sandeep Marwah Inspires School Children with Motivational Speech on Atmanirbhar Bharat

Sandeep Marwah Inspires School Children with Motivational Speech on Atmanirbhar Bharat
Delhi : Dr. Sandeep Marwah, President of Marwah Studios and Chancellor of AAFT University, addressed an enthusiastic gathering of school children at Prudence School, Ashok Vihar. The event was graced by the presence of Dr. C. B. Mishra, Principal of Prudence School, and Dr. G. S. Matharoo, Chairman of the Prudence Group of Schools.
Dr. Marwah captivated the audience with an inspiring speech emphasizing the essence of “Atmanirbhar Bharat” (self-reliant India). He expressed heartfelt gratitude to the Honorable Prime Minister of India for introducing this profound concept to the nation.
“Being Atmanirbhar means not just self-reliance but also fostering confidence, determination, and resilience within ourselves,” Dr. Marwah explained to the students. He encouraged them to embrace this philosophy in their studies and personal development, emphasizing that the youth play a crucial role in shaping India’s future.
The event was a memorable experience for the students, leaving them motivated to strive for excellence and contribute to the nation’s progress. Dr. Marwah’s inspiring words resonated deeply, instilling a sense of pride and responsibility among the young audience.
Dr. G. S. Matharoo lauded Dr. Marwah’s vision and contribution to education and media, noting the significance of such interactions in shaping the next generation of leaders.
This motivational session marks yet another milestone in Dr. Marwah’s journey of inspiring the youth and promoting the ideals of self-reliance and nation-building.
#Sandeep Marwah Inspires School Children with Motivational Speech on Atmanirbhar Bharat#Dr. Sandeep Marwah President of AAFT
0 notes
Text
#best dermatologist in ludhiana#chemical peeling in ludhiana#acne treatment in ludhiana#microneedling in ludhiana
0 notes
Text
Top 7 Architectural Firm In Ahmedabad

Ahmedabad, a city renowned for its rich cultural heritage and thriving urban landscape, hosts a diverse array of architectural firms that contribute significantly to the city's aesthetic evolution. The firm's influence extends beyond mere structures, delving into the realms of urban planning and design, shaping the cityscape with a blend of contemporary vision and respect for tradition. However, I can provide you with a list of architectural firms in Ahmedabad that have been recognized for their work.
1. NDA Projects, is known as leading architectural firm in Ahmedabad, pioneers innovative design solutions. Their expertise encompasses a diverse range of projects, from residential to commercial spaces. With a commitment to aesthetic excellence and functionality, NDA Projects reshapes urban landscapes with visionary architectural brilliance.
2. Apurva Amin Architects, a design powerhouse in Ahmedabad, embodies elegance and sustainability. Renowned for contemporary and eco-friendly designs, they craft spaces that harmonize aesthetics with functionality, leaving an indelible mark on the architectural canvas.
3. Bimal Patel & Associates, based in Ahmedabad, pioneers urban planning and design. Led by Bimal Patel, the firm excels in creating architectural marvels that seamlessly integrate modernity with cultural essence, shaping the city's landscape with innovative precision.
4. Kamal Mangaldas & Associates, an architectural force in Ahmedabad, is celebrated for its intricate designs and meticulous attention to detail. Their innovative approach transforms spaces, merging tradition with contemporary flair, leaving an enduring imprint on the architectural horizon.
5. Matharoo Associates, a beacon of modern architecture in Ahmedabad, redefines spaces with avant-garde designs. Known for experimental brilliance, they blend functionality with artistry, creating structures that push the boundaries of architectural innovation.
6. Aakruti Architects, a design force in Ahmedabad, specializes in creating timeless spaces. Their portfolio reflects a harmonious blend of modernity and traditional aesthetics, delivering innovative architectural solutions that resonate with both functionality and visual appeal.
7. Vastu-Shilpa Foundation, based in Ahmedabad, founded by Pritzker laureate Balkrishna Doshi, is a beacon of architectural brilliance. Known for sustainable designs, the firm harmonizes tradition and modernity, reshaping environments with visionary expertise.
#architecture#design#architectural#architectural design#interior design#interior decorating#architectural firm#architecture firm#interior design firm
1 note
·
View note
Photo
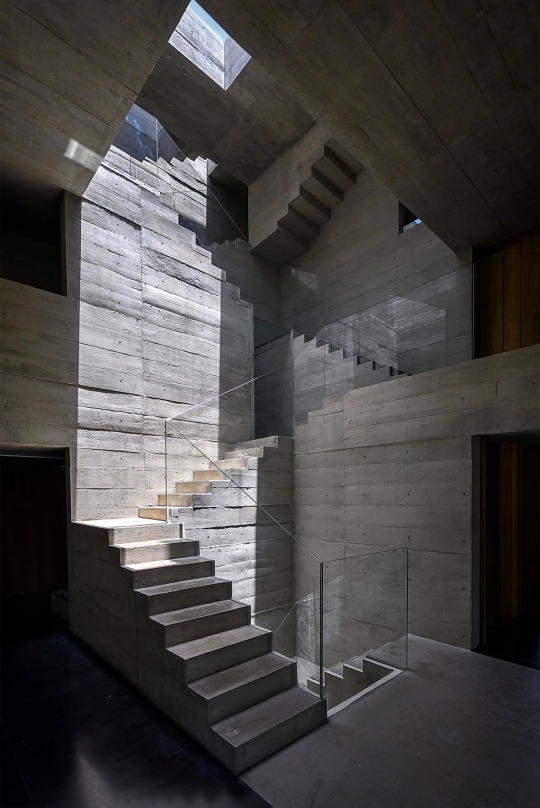
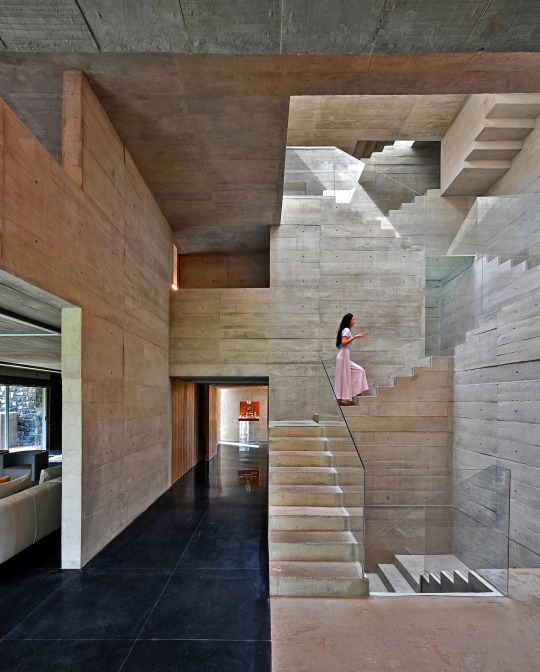
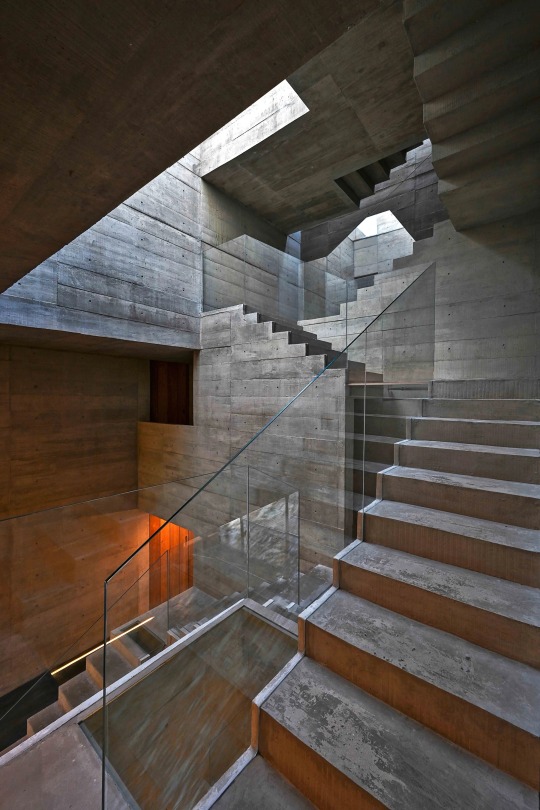
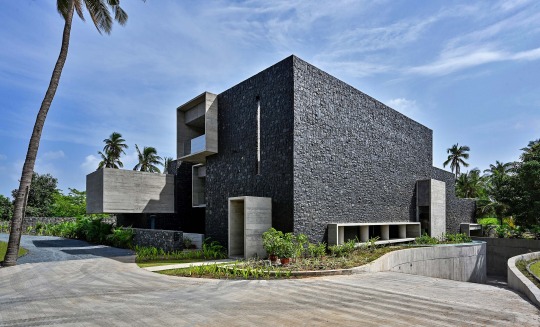

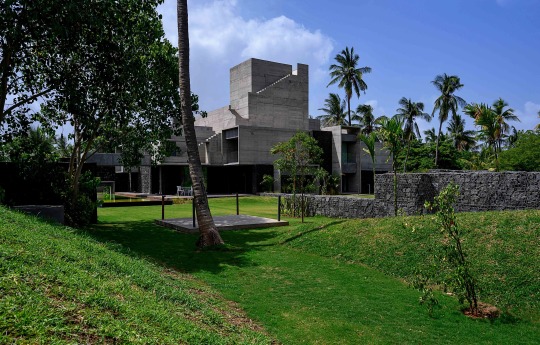
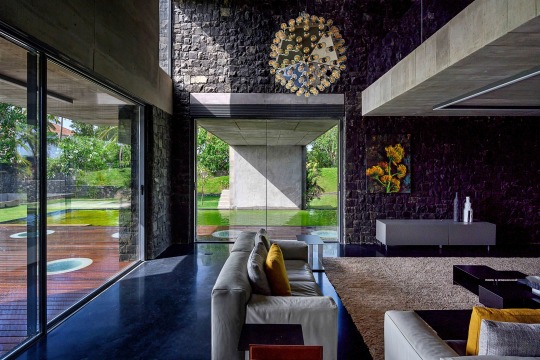
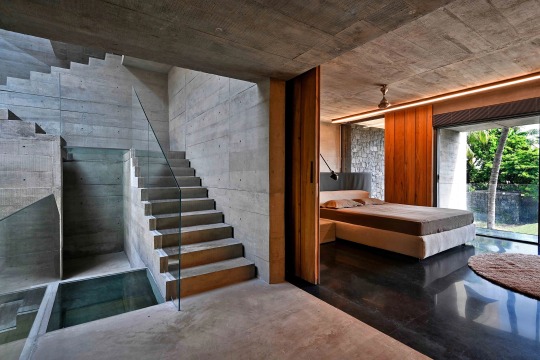
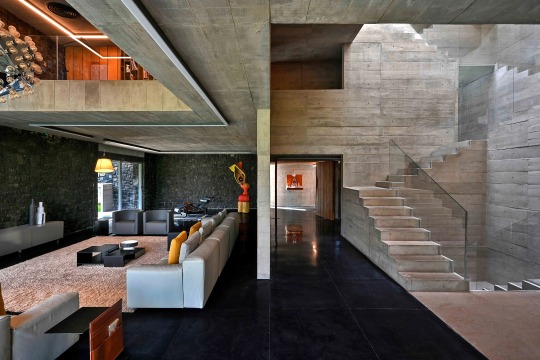

”Up to the Sea,” Surat, India,
Matharoo Associates
#art#design#architecture#interiors#india#surat#matharoo associates#staircase#stairwell#stairway#concrete#sculpture#stairsdesign#luxuryhouses#luxuryhomes#luxurylifestyle#Staircases#grand staircase#balustrades#handrail
237 notes
·
View notes
Text
Lower Primary Maths Worksheets Australia
Explore engaging primary maths worksheets by Matharoo, designed according to the Australian curriculum. These worksheets focus on key skills like addition, subtraction, and problem-solving, incorporating real-world scenarios to enhance student understanding. Perfect for teachers and parents looking for effective lower primary math resources.
0 notes
Text

150 Steps up to the Sea House
Matharoo Associates
158 notes
·
View notes
Photo

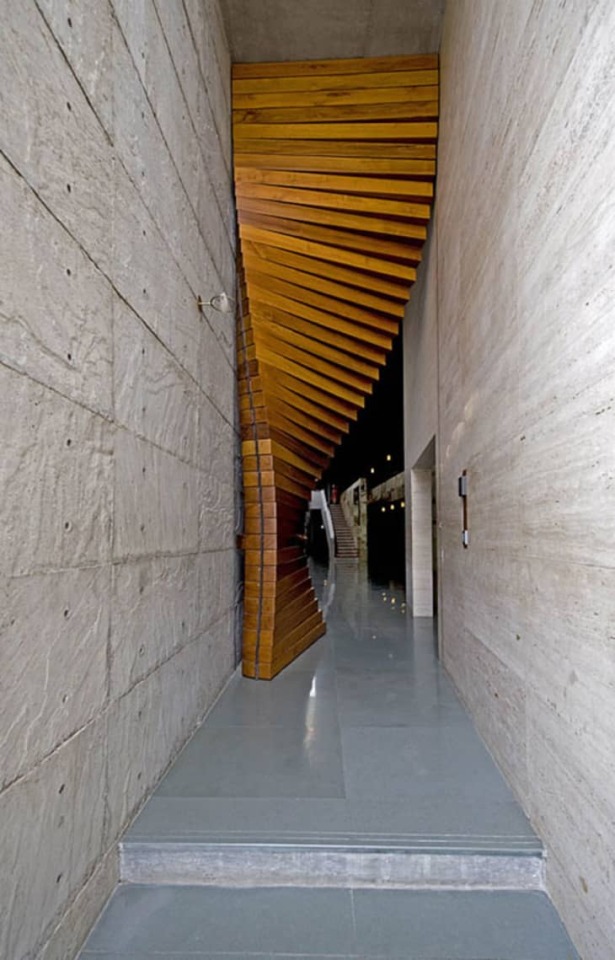
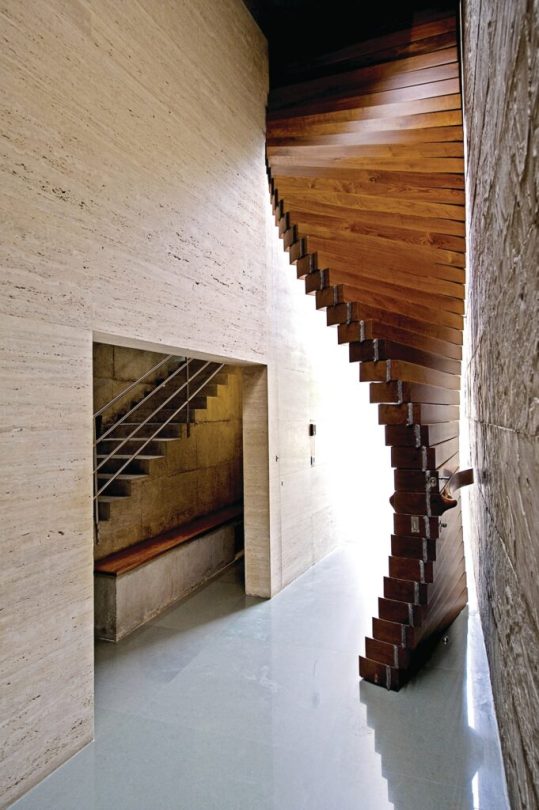
Curtain Door by Matharoo Associates, Surat, India,
Constructed out of 40 pieces of thick Burma teak and set between concrete walls. When pushed open, the wood feathers out into a massive curve.
The sculptural entryway includes 160 pulleys, 80 ball bearings, one wire rope and a hidden counterweight
Photography by Dinesh Mehta
#art#design#architecture#curtain door#surat#india#matharoo associates#teak#doorway#sculpture#unique doors#doors#heavensdoorways#doorsdesign#portal
10 notes
·
View notes
