#marker organizer
Explore tagged Tumblr posts
Visit Tumblr Blog
Explore Tumblr blogs with no restrictions, modern design and the best experience.
Last Seen Tumblr Blogs


Fun Fact
Tumblr has been banned in Indonesia for providing people with access to pornographic content.
Text
How NOT to DIY Marker Storage

Over the past couple of weeks, I put up a total of 4 image posts on my Ko-fi documenting a journey in trying to DIY a new storage solution for my Ohuhu markers.
I already had more to say about the process than would fit in the image captions, and was already sort of planning ahead to compile the information in a more digestible format for a singular public reveal [the individual posts were Ko-fi-Members-only since in the moment they were more like "behind the scenes" content and I usually reserve that kind of thing for members anyway] and considering how things turned out, I think ultimately a long blog post like this compiling the images and properly fleshing out the story only makes sense...
So let's go ahead and start by recapping the first post I made:


Original Caption:
Hey it's the project that's been getting the bulk of my attention this week! Some people over on r/Ohuhu figured out that "mug organizers" work well & similarly to the original Ohuhu markers bags for storage, & after some research, my brain caterpillars insisted I could probably DIY something structurally similar from the oodles of cardboard boxes we have around the house and save a whole $20. Pro Tip: Don't listen to the caterpillars, just buy the mug organizer. 😅 I'm going to finish and use what I started because I'm in WAY too deep now, but I have definitely put more than $20 worth of effort into this thing already...and I'm not even done yet. 🙃 And for the record, I will share more info/make a blogpost about how I put this thing together once it's finished, I just had too much to say for the image caption length and the sooner I can get back to work (mostly just need to finish painting and then any last-minute/decorative touches after that now) the sooner it will BE finished!
Oh if only Past Mystic knew! So a little more background on this situation that I didn't have room to explain in the post caption:
For those that don't know, prior to this DIY adventure, I kept my Ohuhu markers in their original bags, but kept the bags turned on their sides and used a honeycomb system developed by Reddit User Spare-Cartoonist6276 [See her original post here] to give each marker an individual slot within the compartments of the bags.
That setup has worked wonderfully for me, but as I already had three bags (216 + 104 + Skin Tones) and then recently added a fourth (Japanese 80 set), stacking the bags and searching between them for markers was getting a bit unwieldy for me. I didn't want to give up the honeycombs, but I at least needed one place to unite them all.
So when people started posting about the mug organizers, that seemed like the perfect solution. At first glance, they look like they're constructed identically to the original Ohuhu bags, just with a much larger 12 compartments instead of the 320 set's maximum of 6. So one mug organizer could easily hold a full 320 set with plenty of room left over, which sounded exactly like what I needed.
But the plan from the beginning, even if I had gone with a mug organizer, was always to end up modifying the honeycombs I'd already made (and making more as necessary) to still give each marker it's own slot, but have just one container full of Ohuhu markers instead of 3-4. I would honestly still agree with Past Mystic that listening to the brain catapillers that kept insisting I should not spend additional money on marker storage was probably a mistake, but I also know now that Past Mystic was admittedly overly optimistic about the $20 mug organizer being the answer. We'll get to "why, exactly" later.
Anyway. By the time I made Post 1, I had already spent a few days measuring boxes, picking one out, and then hours measuring and cutting up other boxes to make the dividers for the compartments. [And as you can see in the photos, I had already started painting the dividers, which I'll elaborate on a bit more for Post 2.]
And while I do stand by my original sentiment of "don't do this to yourself," if you for some reason have a masochist streak in you that is tied to DIY'ing things rather than spending money (like I apparently have if this project is any evidence), I will very reluctantly tell you:
I picked a based box based on the dimensions of the mug organizers, hoping to end up with similar "how many markers will this hold" estimates: The main mug organizer I was looking at was roughly 16" by 13", and 6" deep. The box I picked out is approximately 17 inches on the longest side, 14 inches on the short side, and closer to 5" deep. [6" would've been more ideal, but anything over 4" would've worked so I decided to not be too picky about that.]
I then made two long divider inserts that were just a little smaller than the 17" length with 4 evenly-spaced slits approximately 2.5" deep to fit with the smaller dividers I needed to make. And those smaller dividers, naturally, are just a little bit shorter than the 14" width of the box, also with 3 evenly-spaced slits. [And you can see one of the smaller dividers that I cut the slits just slightly too big laying on the box on in the first two photos of that first post, Sharpie included for scale.]
And that leads us fairly naturally to the second post in this journey:


Original Caption:
If you'll excuse the bad artificial lighting, you Sparklers can see I was able to finishing painting all of the cardboard black and added some galaxy-print Duck Tape to the front-facing edges, which serves and both decoration and a little extra support/protection for said edges. And today, though not pictured, I also added some felt "feet" to the back and a full layer of felt along the bottom so hopefully it won't have issues sliding or bumping up against other things. The journey isn't quite over yet, but we're so much closer now! The box/organizer itself is finished now, but the next step is to see how much modification the paper honeycombs I already use to give the marker individual slots will need to fit snuggly in these compartments. It probably won't be *that* much, but it will unfortunately be time-consuming. 😅
Once I had finished cutting up all of the dividers, I did my best to remove any tape or packing labels that might resist a paint job, then "sanded" any remnants that wouldn't come off with a nail file. [Because the only sandpaper I own is tiny, meant for cleaning/"sharpening" blender stumps and I did not want to buy sandpaper just for this purpose, but I did have a thick, brand-new nail file on-hand.]
Then I had to glue a couple of pieces of cardboard in place on the base box. With the tape from the back seam gone, I needed to glue the back flaps down, and then I had to fill some gaps left by the flaps with extra cardboard pieces and glue those in place, too. You can see a thinner extra panel on the inside of the box in the first picture, and later on you'll see a super-thin strip down the back of the box.
Then I got to spend several hours and 1.2 bottles of black craft paint...Well, painting everything.
I went with black because I had some extra bottles of both it and white craft paint on-hand that I picked up for cheap without a project in mind, and I figured black would both cover better and not show stains/wear as much over time. And while I wasn't totally sure I'd be taping any edges yet, I also had more tape options that would match the black rather than the white.
I did test the paint on a cardboard scrap first before I committed, though. I was pleasantly surprised that it did in fact cover amazingly—It sank seamlessly into the cardboard with one thin coat and will only rub off with harsh, deliberate effort, even only a few minutes after drying. [It also dried pretty fast, which was a bonus.]
And a really unintended bonus was that even though the black paint isn't supposed to be "chalkboard paint," it does leave a vaguely chalkbord-ish kind of texture on the cardboard.
On the flip side, it didn't totally hide some of the textural imperfections where I pulled tape off, but I more or less expected that.
But then, as the original post says and as you can see from the photos, after attempting to paint the very edges of the cardboard didn't gussy them up as much as I had hoped, I finished them off with some galaxy Duck Tape (brand name, not a typo) I had. I also considered a different decorative duct tape, but you'll see that in a different way a bit later.
I also took this post/these photos as an opportunity to better show the dividers in full + the extra padding/support piece of cardboard I made to slide into the bottom of the box, and what the dividers look like when slotted together, but outside of the box.
The photos also show something a little bit better than I thought I could describe it without a visual aid, which is why I didn't mention it before: To get the dividers to slot together properly, you cut the slots on opposite sides. So the slots cut into the "back" of the two long dividers, and they cut into the "front" of the three smaller ones.
I'm not 100% sure if it matters which set of dividers got which cuts as long as they fit together properly, but I thought it might look better if the long dividers had the smooth edge in front, so that's why I went that way.
And you'll see the felt "feet" on the back of the box mentioned in that post in a photo in a bit, but I did admittedly still neglect to take a photo of the felt along the bottom. But I promise you're really not missing much if you already know what a flat piece of felt looks like! Besides, the felt was just an optional extra step that I took, as I said, to get ahead of any issues with the box scraping up against other things. If for some reason you're crazy enough to try making one of these yourself, you don't have to do that.
Past-Mystic was also so very naïvely optimistic that the box was "done" at this stage and next up would be figuring out exactly how much modification the honeycombs were going to need to fit comfortably in each compartment.
In some ways I'm jumping ahead a bit, but I didn't mention this in any of the previous posts even though I made the decision between Posts 2 and 3, so I'll go ahead and explain here:
After figuring out how the existing honeycombs would need to change (adding onto them) and how many wholly new honeycomb pieces I'd need to make, I did got ahead and have my Cricut cut the necessary cardstock pieces I'd need...But I also recognized that even at my fastest, that modification process would take a while and I didn't want to wait that long to get the markers in the box.
So I made the decision to go ahead and make some flat dividers so that I could go ahead and put the markers in the box in the meantime and they'd at least be divided up by rows of 6-7. Lots of people use dividers like that anyway instead of going the individual slot route, so I figured I could live with it temporarily.
That means I got to spend another few hours cutting up some different, thinner cardboard boxes (like cereal boxes) to make said dividers. Technically, I could have gotten the Cricut to either do that or cut some out of cardstock, but we had the boxes, I didn't feel like using more cardstock when I already needed a good chunk for the honeycomb modifications, and honestly for as much effort as it would have taken to cut the boxes into Cricut-Mat-friendly pieces, make the file for the Cricut, and babysit while the Cricut did the cutting, it made about as much sense to just do that part by hand anyway.
That said, I did not opt to try and paint the temporary dividers mostly because all the boxes have glossy-ish printing on one side and they're thin enough I did not see trying to remove that going well and trying to "sand" them all sounded like actual torture...And also, keyword: temporary.
So when we get to the finished photos, you may see some of the color from the unpainted temporary dividers here and there. If that bothers you...I'm sorry, I guess?
With that said, once the temporary dividers were made, then came what I expected to be the moment of truth: Actually putting the markers in the box.
And well, if you saw Post 3 when it went up, you already know how that went, but for those who didn't...

Original Caption:
Well Sparklers, I started this journey hoping to save a few dollars on marker storage & was hoping Part 3 would be a nice shot of the DIY organizer in action...But instead, as you can see last night while attempting to move my markers into it, before I could even get all of the compartments filled, one of the end compartment supports [divders] collapsed under the weight of the markers. 💔 I'll explain a bit more in the blogpost I intend to compile (get the full saga in one place!) but TL;DR, I think I'm about ready to admit defeat on the DIY route and just buy some storage like I probably should have in the first place. 😅 *Do Note: The organizer is laying on its "back" in this photo so that markers are upright, which is why some of the markers towards the top look like they're levitating. I had it standing on end so the markers lay horizontal (the way it was intended to be used) while I was filling it, but when the support collapsed laying it down before the markers in that section could get too scattered was the best option. And the photo isn't a great one anyway because I was naturally very upset at this turn of events and just quickly snapped one for documentation purposes, then scrambled to get the markers back in their original bags and horizontal again so I could put everything away and get some space from the situation. 😓
This time, the photo and the original caption actually cover most of what actually happened, but I did want to clarify a few things.
Namely: I had been a little bit wary that the main supporting dividers, especially on the ends, might be prone to doing this, because I had seen as much as more community posts about the mug organizers came in.
I would consider that a key flaw of the mug organizers, really. As far as I can tell, none of the easily available ones have the ends of the dividers sewn in place, unlike the Ohuhu marker bags. Some of the cheaper ones even use plain, thin (white) cardboard for the dividers, so the potential for collapsing like this is even higher than my DIY cardboard version.
However, after some further consideration, I made the assumption that collapse wouldn't be as much of an issue if the compartments were completely full, because the weight of the markers above would fall on the markers below, etc.
Allow me to make this abundantly clear: WRONG.
BAD.
NO.
Past Mystic made a BIG mistake in thinking that!
I was trying to be "smart" and had started filling the box more or less upside-down, thinking that I'd fill the lower compartments up and gravity would handle the rest when I turned the box rightside-up.
Clearly, gravity did not wait for me. 🙃
All that work. All that effort, all that time, and for nothing, because it didn't work.
It happened so suddenly, and I was so upset...But before I could walk away and get some space from the situation, I couldn't just leave all the markers I'd moved in the box. I had to sit there and move them all back. So rubbing the salt all the way, deep into my wounded pride.
Technically, I did sleep on it, but the next day I was entirely 100% ready to just buy some marker storage and be done with this "D. I. Why??"...But then I actually tried to price-shop around for options.
If you have a smaller amount of markers to store, there are actually plenty of reasonably priced options ($30 and under) available to choose from and it's mostly a matter of picking your preferred format: Fabric-y travel case, wood or acrylic shelves, plastic trays, etc.
But uh, let me save you all a few hours and some heartache and just let you all know right now that if you're looking to store nearly 400 markers, you're going to have to be prepared to spend $50-$70 minimum.
I thought I was being extremely generous and "splurging" when I wasn't having any luck in the $20-$30 range and decided I could spend as much as $40...And I can't help but feel like maybe a few years ago that would have been a reasonable budget, but whether it ever was or not, that's not the reality we're currently living in.
I even went pretty far off the beaten path and was looking deeply into other DIY options, hoping to find something where maybe I'd have to buy some supplies for $20-$30 but would have a much easier time putting things together and still come out ahead...But again, for the amount of markers I needed to store, I kept coming up short in various ways.
Now, with that said, I would like to take this opportunity call attention to one DIY option I found that I was genuinely impressed with the ingenuity of and I would maybe still be open to trying with a smaller marker assortment in the future...But I wasn't brave enough to try it for my Ohuhus this time around because I am big-time concerned it wouldn't work well for this many markers (especially with one epic failure under my belt already):
youtube
Anyway. I would be glad to talk at length about the landscape of the "marker storage market" (and DIY options) some other time if you Sparklers would be interested in such ramblings, but for the here and now, the moral of my window-shopping: I (somehow, very likely incorrectly) did not feel like I had made $70+ worth of effort with my DIY marker box and still could not justify throwing $70+ at the problem no matter how badly I wanted to just be done and move on...So I went back to brainstorming what modifications I could do to make the box work without having to start over completely.
I toyed with a few possibilities and I'm reasonably sure there are probably a couple of other solutions that could have also worked, but I was looking for an intersection of "make it work, but also let's limit how long this modification is going to take," because in the event that it still didn't work, I wanted to limit how much additional time I would be wasting.
That leads us to one of the images for Post 4 in the saga, but I'm going to go a little out of order and go ahead and show that image to give a better look at the fix I went with for context, then we'll recap and discuss Post 4 properly:
[Possible Trypophobia Warning?]

I decided the best thing to do both in terms of time and the materials I had was to make 3-sided "frames" to give each box compartment additional support to hold up the market weight.
4-sided frames or making straight up mini-boxes that fit in each compartment were also things I considered (and might have been even more secure still, if done right), but either of those would've required a lot more cardboard cutting and potentially having to find a way to securely "stitch" multiple pieces of cardboard together, meanwhile I had a few scrap pieces of cardboard already pretty close to the size(s) I needed ready and cutting a few more wouldn't be that complicated.
Also to be clear, I am fairly certain that the center column of compartments didn't really need the extra frames because they were already really solid, and the two top corners didn't necessarily need them either [because I don't plan on sitting anything terribly heavy on top of the whole box], but I knew it would look weird if I made them for some compartments but not others, so every compartment got one anyway.
Each of the frames, size-wise, is actually just a little bit shorter than the length of the shorter dividers. I can't give an exact measurement both because I didn't bother, but also because each compartment (and therefore each frame) is just slightly off by like 1/4 of an inch in one direction or the other (or both), so I scored and folded each piece to fit the top side of each compartment, then trimed the "legs" of each frame little by little until they fit properly in the compartment.
Related: If you have no idea how to get things thicker than paper to fold easily: I've done that before by using the back/dull side of an X-acto knife, but in some tests found either that was too harsh or I was too heavy-handed to do that here without just cutting into the cardboard, so I ended up using a Cricut scoring tool by just...holding it like a pencil. A bone folder would probably also work, but I don't have one of those. [I had the scoring tool on-hand already for my actual Cricut machine.]
I then repeated the process of painting each cardboard pieces with black paint so they'd blend into the full box, and I taped the edges that would face outwards. Only this time, instead of the galaxy tape, I used a rainbow-leopard print [very Lisa Frank-esque] mostly because I didn't want to totally use up the galaxy tape, but also I knew when folded you'd mostly just see blue and black on the edges of the leopard tape and thought that could be a fun extra pop of color. And as it turns out, the little bit of rainbow hiding just inside the compartment edges is kinda fun in its own way.
Also: I didn't take any pictures of this specifically, but if anybody cares, after everything was a painted, I did label all of the removable cardboard pieces (including the new support frames) with silver Sharpie in discreet places, just to try and future-proof the whole thing in case I ever need to take it apart or maybe replace specific pieces or something.
Now, if you're wondering why I did make a post just about the frames and why I held off on the reveal in this compilation, it's because at the time, while I felt odds were good the frames would work, that previous failure was haunting me and I was, frankly, terrified either they wouldn't work after all or that I'd start putting things together again and discover some other fatal flaw I'd missed.
So I procrastinated a bit by double-checking to see how the new frames might affect how the honeycombs would fit in the box, and trying correct some bowing along the sides of the exterior box by tying some yarn tightly around the box and letting it sit like that overnight.
And here's a related visual that I thought about including in Post 4 but ultimately decided not to:

You can see one of the corrective yarn strings peeking in at the bottom, but the main point of this photo was a reminder to myself of how the honeycombs should be arranged when the time comes.
Specifically, the pinks/purples that take up 6 of the columns are actually in one "complete" 36-cell honeycomb that currently lives in the my 216 set bag, and that last column with a blender, black, and the Honolulu fluorescent colors is a "standalone" column that was made from "leftover" honeycomb pieces.
Before the support frames were added, I was already expecting that I would be able to get a 36-cell section in each compartment plus an additional column pretty much just like this (based on estimates from the mug organizer posts I'd been seeing), and early tests told me that would work with a little bit of breathing room. So each compartment would hold 42 markers, and I'd end up with a box that could hold a whopping 504 markers total.
Another test was necessary once the frames were added because I needed to see if having that extra layer of cardboard would only use up the breathing room or if it would make the fit too tight to get a whole extra column in. It wouldn't be the end of the world if it did, because I'd still be able to get 432 markers in there and that would still hold all the markers I needed with some space left over, it just wouldn't have as much room for new additions.
As you can see from the photo, I do think I'll still be able to get an extra column in for at least 10 out of the 12 compartments; The top right and bottom left corners are the tightest and may have to settle for the original 36-cell structures, but that would only be a loss of 12 marker spaces (492).
Granted, the frames do take up enough space that only the staggered nature of the honeycombs will make it possible to get 42 markers in each one. As you'll see in a moment, with the flat temporary dividers, there just isn't quite enough room to fit a whole extra marker in each row, so for now the compartments are only holding 36 markers each anyway.
Once those two tasks were done, I was out of ways directly related to the box to procrastinate, so it was time for the moment of truth, which brings us properly to the fourth and final post:


Original Caption:
Sooo....After what happened last in this saga, I really was prepared to give up & just buy mrker storage...until I actually looked & realized how much it would cost to get what I wanted. That price tag said: "Maybe you should give the DIY route one more try..." So I ended up. making some extra cardboard "frames" for support, visible in unpainted-form in Photo 5, and so far they seem to be doing the trick! There's a bit more to the story, but I do still plan on compiling the details in a full blogpost to properly explain. For now, the point is I think I have FINALLY come out the other side of this and I'm thrilled! ✨
For this second filling of the box, instead of turning the whole thing upside down so I could fill it "in order," I opted instead to just start at the bottom and fill it "backwards" so the weight would be increased from the bottom-up. It might not have mattered at this point, but I didn't want to take any chances of my box-filling strategy having a negative impact on the final result if I could help it.
And ultimately, I'm kinda glad I did it that way because with 36 markers per compartment, once I got through my 216 and 104 sets, I had room for just 3 markers in that first compartment of the second row left, and it's probably better to have that space near the top and less affected by gravity that it would have been in the bottom corner. You can see I opted to fill those 3 slots with two extra blenders and an extra black, which also means I've got black and a blender acting more or less as "bookends" for the 320 range.
That probably begs the question though about what's going on with those two compartments full of markers in the first row, yeah?
The very first compartment is my entire Old 24 Skin Tone set (note the presence of GY163) 6 extra Skin Tone colors I had on-hand, plus a row on top of Arteza Everblends (which we'll come back to), and the second compartment is all of the other "exclusive" Ohuhu colors I was missing (+ the blender from the Japanese 80 set)...And then another row of Arteza Everblends on top (which again, we'll come back to).
Basically, until I can get the honeycombs ready, I wanted to have both of those compartments full to limit how much the markers can move around on their own. The "extra" Ohuhu colors on their own would've only filled up one compartment and then a partial one, and it's the potential for movement in the partially-filled one I was worried about.
Otherwise, I really don't need the duplicates from the 24 set in there (they can live in the 80 set bag with those duplicates), and long-term I think I would actually want to try and integrate the exclusives so that all of the markers are in order together following my swatch chart.
The Artezas (told ya we'd come back to them!) are there both to fill the space and also because I'd like to use them more and that just isn't going to happen if I leave them in the cardboard box they came in. So even once I get the honeycombs sorted out the Artezas will probably get to stay, at least for a while. [There should certainly be room for them!]
Now, there aren't any markers in that last top compartment, but there is something there, so here's an additional photo of that, and let's talk about it:

Oh, and while we're at it, there's your better look at the leopard print tape on the frame pieces. 😜
Sticking out of the bottom of this compartment are the final temporary dividers that I would use if it was also filled with markers, then on the side there's a small folded piece of paper with a very simple diagram I drew as a very simple guide for where each of the frame pieces go if I ever have to take them out and put them back, and then the most noticeable thing: That little zipper case.
Once upon a time, that was a travel manicure toolkit, but the nail tools have long since been lost. Currently, I'm using it to hold a bunch of very small swatch cards—One for each Ohuhu color I own.
Those cards are for the very long-term ongoing project I have of sorting out my own "proper color order" for the markers. The zipper case is where they live when I'm not using them, and it just worked out really well that the case fits right into the width of the box compartments.
It's not necessary for the case to be there—It was doing just fine on a shelf with some other art stuff—and it probably won't stay there forever, but I thought it would be kind of nice to let it at least temporary live with the markers since that compartment was mostly empty anyway.
And from the full photos you may also notice I also decided to take advantage of what bowing is still on the right-hand side of the box:

By wedging the swatch cards from the 216 and 104 sets in there!
I use my own chart more for making art, but it's nice to have these cards on-hand as quick reference for what comes in those specific sets.
And then just to make sure I have all my bases covered: The last photo from Post 4 specifically shows the box in place near my desk, it's permanent home. And we can see that where it sits, I have space in front to use as a little "catch all" area for other things I might need to have within quick-reach but there isn't room on the desk for them. [The other Post 4 photos were taken in another room that had better window light on the day the photos were taken.]
And now that I think I've explained everything that's in the box (and in front of it) so hopefully you won't be too busy wondering about that to focus on anything else...
I must point out: I was still nervous the entire time I was filling the box that it was going to spectacularly fail at any moment. And since the timing worked out that I finished filling it up right before bed, I also got to turn in for the night worrying that I was going to wake up to some kind of horrid noise and markers all over the floor.
Good News: That didn't happen! 🎉
It's also now been a few days with the box full-up and it seems like it's going to hold, at least for a while!
I do expect if left as-is for too long that some of the cardboard will start to bow from the weight of the markers (as do many of the DIY foamboard marker cases I've seen), but if that's the worst thing that happens, I can live with that. And I also think if I can get the honeycombs ready before that happens, the tighter fit on those might help counter/prevent at least some of it. But only time will tell for sure.
But the point is: The box is holding up so far, and so I feel more comfortable letting myself be happy that it is actually DONE! 🎉
It does just look and feel so nice to have all the markers contained in one home, and the box fits pretty much exactly as I expected in the same spot where I was keeping the marker bags before. It's roughly the same height as the 216, 104, and 80 set bags were stacked together, it's just a little bit wider than the 216 bag was (maybe two inches more?).
And while it's not technically as portable as the bags because it doesn't close up or have handles, I was able to carry it around the house to a different room to take photos without spilling markers everywhere.
I think I could potentially make a lid/cover and maybe some kind of removable carry strap in the future if gaining back that portability for this many markers really mattered to me, but after everything I've already been through to get here, I'm perfectly content with the box as-is.
Speaking of: I would like to call extra attention to the title and the fact that this post is not written at all like a tutorial for how to make one of these boxes yourself.
Remember, even back when I made Post 1, I was already saying a variation of "Don't do this to yourself," and the main reason I continued on at that point—even before the collapse that had me ready to quit—was because I felt I was already in too deep and had to see the project through.
And I said at the beginning of this post, I stand by that sentiment. Even going in with the knowledge of "you'll have to make extra frames to support the marker weight," I think generally the trouble of sourcing and preparing all of the cardboard to get to that point is more trouble than it's really going to be worth for a lot of people.
Especially when you consider that I kind of lucked out that we had a box close to the proportions I wanted already in the Cardboard Hoard.
I don't even want to know what the alternate reality looks like where I would have had to make the base box itself out of other boxes. 😖
So while I can't in good conscience say "just save up and spend $70+ on storage," [because, as we discussed, even at my very lowest in this adventure, I still couldn't justify doing that myself,] I will at least say: "Spend $20-$30 on a mug organizer" and then optionally "spend a few hours making cardboard frames to give it the support it needs."
Had I known ahead of time how much trouble I was going to have in this process, that's what I would have done. I probably could've been halfway through the honeycomb modifications by now.
What will I do if/when I outgrow the box I've made? Right now, I don't know—That's Future Mystic's problem. But also, hopefully, that question won't need answering for a while. [Especially if I can in fact squeeze 504 markers in this thing with the honeycombs.]
So this blogpost exists as:
A cautionary tale
Personal validation that I did it
A very loose point of reference so that if you do feel an inexplicable urge to try making a box like this yourself, you have a little more insight on how best to go about it.
And if you take anything away from this, whether you feel compelled to try making your own marker box or not: Try to remember that some things in life are just not worth torturing yourself over if you have another choice.
And if you're in a similar headspace to mine at the beginning of this journey and you need someone to give you "permission" to spend a non-ridiculous amount of money on something that would make your life easier: Consider this my personal blessing to do so, please.
On that note, I think I've covered about everything that I could think to. And in fact, believe it or not it actually took me roughly 3 days to type all of this out in a way I was satisfied with, so I hope you Sparklers can forgive me that I don't have a more eloquent outro in me at this point. 🫠
So I will leave you all to make your own marker storage related decisions and excuse myself—After all, I have a bunch of extra honeycomb cells and half a dozen other [Ohuhu] marker projects on my to-do list.
Thank you to anyone who actually bothered reading through all of my ramblings, and hopefully you will all be hearing from me again very, very soon.
Sparkle On ✨
~Mystic~
#mysticsparklewings#xxmysticwingsxx#artists on tumblr#adult coloring#ohuhu#ohuhumarkers#ohuhualcoholmarkers#ohuhubrushmarkers#copic markers#alcohol markers#art supplies#marker storage#craft storage#art supply storage#diy#diy storage#art tools#marker organizer#organization#blog post#dont do this to yourself#Youtube
3 notes
·
View notes
Text

God's Favourite
Symbolism notes + process shots under cut (spoiler warning!)
"God's Favourite" because it's based off a track name and because of me trying to emulate religious imagery
Setting sun doubles as a halo because he thinks of himself so heroically (a tortured saint, even)
Biblically accurate angel eyes was honestly a coincidence: it started only with the 4 eyes on top and the ID cards were supposed to have faces, but I might as well really push the religious imagery and turn them into eyes (also less work lol)
Wanted Jimmy's pose to both look vain (because he IS) and to look like he's repenting, like he just realised his mistake, religious imagery +1
Also wanted to play with the irony despite Jimmy directly/indirectly killing everyone (hence their blood on his hands), he's the one crying because he's a little BITCH (boohoo he feels sooo bad for himself)
The scene with the hallway of ID cards had Anya's card always covered up with something (and it wasn't flying around I think) to show Jimmy really did not gaf about her. That inspired having Daisuke/the axe and Swansea/the gun overlap Anya/the pills/her card (aka it was a compositional problem I symbolism'd away lmao)
Jimmy also does not see the dead pixel. He does not care about it. The other reason for including this is because I wanted it to stand out in a 'this feels wrong' way, because it is
Also, I remember seeing Mouthwashing fanart before I knew what Mouthwashing was even and OOC, it looked like Jimmy was a (barf) victim/sole survivor. It is the point of the game and all LOL and the art was good! (I'm not saying it's bad, it's what got me interested in MW in the first place) But I wanted to a little something with the no-context gang to make them go 'oh something's not right' (along with the bloodied weapons + bloodstained hands)
Intentionally left Anya's card numbers uncensored to 'reduce her to numbers', which is meant to parallel the 'just another statistic' attitude towards SA survivors
TL;DR the religious imagery is meant to be very ironic and is meant to highlight just how fucking stupid ridiculous Jimmy's saviour complex is
aka this drawing basically summarises WHY I HATE THIS MOTHERFUCKER SO MUCH TO THE POINT IT COMPELLED ME TO DRAW


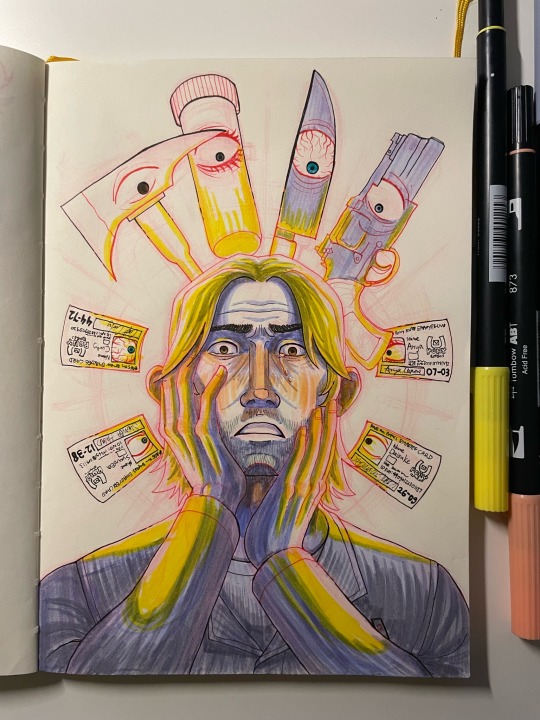
Sketched with a colour pencil, inked with Snowman drawing pens, coloured with Tombow brush pens, and digitally touched with Clip Studio!
#pawsedsart#art#character development#original character#character design#character art#oc story#ocs#my ocs#my art#artists on tumblr#drawing#mouthwashing#jimmy mouthwashing#wrong organ#mouthwashing game#mouthwashing fandom#mouthwashing fanart#tombow markers#tombow fudenosuke#tombow brush pen
53 notes
·
View notes
Text
I have a hard stance on dming ttrpgs and it's this: I will gladly dm an adventure, even on a quite short notice, but if I'm dming I will not be organizing shit. I will not be getting everyone's contacts, creating the groupchat, finding a time window when we can all meet and planning the snacks. If you're unable to self-organize even a single meeting you are not qualified to be an adventuring party, full stop :/
#on some level it's because ttrpgs require some level of initiative and having problem on this level is a good marker of problems with this#but on a much more real level don't expect me to put hours of work into prep when you can't even take 30 minutes to organize a meeting!!
35 notes
·
View notes
Text
WOAH-

yippee!!!
#daisuke mouthwashing#swansea mouthwashing#mouthwashing game#mouthwashing fanart#anya mouthwashing#nurse anya#daisuke fanart#swansea#curly#polle#art#young artist#artists on tumblr#bring my family back#anya#fuck jimmy#mouth washing#wrong organ#acrylic markers#traditional drawing#traditional art#traditional illustration
35 notes
·
View notes
Text


@tinymintywolf 's Blorbovember - Drawing 1- "Nostalgic" complete! Kingdom Hearts will always be with me like a chronic illness. Zexion was my highschool crush, lol. Sometimes you gotta make drawings you know would make your past self happy, and this is one of them. Look, past me! You can sort of draw foreshortened hands now!
44 notes
·
View notes
Text


My finished drawing of Ava and polly from mouthwashing! I've added some more commission options to my ko-fi! Feel free to check them out if you're interested! Thank you even if you don't end up placing one
#anya#anya mouthwashing#nurse anya#anya fanart#art#my art#sketch#sketches#artists on tumblr#sketchbook#mouthwashing#wrong organ#mouthwashing game#traditional art#artwork#artist on tumblr#my artwork#original art#queer artist#small artist#illustration#drawings#draw#hand drawn#drawing#my draws#pencil drawing#tumblr draw#artist#marker
23 notes
·
View notes
Text

37 notes
·
View notes
Text

If all of that is true… why are you still so concerned about him?
#mouthwashing#fan art#art#drawing#traditional art#traditional drawing#traditional illustration#alcohol markers#ohuhu#colored pencil#prismacolor#anya mouthwashing#curly mouthwashing#captain curly#jimmy mouthwashing#wrong organ#tw blood#tw g0re#tw body horror
24 notes
·
View notes
Text
as you can see i am having the normalest time of it right now (trod owns my entire soul)
#cotl narinder#cotl ratau#cult of the lamb#trod au#i swear when i get home im drawing this digitally#vibrating my organs about this fic/au#my art#in retrospect i really just forgot i have alcohol markers. incredible.
98 notes
·
View notes
Text

Responsibility
#ghostly posts#mouthwashing#anya mouthwashing#my art#okay here are my materials list: gundam marker. crayons. uhhh gel pens! and red and orange acrylic brush tip markers#I have a yellow one somewhere but I couldn't FIND IT so I improvised with gel pens. for now#I need to organize my whole thing Bette r
23 notes
·
View notes
Text

While being on hiatus I realized I can upload my pride and joy : The working desk I worked so hard to collect and build organizers for! With a vast collection of alcohol markers (but regular markers too), Acrylic markers, pencils and pens and SO MANY KAPPA ORGANIZERS I've built. I've always enjoyed art stores and how colorful they are!, so I decided to build one in my room. it took about 15+ years to collect all of this! and ofc there is yugioh all around! Many more art materials in the dozens of drawers I have around the room.. hard to take a photo..
#working space#working desk#artist working space#marker organizers#hope it inspires you to build your own art corner!
40 notes
·
View notes
Text
Quick sketch in pub

#sketch#drawing#lord black hat#black hat villainous#black hat#villanos#villainous#black hat organization#quick sketch#sketchbook#markers#traditional drawing#art on tumblr
27 notes
·
View notes
Text


welcome to Whiteboard Marker it kills and dies PLEASE let it kill and die


[ 02 - 08 - 2025 ]
the markerrrrr
#digital art#madness combat#oc - Marker#oc#you can tell its marker and not any other grunt because it is either killing or dying#i LOVE drawing organs#had to figure out The Rules of how i wanna draw this thang. i get it now 👍
26 notes
·
View notes
Text

Deltarune Tomorrow!
#silly design to lest out some new markers lol#he’s basically just a bunch of cables and his outfit is an organizer#nine the fox#sonic prime nine#miles nine prower#my art
7 notes
·
View notes
Text
I'm unable to watch today but...
glancing at the liveblog as a Minnesota #1, Corinne Schroeder #1, and New York #2 fan: What minor deity did I OFFEND this week?
#Christ on a bike#I gotta worry about evil Kennedy's brainworms taking all my meds away and putting me in an organic gulag#The government erasing me because my X marker is very scary#And now THIS?#pwhl lb
8 notes
·
View notes
Text
Hiya friends. I'm still plugging away at art. I have Sylas's ref sheet almost fully inked.
On one hand, "I don't want to get too political on my horny art page..."
On the other hand, "porn IS political. My existence is politicized. Scary shit is happening so FAST and so OUT LOUD if you take a second to open your eyes but somehow not everyone sees it and AAAAAAAAAAAAAA"
Anyway. It's tough to sort through any kind of news you come across online. I recommend subscribing to this newsletter that takes the major daily happenings in the US and makes them more digestible. You can always look into things further from there but it's a good start. It's important to keep yourself educated on what's going on
And in case it wasn't clear from the whole "they/them who has green hair and body mods and draws gay porn": nazi punks fuck off
Do not obey in advance.
And if you let your grief paralyze you, they win.
Love y'all 💚
#🧊🐷 is in my city snatching people off the street.#there are bills proposed in my state that align fully with project 2025.#and one that would REVERSE all gender marker changes/reissued birth certificates#its so much all at once and my heart is heavy BUT. Don't despair. Organize.
8 notes
·
View notes