#manip tutorial
Explore tagged Tumblr posts
Visit Tumblr Blog
Explore Tumblr blogs with no restrictions, modern design and the best experience.
Last Seen Tumblr Blogs


Fun Fact
The KCSC sent more than 20K requests to delete posts related to prostitution and porn to Tumblr from January to June 2017.
Text
I recently came across a super-informative, detailed write-up about the manip-making process by nanuk_dain, whose Stony manips are unparalleled. You can read it here on Ao3 (and see more images of the process), and I highly recommend it if you're curious about this often misunderstood and undervalued artform!
#stony#manip#fanart#stevetony#steve rogers#tony stark#art tutorial#steve/tony#nanuk dain#iron man#captain america
29 notes
·
View notes
Text


Você ouviu dizer sobre mercúrio no fim da história?
jeno + jaemin, nct psd: crystal @colour-source credite em caso de inspiração <3
#capas#capa de fanfic#kpop#capa para fanfic#kodaiine#spirit fanfics#yiza#capa de fic#capa para fic#nct#jeno#jaemin#capa divertida#capa colagem#capa manip#capa romantica#capa com gif#wme#tutorial#nct dream
47 notes
·
View notes
Note
Oi!! Suas capas são incríveis demais, sou apaixonada. Você é muito talentosa 🥺💜
Queria saber quais dicas você pode dar para melhorar a iluminação dos personagens e da capa em si (tenho muita dificuldade nisso :"))
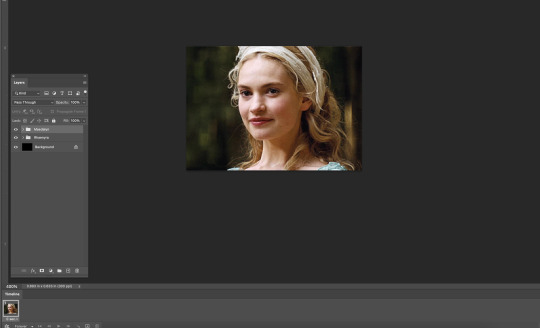
Oláa! Muito obrigada, flor 🥺💖 Também sou apaixonada nas suas 🫂 então, depende muito do estilo da capa e de como é a luz do ambiente/cenário. Vou dar alguns exemplos aqui: se você estiver fazendo uma capa dark ou neon e o cenário usado na capa tem algum ponto de luz, eu recomendo que quando você estiver fazendo a iluminação, antes de passar o pincel em volte do corpo do personagem na camada adicionar (que é o que muitos fazem), adicione uma camada antes em sobrepor e passe a cor que você pegou do ponto de luz no corpo do personagem, só depois de fazer essa camada em sobrepor, você faz a iluminação em adicionar. Essa dica funciona muito para que o personagem pareça de fato fazer parte do cenário e eu particularmente amo muito, pois resolve em qualquer estilo de capa, mas acho que fica mais aparente em capas escuras, contudo, pode testar em todas as suas capas e me diz depois se fez uma diferença e se você gostou do resultado! Para ajudar, eu também fiz um tutorial pra que você possa ver na prática!
E esse é o resultado final do design:

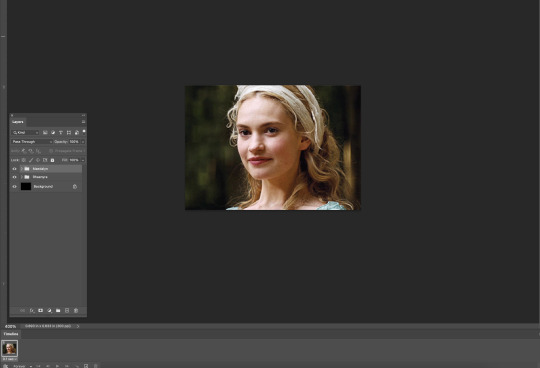
Essa foi uma dica para a iluminação do personagem em ambientes/cenários. Agora, sobre a manipulação do personagem que também é considerada iluminação, eu tento deixar algo mais natural. Eu não mexo em muita coisa na realidade, eu apenas realço os traços do olho e toda parte escura, como embaixo do nariz, pálpebras, parte interna da boca, o contorno do maxilar e aquele lugar que eu não sei o nome que fica entre o nariz e a boca. Uma coisa que eu não gosto é fazer os traços de luzes, pq eu não sei como fazer ksksk então eu faço muito sutil mesmo e quase não dá pra ver, e eu faço com o mesmo pincel que uso pra fazer os contornos pra deixar natural também. E fica assim:
As vezes nem é necessário fazer essa manipulação/iluminação no personagem, pois os pngs combinam com o ambiente e não há necessidade de fazer nada, como nessa capa aqui, onde eu fiz apenas a iluminação do corpo e do cenário:
E é isso flor! Eu espero que essas dicas te ajude! E qualquer coisa é só perguntar e caso queira mais dicas, não hesite em pedir também e eu trago 💖🫂
#chishikizi#design#capa de fanfic#capa para spirit#capa dark#ibispaint art#capa clean#capa simples#dicas de capa#dicas de design#tutorial#capa#cover design#cover#capa com manipulação#capa manip#capa manipulada#capa manipulação#photo edit#graphic design#edits#edit#editorial design#capa de fic#capa romantica#capa divertida
36 notes
·
View notes
Note
Hello! How are you? I hope you are well, I saw some of your posts and I think it's really cool how you edit GIFs. I would like to know how you edit them?
Hello there! I'm doing good, just really busy with work and life! Nothing new for me lol! I hope you are doing well also. Thank you so much for your kind words! I love that people like how I edit and want to know how I did them. I'm so sorry I'm getting to your ask so late! I've never done much tutorials so I hope mine makes some sense!
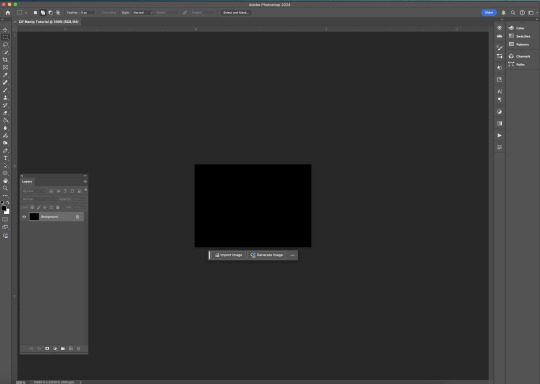
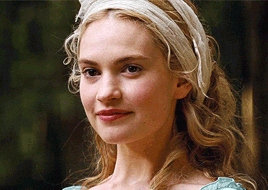
Before I get going into this, I use Adobe Photoshop! My tutorial is just gonna be a simple gif manip tutorial I use for my intros. Like this for example.

I wasn't sure what exactly kind of gif edit you want to know how I did.
And for a more complicated gif manip that I use for intros, like this:

I use mask layers and text, which would be a different and longer tutorial I can do if anyone is interested.
ANYWAY Let's get started!
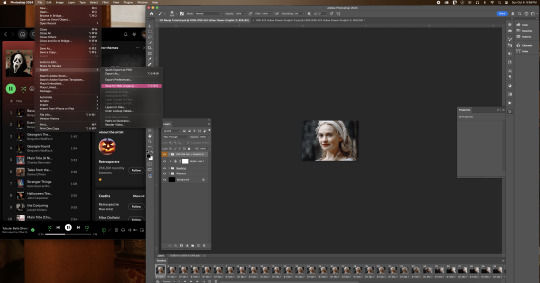
First up you want to create a new document. The size and everything that I did before editing my gif are right in the screenshot below.

Next up this is what you should have when you push the create button and follow the preset details above.
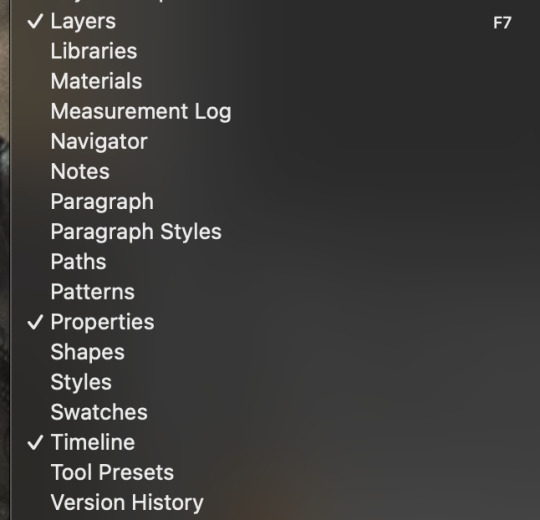
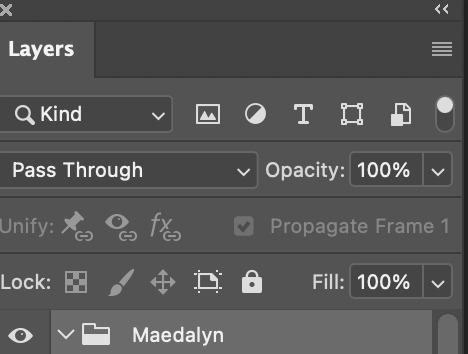
To make a gif you have to have a timeline, there are a few different ways people do this inside Photoshop. But if you don't see the timeline on your Photoshop layout here you can find this by clicking the window bar at the very top of your screen.
Once you click the window bar there should be a whole column of options. Make sure Layers and Timeline is checked off like this.
After doing that This is what you should have.
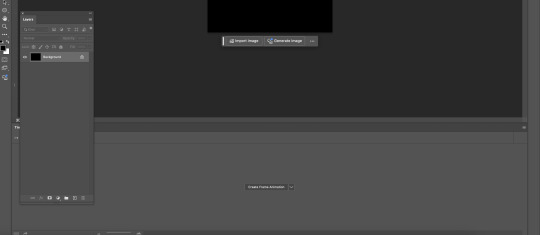
Now like I said there are a few different ways people edit or create their gifs in Photoshop. I do this by the Create Frame animation option. Click that button and a timeline should be created. Next up you need to find and open the gifs for your scene in mind. I recommend trying to find gifs that match in some way. Make sure you number the gifs into the open file BEFORE copying and pasting them into your canvas.
After that,use the transform tool to make sure they fit onto your canvas like this.
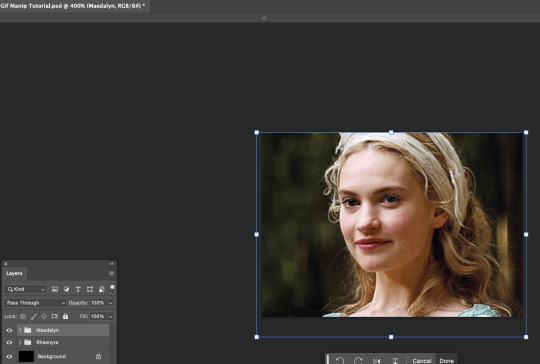
I would try to get into the habit of naming your layers and grouping them up like how you see mine. Since it will be confusing at times if you have a lot of layers to keep track of. Once your layers are named and gifs are placed the way you want. I would try finding colorings and or using the adjustment tool for your gifs. Right now I don't have any on. So after that this is how your layout should look.

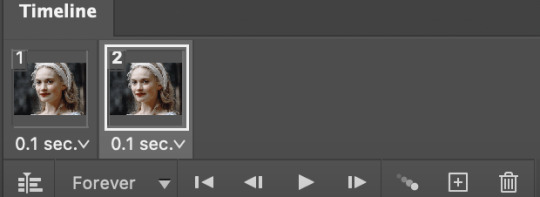
Your timeline is at the very bottom, right now the speed of your gif is 0 sec, which is SUPER fast and could make your gif look REALLY fast pace and mess up with the natural flow of your scene.
Make sure you click the v beside the sec on your timeline. Like this.

Click 1 second to start. Once you finish the gif and get to exporting you can try out what speed is best. Now we can finally start to edit. If you grouped your files click the > where the group file is in the layers tab. This is what it should look like before and after.

Now, this is how your timeline should look.

You are gonna need to click this symbol right here at the bottom. The + with the box around it.
That creates another frame for your gif. When it does your timeline should now look like this. (I forgot to take a screenshot of this part so this is what mine looks like with the adjustments I added later)
When you are on the second frame you need to go to your gif, find that second layer to match, and click the box beside it. It should reveal the eye.


Repeat that step all the way to the end of your first gif.
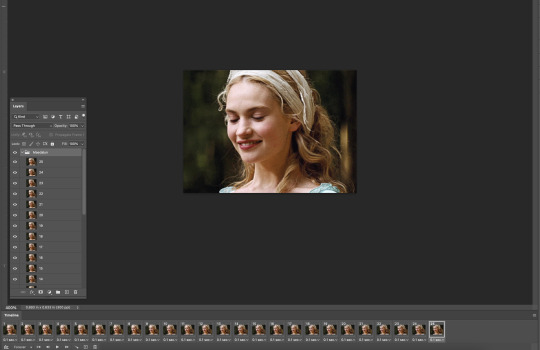
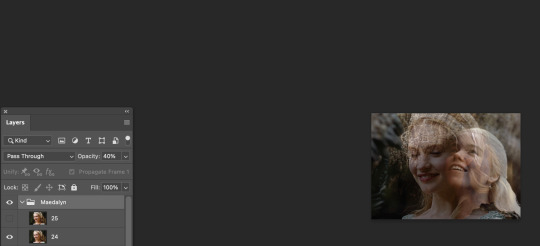
Now you don't have to do this but I like to fade out some scenes to make it flow better. Click the timeline number where the gif is about to end. For mine, it's layer number 22.
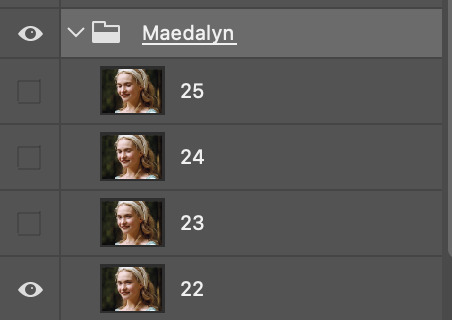
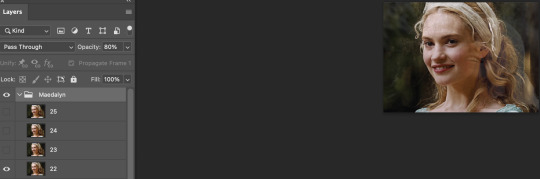
When you click the timeline number it follows right to the number in your layer. You see how my group is highlighted because I clicked it? I would stay right there. Because we are going to click the Opacity for that ENTIRE layer.
Just click the 100%, or click the V beside the 100, it doesn't matter, and put in 80%. It should start to fade and you can see the layer underneath it. The next part of our scene, this is what we wanted.
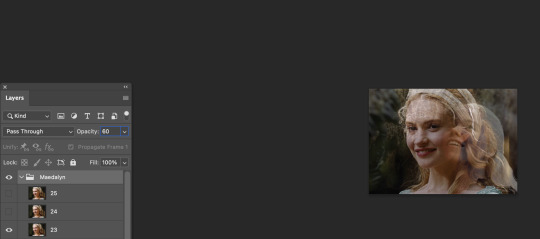
Repeat that by clicking the next number up on your timeline and change the opacity to 60%. Like for me the next one is 23. The pattern that I do for my opacity changes is 80%, then 60%, then 40%, and finally 20%. Example below.

But now you need to make your second gif move right alongside your first so it flows. So now click back to the number on the timeline you change the opacity to 60% and click the visibility box of the second gif.

It should look like this now. I exported the gif so you can see the fade from playing with the opacity.
Next, repeat the same steps you did above for your second group gif. BUT, when your opacity on your gets to the 20%, the next frame make SURE you click OFF the visibility or put the opacity to 0.
The example below is just following where you should start the 2nd frame with the new group.

After repeating the first steps, your gif is now complete and should flow nicely!

NOW we just gotta export it so you can eventually post it! In my example below I ended up using this coloring and just tweaked some adjustments. So go to file, export, and click the save for web button just like you see below.
Now after clicking that this is what should pop box should pop up. In that same box I have below, is the settings I use to export.

NOW!! After you click on save and save that beautiful work into the file area you want...you are now finished!!
I hope I made sense! I'm not used to doing tutorials and I had a lot of more step by step screenshots, but Tumblr's 30 image limit made that impossible to put together!
#mimi replies#ask answered#answered asks#asks answered#mimi does a photoshop tutorial#photoshop tutorial#gif manip tutorial#gif tutorial#Kill your queue. you'll feel better
9 notes
·
View notes
Note
Question, what's a manip?
Manip is short for manipulation, and it is a type of edit that involves altering the content of a photograph by adding, rearranging, reversing, distorting, or removing characters and/or objects from within the frame.
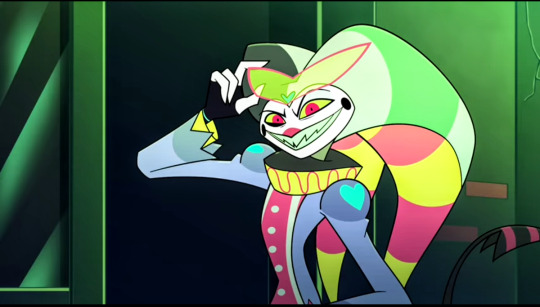
For example, this is a screenshot I took of Fizzarolli.
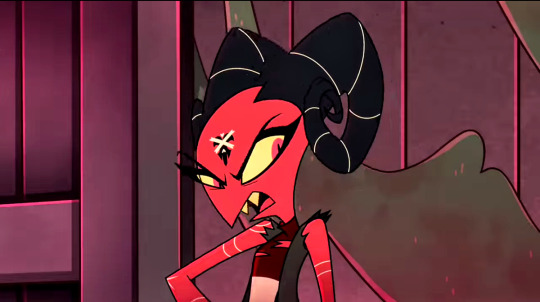
This is a screenshot I took of Barbie Wire.
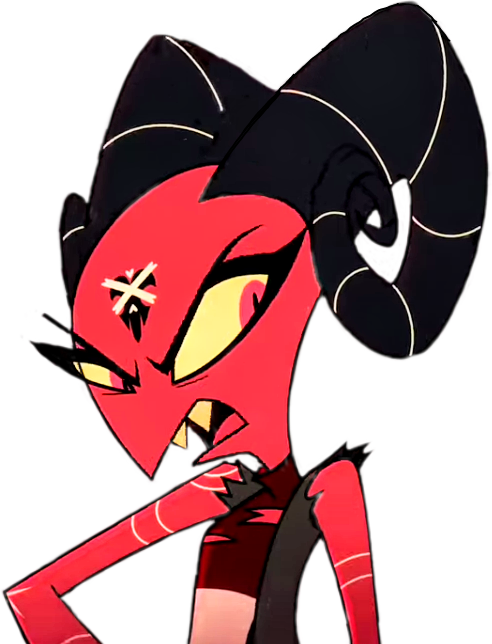
I cut Barbie out of the screenshot with the cutout tool on the PicsArt app.
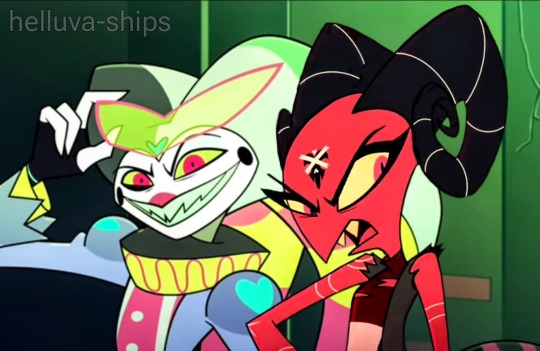
And "manipulated" her into the frame with Fizzarolli making a manip/edit.
I hope this answers your question, anon. 😊
Mod Millie-Billie ~
#helluva boss#mod millie billie#anon ask#ask#asks#tutorial#manip#not a request#picsart#made with picsart#fizzwire#fizzarolli x barbie wire#barbie wire x fizzarolli#barbarolli#its that easy#ship edit#edit#editorial
7 notes
·
View notes
Note
Hey elz! Would you consider doing a tutorial of how you did the frame thing in this post: /post/724195624728379392/and-it-felt-so-nice-so-peaceful-and? It looks so cool!
hi anon! thank you for reaching out. i really appreciate it & you made my day! 💚 ily!!! for length reasons, you'll find the tutorial under the cut!
Resources used:
Photoshop
Vintage flowers pngs -> you can either google vintage/watercolor flower png or here are some DeviantArt packages [x] [x] [x]
Font: Avenir
Workflow
After you have made your gif as you would normally do, it's time for the frame.
First: place the flower
Once you got your flower pngs it's time to place them on your gif. Go on File > Place Embedded... and select the file. This is what will happen.

Now, click on that little tick (✓) on the top right corner, so that your image is actually placed.
Press the shortcut CTRL+T (on Mac: Command+T) to open the transform options - basically it is the same as the photo above. I tend to do it this way, because if I don't like the adjustments, I click on the ⊘ button. If you did that when you placed the image, it would delete the image.
So now, move the image, resize it using the handles on its corners while pressing shift on your keyboard to maintain the proportions.
Once you get a result that satisfies you, click on this button (highlighted in purple)

Now you can wrap the png, and make it "fuller", more natural looking, moving the intersection points of the grid that will pop up

When you're done, confirm.
Now that you placed your png, you can manipulate the colors. Click on the png layer and press CTRL+U (Command+U) and in this case you would adjust the Reds and Yellows.

And you're done!!!!
Second: the border
To make the border use the Rectangle Tool (shortcut: U). On the menu bar on top, set the fill as transparent and the stroke as white

Then drag your mouse and create the rectangle

Then of course, adjust it if needed - by clicking on the rectangle layer, the properties panel will open (if not, go on Window and check Properties).
Now duplicate the layer (CTRL/CMD+J) and make the original rectangle invisible by clicking on the eye next to it.
Right click on the copy and rasterize the layer -> this rasterized layer will be the one you'll work on (you keep the original one as a safe harbor in case you don't like the changes made on the copy).

Now, with the copy selected, pick the Eraser tool (E), reduce the opacity of the layer and zoom in, and erase the parts of the rectangle that goes over the flower. When you're done, set the opacity back to 100%.

Third: add the text
And that is literally it! Super simple and quick to make, and of course you can add as many pngs as you want to create somewhat of a bouquet. The real game changer is the Wrap thing you do to make it more natural, like a real bouquet!!!!
I hope this was helpful and if you have some further questions please please reach out! Love u!!!
E.
#ask#elz:explains#ps tutorials#literally the simplest manip i know - learned it many years ago and it's never old fashioned! it's from the troye sivan flower phase here#on tumblr dot com#*resources
2 notes
·
View notes
Text
#b. tech tutorial classes in noida#b.tech online tuition classes#best b. tech tutorial classes in noida#b.tech coaching classes in delhi#b.tech coaching classes in delhi-ncr#education#online btech tuition#VIT Tuition#Manipal University BTech Tuition#Online University tuition
0 notes
Photo
reblogando isso aqui da diva pq sempre volto nesses exemplos quando quero fzer algo com luzes em manip e sou péssima em imaginar a posição de luz e sombra hahahahaha

Estudos de luz e sombra em alto-contraste.
88 notes
·
View notes
Note
please make more stories about detachable heads stealing headless bodies T-T
I'm glad people are enjoying these-- I do love NBM / Detachable fiction, and there are not that many authors in good standing who are still writing that sort of content on Tumblr. (I am assuming this person knows that Metabods the website exists.)
Honestly, my biggest roadblock is creating the photos for them. I don't want to use AI to make them, and my photoshop skills are... shaky at best. But I don't want to just take someone else's photo manip, that's scummy too. So if anyone knows a good, NBM-specific tutorial feel free to send it my way. Or if anyone wants to give me blanket permission to use their manips (with credit) for my stories...? Hah hah, just kidding! ...unless?
24 notes
·
View notes
Text
The Sunnydale Herald Newsletter, Thursday, May 15
Cordelia: Well, evil just compounds evil, doesn't it? First I'm sentenced to a computer tutorial on Saturday, now I have to read some computer book. There are books on computers? Isn't the point of computers to replace books?
~~The Dark Age~~
[Drabbles & Short Fiction]

"I just didn't think you'd be the one to do such a thing." (Spike, Tara, SFW) by pearlypairings
[Chaptered Fiction]

Flames, Chapter 8 (Buffy/Spike, R) by Annie Dolnar
Anti-Hero, Chapter 7 (Buffy/Spike, R) by Willow25
Hearts a Mess, Chapter 8 (Buffy/Spike, NC-17) by splendidchapette

Echos of magic, Chapter 5 (Crossover with Harry Potter, FR7) by dragonvamp
Destinies intertwined, Chapter 16 (Crossover with Supernatural, FR7) by dragonvamp
Shadow of a Hunter, Chapter 5 (Multiple crossings, FR18) by dragonvamp

This Saturday (and Every Subsequent Saturday for All of Eternity), Chapter 17 (Buffy/Spike, R) by Maxine Eden
[Images, Audio & Video]

Manip:[Better Call Gnarl] by lettingsername
Manip:[Gnarl's in Charge] by KneeHighMischief
Artwork:my interpretations/redesigns of (some of) my favorite buffyverse comics creatures by xaeyrnofnbe
Manip:[Moloch in the Middle] by majorslayagepod
Gifset:Buffy Summers + Outfits (14/∞) by clarkgriffon
Gifset:2x22 // 3x12 by anjelia3
Gifset:A New Man by detectivedawnsummers
Gifset:Buffy + choices in 2.07 and 5.22 by 5bi5
Gifset:Buffy at the beach by 5bi5
Gifset:[Oz + Xander] by starryeyesxx

Video: Buffy S3 at 25: Consequences (Shortened Version) by Slayerfest 98
[Reviews & Recaps]
Buffy S1E7 "Angel" Review by Major Slayage
Buffy the Vampire Slayer - Unaired Pilot Reaction by Liam Catterson
BUFFY THE VAMPIRE SLAYER S7 EP 18 DIRTY GIRLS (2002) REACTION VIDEO AND REVIEW! FIRST TIME WATCHING by Reel Reviews With Jen!
[Fandom Discussions]
[Joyce, Giles, and fandom misogyny] by coraniaid
THE BUFFY VAMPIRES AS VAMPIRE BATS by whitewingedvampbat
I actually really love later season scooby gang by duckwnoeyes
One of my top favorite Lorne moments by dream2nite

Meet the New Slayer by multiple authors

Spike & Fred by multiple authors
Ryan Kiera Armstrong cast as new slayer in new Buffy show by multiple authors
RYAN KIERA ARMSTRONG is your new Slayer! by multiple authors
Pictures from Ryan Kiera Armstrong’s Buffy Audition for the role of “Nina” by multiple authors
New slayer by multiple authors
Little Buffy by multiple authors
What are we predicting: SMG as a co-lead or a Special Guest Star? by multiple authors
Faith, Spike, Angel in Archie Style by multiple authors
I think it would have been okay if Parker had specified to Buffy what he intended (but he didn’t). by multiple authors
Does anyone else suddenly dislike Xander less on rewatch? by multiple authors
What did you think of the mayor? by multiple authors
Why did Amber Benson decline to return for "Conversations with Dead People"?? by multiple authors
Buffyverse Character Development by multiple authors
Why do many people seem to dislike Season 1 and some outright skip it? by multiple authors
What's a reasonable opinion you have that it seems like hardly anyone agrees with? by multiple authors
SINCE WHEN [Nicholas Brendan thread] by multiple authors
Season 4/MsOTW by multiple authors
Throwback: Cast that worked together prior to Buffy. Am I missing anyone? by multiple authors
The wig by multiple authors
Sugar bombs? by multiple authors
[Articles, Interviews, and Other News]

Publication: Who is Ryan Kiera Armstrong? New ‘Buffy’ star tearfully accepts reboot role from Sarah Michelle Gellar via Today
Submit a link to be included in the newsletter!
Join the editor team :)
7 notes
·
View notes
Text
Kenny, when are you directing an episode of 9-1-1? He and Ryan are upping the ante on the stache art series with this video tutorial about "how to keep your stache in shape." Thanks, guys! #911onABC #911abc #ryanguzman #kennethchoi #eddiediaz #chimneyhan 👏🔥💯
Next level (my manip, my edit, Photoshop, digital art)
20 notes
·
View notes
Note
how did you learn to do photo manips and photoshop art? what are your favorite inspirations and resources, for someone who's pretty new to it?
hearing other artist's inspirations & stories is helpful no matter what
I didn't learn anywhere in particular! I mostly taught myself over the years by myself by messing around in photoshop, adding in a few tutorials here and there when trying to achieve something specific.
When I was 13 I was making things like these:
This was around age 15:

I didn't do a lot of photoshop for a few years, but this was when I got back to it at age 20:
And it's been nearly 7 years of making art consistently ever since! After that improvements got slower but I've been consistently learning new techniques and improving my workflow.
Photoshop's learning curve can seem a little steep and daunting at first, but even just knowing your way around the program and being able to use just 30% of the tools will let you do 70% of what you aim for!
In terms of tutorials, the ones I used way back then were terrible youtube videos with bad audio and old photoshop versions, so I don't know the best channels to learn the basics nowadays!
I myself have made more than 5 hours of tutorials that go through every main part of my workflow and explain how to achieve specific effects, starting with a 101 video that teaches you every main button and tool on the program. They're available on my Patreon, you have to sign up at the 3rd tier but you only need to do so one month, once you have access to the playlist you keep it forever.
131 notes
·
View notes
Text
so, awhile ago @mattel was so kind and generous as to make the icon i'm currently using, and not only that, shared their icon tutorial with me, and while i've been practicing for months now, i must say this shit is so harrrdddd.
i'm so grateful for every single editor out there, whether it be for moodboard aesthetics/manips/icons and headers/and not to mention the fucking gifsets??? like... the talent you all possess at your fingertips is just.... so unreal, and i will forever worship the ground you all walk on. i don't know how to fuckin' brighten/sharpen/contrast/or anything about hues and saturations, i have no idea what the hell i'm doing, absolutely nothing looks right, and i'm such a fool for even trying.
#*carly catalogs#been working on this one image as an icon for myself for weeks now and i'm so 😵💫😵💫😵💫#i can't believe there are people out there who can magically “blip! blop! boop!” done ta-daaa!!! 🙌#ya'll make it look so easyyyy (which i know for a fact that it's not)#but DAMN!!!!!#i am not worthy 😭😭😭😭😭#anyway ig i'm here to loiter around for the night lol#gotta take a break quick before i throw my new laptop against the wall 😅#tbd
4 notes
·
View notes
Text
Legends Arceus seed RNG manip tutorial
Ok because there's barely ANY tutorials online about this (and no, discord is NOT an archive of knowledge) ever since the switch emulators got nuked, I want to share the ideal way to RNG manipulate seed spawns on Pokémon Legends Arceus. Not outbreaks, but the seeded spawns.
So what you need is the game, a way to check your pokémons' IVs and abilities (e.g. PKHeX), some way to take notes or screenshots, and of course the pla-reverse-gui (on Lincoln-ML's github). To maximise the chances of getting shinies you'll want to get perfect research on the pokémon and own the shiny charm.
In PLA the whole map of an area is seeded when you load in (you reseed by leaving to the village and returning to the area) with each spawner having its own seed. If you know the seed of a spawner you know exactly what pokémon will show up after you catch/KO the current ones on that spawner. There are multiple types of spawners, some will always spawn 2 pokémon, some always 1, and some will spawn an inconsistent number of pokémon, like 1-3.
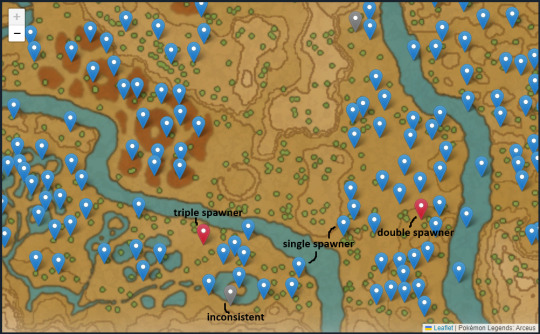
These latter ones currently can't be RNG'd because we can't figure out the seed. Single 'mon spawners are just not worth it because there are no multiple paths to the pokémon generated so you will easily need some 60 iterations to get the same pokémon that you'd get in 10 on a double spawner.
Pokémon respawn when the time changes (e.g. from "morning" to "midday") or when the weather changes. Static alpha spawners take multiple time changes to respawn, I personally wouldn't bother with those.
Unfortunately you can't control the weather… or can you? Well...
I recommend doing this RNG manipulation during the quest to meet the lake trio. When you're ostracised from the village there is NO WEATHER at all to fuck up your respawns. You also don't have to talk to the fucking professor and go through multiple prompts just to leave an area. Life is much simpler.
Onto the real tutorial
Have autosave off for all of this.
Pick a spawner, let's use a triple qwilfish one here. Go to the area of it, bring 3 empty slots in your team, get near the spawner, and save. Catch all 3. You need to be able to distinguish future qwilfish from them so jot down some characteristics like gender, level, stats.
Reload. We will now discover what the seed finder calls pokémon 1. Catch/KO 1 pokémon, ensure the other 2 are still there and didn't run away or somehow despawn (happens A LOT with stuff like basculin). Teleport to camp. Rest/advance time, preferably to some other day time to prevent day pokémon from despawning into drifloons and fucking all of this up. Go back to the spawner, catch everyone there. One of the qwilfish will be different from the originals, that's your pokémon 1 and you can fill in its data on the seed finder.
Reload. We will now find pokémon 2 by basically the same method. Catch/KO 2 pokémon instead of 1, ensure the remainder doesn't randomly despawn, go rest to advance time, save when you get to the spawner, then catch everyone there. You should have an original qwillfish, pokémon 1, and a new qwilfish which is pokémon 2. These are iteration -1 of the generator.
If this is not the case then you got fucked over by a weather or time change or a 'mon despawned when it shouldn't, or you caught a pokémon from another spawner by mistake.
Fill in the seed finder data. Ideally evolve your pokémon if you're getting small ones so you can fill in multiple measurements to save on calculation time.
Seed finder will toss you a seed, put that into the generator as well as the filters you care about. In my case I have max shiny odds and want a shalpha fish with whatever stats.
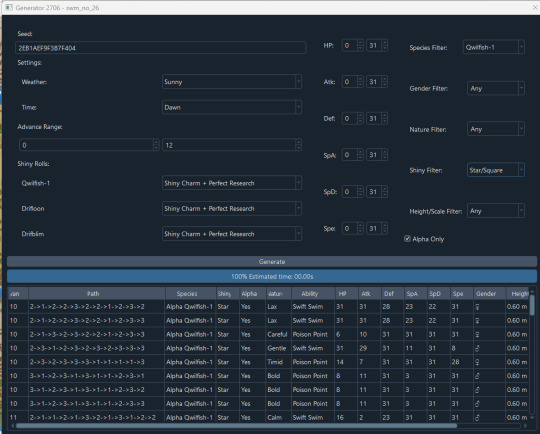
If you didn't save AFTER catching pokémon 2, you can pick any of these. If you did save however (like to trade the pokémon for IV checking), you'll have to pick paths which start on 3, because you despawned everyone from iteration -1 and then iteration 0 will have 3 'mons.
You can open path tracker if you want to be anal and catch everything to make sure you progress correctly. But basically all you need is to follow the path and on each advance catch/KO the number of pokémon stated. So a person who saved after getting pokémon 2 will pick a path like 3-1-2-... which means now they advance time, go to spawner, catch/KO 1 pokémon, advance time, catch/KO 2 pokémon at the spawner, etc etc, until they catch/KO the last pokémon, advance time, and find at the spawner whatever it is they manipulated for.
Please note that alphas can't spawn near other alphas. If you want to manip for an alpha and there's one close enough to hear the alpha music in the spawner, then go despawn it before your manipulated alpha is meant to spawn.
Anyway enjoy your hunts! It's a slow but very easy to accomplish method and nearly impossible to fail. Also more relaxed than MMOs and allows you to catch "skittish" or "neutral" pokémon who you can't multi-battle like in the MMO RNG manipulations.
3 notes
·
View notes
Note
this is a little out of nowhere but do you know if there are any primers for running a fic exchange? I saw you mentioned bring back a caps exchange like a month ago (which would be so cool). it kind of inspired me with another fandom, but I can't find any good guides and was hoping you might have some recs.
(Sorry for the long delay in reply. Clearly when I say I will get to something in a day or so, I-- uh, will not. Life's been a lot. Very sorry!)
With the proviso that @weaglerock did most of the actual hard work of the ALLCAPS Exchange and my role was mainly to make shitty promo manips (actually I still like this one) and nag people to turn stuff in and occasionally pinch hit--
Honestly, AO3 actually has some of the best resources for you, if you're planning to be like most exchanges and run your exchange through/post there. They've put together FAQs and tutorials and I think they're pretty straightforward and easy to understand.
Tutorial: Running a Gift Exchange on AO3
Archive FAQ: Gift Exchange
Challenges tutorial: creating and running a gift exchange
Signing up for a gift exchange
Reddit is also handy, and I've found a number of their posts with good advice: here, here (more from the user POV rather than the runner POV but good to think about, and this post were ones I referred to.
General advice:
I find if you have a random question and you can't figure out how to make shit work with AO3 or something, Fail Fandom Anon is a decent way to ask for help. Every post has a thread related to various Bangs/Exchanges going on, and you can post an anonymous request or question. Quality and quantity of response can vary based on when you post it (if the post is almost at comment limit and about to move to the next, you might not get much; just try again with a newly opened post), but usually someone will respond.
Most of the exchanges I've helped with were done before discord got huge, so I haven't utilized it as an organizer as much, but I've been in exchanges as an author where it originated from a fandom discord, and it did streamline communication to have a dedicated channel/discord for the participants. But mostly we used tumblr, gmail, and a googledoc for notifications and tracking.
Always assume some people are simply going to dip, for legitimate or other reasons. Shit will happen. It's super frustrating to delay opening an exchange because you're scrambling to make sure everyone gets something and that it's of decent quality so I'd advise definitely lining up multiple pinch hitters (and assume some of THEM will also bolt randomly) in advance, or be ready to do it yourself, or build in an extra time period of complete works being due before going live, or optimally, all of those things. Having more than one organizer/moderator is helpful!
Highly encourage people to include detailed author letters to accompany their requests. Have regular timeline check ins and reminders. Also, it's easiest to assume everyone's a newbie and err on the side of over-explaining. Have templates and formatted examples on hand for transparency; this includes examples of how you want people to make their requests and examples of an author letter.
Anyway, honestly my best piece of advice is to find a moderator who's already done this before and is good at all of it and will do most of it, and then just act like you've always been there and tag along for the glory. It worked marvelously for me. (But no, really, in the end I think the best bet for success is go back to an exchange from any fandom you enjoyed and felt was well run, look at their set-up/timelines/rules/verbiage, and then model after that accordingly. Obviously don't copy everything directly, or if you do, credit the those organizers.)
And, like, have fun.
6 notes
·
View notes
Note
Se você tivesse que escolher 10 capistas, seja para fazer collab, aprender mais sobre edição, seus capistas preferidos e etc, quem você listaria? E por que listaria cada um deles?
Puts, dificil é escoher só 10 kkkk mas ok
@chanyouchan com certeza seria uma delas, por causa do estilo que acho único. Acho muito bonitinho e fica sempre uma gracinha no final.
@nekomance Mano, acho lindo de lindo aquelas capas, principalmente por me lembrar bastante de uma banda j-rock e de filmes que eu gosto 😔 meu sonho saber fazer metade do que ela faz.
@taekstuff sempre admirei as capas dele, muito antes de tentar ser capista kkkk
@kodalindissima sempre babei nas capas dela e já usei o tutorial de finalização dela sim.
@trancyzp já tive o prazer de estar no mesmo projeto que ela mais de uma vez. Amo as capas da Natalia e queria collabzinha.
@chishikizi eu coneheci a Alanna pelo SU e ela é simplesmente maravilhosa em tudo 😩 man, só tem colirio no que ela faz. O icone poderia me ensinar e fazer uma collab hein.
@is-ateez foi amor a primeira vista quando vi as capas dela. Até então eu não via ninguém que desenhasse TUDO numa capa kkkk é muito talento.
@fairyeoll aceitaria uma collab e que ela me ensinasse. As capas são lindas, o estilo é lindo, tudo que ela posta me faz babar. E eu sou um desastre com clean que é clean e divertida kkkk mas ela faz parecer tão fácil.
@cryprinss Sempre achei as manips dela lindas e confesso que foi algo que me inspirou a tentar fazer manipulação. Aqui eu também digo a @xxpujinxx pelo mesmo motivo.
É claro que tem outras capistas que eu admiro que não tá listado aqui, como a siena, libertxxe, mocchimazzi, wiwitty, mercury e algumas que conheci recente (muita gente pra citar), mas iria ficar muito repetitivo kkkk todos muito talentosos e com estilos incrivéis e pra alguém que não tem um estilo próprio eu fico só na paquera mesmo kekekekeke.
17 notes
·
View notes