#mac osx
Explore tagged Tumblr posts
Text

Protrekkr 2.6.7 - A hybrid of modern day audio software and old-school styles of music tracker
#retro#tracker#music#player#tool#ProTrekkr#software#samples#electronic music#MorphOS#Windows#Linux#FreeBSD#NetBSD#Amiga OS4#AROS#Mac OSX#Haiku OS
9 notes
·
View notes
Text

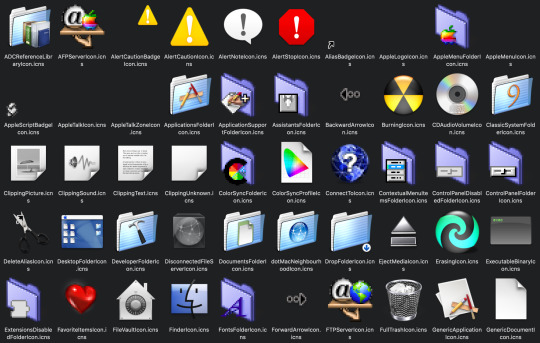
Mac OS X 10.4 Tiger - Icon files (2007)
#2007#2000s#07#00s#apple#art#design#frutiger aero#graphic design#graphics#icons#mac os x#mac osx 10.4 tiger#queuetiger#skeuomorphic#skeuomorphism#technology#vector
91 notes
·
View notes
Text
I normally wouldn't do this as this was never meant to be an official release, but as I started to notice that Frutiger Aqua developed an increasing popularity as well as a fanbase of its own, I decided to release it to streaming platforms for everyone's listening comfort, enjoy!
#Frutiger Aqua#Frutiger Aero#Helvetica Aqua Aero#Seapunk#fishvapour#ocean grunge#aquacore#aqua#Mac OS X#OSX Aqua#webcore#internetcore#webcore music#Frutiger Aero Music#ambient#new age#new age music#Wii music#9:25 am#Spotify
8 notes
·
View notes
Text

#pngs#png#folder#icon#macos#mac os x#osx#os#mac os#random pngs#purple#purple aesthetic#transparent png
2 notes
·
View notes
Text

3 notes
·
View notes
Text
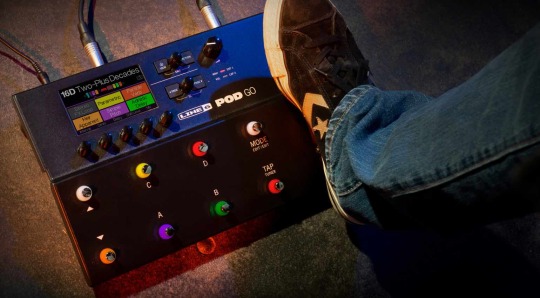
Line 6 POD Go 2.0 firmware update released
Line 6 POD Go 2.0 has just dropped and is an update for the POD Go and POD Go Wireless. It is the fourth significant upgrade since the product’s launch. Line 6 POD Go 2.0 Both the POD Go and POD Go Wireless boast Line 6’s state-of-the-art HX Modeling technology. This technology guarantees top-notch sound and rapid response, setting a new standard in the industry. Expanded Amps, Speakers, and…

View On WordPress
#amps#audio#cabinets#DAW#effects#firmware#Helix#HX Modeling#Impulse Response#Instagram#IRs#Line 6#MAc#OSX#PC#POD Edit 2.0#Pod Go#POD Go 2.0 firmware#Pod Go Wireless#software#Update#video#Windows#YouTube
1 note
·
View note
Text
FYI, if you're on Mac, these instructions do not work. CoPilot cannot be disabled-- probably because if you're not on Windows, Microsoft can't use means outside of Office to get your data.
However, you can disable automatic updates and then install a version of Microsoft Office that does not have Copilot. Here's how:
Disable automatic updates (method 1):
Open any Microsoft Office software application.
Click on "Help" on the Mac menu bar.
This should open a drop-down menu which has an option labeled "Check for updates." Click it.
This should launch Microsoft AutoUpdater. On the window the pops up, uncheck the option to automatically check for and install updates.
Note that the AutoUpdater will still check for updates even after you've unchecked the option. However, it will not install any updates without you giving it the go-ahead. It is still super annoying to have a software nag you about updates you don't intend to install. If you don't want to deal with that, use method 2.
Disable automatic updates (method 2):
Open Finder.
Click on "Go" on the Mac menu bar.
This should open a drop-down menu which has an option labeled "Go to folder..." Click it.
In the dialogue box that pops up, paste "/Library/Application Support/Microsoft/" and press enter.
This should take you to the place where Microsoft stores its AutoUpdater application. There should be a folder labeled "MAU", "MAU2.0", or something else along those lines there. Open it.
When you open the folder, you should see an application named Microsoft AutoUpdater. Drag it into the Trash.
Right-click on the Trash icon. This should open a drop-down menu with an option labeled "Empty Trash." Click it and press "OK" when the computer prompts you to confirm the deletion. Microsoft AutoUpdater is gone!
A note: I don't know if another Microsoft software will attempt to reinstall AutoUpdater if it detects that the "MAU" or "MAU2.0" folder is missing. Thus, it's safer to leave that folder where it is and only delete the application within it. I also would not recommend pressing "Check for updates" after this on any Microsoft software.
Installing Microsoft Office pre-Copilot:
First, you'll need to see if this is necessary. Open the Microsoft Office software that you wish to disable Copilot on. On the Mac menu bar, there should be an option with the name of the software on it-- e.g. "Word," "Excel," or "Powerpoint." Click on this option.
This should open a drop-down menu which has an option labeled "About [name of software]". Click it.
This should open a window containing information about the version of the software. The last version of Microsoft Office that does not contain Copilot is 16.88 (from August 13, 2024). If you have 16.88 or earlier, you are all set and simply need to not update anything you don't want Copilot on.
If you have a later version, go to the Applications folder in Finder. Find all the Microsoft Office software that you do not want to use Copilot on, and drag them into the Trash. As of January 24, 2025, the software that use Copilot are Word, Excel, and Powerpoint.
Right-click on the Trash icon. This should open a drop-down menu with an option labeled "Empty Trash." Click it and press "OK" when the computer prompts you to confirm the deletion.
Now, go to this webpage: https://learn.microsoft.com/en-us/officeupdates/update-history-office-for-mac
This page is official from Microsoft and contains a log of prior versions of Microsoft Office. Scroll until you see August 13, 2024 and download the software corresponding to that date. Any installation from before August 13, 2024 will work too, but I figure you probably want the latest version possible for security reasons.
Follow the install instructions for the software. You should be all set, although you can check the version listed under the "About [name of software]" thing if you're not sure.
Now, all you need to do is not update it! You have fired Copilot!
As a final note, Microsoft has done something rather scummy with its data management policies. Everybody who installs Microsoft Office is automatically opted into something called "connected experiences." Although it's not said outright in the descriptions, opting into connected experiences also opts you into sharing your data with Microsoft-- meaning that your data will still feed Copilot even if you don't use it. Even more scummily, a few useful features, such as autosaving to OneDrive, have been lumped in with connected experiences. However, I think users can still forgo them and have a good time. So here's how you opt out:
Do not grind my bones to make your bread:
Open one of the software in Microsoft Office. Any one will do.
Click on the name of the software in the Mac menu bar.
This should open a drop-down menu with an option labeled "Preferences...". Click on it.
This will open a window containing various configurations for the software. One of the options is labeled "Privacy." Click it.
You should see a paragraph about "connected experiences." Microsoft really tries to sell it to you here by tying it to cloud services and reminding you of a few useful things that got lumped under it. Underneath the sales pitch, there is a checkbox that reads "Turn on optional connected experiences." Uncheck that box.
You should be all set! You have opted out of being fed to Microsoft's bone-grinding machine!
Hey writers!
As of January 16, 2025, Microsoft has decided to automatically enable their AI service, CoPilot, on Word - even if you've previously turned off the service. They've also changed the process to disable it.
If you want to disable it again, go to:
Options -> CoPilot -> Uncheck "Enable CoPilot"
Hope this helps!
#microsoft word#writeblr#fanfics#writing#writing process#anti ai#<prev tags#anti copilot#psa#useful information#disabling ai#disabling data harvesting#microsoft office#microsoft excel#microsoft powerpoint#instructions#mac#osx
3K notes
·
View notes
Text
I Appreciate the Nostalgia
I really do appreciate the nostalgia that this product represents for the days of DeployStudio RIP. I do have to wonder about the market for this sort of idea. It's a whole thing with the software and these USB dongles. I would be curious to hear from someone who uses it–why did you pick this option? I tend to be of the mind that the world has moved on from this. Rapid return to service etc have made this sort of approach I think a bit obsolete–however if someone can show me how I am wrong I would enjoy that.
This I guess sort of pairs with the DFU Blaster Pro product.
This is something that I think has legs given that Apple Silicon Macs and the iOS space all have DFU modes. The USB hub they recommend for mass operations is kind of hilariously expensive. I assume the software is just based on the work from the Asahi Linux project.
I do find the fact that they are charging $99 for what is at its core open-source technology a bit off putting. I know lots of people do this, but still. You certainly don't have to spend $99 for DFU mode see here.
0 notes
Text
okay now, since my boss doesn't deem it important enough to give me a new work laptop, although my macbook pro is outdated (13,3 / 2016) and doesn't play nicely with the newest adobe software (illustrator 2025 crashes oh so foten and every fucking app tells me to update even though monterey is the latest osx i can get) i decided to patch and update my laptop myself :D (boss doesn't know)
1 note
·
View note
Text
Unable to send text messages from MacBook
If you mean SMS messages, Text Message Forwarding probably got turned off on your iPhone. On your phone, go to Settings>Messages>Text Message Forwarding and select your Mac.
Source: https://discussions.apple.com/thread/254850321?sortBy=rank
Not working: Disable on both, shut down, start iPhone, enable, start mac, enable..
0 notes
Text
IIRC the Mac versions of Microsoft Office actually function better than the Windows ones. I suspect this is partially because Apple has its own proprietary version of the Office suite that you can download for free if you are running OSX, so Microsoft Office has to work really hard to be able to compete.
I say partially though because the performance of Microsoft Office software on Macs has always been better in my recollection, even before the iWork suite was a thing. Word 2004 on the old-timey rainbow iMacs and battered Macbooks at my elementary school ran smoother, with much quicker saving and less crashes, than Word 2003 on the XP I had at home. Word 2007 was even more laggy, and this was despite my parents buying a custom Vista to ensure that all the hardware was suitable for the then-new OS (bad communication at launch from Microsoft meant that a lot of retailers were selling computers with Vista installed that had no business running anything newer than XP. My parents made sure that our Vista did not have this problem.).
Vista was the last Microsoft computer my family invested in, but from my experiences at libraries and places like that, I've been disappointed in how little has changed. I mean, that's not to say that nothing has changed at all-- Word 2023 doesn't crash like Word 2007 (which makes it much less anxiety-provoking to use!), and Excel has made leaps and strides towards better functionality when it comes to complicated math and data analysis. But across the board, the performance of Microsoft Office is still noticeably worse on Windows than Mac.
I mean, lack of competition is one hell of a drug but the performance gap between Microsoft Office on Windows and on Mac has been around since before Apple started trying to compete with Microsoft Office. Microsoft Windows is consistently the worst OS to run Microsoft products on and it's just so... baffling. If you love Microsoft software (and have a pool full of gold coins to swim in), buy a Mac. The software will work better.

#not kidding about the pool of gold coins though#macs are expensive#and so is a lot of microsoft software#frustration#absurdity#apple#osx#microsoft#windows
70K notes
·
View notes
Text


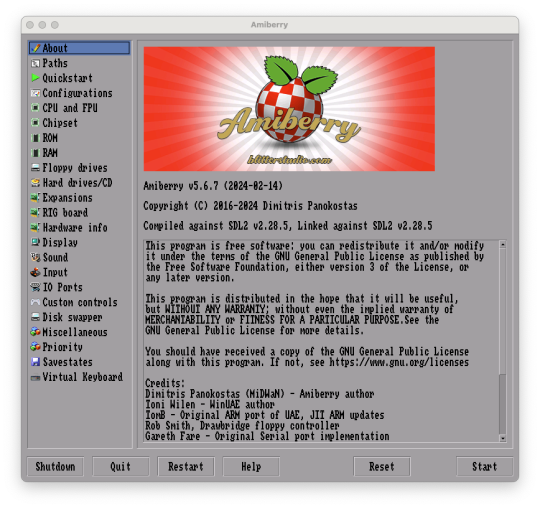
Amiberry v5.6.7 - A optimized Amiga emulator, for ARM, ARM64, x86_64 (macOS and Linux) and RISC-V platforms
18 notes
·
View notes
Text
Catálogo Oficial de Aplicativos Móviles del Estado peruano
Accede a las aplicaciones móviles de las entidades públicas, disponibles en los sistemas operativos iOS, Android y HarmonyOS. ¿Qué necesitas? Alertas y emergencias Notificaciones por eventos de riesgo como sismos y accidentes. Contrataciones públicas Contrataciones de servicios, bienes y obras con el Estado. Educación Becas y créditos educativos. Gobiernos regionales y municipalidades Trámite…

View On WordPress
0 notes
Text
youtube
8,000 views! Thanks everyone for listening :U
#Frutiger Aqua#webcore#frutiger aero#neo aero#aero#frutiger#aquacore#seapunk#ambient#y2kcore#y2k aesthetic#music#helvetica aqua aero#aqua#aqua Aesthetic#techcore#Mac OS#OSX#Apple#cybercore#cyber grunge#cyber ghetto#internetcore#Youtube#fishvapour#frutiger aero music
15 notes
·
View notes
Text

#purple#mac#macintosh#macos#osx#mac os x#mac os#purple aesthetic#laptop#macbook#xvisualtreasure09x#found photos#old tumblr#old internet
1 note
·
View note
Photo

(via GIPHY)
My new favorite GIF
1 note
·
View note