#lolita tutorials
Explore tagged Tumblr posts
Visit Tumblr Blog
Explore Tumblr blogs with no restrictions, modern design and the best experience.
Last Seen Tumblr Blogs


Fun Fact
The “We are the 99%” Tumblr blog became the slogan for the Occupy Wall Street movement.
Text
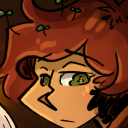
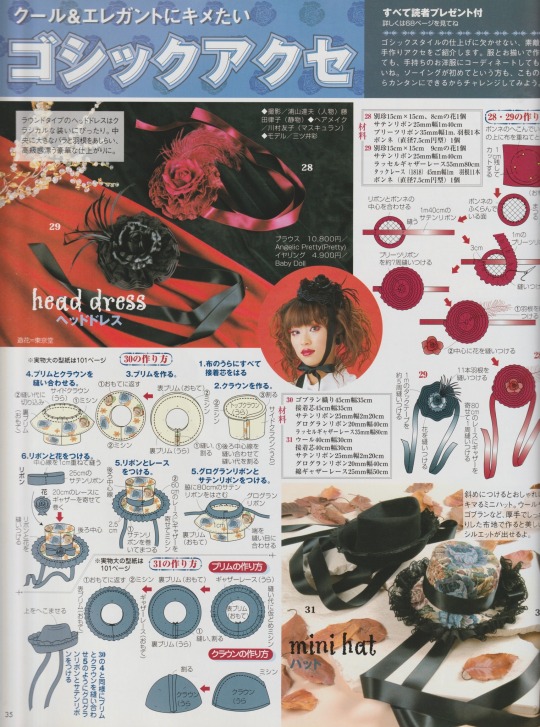
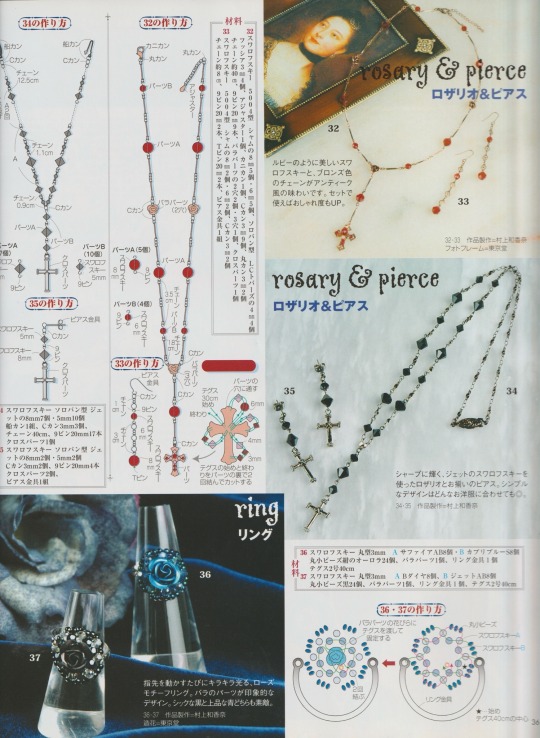
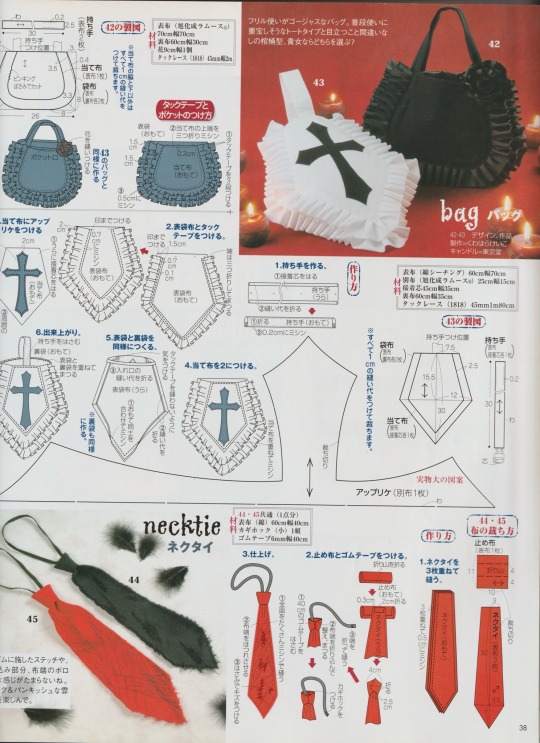
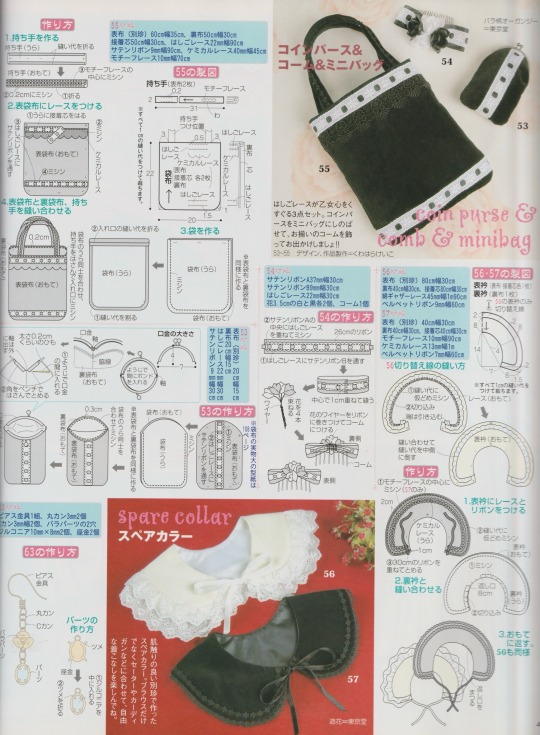
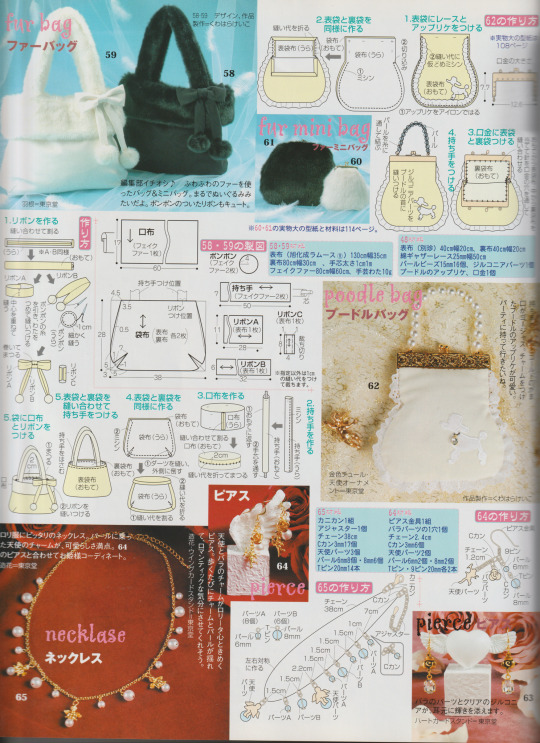
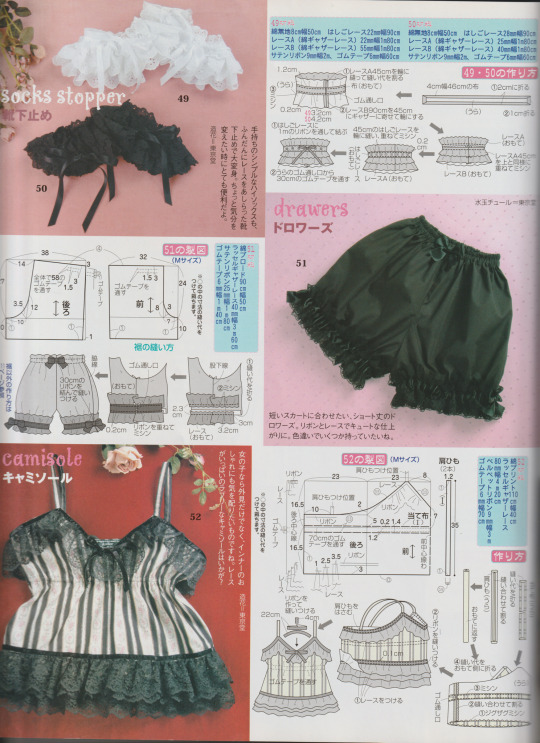
Lolita Accessory tutorial pages from Japanese mook “Gothic & Lolita Patterns”, 2004
Included are: head dresses, hair clips/ties, camisole pattern, drawers pattern, sock stoppers, multiple bag patterns, detachable collars, and jewelry.
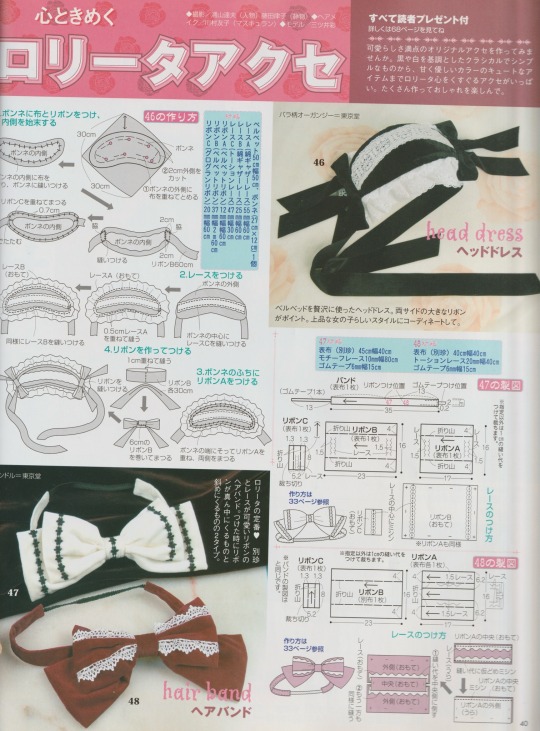
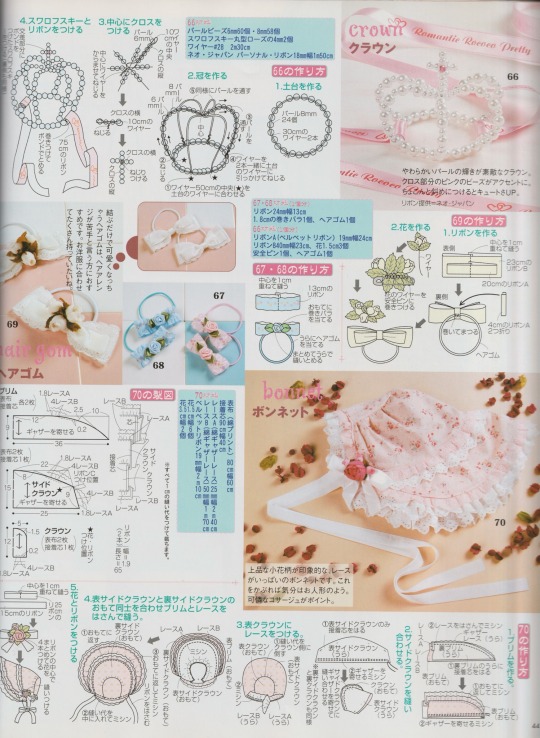
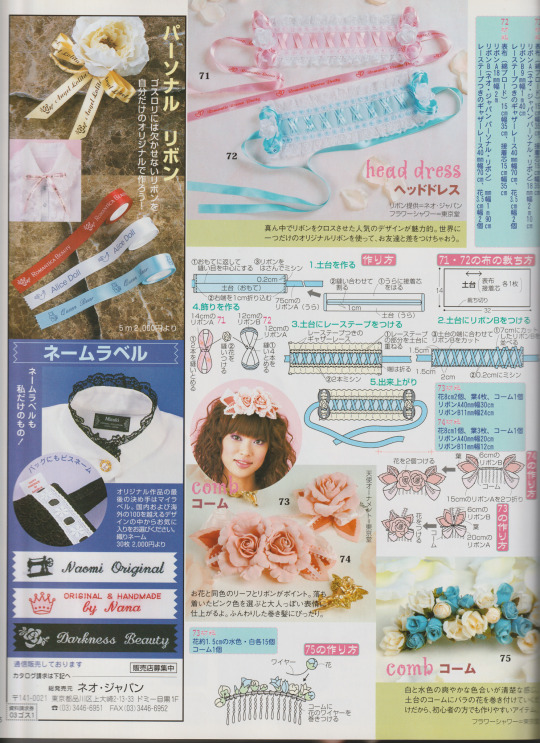
Consider this as my Valentine’s gift to you guys!! Thank you for being very kind about my post ^-^
*Also* If you would like the patterns to some of the tutorials (ie: the mini top hats, pattern 62) let me know so I can make a post later!
#gothic lolita#lolita fashion#j fashion#old school lolita#egl#egl fashion#coord#fashion#tutorial#magazine#sewing patterns#jewelry#goth#archive#my scans#happy valentine's day
1K notes
·
View notes
Text

Bag and headdress are handmade. From Gothic & Lolita Bible Vol.2, 2001.
145 notes
·
View notes
Text
Crossposting my little video here on trimming fur around usakumya's face to make it cuter!
I think this is a common practice for Chinese and Japanese lolitas, but it seems to not necessarily be too well known overseas. I recall watching a video by Cordelia in the Summer who edited a clip by BABY shop staff about it, and wanted to try myself!
I probably could have trimmed more fur around the mouth but I didn't want to overdo it. Anyways, this particular kumya will be going to it's new home with yuefii!
208 notes
·
View notes
Text
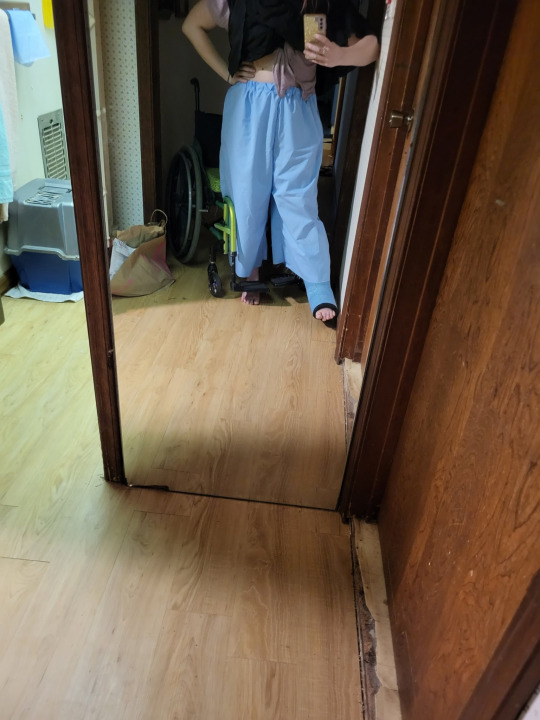
(It's been entirely too long since we've started a tutorial with a very blurry picture, which is a 20dollarlolita tradition. Am I about to fall over and only staying upright because of a death grip on this trim? Stay tuned to find out)
Let's make a skirt.
There's a lot of lolita fashion that doesn't fit most people. It's me. I'm most people. I'm going to wear it anyway, so I'm going to resize that to fit me.
The hardest part of resizing a lolita skirt (or skirt part of a dress) is that you almost never can get the fabric that the skirt was made out of. Lolita prints are usually pretty limited run. While some dresses will let you redistribute the fabric to have a slightly less full skirt, that's usually a major reconstruction that ends up drifting a bit away from the lolita shape.

x
A ruffled bustle bustle, however, is pretty common. Bustles like this are pretty common in lolita fashion and add an additional detail. In addition, you can make the waist of the skirt several inches bigger without a problem, and without compromising skirt fullness. If you ever want to undo the alteration, seaming the skirt back up is not very difficult. It's not a fully seamlessly reversible alteration, but there's far worse things you could do to the garment (ask me about my AP dress with mesh pits).
The problem is that bustles like this take quite a bit of energy and fabric, especially if you want to have details like lace trim. It's one of the more time-consuming alterations to do.
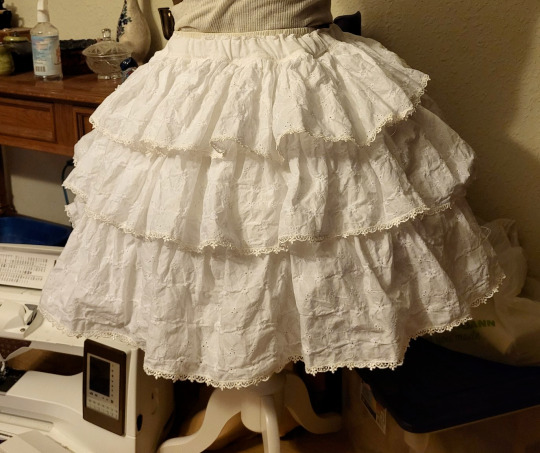
Or you can make one bustle/ruffle underskirt, one time, and wear it with all your skirt and dress modifications. You can splurge and get some nice trim and get some nice fabric, because you only need to buy it once. You can also wear it as a standalone skirt. (Just remember to never, ever steam it before taking pictures. You wouldn't want to look competent)
I put off making one of these for a very long time, because I'd made the process much more complicated in my head than it turned out needing to be. Once I was building this and realized I needed to simplify the fuck down, this became a really easy project.
Materials: I decided to make the ruffles on my skirt out of eyelet lawn, which is a cotton fabric that has an all-over embroidery. I got this for about $10 a yard on ebay. I don't have a very accurate judgement of how much I used on the skirt. I bought 4 yards and used probably 3.5, but I also wasted a bunch of fabric on an extra tier that I had to chop off. I wanted a fabric with more detail than broadcloth, but that wasn't exclusively going to work with OTT styling.
I got 30 yards of 1/2" Venise lace off cheeptrims.com for $9. I really recommend putting lace on your ruffles if you can. It really adds to the detail level, and you only need to buy it once. You already have to hem all of this so you might as well hem it with lace.
You will also want some fabric for the slip layer (for want of a better term) to attach the ruffles to. My ruffles were a little bit sheer, so I wanted an opaque base fabric for modesty. Depending on the look you're going for, you can also use this layer to add some subtle detailing or changes to the finished look. If you're only wearing it with over-the-top looks, using a base fabric with shine or glitter can stop your ultrabustle from looking too plain. If you're wanting your ruffles to lay flatter, getting a soft fabric with a lot of drape will make the ruffles droopier. I just used some weird cotton plainweave that I got at Green Store for 75% off due to a bolt-long defect.
I used 1" elastic in the waistband here, because this skirt can get a little bit heavy, and then you often have another skirt on top of it adding to the weight.
The other thing that I used that made this much easier was a ruffling attachment for my serger. You don't need to use a serger, but a ruffling or gathering attachment that allows you to ruffle a flat strip of fabric and sew it onto another piece of (not to-be-ruffled) fabric will speed things up considerably. I know a lot of people buy a ruffler or a gathering foot when they start sewing lolita, and then are disappointed when they don't use it very much. There's a very limited number of lolita applications for these attachments, and I'm happy to tell you that this is one of them. If you don't have one, you don't need to go buy one. You can just do the two-step process of gathering the fabric and then sewing it on. But if you wanted an excuse to go buy one, well, you have one.
The Plan:
So I'd previously made a lot of math and calculations for how each tier was going to gather into the previous one, and then realized during the build phase that actually was way too complicated.
What we need is a rectangle with ruffles on it gathered into a waistband. Yes, a rectangle. I know, I was stunned too, but the final result worked the best.
I wanted the tops of the ruffles to be hidden in seams. If you just sew ruffled strips onto a single piece of fabric, it's very difficult to hide all the raw edges and to make sure you're not spreading loose threads all over the place. We're going to make ruffled strips, and sew them to each other. This covers up the raw edges very nicely.
This also will allow you to slightly gather the second and top tiers to each other, if you want to make this skirt in an a-line instead of a bell/cupcake shape.
The Math:

If you know what skirts you're planning on wearing your ultrabustle with, it can help to measure them and get a good guideline.
Generally, you want your ultrabustle to be a number somewhere within these guidelines.
~~Close to the same length of the skirt you're wearing it with or ~~4"ish longer than the skirt you're wearing it with. (This depends on if you want the bottom ruffle to stick out. If you're Tallita and all the skirts and dresses you're resizing are also too short, you might want this to double as a ruffled underskirt) and ~~An acceptable length to wear as a skirt all on its own.
My first run at this ultrabustle was WAY too long, and after chopping off the entire top tier, it ended up being either 1" shorter or 1" longer than the skirts I'm planning on wearing it with, which is a great number for me.
As for the total fullness of the skirt, you have to remember that the ruffles will add visual volume to the skirt. This means that you don't actually need the hemline of your skirt to be super full. All that matters is that your petticoat can comfortably squeeze in there. For this, I measured the hemline of the smallest dress that I had that still fit my petticoat, and used that. It turned out to be about 80" around.
So, what sizes do we cut this at? It's math time.

Here's a worksheet if you want. You're going to need to know how long you want the finished skirt, how wide you want the hem of the slip (not the ruffle) of the skirt, how many ruffle layers you want, and your waist measurement.
The slip needs to be shorter than the ruffles, so it doesn't show. So total slip length is your skirt length minus 2.5". Divide that by the number of ruffle layers that you have, and you'll have how long to cut each of those. This is slip tier short side.
Each ruffle layer needs to be longer than each slip layer, so that the slip doesn't show. You want each ruffle to overlap the previous one. So, take your slip tier short side and add 2-3" (or more, if you want). This is your ruffle short side.
Your finished slip diameter is your slip tier long side. That one's easy.
If you're a math and planning person, you can determine your ruffle long side measurement. You'll want to take a piece of your fabric, cut to the ruffle short side measurement and also about 45+ inches wide, and a piece of your slip fabric. Run them both through your gathering attachment so that your ruffle fabric is sewn onto your slip fabric. If you like how that looks, you can then measure the finished length of the ruffled fabric and use that to calculate how much fabric you'll need for the ruffles. There's four places where people mess this up. First of all, if you're using your gathering attachment to sew and gather at the same time (which is the point of that attachment), you want to do all your test runs gathering it onto a fabric. The amount of fabric that goes into a machine ruffle changes depending on if it's onto fabric or just gathering. Second, you want to use your finished fabric, at your finished ruffle length. Different fabrics will ruffle different amounts, and different ruffle widths will look different even at the same gathering amount. Third mistake people make is to not gather a long enough strip. The longer a strip you gather, the more accurately you can measure how much fabric is actually going into your ruffle. And the fourth is to take that measure as an accurate one, and not plan for needing extra fabric. The upside of the gathering attachment is that it will save you so much time. The downside is that you can't be as accurate with knowing how much fabric you'll use. Remember, you can always turn the leftovers into a matching accessory. Even if you're going to go yolo like I did and not do the math about how many ruffles you need, you will still want to run a check that you like how your ruffling attachment looks. You don't need to measure super accurately, but try to get a feel for how much fabric is going into each ruffle. For example, if your ruffler takes a strip and makes it 1/3 it's flat size, then you'll need more fabric than if your ruffler makes it 1/2 it's flat size. If you're really on a budget, you can just cut your ruffles at 2.5x your slip long dimension and precisely gather by hand. My time's worth something to me and so it wasn't worth it to do that just to save a yard of $10 fabric.
The last part is just to check that your ruffle long dimension (or it's rough approximation) is still at least 2.75x your waist measure (3.25 is better). If you don't have that, your skirt likely won't look full enough for a lolita silhouette. If that's the case, just add to your skirt dimension until it is.
Actually making it:

Before you forget, cut out a piece for your waistband. You can decide if this looks better in your ruffle fabric or your slip fabric (I used slip). This piece should be 3ish" longer than the distance around the fullest part of your booty. You need this to be longer than your booty distance so that you can get it on your body. If you're using 1" elastic, you want this piece to be a minimum of 3" wide.
I've found that the easiest way to do this is to start out by making the whole skirt as a single, very long strip. So, I take my slip tiers and cut them all out, and sew them into a long strip.
On my specific fabric, I decided that I wanted the pattern on the eyelet to go lengthwise. So, instead of cutting the fabric across the grain (short side, selvedge to selvedge) like I normally would, I cut down the 4 yard length of the fabric. This meant a lot less seaming. Since I didn't really know how much fabric I was going to use (you know that test I described to check how much fabric you're going to use? Yeah, guess who didn't do that), I just cut them one 4-yard strip at a time. I'd ruffle one all the way, stop, and cut the next one. This did actually save me quite a bit of fabric versus cutting them all at once. I had to go back and sew the sides of the ruffle together once the skirt was done. It was a small price to pay for the convenience I experienced.
I knew what size I wanted the finished ruffle length to be, but I cut my ruffles about 2.5" longer than that. I wanted a little bit of wiggle room once the skirt was done, so that I could do the length adjustment once the whole skirt was assembled.
And then, it's just a matter of letting the ruffler do its work. My serger ruffler works by you putting the item to-be-ruffled on the bottom, and the item to attach the ruffle to on the top, and then just hitting go. Some other rufflers work by putting the to-be-ruffled at the top, so you can see it as you go. Like all sewing machine attachments, if you're not sure, just go on youtube and search "HOW SINGER GATHERING FOOT DO THING NOT LOOK LIKE SHIT?" and someone's probably made a video of it.
So, once you've run all your ruffle through your machine, you should have a nice single strip of slip fabric with a ruffle on top of it. Now, some gathering attachments don't actually sew super strong seams, because you have to adjust tension or stitch length pretty severely to get it to ruffle like you want. The other advantage of putting the ruffles in a seam instead of just topstitching them onto a piece of fabric is that it doesn't matter how strong your ruffle attachment is, as long as it's strong enough to hold until you can put the ruffle in the seam. The seam provides the strength.
Once you have your single long ruffle, cut off a section that's the diameter of your bottom tier.
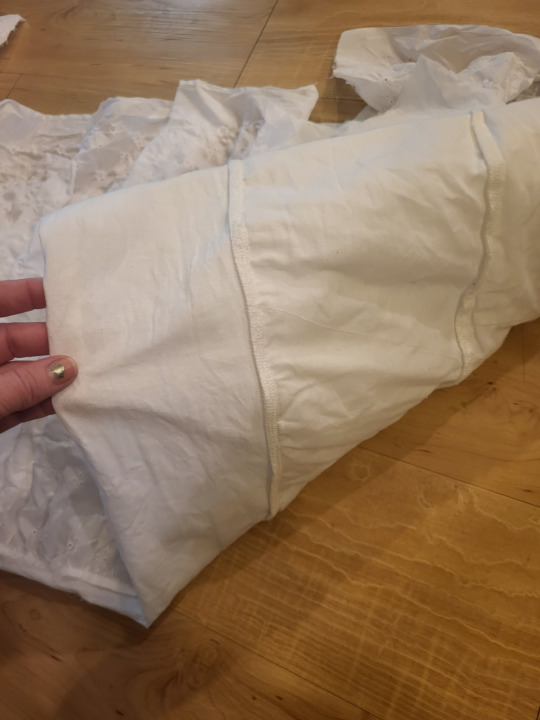
Now you just need to sew them together (and finish your inside edges). I like to start at the bottom tier and go up.
For each tier, you're sewing the bottom of the slip layer to the top (ruffle and slip) of the tier below. Just pull the ruffle of the higher tier out of the way, put right sides together, and sew.
If you aren't using a serger, you can zigzag over your edges and then trim them down, use an overcasting stitch from your sewing machine, or topstitch some seam binding over the seams. The extra line of stitching on the slip layers in front won't be visible. One of the other nice things about building this in the way we have is that, when you finish the edges of your inside seams, you're putting three layers together and finishing it as one. This is actually a lot less then 1/3 of the work of finishing them separately, because you'd have to finish the ruffle as a flat piece, which would take way more time. Have I convinced you on the greatness of this technique yet?
Continue cutting pieces off your ruffle layer and stacking them until you have as many layers as you decided you were going to have.
Once you have your layers all stacked up on each other, it's time to sew the skirt back seam. I find that it looks best to hold the ruffles out of the way, sew the slip together, and then go back and sew all the ruffle pieces. Basically now is a good time to just check for any ugly spots and to touch them up.
There's like 50 ways to attach a waistband to a skirt. For this one I used this method (what a blast from the 20dollarlolita past we have there. Also please note that the cost of ruffler feet seems to have gone up from $15 to $60-$100 in the past 10 years and despite working in a sewing machine store, I'm not totally sure why).
Once you've got the whole skirt assembled, it's time for the finishing.
The first thing that I did was put it on and try to judge how short I wanted my top ruffle. I'd cut all my ruffles extra long in the short dimension, so that I could shorten them when they were on the skirt. I picked a length that worked, marked it out, and chopped at that point. I then did this for the other two layers. I found that I wanted my bottom ruffle to be a little bit longer than my top ones, and cutting it long allowed me to make that choice.

I then started just zigagging on my lace. If you don't have a serger, you can use the lace as a hem finish, which also saves you an additional step. The lace really added a lot to this, and since I only need to make this once to wear with a lot of different garments, it was an economical use of nice lace.
I started putting the lace on the top layer first. This is because, if I ran out of lace, having a different (wider) lace on the bottom layer wouldn't look strange. As previously mentioned, I did zero measuring of how long my ruffles are, and had no idea if 27 yards would be enough lace. Don't be like me. Do some tests. Or be like me and choose the life of treachery. Anyway, stick lace on this thing, please. You worked hard and your skirts deserve it.
The only other thing that I did was to cut the slip layer down by about 3" on the very bottom. I did this because I made a mistake, but I like how it looks.

You can take this system of ataching ruffles in rectangles or even a trapezoid and stick it in the back of a skirt (or skirt on a dress). I did that here because I knew that I wanted a pink bustle, not a white one.

I'll do a tutorial for the actual skirt resizing sometime after I actually resize a skirt with this. Here, all I did was slice the back, hem those edges, and then button on some waist ties from another dress. This let me easily add several inches to the back of this skirt, without needing to re-distribute pleats, and without sacrificing the fullness of the shape.
This will all sit a little bit better once I've pressed the skirt, as well. Steaming the top layer of this while the garment is on me/a dress form/a hanger will decrease the poof in the top layer a little bit, and honestly, we could benefit from that in this case.
Anyway, if you have this, you have a very fast way to enlarge existing garments.
So, while this has thankfully very much decreased in the past years, there's still some people with weird opinions on MoDiFyInG bUrAnDo, so let's have a talk. Lolita clothing is not community owned. If someone who was never going to sell a dress to you modifies it, that doesn't take it away from you. This is a mentality that we tend to have in lolita more than other fashion just because of our high resell scene, but it wasn't ever going to be your dress and so you don't need to have an opinion about what happens to a thing you were never going to personally own. Things have value more than money, and value is often changed rather than destroyed. AP's Halloween Treats OP has no value to me when sold for $500 on Lacemarket. I don't spend that much money on lolita, ever. But a questionably-altered AP's Halloween Treats OP that I can un-alter has value to me if the price is good. But a questionably-altered AP's Halloween Treats OP has very little value to someone who likes the price, but can't undo the alterations. When someone resizes a dress or skirt, true, sometimes the people who are the size it was originally made can't wear it anymore. You've decreased the value to them, but you've made it more valuable to people who are the size that you've made the garment become. This skirt had no value to me when it's waist measure is 7.5" too small, but now I can wear it, so it has functional value to me. A lot of people who say that modifying the dress ruins it are either ignoring that also the stress of putting a dress not sized large enough for your body can damage it and not look as great while doing so, or else they have a much worse take. People who say that modifying clothes ruins the garment, but also say that wearing a garment that's too small ruins the garment, what they're actually saying is that wearing that garment is a privilege that should not be extended to larger sized people, and if they say that then they can just, you know, go fuck themselves. We don't need that in the community. Everyone deserves to wear lolita, and some people have to work harder to achieve it, and that's not fair, but everyone deserves it.
So yeah, kiddos! Build a skirt! Go cut up some clothes! Wear the skirts you've always wanted to wear! You can do anything!
And to answer the question we opened this with, yes, I was absolutely falling over.
#handmade lolita#20dollarlolita#lolita fashion#resizing clothes#making clothes bigger#tutorial#skirt tutorial#lolita skirt tutorial#sewing tutorial#bustle underskirt#utilibustle#ultrabustle#the one bustle to rule them all#one bustle to find them
249 notes
·
View notes
Text
⋱⋰ ⋱⋰ ⋱⋰ ⋱⋰ 𝘽𝙇𝙊𝙂 #5⋱⋰ ⋱⋰ ⋱⋰
I've missed a couple days, but i suppose that a blog isn't exactly a daily thing, is it?
I have tried out some new, super cute hairstyles over the last few days and i wanted to share them with ya'll! (。•̀ω-)b
This first one required me some work in the evening. (heatless curls) i parted the hair down the middle then split the two sides in about 1/3rds horizontally. I curled the top part and took it out in the morning! Made it into pigtails and topped it off with a cute headband, leaving some curled strands infront.

This next one didnt have me do any curling, but its also a half up style! Same as before, down the middle the horizontal parting. Put the top part into bubble braids and strands infront into bubble braids too! A headband on top and voila! (❛ε ❛ ) ~♪

Signing off . . . Your dear frillmonster! ♡
5 notes
·
View notes
Text
Lolita Cutsew · How To Make A Blouse · Sewing on Cut Out + Keep
20 notes
·
View notes
Text
youtube
#girlblogging#girl interrupted#girlblog aesthetic#gaslight gatekeep girlboss#lana del rey#hell is a teenage girl#female hysteria#this is what makes us girls#coquette#daisy randone#alida simone#baby darko#nymph3t#american lolita#vintage americana#america’s sweetheart#lana del rey aka lizzy grant#key west kitten#ldr unreleased#coquette dollette#makeup tutorial#tumblrina#fawn angel#angel core#heroine chic#chic diet#alana champion#lily rose depp#lux lisbon#mermaid motel
14 notes
·
View notes
Text


16 notes
·
View notes
Text
youtube
I made some cute hair bows ♥
#kawaii#kawaii fashion#bows#hairbow#lolita hair#sweet lolita#lolita fashion#coquette#dollette#handmade#cosplay#jfashion#fairy kei#pastel#kfashion#pastel kei#pastel goth#crafts#youtube#tutorial#how to#cute aesthetic#Youtube
5 notes
·
View notes
Text
Hair, makeup, & nail tutorials from Japanese mook “Gothic Lolita Patterns Vol.1”, 2004
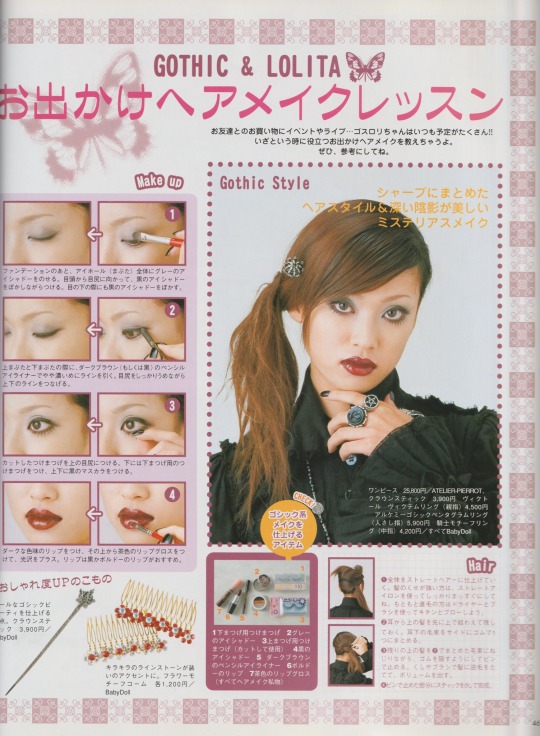
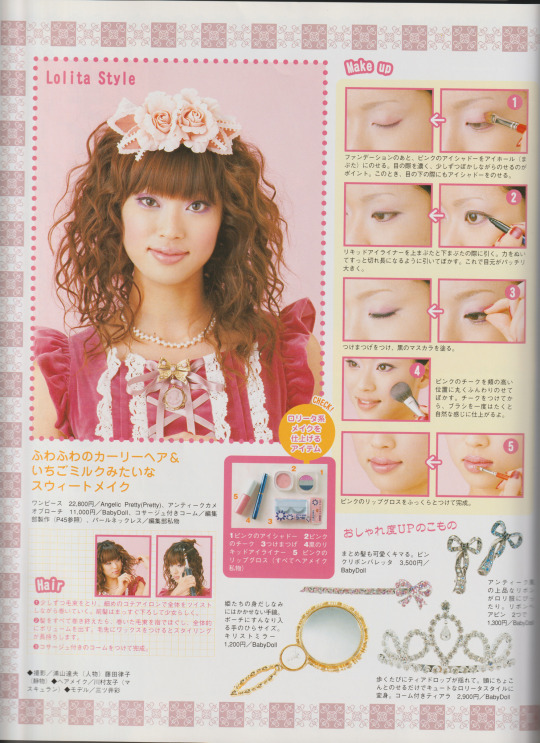
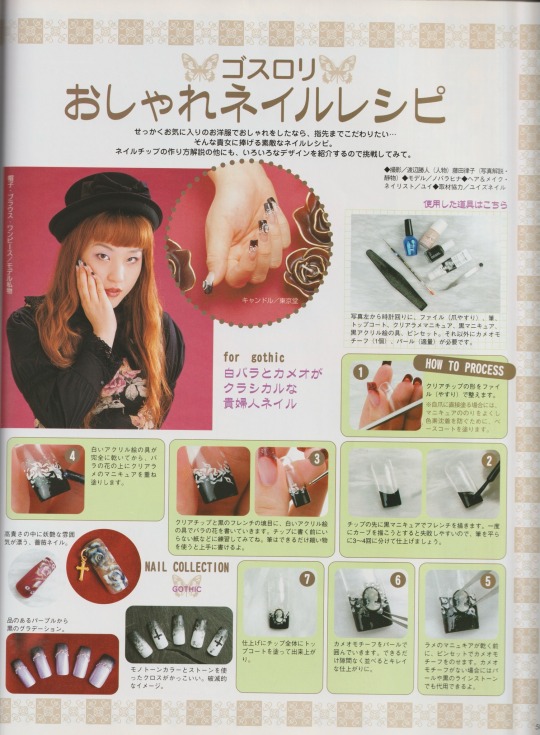
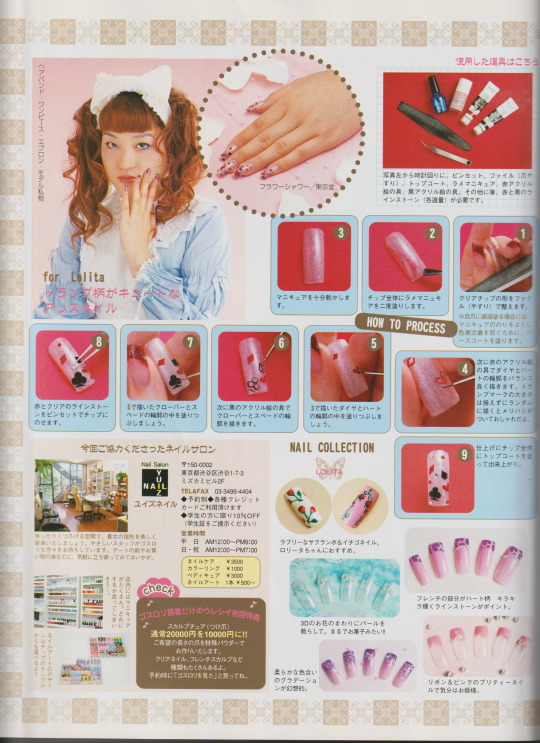
I wanted to do one of the makeup looks for reference, but I am neither pretty nor good at makeup, sorry T-T
#gothic lolita#j fashion#lolita fashion#egl#old school lolita#egl fashion#nail art#cute nails#makeup#hairstyle#tutorial#my scans#archive#i should up my makeup game
301 notes
·
View notes
Text
The only sewing tutorials I trust are videos from 8+ years ago where the camera quality is terrible and theres no voice over, just text on the screen with an odd font choice
#im planning a porcelain doll costume for halloween so ive been watching a lit of lolita tutorials#those girls have my back when no one else does#glowing posts
1 note
·
View note
Text
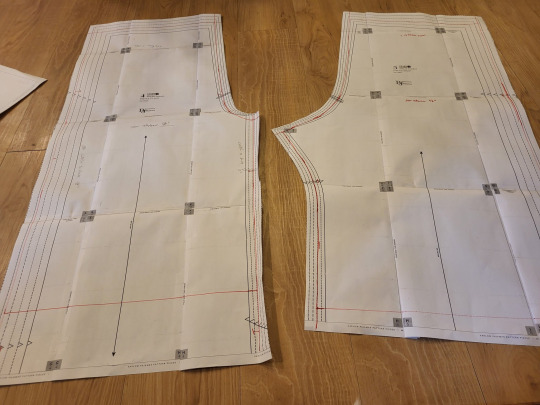
Can you believe it? 20dollarlolita Pattern School Step 2!
Only took me a year and a half. For people who don't remember a year and a half ago, we've started a project about learning to sew from patterns. The eventual goal is to help people become proficient enough at reading patterns to be able to tell what's going on in a pattern with instructions in another language, taking a pattern that doesn't fit and resizing it so that it does, and taking a pattern that isn't technically lolita and make it work in lolita fashion.
Step 1 was to make a non-fitted item from a commercial pattern. There were two goals of step 1: first to ensure that everyone was familiar with notches, grainlines, and other pattern markings; second was to give people experience with selecting fabric and trims to help give a non-lolita pattern a more lolita feeling.

For step 2, we're modifying a commercial pajama pants pattern into bloomers. In this step, we're going to become familiar with how to prepare a commercial pattern for modification, to compare pattern size to body size and to use your tape measure to judge added fullness, and how to do some basic flat pattern manipulation to add in style ease. Bloomers are a great first manipulation/fitted project due to the loose fit and the fact that, in most lolita applications, the vast majority of it is under your skirt and therefore invisible.
For this specific sample, I'm going to use Gertie's Harlow Pajama Pants pattern for this. I'm doing this because I bought a commercial pattern from Green Store and then promptly lost it, and these pajama pants are a free download. If you are printing the tiled version on your home computer printer, you only need pages 41-52 and 58-71, which will save you about 40 pages of printing.

I highly recommed doing some research and having a good idea of how long the bloomers you want to make should be, as well as how they are decorated. This is my research board.
You can use any pajama pants pattern that has a casing (elastic or drawstring) at the top, and no zipper. In this case, pants with a looser fit are going to be easier to turn into bloomers. If you like wearing your pants at a certain point on your body, I'd check for pajama pants that are at that waistline. The pants that I'm using are designed to sit at your natural waist, which might be too high for some people.

Your first step is to assemble and fortify your pattern. If you're printing this on copy paper, it's going to be strong enough, provided you use enough tape when tiling your pattern. If you're using a tissue paper pattern, like the kind you'd buy at the craft store, it helps to fuse some inexpensive interfacing onto the back of the pattern. We're going to work with these patterns a lot, so it's important to make them a little bit stronger.
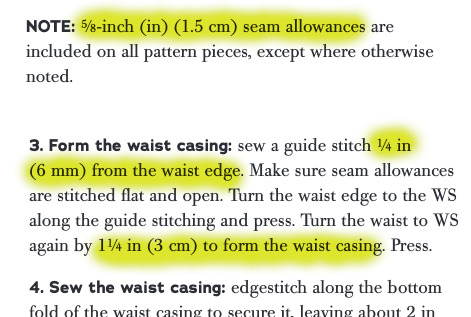
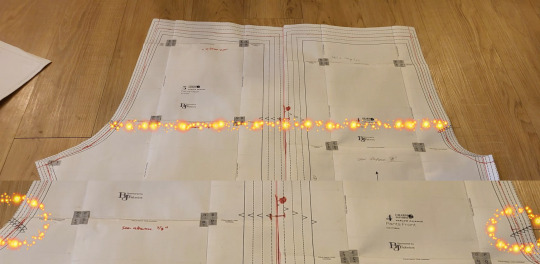
Now, you are going to need to go into your pattern instructions and find two important things. The first is your overall seam allowance. In most commercial patterns, this is 5/8 of an inch. Some other patterns might have different seam allowance.
The second is how big your elastic casing at the top will be. In this case, my seam allowance is 5/8" of an inch. Because my hem casing is .25"+1.25" (the amount you turn up plus them amount you turn up the second time), I know that my elastic casing will take up 1.5".

You're now going to mark on your pattern what the stitching line is. Your pattern has seam allowance included. This is very useful for when you cut out the pattern. However, if we take our pattern measurements with seam allowance, we won't have accurate numbers. So we have to clarify where the seam allowance is.
The first thing that I do (not pictured) is to write how much I'm removing along each line. In this case, I write 5/8" along the side and crotch seams, and "1+1/2" at the top where the casing is. Since we're going to drastically shorten these pants, it doesn't matter what the hem allowance is.
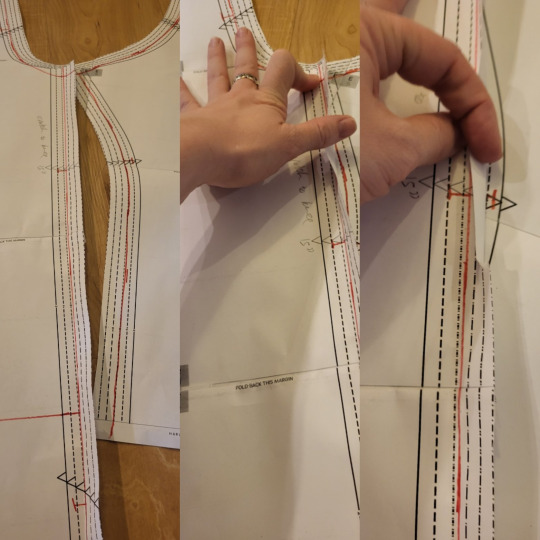
Then, I take my ruler, and I mark my stitching line. I do it in pencil, check that I'm correct, and then go back and re-draw it with a red marker. This helps me make sure that I'm following the correct lines.
Make sure you transfer your notches onto your new stitching line. You can see in the picture above how I'm using the ruler to measure where the notch is going to go.
The next step, walking the pattern, is a little tricky to explain. Here's a post that goes into it in great detail.
Basically, you're going to overlap the seam lines, to make sure they line up. The only problem with doing this is that both seam lines are curved. So, instead of lining it all up at once, you're going to go about an inch at a time, letting the pattern rotate so that it stays flat on the table. At any given point, you're only going to have an inch or so of the line overlapping, but that's all you need. If you run into notches that don't line up, cross one out and re-draw it so that it matches the other notch.
If this seems really complicated, you don't really need to do that on this project. It just is a good practice to have.
So you now should have a pattern with all the commercial markings, but where you've drawn the stitching line.

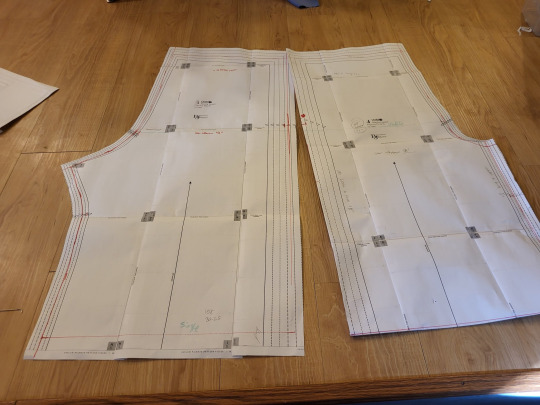
So now, you're going to put your two pieces together along the outseam. Since this is a pretty straight part of a pajama pant, it shouldn't be too difficult to get them to line up. Remember to overlap them on your stitching line, and not on the edge of the pattern.
We're putting them together so that you can measure them both at the same time. it saves us some math.

In bloomers, there are three major measurements to take into consideration. You need to know how big you want the leg to be, how big you want the booty to be, and how long you want the leg of the bloomer to be. In addition, you need to make sure that the waist of your pants will be big enough to fit your waist. In most pajama pants patterns, this isn't a problem, but checking it is good practice.
So, in this picture, you can see that I've measured the cuff of the pants. These two pieces together make up one pant leg, so I just need to measure the two pieces to know how big the pant leg will be.

I then take my tape measure and hold it around my leg at the same size that the pattern is at that point. I just use my eyes and judge if I think that'll be enough room to make my bloomers nice and poofy.
If your pattern doesn't tell you your hip line (mine didn't), it's usually at the point where the two notches on the crotch curve are. One of the reasons why we're doing this on a commercial pattern is that someone did the work for us and put those notches where they should be.
Now, remember, these two pieces are only half of the pant pattern. When we measure the hips of the pattern, we have to multiply this measurement by 2. Half the hip measurement x 2 is the full hip measurement.

Once again, hold this out next to your body and make sure that you like how much fullness you need. Remember that, in addition to having extra fullness because bloomers are poofy, you need room to be able to move and sit down. This measure between the size of my body and the size of the pattern looked pretty good to me. I could definitely have gone a little bit bigger.
The pant leg measurement is okay to be a little bit too long. You can always make it shorter. However, feel free to chop about 18" off the bottom of a full length pant leg. This just makes things a little easier.

Now, we're going to move the two pattern pieces until they're the size we like. If both the hip measurement and the leg measurement are too small, we're going to move both pattern pieces apart. To turn pajama pants into bloomers, this is likely to be the most common adjustment.
If the hip measurement is pretty okay, but the cuff measurement is too small, you're just going to move the bottom part of the pattern apart.
You'll notice that this is still enlarging the hip measurement a little bit. This is fine for bloomers since the style is for a lot of fullness in that area.

And if your cuff is the correct size, but your hip measure is too big, you can keep the cuff size the same and move the hip line apart until it's the size you want.
This technique of lining up the pattern pieces, and then moving them until they're the size you want, is the basics of flat patterning. As long as you follow the philosophy of keeping the measurements you like roughly the same, and moving the areas that you don't like until they measure what you need, you can easily resize a pattern without having to re-draw everything.
If you had to spread your pieces apart, tape some paper underneath the gap. This piece of paper should bridge the gap between the two pieces, turning them into one piece. Really quickly double-check that these pieces measure how you want. Then, mark a line in the middle of the paper bridge. Draw your notches onto the cut line. Cut the two pieces apart on that line. You've now made both pieces bigger. Tape another little piece of paper onto the cut edge of each piece, mark out your seam allowance, and cut that off.
Bonus points: swap the position of the pattern pieces, so that the crotch curve is one continuous line. Measure the length of that. Then, hold your tape measure along where the crotch curve of your pants will fit, and make sure that you have clearance there. I'm not going to photograph that, andi t's not super necessary with most pajama patterns.
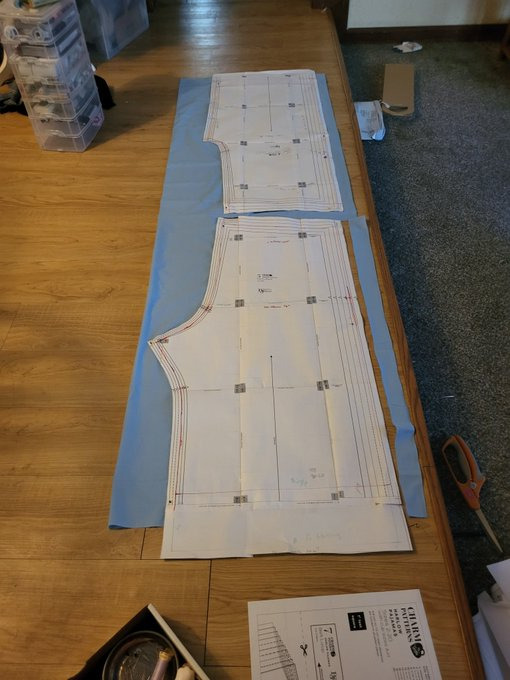
Go ahead and cut your pieces out.Even though I'd shortened the pattern, mine were still too long to fit on a 2-yard cut of fabric. Since I knew that my pants were a little long, I just let the end hang off the edge of the fabric.
Here's the really magical part about this. Even though you've resized your pattern, you still have all your seam allowance, notches, grainlines, and your pattern instructions. Since you kept all your pattern markings consistent, you can now follow the instructions that came with your pattern. Go up until it tells you to hem the pants, and then try them on.
In my case, my pants were way too long to be bloomers. I knew that I wanted to do a casing with a heading, which does use s pretty big hem allowance, but even so, I'd need to shorten them.
Check out your bloomer research board to see how long you want them to be. I wanted some long ones that did the old-school bloomer peek, so I made them on the longer side. I also didn't want them to ride up into my butt when sitting in a wheelchair.
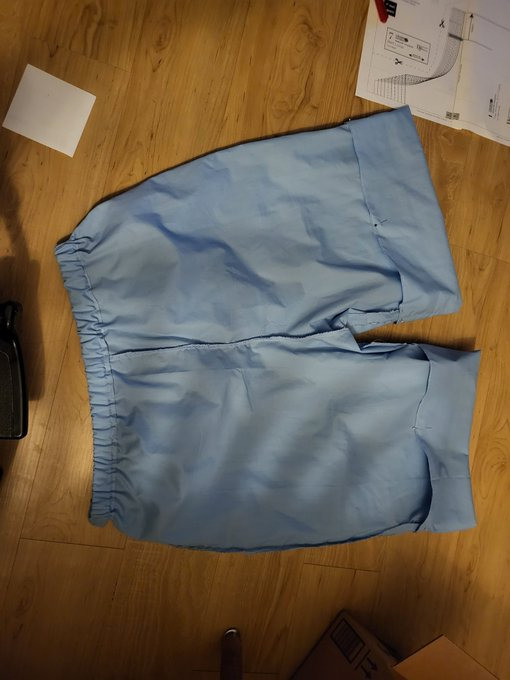
So, time to fold up the bottoms, add my elastic, and call the basic construction finished.
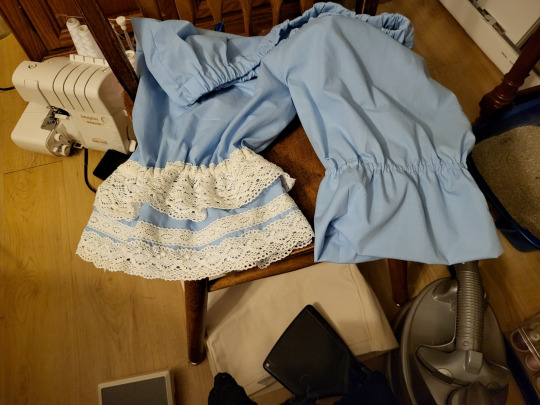
I looked up on my research board to try to find a good way to decorate these. One of the nice things about bloomers is that you can wear them with a wide variety of coords. This makes them one of those items where you can add some extra lace, and then use that lace in multiple coords. I feel like, since these bloomers are a good way of adding detail in multiple coords, it's a good excuse to add a little bit extra lace. You can see how much of a difference it makes in this picture. It really turns them from baggy shorts into real bloomers. I really recommend sometimes investing in a couple of big purchases of lace. If you have lots of lace on hand, you're more likely to include it in your projects, which can really help push a meh project into proper lolita fashion territory. I have a rule that I don't spend more than $1.50 a yard on lace unless it's really fantastic, and I manage to find things at that point on Aliexpress and sites like Cheeptrims.

Now go on and let them peek out of your favorite skirt. And remember, definitely don't press that skirt before putting this picture in your tutorial.
#20dollarlolita#dollar chan's pattern school#step 2#lolita fashion#patternmaking#handmade lolita#lolita bloomers#sewing tutorial#hey guys look i actually made somethign#long post
111 notes
·
View notes
Text
tag list:
#tutorials
#fashion - for any kind of fashion
#lolita fashion
#historical fashion
#favs - for things i'd like to possibly use in future character designs
#accessories
#himari vibes
#lianhuo vibes
#ahli vibes
#kieran vibes
#malakai vibes
#amir vibes
#[character] vibes is my general tag, i'll be using it for any character i happen to tag
#templates
#art memes - with sub categories of #expressions art memes
#poses
#expressions
#tutorials#himari vibes#kieran vibes#ahli vibes#malakai vibes#amir vibes#fashion#historical fashion#lolita fashion#favs#lianhuo vibes#poses#templates#art memes#expressions
0 notes
Note
ooh, 1 and 7 for the book ask :]
What's something you read recently and enjoyed?
I read Tamsyn Muir's new novella 'Undercover' during work breaks the other week and all I have to say is that with every book she inches closer to necrophiliac erotica and i await that moment with baited breath. delightful little book about sentient zombies in the weird west i very much recommend it to break you out of a slump. I also just finished Rachel Holmes' biography of Dr James Barry to which I can only say HIGH BUDGET BIOPIC. NOW
7. What book do you love but usually not recommend because it's weird or intense, etc?
The obvious answer here on peglarpapers dot tumblr is Dan Simmons' The Terror of which I am a staunch defender. The slightly less obvious answer is most stuff by NK Jemisin, which I truly do not think is particularly weird in the grand scheme of things, but i've lent my copy of The Fifth Season to multiple people looking for new sff and most of them returned it unfinished saying it was too weird for them. i will continue to collect data on this matter
#thanks for the ask!!!#also have a longstanding vendetta about the artistic merit of lolita w a guy who somehow ends up in half my tutorials#joe maybe if you had read the book rather than grandstanding about how you're morally superior bc you didnt we could have a chat <33
1 note
·
View note
Text
#song rec sunday#this is probably the song that kicked off my obsession with gothic lolita tbh#i used to watch a lot of makeup tutorials and one of the artists i loved did a lot of haunted doll looks#and she played a lot of kanon wakeshima songs while she wasnt explaining a step#this and skip turn step are just the songs which stuck#Spotify
0 notes
Text
With this devastating news I want to push how easy it is to use a shopping service and that many like jpshopping.jp have very affordable shipping options and fees. Don’t let the lack of direct sale stop you if you love innocent world
I was even able to secure a preorder slot for the frederick pochette through JSS and they handled it SO easily and offered very affordable combined shipping with some other stuff.
If you’re lost on how to use any shopping services and this post finds you before anywhere else here’s a little JSS tutorial since it’s the service I have always used

The website is quite… archaic… however it is safe and reputable. They can buy from Japanese secondhand sites as well as shops like innocent world so they’re great especially if you want to buy from multiple places and save on shipping.

For innocent world and most shops you’ll click “order” and then “online shop”
It’ll bring you to this page- it’s simpler than it looks.

From the top down:
Item amount can be toggled up and down and it will add more spaces to enter items to buy below.
“Item one” is where you’ll fill out for the items you want…. So let’s look at how to do that.


Let’s say I want to buy this beautiful innocent world op!

Just copy the name of the item first. Wether it’s in English or Japanese doesn’t matter. I personally go ahead and put the color I want in the title so it’s hard to miss
Item price just toss it in without commas IN YEN!
This is all you really need to fill out. You can leave notes for yourself or reiterate a specific color or something in the notes and enquiry sections below
When you have all your items added it’s as simple as just selecting if you want to ship the item as soon as it arrives or combine it with other packages (I would always select to hold and combine just in case you want something later, you can always request to ship it alone after if you select this option) I also personally recommending selecting the “select after JSS receives item” shipping method as then you can view all rates for the specific weight of your items

After that hit confirm and it will bring you to the summary page and where you can select payment methods. It supports PayPal and direct card sale. If you over pay or an item gets canceled they automatically refund it to your payment method once all other items in that batch are received by them

Once you’ve paid and ordered you can keep track of your orders and their statuses in the history tab. You’ll be met with this.

And if you hit the down arrow it will expand to show you even more information such as individual item statuses

For example in this order I can see what items were canceled or arrived already- I don’t have any orders that I’m waiting on but you can usually see “processing” and “waiting arrival” as statuses too.
I hope this tutorial covers the basics and can help you all continue to support innocent world and other brands you love.
If you have questions please ask
Innocent World will no longer ship internationally soon.

After December 19, 2024, you’ll need a forwarding service to order from them if you’re an international customer.
Image ID: A screenshot of a message from Innocent World’s English website saying “As of Thursday, December 19, 2024, we will no longer ship overseas. Shipping destinations will be limited to within Japan.
If you wish to ship overseas, please use online shopping services such as tenso.com.
*Items from ‘tenso.com’ will be shipped domestically. Therefore, consumption tax will be charged.
*Returns or exchanges will not be accepted via ‘tenso.com’ purchases, excluding cases of defective products or incorrect delivery.
*We are not responsible for any loss or damage to your package via ‘tenso.com’. Please contact tenso.com directly to resolve any issues.
If you have any questions about the ‘tenso.com’ service, please directly contact ‘tenso.com’.”
69 notes
·
View notes