#lod Legacy
Explore tagged Tumblr posts
Text


Legend of Drizzt: Legacy RIP to all those Bregan D'Aerthe boys ;-;
#I have too much sympathy for the villains#also poor Artemis#legend of drizzt#the legend of drizzt#drizzt do'urden#dinin do'urden#yvonnel the eternal#yvonnel baenre#jarlaxle baenre#wulfgar battlehammer#wulfgar#cattie brie#Cattie Brie battlehammer#bruenor battlehammer#thibbledorf pwent#artemis entreri#Regis#regis rumblebelly#lod Legacy#dnd#dnd character#dungeons and dragons#forgotten realms#art#drawing#fanart#digital drawing#myart#my art#vierna do'urden
100 notes
·
View notes
Text
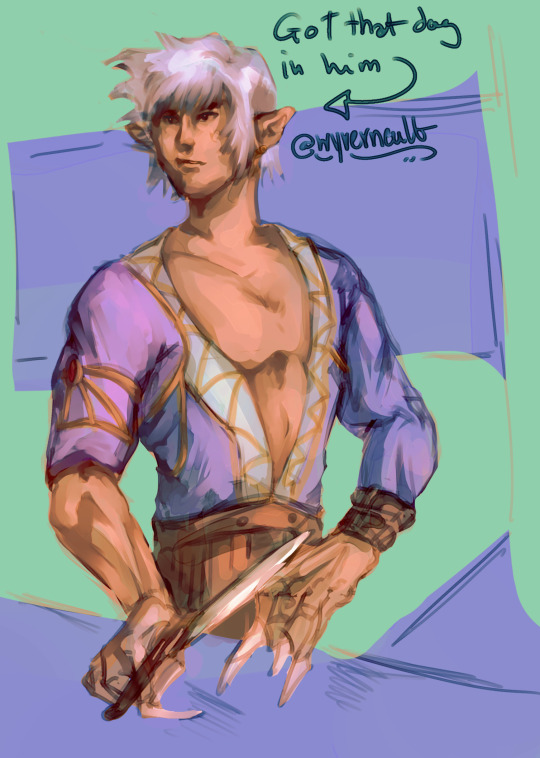
friend called him corndog + now i can't stop thinking about it
#castlevania#akumajou dracula#castlevania 64#legacy of darkness#castlevania legacy of darkness#cv lod#lod#my art#cornell#cornell castlevania#get it. cause hes a werewolf#he's got that d
21 notes
·
View notes
Text
Bracelet Girls Sprite Comparison - Duel Links VS Legacy of the Duelist


#duel links sprites cut off for better visual comparison#i think they look nicer in dl#i do like how rin's jacket looks baggier in lod it's a cool look#but her face is nicer in dl#yuzu overall looks nicer in dl she looks a bit Off in lod#also uh#less pronounced boobage for both yuzu and serena in the dl sprites#the colours are more vibrant in the dl sprites as well#especially serena's hair it's much more vivid#yugioh arc v#yugioh#yugioh duel links#duel links#yugioh legacy of the duelist#yuzu hiiragi#serena#serena arc v#rin#rin arc v#ruri kurosaki
19 notes
·
View notes
Text
DININ!!!!! :D
DININ!!!!! D:
11 notes
·
View notes
Text
Hmmm... castlevania Cornell alt design...

#i be thinking abt him#i just like his cv64 scrapped/LoD alt design more than the formal one#he cool :)#castlevania#akumajou dracula#legacy of darkness#me draws#wasnt gonna post this marker test but u kno what why not#some food for the werewolves 👍
12 notes
·
View notes
Text
looking through all the newer drizzt covers and some of them are lowkey gorgeous… exile and hero are my favorites but at this point i’m committed to collecting all the older (second printing i think?) covers bc i’m super specific about my book collections matching (as much as possible at least)
#i did get the massive collector’s editions of the legacy of the drow & paths of darkness#bc i just couldn���t pass up the cheesy vintage cover art#i might also have to get some of the truly awful original covers just for collecting purposes#i have such a deep love & fondness for awful ridiculous old fantasy and sci-fi cover art#ghoul reads lod
2 notes
·
View notes
Text
Someone in the forgotten realms should invent a magic item that just negates any returning powers of your attacker's weapons.
15 notes
·
View notes
Text


Jake and Fia's ranch shanty house. I'm only willing to entertain this because I watched The River's Edge, and it took my heart.
#ts4#ts4 gameplay#sims 4#ts4 horse ranch#sims#simblr#sims gameplay#Castillo Legacy#don't look at the curtains too closely the lods are f*****#The River's Edge#River's Edge Save
2 notes
·
View notes
Text

♡ DOWNLOAD
This hair is a collaboration with Bubble Play, especially for her beautiful Gabriel
I hope you like this hair too, you might want to follow the Abernathy Legacy on Instagram or YouTube
♡ Gabriel's makeover video
♡ basegame compatible
♡ compatible with hats
♡ all LOD’s
♡ 6 324 poly
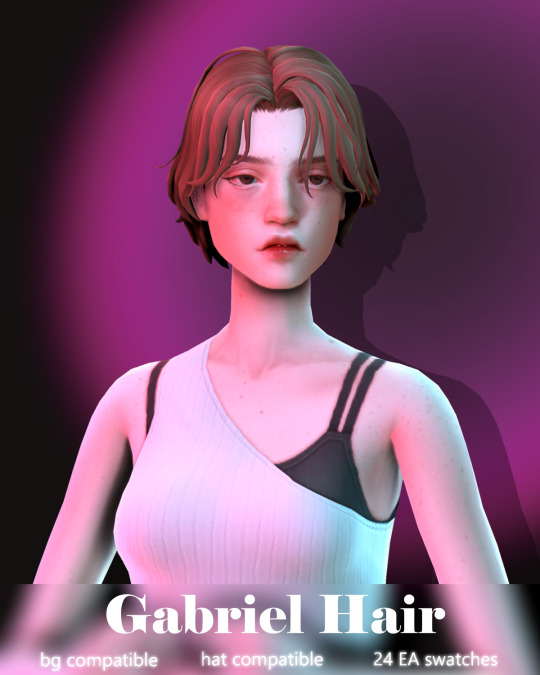
♡ Thanks to everyone who reblogs this post)) With your help more people are able to know my work. This is really very important for me!
#s4cc#ts4cc#s4mm#ts4cc hair#s4#s4cc hair#s4mm hair#sims#sims 4#s4cc female#s4cc male#s4mm male#s4mm female hair#ts4cc maxis match
790 notes
·
View notes
Text
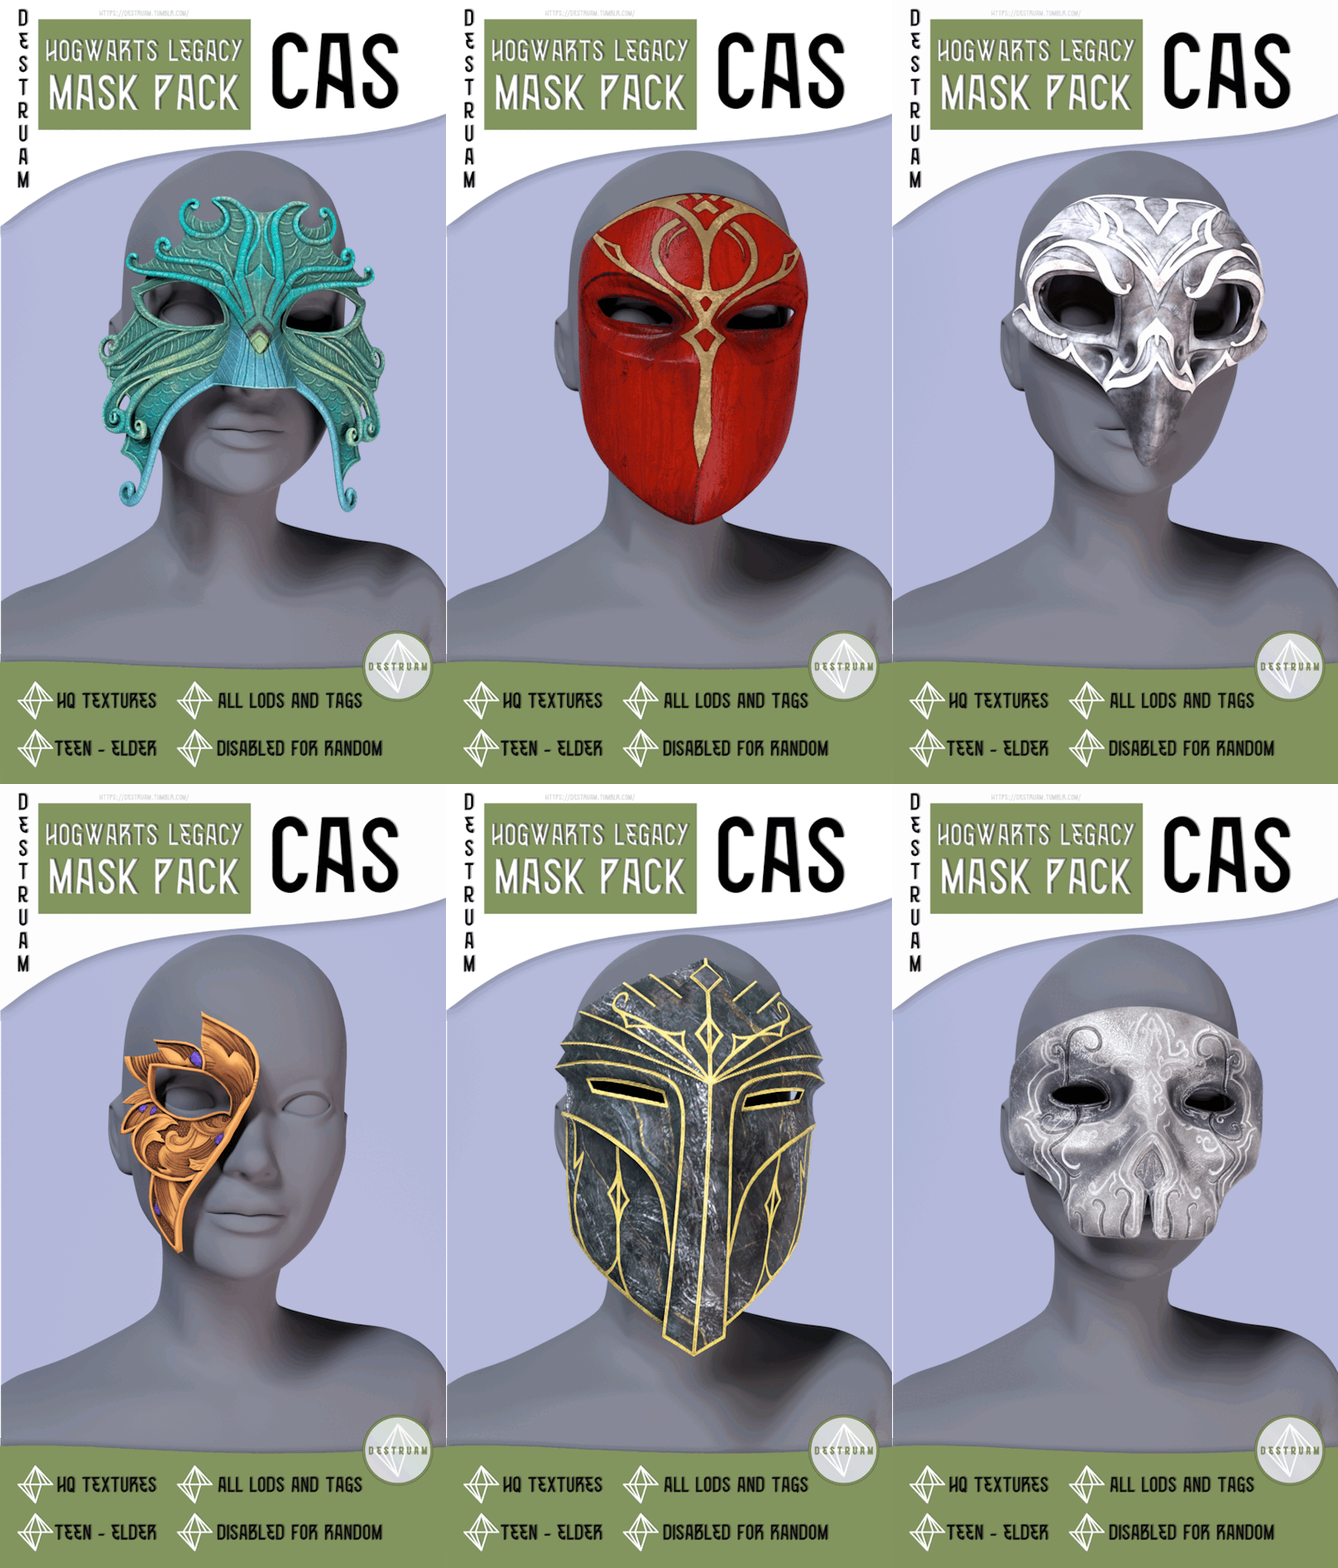
Hogwarts legacy - mask pack
Game: Hogwarts legacy
Mask
Hq textures
All maps
All lods and tags
Disabled for random
Teen - Elder
Early Access untill Jan 28
Download || Boosty || Patreon
|| PINTEREST ||
@sssvitlanz @coffee-cc-finds
155 notes
·
View notes
Text
Faer Set: 300 Follower Gift

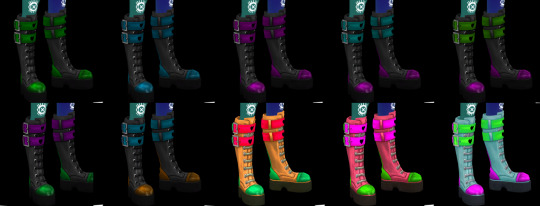
a (belated) 300 follower gift (thank you!). inspired by an OC i'll be making for my legacy. previews taken with reshade OFF. tested on a wide variety of body types, though please let me know if anything is funky. also sorry that the tunnel previews are kinda... meh. each side has different colored pony beads. i like to wear hoops and dangly earrings through my tunnels, that was the inspiration.
Swatches~



Dress
Frame: Masc
Base Game Compatible
Swatches: 13
Disabled for Random
Poly Count: 5932
All LODS
Boots
Frame: Masc
Base Game Compatible
Swatches: 10
Disabled for Random
Poly Count: 2088
All LODS
Necklace
Frame: Masc
Base Game Compatible
Swatches: 16
Disabled for Random
Poly Count: 1768
All LODS
Tunnels
Frame: Masc
Base Game Compatible
Swatches: 7
Disabled for Random
Poly Count: 3858
All LODS
Download~
Dress (SimsFileShare)
Boots (SimsFileShare)
Necklace (SimsFileShare)
Tunnels (SimsFileShare)
Everything (SimsFileShare)
#ts4#sims4#ts4 simblr#ccfinds#free cc#the sims cc#cc finds#my cc#sims 4 cc#ts4 cc#ts4 mm cc#maxis match cc#gloomiecc
137 notes
·
View notes
Text


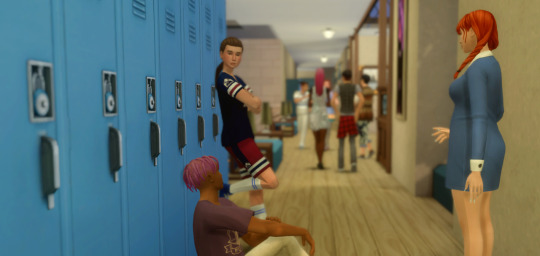
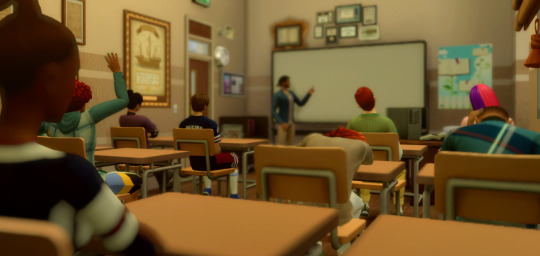
I'm about to jump into my legacy again, and one of the things I needed to do was to make some deco sims to fill my teens high schools with! So voila! I was INSPIRED when making these and I think they might be my best. :3
The High School Deco Sims zip includes:
20 Deco Sims
4 Swatches Each
All LODS
Reshade compatible
BGC
All titled with "madebycoffee l High School Deco Sims" for easy searching. As well as custom in game icons.
.
The zip also include a posepack with all of the Desk Poses I made. Place the teleporter over a chair!
You will need hulazombie's phone acc for one of the poses, download here. .
TOU: don’t be a greedy jackass and try to make money off the shit I make.
.
sfs l pat
.
check out my other poses and deco sims here
#ts4cc#sims 4 cc#sims 4 poses#ts4 poses#madebycoffee#ts4 cc#deco sims#10 of the sims are for desks/tables#and then there are 8 sims to populate ur hallways#plus two teachers!#im really pleased with these :3
560 notes
·
View notes
Text

draculatober day 4! hedge maze moment
#castlevania#castlevania game#legacy of darkness#castlevania 64#lod#cv64#cv lod#cornell#cornell castlevania#draculatober#inktober#my art
22 notes
·
View notes
Text

ℂℍ𝔸𝔻 - 𝔸 𝔾𝕆𝕃𝔻𝔼ℕ 𝕀ℂ𝕆ℕ 𝔽𝕆ℝ 𝕋ℍ𝔼 𝕊𝕀𝕄𝕊 𝟜
A little something to say thank you to @obigem for hosting my Legacy Sims in her story over on twitter!
Please enjoy this ridiculous Sims 1 Livin' Large inspired golden icon (feat. Chad) ((It's very dumb just go with it))
🌞 One Swatch - Cause he's just Chad 🌞 Proper LODs - LOD0 13K Poly, LOD1 10k, LOD2 5K 🌞 Shiny as fuck
DOWNLOAD (SFS)
162 notes
·
View notes
Note
Also since you like BG3 have you ever heard of Dragon age or Legacy of Kain. I think they,d be right up your street
Oh my gosh, I was obsessed with both of those back in the day!! The Soul Reaver games were incresible. I loved Raziel so darn much. His design was beautidul and the play mechanics so much fun! But...Legend of Dragoon...the impact that game had on me. It was one of the first fandoms I wrote fic for, and it introduced me to my first writers group online. I was such a Lloyd fan, and Rose too :) I even cosplayed her! I'm still friends with some of the creators I met through the LoD fandom 💜💜💜 What beautiful memories you've dredged up ✨️✨️✨️
6 notes
·
View notes
Text
Making LODs for Modded DAO Armors
Tools needed: Blender 2.49b Blender 2.79a Blender ImportExport Script The DAO Toolset OR pyGFF texconv utility any text editor
This tutorial assumes you have already created the LOD0 models, and that you've already gotten them working in-game. Hopefully, you still have the .blend file. If not, or if you're working with someone else's models (with permission or only for personal use), it'll be a bit trickier, but still possible.
Firstly, make sure you have the ImportExport script installed correctly (all the files dumped into the same folder as your 2.49b Blender.exe).
If you don't have a .blend file with your LOD0 models, you need to make one. Open up DragonAge_tools.blend, and use the MMH tool to import the model's .mmh. (the MSH Tool often doesn't like to import modded meshes, but the MMH Tool usually works fine) It will import both a weighted mesh and the skeleton. (sometimes you need to zoom or otherwise adjust the camera for them to appear) If the MMH Tool fails, then you might try fbxcmd to convert the model to .obj and then import the .obj into Blender. I've had mixed results with that tool, but others have had great success.

Remove everything except the mesh by right-clicking on the mesh to select it, then hitting H to hide. Then hit A to select all, and X to delete all objects. Then, do Alt+H to unhide the mesh. Save the .blend file, and close Blender.
Open up Blender 2.79a, and then the .blend file you just made.
If it's not already open, switch to the 'Data' tab (looks like a triangle) in one of the windows, and make sure you're viewing the model in 'Object' mode.
Then, under 'Vertex Groups', delete all existing groups by selecting one and clicking the '-' until they're all gone.

Now we'll simplify the mesh. Switch from the 'Data' tab to the 'Modifiers' tab (one to the left; looks like a wrench). If you still have a skeleton modifier, click on the X to remove it.
Click on 'Add Modifier', and choose 'Decimate'. There are three methods for reducing vertex count - 'Collapse', 'Un-subdivide', and 'Planar'. 'Collapse' is the default, and the one I usually use, but you may find the other methods work better, depending on your model's geometry.
'Collapse' randomly combines faces that share an edge. 'Un-subdivide' combines faces that were previously subdivided using the subdivide function, or that resemble a nice, evenly-spaced grid. 'Planar' combines faces that meet at a flat or near-flat angle.
Click on the Ratio field, and type in 0.45. This reduces the face count to 45% of the original. As you hit the Enter key, you'll be able to see the mesh be simplified. If you like how that looks, hit 'Apply' to make it permanent. Otherwise, play around with other ratios or decimate options. They won't become permanent until you hit 'Apply'.

Save your .blend file, making sure to select the 'Legacy Mesh Format' option. If you also want to do an LOD3, add another Decimate modifier, and further collapse it with a ratio of 0.5 - 0.8. Save this file separately, also as legacy mesh format.
Close Blender 2.79a, and open Blender 2.49b and your LOD file. There will be a pop-up warning you that the file was made in a newer version of Blender, but you can ignore it.
Using the Blender ImportExport script, import a vanilla LOD2 of the same race & gender, with similar appearance to your mesh (preferably the LOD2 of whatever vanilla LOD0 you used to weight the original).
Change one window to a Scripts window (not the viewport with your model). Then right-click on your modded mesh and the vanilla mesh.
Click on 'Scripts' -> Object -> Bone Weight Copy. Choose the quality (I usually do 2 for LOD2, and 1 for LOD3), and hit 'OK'.
Delete or hide the vanilla mesh.
Minimize Blender, and make a copy of the vanilla LOD2 .msh you just used for weighting, along with the corresponding .mmh & .phy. Put these files somewhere else so you don't accidently override the original DAO files.
Back in Blender, use the ImportExport Script's MSH Tool to load the copied vanilla .msh.
Making sure you have the modded LOD2 selected, click 'replace', then 'replace chunk', and then 'save '. This overwrites the vanilla mesh geometry with that of your modded mesh.
Save your file, and then minimize Blender again, and rename the .msh, .mmh, and .phy to match the LOD0, but ending in 2 instead of 0.
Using the toolset or pyGFF, open up all three, and rename all instances of the vanilla .msh & .mmh names to the new file names. Make sure to hit 'Save' in the bottom left after each edit, and save the files.

If you're also making an LOD3, simply open up the LOD3 .blend file and repeat the above steps, using a vanilla LOD3 .msh, .mmh, & .phy.
That's all the dealing with Blender you'll need to do. Time to move on to the textures. (much shorter, I promise)
Make copies of the model's texture files (0d, 0s, & 0t. The normals aren't needed), and put them in the same folder as texconv.exe. Make a note of their dimensions, and whether the diffuse has transparency. (Transparency is stored in an alpha layer. Normal, specular, and tint maps also use an alpha layer for different aspects)
You can tell these things without opening the files by changing the window view type to "Details". Right-clicking the header bar will then allow you to view even more details, like file size and dimensions. If the diffuse file size is about the same as the others, it probably has transparency.
Open up the command line (on Windows 10+, this is easily done by holding Shift and right-clicking in the window, and selecting "Open PowerShell here").
Texconv has a lot of switches and options, but the relevant ones for us are: -r (enables use of wildcard characters) -w (sets width in pixels) -h (sets height in pixels) -m (sets # of mipmaps) -f (sets the image format - DXT1 for textures with no alpha layer, DXT5 for textures with an alpha layer) -sx (appends a string to the file name) -sepalpha (separates alpha layer for mipmaps) -dx9 (forces DirectX 9 compatibility) The height and width for your LOD2 textures should each be half that of the LOD0. So, if your LOD0 diffuse is 1028x1028, the LOD2 should be 512x512. Technically, you can name your LOD textures whatever you want, but DAO convention is to use the same name as the full textures, with "L2" added to the end ("L3" for LOD3s). Also, due to permissions, you may need to type ".\texconv" instead of just "texconv".
For a single 1024x1024 diffuse without transparency, the command will be
texconv -w 512 -h 512 -f dxt1 -sx "L2" -dx9 texturefile_0d.dds
This will produce a 512x512 diffuse texture named "texturefile_0dL2.dds".
For a single 1024x1024 specular or tint map, the command will be
texconv -w 512 -h 512 -m 1 -f dxt5 -sx "L2" -sepalpha -dx9 texturefile_0s.dds
This will produce a 512x512 specular texture with alpha layer named "texturefile_0sL2.dds".
If you're mass-converting multiple textures, you can use the -r switch and wildcard character, for instance:
texconv -r -w 512 -h 512 -f dxt1 -sx "L2" -dx9 *_0d.dds
This will make copies of all files in the folder that end in "0d.dds", all with dimensions of 512x512 and with "L2" appended.
Almost done! We just need the .mao now.
Using a text editor, open up a vanilla .mao with similar texture/materials (so, for clothing, use a clothing .mao, leather armors use a light armor .mao, etc.). If you know/remember what vanilla .mao was used for the LOD0, use the matching L2 & L3.
Replace the vanilla file names with your own file names. If your diffuse texture has transparency, make sure the DefaultSemantic for your L2 .mao starts with "Punchthrough". The most commonly used is "PunchthroughArmourSkinTintL2".
Save it, using the same name as the modded LOD0 .mao, but with "L2" added to the end.

Now, open your LOD2 .mmh, and expand MMH_CHILDREN -> 0 -> MMH_CHILDREN, and then drop-down the bottom option. This should have a reference to your .msh.
In the field MMH_MATERIAL_OBJECT, replace the vanilla L2 .mao with your own.

Save the .mmh and put all your files in your override. You're done! Boot up the game and run around to test your non-warping models. :D
Common problems: -- Distorted/flying body parts: used a mmh that didn't match the msh, or used the wrong gender/race/LOD when copying bone weights -- Model is mint green and t-posing: can't find the mao -- Textures are gray and/or shiny: can't find texture(s) -- Game crashes: bad msh export. Try exporting again, or compare it to a vanilla msh for errors -- Invisible model: wrong msh name in the mmh, or mismatched chunk names between the msh & mmh -- Won't tint: the chunk names in the mmh MUST be BootsM1, GlovesM1, ArmorM1, HelmetM1, ClothesM1, or RobeM1. Chunk names must also be consistent for all different race/gender variations of the same model, and all LODs.
2 notes
·
View notes