#like how your image is used in production and editing and stuff
Explore tagged Tumblr posts
Visit Tumblr Blog
Explore Tumblr blogs with no restrictions, modern design and the best experience.
Last Seen Tumblr Blogs


Fun Fact
25% of US internet users with an annual income of $80-100K use Tumblr.
Text
.
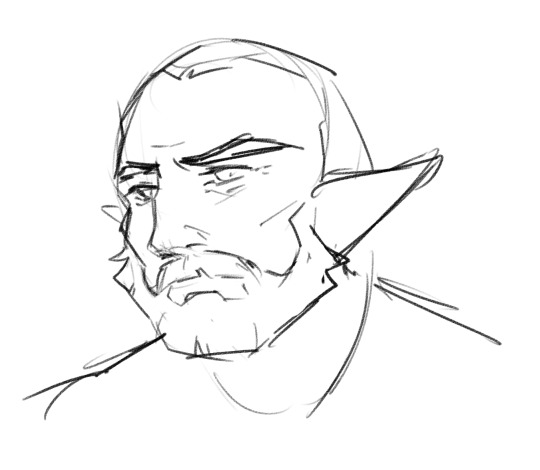
#i feel like a lot of people on this tag don’t know how these shows work 😭😭😭#like when you choose (key word) to be on a show like this you sign over certian things#like how your image is used in production and editing and stuff#like yall are overreacting just a bit it’s not like they showed her having a seizure#gbbo#sorry it’s just you’re making it a bigger deal than necessary??? bringing even more attention to it which is kinda hypocritical#like damn yall don’t want anything filmed atp!#i guess what i’m trying to say is please never watch survivor#or live blog it for that matter
0 notes
Text
HAIRCARE!~♪

notes: ‘this alien stage x reader was sponsored by free time in the car’😌
characters: all characters
warnings: cursing, not edited/proofread (idgaf)

She’s always had long hair, and has always preferred it this way
She does her very best to keep the tangle free- but at the end of the day it’s full of knots
This is why she loves hair days!
She’ll lay down on your lap and be all happy with your fingers combing through her pretty long hair
It helps her unwind from the day, it’s because apart of her daily routine ig :3
She just likes talking to you about whatever
Then when’s she’s had her full of love and affection she’ll pamper you endlessly heh
Loves twirling your hair around and making up hairstyles
She can do anything you want for the most part! She’s a bit messy but it always looks good :3

She doesn’t style her hair really, aside from combing it or putting it in a pony
When her hair was longer fans had you put it in braids then :3
Honestly she doesn’t like people touching her hair, gets it all greasy and messed up yk?
But she doesn’t mind if you’d like to play with hers time to time :)
At your time at anakt you’d both sit underneath the trees there and try to intertwine the flowers into her hair.
Sua was better at styling flowers than you were tho heh
She likes twirling you hair around her finger :3

You could look at Till and think ‘he dgaf about his hair’ —but he actually does gaf 😭🙏 he wants to look cool okay?? His hair is important to him
He takes like 5 minutes in total making sure his hair looks good lmao
It’s just perfectly messy ya’know? :3
He likes brushing your hair
It’s very soothing for him
If he’s feeling creative he’ll experiment around with different styles but mostly just brushes lmao

Don’t gaf about his hair
But he has to gaf about his hair 😔 sad thing
Gotta keep that image up yk 🥲
Normally he just combs through it and calls it good (on a normal day anyways)
Likes it to look pretty neat tho
He likes making a rats nest of yours though!
Kidding, kidding (kinda..)
Likes ponytails:)
But yeah he just fucks up your hair for fun basically
True love?

Oh boy 💀 THIS diva
As the star that Luka is, his appearance is the most important aspect of his product (well following after his voice but YK-)
Bro has a curl routine n all
I mean he’s basically an influencer?? in a way?? So id imagine he gets free stuff
Anywho he’s a scruncher then he uses that curl thing (I’ll look it up later)— It’s a process
Prefers you not to touch his hair, will smack your hand away LMAO
But when’s he’s utterly exhausted and burnout he’ll put your hand on his head (if he has the energy too anyways)
Lukas not like 😭 an affectionate person anyways?- well it’s weird? He’s touchy but not, affectionate
Ya get it?
He might twirl your hair around but that’s kinda it 😭🙏 hate to be a dream destroyer
Well I’ll give some crumbs…heh..heh
S
When you two are lying alone in bed together— wether it’s after a photoshoot or what not, he’ll like creep up behind you and start caressing you hair
It’s a bit uncomfortable at first because you can just FEEL him burning holes into the back of your head while twirling your hair 😭🙏 sweating n shit
It’s relaxing for him anyways, when he’s tired but not ready to sleep yet yk

Hyuna 🤤 hair goals fr fr
She usually just has it down or in a high pony/braid tbh
Her hair is LONG AF and is such a pain to deal with so I’d imagine she just puts it up and calls it good
She washes her hair like once a week anyways (the shower is full of grime JUST from her hair 😭🙏)
She dgaf (yesss Hyuna 🥹🗣️)
She’s really great at braiding!! When she decided to put her hair in a braid one day you would NAWT shut up about how she needs to have it styled like that more often (and she did hehe)
Hyuna also collects trinkets— whenever she goes out on raids/bounties or wtv she picks up/steals (LMAO) anything that catches her eye (Like a crow! heh)
She always brings smth back for you, any shiny things go to you, only the best for her babe 😌
Now!- when you asked her to braid your hair you brought up the trinkets suggesting that you put it in the braids- like as accessories!!
And she liked that idea vv much ofc and planted little coins and charms tied into your hair :3
Your head legit looked like a crows nest lmao
But it looks so pretty!! Two fishtail braids with shiny things in your haiirrrrrr!
She was proud af of her work 😌
You both went person to person showing off your head lol
DEWEY (I love him plsss)
His head is full of tangles, but he insists it’s just apart of his ‘look’
His really not picky with his hair- just prefers redoing his roots before they get too-too grown out yk
Which of course you always help him!
He sits on the floor criss-cross in his white tanktop and sweats while you mix the blonde dye
He stays still for the most part, but gets antsy staying in the same position for too long
He justs yap your ear off while you apply the color loll
“Yah so, I tried 85 arm-curls which that went friggin’ awesome as expected-“ “Yeah then Isaac went blackout drunk- Ha it was hilarious” “I think the showers broken ‘cause when I turned it on purple shit came out-“
Since his hair is all sticky and wet he like makes his hair stick straight up lmao😭
Tries to convince you to use the left over dye on Isaac lmao
While he waits for it to dry he begs you to let him do your hair
He tries to do a Dutch braid, but fails lmao
“WHY ISNT YOUR HAIR WORKIN’?!”
And ur like ?! Everything good back there ?!
He keeps trying until your hair is a literal rats nest lol
He just looks at his mess like ‘oh shit’
Ur so pissed at him and he’s like: 🥺
So he just brushes out the mess he made lol
Which it freakin hurt bc OWWW KNOTS
After it’s all brushed out he just did a basic braid and called it good lmao
Then you take him to the showers to rinse it out and in fact- purple did come out
Probably should’ve thought about that before you stuck his head under the shower head heh..
You ended up using the sink in the bar and everyone just sorta was like ‘uh, okay’
Just imagine Dewey laying on the counter with his head in the sink lol- def stained the counter
Bro shakes his head like a dog to dry off, THEN gets a towel
Smh
In reward for you hard work he gives you a big fat smooch heh
Then goes around base to show everyone his hair lmao
Successful hair dyeing day with Dewey id say!
(Dewey j love you please I need more of him yall PLEASE.)
ISAAC (I LOVE YOU TOO!!)
I mean he just puts his cap on and calls it a day sooo
Really couldn’t give two shits about it lmao
Doesn’t care if you mess around with his hair, so might as well go for it :3
You tried putting his hair into a piggy tail, which his hair is so short so it just kinda, stuck out 😭
He really does love playing with your hair :) it’s actually rlly cute he’ll be talking to a member and just be playing with your hair (the thought gives me butterflies gets me mushy SOB)
by the time he’s done talking to the person there’s like 6 little braids in your hair on on side 😭🙏
Best hair time w/ him is when yall are fucked up and tied from raiding and just lay together, you most likely on top of him
And he just holds ya and plays with your hair 🥹
Yall talk about the day, or some things you’ve been thinking about, just quiet words yk? :)
(Stop I’m like tweaking thinking about this wtf)
help so sorry for how short Till+Ivans is 😭🙏 no creative juice came for them (and I wrote theirs last so yk…)
Made December 20th 2024
#Merlucide’s works#Alien stage#alnst till#alnst#alien stage x reader#alien stage x you#Mizi#sua#Till#ivan#Luka#Hyuna#Dewey#Issac#Mizi x reader#Sua x reader#Till x reader#Ivan x reader#luka x reader#hyuna x reader#Dewey x reader#Issac x reader#alnst ivan#alnst luka#alnst mizi#alnst sua
516 notes
·
View notes
Text
One month on; The future of Monkey wrench as a fully animated indie series.
It’s been exactly one month since Ep 3 of Monkey was released to the public, and as the ever want to be as transparent as possible with indie production it’s time we sat down and had a very important discussion on the future of the series…
So, as we said above, one month has passed from the public release of episode 3, and everything hinges on how well it does.
Below are the metrics for it on Youtube;
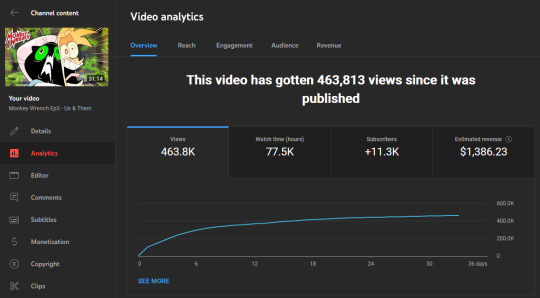
Our hope was to have ep 3 hit 500k in two weeks. After 31 days we’re still under 470k views, ad rev as you can see is pitiful and engagement has evaporated. Maybe we set our hopes a little too high?
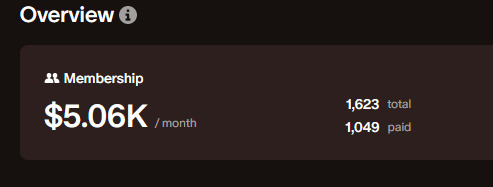
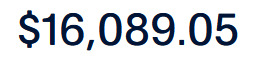
It’s not all doom and gloom though, this is the first ep to get this many views in this amount of time. Our patreon support has grown by 1/3 after the ep came out and our Scratch & Scritch plushies did ok, see images below;
So as of now, we have enough money for voices, sound and music for episode 4. Voice recording begins next week and I hope to start the animatic for the ep sometime after.
As for the animation portion of production… things are looking a little tricky.
As you should know, animation, especially frame by frame stuff like we do, it’s obscenely time intensive and expensive. For ep 3 we had a rough animation rate of $20.83 per 1 second of animation and the same for clean up with very minimal edits and redos.
Seeing the recent animation pay discourse has honestly shaken us up pretty bad, we had no idea how pitiful our pay had been compared to other indies and we in no way want to exploit anyone for their work on the series.
With both Ash and I putting everything we had saved in Eps 1, 2 and 3 and seeing how below average they’ve all performed and with how little we can afford to pay our animators, on top of burning myself out horrifically doing 3 eps in a row, we’ve sadly had to come to the conclusion that full animation for this series is no longer financially possible at our current support level.
That does not mean we’re stopping production, however.
There are two possible routes we can take;
Route 1; Animatic hybrid.
Over the past week and a half I managed to solo out 5 minutes and 15 seconds of animatic keyframe animation for our recently released outtakes video.
youtube
At our current support level I can do the animatic keyframe route for most of the mundane stuff in an ep, and then go into full animation for the ‘good bits’, that way we can pay our animators an actual decent wage. Over time if our support grows we can return to full animation.
Route 2: Kickstart ep 4 for $100k
We have thought about doing a kickstarter type thing to get the $100,000 we’d need for the animation portion of the ep. We want to pay our animators properly for their time and skill and this would be the best route to go if we want to have ep 4 fully animated.
However with our current viewership and engagement with eps 1, 2 and 3 I’m not sure we could hit a goal of $100,000 in the 30 days we need.
Is it a risk worth taking?
What would we do for rewards?
Physical rewards would take money away from animation production and things like animated rewards would take time away from myself working on the ep.
That’s pretty much where my mind has been at the past few days. I’d love to hear your input and thoughts on how you would like us to proceed.
#monkey wrench#indie animation#zeurel#2d animation#youtube#animation#animators of tumblr#indie series#support indie creators#Youtube
726 notes
·
View notes
Note
excuse me.. do you have a tutorial on how you make the banners of your themes?
⠀⠀⠀⠀⠀• GFX TUTORIAL !

honestly a bunch of people asked me how to make banners like I do, but chat im gna be fr there's no set tutorial because if u check some of my headers, they're quite different! but ill try to explain my process heh
⠀⠀⠀⠀⠀⠀⠀⠀⠀⠀⠀𝒇 . how to make banners !
⠀⠀⠀₊˚ thank u anon for asking!! if anyone wants to make banners like these, hopefully this tutorial will help u!!


⠀⠀resources 𝑖𝑖. pinterest
i usually use pinterest for overlays and pngs like these u can check some of them out here in my pinterest or just type up gfx overlays and itll show up!


for pictures of idols when I make smau headers or navi headers, I recommend choosing photos that match!! In most cases, I use photoshoots of the idol I chose. for example if it was jake, I would use something like this!


⠀⠀inspo 𝑖𝑖. pinterest
most of my header ideas come from pinterest! they have many gfx edits on there and its very helpful if u don't have a solid image on what u want! you can check out my pinterest once again for some ideas ( here are some I found on pinterest )


another important thing is to have a matching colour scheme!!! guys im telling u thats literally what brings it together!! STICK TO THE COLOUR SCHEME like genuinely imagine ur colour scheme is like white pink and yellow and u go ahead and put like a blue png on there. executed on the spot.
take a look at the pictures above, they have a matching colour scheme that compliments the edit! pro tip if u have a concept on what u want ur header to be ( for example grunge ) use colour schemes that match the concept ( so for grunge you would use for example red black and grey )
⠀⠀software. 𝑖𝑖. photoshop, procreate, ibis paint
now this is the part where u have to actually make it. I reccomeed ibis paint ( guys have u seen soov headers ) cuz its lowk mad easy to make stuff on there plus its free, but personally for me I would choose either photoshop and procreate ( I moved on from procreate to photoshop cuz the quality on procreate was buttcheeks ) icl I got photoshop for free ( @aewon my goat thank u ) and it took me like a few tries to get the hang of it ( okay I lied I made the gigi header on the first try ) BUT Its really easy honestly its just the system that looks intimidating.
⎯⎯ anyways here are some things I like to add on my headers based on what I have already made
( shapes ) guys the rectangle shapes thing with a gradient in it always does it for me. they fill up spaces u dont know what to add in really easily. just put some text over it and align it and call it a day LMFAOOO
( pngs ) okay hear me out, pngs but only ones that FIT the concept. say ur making a game themed banner, I would put either pixel pngs or those cute game consoles yk!! I wouldn't slap a postcard onto it, that wouldn't fit the vibe
( texts ) the go to fonts I use is coolvetica, la graziela demo and retro gaming. honestly these fonts fit literally almost any concept!!! its lowk fire! something I like to do is use my cursive font ( la graziela demo ) and type one letter and zoom it in. it looks really cute trust!!


( effects ) guys pixelate effect is literally my bsf cuz why do I use it in everything!!! it literally is so perfect I use it in EVERYTHING! guys trust it brings it together so well!! especially when its like blending in to the unpixelated area! another effect I love to use is grain! chat I basically use it for everything. genuinely its like going out without any setting spray on like TF!! add ur grain, it makes it look so much more expensive ( but not that much, it just has to be really subtle )
( overlays ) okay this again! but these overlays are some I use for quite literally anything ( u can see it if u zoom hard enough ) but add them in the right places and put the blending mode on lighten and ur good to go!!


⠀⠀results 𝑖𝑖. the finished product
well, if u have enough practice and a creative mind, it should look something like this!!


guys this was lowk so fun!! hope this helped u guys I literally pulled out every header I made lmfao 💭 lmk if u want one on how to make themes heh
138 notes
·
View notes
Text
Mug Brownie: Autism Edition☕
When you try to make a microwave brownie, does the image below look like your result?

Are you tired of ~trying to make a brownie in the microwave~ by following some recipe you found online, only for it to taste like shit because the ratio of oil/sugar/flour to brownie mix is an overpowering assault on your senses?
Or maybe you don't even bother trying because the instructions are unclear and you'd rather not risk fucking it up "just in case" using a wooden spoon instead of a plastic one might make your kitchen explode?
Maybe it's even worse - maybe you did everything right and followed the instructions perfectly, but you can't for the life of you tell if the final product came out right and don't feel like setting yourself up for an unpleasant surprise.
Well, I'm here to share with you the one tried and true microwave/mug brownie recipe that works for me.
Ingredients
Here's what you'll need:
A mug of some kind (doesn't HAVE to be a mug but needs to be mug shaped + microwave safe)
2 and 1/2 tablespoons (TBSP) of brownie mix or cocoa powder
1 and 1/2 TBSP of all purpose flour -> 1 TBSP only if you don't want to be able to taste the flour slightly (this is what people mean when they say brownies taste "cakey")
1 TBSP granulated white sugar -> add another if you want to make it more sweet than tart OR only use 1/2 TBSP if you don't want to be able to taste more sweetness than tartness
ALWAYS* mix your dry ingredients together in the mug before you add in the liquids. (*The only exception being any chocolate chips you add, those can go in at the end or the start, it has no bearing on the recipe.)
Once you've done that, add the following:
1 TBSP of canola, vegetable OR olive oil -> the more you add, the smoother and richer it will get, but the harder it will be to cook and physically eat
2 TBSP water (to be added at the very end because it needs to be mixed in quickly)
Final Prep
Stir your ingredients together for at least 15-30 seconds or long enough to completely mix the dry and wet stuff together. If you've made normal brownies before, this should look like brownie mix right before it goes in the oven.
Check the wattage of your microwave. Most of the recipes I saw accounted for a 1000 watt or less microwave and recommended microwaving for about 30 seconds at full power. However, mine is around 1200w and I get the best results from microwaving for 45 seconds at full power. If you can't figure out what wattage your microwave has, just start with 30 seconds at full blast and add on 15 second intervals from there. It might take some experimentation on your part to get the recipe perfect.
When it's fully cooked, your mug brownie should look kind of puffed up like a mini lava cake. It probably won't fill up much of your mug at all, but trust me, it'll be dense. The texture might surprise you because it's a little more mousse-like than your average crispy-topped oven brownie, but the overall taste should be pretty similar.
It will also be HOT when it first comes out, so wait at least a minute and a half for it to cool down a bit and blow on your fork/spoon before putting any of it in your mouth.
TW: Trypophobia - Every single time I successfully make this recipe, the imprint of popped air bubbles looks like a bunch of little holes clustered close together. If that's something that would bother you, don't look directly into the mug when you finish microwaving it - stick a toothpick inside to gage how goopy the brownie is instead.
Additional Tips
Drink a glass of milk milk/eat a scoop of ice cream with your brownie. This will help balance the heat of the brownie and its overpowering chocolatey taste, if that's something that's been a sensory issue for you in the past.
Chocolate chips, being heavier, tend to migrate towards the bottom of the mug, so don't be afraid to get in there and swipe around with your utensil to more evenly distribute them around the brownie.
Add whatever extra toppings you want! I'd recommend sweet things like bits of candy/chocolate though.
As someone who recently had major oral surgery and hasn't been allowed to bite down or chew any of my food for weeks, this recipe is very easy to swallow and digest. If you've just had wisdom tooth surgery or something similar, as long as you use plastic utensils and make your tongue do most of the work, you should be able to eat this with ease.
Eat slowly. Trust me when I tell you that you're underestimating just how filling this brownie will be. These have easily lasted me 2-3 meals because my sensory-specific satiety keeps burning out halfway through eating them.
Store your leftovers in the fridge. You can just leave what's left of the brownie in the mug for this part. They keep well and you can always heat them up again!
When you're 100% done with it, drizzle liquid soap in the mug and fill it up with water to let it soak before washing it. This will make it easier to get all the extra gunk out whether you wash your dishes by hand or use a dishwasher.
🦴🍎🦷
#lmk if you got the joke at the very end#actuallyautistic#microwave brownie#mug brownie#easy recipes#quick meals
114 notes
·
View notes
Note
I know the shop's down now, but do you have any tips on doing that yourself? Did you do the same thing as your website where you straight up built it and added on extra stuff like Paypal and the old forum feed?
Yes, that's exactly how you do it! It's very easy!
Just build yourself a little HTML page, then login to your Paypal account and look for the button editor. You'll make a different button for each product. Then you set up the shipping options under your Account info. You need to stay on top of shipping costs, calculating this will be the hardest part.
After you edit the buttons, you C&P the button codes it gives you onto the HTML page along with product descriptions and any images, and that's really it! People hit the button to add the product to their paypal cart, and then they checkout when they're ready.
The buttons really act like a sort of portal to an external paypal cart. But it still looks like it's your own site. Very slick! And MUCH more economical for you than using Etsy or Big Cartel or one of those other shop sites. Paypal takes its processing cut, but it doesn't take a cut for letting you use its shopping cart.
I actually have been waiting for them to change this for years, but so far so good.
I just commented out the shop code on the shop page. If you look at the source code, it's still there. Feel free to copy the layout and just replace it with your own images, text, and button code.
You can do it, Anon!
41 notes
·
View notes
Text
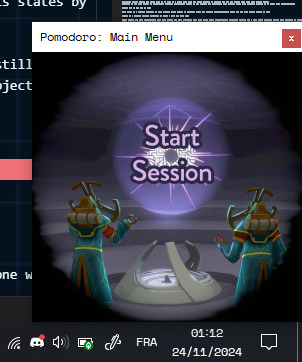
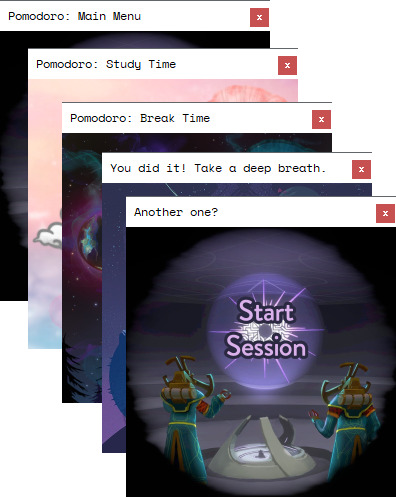
I have an issue with constantly getting distracted, so I got distracted from working by making a 100% customizable Pomodoro App to keep my future self from getting distracted. Have a Google Drive download link.
The Pomodoro technique, if you don't know it, is a discipline method for keeping track of when you are working and when you are taking breaks, notably through the use of a timer.
There are tons of apps centered around this, and yet after looking at so many of them, I somehow could not find one that would do the most basic thing I'd like to have for a study companion: change the background of the app so that yes, I do have a timer telling me to work harder, but I also have an image of my choice to cheer me up along with it.
So what did I do? Did I take the rational, reasonable path, to just suck it up and stick to one of the already existing apps even though it would mean saying no to having my adorable Hearthian OC sleep in a corner of my screen?
Or did I go the hyperfocused insane route of utter procrastination and learn a whole new programmation language from scratch just in order to get my frikkin baby to comfort me while I work?

Yeah, who could have guessed.
So! The Google Drive link I shared will let you download everything you need in order to run your own version of this little app, including a tutorial on how to customize it to suit your needs.
The first thing you will see after unzipping the archive is this:
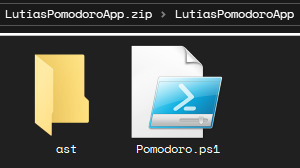
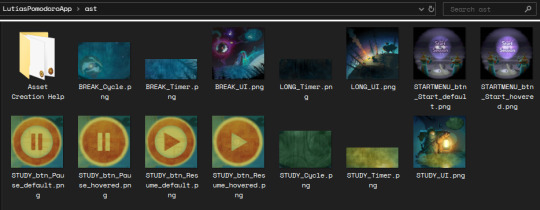
The "ast" folder (standing for "assets") contains every image used by the app -- which means that you can change them as you please! I even gave you transparent versions of the buttons in the "Asset Creation Help" subfolder, in case you like the shapes but want to change the backgrounds.
You think that's cool? Oh, but the image assets are far from being the only thing you can change for this app's behavior! You can change EVERYTHING that this app is doing (which isn't much because it's literally just three different types of timers, and even then there are some trickier details with more coding than others (but I still give tips on how to handle those), but shush. Everything this app can do, you can customize to your heart's content).
How do you do that? Well, this is what you get when you right-click on the "Pomodoro.ps1" file:
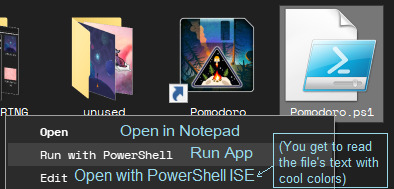
The Pomodoro.ps1 file is the "app" itself, written in PowerShell code that I made as legible as I could make it. There is a whole tutorial in there, made easier to read if you right-click on this file's icon and choose the "Edit" option. Have a preview!
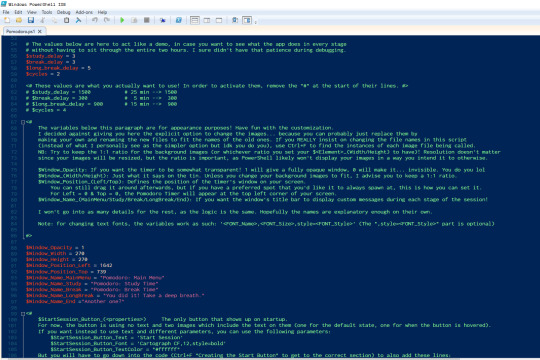
Through editing this file, you can then run a Pomodoro app from which you can have the window's appearance customized, from its size, opacity (if you want to still half-see what's sitting behind it), and start position on your screen (the window can be dragged around, but if you have a preferred position you can tell the app to always load it in that preferred spot right from the get go), to stuff like the custom messages you get whenever the timer progresses:
So, yeah. I made a little app meant to help with productivity. One out of many already out there, sure, and it's probably not as cool as many others (but I'll just remind you that three days ago I knew absolutely nothing about PowerShell as a whole, so- I guess that would be still a little impressive that I was able to make a working app like that at all? xD), but as far as I've looked, it's the only one that will let you have your favorite images keep you company while you use it.
I don't know whether anyone other than me will like it enough to use it, but just in case, it's here! Hope it's as easy(-ish) to customize as I made it out to be, or at least close enough.
PS: The version I use for my own personal choices uses some slightly different assets compared to the version I share in the .zip file on my Google Drive. This is because the version I share online solely uses official Outer Wilds art (while the version I made for myself notably uses one piece of OW fanart that I did not make myself, and it didn't sit right with me to share that piece uncredited, even in an edited form. If you are curious, this is the artwork in question).
41 notes
·
View notes
Note
Hi, sorry if this is random, but I keep seeing your LM posts and your male style characters are so???? pretty???? they literally look perfect! Ive been trying to make a more male style character in LM but i cant for the life of me figure out how to make it not look weird and uncanny. could you tell me your tips and tricks?
Not random dwdw. Isa long post cuz i cant help but yap, i shall put it under readmore. EDIT DID I FORGET THIS POST IN MY DRAFTS. DAMN. soz
I wish i could give u specific tips, but 1. Idk how ur guy looks like so idk how to fix him and 2. i generally try to aim for basic "male" features. Narrower hips and wider shoulders, thicker arms (his wrists are fuckin massive cuz u cant individually adjust the size of the models biceps/forearms, but he looks weird with the thinner arms, so i just live w it... they look worse from other angles just trust me bro)
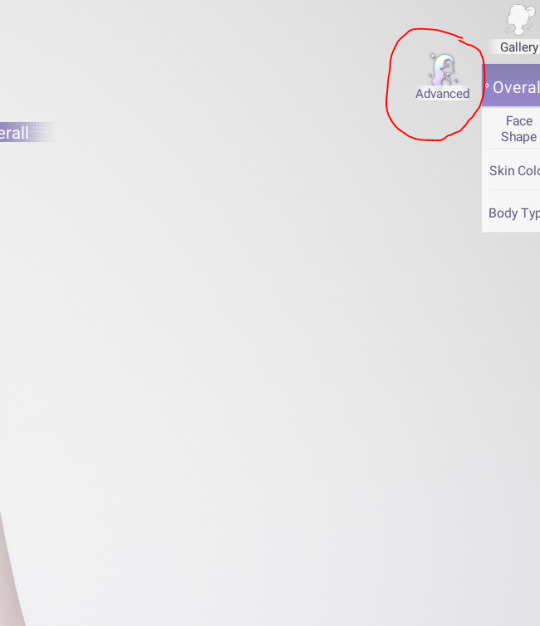
U prolly already use this but just in case, turn on the 'advanced' thing in the corner, so u can actually do more things. It was life changing when they added it frfr lol
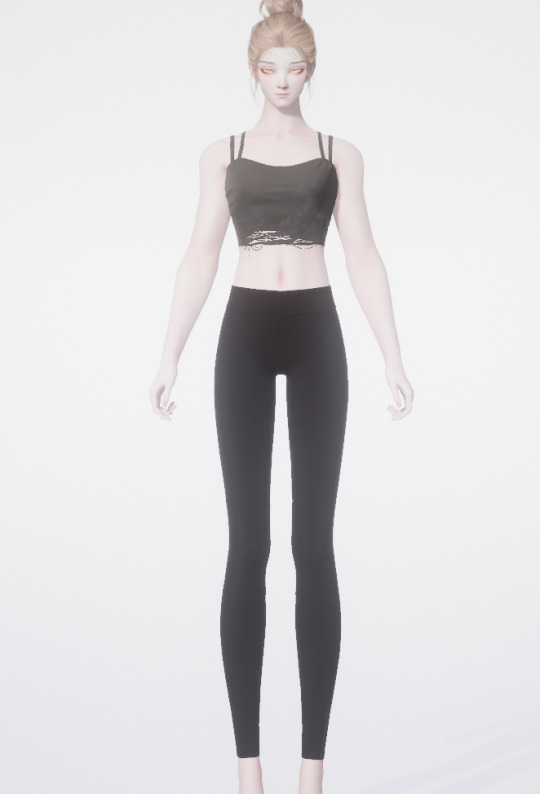
The changes in some sliders are super minute, but if ur like me and love fuckin about w sliders for 7 hrs, it should b fine lol (exclusive lil styling i never posted here just to make the left image smaller, ignore him. Oh actually, it would b good to note that yes hairstyle matters, but makeup too. Lots of eyeliners/eyelashes make ur avatar look much more feminine and weird. I try to go for eyeliners that turn downwards, for example. I have some favorites, I can share em if ur interested)
For the face itself, i made the chin wider (no sharp chins here no siree), mouth and nose as wide as possible (yes thats how wide it goes. I keep tryin to makeit wider u cannot. Sob.) and the eyes
I actually redid him a bit since downloading to my pc, but guess what? I can't save shit on pc version :)) i need to hound customer support about it..
<- og, new ->
Made his eyes a bit smaller and higher up, pupils smaller too, mouth more downturned. One thing i rly wanted to focus on is the 3/4th view cuz he had that weird dip in his cheeks and whenever i took pics it pissed me off... I'm much happier w him on the new ver but i cANT SAVE HIM GRRAHHH anyway this aint even a tip im jus complaining
Other small things that really help, thicker eyebrows, smaller + higher up eyes, thicker neck, longer face. More pronounced browbone as well, within reason. When tryin to make a guy in a game that only rly expects you to make girls u gotta pull out all the stereotypes yk?
It's very much a product of me doing the exact same minute tweaking in my own art, so i have an eye for making it balanced. Don't b scared to use reference if u cant figure it out. Usin asian idols or actors would help, bcs the models in this game are based off beauty standards in asia... u aint ever gonna b able to make a western lookin girl, let alone a guy. (I tried to make my black friend in here..... hella hella hard, only rooooughly resembles her pfft)
Lastly, It took me a long time to actually get to this point. As i said, i keep tweaking him to this day, change things that i didnt notice the first time, or if i changed my mind about others..... play around w stuff.
I would give u my guy to dress up if u want, but i legit think i cant anymore since i moved to pc.... as i said i need to go hound the devs.... but ur free to use him as ref if u want.
(also, add me in game perhaps? I'd love to have more male avatar enjoyers in my friends list lol)
16 notes
·
View notes
Text


example donation link
if you are an artist or something and want to offer the same commissions, please feel free to take any of these images and use them yourself (edit however you want, remove my art, obviously), the text is free to use.
*in the unlikely event i receive a ton of these, i might have to close them. will let you know. reblogs will be turned off if i close commissions
extra information below v


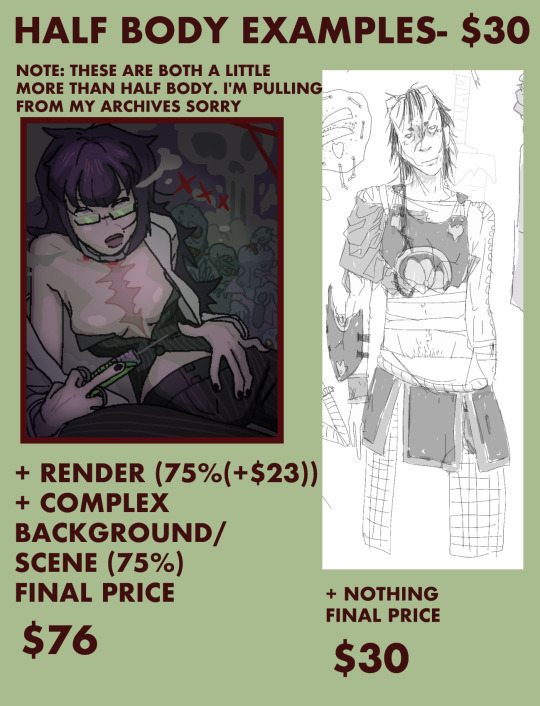
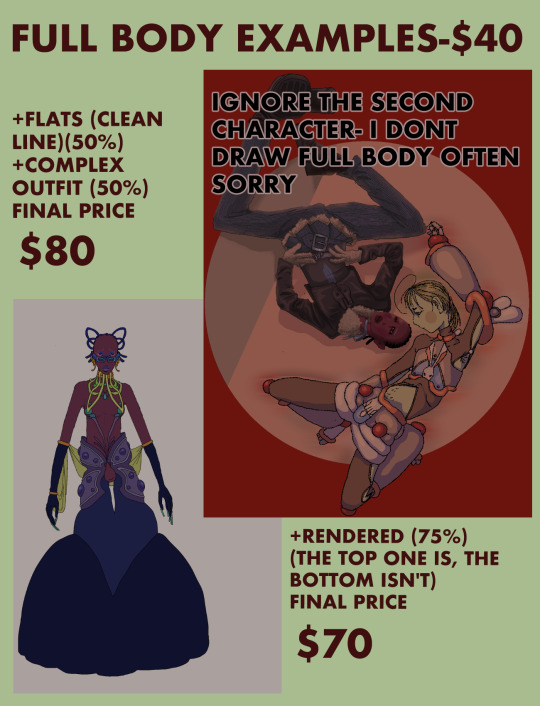

thank you so much for reading! i used all caps for ease of read, it comes across super agro lol sorry <3 i will be nice in person
also, small note, i dont consider mobility aids (including wheelchairs) to be props, those are free to add.
any further questions DM away!
TEXT IN FIRST MAJOR IMAGES BELOW
------------------------------------
HOW DOES THIS WORK?
FIRST: AGREE UPON AMOUNT IN APPROPRIATE CURRENCY (SEE "QUESTIONS")
SECOND: WE AGREE UPON ONE OR (IF THE COMMISSION IS OVER $40) MORE GOFUNDME'S TO SEND IT TO TO SEND THE AMOUNT TO
OPTION 1: PAYPAL
SEND ME THE AMOUNT AGREED UPON VIA PAYPAL
I WILL IMMEDIATELY SEND THIS AMOUNT TO THE GOFUNDME OR GOFUNDME'S WE AGREED UPON
I WILL SEND YOU PROOF OF DONATION (SCREENSHOTS, FORWARDED EMAILS, WHATEVER YOU NEED).
(THIS IS MY PREFERRED BECAUSE I CAN BE 100% SURE THE MONEY IS SENT)
OPTION 2: STRAIGHT TO THEM
CREATE AN ACCOUNT WITH 'GOFUNDME' AND ALLOW THEM TO SEND YOU AN EMAIL TO SEND YOU A DONATION RECEIPT
SEND THE MONEY STRAIGHT TO THE AGREED UPON GOFUNDME/S
SHOW ME PROOF (SCREENSHOTS AND FORWARD THE EMAIL CONTAINING THE RECEIPT TO ME)
IF YOU CANNOT FORWARD THE ACTUAL EMAIL TO ME, I WILL NOT ACCEPT YOUR COMMISSION.
THIS HAS TO BE A NEW DONATION THAT WE MAKE TOGETHER (PEOPLE NEED MORE MONEY RIGHT NOW, I WILL NOT BE ACCEPTING COMMISSIONS BASED ON OLD DONATIONS.)
additions:
+75% extra character, complex background/ scene*, full render, complex outfit design by meee ;)
+50% medium background/ scene*, flats (will include nice lineart), complex outfit/ design, simple outfit design by me
*scene means a complex pose or it looks like they're actually in the background. interpretation of this is up to me
addition prices are calculated based off of the base price and do not compound
example calculation: half body ($30) + extra character (+75% of $30 = $23) + medium background/scene (+50% of $30 = $15) = 30+23+15= $68
for stuff not covered here (like a complex prop) just shoot me a DM
will draw: furry (not great but i can try), gore (incl extreme), horror, artistic/ casual nudity, fanart, your roc's, my doc's, romantic/ ship art, anything LGBT+ (people might not know me i felt i should add that)
wont draw: porn, fetish (up to me to interpret what i consider that), ship/ romantic/ nude art involving persons who are or appear to be under the age of 18 (even if they are 'aged up'.) even if its like kids kissing, i'm not comfortable with that cheers, anything i consider 'hateful' (i dunno man i felt i had to add it)
if i am uncomfortable i reserve the right t refuse aspects or the entire request
ownership of the art is yours, if you dont want me to post it to my account i wont
QUESTIONS
USD? AUD? CAD? EUROS?
I TRUST YOU TO BE HONEST, IF YOU ARE AUSTRALIAN, AUD, IF YOU ARE AMERICAN, USD. IF YOU DON'T USE THOSE, PICK ONE. (EUROS AND USD ARE WORTH MORE SO I WILL PUT MORE EFFORT IN NGL)
DO I (THE ARTIST) KEEP ANY OF THE MONEY?
NO!! 100% GOES TO A GOFUNDME (OR MULTIPLE) WE AGREE UPON MUTUALLY
WHEN DO YOU (THE COMMISSIONER) PAY?
ASAP! (BEFORE I START PREFERABLY) THESE PEOPLE NEED MONEY NOW. IF YOU CAN ONLY PAY HALF NOW, HALF LATER, THAT'S FINE. I WILL NOT SHOW YOU THE FINISHED PRODUCT UNTIL ALL THE MONEY IS DONATED. (I WILL SHOW YOU PROOF OF WORKING ON IT (A SKETCH))
WHEN WILL YOU (THE COMMISSIONER) RECIVE THE ART?
I AM CURRENTLY A FULL TIME UNI STUDENT, AND IF I RECEIVE A LOT OF REQUESTS IT MAY TAKE SOME TIME. I DON'T KNOW HOW STRESSFUL THIS WILL BECOME
HOW MUCH WOULD ONE LIKEDRAWING FROM MY (THE ARTIST'S) ACCOUNT COST?
DM IT TO ME I'LL TELL YA
HOW IS 'RENDERING' DIFFERENT FROM A 'FULL PAINTING'
RENDERING INCLUDES CONSIDERED LIGHTING AND SHADING AS WELL AS ATTENTION TO DETAIL. A 'FULL PAINTING' INCLUDES THAT PLUS INTERESTING COMPOSITION, BETTER LIGHTING AND DETAIL, A BETTER 'VIBE' TO IT. ITS HARD TO EXPLAIN, BUT YOU CAN SEE IT FOR SURE. IF YOU DISAGREE
REFUNDS?
NO FULL REFUNDS
IF I AM UNABLE TO PRODUCE A DRAWING IN A MAXIMUM OF 3 MONTHS I CAN REFUND YOU 50% OUT OF MY OWN POCKET. IF THIS HAPPENS, YOU WILL NOT RECIVE ANY ART FROM ME FOR THIS COMMISSION
IF THERE IS AN ISSUE WITH YOU DECIDING YOU NO LONGER WANT THIS, OR YOU ARE UNABLE TO PROVIDE SUFFICIENT PROOF (OUTLINED ABOVE) FROM THE ACTUAL GOFUNDME THAT IS NOT MY PROBLEM. YOU HAVE JUST DONATED MONEY TO PERSON/S IN DIRE NEED SO THATS AWESOME ACTUALLY
TO BE CLEAR: IF YOU CHANGE YOUR MIND AND THE MONEY IS SENT, I WILL NOT REFUND YOU. I WILL ONLY REFUND 50% IF I FAIL TO PRODUCE A DRAWING IN 3 MONTHS FROM TIME OF COMMISSION
53 notes
·
View notes
Text
Trigun Maximum Chugai Grace Cafe Collaboration - I Translated the Website :3
Hi I saw someone on twt wanting this to be translated and that's literally all it takes to get me moving anymore so!
Anyways I translated all the food and drinks, I found the references they chose really cute except for the evil one lmao and I also included the unbelievably small print drink ingredients if you wanna try mixing them yourself!! 🫶
Also also, if you know how to use a proxy, there is actually some stuff here that overseas fans can get our hands on!! Under the cut to keep the dash clean!! Hope it helps!!!!!
Edit my dumbass forgot the original announcement link sjshsk IT’S HERE!!!
So, the menu

Going from left to right we've got
"Battle Sausage Spaghetti"
"As Many Salmon Sandwiches You Want"
"Love&Peace Donuts"
"Banana Sundae"
and on the bottom row
"The Perfect Meal Plate: Vash's Handmade Fried Rice and Salad" ((´༎ຶོω༎ຶོ`) o k )
"Particularly Wonderful Udon"
"Mille-feuille with Ceylon Tea" (i believe the first part specifies gateau mille-feuille but I went to episode one and checked the subs for what they had her say officially and they left the gateau off so I did too)
"Latte with a random character art"
Character Drinks!!!
The Bride Soda, which comes with a double-sided postcard of the sworn friends (very common nickname for Vash and Wolfwood in JP fandom and ig official uses it too)
So the soda is their proprietary thing, it doesn't say what flavor it is or if it has one, but the shotglasses come with a little bit of smoked oak syrup and black ceylon tea and you're meant to fill the rest of the glass with soda and drink it that way. And then the rest of the text is just information and disclaimers for customers that plan on taking the bottle home (I guess it breaks really easily that’s So. lmao).
Vash's Drink <3
strawberry syrup
carbonated water and lemon juice
yellow candied cherries (drained cherries) and ice
Wolfwood's Drink
crushed coffee jelly and cafe ice (ice made and flavored with concentrated coffee and fruit juice)
brewed iced coffee and gum syrup
blue curaçao syrup and carbonated water
experimental ampules filled with blue soda
the cigarette is full of light brown sugar you're meant to mix in before drinking
Knives's Drink
apple juice and round sliced apples
mint and ice (it looks like mint leaves but full disclosure they have blurred that kanji to all hell I have no idea)
Legato's Drink
blue curaçao syrup
grapefruit juice
carbonated water and a mint cherry
a lemon and ice
Collab Merch
(Overseas pay attention here!!!!!! ChugaiOnline is opening these to online orders so we can get them with a proxy, I'll leave their link at the end of this section!!!!!!)
I've also listed all the prices in yen here so you can convert them to your currency, and all of these are the prices including the listed Japanese sales tax. If you want to see the price without it, it’s just the other number on the image!

So they've got
Two way acrylic figure stands (the main stand comes with a ball chain, you can reference these on Amiami for what this kind of product looks like I'm prettyyyyy sure like they're called different but it looks like they go together the same way). Anyways this is a set of 6 and 1650 yen each, it looks like you get to choose which one you want but they don't have a deal listed for getting all of them.
Next to it are the buttons (also called can badges idk which one is more common over here), set of 12 (6 are regular and 6 are glittery variety). They are 550 yen per button AT RANDOM, THEY WILL GIVE YOU A RANDOM ONE, or a box with one of each all 12 for 6600 yen.
Below that is the polaroid collection, it's also a 12 piece set and you can get A RANDOM ONE, THEY DO NOT LET YOU PICK for 330 yen each or a box with all of them for 3960 yen.
The same exact deal with the plastic (like a vinyl material) postcards underneath, they're double-sided and come one for 660 yen each at random or the whole set for 7920 yen.
The calendar is for 2025 and is 1980 yen probably obvious but y'know
I would be so shocked if a proxy actually let you ship the Kuroneko sama cookie discs lmao but hey wtf they're 1080 yen.
The Bride soda is listed here because this is the same merch that will be sold in the shop but they specify elsewhere that it's not available for online order even in Japan you have to go to the cafe ;-;
Also this is just personal experience but a lot of proxies will not let you get like blind or random stuff like the buttons they don't let you pick which one, some of them will only let you get it if you're getting the whole box.
Annnnnnd online order special gifts!!
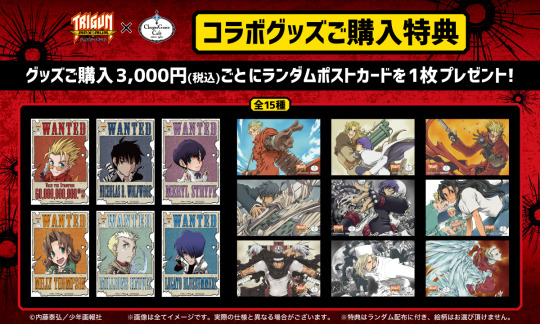
For every 3000 yen spent in merch (including tax) you will get a random postcard from this set!! There are 15 to collect, they are NOT divided into halves of the event, you can get any of them at any time or all at once!! However, you can't combine orders made at different times/by different people to get more and if they run out that's it. Altho fwiw I have never seen an event run out of these lol
The online order period will be from Friday, May 24th at 11 am to Sunday, June 16th at 11:59 pm (both JST) and items will begin to arrive (within Japan, proxies will have to handle our own shipping ofc) from August 2024 on a first ordered first shipped basis.
CHUGAIONLINE STORE (JAPAN)
Ok, this last bit is relevant to the in-person cafe experience so it's just for if you're curious about other cool things going on or you have a hobby of watching JP mercari like a hawk and wanna know what to expect!
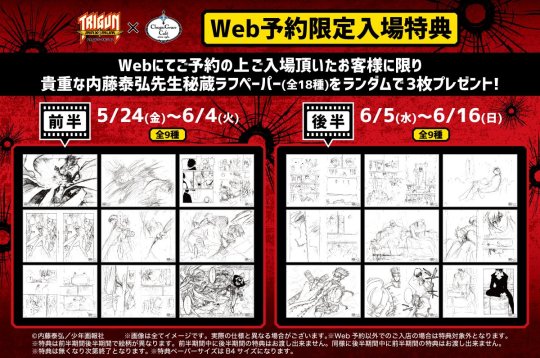
Guests who reserve places at the cafe online will get copies of some of Nightow sensei's most prized sketch pages, they'll get 3 random ones! Like with the special gift postcards, there are a limited amount and this event will end when they're all gone.

And these are the coasters, guests will get one with every item they order off the food or drink menu at random (while supplies last)! The variety you can get is split between the former and latter halves of the event so there's something new to come back for even if you've already been once! (The first 12 days is on top and the last 12 days is on bottom)
They're also doing a wallscroll campaign!

They'll have these decorating the venue, and when the event is over a raffle will be held where the winners get to pick out a scroll of their choice!
OK I THINK THAT'S EVERYTHING RELEVANT HAPPY TRIGUN MANGA CAFE EVENT!!!!!
#trigun#trigun maximum#english translation#chugai has honestly been so fucking good to us yknow theyre the ones responsible for the mochi plushies and nendroids too??#yeah i genuinely hope you guys use this as a guide to make them make a billion dollars this is now a mutually beneficial trigun relationshi#i hope that person on twitter finds this anyways sdflkj#leaving in the tags but yall know this is a very small blog so. its not in my requests but if any of you ever need help finding something o#or help with a proxy genuinely just hmu i gotchu#ok goodnight
48 notes
·
View notes
Note
Ignoring the fact that ibis had the ai paint feature a couple years before this whole ai fiasco, after seeing your post, I decided to try it out to see if it really held up. I already knew what you said made no sense, as even stuff like ai painting requires heavy human input that isn't just someone typing a prompt in a thing and looking through thousands of images and somehow still calling it 'art'. Really, it's just some weird advanced bucket.
The ibis ai paint... really sucks. I'm pretty sure it hasn't even been touched since it was added. No matter what I did, I got random colours and whatever colours I had put there looked like it were from a filter, not to mention how my lineart bled everywhere like it was blurred out.
Ibis isn't problematic for adding that feature as not only was it added ages ago, but it was also just a gimmick only added because a few more popular paid programs added them, like Clip Studio Paint. I highly doubt even the company took it seriously considering how poorly built it is. This is actually the one time I'm glad some feature in an app sucks so much.
Another reason why ibis isn't problematic by the mere feature alone is that, when you look at the artists making content during the time of that update, it was received with humour. It was something fun to try, but ultimately dismissed for actual artwork, as nobody would use it to fully paint their works. Nowadays we see something slapped with the words 'ai' and think that it's instantly bad due to the latest issues with it and big corperations/ certain production companies but it isn't. It's just a lot of people abusing what was previously some fun gimmick, which it can still be, and for certain apps, still is. Nobody throws pitchforks at character ai, after all.
You can tell just by the size of this that I'm procrastinating on something. Ima go and let this rot away in your askbox now lol
You really thought this would fade away in my ask box, mwahahaha /j
I wanna start off by saying thank you for holding me accountable, I will admit that I got buzzworded pretty hard in this situation lmao
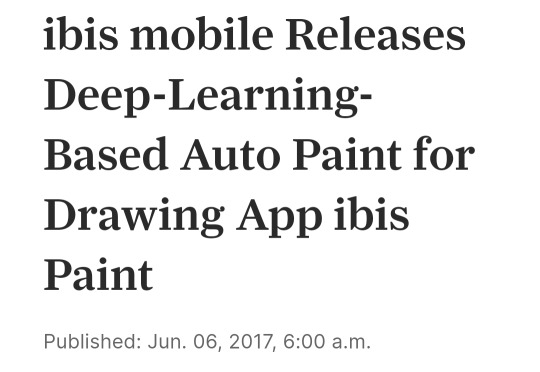
This information came as a surprise to me-- I was seeing posts pop up within the past week complaining about the ai feature on ibis, so I assumed it was recent. As it turns out, after reading your ask, I discovered that I got a few wires crossed! Because yes, the auto paint feature I referred to in my post has been around for years now, and was never taken seriously anyways
So that was my bad (and yea ur right it's completely unusable, lmao)
But as it turns out, the feature that people have been complaining about DID come out recently. It was called the AI Example feature, I think the idea was that you make a simple drawing and the AI adds 99% of the detail and color, which I've seen a bunch of other programs do.
...and then it was immediately removed due to some pretty major backlash, which, duh
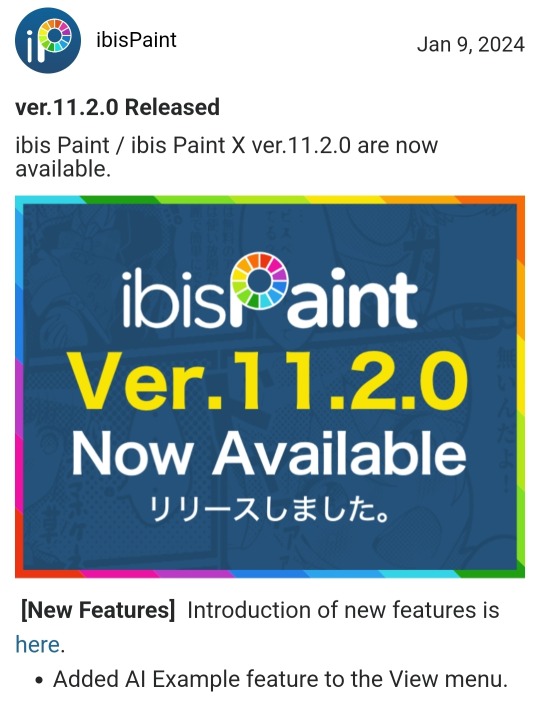
^ This is the only evidence I can find of the 11.2.0 update that included the AI feature on the actual site; their update history stops at 11.1.0. But there's also the news page about the removal of the update, so it's not like they're trying to pretend it never happened.
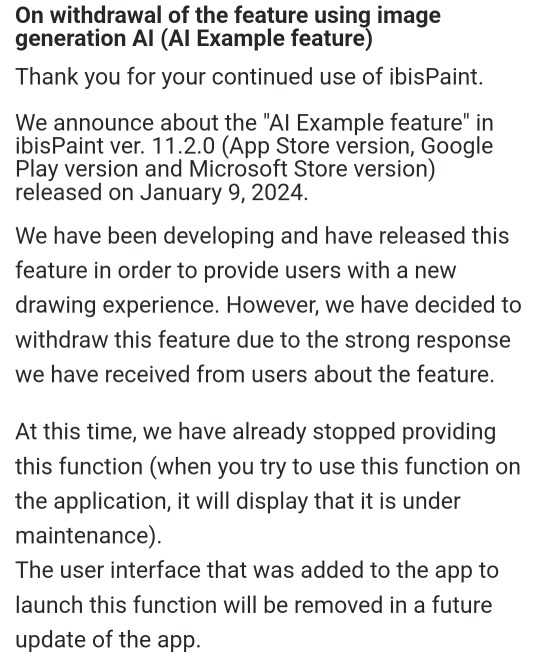
So tl;dr, I jumped on the hate train a little too quickly and never did enough research to figure out what the actual update was, and that it's been removed by now anyway (which I couldn't have known until today, ofc, but i did kinda post that thing about ibis today so it's still a pretty major oopsie)
I think I can say with confidence now that I agree, ibis paint isn't problematic to use-- they made a mistake with this update, but they actually listened to their users and removed it LITERALLY the next day. So, thanks for letting me know! I'll also edit my last post to prevent any misinformation, just in case people make the same mistake I did :]
#its a big relief that i dont have to learn how to use an entirely new art program anyway#so this ask came as a pleasant surprise#asks open#ibispaintx#now i just gotta hope i didnt get anything else wrong about the update
94 notes
·
View notes
Note
hi :] this isnt really a reqest cuz it'll prob be a longer answer but im rlly curious abt ur comic process
i love all ur comics and somehow they always manage to gutpunch me- and ur composition and the way they read is always so beautiful and adds so much to the message youre trying to get across
yeah lol let's get into it! Ive spent maybe 5 or so years refining this process to the point it's at now so it's pretty much my standard procedure now. I'm going to use Now that you're gone as my primary example here since i still have most of the planning stages associated with it (my laptop does not have a whole lot of storage left so i usually delete my planning once the comic is finished lol) but i'll try to throw in some other examples too!
I almost always start with a written script. (the exception for this is longform oc comics which i find easier to write in the moment, but for my shorter character studies I almost always write first.) I use discord to write because it's convenient, but before i had a dedicated discord server for my stuff i was using txt files on my laptop which i do NOT recommend. anyway, this is what the written script for ntyg looked like:
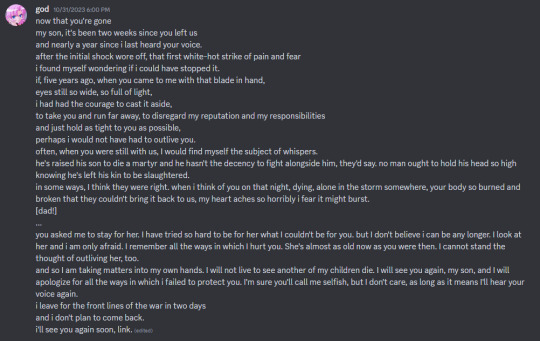
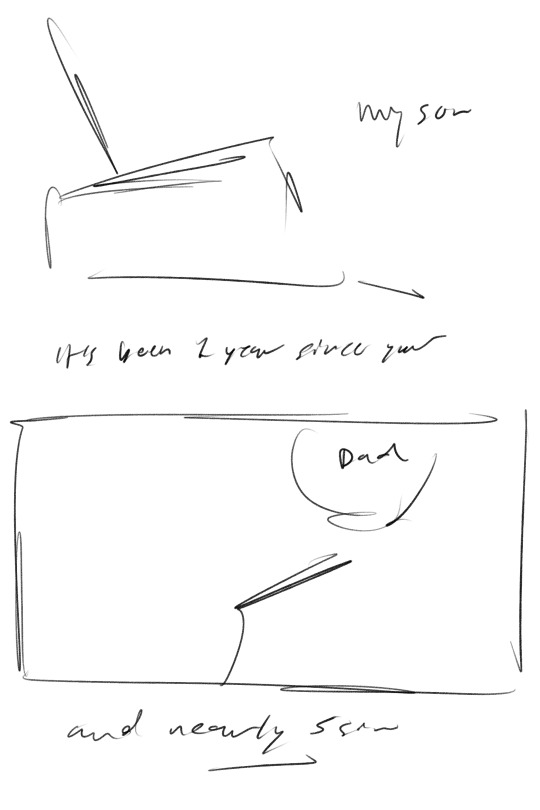
note that some small elements changed in production, like the amount of time that had passed since link's death. the lines "I look at her and i am only afraid. i remember all the ways in which i hurt you. She's almost as old now as you were then. I cannot stand the thought of outliving her, too" were also added during the rough stage because i felt like there wasn't quite enough emphasis on aryll in the initial script, and since this was a major change that necessitated a whole extra page in the comic I went back and edited those lines into the script so I wouldn't forget them. (both these changes were made during the rough stage. i'll almost never make major script adjustments after the roughs are finished.)
more examples of my scripts; specifically the original script for totk: failure and two versions of oot: adulthood (one before some major refining and one after.) with comics like these, where i have a very clear idea in my head of the imagery i want to go along with the words, i'll sometimes include it interspersed in the script, either spolier-marked or denoted with brackets.

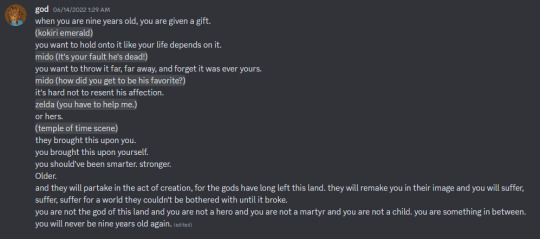
with ntyg and some of my other more. canon divergent? i guess? comics, there's sort of a mini phase in between scripting and roughs where I do some minor character studies to get designs nailed down in the early stages. with ntyg I already had a clear image in my mind for aryll, but the central character was link's dad, whose design wasn't quite so solid in my head. I really wanted to make sure that his design was well thought-out and consistent throughout everything, so i did a few mini sketches and studies to ensure I had his design memorized and could execute it consistently:

these are sans hair and accessories because nailing down consistent facial features was my main focus with them, and both these sketches ended up getting used as references for certain panels later on. This isn't a step I ALWAYS take with my comics, but if there's a central character that i'm not super used to drawing i find it helpful to get some practice in before jumping into the real thing!
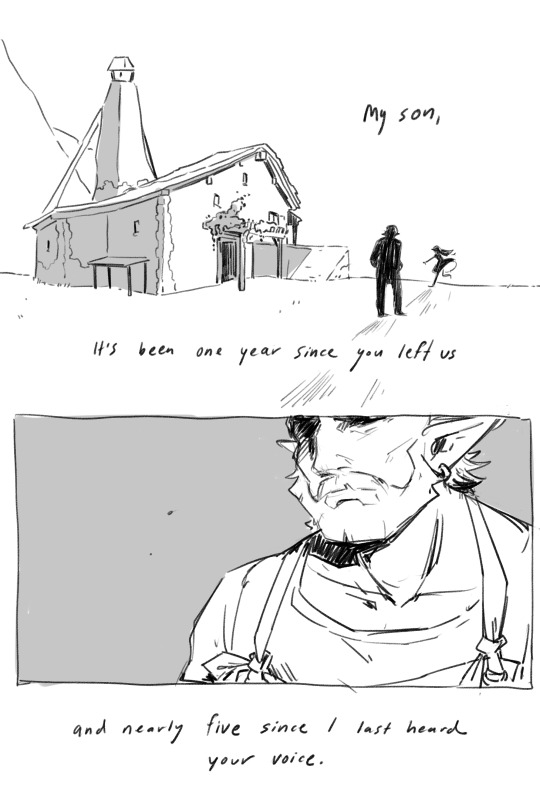
after the scripting and design phases i move on to roughs, which I consider to be the most important stage in my process. roughs are very very quick approximations of what I want the final pages to look like. they usually don't take me more than a few minutes per page to create, and their sole purpose is to help me visualize the flow of the page and the placement of major elements like panels, characters, and dialog. this is what the 1st page rough for ntyg looked like compared to the final page:
as you can see, all i have laid out is the major text and visual elements, but it really helps me to visualize how the finished comic is going to flow. i do the roughs for every page before i start on the finals so that i have an idea of what the entire comic is going to look like before I really start finalizing it. it's important that these roughs are FAST--i almost never draw fully-fledged characters unless the pose or expression is particularly important to the scene, and that's because the goal is to allow everything to flow quickly and easily from panel to panel and page to page, and getting too caught up on one panel or element often breaks that flow. Nowadays, i have a pretty good idea of how much room my writing takes up so i don't write out the entire script in my roughs, but back when i was a little less experienced i took the time to write everything out in this stage to ensure that my dialog would fit into the space it was given without getting cramped or cutting off other important elements. doing that really helped me build awareness of how much dialog and panel placement matters and how i could use it, so this rough stage is non-negotiable for me even now!
after the roughs i go straight into finalization. I never enjoyed lineart back when i was learning to draw digitally so i basically built my art style to be understandable and visually appealing after one sketch phase, meaning there's legitimately no in-between stage between that rough and that final page, i just sort of. go for it. this is what works for me, but i think most normal people would probably find a second sketch phase helpful LMAO i'm just crazy and i need everything done as fast as possible. the finalization stage usually doesn't contain any major adjustments of script, composition, etc; i make it a general rule to keep most of the major adjustments confined to the earlier stages, for my own sanity. One thing that DOES occasionally change in this stage is my plans for color--ntyg in particular was originally planned to be completely black-and-white with no grays added, but when looking at my completed pages i found them sort of empty and unengaging without the gray, so i added it. usually if my color plans DO change it's something small like that--I'll almost never switch between full-color and grayscale on a whim because the way that i sketch for those two versions differs significantly so it isn't an easy switch to make.
anyways i hope this is what you were looking for! I'm very passionate about making comics and this process is a result of years of experimentation & finding what works for me, but i hope it's of some use to you as well!
#asks#^guy who loves writing comics so much it's unreal. i love comics and i love this process it's so fun genuinely#long post#<kinda
78 notes
·
View notes
Text
PC Components and You: A Brief Primer
(a.k.a "Just What Is Adam Talking About In Those Random Posts of His?")
"Building a computer" is one of those things that sounds like an incredibly complicated technical feat, but is in reality much less difficult than it sounds. Most of the stress, in my experience, happens when you're trying to pick out parts. Second place being when the build is done and you know you've forgotten to plug something in, but can't for the life of you figure out what. Once you've got a handle on what the different parts are and do, it's mostly a process of inserting tab A into slot B, and when it's over, you'll have a machine you know inside and out and customize to your liking.
(all images from PC Part Picker unless stated otherwise)
1. The CPU

(screenshot from GamersNexus)
The Central Processing Unit, or CPU, is probably the first part you'll pick out in a build, and the second most important for gaming, image and video editing, and various CAD-related stuff. Your choice CPU will determine your options for a motherboard and RAM. You two mainstream choices for CPUs will be Intel and AMD.
Aside from a general rule of "newer tends to be better", a CPU's performance is usually determined by core count, thread count, and clock speed.
Core count, shockingly enough, refers to the number of individual processing cores. Any desktop CPU you buy today is a multicore processor, and in 2025, nothing below 6 is worth looking at. Thread count is the number of instruction sets a core can work through at the same time (put very simply; it's more like the threads quickly taking turns). Strictly speaking, more cores is preferable to more threads, but you want as many of each as you can get, especially in CPU-intensive workloads.
Clock speed is the speed at which a core operates, the faster the better. Many users manually raise the power draw of their CPUs to increase the clock speed, hence the term "overclocking".
2. The Motherboard

The thing that all the other things plug into. The Motherboard is mounted inside your case and lets all your components coordinate with each other. The nervous system to the CPU's brain. A motherboard's capabilities are determined by the CPU socket, and the chipset. They are developed by the same companies as CPUs, but manufactured and sold by a number of third-party companies.
The CPU socket is pretty self-explanatory: It accommodates compatible CPUs and only compatible CPUs; an Intel chip will not fit an AMD motherboard, or vice-versa, and trying will destroy multiple expensive pieces of hardware. A given socket may be used for multiple product generations, and older boards can usually use newer chips that fit, after a BIOS update; a board made for, for example, a Ryzen-1000 series processor in the Socket AM4, could work with anything up to a 5000 series, assuming the BIOS supports it.
A chipset determines what and how many devices a board can support, although a given board might not use all of a chipset's features.
Many (but by no means all) motherboards have built in connectivity for things like ethernet, wifi, or audio and video output (for integrated graphics, more on that below), via the rear I/O ports.
A motherboard will have a certain number of SATA ports, which connect hard drives, full-sized SSDs, and optical drives (assuming your case supports one). Headers to connect your case's USB ports, audio jacks, and fans will usually be located along the edges of the board.
PCIe slots allow for expansion cards that increase your PC's functionality with features that aren't included on the main board, like a graphics card or a network adapter. Most boards include at least one full PCIe x16 slot, and one lower-bandwidth PCIe x1. The current standard is PCIe 5.0.
BIOS is the motherboard's onboard firmware, although most modern systems use the technically different but functionally identical UEFI (which, as I recently learned, is a requirement for Windows 11). Some boards allow for either to be used, depending on what your operating system supports.
3. Cooling
(image from Amazon)
CPUs generate a lot of heat, enough to cook themselves. You need a cooling solution; in fact, most motherboards won't even let the system power on unless the dedicated cooler fan power header is plugged. Coolers are placed directly against the CPU with a conductive thermal compound and attached to the board. In a common air-cooler, the heat is radiated through the fins and expelled via fan; liquid cooling options exist for the enthusiast.
Many lower-power CPUs still come with coolers included. Higher-end chips need coolers purchased separately. The companies' rationale is that the better chips can be overclocked, which makes them run hotter, necessitating heftier cooling than it was cost-effective to provide.
4. RAM
Random Access Memory, RAM, is the high-speed memory that passes information between your storage, CPU, and peripherals. You need it for your computer to work at all, and you need more of it clocked higher for your computer to work well. You can get by with 16 gigabytes, but these days I'd recommend 32.
RAM slots on your motherboard are specialized, and vary in shape depending on which generation you're using. The current standard is DDR5, and generations are not intercompatible. A DDR4 stick (or DIMM) will not work in a DDR5 slot, or vice-versa. The sticks are notched off-center and can only be inserted one way.
Most consumer boards have two or four RAM slots, and run in dual-channel, meaning that they work best with identical DIMMs in the first and third or second and fourth slots (the reasons for this are complicated and I don't fully understand them, but that's how it works). It's my understanding that it's better, in a four-slot board, to have two high-capacity sticks than it is to have four-lower capacity ones for the same total RAM, as performance suffers when drawing from four sticks at once (also complicated, also don't fully understand it).
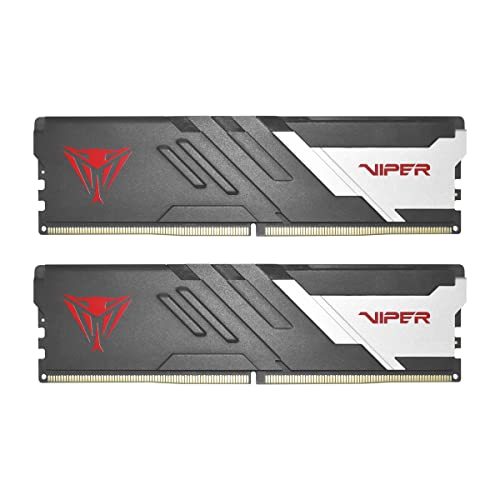
Besides capacity, your RAM's performance depends on its clock speed and its CAS latency. The sticks pictured above, for example, are DDR5-6400 CL32, meaning it runs at 6400 megahertz with a base latency of (more or less) 32 nano seconds. It's mechanically more complicated than that, and a faster frequency will negate much of the negative impact of a higher latency. In general you want higher clock and lower latency, with preference given to higher clock speed.
5. Storage


Long-term memory. Your storage drives will come in two broad categories: Solid State Drives (SSD) and older mechanical Hard Disk Drives (HDD).
SSDs are pure flash storage and have no moving parts, and are much faster than HDDs, which read their data off of spinning platters. This allows them to be smaller and quieter.
Desktop HDDs have 3.5''platters (which is where the 3.5/2.5 form factor distinction comes from). They're one of the noisiest components in a PC, but are relatively cheap nowadays; the WD Blue drive pictured above is roughly half the price of its SSD counterpart. Their best use case now is for the mass storage of low-impact files like music or videos. It needs both a SATA cable to connect to the motherboard, and a power cable from the PSU.
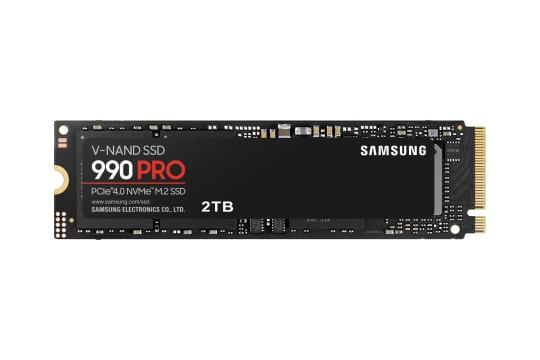
Modern SSDs are additionally split off into two types, one of which is further subdivided by interface. A regular old 2.5'' drive is connected by SATA cable and needs a power cable to run. This type is generally your cheapest solid state option, and I'd consider it the minimum for your OS and programs.
The newest option is an M.2 drive, distinguished by plugging directing into your motherboard (or an expansion card), and needing no separate power cable, allowing for a much cleaner setup. They vary in length and width, ranging from a bit larger than your big toenail to a little bigger than a stick of gum, and are very thin without a heatsink attached. Older M.2 slots are on the SATA standard, and typically won't run any faster than the 2.5'' drive pictured above. An NVMe drive, on the other hand, is both faster internally and uses a specialized PCIe slot. Their ports may or may not be intercompatible, depending on your motherboard. More demanding programs like games at high resolutions and settings benefit tremendously from running off an NVMe drive.
6. Graphics
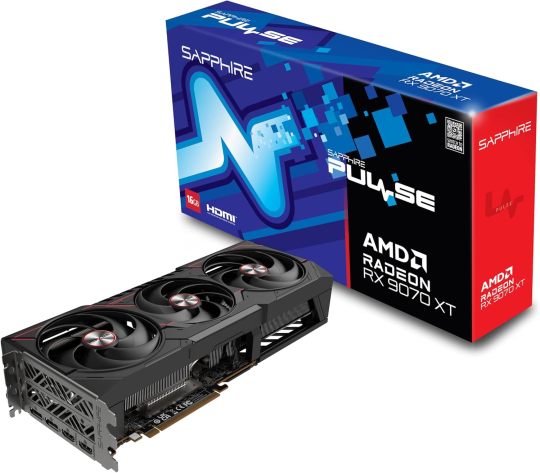
At it's most basic, your Graphics Processing Unit (GPU) is just there to put all the stuff your computer is doing onto a screen for you to see. They range from extremely basic display adapters useful for nothing more demanding than youtube videos, up to absolute beasts capable of rendering every strand of hair in lifelike fidelity at the highest of resolutions. They come in two varieties: Integrated (iGPU) and discrete or dedicated (dGPU). They're developed primarily by Nvidia and AMD, with Intel recently reentering the entry-level space, and primarily manufactured and sold by third-party companies.
Integrated graphics are built directly into the CPU and output through the motherboard. They're primarily display adapters, use your onboard RAM, and can usually only handle relatively lightweight gaming and productivity workloads. The simplest and cheapest option if you just need to see what you're doing and nothing more, but not every CPU includes one.
Dedicated graphics cards plug in via your motherboard's PCIe (usually in the top fullsized x16 slot), have their own RAM, and typically require supplemental power over a special cable from the power supply. A high-powered card is essential for heavy gaming, editing, and CAD rigs.
Like CPUs, GPUs use multi-core setups. With GPUs, however, the core count is much higher, because the workload for each is much simpler. As always, newer and more will usually beat older and fewer.
Video RAM (VRAM) is where the GPU arguably sinks or swims. Textures and effects are big and resource-intensive, and you need VRAM to load it up and push it through to the display. Even a good GPU will be let down by insufficient VRAM. 16gb is the minimum for a modern workload; 8gb can can and should be ignored for anything more than esports or pre-ninth gen titles.
These are the problem children of the PC building world; they're already the most expensive single piece in most builds, and they're by far the most subject to both manufacturer whim and market volatility. This is because their high number of simple processing cores make them great at the number crunching you need for things like cryptocurrency mining and, more recently, AI development. AI devs in particular have become the primary customers for most of this hardware, leaving the gaming and productivity crowds to fight for whatever scraps the manufacturers deign to pass along to the consumer market. The 9070xt pictured above, a card I would describe as "the high end of mid", has an MSRP of $600, and is currently selling on Amazon for $780. I don't trust the used market myself (for about 450 reasons), but it's an increasingly attractive prospect for a lot of people.
7. Power Supply
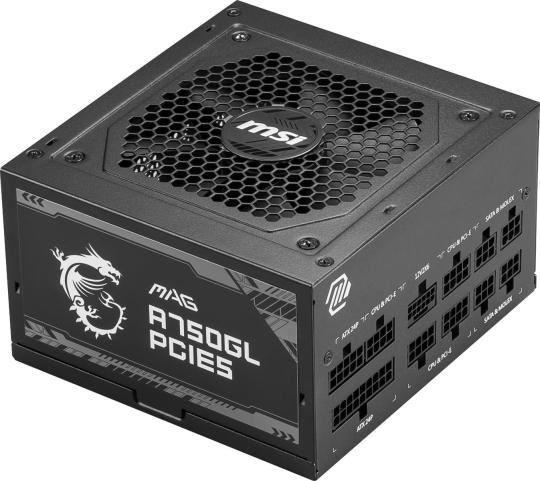

You probably don't need me to explain what this does. One bit goes into the wall, one bit goes in everything else. The power supply (PSU) supplies power. It's a critical but often overlooked part of a computer; half the reason I tell people to stay away from pre-built computers is the uncertain provenance of the components, and nowhere do things get less certain than with weird cheap OEM power supplies from companies nobody's ever heard from. They make it next to impossible to add anything in because their wattage is so low, and the first suspect in a system failure. You want a reputable brand. A good PSU can take you through multiple builds if you treat it well; a bad PSU can destroy your entire computer, and might not stop at that. It isn't that much more expensive to get something reasonable, and it's money you won't miss.
A power supply needs to be able to pull enough wattage from the wall to feed your whole system. A graphics card is usually the biggest power hog, but overclocking will also raise demand. All parts have a wattage requirement; take note of it and buy accordingly. (the second reason to avoid cheap power supplies/prebuilts: the wattage is always low, and even the ones that work can't support new parts)
You'll notice a rating badge on most boxes for 80+ certification. This means that the PSU is 80% power-efficient at various levels of load. The tiers run from basic 80+ all the way up to 80+Ruby. Basic 80+ is what I'd call the bottom of the barrel. 80+Bronze is the safestpoint for price and quality, Gold being what I'd personally feel safest at.
Every PSU has a large-plug ATX cable for the motherboard power(you'll know it when you see it, trust me), a smaller plug for CPU power(probably glance at the manual for that one), and at least one connector for SATA devices (usually three plugs per cable in my experience). Any decent PSU will have at least two for SATA, additional molex connectors, and one or two PCIe power cables to power the graphics card. You may need an adapter for that last one, which will usually (but not always) come with the card.
Power supplies are sold as either modular, semi-modular, or non-modular. A modular PSU's cables are all detachable. You plug in what you need and leave the rest in the box. Semi-modular is similar, except for the board and CPU cables, which are attached. Non-modular, as the name suggests, has all the cables attached, and is the least attractive option in terms of aesthetics.
DO NOT USE THE CABLES FROM ONE POWER SUPPLY IN ANOTHER. THEY ARE NOT THE SAME. THIS CAN DESTROY YOUR COMPUTER. ALWAYS GET REPLACEMENT CABLES FOR YOUR SPECIFIC MODEL FROM THE MANUFACTURER.
As with most components, power supplies vary a bit in size, and the size you can use is dictated by the last item on today's walkthrough...
8. Case
If Star Wars Episode I: The Phantom Menace taught us one thing, it was that George Lucas needs competent people on scripts and editing who are willing to tell him when something isn't working. If it taught us two things, the second one is that machines don't like to be naked.
The case does four things for your build: It provides the structure upon which all other components hang; it keeps out dust, debris, and pests; it ideally provides and directs the airflow to keep everything from getting too hot, and it lets you move everything in one go.
Cases generally come in one of four common form factors: Mini-ITX (both a case and board standard) is the smallest and most portable; Micro-ATX (ditto) is larger with more room for expansions. Mid-Tower cases, the most common, have a respectable amount of space and can fit most components. Full Towers are the biggest you'll find outside of server or custom markets, can fit the most and the biggest components, and are all but certain to make people ask "what the hell do you have in there!?".
Cable management between your power supply, mother board, and other components is usually done via the small space between the motherboard mount and the detachable right-hand side panel on most cases. Proper cable management is good for airflow and looks better if you have a side panel window.
You'll want a case that's big enough to accommodate the rest of your build, easy to work in if you need to adjust something, and with enough ventilation and case fans (preferably filtered) to keep it clean and cool.
Beyond those requirements, everything else is up to you. If you don't particularly care about front audio or USB, there are cases that omit it. If you do, you'll have plenty of options there as well. Glass or plastic side panel to show of your build? They've got 'em. Want to cheat on cable management and shove all your cables into a pile out of sight? Your PSU basement literally has you covered. There are cases that prioritize hard drive space, cases that are built for watercooling loops, hell there are still options for things like internal optical disk drives if you want one. Black is the standard for color, but you can find others.
Further Reading
You'll note I didn't actually include a how-to in this little guide. While it's not as complicated as it sounds, building a PC is involved, and I find it helps to watch it being done (it sure helped me). Paul's Hardware has some good step-by-step instructional videos.
For what I think are good product reviews and coverage of industry news, I prefer GamersNexus and Hardware Unboxed.
For putting together your own build, checking power consumption, and doublechecking compatibility, I can't recommend PCPartPicker highly enough.
For build advice, consider r/buildapc.
5 notes
·
View notes
Text
The exquisite tomarrymort telephone will proceed thusly!
All participants who are comfortable going first will be added to a randomiser. Once selected, they will be contacted to check the date range works for them.
Most people have voted for a one-week writing/drawing period, so that's what we'll go with! At the moment, the telephone's start date is set for April 8.
How it goes
Once the first person has been confirmed, the rest of the participants will be randomised and assigned a date range that doesn't conflict with any dates they'll be unavailable. Everyone will be contacted to confirm the date range works for them.
Once all the participants have been confirmed, the timeline will be posted. The first person will be given the secret prompt on the Sunday before the telephone starts at 8 PM ET. Once the first person has completed their prompt fill, please submit it as a Google Doc for ease and to preserve formatting (G Drive link will be shared with participants) and share your summary sentence with me or jenny, Master of the Broken Telephone, by DMing this blog. If you're submitting an image, please include a link to your art in the Google Doc for ease of posting on Ao3.
Please also include your summary sentence at the beginning of your submission. That way we can include them in the final fic when posting.
Edit: Please submit your summary/prompt sentence and/or prompt fill by 11:59 PM ET on the Sunday of your week to the G Drive folder. Prompts will be passed on to the next author/artist ASAP. If you need a couple extra hours to finish your story/art, that's okay -- as long as we get the sentence for the next person by the 11:59 deadline.
The finished product will be posted on Ao3 as one fic, with each submission counting as a chapter. If you have an Ao3 username and would like to be listed as an author/artist when the fic goes up, please also include that in your Google Doc submission.
Submission guidelines
Authors will write a roughly 1,000-word one-shot (more or less is fine) based on the prompt they are given.
Artists will draw a single fanart scene with a small amount of dialogue/up to three scenes with no dialogue (or whatever you would like to draw) based on the prompt given.
You are welcome to decide whether you draw or write in the moment. You can write a bullet-point list instead of prose or doodle some stickmen -- as long as you're having fun!
The main rule is that the prompt/sentence/artwork you pass to the next person cannot use the same words as the prompt/sentence you were given, aside from things like names, articles (the, a, an, etc.), and conjunctions (but, and, or, so, etc.). It can be very similar, but describe it in a different way or from another perspective. If all else fails, bust out the thesaurus and go to town. (Edited and changed on March 28.)
NB: You can write or draw NSFW stuff/smut if you're so inclined, but we ask that the prompt/sentence/section of art you submit for the following person be SFW.
Having trouble?
If at any point your availability changes or you're having difficulties with your part of the telephone, please reach out to jenny or I through this blog! We want this to be fun and low-stress, so let us help you if that's not the experience you're having.
Any questions, comments, thoughts? Drop us a message!
#exquisite tomarrymort telephone#a division of#exquisite tomarrymort corpse#tomarrymort#fanfic game#fanart game#let's goooo
21 notes
·
View notes
Text
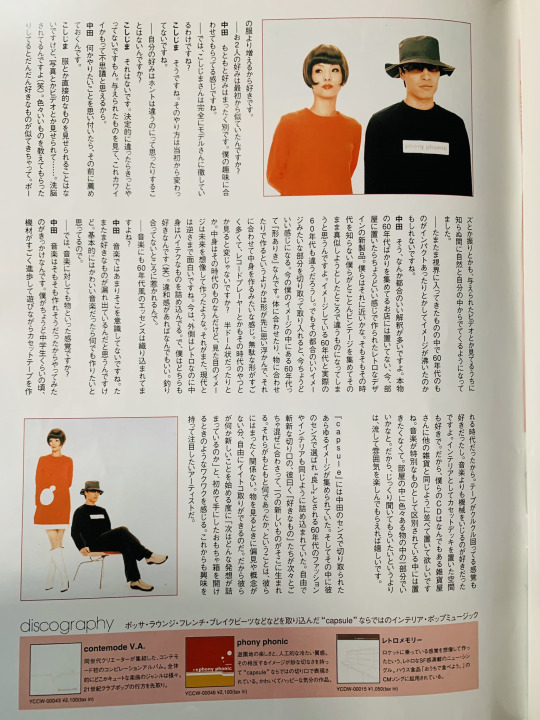

[Translation] capsule in girls '60s magazine (Feb. 2004)
When I first saw their music videos, the striking visuals immediately caught my eye. Simplistic designs, vivid color schemes on the outfits and sets… I can't describe the style as anything other than '60s-inspired. For the first edition of our "Pick Up Artist" feature, it's one whose existence fascinates me — let's take a look at the charm of capsule.
capsule is a music unit consisting of Nakata Yasutaka, whom manages the sound, art direction, design, concept work and so on, and vocalist Koshijima Toshiko. Nakata directs the image, visual aspects, and songs while Koshijima performs it all, resulting in their unique style. - original interview by Aikawa Chisato, translation by ystk-archive -
The reason behind their '60s-inspired visual style
Nakata: To be honest, I don't have any particular attachment to the '60s. I just like unique and minimalistic things, stuff with interesting shapes and clean designs and whatnot. It started when I got into interior design, and at first I especially liked Space Age furniture.¹ That's changed a little recently — I like pieces made out of wood but still with that outerspace kind of vibe. Even when it's made from wood, it doesn't feel natural, it still has this sort of odd look. When it comes to the '60s, I like the plywood that they often used. But I'm intrigued by Karimoku furniture too (laughs).²
— So would you say you're more interested in space and not the '60s?
Nakata: Yeah, and I guess sci-fi movies played a part in that. In movies like Men in Black you often see Tulip chairs, though I don't think they were used to evoke a retro or '60s feel on purpose.³ With films like that I tend to focus more on the furniture and not the overall atmosphere; if anything, I see furniture along with fashion as objects that look nice when put into a scene you're taking in as a whole. I like to come up with unconventional settings. Women are usually depicted in sci-fi films as secretaries, all wearing identical wigs and uniforms, and I like that kind of weird atmosphere. So instead of me consciously liking '60s aesthetics, I wound up thinking they were cool without making the connection that they were from that decade. I also love clothes that incorporate simplistic, striking designs, since they're like spacesuits (laughs).
— How do you feel about wearing clothes like that?
Koshijima: I'm also not obsessed with the '60s or anything, but I like to play around with that era's clothing and makeup styles. It's more fun than just wearing normal clothes.
— Have you two had similar tastes all along?
Nakata: Our tastes used to be completely different. I feel like she's adjusted to match me.
— So Koshijima-san is committed to being a model?
Koshijima: Yep. I haven't changed my approach, ever since the beginning.
— Are there times where you feel like your tastes really are different?
Koshijima: I don't think so. If we actually were fundamentally different, I don't think we'd be working together. Strangely enough, when I look at the materials I'm given, I start to think they're cute. Nakata: When I get an idea, I suggest it first. Koshijima: But he doesn't show me clothes or anything directly, instead he shows me photos and videos… Like I'm being brainwashed (laughs). The more he introduces me to all kinds of cool things, the more similar we become. After I watched the materials he gave me, poses and dance moves just started coming naturally to me without even realizing it.
— Maybe you ran across something from the '60s that left an impression and that ended up coming through in your image.
Nakata: Yeah, there are a lot of easy explanations for it. I wonder if we're more like a new product with a retro design that would fit nicely in someone's living room, rather than something that could be found in an authentic '60s vintage shop. I think even if we intentionally collected oldschool aesthetics from that era and tried to copy those, it'd still turn out differently, because peoples' concept of the '60s and the real '60s are two different things. But if you take parts of that concept people have of that decade and use them, you wind up with something that has the right feel to it. For me right now, the concept I have in mind is the "style" of the '60s. Instead of making clothes or objects to match up with the '60s aesthetic, the styles are already floating around in my head, and then I make content that reflects that. There were a lot of useless shapes — like aren't record players from back then weird-looking? The technology of them and the half-dome shape are of that time, but the way they look on the outside is as if someone was imagining the future while designing them. It's interesting how these days it's the opposite: now the exterior designs of things are retro while the tech inside is highly advanced. And I like both (laughs). I even like things that seem out of place. I'm drawn to a sense of disharmony.
— Would you say the essence of the '60s is woven into your music?
Nakata: Not intentionally. I think the things I like tend to show through my music on accident. Basically I want to make any music, as long as it's cute.
— So do you feel like music is essentially an object?
Nakata: Music is something I started doing because I thought I could create it. It was right when I was in junior high school, they'd made a lot of progress with technology so making cassette tapes became fun. Part of that was because I liked the feeling of winding a tape up. I liked playing around with machines more than the music aspect itself and, when it comes to decorating, I even like the look of a tape deck sitting in a room. So that's why I want our CDs to be sold in regular stores along with other kinds of merchandise. I don't think music should be classified as something special and separate; it's good if it's just one part of the total amount of belongings in a space. Rather than wanting people to listen to our music seriously, I'd be happy if they enjoy the atmosphere it gives when they play it out in the open.
¹ Space Age design was characterized by "sleek, aerodynamic lines and geometric forms," "dominated by bright, bold hues" and was often constructed of manmade materials such as plastic. You can read more about it here. ² Karimoku is a Japanese brand of all-wood furniture boasting superior craftsmanship. You can read more about it and look at examples here. ³ This is the famous Tulip chair.
#nakata yasutaka#koshijima toshiko#capsule#girls '60s#phony phonic#S.F. sound furniture#Retro Memory#2004#magazines#interviews#translations
44 notes
·
View notes
Text
Throwback Not-Thursday (2012 v 2024)
Gerrin Goblinkicker, Dwarf Hero (sculpted by Bob Olley)
This was the last figure I painted before starting up again in 2020.
I'm known to be insufferably/irredeemably stuck in the past, so unlike normal people who might strip and repaint their earlier figures, I painted a whole other copy. This dwarf figure is still in production, so I didn't need to wrangle one from eBay at stupid prices. I even happened to have a matching base (they had come in a 3-pack and I still had the other 2—these are discontinued).
On the old version the middle of the shield is just off-center if you look at the model from that corner and it just feels like something is wrong. For the new version I decided to place him along the diagonal of the base instead of the side. I think this way it is clearer which direction he's facing—though it's actually the feet that are aligned to the diagonal and not his face, so it's still kind of off.
I considered painting a whole pattern onto the shield instead of leaving it plain wood, but I didn't want it to be too different from the old version, so I just changed the shield boss to brass/bronze for contrast.
I had placed him too far forward too; I think I was trying to center the feet on the base instead of the figure overall.

I used the same static grass from a plastic film container of it that I got from somebody. I have no memory of where it's from and this is the only figure I have that uses it. I wonder if it's from 2000/1 when I'd just learned to paint, since a pinch of grass on the base appears to have been typical on Warhammer figures from that era. Maybe I used it on Battletech figures I painted for my classmates at $5 a pop. Anyway, it sits on a bed of green stuff instead of a thick layer of PVA glue (which shrinks so you'd need a lot of it to fill up the hollow base, but that's how I did things back then. didn't know any better).
Recipes
The base blue paint on the old model was Ral Partha's Dragon Blue (highlights in Sky Blue). I still have the Dragon Blue pot and wanted to use it but the paint doesn't stick to the primer anymore so I guess it's dead. It's a bit drowned in black wash on the 2012 model, and here's what I did on the new one:
Speedpaint Beowulf Blue (as you do because, you know, vikings). I didn't shake it enough so it came out a bit purple
Thin layer of Ultramarine Blue
Wet blend Wolf Grey into Ultramarine for first highlight
Gorgon Hide for second highlight
The green base was a bit trickier since the Army Painter Warpaints do not have a match for it (maybe the new Fanatic line does, dunno). But I made it work with a solid coat of Greenskin and then Speedpaint Shamrock Green (the latter of which is a decent match).
P.S. The old Ral Partha Bronze paint is really more of a brassy color. It's not orange-ish at all.
Bonus: Super-black background tutorial (kind of)
When you take the photos, use a sheet of black velour / flocking as the backdrop; Green Stuff World sells these in various sizes but the material is originally used in other things that need to be super dark, like telescopes, so you can probably find it in places where astronomy stuff is sold.
You'll never get all the dust and speckles out of it with a tape roller so just remove as much as you can.
Editing the pictures—I use GIMP:
(Optional) Crop your image. You can do it now, or at the end like I do.
Adjust levels and do color corrections as needed.
Fuzzy select the black area around the figures. 10% tolerance worked for me, but go lower if the figures are dark. You want to avoid picking up parts of the miniatures.
Invert the selection.
Copy and paste to a new layer and put it at the top. This layer will be transparent and contain just the figures and a lot of dust speckles.
Create a new white layer and put it under the transparent layer. Now you can see all the speckles against the white background.
Clean up background with eraser tool.
Hide the white layer and create a black layer. (Or just put the black layer above the white one.)
Clean up any stray dust with eraser tool.
If fuzzy select was overzealous and took out too much (you can flip the solid layers on and off to check), copy/paste those areas back in from the original picture.
#miniatures#fantasy miniatures#reaper miniatures#dwarf#photo editing#miniature painting#mini painting
15 notes
·
View notes