#like embroidery floss if it fits
Explore tagged Tumblr posts
Text
Aight I'm finally tackling this. I'm reorganizing my Webkinz shelves. My closet is a total disaster and my Signature shelf is all dusty. Last time I did this was 2020. I'd say it's needed.
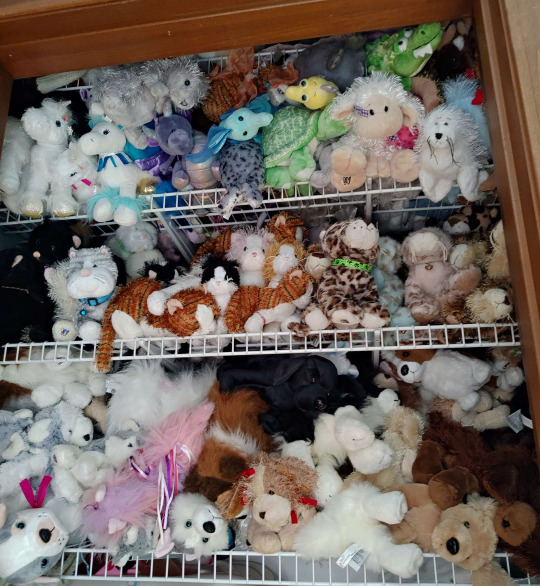
#webkinz#literally when i pulled them all out to film the collection video was the last time i organized them#need to go through because i keep finding beads from necklaces that dry rotted#replace those this time I think I'm just gonna use something that's not gonna become brittle as it ages#like embroidery floss if it fits
98 notes
·
View notes
Text

La Repasseuse
Hello I'm back with a lingerie set this time ! It includes corsets, a corset cover and some drawers. Althought the painting that inspired me this time is older than usual, the cc I ended up making is fit for the 1870s, 1880s, 1890s & 1900s. More pics and download below
This set was mainly inspired by the Edgar Degas's painting : La Repasseuse (The Laundress/Ironer).
————————— Plain Corsets —————————

———————————————————————————
In the 19th and 20th corsets were used to achieve the fashionable shape of the times, provide bust support, maintain good posture and distribute the weight of the skirt's and petticoat's yards of fabric. Althought corsets were underwear judging from the paintings I've seen (cf reference pictures below) working women would sometimes take off their bodices when it was getting too hot (ironers, laundresses as well as peasants during harvest). I've kept these plain corsets pretty simple only featuring the boning channels (where the whale bones or steel bones would go) and a bit of cording under the bust, as I've seen on most corsets of that period.
I've made 2 versions :
is meant to be worn on top of clothing (presumably underwear but you do you) and as such are compatible with my skirts and split drawers
is meant to be worn under clothing (petticoat or skirt)

32 swatches : 22 solids & 10 floral patterns
2 versions
————————— Lace Corsets —————————

———————————————————————————
These are the same corset but with some lace at the top, a very common style but probably more expensive than the plainer ones.
These corsets too exist in 2 versions (V1 to wear over clothing and V2 to wear under).

32 swatches : 22 solids & 10 floral patterns
2 versions
——————— Embroidered Corsets ———————

———————————————————————————
These corsets are the same as the lace ones with added embroidery.
This type of embroidery is called flossing it's decorative but also practical : the flossing reduces the corset bones’ movements to improve the comfort of the wearer. These corsets too exist in 2 versions (V1 to wear over clothing and V2 to wear under).

36 swatches : 24 solids & 10 floral patterns
2 versions
————————— Corset Cover —————————

———————————————————————————
As the name implies corset cover were worn on top of corsets. Their purposes were to smooth over the corset lines (the equivalent of today's pantylines), to hide the corset's color (for it to not show under a lighter bodice), to absorb sweat so as to protect the bodice and finally especially in the edwardian era to act as padding to achieve the fashionable pigeon breast look.
That being said it seems not everyone wore corset covers from what I've seen.
Like corsets, corset cover too were sometimes used as workwear by women working in hot environnements (ironers, laundresses as well as peasants during harvest).
This corset cover includes 3 styles (pictured below) with different degrees of "laceyness". I tried my best to make it work for both 1880s and Edwardian fashion, in the end I think it's leaning more toward the later.

15 swatches : 3 styles (cf picture above) with 5 swatches of white/off white each
————————— Split Drawers —————————

———————————————————————————
For most of the 19th century and even the beginning of the 20th century, women drawers were open : they were composed of 2 legs that would be buttoned or tied together at the waist and that would overlap in the crotch but could be split appart when necessary.
I've made 2 versions of these, since I've seen both :
is tighter under the knee giving that poofy "bloomer" like shape
is straight legged

10 swatches with 5 different white & off white color ways
2 versions
———————————————————————————
Download : dropbox — simfileshare
———————————————————————————
And once again as a bonus some of my main reference pictures :

#my cc#ts4cc#ts4 historical#ts4 clothes#sims 4 historical#sims 4 clothes#maxis match#decade challenge#1880#clothes#timeless#teen#grown up#1880s Impressionism Sets
466 notes
·
View notes
Text
Breaking down the sewing kit
This required the most work of all the notions up on the shop, since I got and assembled all the pieces individually. I've got six of them to sell right now.
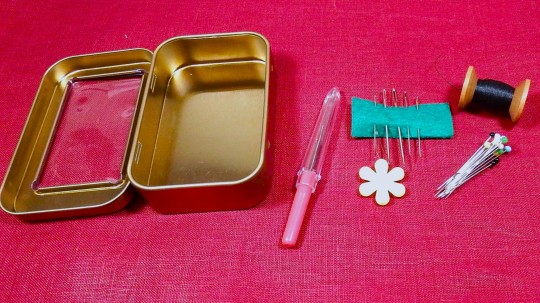
Included:
The tin: It's compact, roughly the size of a playing card, with a hinged lid that fits on snugly.
Seam ripper: Compact enough to fit into the tin, sharp, and nimble. (Pro tip: Keep the clear cap around to fit onto the butt end of the tool when you use it, and make life easier on your hands!)
Needles: 5 assorted sewing needles, sharps with different thicknesses and eye sizes.
Needle threader: I went on a quest to find decent ones, since the little tin ones in your average sewing kits break easily and drive me wild. The plastic flower is easy to grasp, and it makes threading your needle (especially when working with crewel wool or embroidery floss) SO much easier.
Thread: 5 metres/5.5 yds of glazed cotton quilting thread. Choice of white or black. I am SO sick of crappy sewing-kit thread, which is usually flimsy AND a nightmare to sew with, so I've spun up spools of my favourite handsewing thread instead. It's smooth and sturdy, and less likely to snarl or knot as you're working.
Pins and pincushion: The secret ingredient is a strong and tiny magnet, which sticks to the tin but can also be taken out. It keeps all 20 of these sharp glass-headed pins in line without breaking a sweat. Once I discovered magnetic pincushions, I never turned back. You just have to throw your pins at them to make them stick.
The sewing kit on Etsy
There are also three things I think are good accompaniments to the kit, but kept them separate to keep the kit's price down.
Thread wax: 100% beeswax thread conditioner. Running your sewing thread through the wax will make it much tamer and easier to deal with. It saves SO many headaches if you do a lot of sewing by hand.
Leather thimble: The handsewer's best friend. Comes in small adult and large adult sizes. I use these myself to keep handsewing from causing inflammation and nerve issues when I have a lot of embroidery to do. Leather thimbles allow sensitivity and freedom of movement I find hard to achieve with metal or plastic ones.
October 2024 special offer: If you buy kit, wax, and thimble all together, you get 20% off. That's a $20 CAD value, and a $16 CAD price.
182 notes
·
View notes
Text
Quick headcannon for our favourite little family. (Tsu'tey/Reader & Spider)
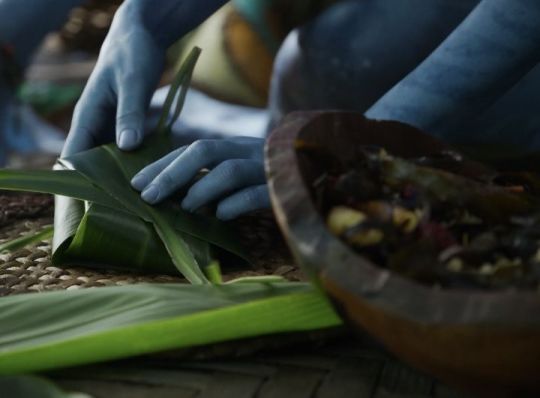
Tsu'tey, like the rest of his clan, is a professional weaver. He can make rugs, tapestries, baskets, anything you can think of. And he'll have it done in half the time you expect it to take. In comparison, Reader's skill equates to a teen learning for the very first time, how to make friendship bracelets with sewing thread instead of embroidery floss.
So of course, hilariously, Spider (age 4) decides to go to Reader out of both parents, and demand they teach him how to make jewellery. (Bonus points if Reader was already trying to make a piece for Tsu'tey and was near tears with how hard they were struggling).
And of course, like a good parent who does not want a scenario of the blind leading the blind, they suggest he waits for Tsu'tey to come home. To which Spider refuses, so they compromise with Reader showing him the basics (they can barely do it themselves) so that Tsu'tey can show him the more complicated stuff later. Unsurprisingly, Spider takes after Reader and can't weave for shit so the first attempt it laughable.
Tsu'tey doesn't seem to care though.
When he ducks into the compound, looking tired and content after a long day with the clan, he greets his mate and child with a warm smile and a hug. He has barely put down his bow before Spider is rushing up to him and brandishing his first weaving technique.
Of course, Tsu'tey looks at it with nothing but heart eyes.
<"For me?"> He asks, tail beginning to wag as Spider nods excitedly, toddling closer to push it into his Dad's hands, only for his little face to fall when he realises that the bracelet is WAY too small for Tsu'tey's big wrist.
Not missing a beat, Tsu'tey carefully plucks the bracelet from Spider's little hands and rolls it onto his second finger, before giving the fingers a wiggle. <"It fits perfectly, thank you my sweet."> He praises, bending to give Spider a raspberry to the forehead. Of course, Spider is immediately delighted and toddles off to go make MORE bracelets.
And like the proud father he is, Tsu'tey loves EVERYTHING Spider makes for him and I mean EVERYTHING! This man goes round decked out in brightly coloured jewellery with uneven beading and knot work, and he is PROUD to be seen in it all. He hoards Spider's projects like a human parent hoards drawings on the kitchen fridge.
And even years later, when Spider has significantly improved and is making pieces that rival all the other kids his age, Tsu'tey keeps everything his boy ever made him. Spider once demanded he remove all the shitty bracelets and burn them, looking embarrassed as he pressed a new piece into Tsu'tey's hands.
Of course, the new piece simply got added to Tsu'tey's attire, and he reluctantly removed the older pieces upon Spider's request, but kept them safely stored with his other possessions. What Spider doesn't know however, is that he keeps the very first bracelet/ring, hidden under his forearm guard, secured tightly with an additional leather strap so it will never go missing.
#tsu'tey#spider socorro#tsu'tey x reader#dad!tsu'tey#spider#avatar twow#tsu'tey avatar#father-son duo#avatar#family fluff#weaving shenanigans#Tsu'tey being really soft#some FLUFFFF for the soul
297 notes
·
View notes
Text
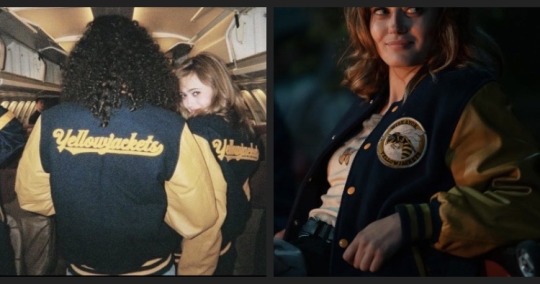
While there are lots of options as to where you can buy a replica of the Yellowjackets Letterman Jacket, they’re not always easily attainable. Last year for halloween I made my own letterman and I figured others could find my process helpful. (The supplies I used were things I already had or were accessible to me but there are other ways to create the same thing. If you have different materials that also work feel free to make suggestions or use them in your process).
HOW TO MAKE A YELLOWJACKETS LETTERMAN JACKET:
Supplies:
• Gold/Navy Letterman jacket
• Printer
• White Printer paper
• Gold Felt
•Chalk
• Heat ‘n Bond
• Embroidery floss in the colors White, Black, Gold and Gray (I ended up needing two packs of white).
• Embroidery needle
• White (or light colored) tissue paper
• White fabric (I used cotton)
• Embroidery hoop
• (Optional) White and Black thread
• Glue stick
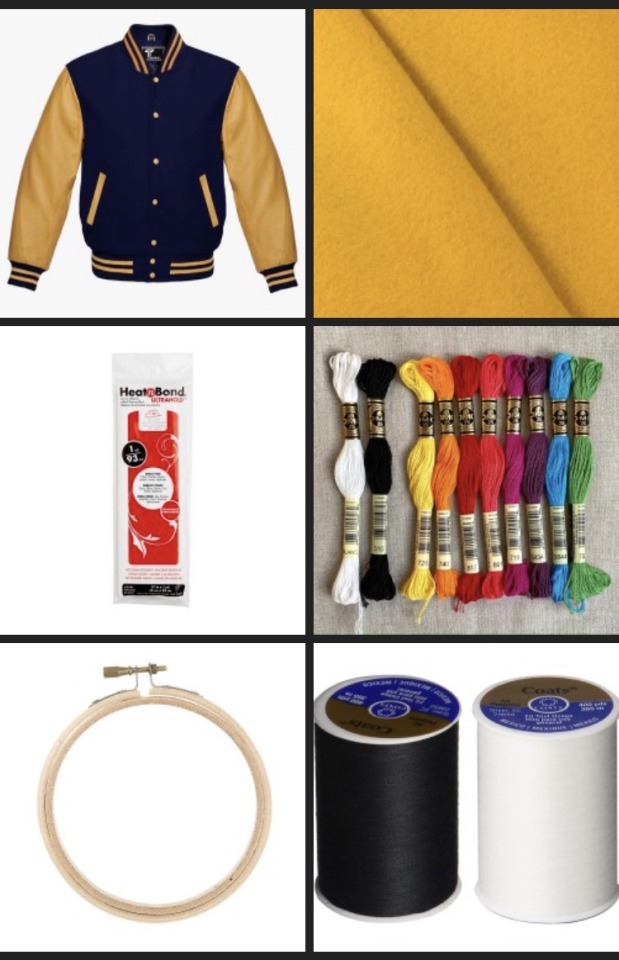
Step 1: Aquire your jacket.
You can do a lot of different things for the plain base jacket. I bought mine off Amazon but if wanted too you could probably sew one or buy one second hand etc. The only specification is that it’s Gold and Navy. It is important to do this first because everything else builds off of this step.
Step 2: Print out designs.
Use the photos I provided below and paste them into a word document. From there you can size them up or down to reach the size that you like for printing. The “Yellowjackets” logo is for the back of the jacket so when I did it I kind of split the photo in half and put it on two different pages. In the end it turned out to be just shy of 13 inches length wise. The round patch goes on the front and mine was 4.25 inches in diameter.


Depending on the size of your jacket your patches can be bigger or smaller, but once your happy with the sizing you can then move onto the next step.
Step 3: Gather supplies.
The gold felt is to be used to create the back patch. Because of the size of mine I was able to get a little 50 cent sheet of it (I was able to place the logo at an angle to fit it) but because the patch sizes will be different it’s important to bring your print out of the logo when shopping to make sure you have enough. Most craft / fabric stores should have this in stock. It’s also a good idea to bring your letterman jacket with you to try to color match the shades of gold/yellow as best as possible.
The embroidery hoop, floss, white fabric, and thread are for the front patch as I hand embroidered mine but in theory you could use an embroidery machine or printable fabric sheets to create your patch. If you use these other methods you’ll need different supplies and different instructions that I can’t give.
The Heat ‘n Bond is to iron the patches onto your jacket so they stick (though I’ve had to re iron my back patch because the fibers of the wool make it hard to stick to). It will essentially act as double sided tape.
Step 4: Creating & attaching the back patch
• Cut out a piece of Heat n’ Bond that covers the area where your logo will go.
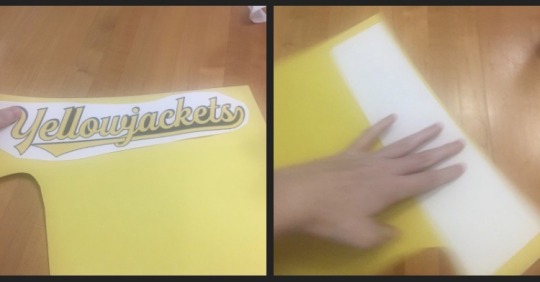
(i am using colored paper in the example pictures. Yellow represents the felt. White represents the heat and Bond).
• Once you have the right sized piece of Heat n’ Bond, iron it onto the back of your piece of Gold felt (make sure to follow the instructions on the Heat n’ bond packaging).
•Use your printed template of the logo and cut out the words on the felt. You can cut out the logo on paper first and trace it or attach the paper to the felt and just cut them both at the same time. (I moved the dot on the J down so that it’s still attached just to make it easier but you can do whatever you want).
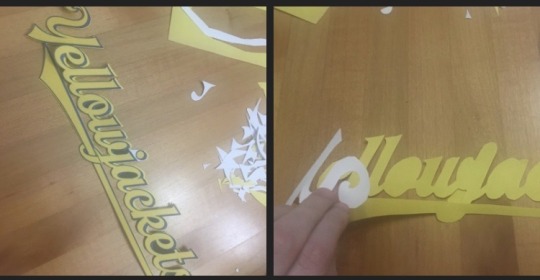
• Put on your Letterman and use the chalk to mark where on the back you want the patch to go. For this step it can be helpful to have someone else assist you (though it’s possible to do it yourself).
• Take off the jacket and lay it flat to align the patch up with your chalk markings. Once it is where you want it you can Iron it onto the back of the jacket (according to the instructions on the Heat n’ Bond).
You now have a finished back patch!
Step 5: Creating the front patch.
• Trace the design of the front patch onto tissue paper (I would suggest a dark pen or sharpie so you can see it really well). If you have trouble seeing the design underneath it can be helpful to hold it to a window pane when it’s sunny or another light source. The photo of the logo I included has a white border around the black words but the patch in the show doesn’t have it so I just ignored it. From there you glue the traced tissue paper onto the fabric.
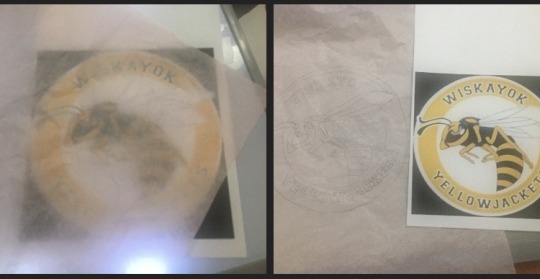
• Cut out a piece of white fabric big enough for your embroidery hoop and glue the tissue paper sketch onto the fabric.
• Put the fabric/tissue paper into the Embroidery hoop.
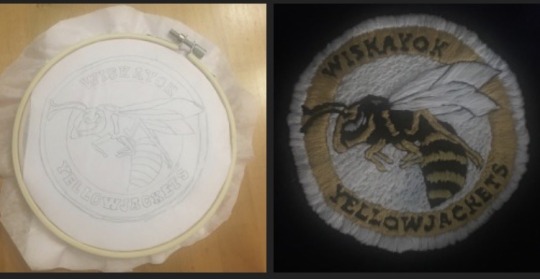
• Thread the needle and start embroidering the design. I found it good to use different techniques on different areas of the patch (long white stitches on the wings versus short ones on the background etc. I also thought it was helpful to embroider in color groupings (so like white all at once or yellow all at once etc. so you don’t have to switch out the floss that much). Save the white outer circle and black outline for last though to help clean everything up. The white and black sewing thread can be used to outline smaller details or neaten up some of the floss.
• Once the patch is done cut out a piece of Heat n’ Bond that covers the back of the patch.
• Put on your jacket and mark with chalk where you want to put the patch. In the show it’s placed by the second from the top button. (See Jackie reference photo at the top of the post).
• Iron on the Heat n’ Bond to the back of the patch (following packet instructions).
• Iron the Patch to the jacket based on your chalk markings.
• You have completed the front patch!
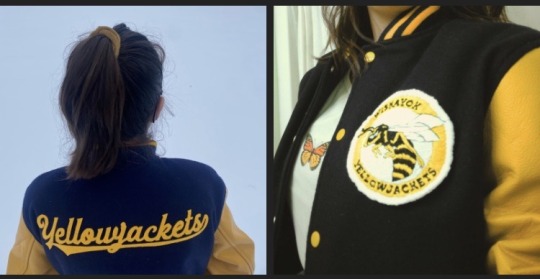
Above are some photo examples of my jacket (please ignore my messy hair in the left picture, being in the snow got it ruffled up).
Sorry for the long post but I think I got everything covered. I hope you guys found this helpful but if you have any questions about the jacket, my process, or anything else feel free to ask!
#yellowjackets#fashion#costume#diy#jackie taylor#taissa turner#akilah yellowjackets#gen yellowjackets#shauna shipman#natalie scatorccio#van palmer
108 notes
·
View notes
Text
Baby punks!
Listen up. I got a few tips and stuff.
1: Thrift everything. I'm not even remotely kidding. You can go MILES with the shit available at thrift stores and only spend like 10 bucks. I go to Goodwill about once a week and I find more than I even really need.
If you wanna make patches but don't have anything to cut up, just buy like 3 pairs of jeans for like 3 dollars and you'll be set up for a while. Cloth, clothes, gadgets, wallets, jackets, even shoes. If you're worried that punk is "expensive", you're not looking in the right places.
2: Five Below. They have really solid fabric paints and stencils you can get. Also check out Joann's and Michael's. They got needles, embroidery floss, fabric paints, fabrics, etc. But be wary about those two, prices are up due to inflation.
3: YouTube tutorials are your friend!! If you're confused about how to do something, take to the web. You won't get all your answers, but you sure will find how to attach a zipper to your pants.
4: Dental floss. This is brought up every time in these discussions because it works. If you need to sew something onto your pants, jacket, whatever, use dental floss. You can snatch some up at CVS. It is very helpful.
5: Find a jacket with wide armpits. Especially if it's denim and especially if you plan on adding zip-off sleeves. ESPECIALLY if you have armpit hair. Just trust me on this.
6: Do you drink soda/beer/other canned beverages? Because if you do, save them. The cans, the tabs, all of it. It can be very useful. The cans, you can turn into spikes. The tabs can be helpful for zippers, chainmail, whatever you might use them for.
7: Believe in what you're saying. Don't just claim you stand for human rights, put it into action. Learn. Understand that some women, black people, and/or other minorities are gonna be hesitant to trust you and understand why. Know when it is your turn to participate in a conversation, and don't force your way into a community or conversation that isn't yours. You're going to be in a strange place where you've been pushed away from all the bigots in your life but can't go to other minority communities because they don't know whether or not you can be trusted. And don't try to make them know that you're "one of the good whites/men/etc". You're gonna need to find community and put weight behind your words. A friend or a relative says something just a little bit off? Don't laugh it off, make them know it was wrong (my go-to is to stare at them in silence the moment they say it and not budge until they repent the comment). Nobody's gonna trust you unless you mean what you say.
8: Don't listen to the gatekeepers. Anybody who tells you "oh well, that's not really punk, you're a poser!" Is missing the point and is hence the real poser.
9: Participate in the culture! Really! Go to playlists, find local bands. Go to a punk show. Make friends, participate in rallies/protests.
10: Be you! Seriously, be you. Whatever you think would look cool or would be comfy, do it. Literally, if you wanna turn a winter coat into a battle jacket, go for it. The key to punk is expression. Don't feel like you've gotta meet up to everyone else's standards. Punk fashion should be a tool to help you find yourself and what you're comfortable in, what you enjoy. If you're doing something to fit in, you're doing it wrong, and you're doing yourself a disservice.
#11: punch a Nazi#punk#punk fashion#punk tips#punk diy#goodwill#diy#rally#protest#dont tolerate intolerance#spiderpunk#crust punk#baby punk#new punk#battle jacket#punk patches#thrifting#down with capitalism
428 notes
·
View notes
Text
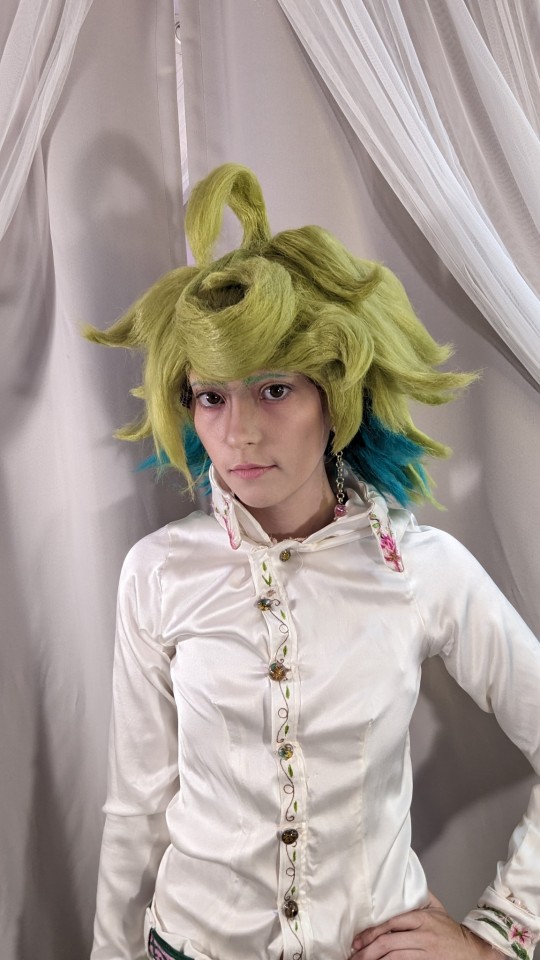
Pst! You know what time it is? New cosplay time! I decided to remake one of if not my favorite cosplays in my collection, Naven Nuknuk from Epithet Erased


This has been by far my most time consuming build (as well as expensive). this cosplay took a total of 279 hours over the span of roughly 8 months to make. That time doesn't include redoing sections or details that didn't make it into the final look.
And now for a detailed look at this whole outfit because dang, I put so many tiny details in.
Starting off with the earring and beads, I used a tequnic called lampwork to make them. The best way I can explain lampworking is like miniature glassblowing
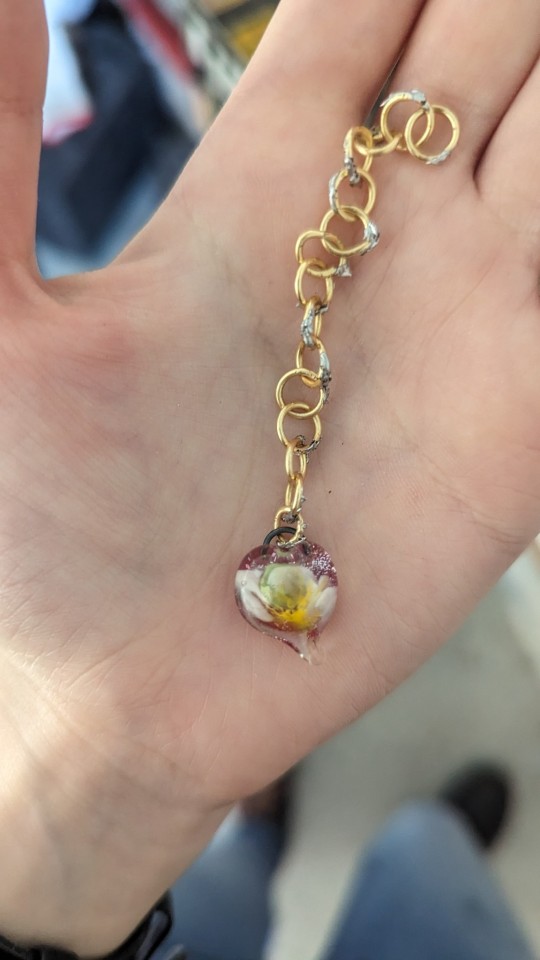
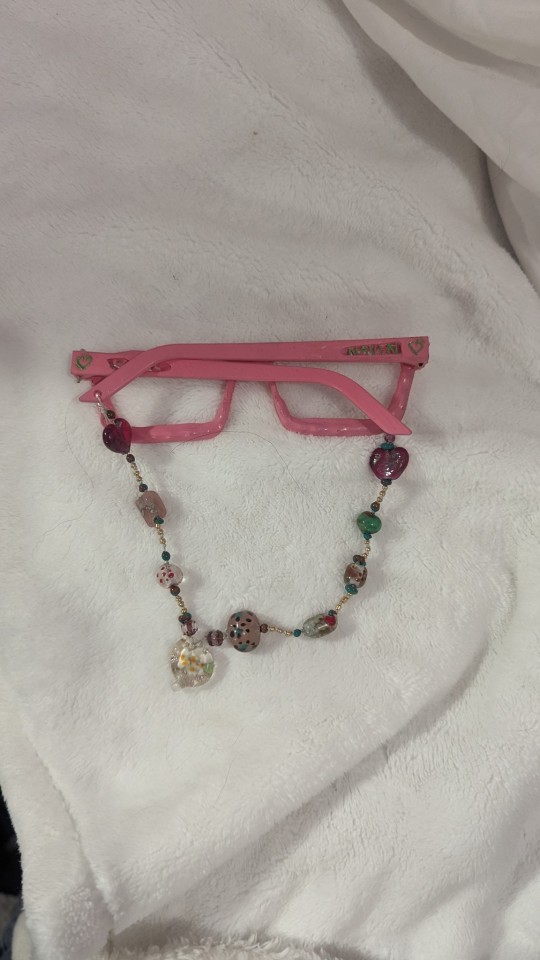
Lampwork uses glass rods heated in a flame to create generally small pieces like beads or buttons. Lampworking can be incredibly detailed. While I'm still fairly beginner at all of this I was able to learn a tequnic called implosion to make the flowers look more 3 dimensional. I also used lampworking to make the buttons on the undershirt!
I did all the 3d modeling for parts like the glasses and the belt buckle. (Stealing pictures from my Instagram because the progress tracker i use corrupted my images)
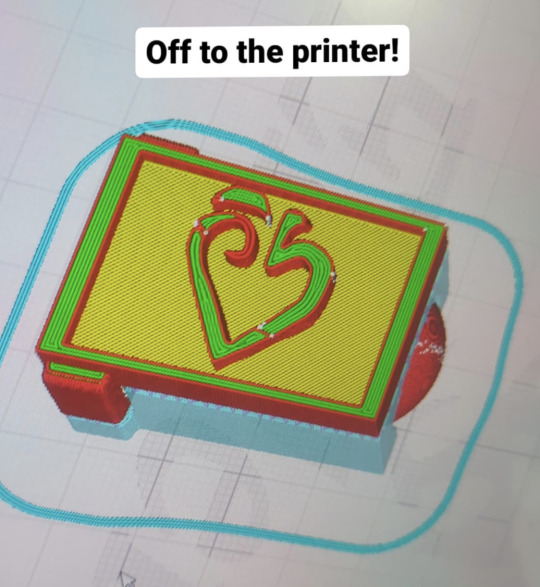
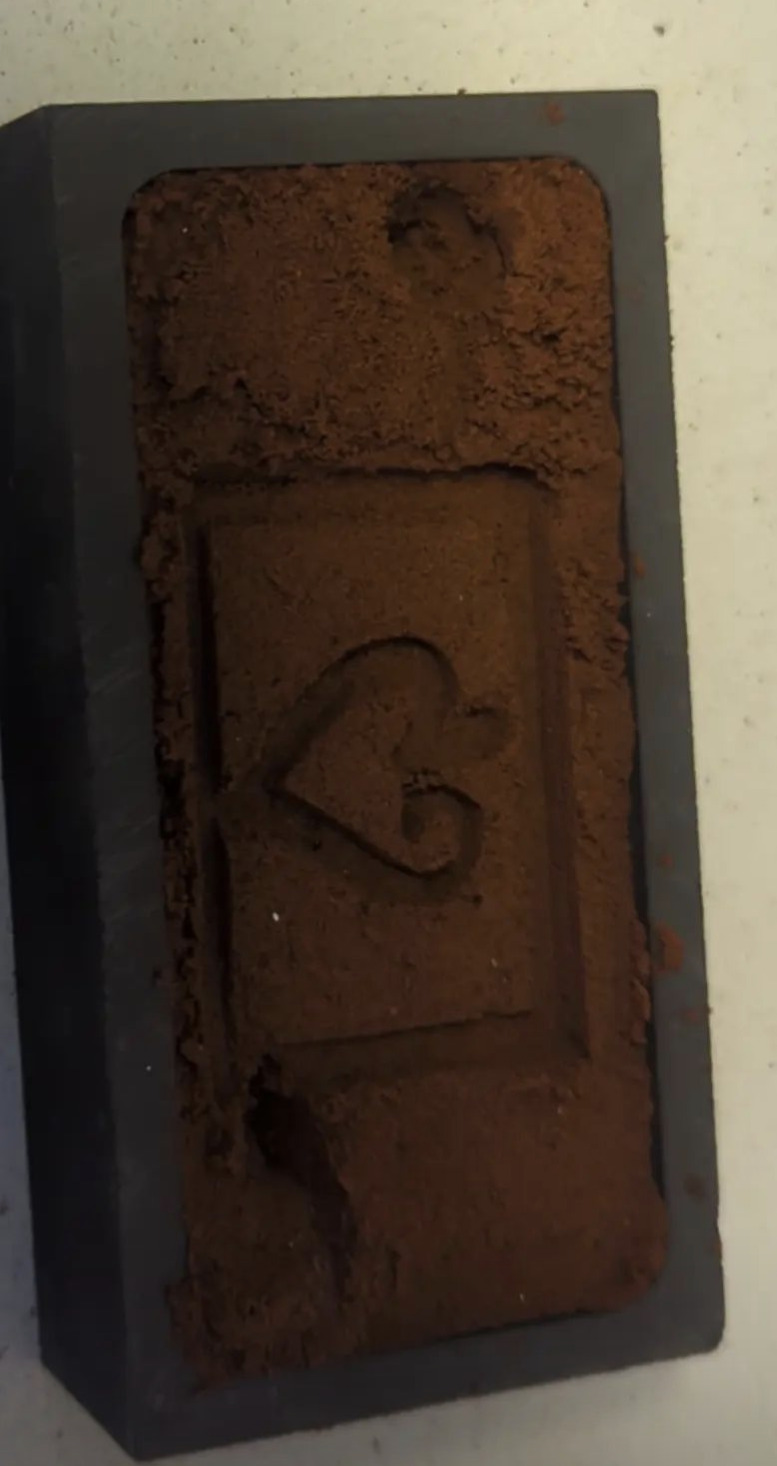
While I don't usually focus on the 3d modeling in my builds it's a huge passion of mine. After making a model of the belt buckle I put my 3d print into casting clay. After carefully removing it I poured tin in to make the final belt buckle.

I also taught myself basic leather working and tooling to add some apple blossom inspired designs onto the belt and painted it.
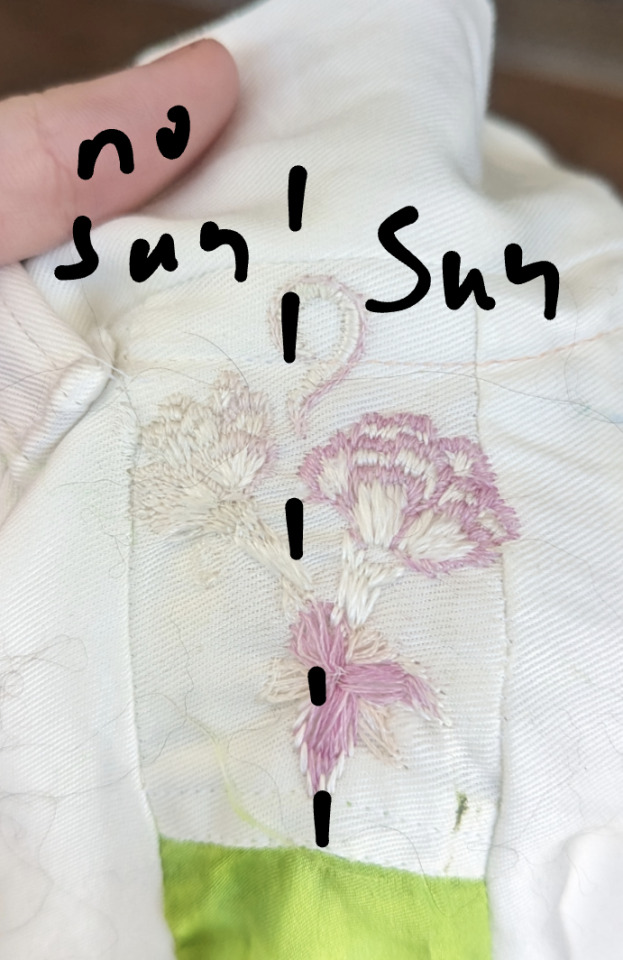
Next thing I think I should talk about is the embroidery. I wanted to incorporate more details about naven into his outfit. After asking jello some questions we came to the conclusion that the embroidery should be lillies and carnations. Because of my constant insanity I hand embroidered everything. I also did some embroidery on the pants and used an embroidery floss that changes colors in the sun for fun.
Before I get any questions about materials I'll add in, the white shirt and embroidery are both silk. I struggle to embroider with cotton dye to the sound and feeling it makes, and I felt like being fancy so silk shirt too. The pants are a cotton twill (pretty much jean fabric without the indigo) and the green strips are silk. A perfect Segway into the tatting and knitting!
For those who don't know tatting is a traditional form of lace making found in many different places around the world. There are 2 main forms of tatting, needle tatting and shuttle tatting, I tend to use shuttle tatting due to how nice and portable it is. I thought tatting would be fitting to add to navens outfit due to it's other name, farmers lace.
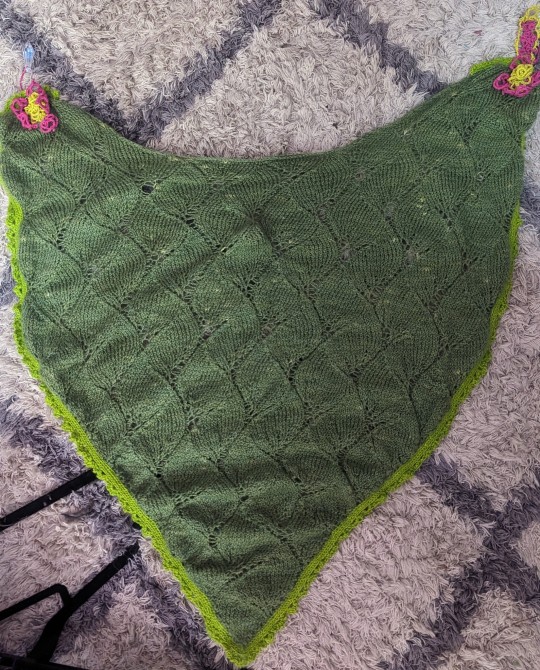
And now for the big beast of this outfit, the knitting. Like with everything else in this outfit I dyed the yarn myself. It's 80 percent wool to 20 percent silk blend.
Huge thanks to jello for suggesting so many ideas, this outfit wouldn't be nearly as cool as it is otherwise.
Anyways I hope all y'all like the outfit! I had so much fun making this insanity
#naven nuknuk#naven nuknuk cosplay#ee naven#epithet erased#epithet erased cosplay#prison of plastic#prison of plastic cosplay#anime campaign#anime campaign cosplay#cosplay
496 notes
·
View notes
Text
Renegade 2023 Bound Exchange: i like you very much, just as you are by sweaters_in_the_summer


Ahhhh, somehow I missed posting this one back in January! My recipient for the annual @renegadepublishing bound exchange this year was @sits-bound, which gave me the chance to explore some new Schitt's Creek fic. When I realized that she had requested one of her own fic, and it was a cute Bridget Jones's Diary AU that would fit into a cute little half-sized book... well then. Choices were made.


The bookcloth is the lamented (discontinued) Colibri in Velvet Rose, endpapers are from my wife's gel plate printing art stash. I leaned into the 2000's era hearts and swoopy font look to go with the AU concept.


Title and spine are acrylic paint with a Cricut stencil, edges splattered with acrylic paint, and endbands sewn with embroidery floss and some stray bits of weaving cotton. Unlike my other bind for sits-bound, there were no dramatic disasters, and it made it safely to its new home with no major surgery required!
#fanbinding#ficbinding#schitt's creek#renegade bound exchange 2023#quarto books are inherently cuter#fight me
78 notes
·
View notes
Note
I'm so happy you don't mind!!
I apologize in delay and also advance about my madwoman ramblings in every reblog I do from you henceforth!
Your ramblings are DELIGHTFUL !!!! 🥺🥺💛💛💛 There is no need to apologise, I saw the wall of text on my phone and went "ohhHH YESSSSSS" hkjhfdskg so I'm not complaining lol
#mostly because i just can't stop myself sometimes haha!#it's like stimming i just hAVE TO#also fun fact i found out the tag limit is 30!#PURELY because tagging all the variations meant I had to DELETE SOME RAMBLINGS 😭😭#but it was mostly just gushing about the fits (and papyrus' pants) anyways lol!#i love that we both just went THE CONTINUITY#my first thought when i read that was that i wanna high five you HAHAHSHDN#one of my favorite parts about tumblr is the full on conversations that usually happen in the tags it's hilarious#reblog#also your art is amazing I'm so shocked i only just now found you!!#and ahem.... starts looking at my old pants 👀👀👀👀#i have SO MANY FABRIC SCRAPS AND YARN AND THREAD AND EMBROIDERY FLOSS i could do it#i might do it heheheheeheehehehe
8 notes
·
View notes
Text
Hellspawn idea that hit me like a religious vision
Astarion can't stop thinking of the color of this flower Karlach found during one of the more idyllic moments of traveling to Baldur's Gate, and it should have been such an inconsequential moment. It was just a flower. But the delight burning in the embers of her mirthful eyes just sticks with him. And it's mostly annoying how happy she is about everything, but he also can't hold it against her when she, too, is adjusting to sudden, newfound freedom, and hers is much more limited than his.
And it isn't even a romantic moment or anything, right? Karlach just sees it on the edge of where the last bit of life was able to grow between the Shadow Curse and the land beyond it. She's STOKED. Bellowing in that way she does about this flower. She just takes a moment to enjoy it, then moves on. Doesn't pick it. Doesn't touch it. Just moves on with her day.
but this moment sticks with him and he thinks about it when they're curled together under the stars that night, his body fitting against the curve of hers, his cold weight soaking up every bit of warmth her overheated body will give him, and her arms are SO strong, but so gentle in the way she holds him.
The immortal forced to reckon with mortality bc this woman, who truly believe deserves a much better lot in life, only has a finite amount of time to appreciate the flowers and the sunrise and just. everything.
He'll still be able to live his life from the shadows and find beauty in the darkness, but Karlach?
He can see her death coming on the horizon and there's so much he actually wants to do, now that they're trying to make things real. and he just. is feeling the pressure bc he did waste time trying to get Karlach into a position to protect him and he'll forever feel bad about it (but not say anything bc that's his burden to carry).
So the immortal keeps thinking about this flower and what Karlach would look like adorned in beautifully crafted items accented in blue: gilded chains and cuffs adorning her hair and horns, sturdy leather dyed and stamped, fine silk embroidered with expensive floss, of all the nice things he wishes she could experience - because he promised her new experiences once they returned - and just.
When everyone's sleeping, he just spends that time sneakily embroidering this doublet he stole from a vendor the moment they entered the city. He's working against time, too, cus this is a gift he HAS to give her before her time is up. So, his skilled fingers move quickly, embroidering this black doublet with the most beautiful embroidery done mostly in blue, but accented with red, orange, and yellow.
He's almost done when Karlach tells him one night that she thinks she doesn't have much longer. Her heart is in overdrive and she can feel her body beginning to give out, to fail her when freedom was so close she could taste it. and it isn't fair. Astarion is SO angry at the world and at the Gods because he FINALLY has someone and. Time is running out. he feels even more powerless here because it really is just up to Karlach and whether she wants to keep going or not. He tries to talk to her about it, but usually they just end up fighting because they're both stubborn.
So, he avoids the conversation, mostly. Just tries to pretend the end isn't peeking over the horizon.
He doesn't give her the doublet right away. He doesn't want that finality, to give it to her and to know this may very well be the last time he gets to give her something he put his time into for her like this. and he has other gifts for her. a new owlbear to go with clive (even if he thinks that's juvenile, but he's not going to judge....well. he will, but not as much as if it were Gale who still had his stuffies). but he just. cannot bring himself give her this doublet bc he knows it's the first and last time she'll be adorned in something that he put together for her. the embroidered doublet is his labor of love, and the man does NOT like to labor.
embroidering isn't even necessarily his favorite thing to do, it's just one of his skills he actually has. he lacks self-confidence when it comes to what qualities he thinks he has that make him worthy of a relationship, but he can make sure his partners' clothes are mended and presentable.
When he finally gives it to her, it's after they take down Gortash. Karlach spends that very night alone, and Astarion cannot take it. He hasn't spent a single night away from Karlach since before they arrived at the Shadow-Cursed Lands, and now they're literally counting the days until they're taken from one another. He's big mad, seething, but very respectful to her bc he understands. he's not mat at HER, he's mad at everyone that took everything they could from her.
That's the first night he actually sits down and starts coming up with a plan. And it's a genuinely good one, but it's the first good one he's had in almost two-centuries. This is when he comes up with how he wants to convince Karlach to let him go to Avernus with her. He's not ready to let go and he is willing to murder his way through the Hells with her if he gets to see her smile about inconsequential things again.
He gives her the doublet the night before they plan to head for the Morphic Pool. They know it may be their last night together, so after a group meal, when everyone is winding down to turn in for the night, they make their way up to the roof of the tavern. They sit beneath the stars, side by side, but they're just sitting and refusing to look at one another.
Karlach is unusually still and silent. She's exhausted. Astarion swears she had his undead heart beating again, but seeing her like that had it stop cold in his chest. He tries to break the silence, to cut off his own thoughts so he doesn't spiral into despair thinking of the unknown, but just ends up reaching out to take her hand.
She's hot to the touch. He can feel that her temperature IS increasing and just. imagining what she's feeling and how she's been pent up this entire trip. like no fucking release from the pressure of this shitty heart that only does its job in the right environment.
She's the one who breaks it first. to thank him for his company. to tell him that he was a little fucking SHIT when she first met him, but she always could see something good behind the veneer of mischief hiding the fear in his piercing eyes. but she loves him and she's so, so happy to have been given a chance to love someone, to touch them freely, to feel loved in return. it was something she was missing in the last 10 years of the loneliness of being simple cannon fodder in an endless war.
and she doesn't want to talk abt this. she had been avoiding it, took him on their date to pretend like he wasn't doomed to be left alone in his eternity. And neither of them even MENTION the elephant in the room. like they're both talking circles around what's going to happen, but they're being honest about the feelings they have for one another. like the only thing they even voice concern for is not being able to take out the Absolute.
Under the stars, accompanied by declarations of love spilling from their lips, Astarion produces the doublet. Karlach is just ecstatic that she received a gift, but when she realizes HE embroidered it, she's just kinda like.
This is. the most beautiful gift i've ever received, fangs.
and her calloused fingers, fingers that had seen more war and death than anyone her age should have to, gently touch the floss, follow the design, and she realizes the particular shades of orange, red, and yellow are in her eyes, in her body, in her chest, all complimented by the blue thread he used as the main color of the design.
It's a design made of the sun, moon, and stars, trailing up the front, across the broad shoulders, and down the back yoke.
she's his sun. She's the gentle warmth of the sun's rays comforting him when he would rather recede to the shadows and fall back on old habits. she's his moon and his stars, his guiding light when everything seems like it may crash down and suffocate him. She's everything good in this world if you look for it. She's proof that you can be put through shit and still come out a decent person.
Karlach does cry, but it's nothing dramatic. It's a few tears, her own stomach and chest twisting with an overwhelming sense of loss and yearning; the loss of time when her light inevitably extinguishes and a deep yearning to stay. it's in direct opposition to her desire to die in the place she loves simply so she can keep living this life with the man she loves.
She puts the doublet on, wearing it that night while he cuddled against her side. They held each other beneath the stars, until it was time for Karlach to get some rest for the upcoming battle. Astarion spends that entire night just watching her, playing with her hair, getting every last touch he can, then makes a vow that he WILL save Karlach, just as she saved him.
#bat rambles#hellspawn#karlach#astarion#bg3#i'm dying on the hill that astarion's preferred way of showing love#would be gift giving (making sure his partner is taken care of) and touch#but like the former he would NOT draw any attention to that's between him and his partner#like generally gift giving with him is someone just finds it wrapped up on their bed like he's a cat#or in some cases#he'll just casually give it to them during an unrelated convo and. not mention the gift once#for example i imagine when he and mercy are going through loot#to decide what to keep and what to sell#astarion will sometimes pick a ring from the bunch#or maybe he had one he had found while actively looting and tucked it away specifically to give#but he'd just reach over to put the ring on one of their fingers#then go back to what he's doing#just gestures like that#he's dramatic but i think he'd be awkward with gift giving#bc part of it is just how long he went without y'know#once he loves someone he just needs all their needs to be met and then some#one day i'll actually write this out but#here's a quick play by play of what i keep envisioning lmao#long post#bat writes#fic idea
79 notes
·
View notes
Text


While I'm super busy with play costumes, I'm not working on any of my own stuff, so I figured I'd share stuff that hasn't been posted about!
These jeans were my dad's, but they fit me way better so they're mine now. They had little constellations of holes, almost like the previous owner walked into a thornbush or got a tiny spatter of acid on them. Whatever happened, they needed fixing. I saw a video of someone embroidering stars for fun, so I decided to try it!
I used backing fabric from sleeves cut off dad's t-shirt. Used regular thread for the first few and quickly realized that's what embroidery floss is for. Tried variations on quite a few stitch styles: leaf stitches, long and short filling, weaving, and wheel-type stitches. Then I cut away the backing fabric to the shape of the embroidery!
So far I've been able to wear and wash them exactly like all my other jeans with no issues. (I wash them inside out so that any damage happens on the back.) Nothing has come undone yet!
#sewing#diy#mending#beginner sewing#cj sews#solarpunk#it's not waste until you waste it#use it up wear it out make it do or do without
61 notes
·
View notes
Text


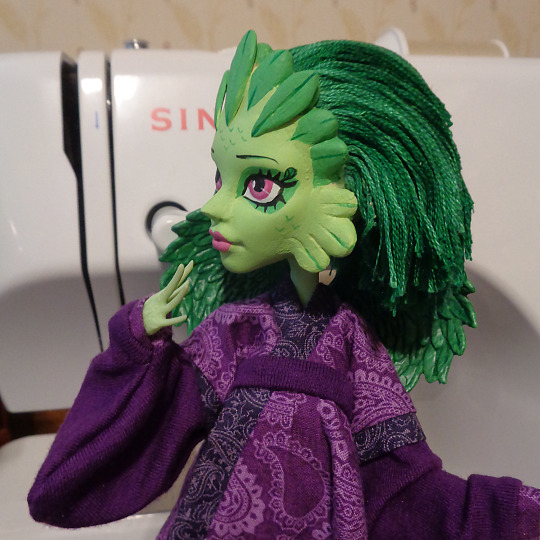
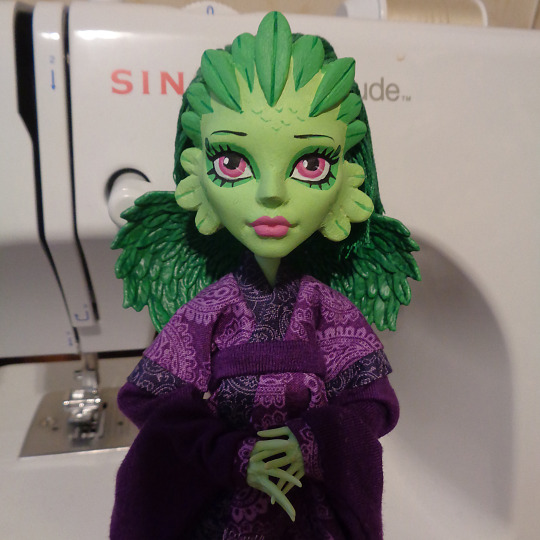

When Quill Talyntino was formally introduced by Monster High I immediately fell in love with how adorable she was. Unfortunately, her introduction was tied to a poll on who got to be the next doll made, which she (understandably) lost to Finnigan Wake, another cool character and doll.
Despite this, at the time I had hoped that Monster High might make her eventually anyway, seeing as they had eventually released every doll from a previous poll.
Then G1 was cancelled. So any potential doll for Quill was lost. Oof.
At the time I didn't really feel like I had the skills to make her design myself, but I decided I still wanted her as a doll and gave it a stab.
The base doll is a Venus McFlytrap, and the wings are from an EAH Cupid doll. I rerooted her hair with embroidery floss, and sculpted her face feathers and distinct nose with milliput.
As I wasn't the biggest fan of her cannon dress, I decided to change it up by making it a modified hanfu, with a pattern by DGRequium on etsy. The only part of their pattern I changed was the skirt, to make it a bit more like her dress in the show. I was going to giver her boots, but didn't have any spare ones that fit and wasn't about to pay a fortune for some off ebay, so I just created the vibe with long socks and Raven Queen shoes.
I think she turned out really cute and I'm so happy I was finally able to add Quill to my collection.
461 notes
·
View notes
Text
It's August 21, which means: Happy Fanfiction Writers Appreciation Day! If you are a writer of fanfic, please know just how appreciated you are!! Fandom would be such a different space without your creativity and labors of love. 💜
In celebration of this most glorious holiday, @renegadepublishing ran an event where we bind copies of fics to gift to their authors, and I had the joy of binding The Tranquility of Water for @noppoh! It's a truly fantastic post-canon story and I love the exploration into the effects of the main story on its characters after the fact. (This is a story I love so much that I wrote up a page and a half crash course on The Untamed so I can try to force my sibling into reading it as well. Take that as you will)
The walls of the Hanshi creep in on him and so Lan Xichen leaves. He leaves Cloud Recesses and his seclusion, stealing away in the night with no-one the wiser that he even left. His feet bring him to Lotus Pier where a surprisingly kind Jiang Cheng seems determined to help him heal.
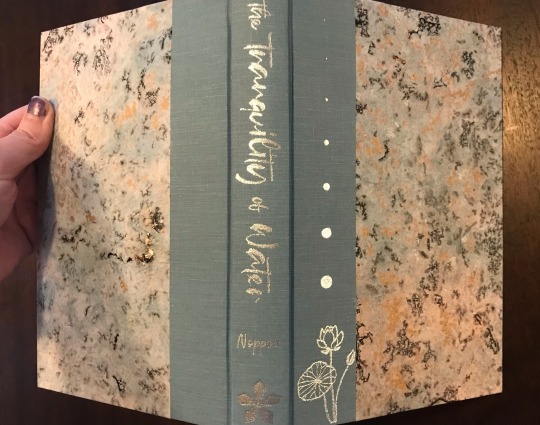
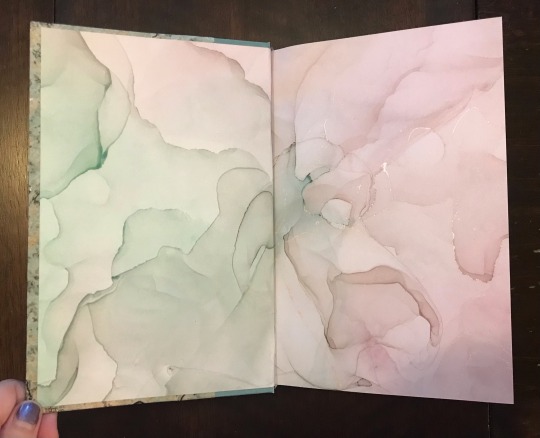

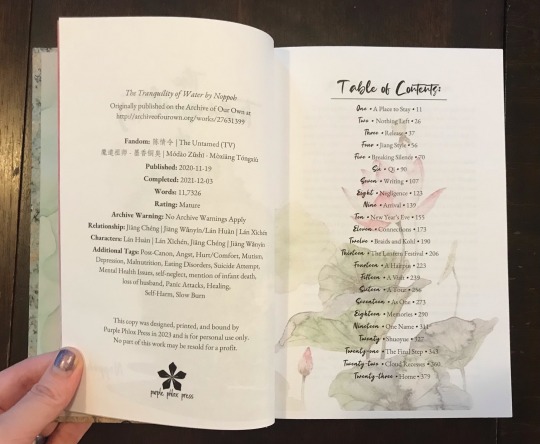


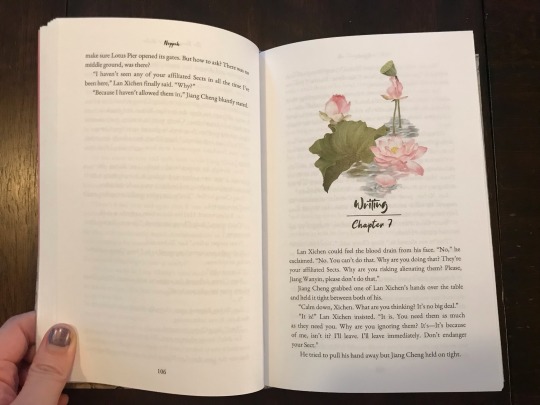

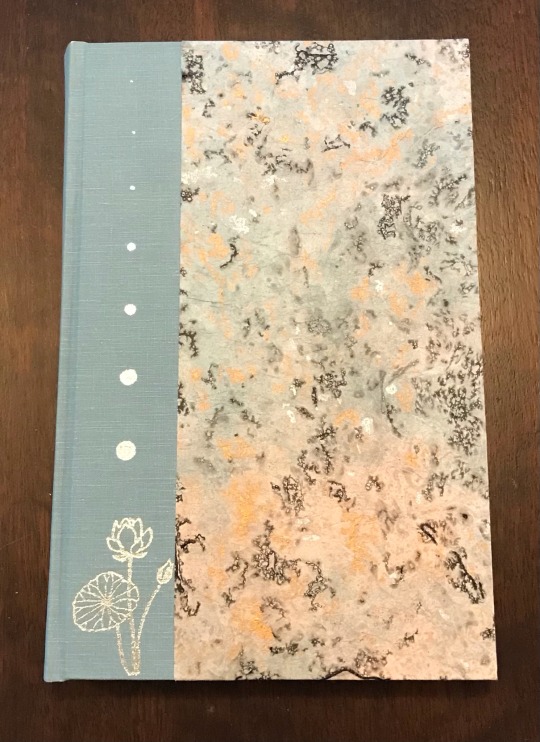
With a title like "Tranquility of Water" and the story largely taking place at Lotus Pier, I may have been a little heavy handed with the lotus imagery throughout the book, but it felt very fitting! The lotus on the cover was a last minute addition, but one that turned out so lovely. Just, you know, to tie everything together lotus-wise. (Another one of my favorite design details in the typeset is that both title fonts from the chapter headers and title page get repeated within the text of the story as the main characters handwriting fonts!)
I started the physical binding process of my copy while at the Renegade Retreat in April (and decided the week before that I wanted to change my body font... can you say formatting speedrun?) and up until that point I hadn't actually figured out what the cover and endpages were going to look like. Special thanks to everyone who contributed pieces to this binding (and who moral-supported me along the way -- my copy holds so many fun memories now) because it LITERALLY would not look like this without you all. I really love the way the color transitions worked out, with a predominantly blue/green case, fading into green, into pink, into the title page, and then transitioning back out at the end of the book.
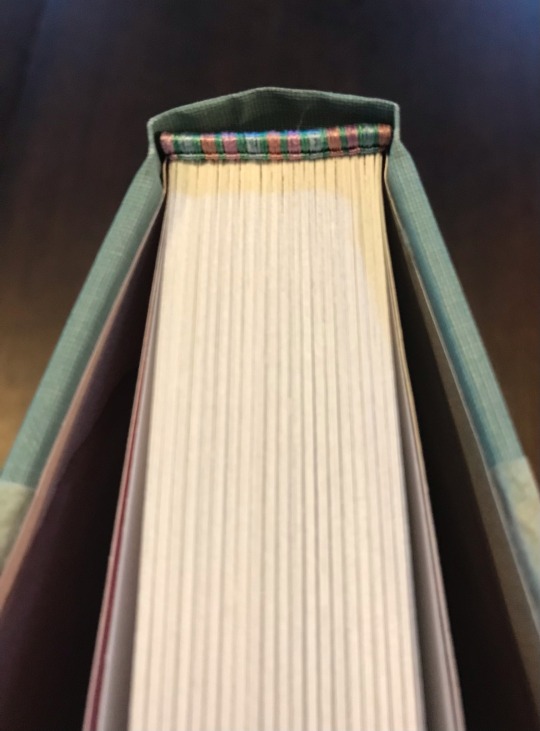
And these endbands!! Friends, that is SILK embroidery floss that a friend brought to the retreat especially so I could experience the decadence of silk endbands. I will never be the same. (They're so smooth... so shiny... so slippery to work with, but SO WORTH IT)
(Binding details under the cut)
The pieces that went into this bind:
Fandom: The Untamed/Mo Dao Zu Shi
Pairing: Jiang Cheng | Jiang Wanyin / Lan Huan | Lan Xichen
Bookcloth: Renegade Retreat Swap Table Special (I have no idea what it is, but it was just enough to make a copy for myself and the author and the color worked PERFECTLY!)
Cover paper: Opal Momi paper
Cover paper: Opal Momi paper
Endpapers: from the Craft Consortium Ink Drops - Dusk paper pack
Titling: foil quill
Endbands: leather cording core, silk embroidery floss for the bands
Body font: EB Garamond
Title fonts: Wintersoul and Bastian
Handwriting fonts: Bastian (Lan Xichen), Richardson Script (Lan Wangji), and Wintersoul (Jiang Cheng)
Tumblr insists on eating and doubling text in this section at its own whim, so if there's something missing that you're curious about, feel free to DM me an ask!
#ffwad#renegadelovesfic#fanfiction writers appreciation day#renegade bindery#ficbinding#fanbinding#purplephloxpress#adventures in bookbinding#the untamed#mdzs#xicheng#noppoh
179 notes
·
View notes
Text
We've got sewing kits back in stock!
I bought 10 tins to make kits in back in June, and now (November?) they finally sold out. So we got another 10 tins, and during our work session yesterday my assistant divvied up needles, pins, and everything else in the kit.
They're assembled in-house because I haven't found a reasonable ready-made kit that has tools I'd actually like to use. These kits have the kind of tools we use ourselves, and they're $15 CAD.
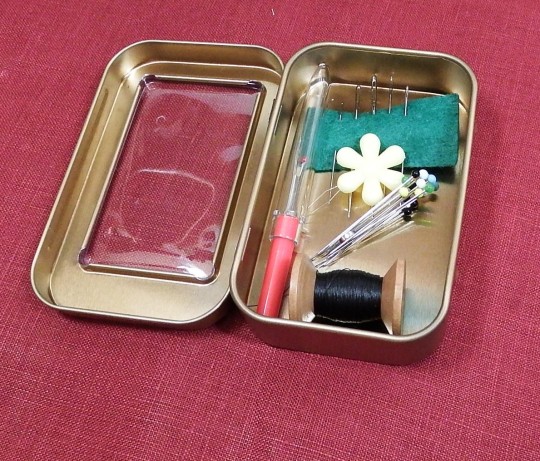
Included:
The tin: It's compact, roughly the size of a playing card, with a hinged lid that fits on snugly.
Seam ripper: Compact enough to fit into the tin, sharp, and nimble. (Pro tip: Keep the clear cap around to fit onto the butt end of the tool when you use it, and make life easier on your hands!)
Needles: 5 assorted sewing needles, sharps with different thicknesses and eye sizes.
Needle threader: I went on a quest to find decent ones, since the little tin ones in your average sewing kits break easily and drive me wild. The plastic flower is easy to grasp, the wire is sturdy if not indestructible, and it makes threading your needle (especially when working with crewel wool or embroidery floss) SO much easier.
Thread: 5 metres/5.5 yds of glazed cotton quilting thread. Choice of white or black. I am SO sick of crappy sewing-kit thread, which is usually flimsy AND a nightmare to sew with, so I've spun up spools of my favourite handsewing thread instead. It's smooth and sturdy, and less likely to snarl or knot as you're working.
Pins and pincushion: The secret ingredient is a strong and tiny magnet, which sticks to the tin but can also be taken out. It keeps all 20 of these sharp glass-headed pins in line without breaking a sweat. Once I discovered magnetic pincushions, I never turned back. You just have to throw your pins at them to make them stick.
The sewing kit on Etsy
There are also two other things I think are good accompaniments to the kit, but kept them separate to keep the kit's price down.
Thread wax: 100% beeswax thread conditioner. Running your sewing thread through the wax will make it much tamer and easier to deal with. It saves SO many headaches if you do a lot of sewing by hand. $3 CAD
Leather thimble: The handsewer's best friend. Comes in small adult and large adult sizes. I use these myself to keep handsewing from causing inflammation and nerve issues when I have a lot of embroidery to do. Leather needles allow sensitivity and freedom of movement I find hard to achieve with metal or plastic ones. $5 CAD.
19 notes
·
View notes
Text
DIY Goth Shorts
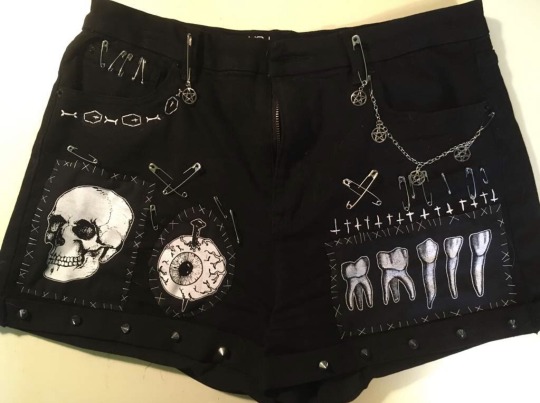

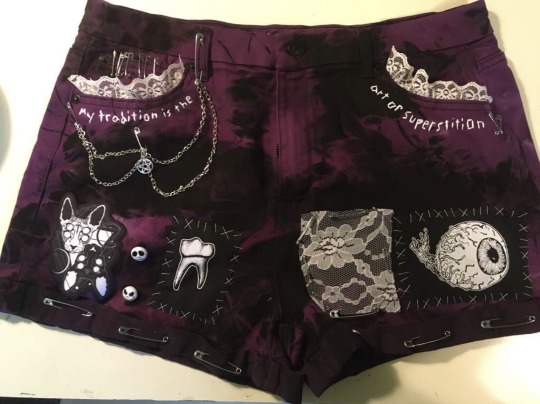
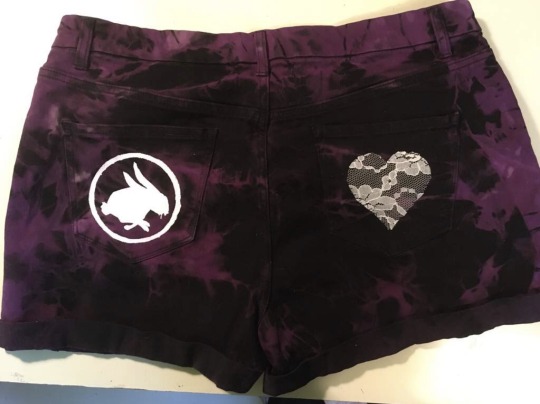

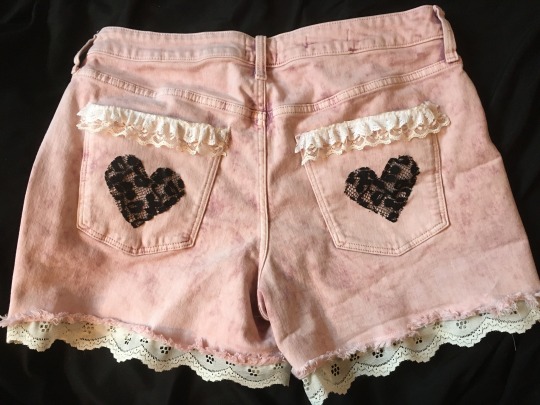


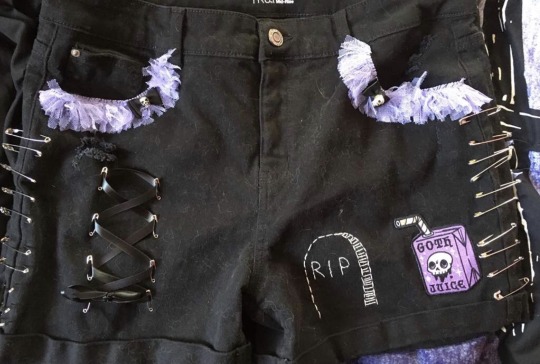
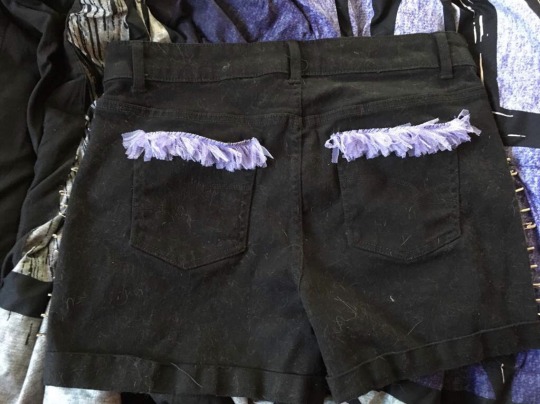
Goths of Tumblr, grab your sewing needles and safety pins, because have I got a fun and easily-customizable project for you!
I’ve been gothifying shorts and pants for a couple years, now, and they’re just so much fun to make! Very affordable, too, since all the shorts I get are either thrifted or from Walmart. From then on, I add anything I see fit—patches (bought from Hot Topic and Etsy or DIY), beads, chains, safety pins, fabric paint, embroidery, charms, ribbon, lace, buttons—you get the idea. Lots of my lace trim comes from thrift stores, charms are easy to find in bulk online, you can get beads at Walmart or your local craft store, embroidery floss and needles can be found at Walmart and are cheap (and easy to learn how to use!), and if you don’t want to buy patches you can easily make your own by creating stencils with freezer paper (tutorials are on YouTube) and dabbing on fabric or acrylic paint with a sponge brush.
I’ve also tie-dye bleached and dyed some black shorts for a cool black-and-red and black-and-purple pair. I’ve customized long pants for colder weather, as well, which may get their own post if people are interested.
If all this sounds intimidating to a new crafter, worry not! I have some really simple pairs that took no skill. I don’t have pictures, but I have one pair that just has 2-inch safety pins on the hem and a chain pinned at the pocket. That’s it! No sewing, no painting, just pins!
I also have a pair that has sew-on-studs on the hem and one patch on the leg for a less-busy design if all the eclectic clutter isn’t your vibe.
Point is, you can add whatever you want to some shorts to make them uniquely yours. They can be as busy or plain, colorful or monochrome, girly or grungy as you like! Heck, they don’t even have to be goth. I encourage anyone who knows how to hand-sew or embroider to customize their clothes, no matter their style. It’s fun!
380 notes
·
View notes
Text
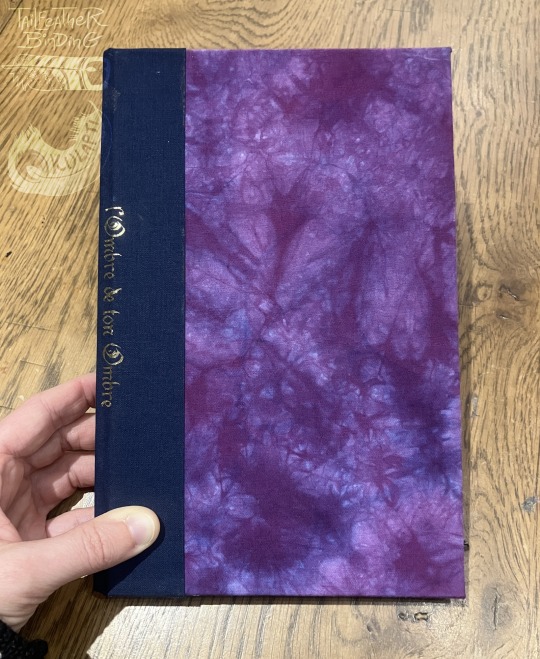

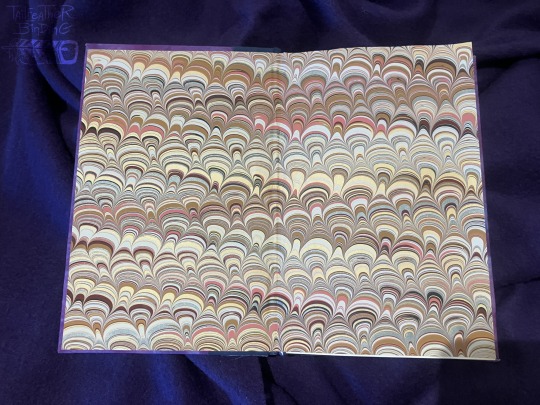
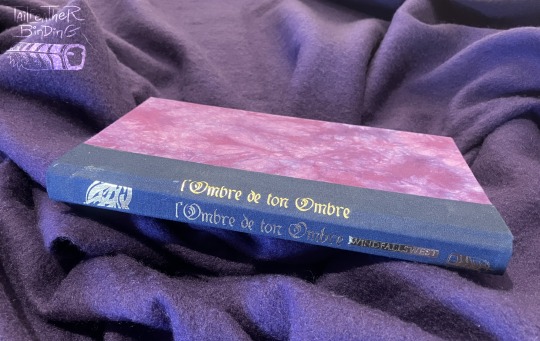
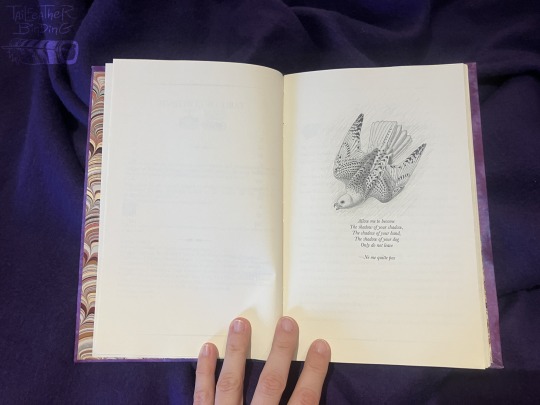


Bookbinding of L'Ombre de ton ombre by windfallswest, Dec 2023.
L'ombre de ton ombre (Fantastic Beasts, Percival Graves x Credence Barebone) is another of my favorite Fantastic Beasts fanfics. It is a novel-length work that deals sensitively with the characters' experiences of grief, depression, and healing. The story has a strong visual element, with the setting and landscape playing a prominent role in the story: the landscape is beautiful and isolated, which fits appropriately parallels the characters' slow process of learning how to live again and appreciate beauty, while emphasizing the difference between being isolated in your struggles and being companionably alone with someone. Treating mental illness is often a long haul, and the structure and resolution of this story addresses that fact with a balance of frankness and optimism.
About this project under the cut.
The gorgeous endpapers are marbled paper by Brazilian artist @renato-crepaldi. Since the landscape is important to the story, I specifically wanted endpapers that reminded me of the Australian badlands. I literally looked for months until I saw this paper before finishing the book. I was so pleased with this!
I'm honestly not entirely convinced by the pinkish tone of the cover, but I made this book to be part of a set of four, and I do think it matches nicely with the others in the set (here's another one of the four).
The frontispiece art is an edited version of J.J. Audubon's illustration of gyrfalcons. Yes, bird guy Audubon. I love this falcon illustration and falcons play a symbolic role in the text, so it was a great excuse!
Materials: Textblock is archival paper, laser printed text, marbled endpapers, with linen and beeswax stitching, reinforced with cotton cheesecloth as mull. Sewn endbands are cotton embroidery floss. Covers are Italian rayon bookcloth (spine) and hand-dyed cotton batik backed with handmade wood pulp paper (ink-like cover pattern). Cover lettering is machine-cut metallic heat transfer vinyl. The case is constructed of archival bookboard, handmade wood-paper, cotton rag paper, and PVA craft glue.
#my art#bookbinding#ficbinding#fanbinding#handmade books#artists on tumblr#here there be fandom#fantastic beasts#tailfeather binding#l'ombre de ton ombre#described#id in alt text of first photo
72 notes
·
View notes